

 The Domo Apps Command Line Interface (CLI) is your primary tool to:
- create
- publish
- edit
Installation
The Domo Apps CLI is available for installation via npm:Usage
For a complete list of available commands, usedomo --help
Domo
Dev
Starts a local development server with the following features:- Live Reload: Reloads when code changes are detected.
- App Sizing: Renders the app in a frame that honors the sizing and fullpage settings from the app manifest.
- Data Proxy: Proxies basic XHR requests for data to the appropriate Domo instance, enabling local development with live data.
Init
Asks you questions to initialize a new Custom App design template. Once complete, be sure to follow the “Next Steps” provided.No
mkdir necessary
domo init will create the folder for you.Prompts
- design name
- select a starter: see “STARTERS” section
- would you like to connect to any datasets? (Y/n): see “DATASET MAPPING PROMPTS”
Starters
- hello world: creates a basic project in a new directory with the following content
-
manifest only: Adds a single
manifest.jsonfile to the current working directory. - basic chart: Gets you started rendering a basic Domo Phoenix bar chart.
- map chart: Gets you started rendering a Domo Phoenix world map chart.
- sugarforce: Creates an app with multiple screens; demonstrates tabbing between screens, database CRUD operations, and more.
Dataset Mapping Prompts
If you choose to connect to datasets, you’ll be prompted for the following:- dataset id: Can be found in the URL of the DataSet detail page in your Domo instance.
https://[customer].domo.com/datasources/[dataset id]/details/overview - dataset alias: The alias your app will use when requesting data from Domo. Make sure it has no spaces or special characters.
manifest.json. Refer to the manifest reference documentation for more details on data mapping.
Login
Authenticate to your Domo instance from the CLI. This is required before running other commands likepublish, or for fetching data during domo dev.
The CLI supports two authentication methods:
OAuth Login (Interactive)
If no options are provided, you’ll be prompted to choose from a list of previous instances or a “new instance”, at which point you’ll be prompted for instance name, username, and password.Token-Based Login (CI/CD)
For automated workflows and CI/CD pipelines, use developer token authentication:
Getting Your Developer Token:
Developer tokens can be found in the Admin section of your Domo instance under the “Developer” or “Access Tokens” area. Tokens are alphanumeric strings (letters and numbers only). Token-based authentication is ideal for CI/CD pipelines and automated workflows.
Token
Manage developer tokens for CI/CD pipelines and automated deployments. Tokens provide a secure way to authenticate without interactive prompts.Add Token
Add or update a developer token for a Domo instance:Remove Token
Remove a stored developer token:Logout
Sign out from your Domo instance and clear the authentication session.Remove
Remove saved login credentials from the CLI. This is useful for cleaning up old instances or switching accounts.Owner
Manage the owners of the Custom App design. Only owners of a design can manage that design from the CLI or the Asset Library within the Domo instance. Additionally, only owners of a design are authorized to deploy new apps based on that design.Publish
Uploads all the assets of your current working directory as a Custom App design. You can choose to ignore certain files, meaningdomo publish will not upload those files. Any node_modules directories are ignored by default.
If an existing ID is not found in the manifest, a new design will be created, and the manifest file will be updated with the newly created design ID. Existing designs will be updated.
Release
Locks a design version for submitting to the Domo Appstore. Once a version is released, you can’t make further changes to it. You can, however, work on a new version by bumping the version in the manifest file.Download
Download an existing Custom App design from your Domo instance to your local machine. This is useful for retrieving apps for local development or backup purposes.List (ls)
Get a list of all your Custom App designs published to your Domo instance.- Design Name
- Design ID
- Version
- Last Published date
- URL to Asset Library
Delete
Delete a published Custom App design by its ID. This is a soft delete and can be undone withdomo undelete.
Undelete
Restore a previously deleted Custom App design.Proxy
Configure proxy settings for corporate networks or firewalls. This allows the CLI to work through network proxies.
Examples:
Data Proxy for Developing Locally
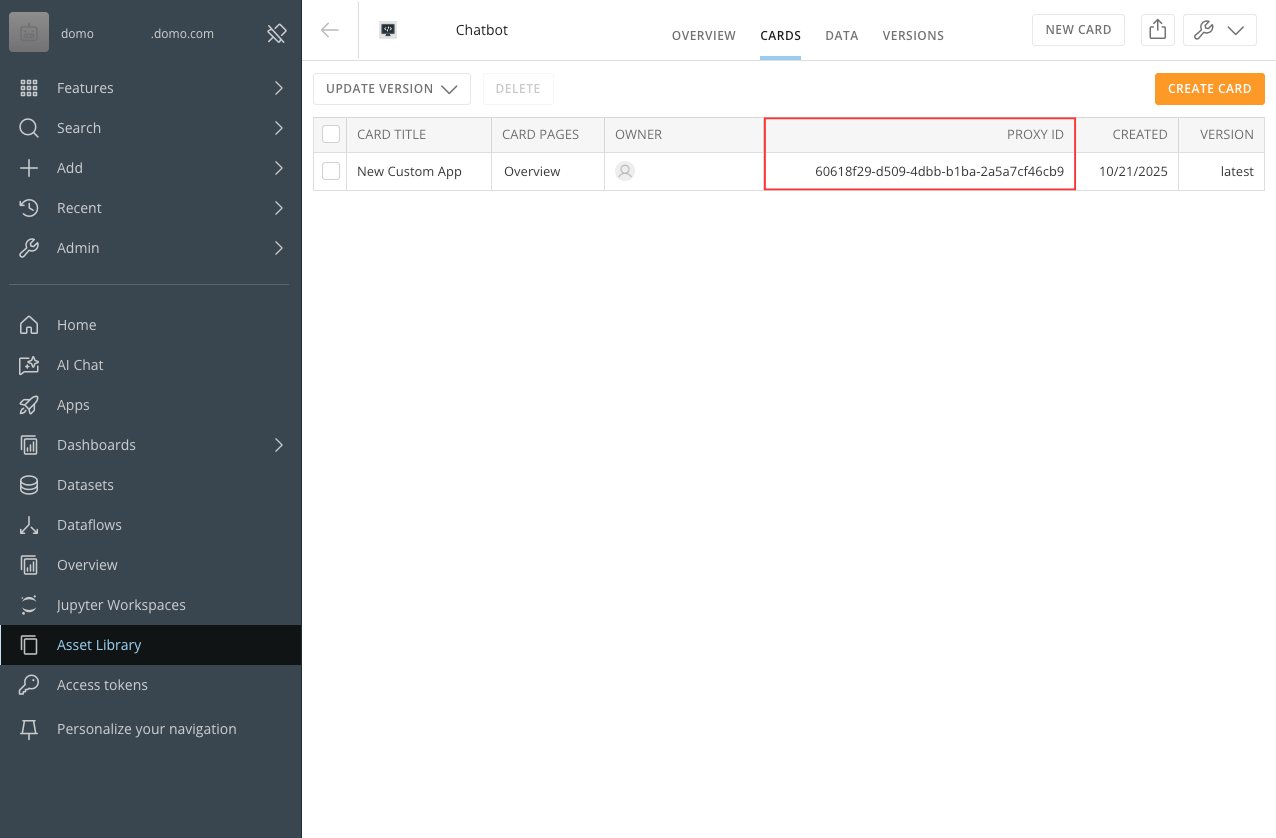
To enable proxying for advanced requests (like the AppDB, Files, Code Engine, and Workflows APIs), you must provide the ID of an app in your instance that the CLI can proxy to (e.g., impersonate a particular Card). Add this app ID to your manifest under the propertyproxyId. If the ID is valid, proxying advanced requests with domo dev will work automatically.
All proxy IDs for your app can be found on the App Design page under the “Cards” tab.
CI/CD Integration
The Domo Apps CLI supports automated deployments through CI/CD pipelines using token-based authentication. This enables you to automatically publish app updates when changes are committed to your repository.Getting Started with CI/CD
- Obtain a Developer Token from the Admin section of your Domo instance
- Store the token securely as a secret in your CI/CD platform
- Configure your pipeline to authenticate and publish automatically
CI/CD Pipeline Examples
GitHub Actions
Create.github/workflows/deploy.yml:
DOMO_INSTANCE: Your Domo instance (e.g.,company.domo.com)DOMO_TOKEN: Your developer token
GitLab CI
Create.gitlab-ci.yml:
DOMO_INSTANCE: Your Domo instanceDOMO_TOKEN: Your developer token (mark as masked/protected)
Jenkins
Create aJenkinsfile:
Azure DevOps
Createazure-pipelines.yml:
DOMO_INSTANCE: Your Domo instanceDOMO_TOKEN: Your developer token (mark as secret)
Best Practices for CI/CD
- Secure Token Storage: Always store developer tokens as encrypted secrets in your CI/CD platform
- Branch Protection: Only deploy from protected branches (e.g.,
main,production) - Version Management: Update the version in
manifest.jsonbefore publishing - Build Verification: Run tests before deploying to ensure code quality
- Deployment Notifications: Configure notifications for successful/failed deployments
- Token Rotation: Regularly rotate developer tokens and update CI/CD secrets
Advanced CI/CD Workflow Example
- Runs tests on all pushes and PRs
- Deploys to staging when pushing to
develop - Deploys to production when pushing to
main - Creates a release after production deployment
Troubleshooting CI/CD
Authentication Failures:- Verify token format (alphanumeric only, minimum 20 characters)
- Ensure token has not expired
- Check instance name is correct (e.g.,
company.domo.com)
- Verify
manifest.jsonis present and valid - Check design ownership permissions
- Ensure all required files are committed to repository
- Never commit tokens to your repository
- Use environment variables or secrets management
- Rotate tokens regularly and update CI/CD configurations