> ## Documentation Index
> Fetch the complete documentation index at: https://domoinc-openapi-sync-dataflows.mintlify.site/llms.txt
> Use this file to discover all available pages before exploring further.
# AppDB Admin User Interface
export const InlineImage = ({src, alt = '', height = '1.6em'}) => {
return  ;
};
### Intro
AppDB stores JSON documents in Domo like a NoSQL database. You can store data in collections, update documents, update collection schema, add document-level filters, and manage permissions. You can also perform all of these tasks through API calls. For information on using APIs with AppDB, see [AppDB API](https://developer.domo.com/docs/dev-studio-references/appdb) in our developer documentation.
**Important:**
AppDB in Domo Bricks is blocked in public embed contexts due to security concerns and trust requirements.
***
### Access AppDB Admin
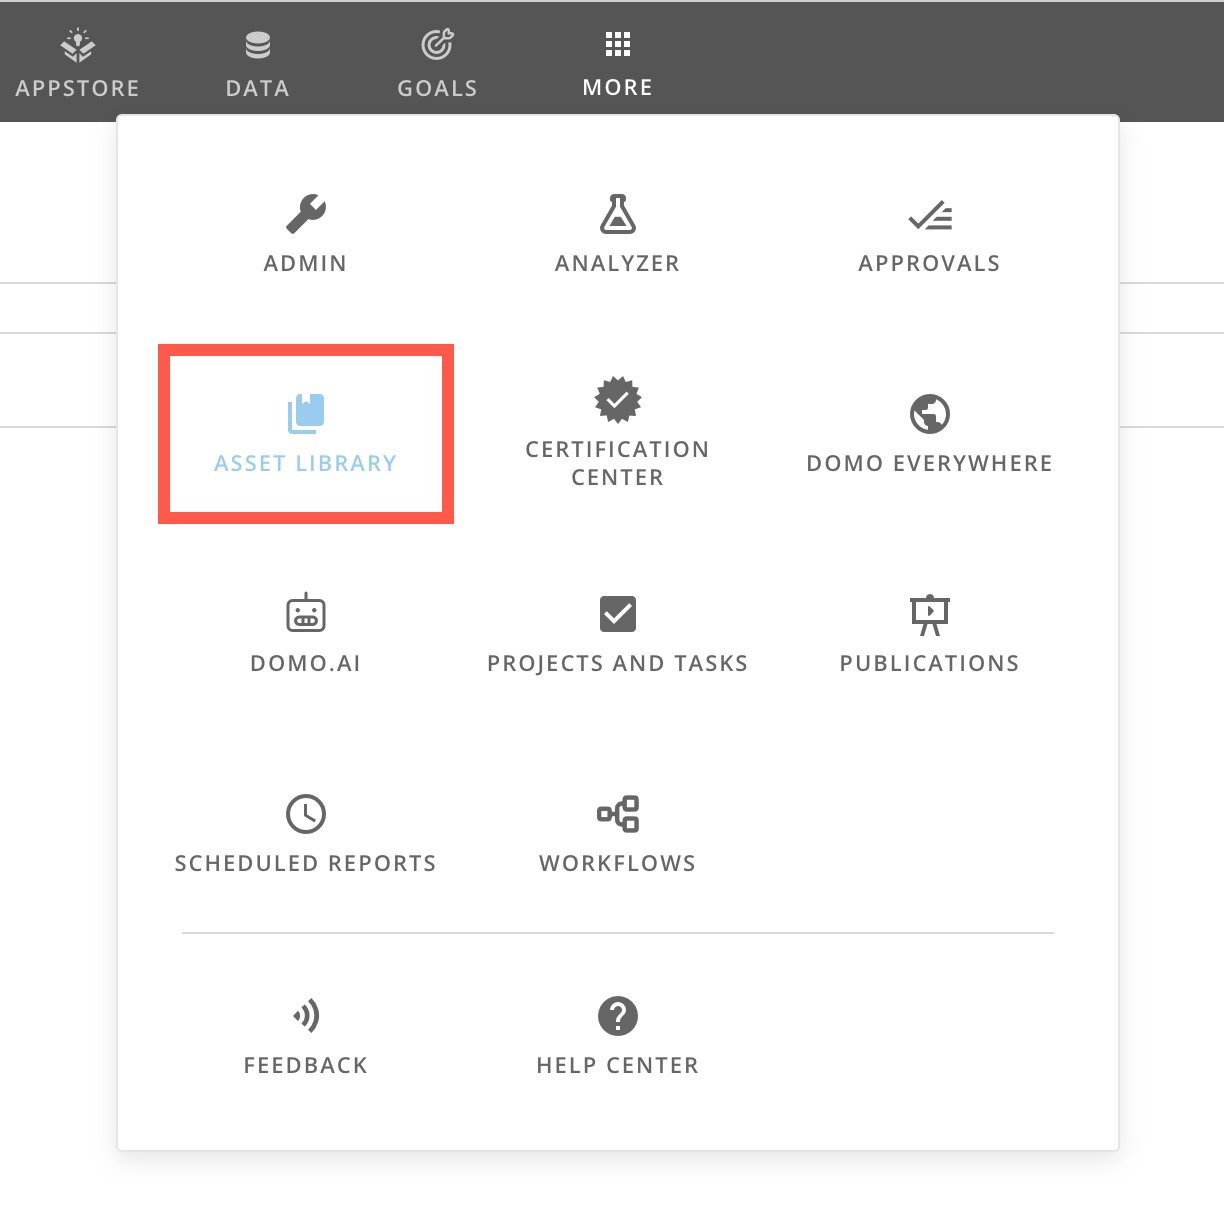
1. In the navigation header, select
**More** > **Asset Library**.
;
};
### Intro
AppDB stores JSON documents in Domo like a NoSQL database. You can store data in collections, update documents, update collection schema, add document-level filters, and manage permissions. You can also perform all of these tasks through API calls. For information on using APIs with AppDB, see [AppDB API](https://developer.domo.com/docs/dev-studio-references/appdb) in our developer documentation.
**Important:**
AppDB in Domo Bricks is blocked in public embed contexts due to security concerns and trust requirements.
***
### Access AppDB Admin
1. In the navigation header, select
**More** > **Asset Library**.
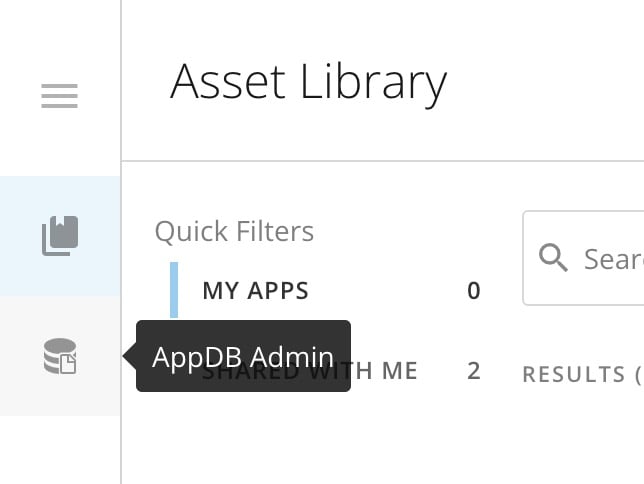
 2. In the left navigation, select
**AppDB Admin**.
2. In the left navigation, select
**AppDB Admin**.
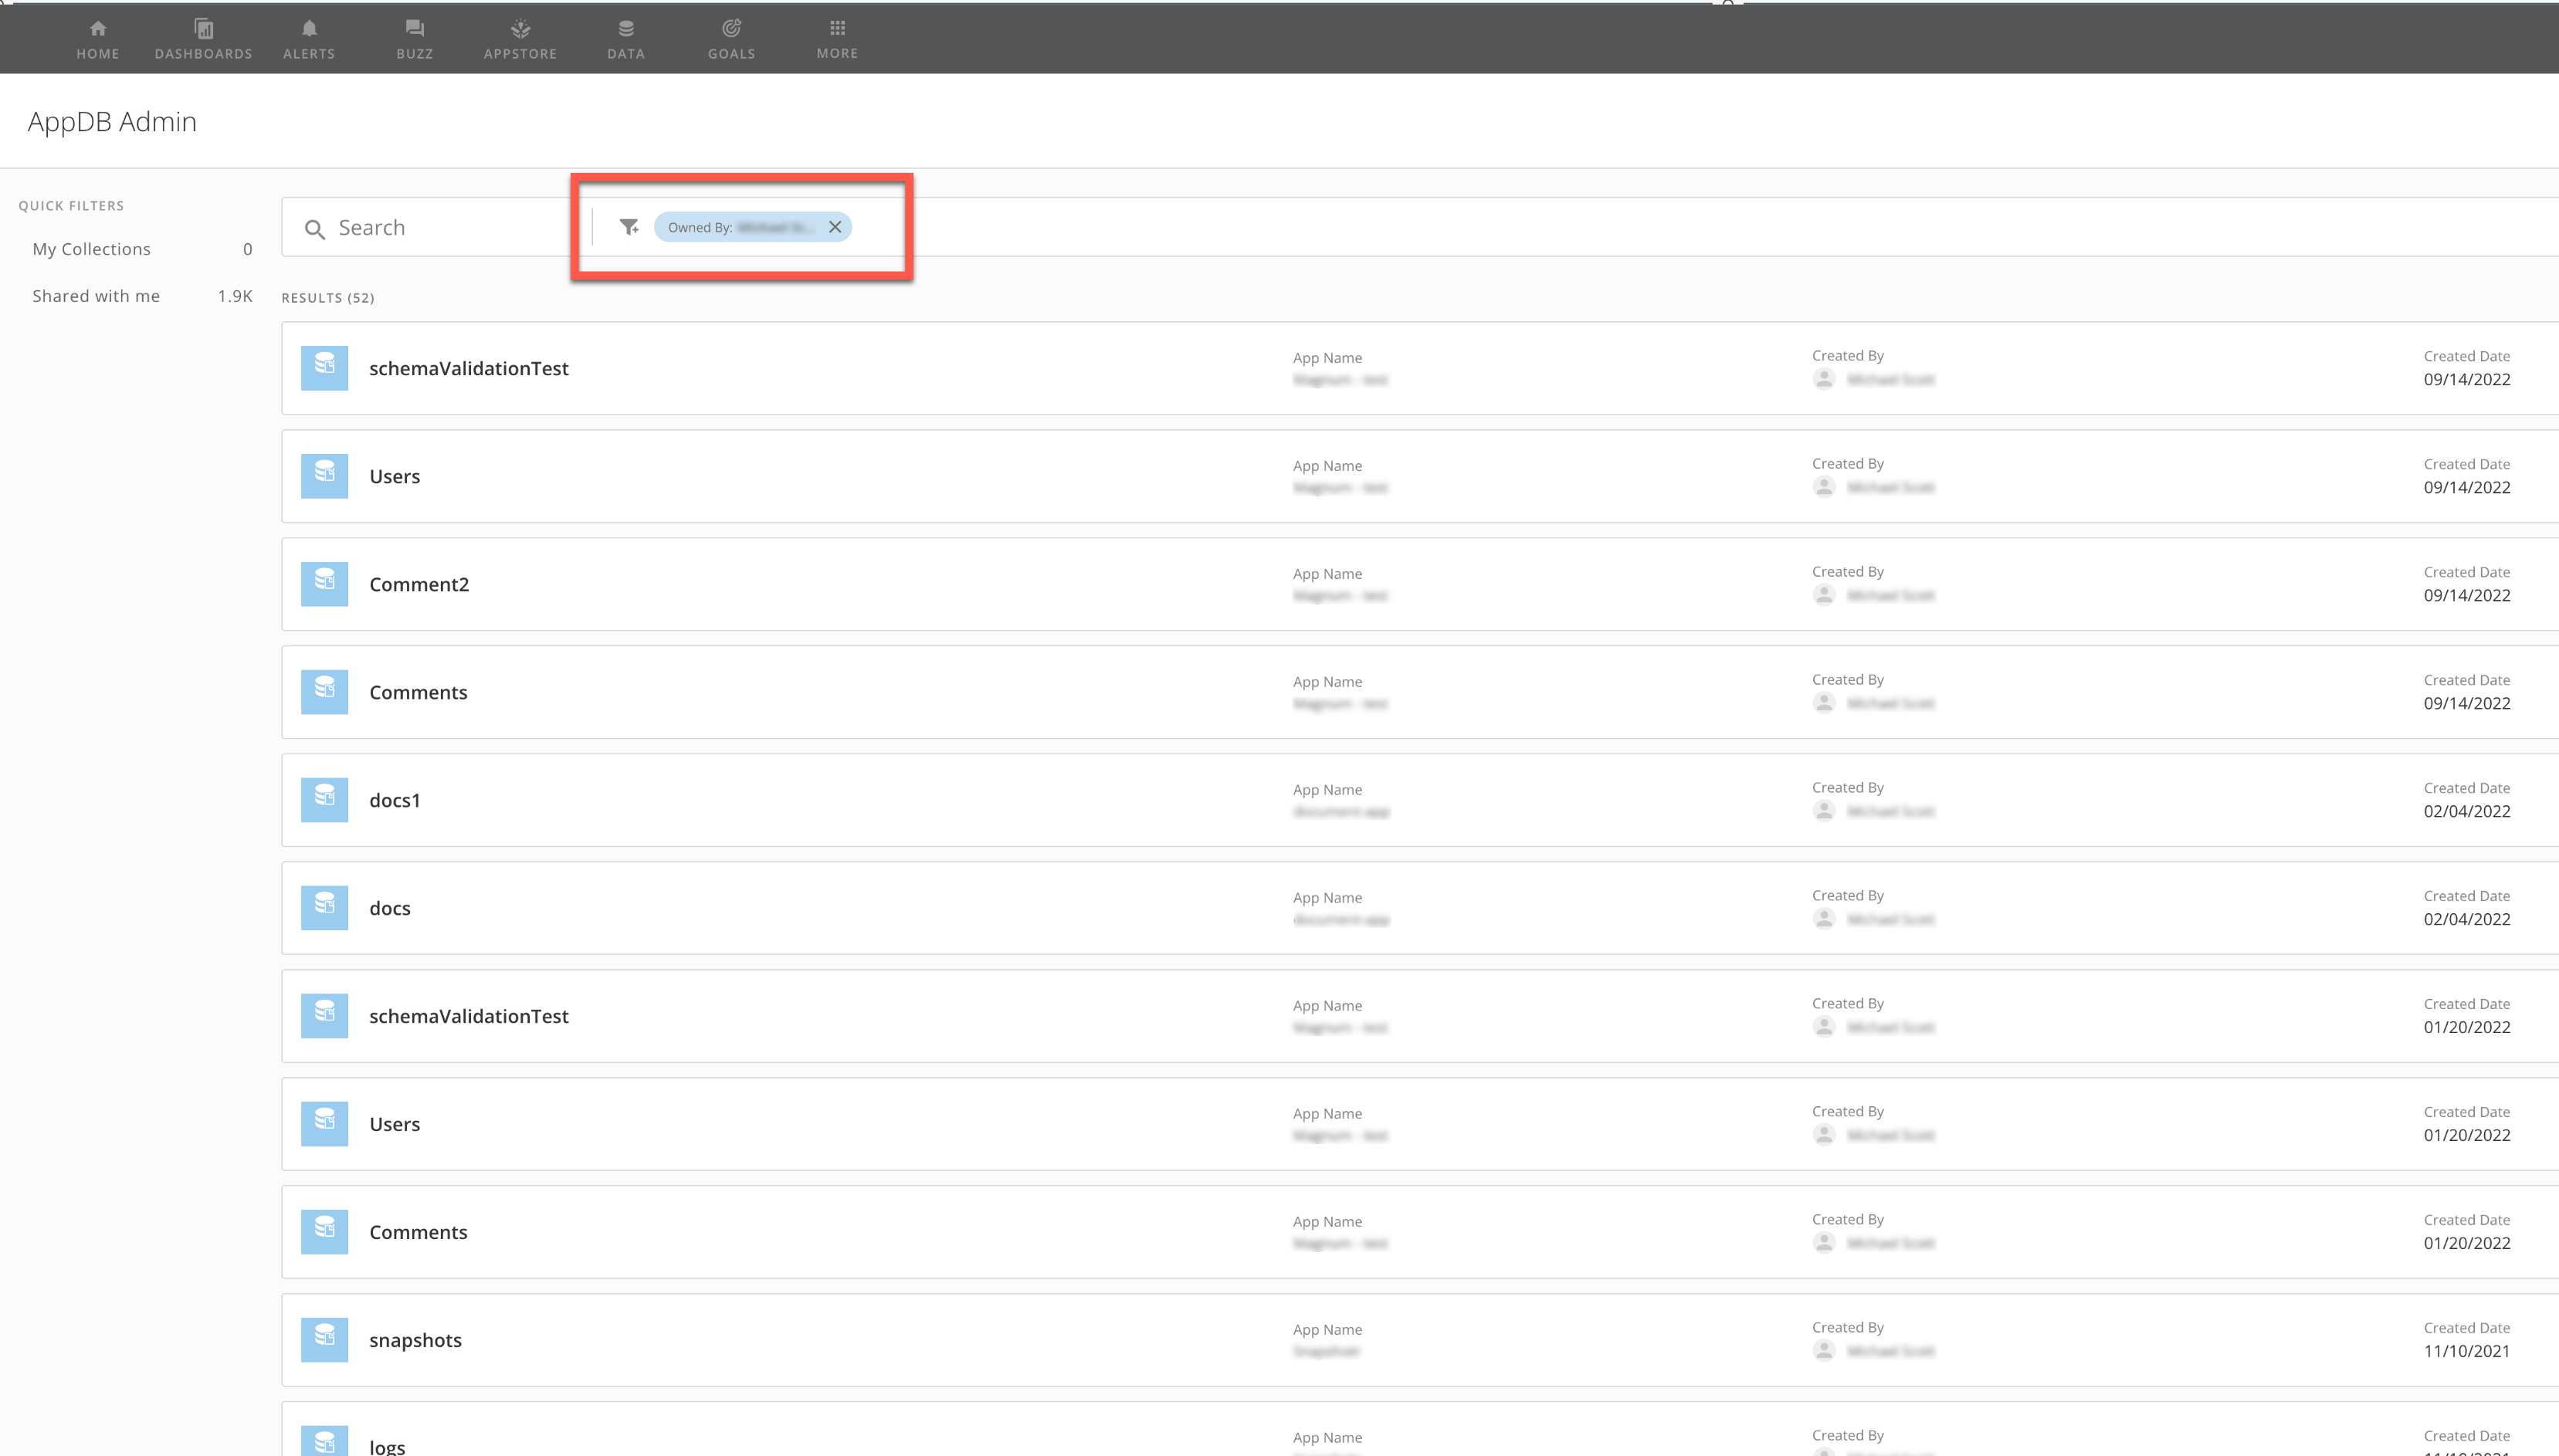
 The AppDB Admin interface displays. The default landing page is **My Collections**, and the default Filter is **Owned By: *Your Name***.
In the **Shared with me** section, you can view all the collections that other users have shared with you.
# Searching and Filters
To find a specific collection, enter a keyword in the search bar.
You can select **Add Filters** to apply other Filters and narrow down the list of search results.
Remove a Filter by selecting ✖ for that Filter.
The AppDB Admin interface displays. The default landing page is **My Collections**, and the default Filter is **Owned By: *Your Name***.
In the **Shared with me** section, you can view all the collections that other users have shared with you.
# Searching and Filters
To find a specific collection, enter a keyword in the search bar.
You can select **Add Filters** to apply other Filters and narrow down the list of search results.
Remove a Filter by selecting ✖ for that Filter.
 ### Create a Collection
1. On the
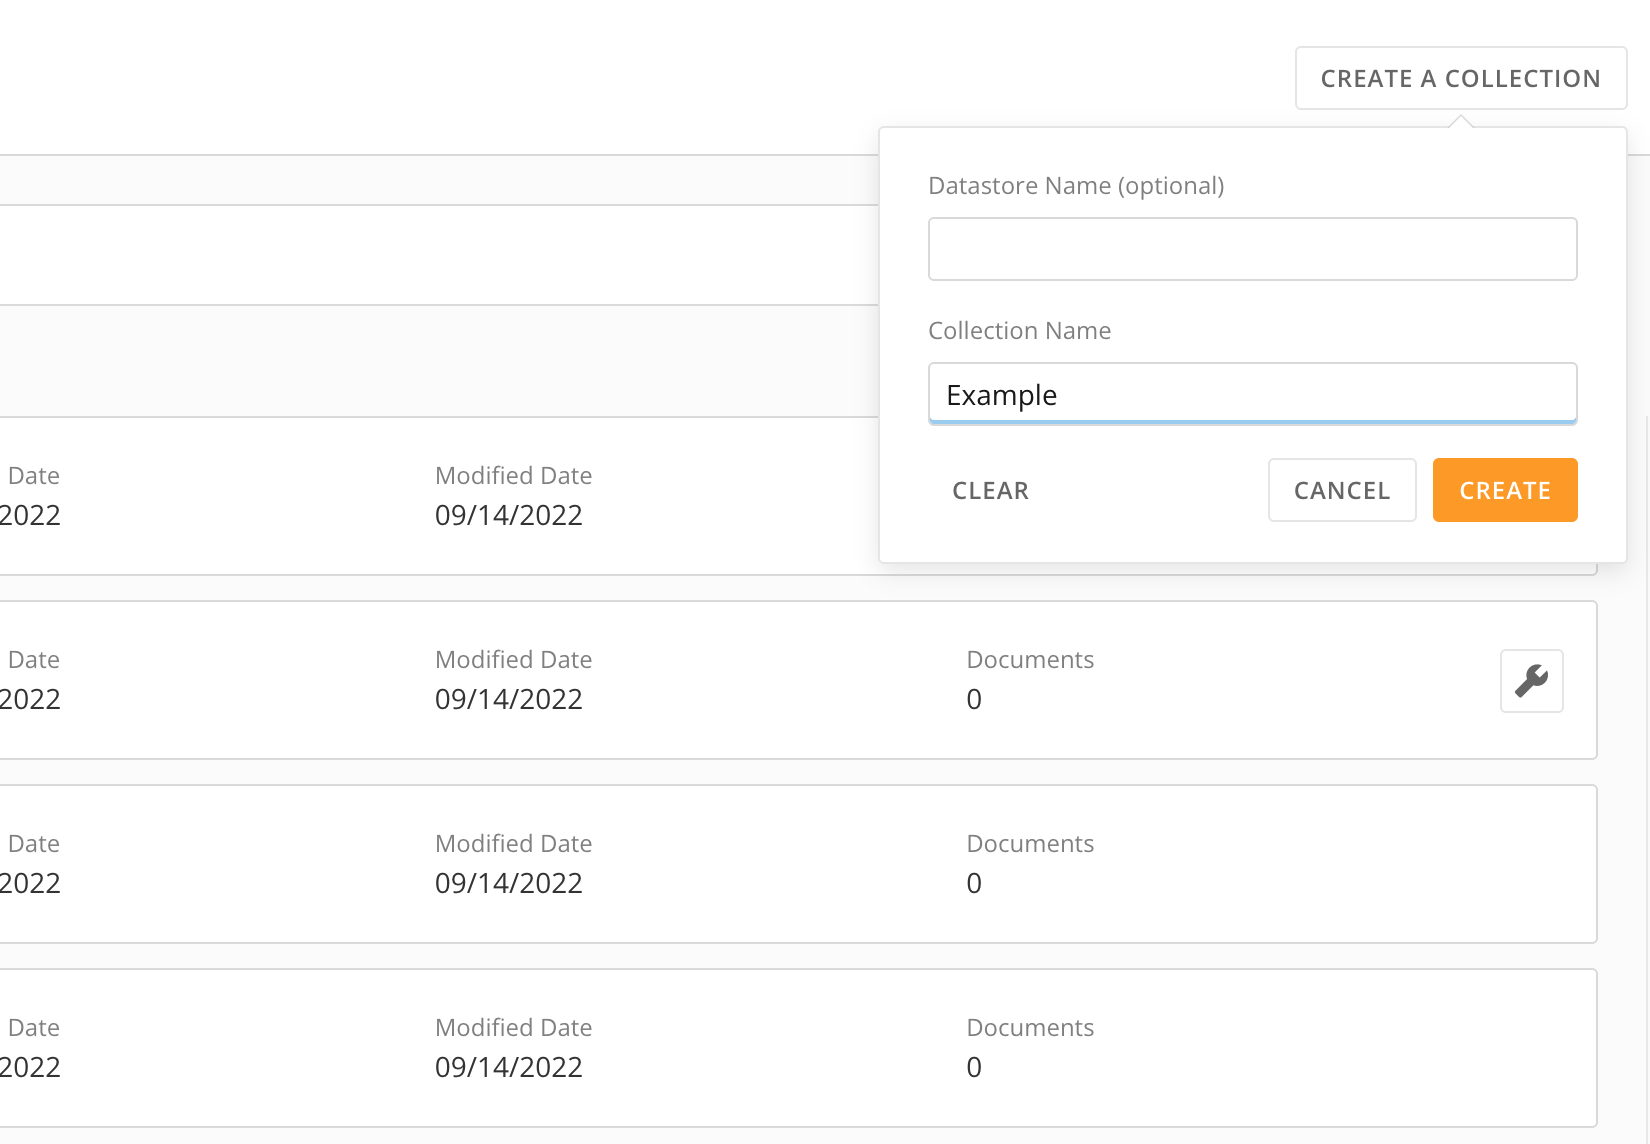
[AppDB Admin landing page](#Access), select **Create a Collection**.
You are prompted to enter a **Collection Name** and an optional **Datastore Name**.
**Note:**
If you add a datastore name when creating a collection, a datastore is created in Domo for that collection. This can be helpful because it creates other possible keywords to search for if you remember the datastore name but not the collection name. The datastore name displays in the
**App Name**
column of your collection.
### Create a Collection
1. On the
[AppDB Admin landing page](#Access), select **Create a Collection**.
You are prompted to enter a **Collection Name** and an optional **Datastore Name**.
**Note:**
If you add a datastore name when creating a collection, a datastore is created in Domo for that collection. This can be helpful because it creates other possible keywords to search for if you remember the datastore name but not the collection name. The datastore name displays in the
**App Name**
column of your collection.
 2. Select
**Create**.
The collection details page displays.
### Collection Details
The collection Details page has three tabs: **Data Explorer**, **Configuration**, and **Permissions**. The **Data Explorer** tab is open by default.
This section describes the actions you can perform within each tab.
# Data Explorer
The Data Explorer allows you to create, modify, and query documents in a collection, all of which are described below.
#### Create a Document
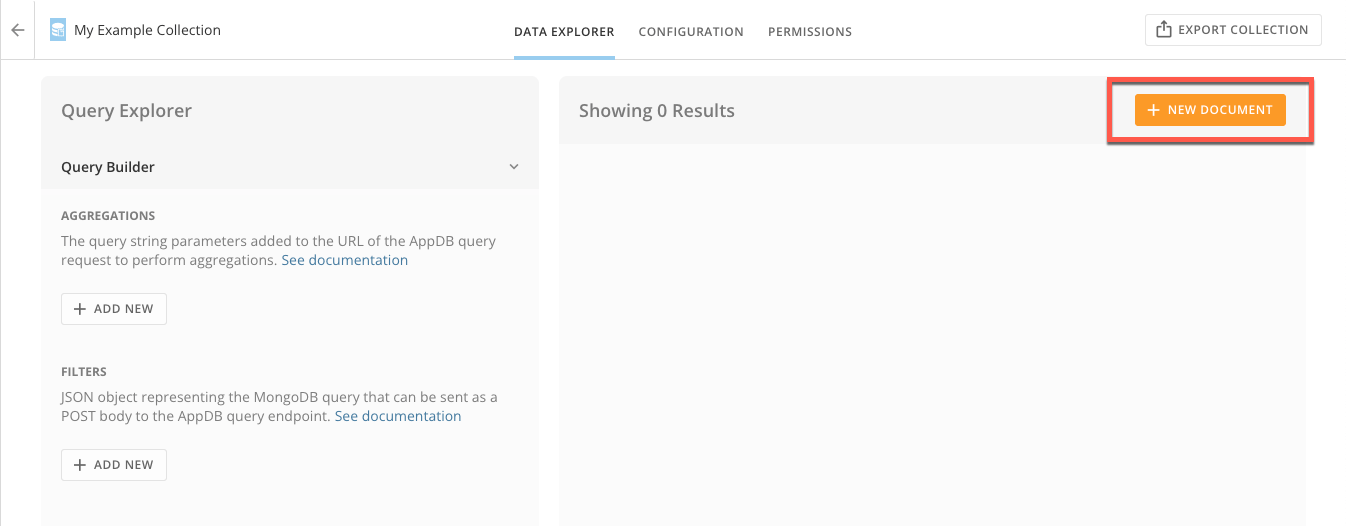
1. Select
**+ New Document**.
The **New Document** modal displays.
2. Select
**Create**.
The collection details page displays.
### Collection Details
The collection Details page has three tabs: **Data Explorer**, **Configuration**, and **Permissions**. The **Data Explorer** tab is open by default.
This section describes the actions you can perform within each tab.
# Data Explorer
The Data Explorer allows you to create, modify, and query documents in a collection, all of which are described below.
#### Create a Document
1. Select
**+ New Document**.
The **New Document** modal displays.
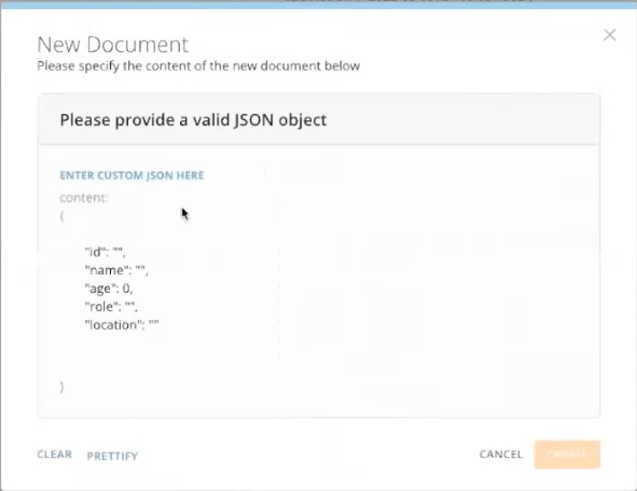
 2. Specify the content of your new document in a JSON format.
**Note:**
If the collection schema has been defined, the modal prepopulates the default value.
2. Specify the content of your new document in a JSON format.
**Note:**
If the collection schema has been defined, the modal prepopulates the default value.
 3. Select
**Create**.
#### Modify a Document
1. Select the three-dot menu next to the document.
The document options display.
3. Select
**Create**.
#### Modify a Document
1. Select the three-dot menu next to the document.
The document options display.
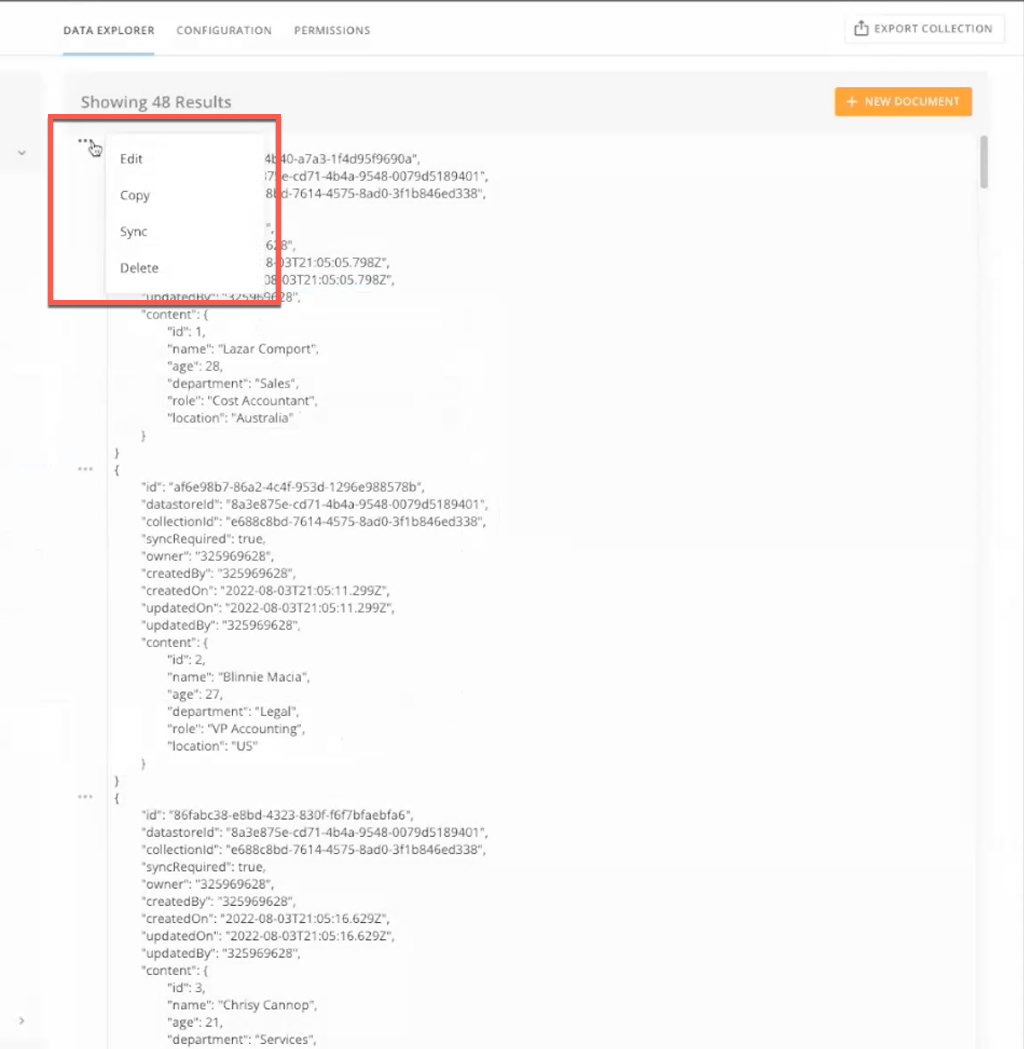 2. Select one of the following document options:
* **Edit**
— Allows you to modify the document's content.
* **Copy**
— Duplicates the document.
* **Sync**
— Displays the most recent version of the document.
* **Delete**
— Deletes the document.
#### Querying and Filters
1. To query on a certain item in the data, go to the
**Filters** section in **Data Explorer** and select **+ Add New**.
A blank Filter displays.
2. Select a field to filter on from the
**Select Field** list.
3. Select a logical operator.
4. Enter the query term.
5. Select
**Apply**.
2. Select one of the following document options:
* **Edit**
— Allows you to modify the document's content.
* **Copy**
— Duplicates the document.
* **Sync**
— Displays the most recent version of the document.
* **Delete**
— Deletes the document.
#### Querying and Filters
1. To query on a certain item in the data, go to the
**Filters** section in **Data Explorer** and select **+ Add New**.
A blank Filter displays.
2. Select a field to filter on from the
**Select Field** list.
3. Select a logical operator.
4. Enter the query term.
5. Select
**Apply**.
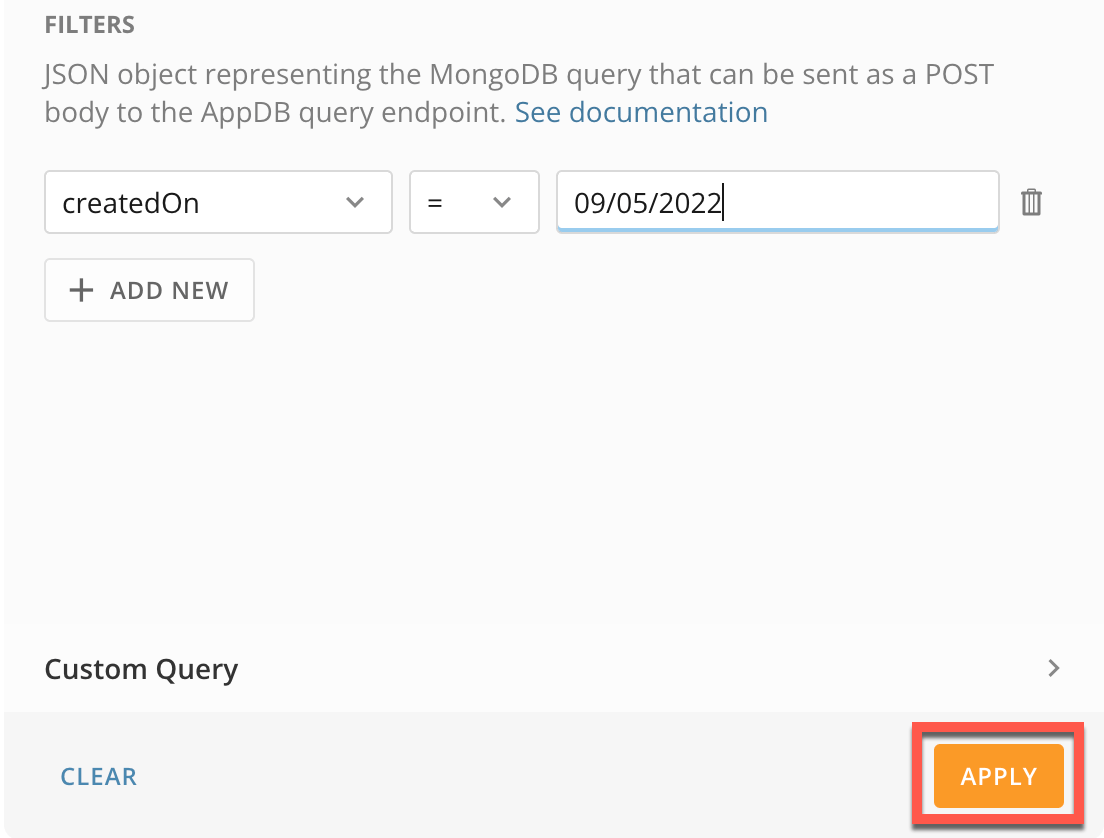 The Filter results display on the right side of the screen.
You can delete a Filter by selecting **Delete** next to the Filter fields.
#### Sort Results with Aggregations
You can sort the results of your Filter using aggregations, as described below.
1. In the
**Query Builder** under **Aggregations**, select **+ Add New**.
The aggregation fields display.
2. Select the aggregation method.
3. Select the Field to sort by.
4. Select the order.
The Filter results display on the right side of the screen.
You can delete a Filter by selecting **Delete** next to the Filter fields.
#### Sort Results with Aggregations
You can sort the results of your Filter using aggregations, as described below.
1. In the
**Query Builder** under **Aggregations**, select **+ Add New**.
The aggregation fields display.
2. Select the aggregation method.
3. Select the Field to sort by.
4. Select the order.
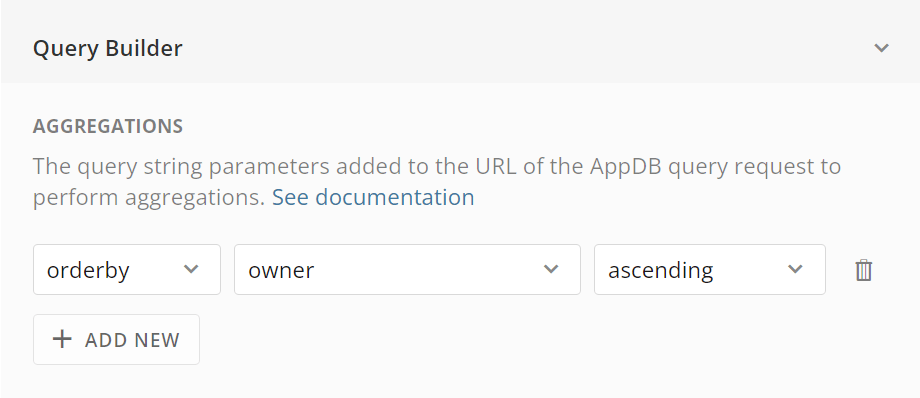 5. Select
**Apply** to sort the results by your aggregation.
You can delete an aggregation by selecting **Delete** next to the aggregation fields.
**Note:**
Some aggregations, like
**average**
and
**groupby**
, support multiple columns.
### Configuration
The **Configuration** tab displays all currently defined columns and allows you to add and modify columns.
#### Add a Column
1. Select
**+ Add Column**.
A record is added at the bottom of the **Schema Builder**.
5. Select
**Apply** to sort the results by your aggregation.
You can delete an aggregation by selecting **Delete** next to the aggregation fields.
**Note:**
Some aggregations, like
**average**
and
**groupby**
, support multiple columns.
### Configuration
The **Configuration** tab displays all currently defined columns and allows you to add and modify columns.
#### Add a Column
1. Select
**+ Add Column**.
A record is added at the bottom of the **Schema Builder**.
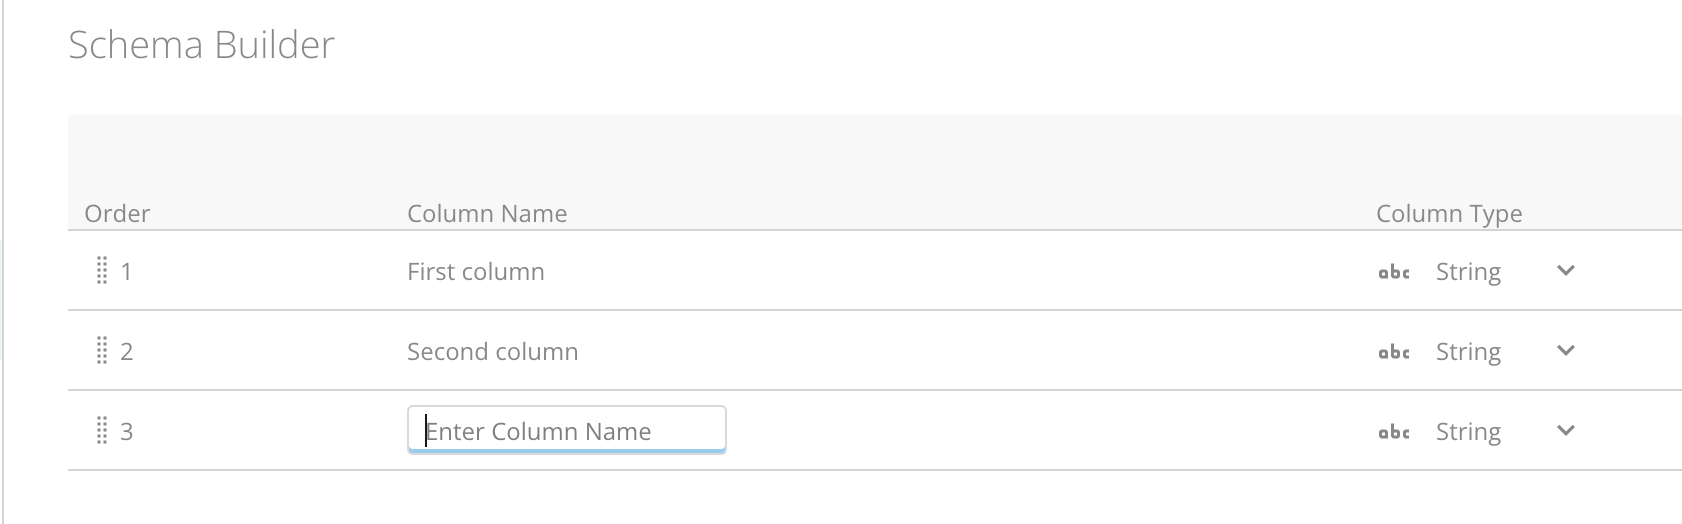 2. Enter a
**Column Name**.
3. Select a
**Column Type** from the list.
2. Enter a
**Column Name**.
3. Select a
**Column Type** from the list.
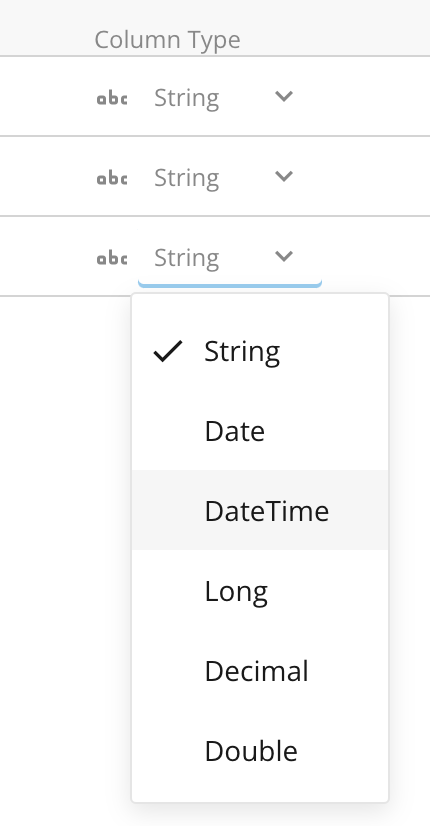 When you are ready to save your changes to the **Configuration**, select **Save**.
#### Modify a Column
You can modify a column by editing its name or column type, reordering it, or deleting it, as described below.
* **Edit Name —**
Hover over the name of the column until the pencil appears, then select it and enter the new column name.
When you are ready to save your changes to the **Configuration**, select **Save**.
#### Modify a Column
You can modify a column by editing its name or column type, reordering it, or deleting it, as described below.
* **Edit Name —**
Hover over the name of the column until the pencil appears, then select it and enter the new column name.
 * **Edit Column Type —**
Select the arrow to show the list and select the new column type.
* **Reorder Columns —**
Hover over the ** Reorder Handle** until the cursor becomes a hand, then drag the column record to the correct location.
* **Delete Columns —**
Hover over the column until **Delete** displays and select **Delete**.
When you are ready to save your changes to the **Configuration**, select **Save**.
### Permissions
The **Permissions** tab is where you manage your collection's sharing permissions. Use **Document Security Filters** to create specific queries that restrict users to viewing or using only certain data that is stored in the collection. These Filters are like Personalized Data Permissions (PDP) for AppDB.
#### Share Collection Access
At the top of the **Permissions** tab, you can see a list of users who have access to the collection.
1. To add or modify access, select
.
The **Share Access for Collection** modal displays.
* **Edit Column Type —**
Select the arrow to show the list and select the new column type.
* **Reorder Columns —**
Hover over the ** Reorder Handle** until the cursor becomes a hand, then drag the column record to the correct location.
* **Delete Columns —**
Hover over the column until **Delete** displays and select **Delete**.
When you are ready to save your changes to the **Configuration**, select **Save**.
### Permissions
The **Permissions** tab is where you manage your collection's sharing permissions. Use **Document Security Filters** to create specific queries that restrict users to viewing or using only certain data that is stored in the collection. These Filters are like Personalized Data Permissions (PDP) for AppDB.
#### Share Collection Access
At the top of the **Permissions** tab, you can see a list of users who have access to the collection.
1. To add or modify access, select
.
The **Share Access for Collection** modal displays.
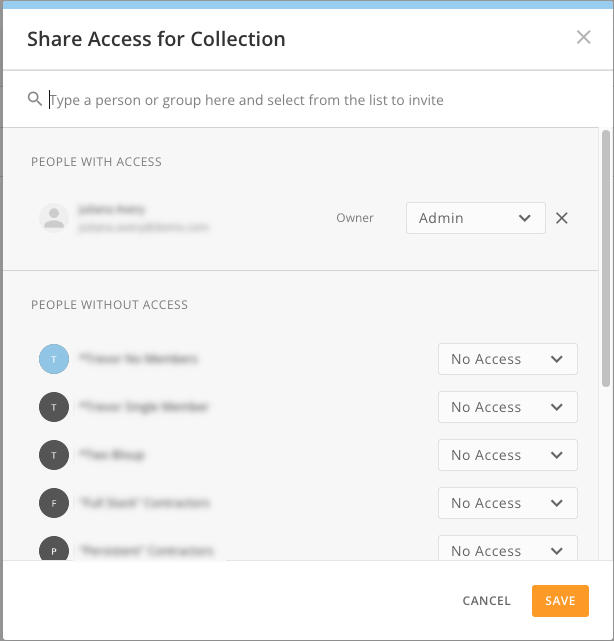 2. Enter a person or group in the search bar to find their profile.
3. Next to the person's name, select the access list to choose what level of access that user should have. The options are as follows:
* Read
* Write
* Delete
* Share
* Admin
* Read Content
* Create Content
* Update Content
* Delete Content
* No Access
4. Select
**Save**.
#### Connect an App
To connect your collection to an app, follow these steps:
1. Select
**+ Share With New App**.
The **Manage Permissions** modal displays.
2. Enter a person or group in the search bar to find their profile.
3. Next to the person's name, select the access list to choose what level of access that user should have. The options are as follows:
* Read
* Write
* Delete
* Share
* Admin
* Read Content
* Create Content
* Update Content
* Delete Content
* No Access
4. Select
**Save**.
#### Connect an App
To connect your collection to an app, follow these steps:
1. Select
**+ Share With New App**.
The **Manage Permissions** modal displays.
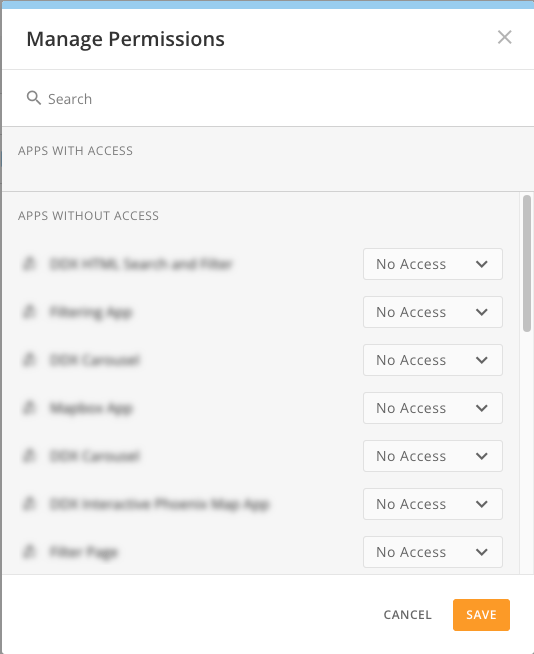 2. Enter the name of an app in the search bar or scroll to find it.
3. Next to the app's name, select the access list to choose what level of access that app should have. The options are as follows:
* Read
* Write
* Delete
* Share
* Admin
* Read Content
* Create Content
* Update Content
* Delete Content
* No Access
4. Select
**Save**.
#### Add a Permission
1. Select
**+ Add Permissions**.
A blank permission record displays.
2. Enter a
**Filter Name**.
3. In the
**Add groups & people** modal that displays, select **Apply To** and add groups and people that the Filter should apply to. Alternatively, you can select **Apply To** and select the **Apply to All** checkbox.
4. Select
**Apply Changes**.
The modal closes with the saved changes
2. Enter the name of an app in the search bar or scroll to find it.
3. Next to the app's name, select the access list to choose what level of access that app should have. The options are as follows:
* Read
* Write
* Delete
* Share
* Admin
* Read Content
* Create Content
* Update Content
* Delete Content
* No Access
4. Select
**Save**.
#### Add a Permission
1. Select
**+ Add Permissions**.
A blank permission record displays.
2. Enter a
**Filter Name**.
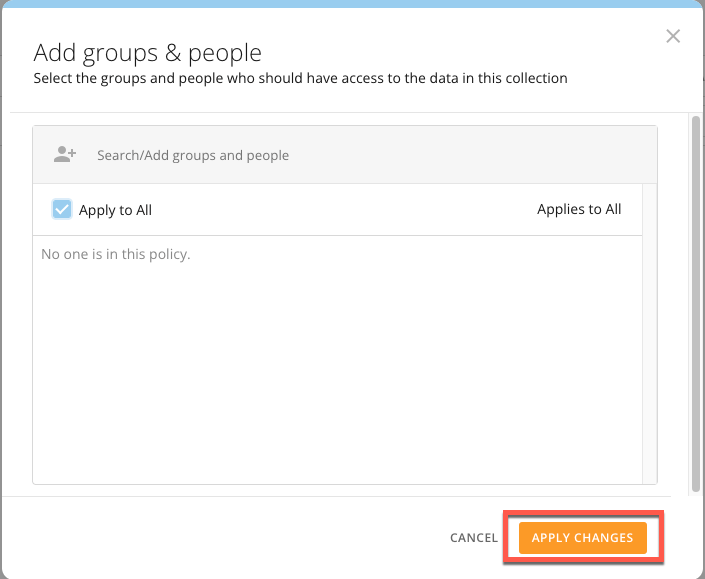
3. In the
**Add groups & people** modal that displays, select **Apply To** and add groups and people that the Filter should apply to. Alternatively, you can select **Apply To** and select the **Apply to All** checkbox.
4. Select
**Apply Changes**.
The modal closes with the saved changes
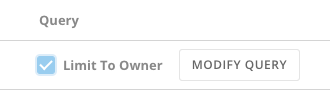
 5. Under
**Query**, select the **Limit To Owner** checkbox or select **Modify Query** to modify the JSON request.
5. Under
**Query**, select the **Limit To Owner** checkbox or select **Modify Query** to modify the JSON request.
 6. In the
**Apply On** list, select the action to apply the permission to. The options are **Read**, **Update**, and **Delete**.
7. Select
**Save**.
Select **Delete** to delete a Filter.
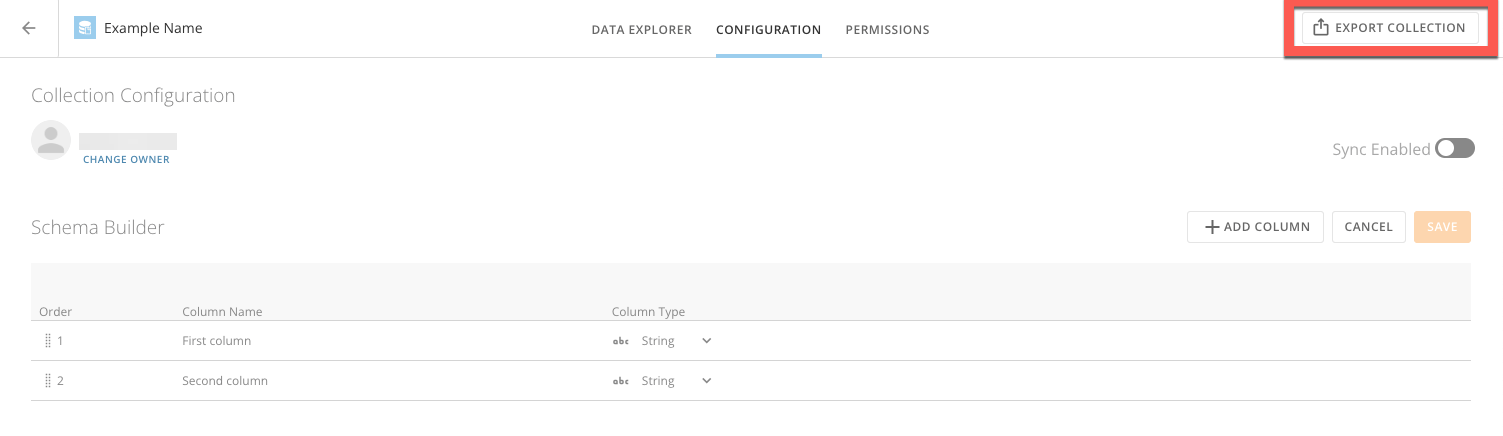
#### Export a Collection
On each Collection Details tab, the **Export Collection** option displays near the top of the screen.
Select **Export Collection** to download the current collection as a JSON file.
6. In the
**Apply On** list, select the action to apply the permission to. The options are **Read**, **Update**, and **Delete**.
7. Select
**Save**.
Select **Delete** to delete a Filter.
#### Export a Collection
On each Collection Details tab, the **Export Collection** option displays near the top of the screen.
Select **Export Collection** to download the current collection as a JSON file.