> ## Documentation Index
> Fetch the complete documentation index at: https://domoinc-openapi-sync-dataflows.mintlify.site/llms.txt
> Use this file to discover all available pages before exploring further.
# Schema Management
export const InlineImage = ({src, alt = '', height = '1.6em'}) => {
return  ;
};
### Intro
Schema Management is part of the Governance Toolkit and allows you to update a schema, and clone and clear a DataSet.
Schema Management is primarily meant for the following use cases:
* Cloning connectors with complex connector settings
* Clearing data from a Domo-managed DataSet
* Manually updating schemas for DataSets that have custom data being programmatically uploaded
Schema Management is not meant to manage Cloud Amplifier or connector DataSet schemas, since these schemas are regularly and automatically updated by either the Cloud Amplifier service or the connector.
***
### Access Schema Management in the Toolkit
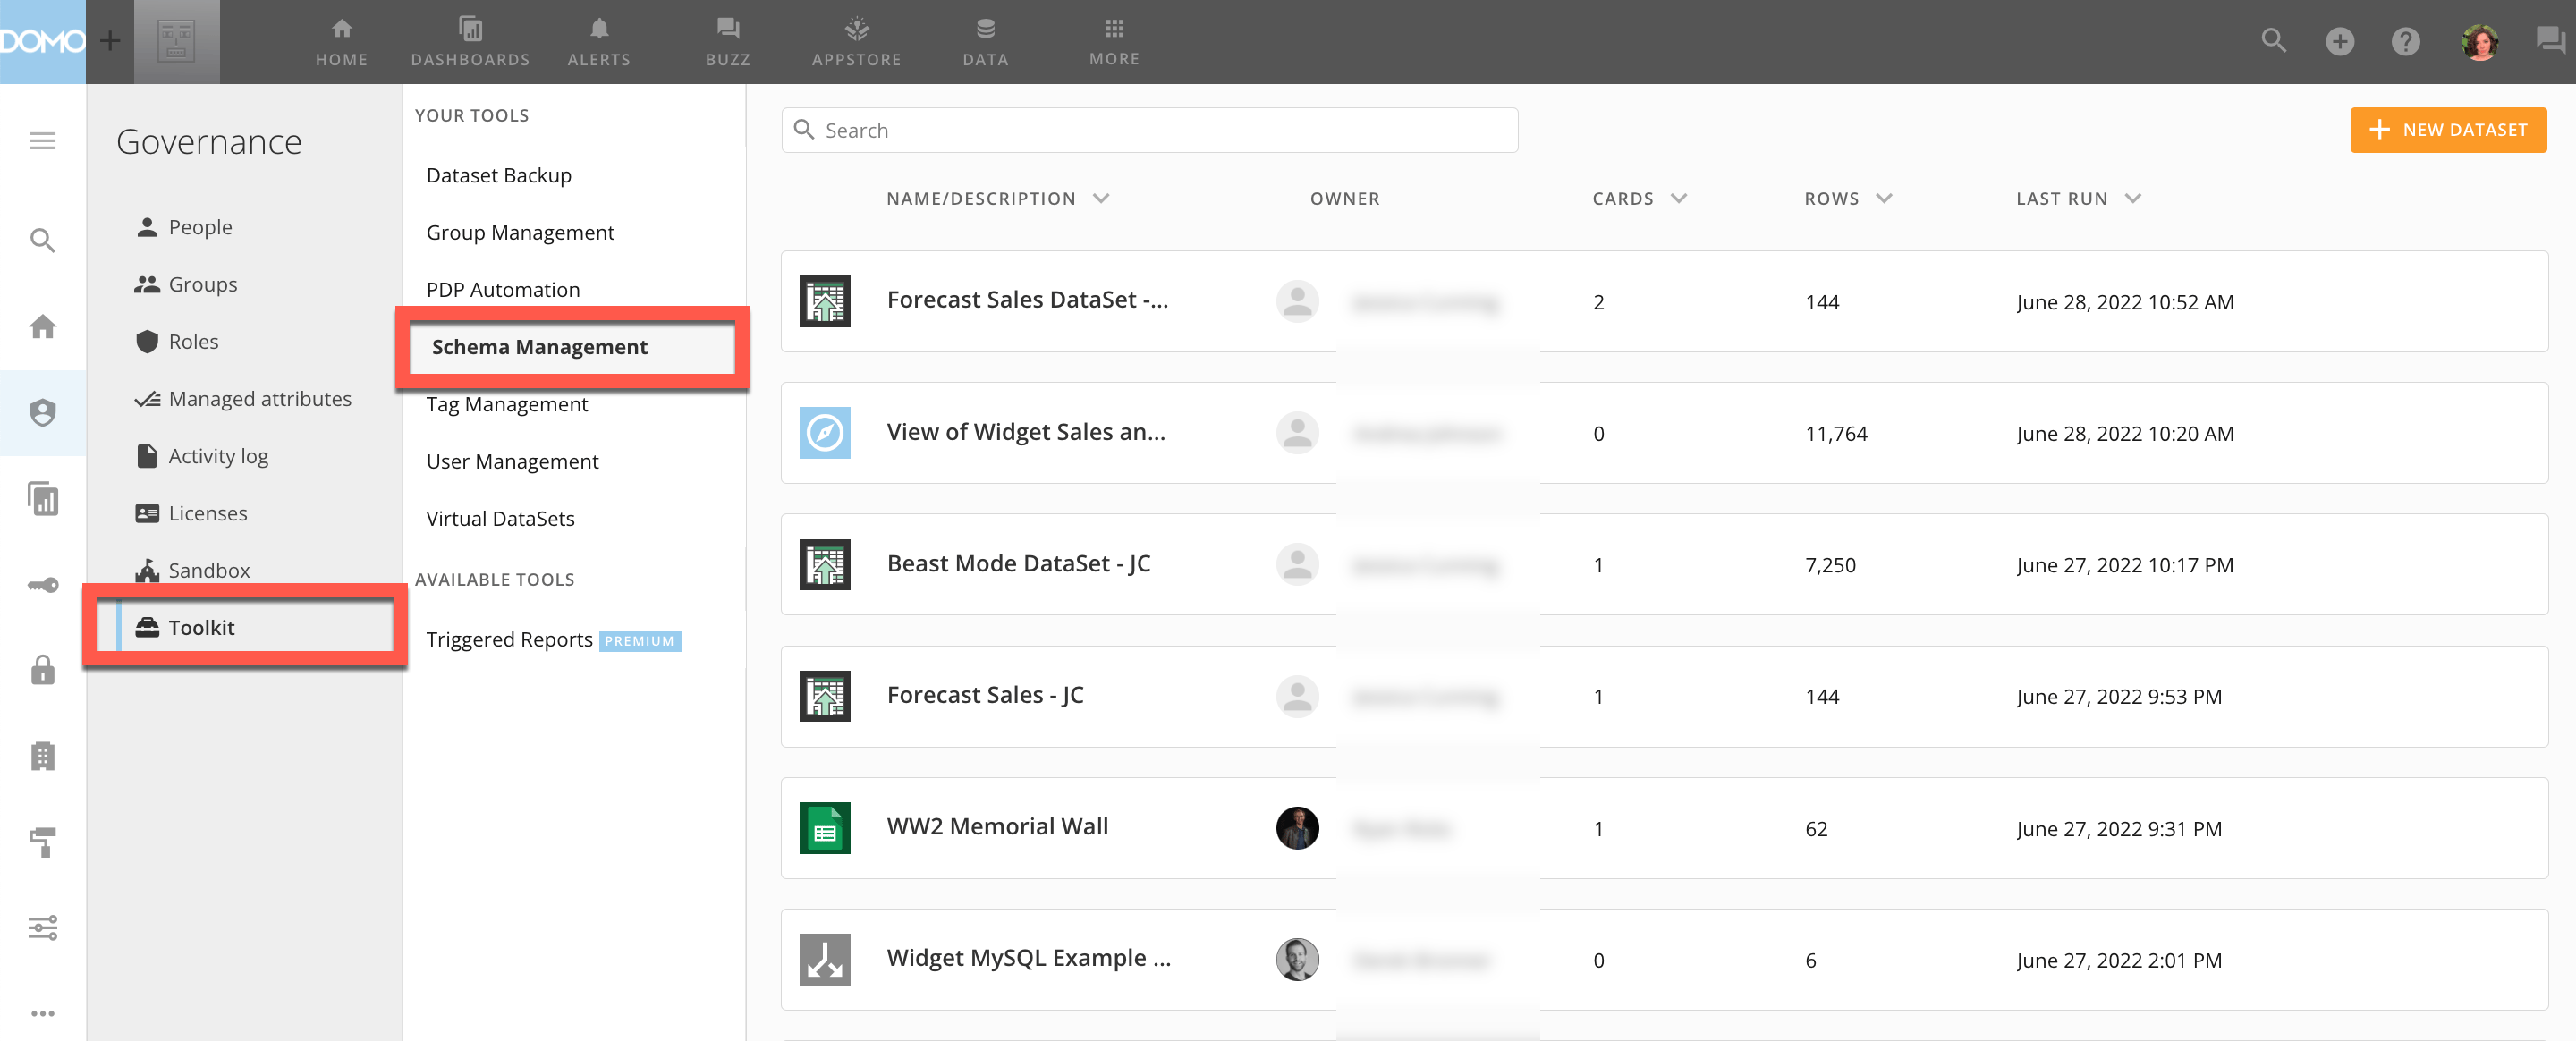
Follow these steps to access Schema Management in the Governance Toolkit:
1. Navigate to the Admin Settings.
2. Under
**Governance**, select **Toolkit**.
3. Inside the Toolkit, go to
**Schema Management**.
;
};
### Intro
Schema Management is part of the Governance Toolkit and allows you to update a schema, and clone and clear a DataSet.
Schema Management is primarily meant for the following use cases:
* Cloning connectors with complex connector settings
* Clearing data from a Domo-managed DataSet
* Manually updating schemas for DataSets that have custom data being programmatically uploaded
Schema Management is not meant to manage Cloud Amplifier or connector DataSet schemas, since these schemas are regularly and automatically updated by either the Cloud Amplifier service or the connector.
***
### Access Schema Management in the Toolkit
Follow these steps to access Schema Management in the Governance Toolkit:
1. Navigate to the Admin Settings.
2. Under
**Governance**, select **Toolkit**.
3. Inside the Toolkit, go to
**Schema Management**.
 ### Required Grants
To access the Governance Toolkit, a user must have one of two grants enabled for their role: Create Custom Pipeline Processes or Administer Custom Pipeline Processes. By default, the Administer Custom Pipeline Process grant is enabled for Admin users.
#### Create Custom Pipeline Processes
* Allows the user to create, update, share, and delete jobs.
* Only allows the user to view jobs that they created or jobs that have been shared with them.
#### (Admin-level) Administer Custom Pipeline Processes
* Allows the user to create, update, share, and delete jobs.
* Allows the user to see all jobs within the pipeline.
To learn more about custom roles and grants, see [Managing Custom Roles.](/s/article/360043438973)
### Update a Schema
You can use Schema Management to update the schema of existing DataSets.
Follow the steps below:
1. Access
[Schema Management](#access_schema_management_in_the_toolkit).
2. Locate the DataSet you want to update by scrolling through the list or using the search
bar.
3. Select
the DataSet to view its details.
4. Select
**Edit**.
### Required Grants
To access the Governance Toolkit, a user must have one of two grants enabled for their role: Create Custom Pipeline Processes or Administer Custom Pipeline Processes. By default, the Administer Custom Pipeline Process grant is enabled for Admin users.
#### Create Custom Pipeline Processes
* Allows the user to create, update, share, and delete jobs.
* Only allows the user to view jobs that they created or jobs that have been shared with them.
#### (Admin-level) Administer Custom Pipeline Processes
* Allows the user to create, update, share, and delete jobs.
* Allows the user to see all jobs within the pipeline.
To learn more about custom roles and grants, see [Managing Custom Roles.](/s/article/360043438973)
### Update a Schema
You can use Schema Management to update the schema of existing DataSets.
Follow the steps below:
1. Access
[Schema Management](#access_schema_management_in_the_toolkit).
2. Locate the DataSet you want to update by scrolling through the list or using the search
bar.
3. Select
the DataSet to view its details.
4. Select
**Edit**.
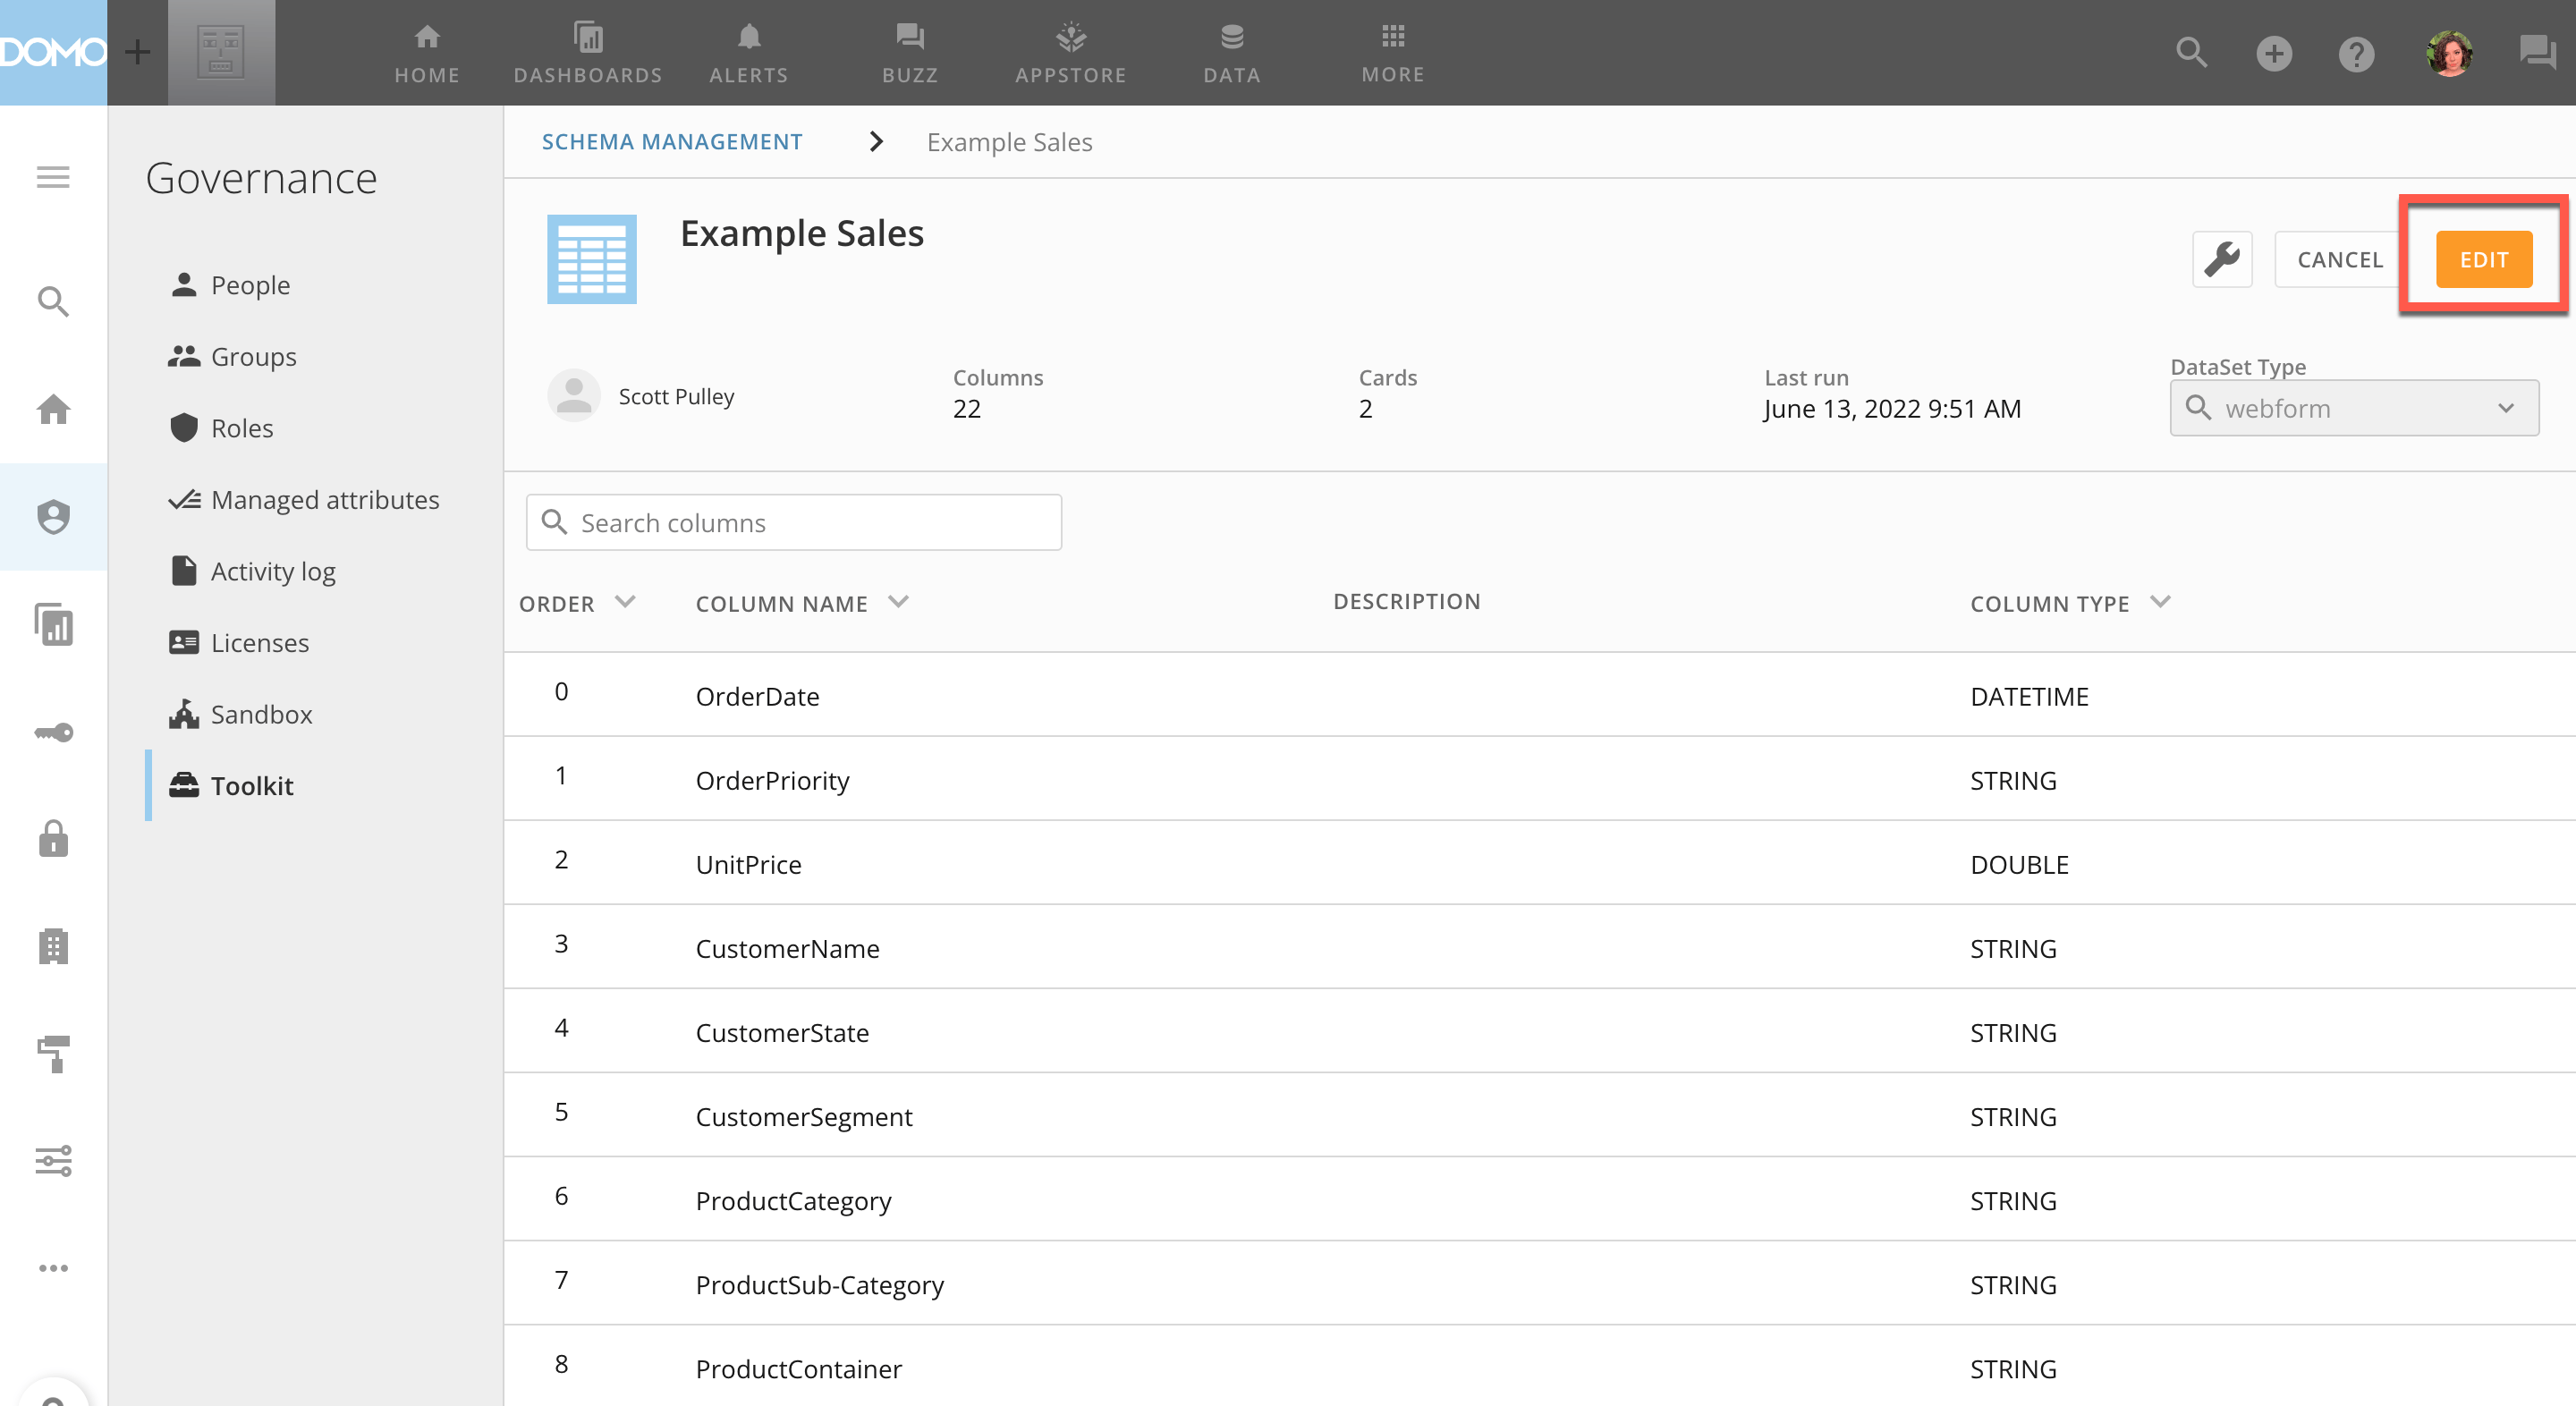 In the editing view, you can make the following changes:
* Reorder columns
* Rename columns
* Remove columns
* Add columns
* Change column descriptions
* Change column types
* Change the DataSet name and description
In the editing view, you can make the following changes:
* Reorder columns
* Rename columns
* Remove columns
* Add columns
* Change column descriptions
* Change column types
* Change the DataSet name and description
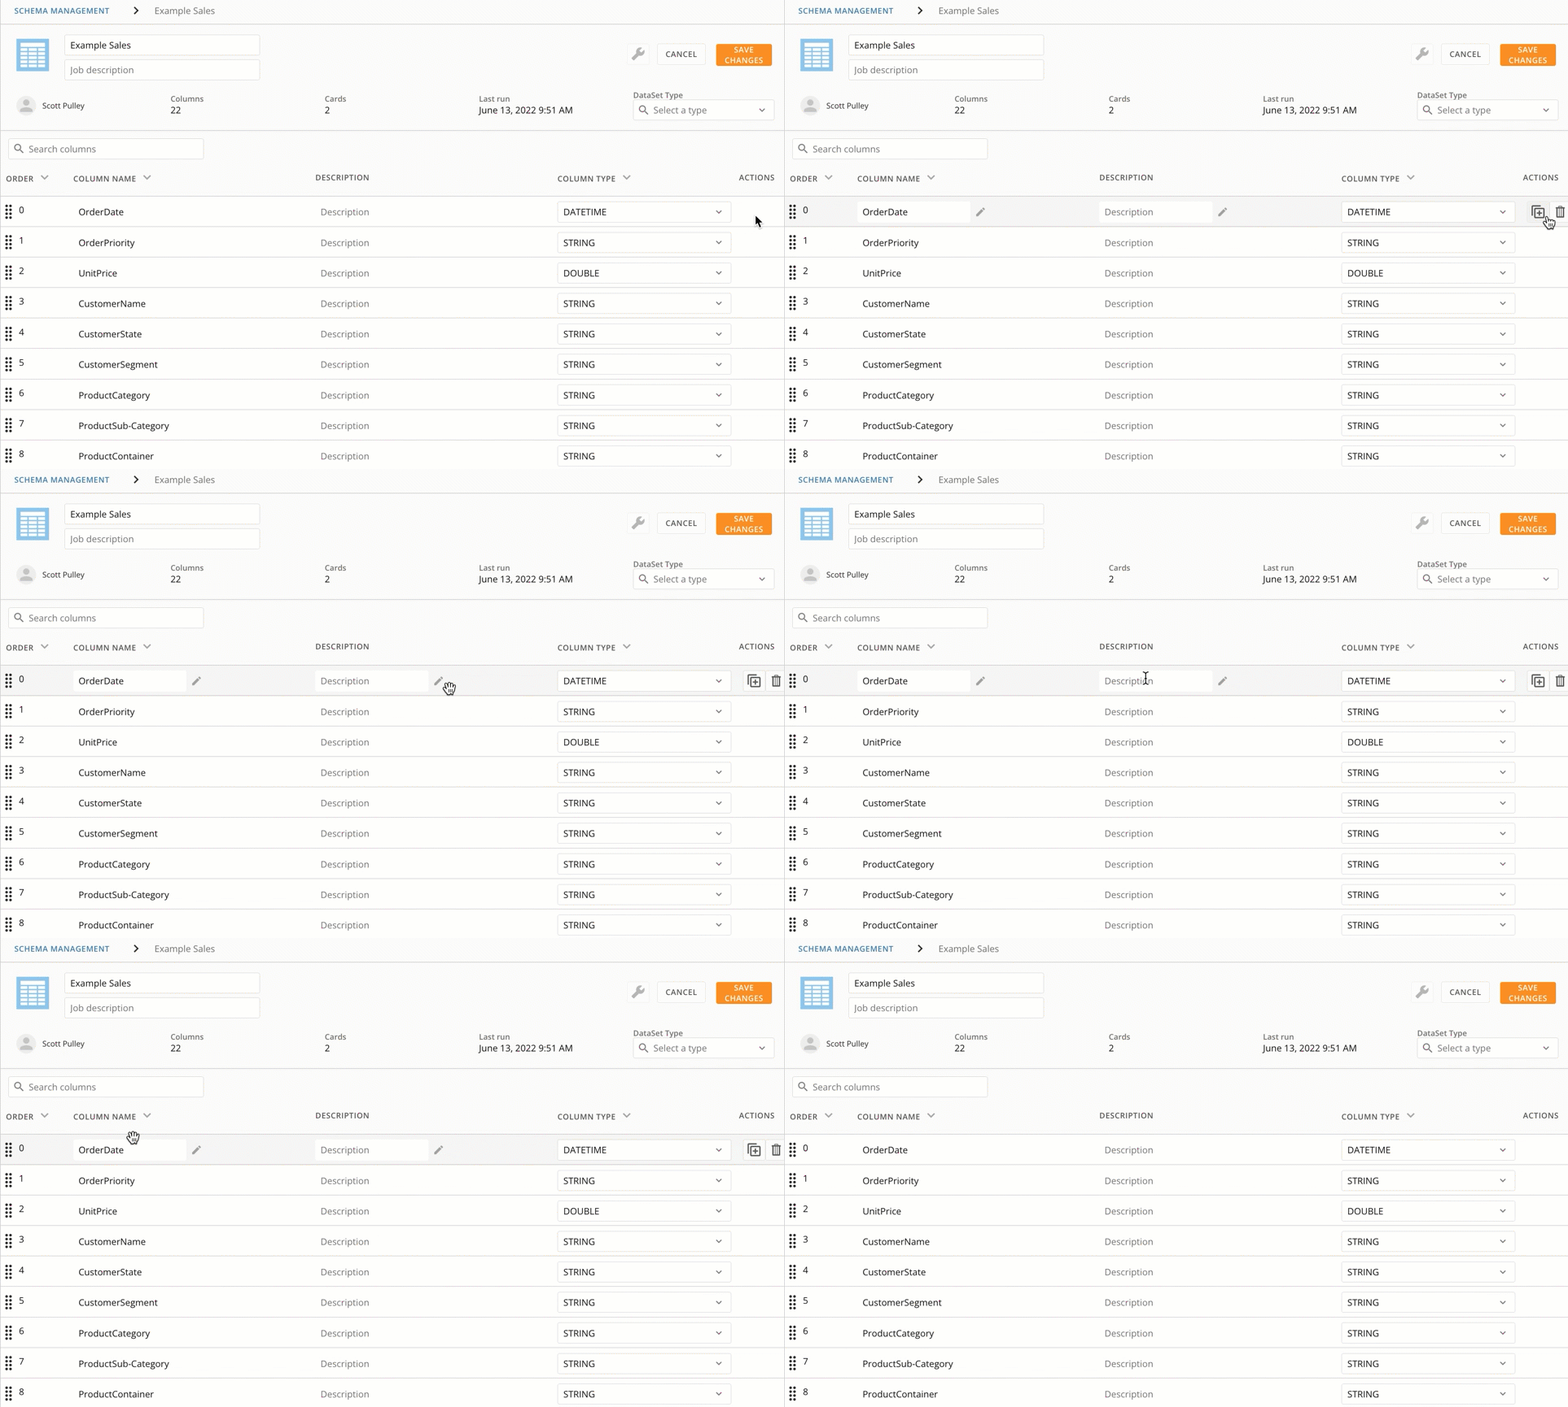 To add columns, select under **Actions.** To delete columns, select .
5. Select
**Save Changes.** The **Update DataSet** dialog displays.
6. Check the following boxes to confirm that you understand the changes.
To add columns, select under **Actions.** To delete columns, select .
5. Select
**Save Changes.** The **Update DataSet** dialog displays.
6. Check the following boxes to confirm that you understand the changes.
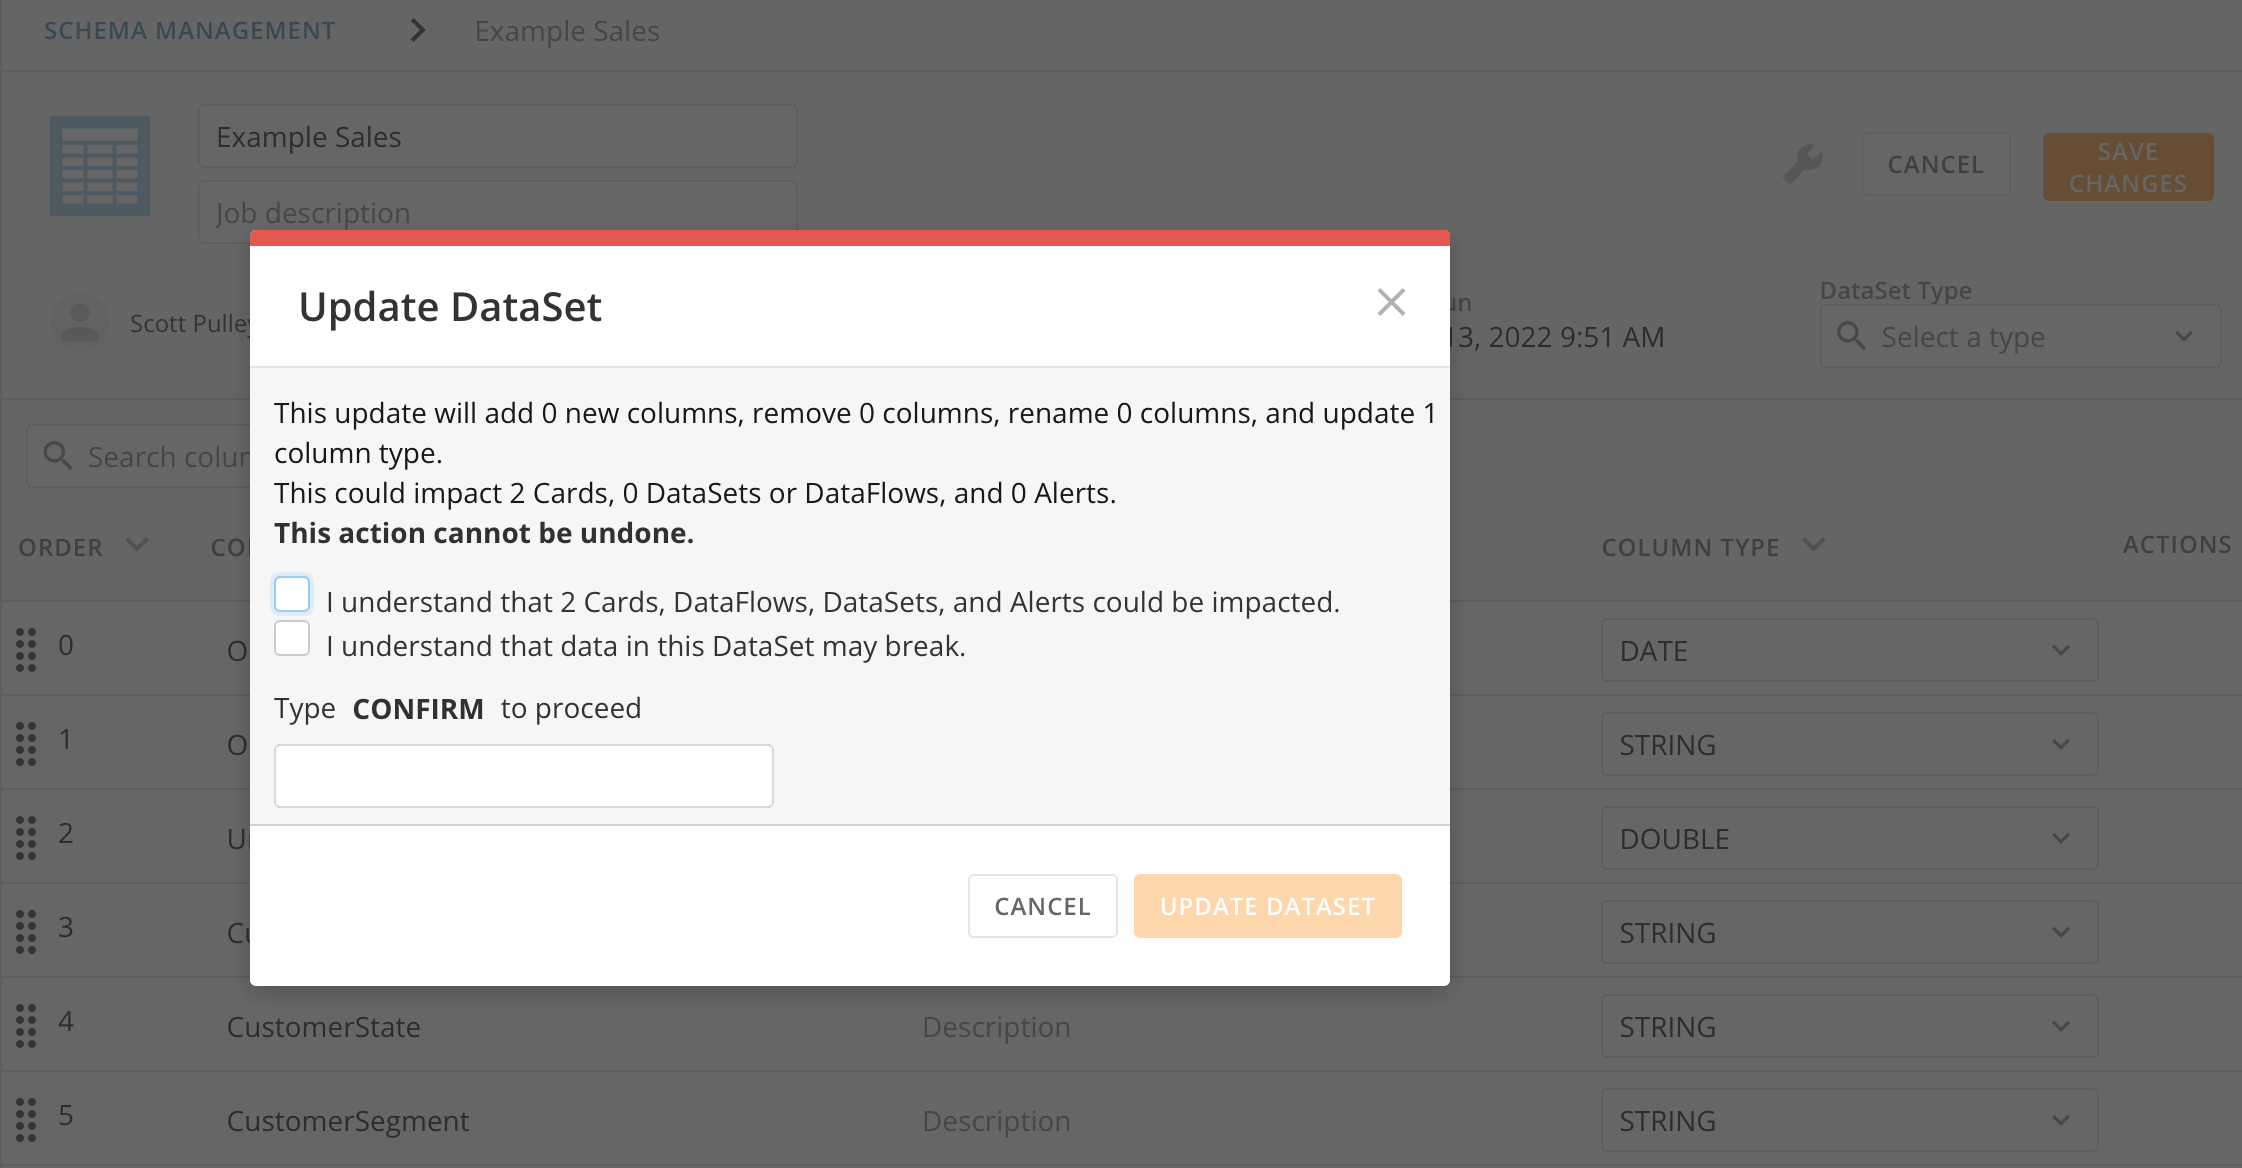 7. Type
**CONFIRM** (all caps) in the field and select **Update DataSet** to save your changes.
### Clone a DataSet
You can clone an existing DataSet. Cloning a DataSet copies the schema of the existing DataSet and creates a new DataSet with the same schema. You can also choose to copy data from the existing DataSet. Cloning a DataSet does not copy connector settings or scheduling.
Follow the steps below to clone a DataSet:
1. Access
[Schema Management](#access_schema_management_in_the_toolkit).
2. Locate the DataSet you want to clone by scrolling through the list or using the s
earch bar.
3. Select the DataSet to view its details.
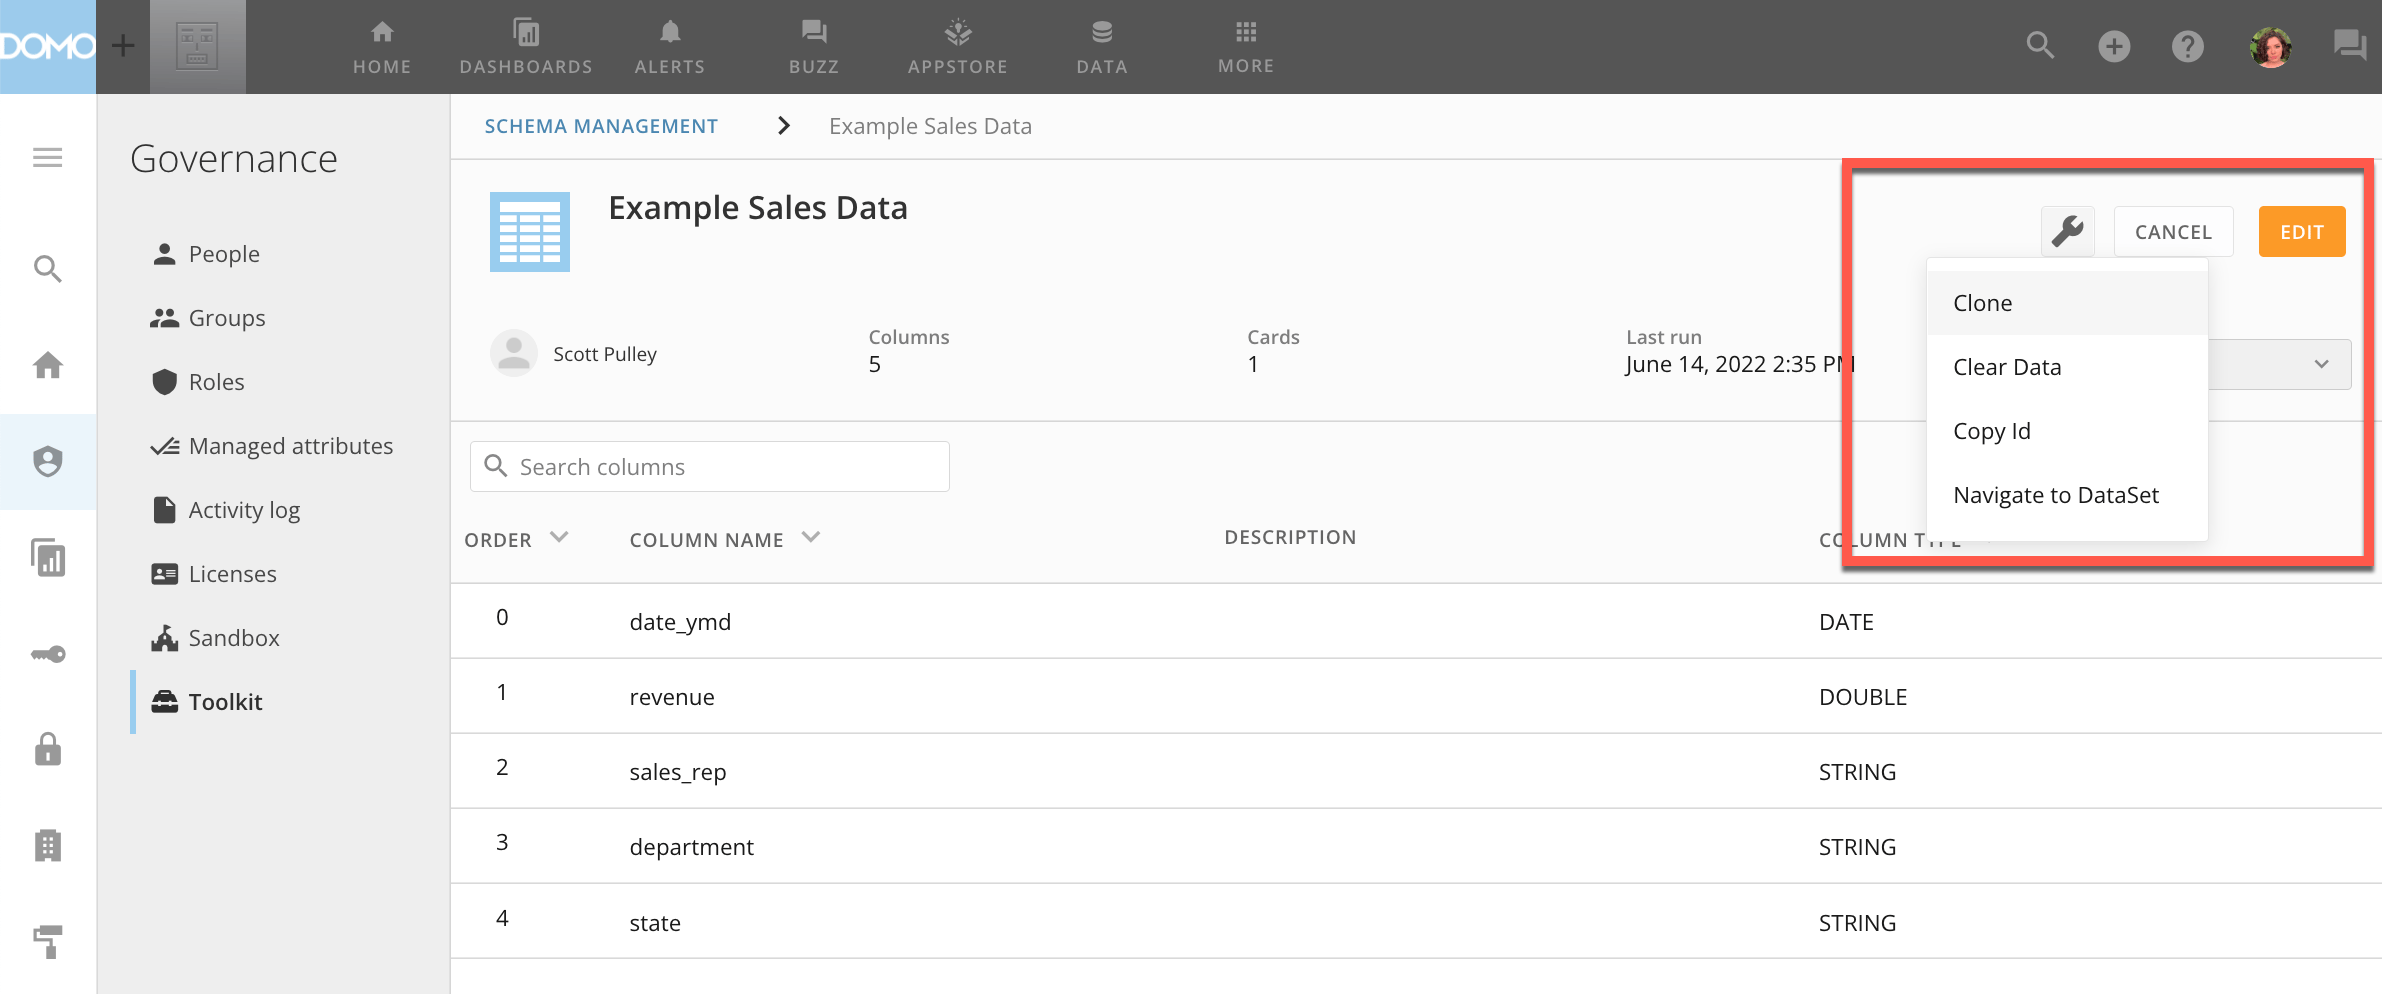
4. Select
**Options** > **Clone**.
The **Clone DataSet** modal displays.
7. Type
**CONFIRM** (all caps) in the field and select **Update DataSet** to save your changes.
### Clone a DataSet
You can clone an existing DataSet. Cloning a DataSet copies the schema of the existing DataSet and creates a new DataSet with the same schema. You can also choose to copy data from the existing DataSet. Cloning a DataSet does not copy connector settings or scheduling.
Follow the steps below to clone a DataSet:
1. Access
[Schema Management](#access_schema_management_in_the_toolkit).
2. Locate the DataSet you want to clone by scrolling through the list or using the s
earch bar.
3. Select the DataSet to view its details.
4. Select
**Options** > **Clone**.
The **Clone DataSet** modal displays.
 5. In the modal, you can change the DataSet clone's name, description, and type. Checking the box to copy data rows from the existing DataSet preserves the original configuration and allows you to edit the clone.
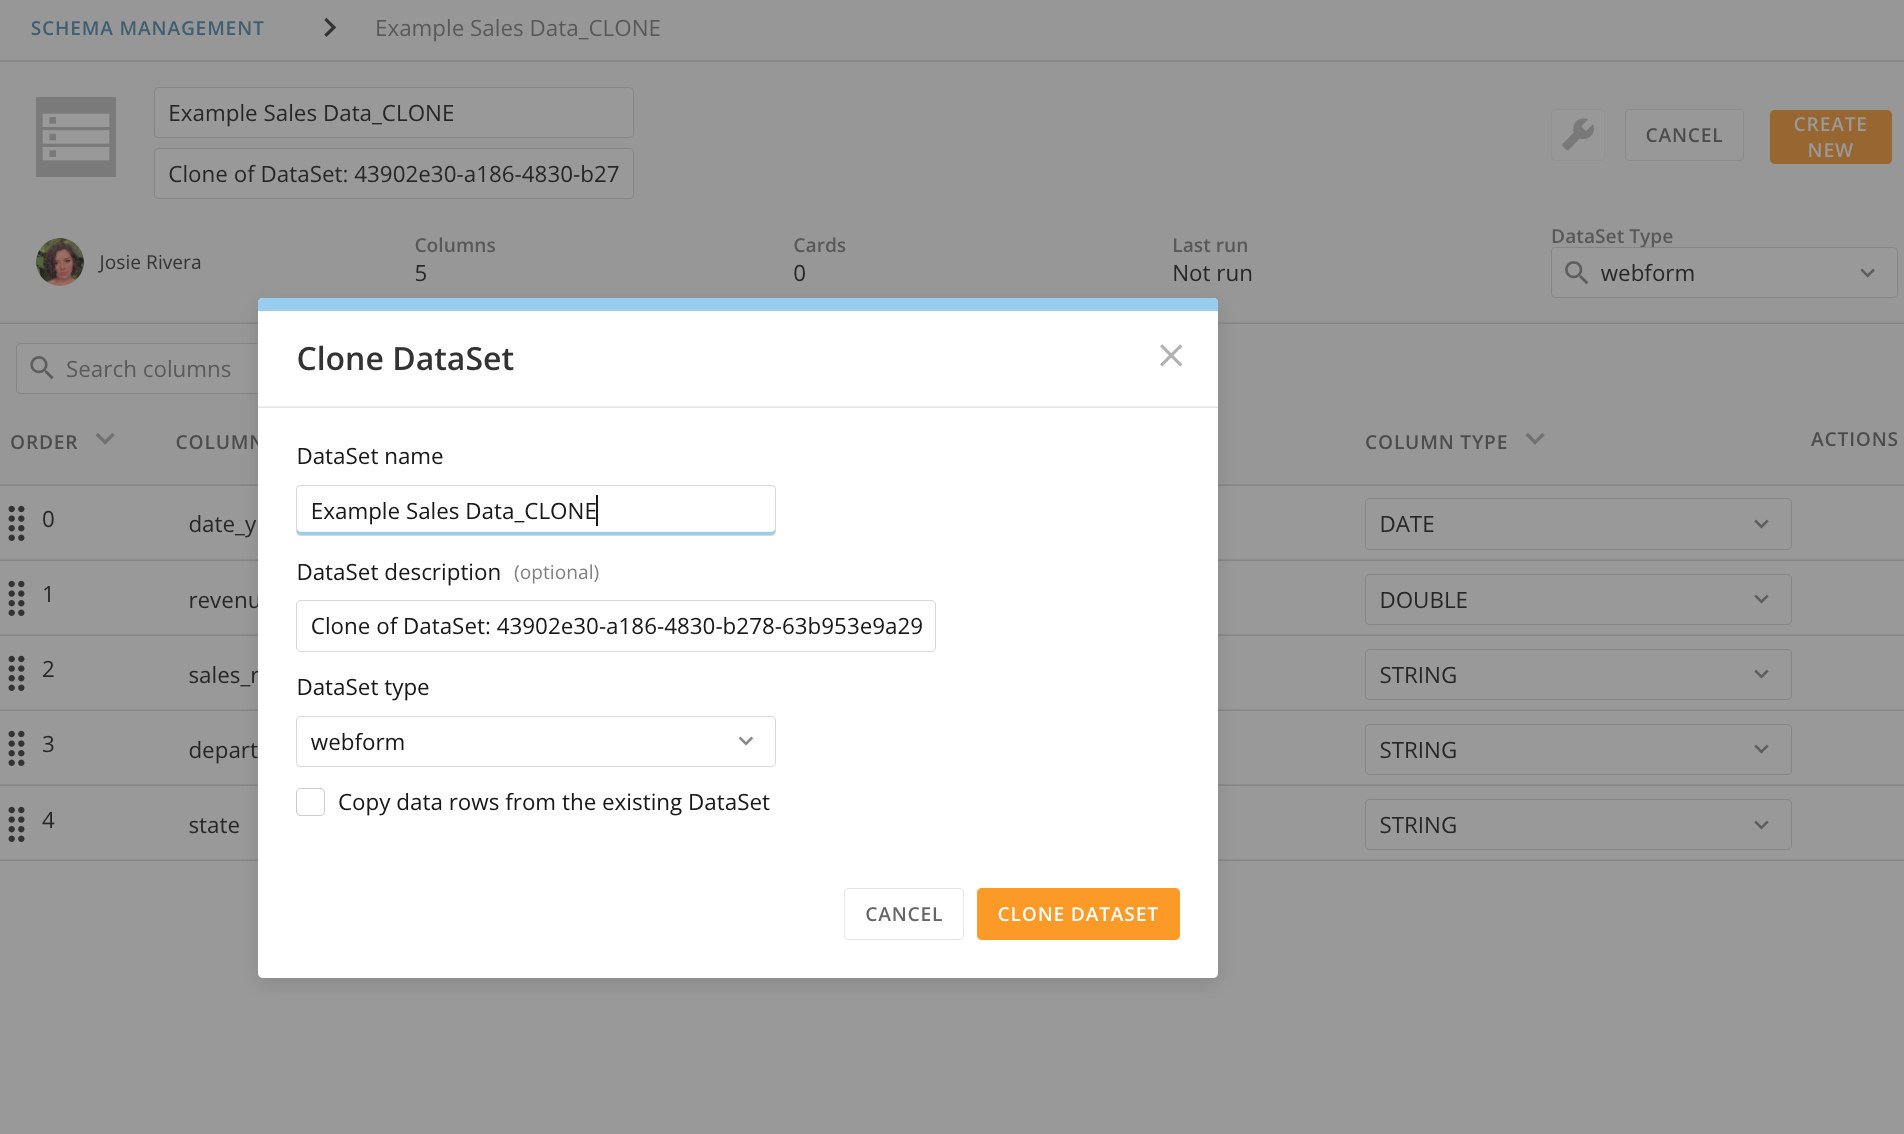 6. Select
**Clone DataSet** to close the modal and clone your DataSet.
**Note:**
The new DataSet can take several minutes to generate.
## Clear a DataSet
You can clear data from a DataSet. This option removes all existing data from a DataSet while preserving the existing DataSet schema.
To clear a DataSet, follow the steps below:
1. Access
[Schema Management](#access_schema_management_in_the_toolkit).
2. Locate the DataSet you want to clear by scrolling through the list or using the s
earch bar.
3. Select the DataSet to view its details.
4. Select
**Options** > **Clear Data**.
6. Select
**Clone DataSet** to close the modal and clone your DataSet.
**Note:**
The new DataSet can take several minutes to generate.
## Clear a DataSet
You can clear data from a DataSet. This option removes all existing data from a DataSet while preserving the existing DataSet schema.
To clear a DataSet, follow the steps below:
1. Access
[Schema Management](#access_schema_management_in_the_toolkit).
2. Locate the DataSet you want to clear by scrolling through the list or using the s
earch bar.
3. Select the DataSet to view its details.
4. Select
**Options** > **Clear Data**.
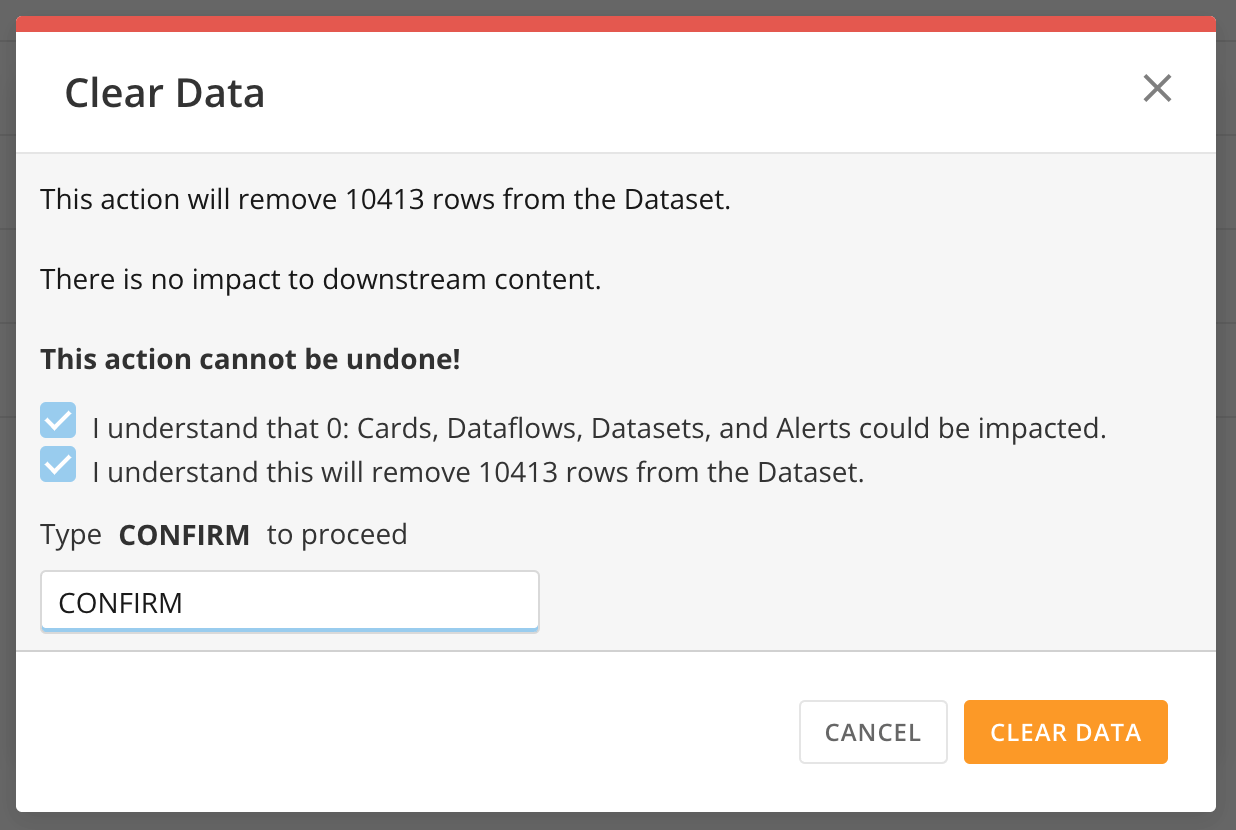
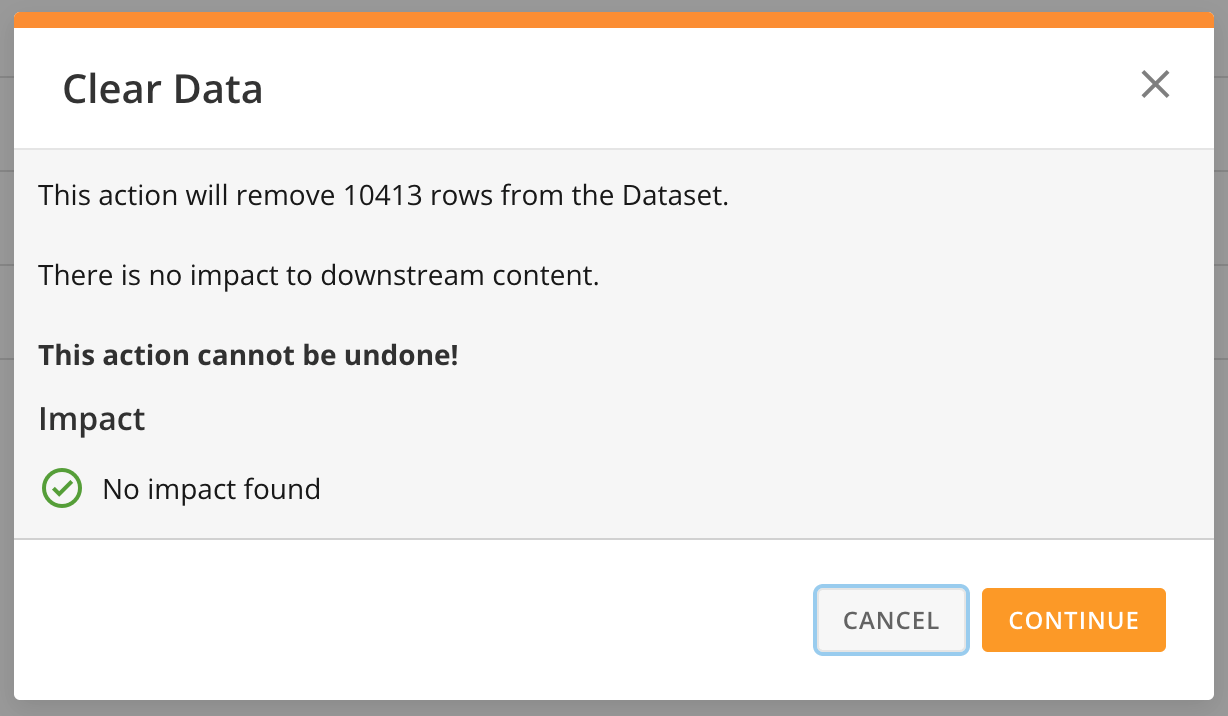
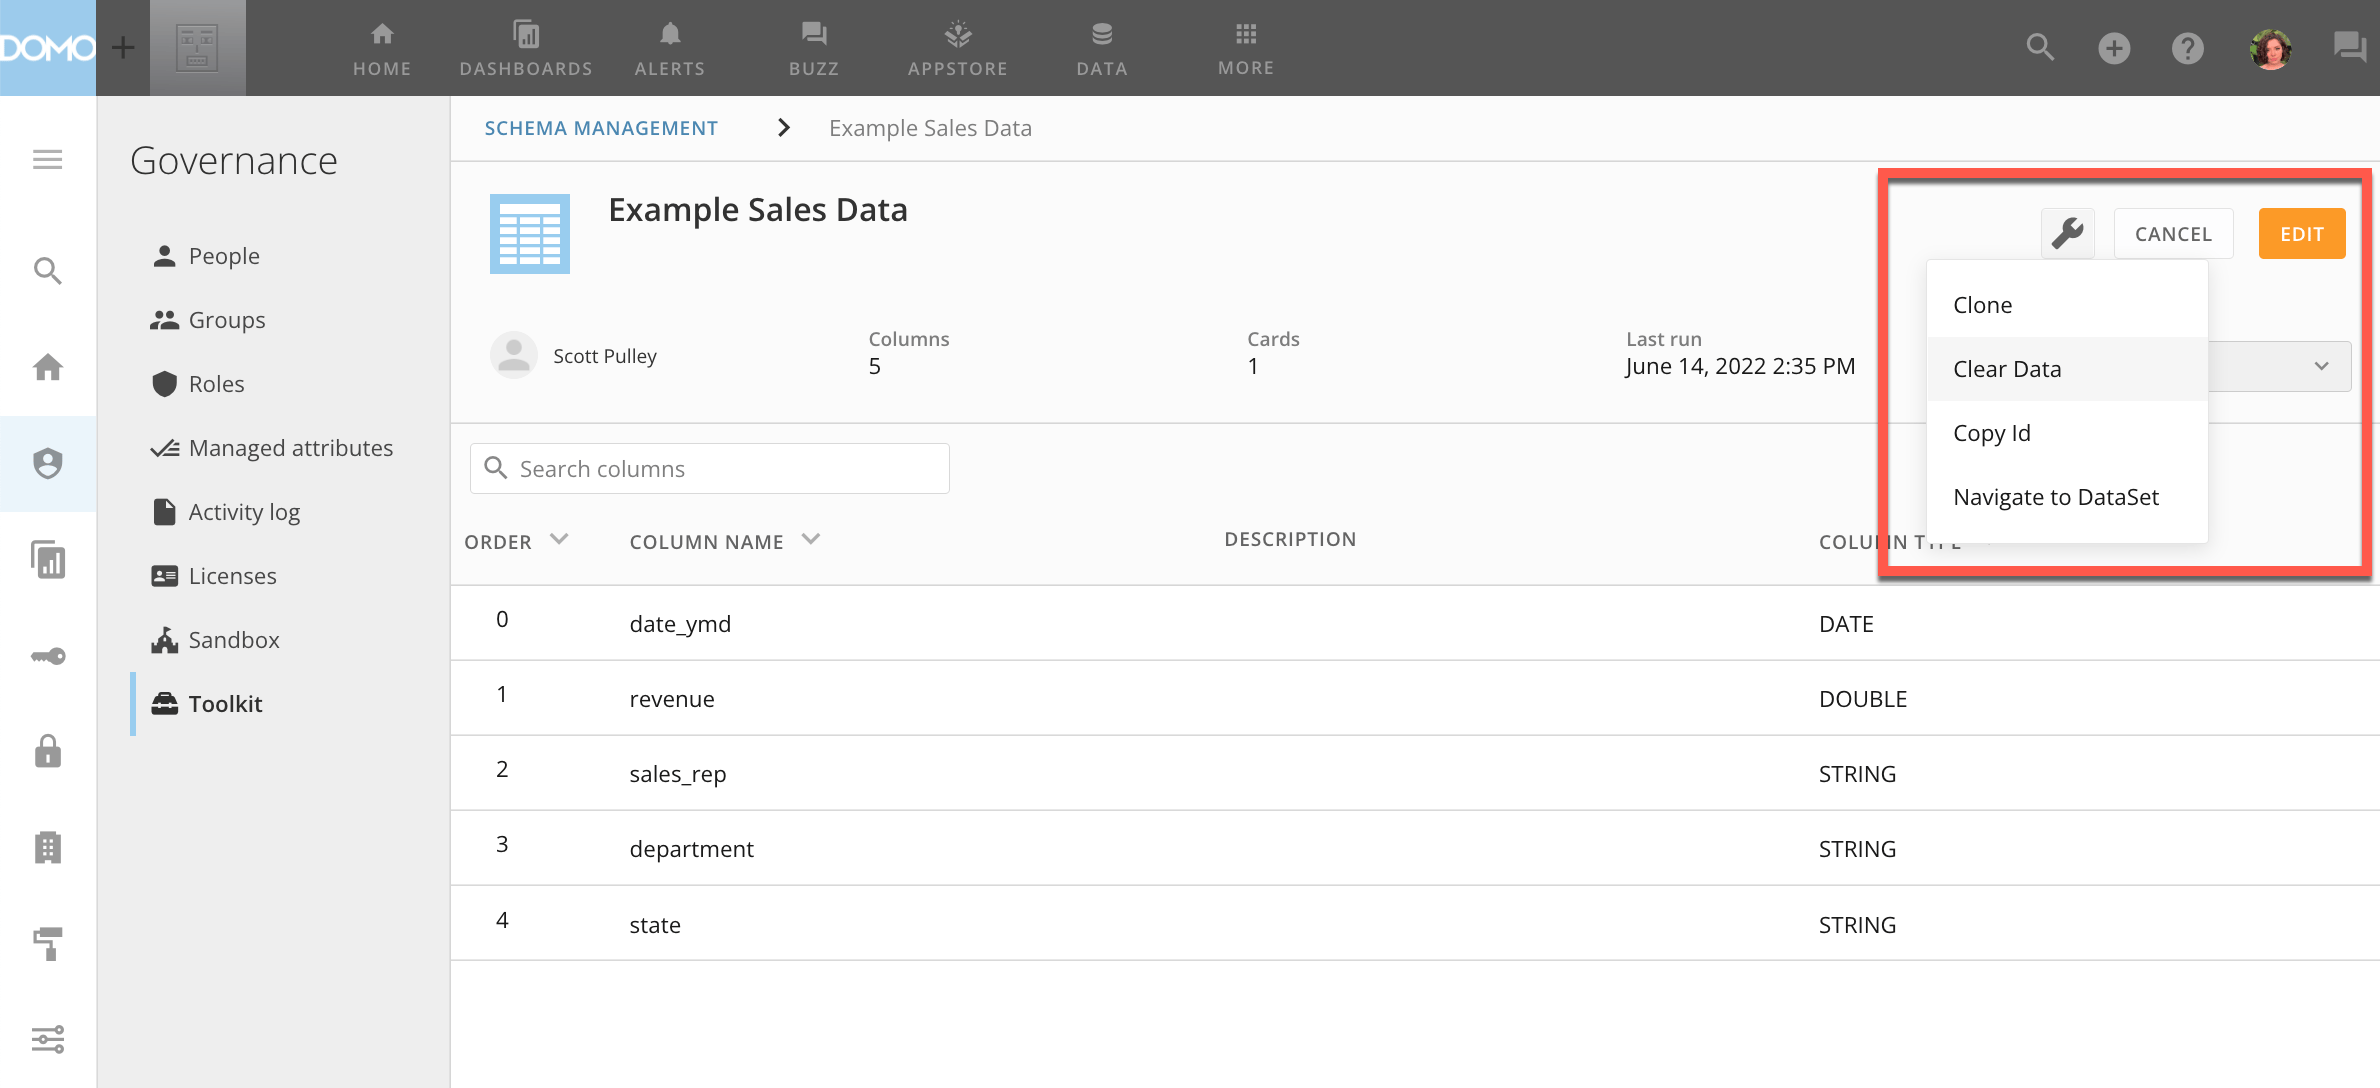 The **Clear Data** dialog displays the number of rows to be cleared and the impact of clearing this data on data downstream.
 5. Select
**Continue**.
6. Check the boxes to confirm the impact and the number of rows being removed.
7. Type CONFIRM (all caps) in the field and select
**Clear Data** to clear the data and close the dialog.
5. Select
**Continue**.
6. Check the boxes to confirm the impact and the number of rows being removed.
7. Type CONFIRM (all caps) in the field and select
**Clear Data** to clear the data and close the dialog.