> ## Documentation Index
> Fetch the complete documentation index at: https://domoinc-openapi-sync-dataflows.mintlify.site/llms.txt
> Use this file to discover all available pages before exploring further.

# Brand Kit

export const InlineImage = ({src, alt = '', height = '1.6em'}) => {
  return <img noZoom src={src} alt={alt} style={{
    display: 'inline',
    verticalAlign: 'start',
    height: height,
    margin: '0'
  }} />;
};

### Intro

Domo Brand Kit is a collection of tools and features that help you craft a Domo experience for your users that is consistent with your internal and external branding. These tools include login backgrounds, chart color palettes, custom fonts, and customized emails.

You can do the following with Brand Kit:

* Style your interface and emails to match brand guidelines
* Customize experiences for your target audience
* Domo Everywhere users can match published content to the surrounding colors on the host page for more cohesive external experiences​

***

### Required Grants

Some areas in the Brand Kit required the following grants to be enabled for your role:

* **Manage All Company Settings**
  **—** This option allows the user to view the Brand Kit section but does not allow them to make changes to it.
* **Manage All Cards, Pages and Apps (App Studio) —**
  This option allows the user to view the Brand Kit and make changes to it.

### Access Brand Kit

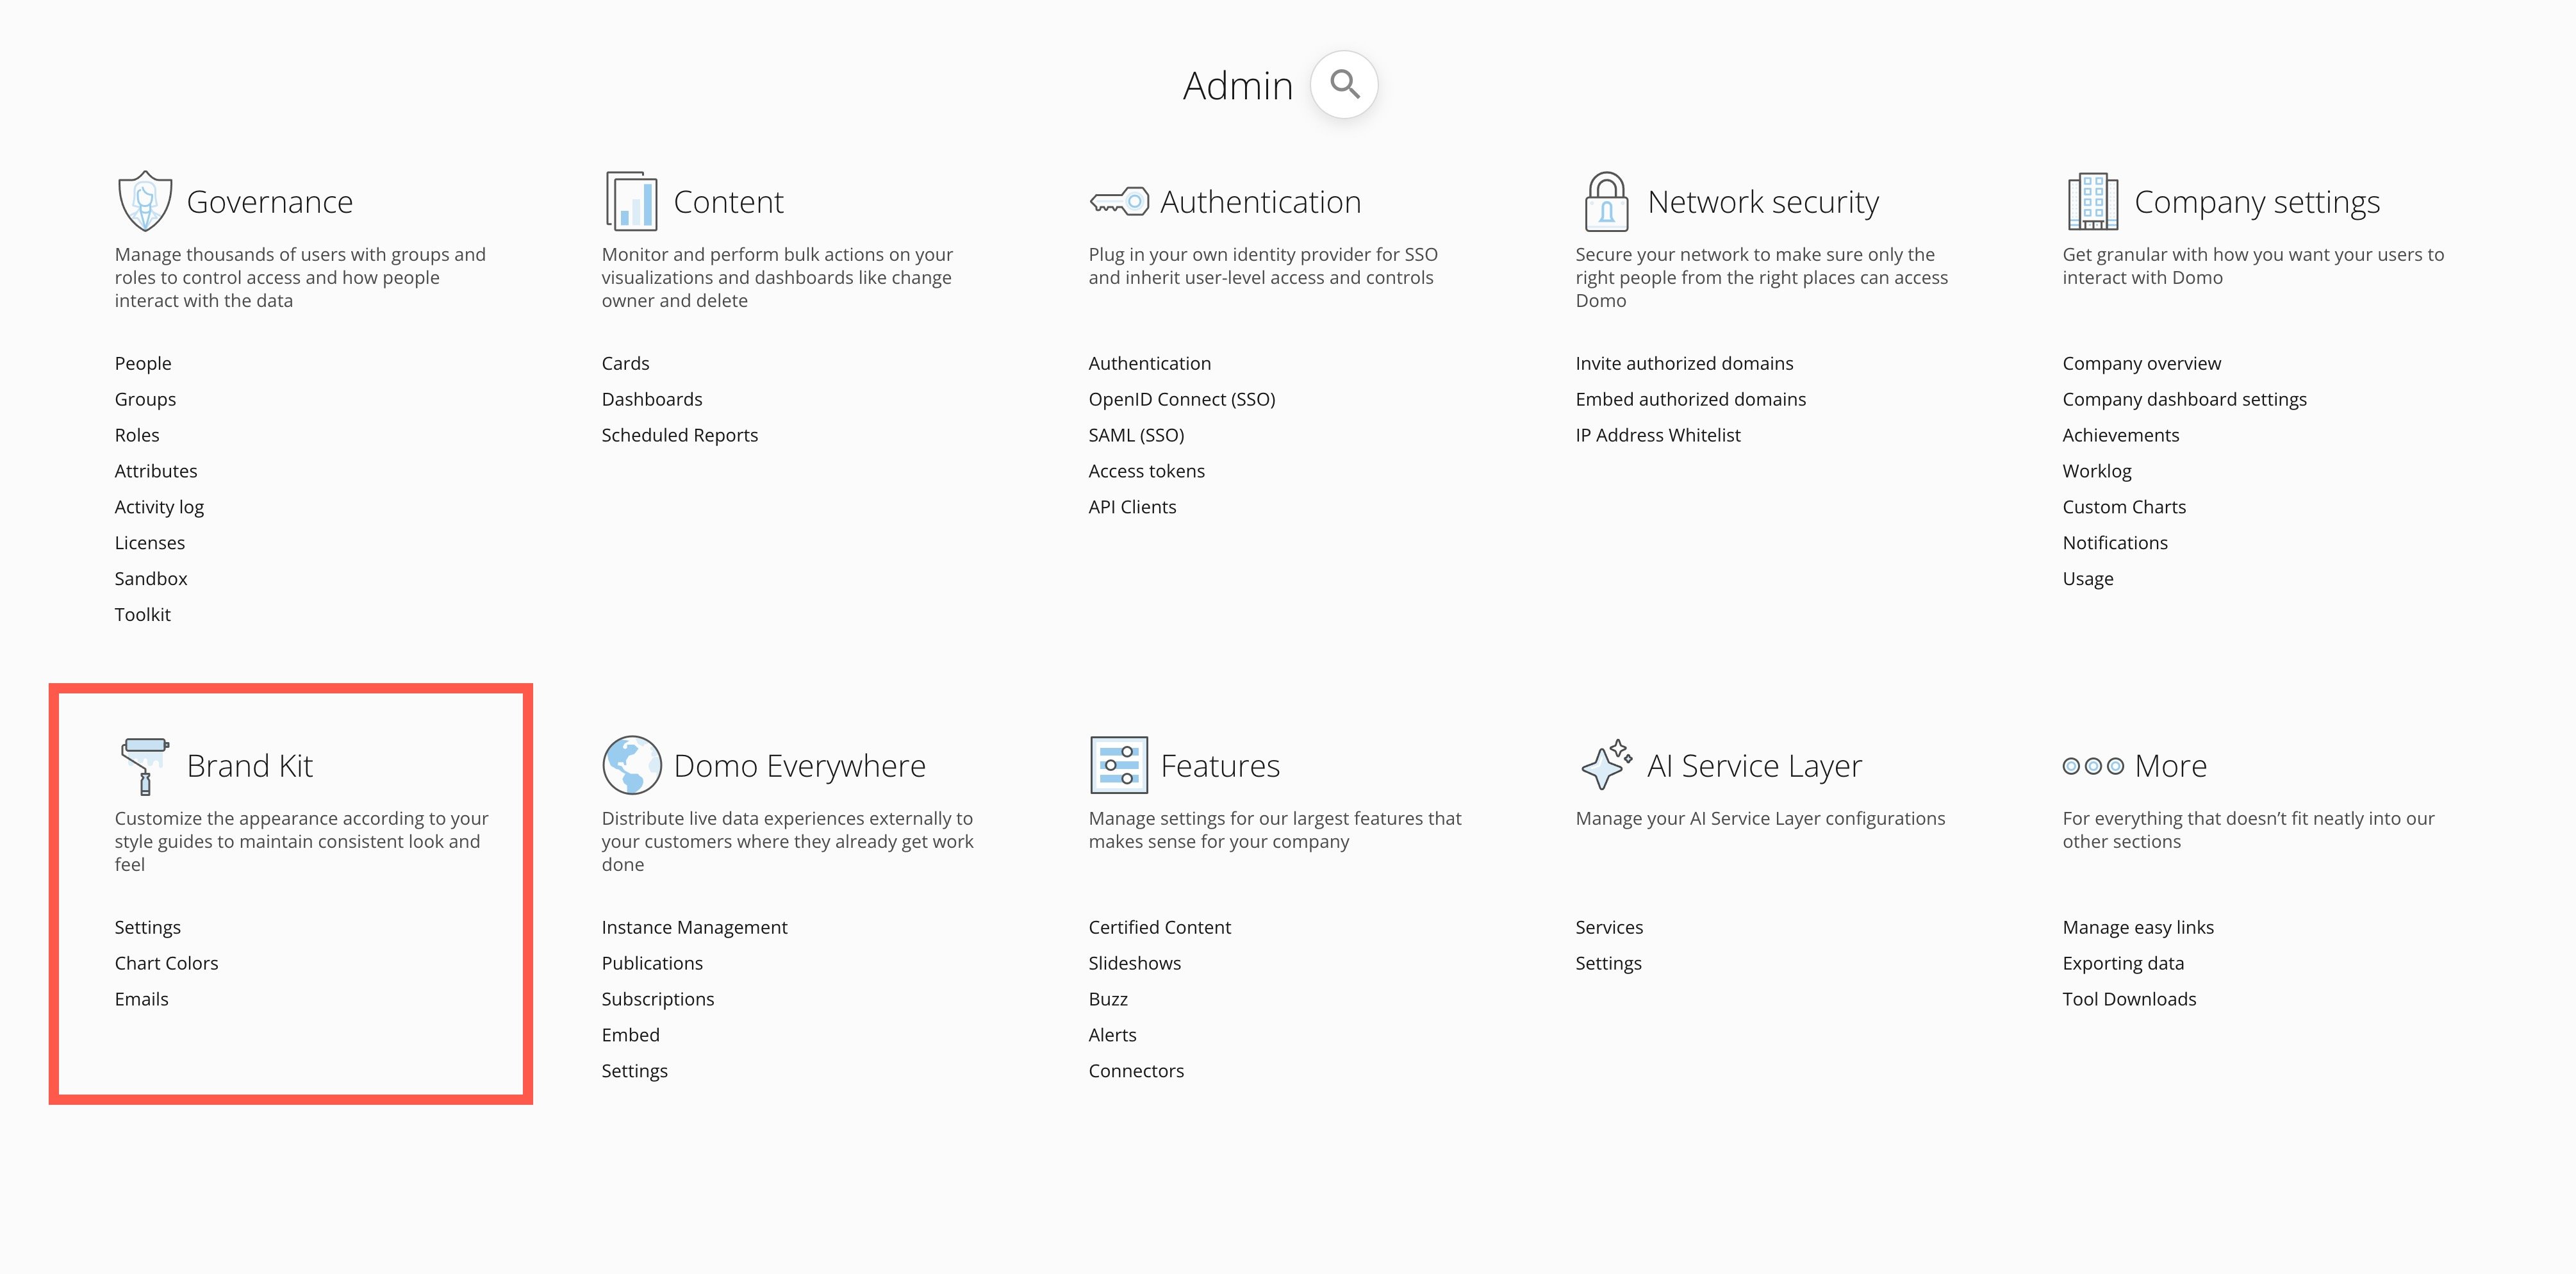
Access Brand Kit from the Admin Settings. Access the Admin Settings from the navigation header by selecting **More** > **Admin**.

Under **Brand Kit**, you can navigate to any of the related pages.

<Frame>
  <img alt="brand kit admin.jpg" src="https://mintcdn.com/domoinc-openapi-sync-dataflows/Ii_OEK7nN-EzkrX1/images/kb/ka0Vq0000007KoP-00N5w00000Ri7BU-0EMVq000000SHvZ.jpg?fit=max&auto=format&n=Ii_OEK7nN-EzkrX1&q=85&s=a6b87981304df2b496e12303c1184120" style={{width: 900, height: 445}} width="4020" height="1988" data-path="images/kb/ka0Vq0000007KoP-00N5w00000Ri7BU-0EMVq000000SHvZ.jpg" />
</Frame>

### Settings

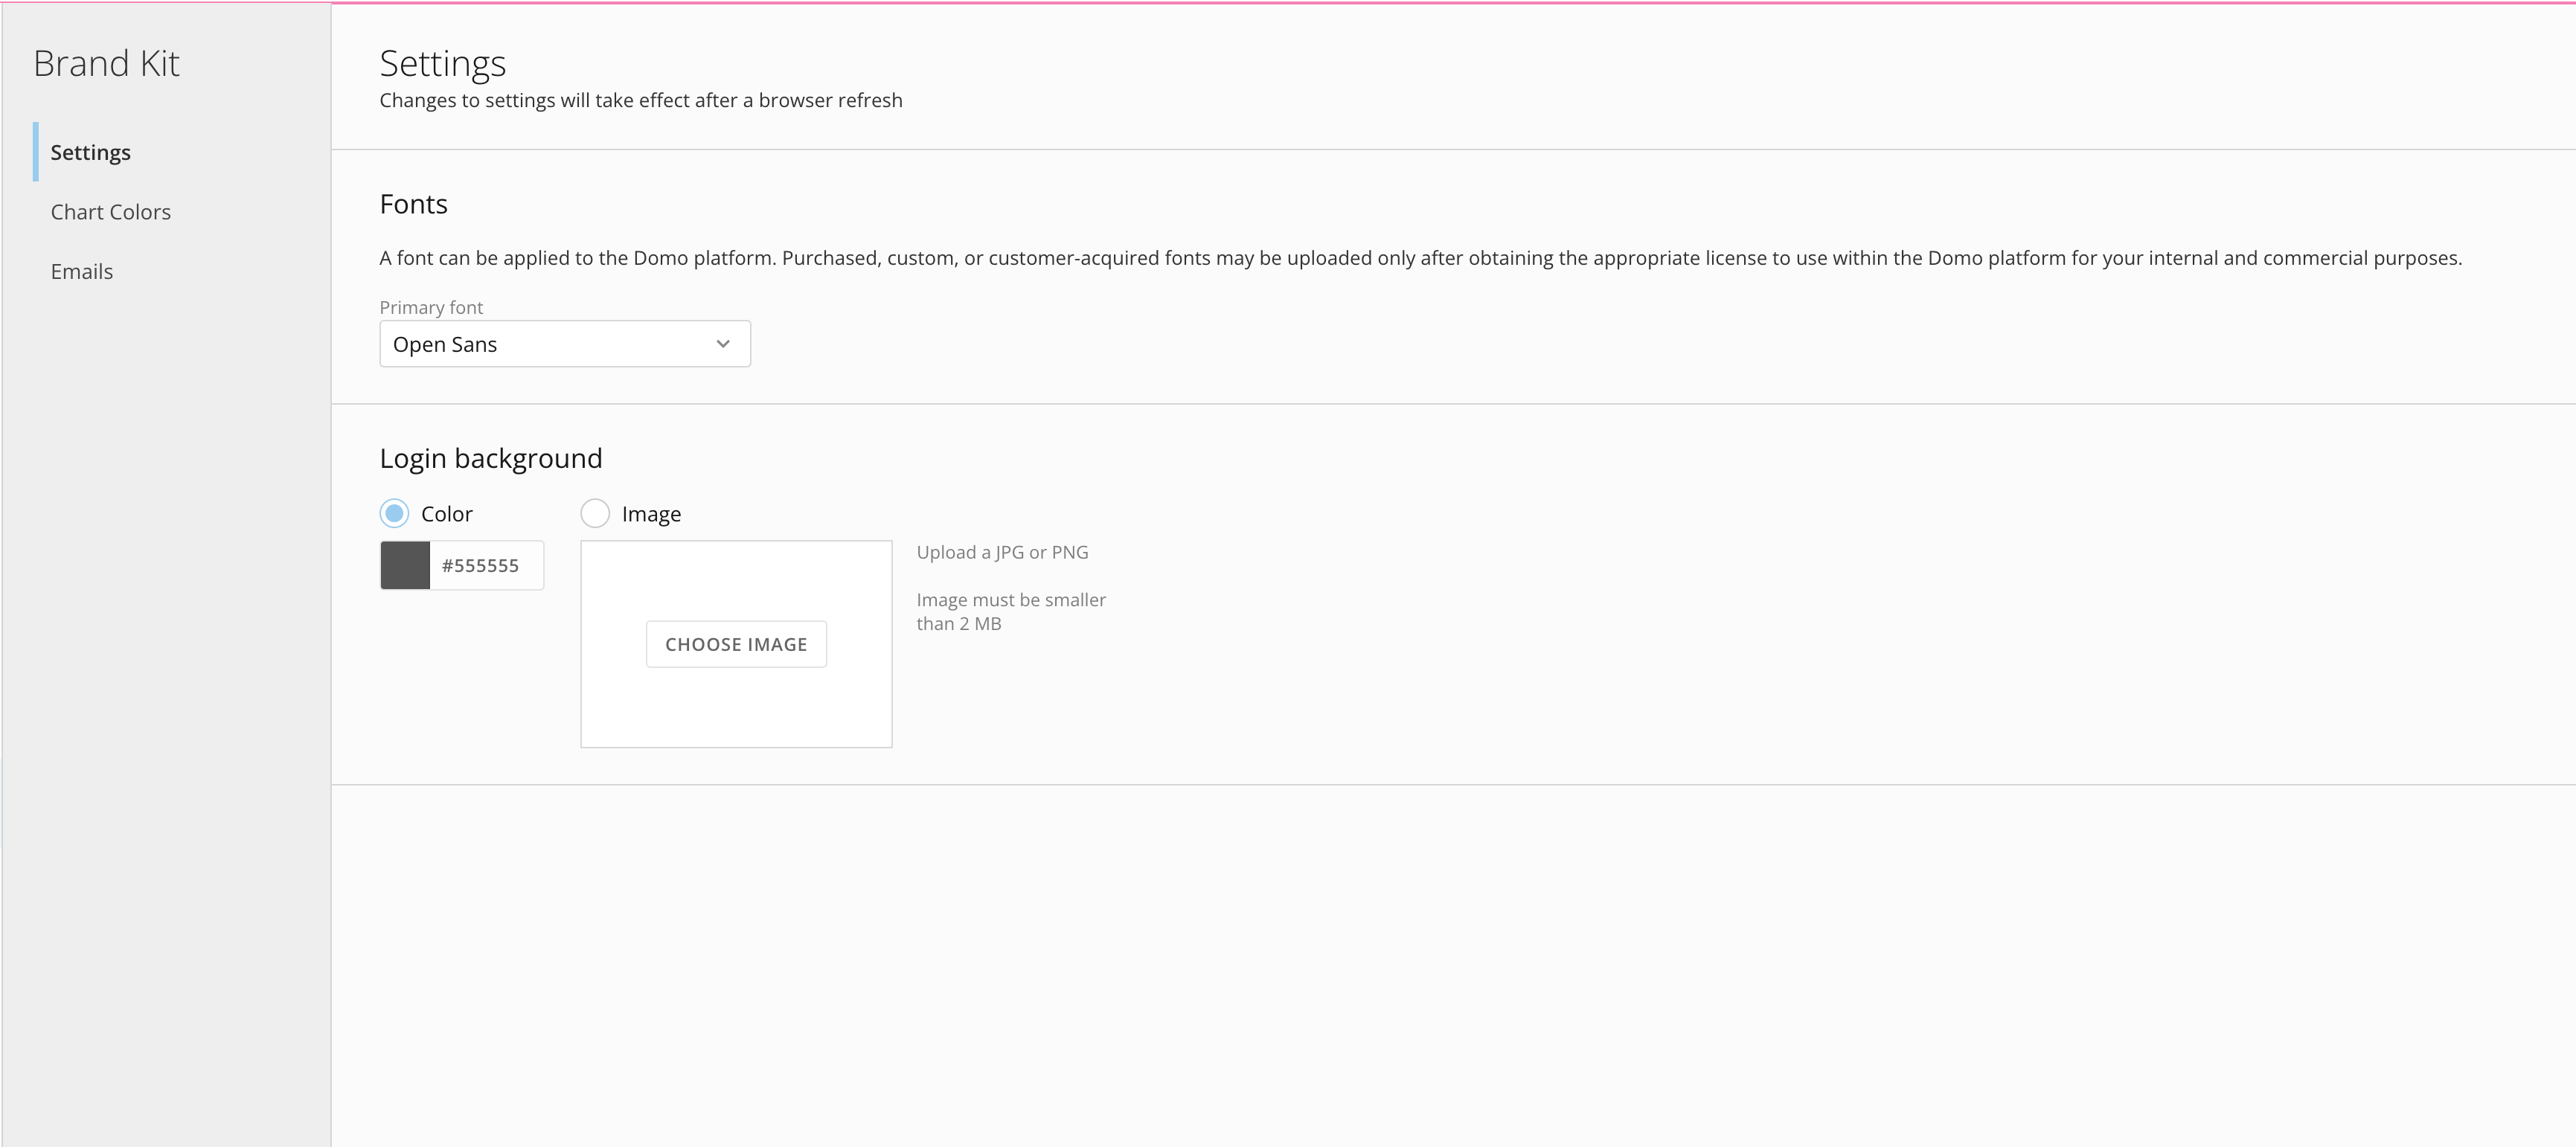
Brand Kit Settings allows you to update and customize the fonts displayed in your Domo environment and the login background. After making changes, refresh your browser to see them.
<Frame>
  <img alt="Screenshot 2024-05-29 at 10.35.17 AM.png" src="https://mintcdn.com/domoinc-openapi-sync-dataflows/Ii_OEK7nN-EzkrX1/images/kb/ka0Vq0000007KoP-00N5w00000Ri7BU-0EMVq0000017kdR.jpg?fit=max&auto=format&n=Ii_OEK7nN-EzkrX1&q=85&s=2388dc4d9d5c16aa008a05341d41ed8f" style={{width: 887, height: 395}} width="3462" height="1542" data-path="images/kb/ka0Vq0000007KoP-00N5w00000Ri7BU-0EMVq0000017kdR.jpg" />
</Frame>

# Fonts

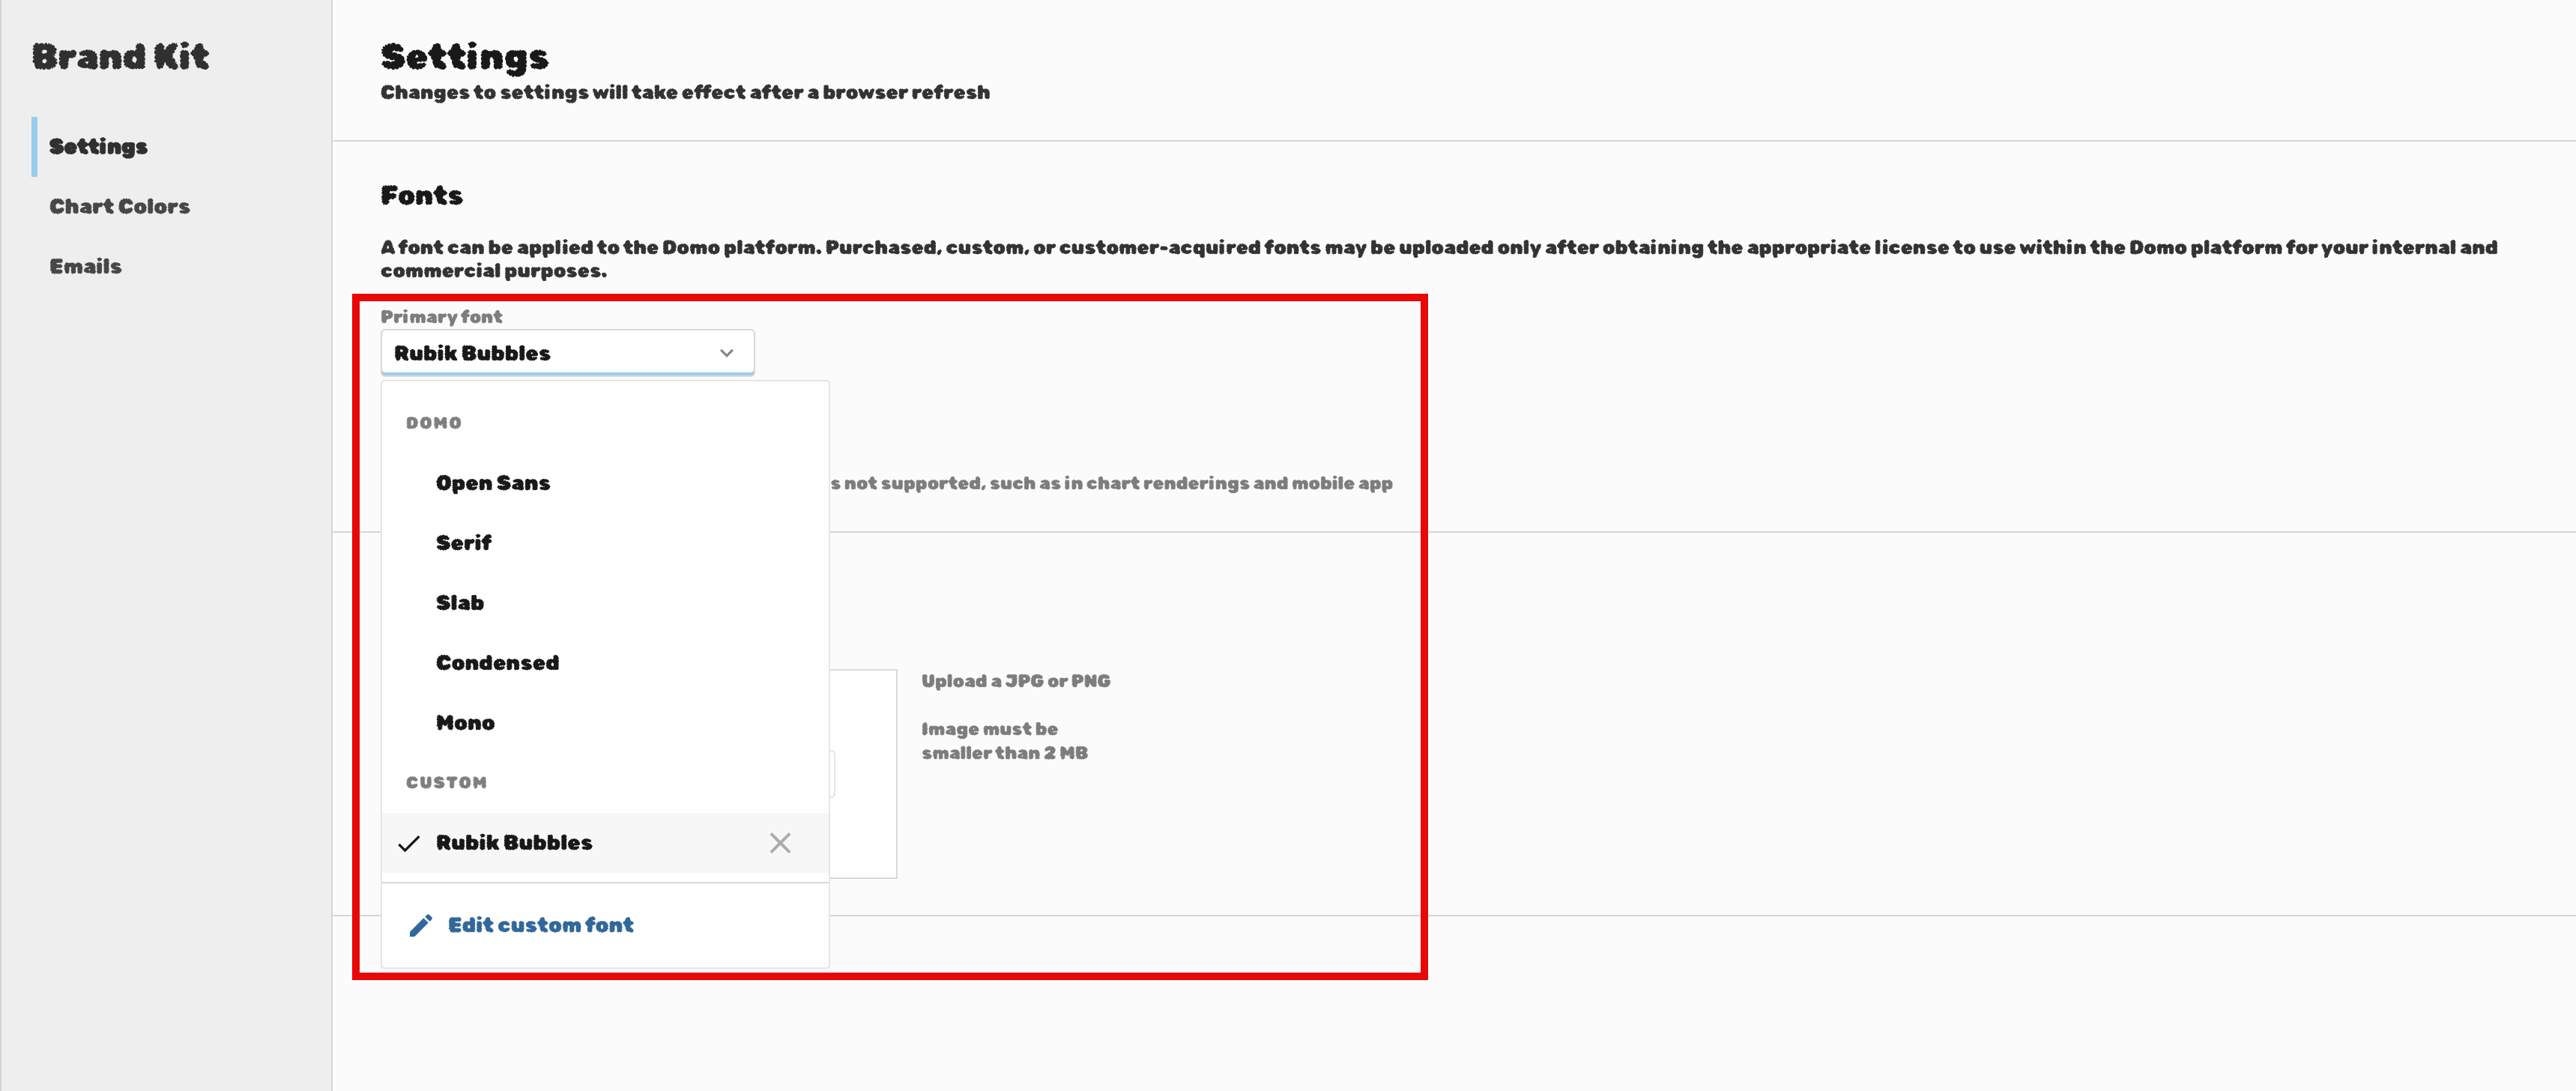
Add and apply Domo-provided and custom fonts to your Domo instance in the Brand Kit setting. Setting the primary font to anything other than the Domo-provided fonts prompts you to set the secondary font for areas where the primary font is not supported, such as chart renderings and the mobile app.

The Domo-provided fonts include Open Sans, Serif, Slab, Condensed, and Mono. Domo uses Open Sans as the default font.
<Note>
  **Note:**
  You can only use custom fonts as the primary font.
</Note>

<Frame>
  <img alt="Screenshot 2024-05-29 at 11.18.47 AM.png" src="https://mintcdn.com/domoinc-openapi-sync-dataflows/Ii_OEK7nN-EzkrX1/images/kb/ka0Vq0000007KoP-00N5w00000Ri7BU-0EMVq0000017uuZ.jpg?fit=max&auto=format&n=Ii_OEK7nN-EzkrX1&q=85&s=ea51a14cbce6ccad0ec293102d687eb8" style={{width: 897, height: 380}} width="3438" height="1456" data-path="images/kb/ka0Vq0000007KoP-00N5w00000Ri7BU-0EMVq0000017uuZ.jpg" />
</Frame>

Add a Custom Font (from Adobe or Google)

Follow the steps below to add and apply custom fonts to your Brand Kit.

1. [Access the Brand Kit](#access_brand_kit)
   from the Admin Settings.
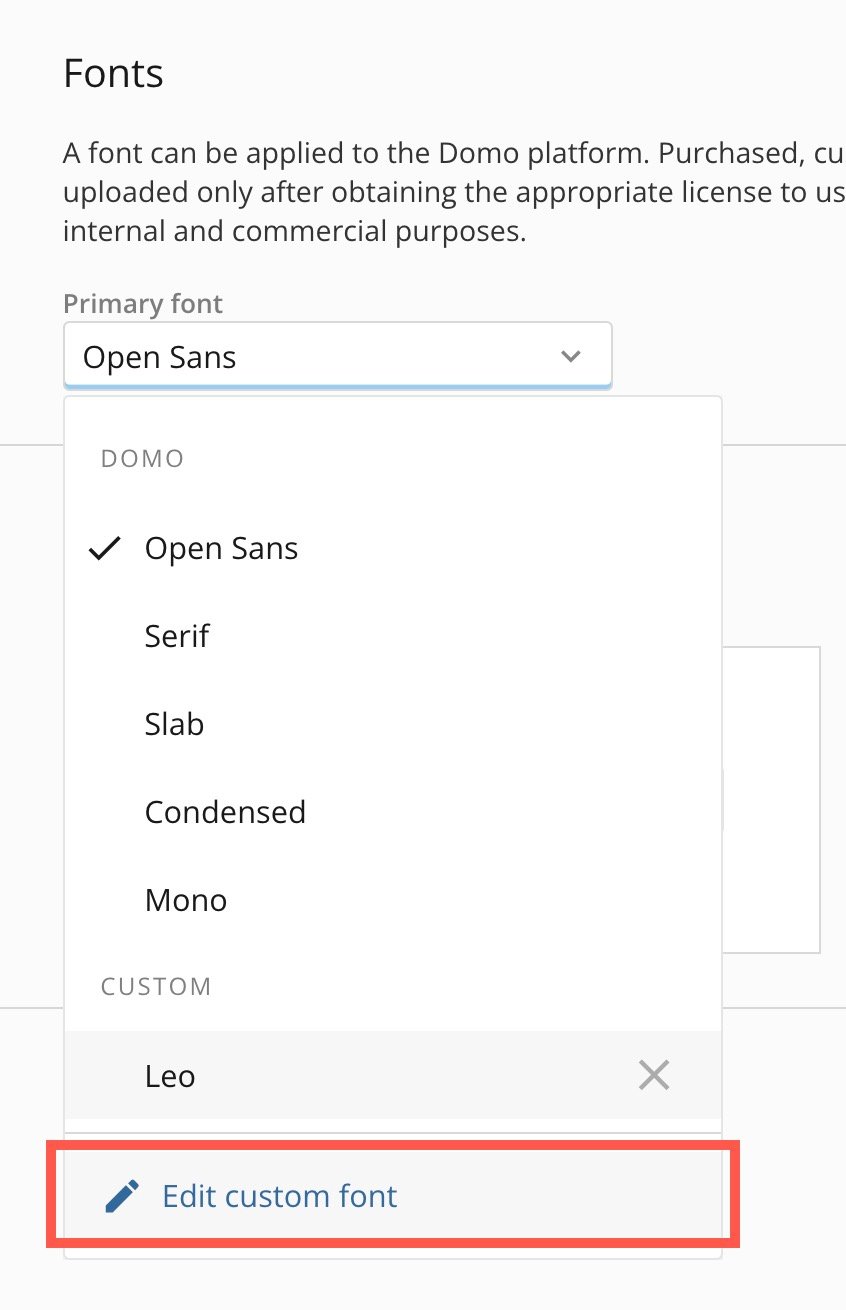
2. Go to
   **Settings** in the Brand Kit and expand the **Primary font** dropdown.
3. Select
   **Edit custom font** to open the modal.
   <Frame>
     <img alt="edit custom font.jpg" src="https://mintcdn.com/domoinc-openapi-sync-dataflows/Ii_OEK7nN-EzkrX1/images/kb/ka0Vq0000007KoP-00N5w00000Ri7BU-0EMVq0000043x7h.jpg?fit=max&auto=format&n=Ii_OEK7nN-EzkrX1&q=85&s=fa8f6a997bc85b354fd0f6f5a1f86065" style={{width: 299, height: 463}} width="846" height="1310" data-path="images/kb/ka0Vq0000007KoP-00N5w00000Ri7BU-0EMVq0000043x7h.jpg" />
   </Frame>
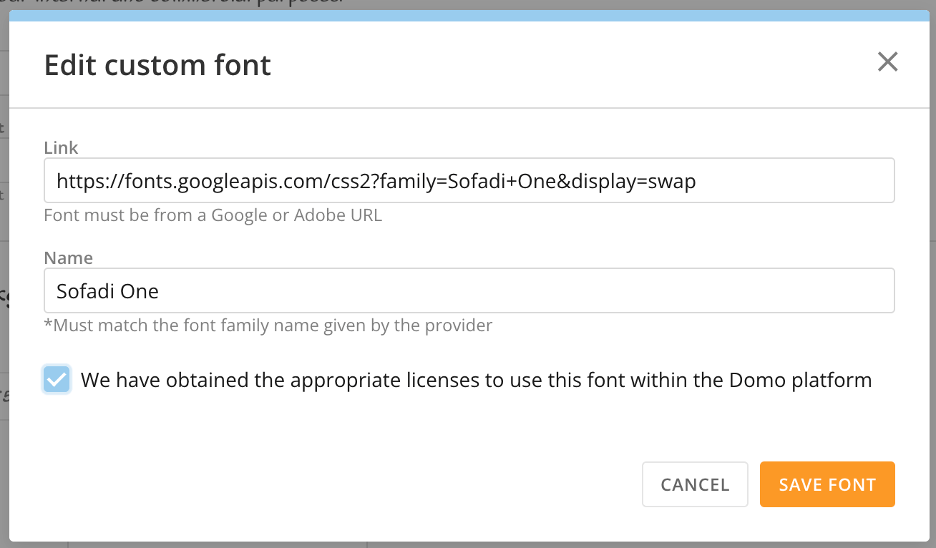
4. In the
   **Link** field of the modal, enter the URL for the Google or Adobe font. Learn how to [get the font URL](#get_font_url).

   **Note:** The font must be from Google or Adobe.
   <Frame>
     <img alt="font.png" src="https://mintcdn.com/domoinc-openapi-sync-dataflows/Ii_OEK7nN-EzkrX1/images/kb/ka0Vq0000007KoP-00N5w00000Ri7BU-0EMVq000002p45F.jpg?fit=max&auto=format&n=Ii_OEK7nN-EzkrX1&q=85&s=21ee52660224bce37918251e6a2b9515" style={{width: 582, height: 341}} width="936" height="548" data-path="images/kb/ka0Vq0000007KoP-00N5w00000Ri7BU-0EMVq000002p45F.jpg" />
   </Frame>
5. In the
   **Name** field, enter the same name that appears in Google/Adobe.
6. Check the box to confirm that you have obtained the appropriate licenses to use the font in the Domo platform.
7. Select
   **Save Font**.

Your custom font is now available in the **Primary font** dropdown. Select it to apply it across the Domo platform.

##### Get Font URL

You can add and apply Adobe and Google fonts to your Brand Kit. Follow the steps below to set these up:

1. Navigate to
   [Google](https://fonts.google.com/) <InlineImage src="/images/kb/ka0Vq00000001FR-00N5w00000Ri7BU-0EMVq0000000XDh.jpg" /> or [Adobe](https://fonts.adobe.com/) <InlineImage src="/images/kb/ka0Vq00000001FR-00N5w00000Ri7BU-0EMVq0000000XDh.jpg" /> fonts.
2. Locate the font you want to use.
3. (Conditional) For Google fonts, select
   **Get Font**, then **Get Embed Code**.
4. Copy the font URL:
   * For Adobe, the URL should be formatted like this: \<\<[http://use.typekit.net/\{fontCode}/css\\>\\>](http://use.typekit.net/\{fontCode}/css\\>\\>).
   * For Google, the URL should be formatted like this: \<\<
     [https://fonts.googleapis.com/css2?family=Sofadi+One\&display=swap\\\\>>](https://fonts.googleapis.com/css2?family=Sofadi+One\&display=swap\\\\>>)
     ;.
5. Add the URL to the modal while
   [adding a custom font](#add_custom_font).

<Frame>
  <img alt="font.png" src="https://mintcdn.com/domoinc-openapi-sync-dataflows/Ii_OEK7nN-EzkrX1/images/kb/ka0Vq0000007KoP-00N5w00000Ri7BU-0EMVq000002p45F.jpg?fit=max&auto=format&n=Ii_OEK7nN-EzkrX1&q=85&s=21ee52660224bce37918251e6a2b9515" style={{width: 582, height: 341}} width="936" height="548" data-path="images/kb/ka0Vq0000007KoP-00N5w00000Ri7BU-0EMVq000002p45F.jpg" />
</Frame>

# Login Backgrounds

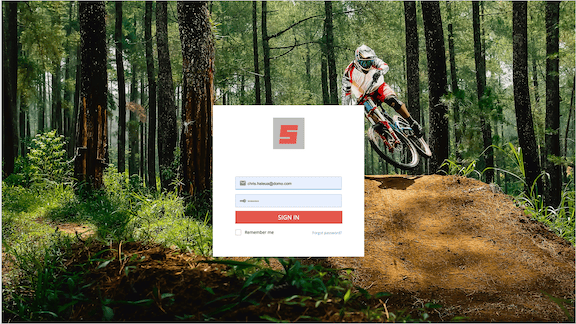
Brand Kit allows you to customize the background image or color shown when logging into your organization within Domo.
<Frame>
  <img alt="Background.png" src="https://mintcdn.com/domoinc-openapi-sync-dataflows/Ii_OEK7nN-EzkrX1/images/kb/ka0Vq0000007KoP-00N5w00000Ri7BU-0EM5w000005vNjx.png?fit=max&auto=format&n=Ii_OEK7nN-EzkrX1&q=85&s=66bf41679ae15e0b4f25eaf4b8f32055" style={{width: 800, height: 449}} width="576" height="324" data-path="images/kb/ka0Vq0000007KoP-00N5w00000Ri7BU-0EM5w000005vNjx.png" />
</Frame>

Follow these steps to customize your own login experience:

1. [Access Brand Kit](#access_brand_kit)
   and go to the **Settings** page.
2. On the
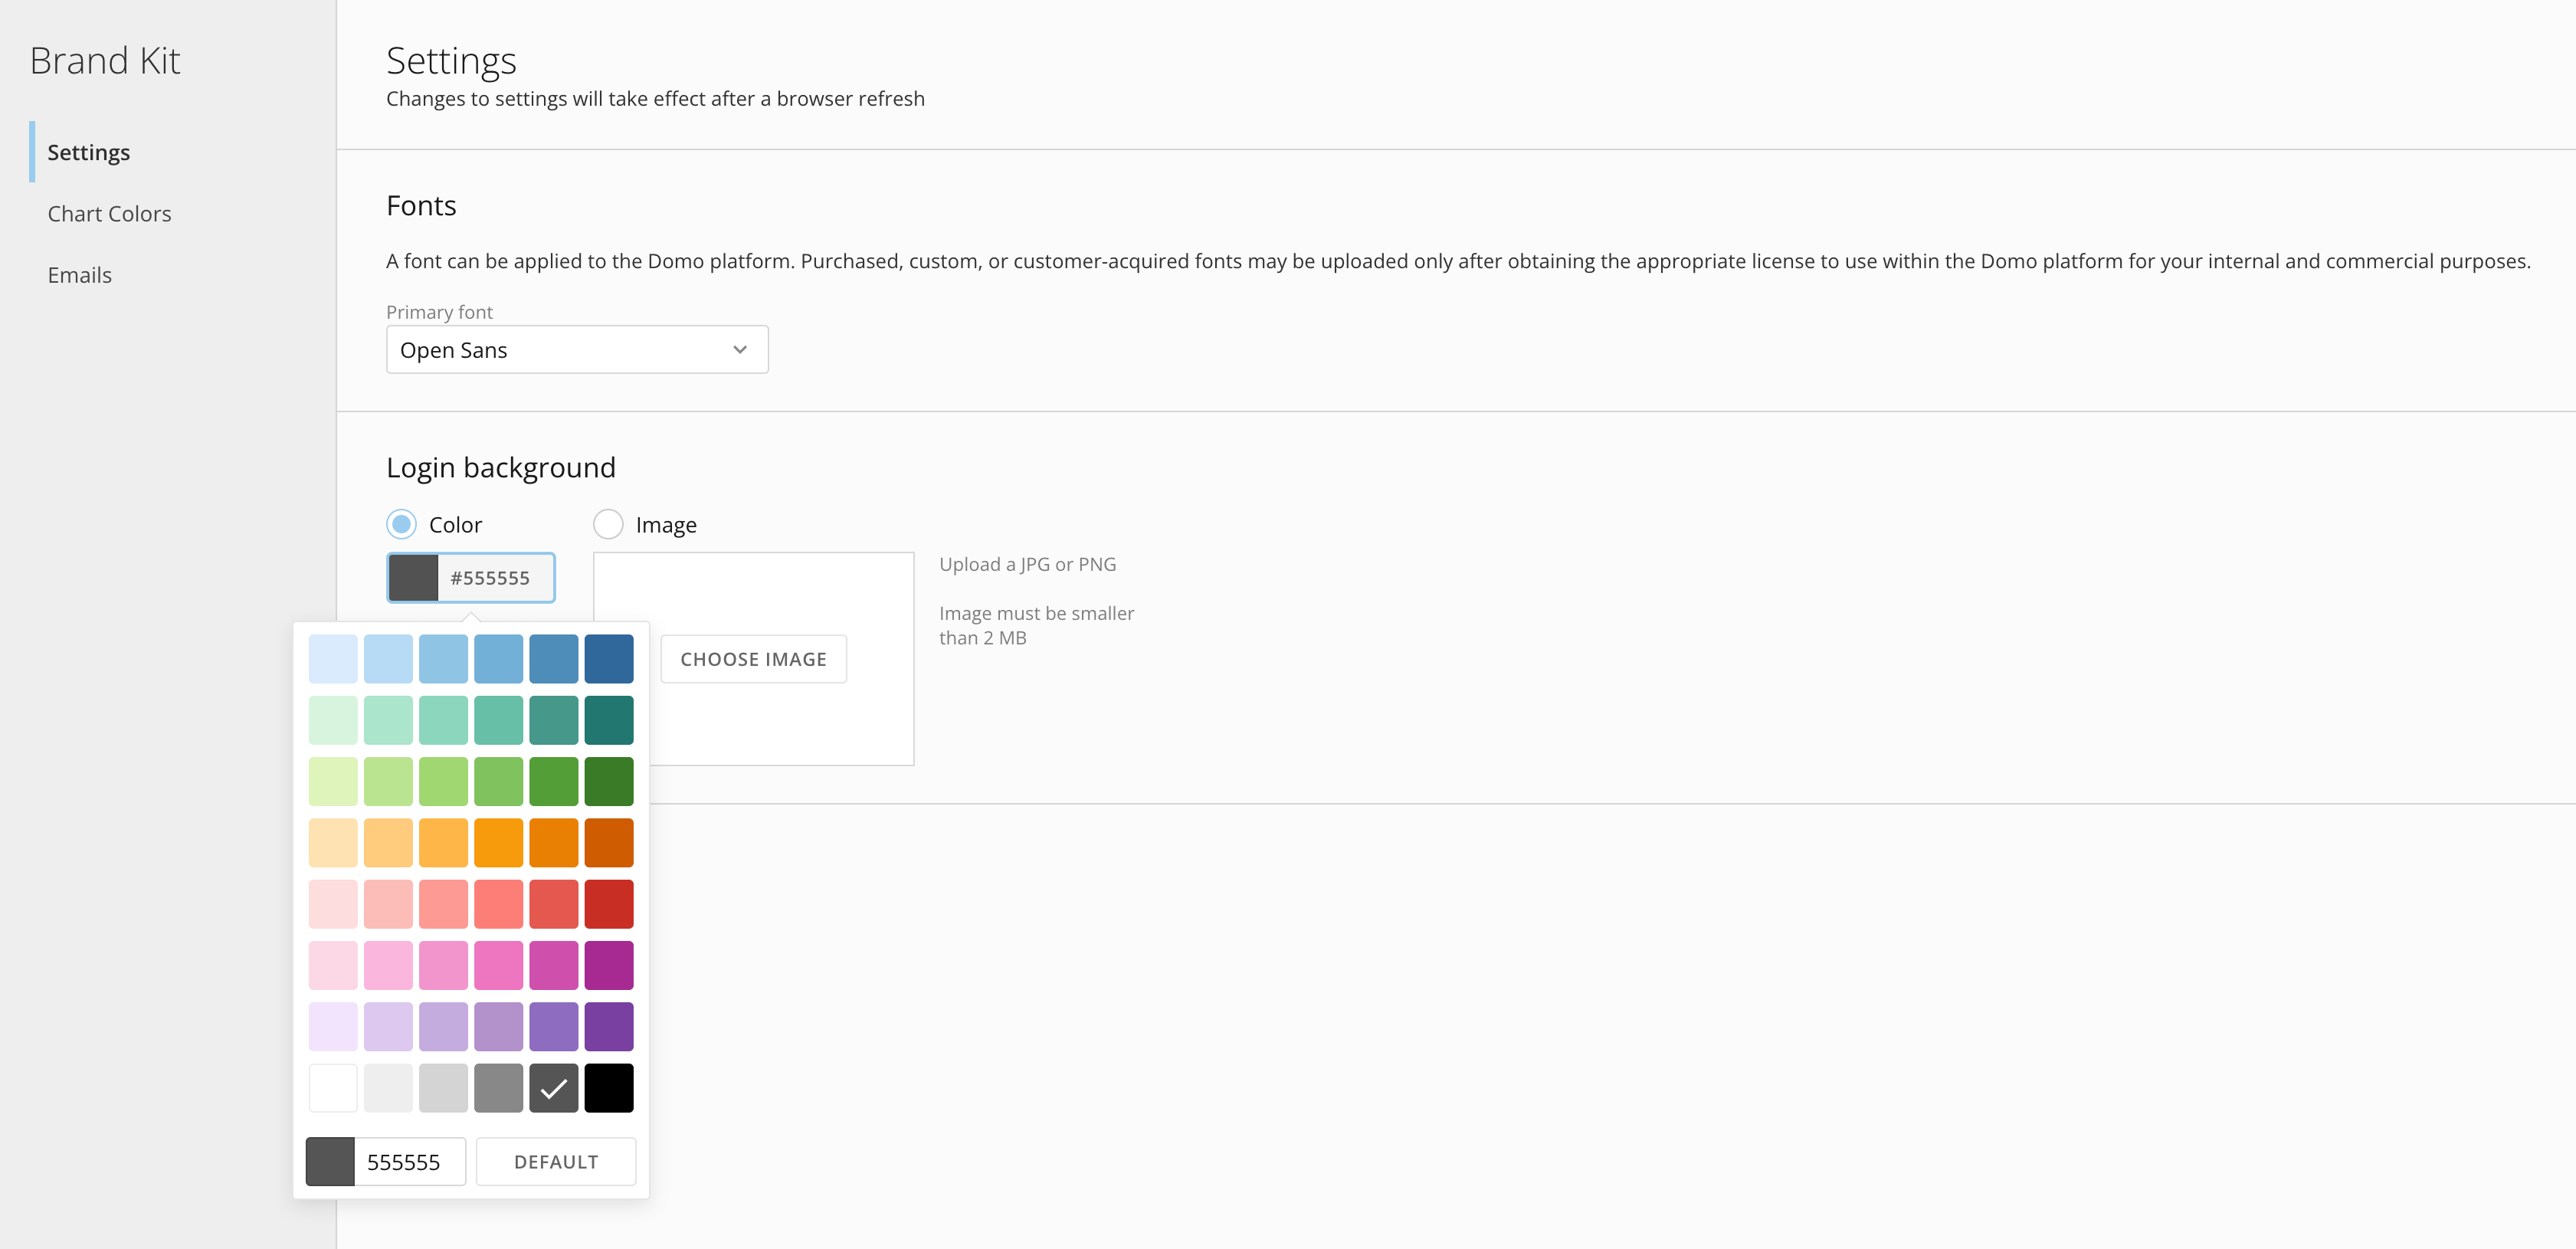
   **Settings** page, select a radio button to set a solid **Color** or **Image** as the login background.

   * If you choose
     **Color**, select the field displaying a HEX color code and choose a preset color or enter your own HEX code.
   <Frame>
     <img alt="Screenshot 2024-03-04 at 3.24.11 PM.png" src="https://mintcdn.com/domoinc-openapi-sync-dataflows/Ii_OEK7nN-EzkrX1/images/kb/ka0Vq0000007KoP-00N5w00000Ri7BU-0EMVq000000SHif.jpg?fit=max&auto=format&n=Ii_OEK7nN-EzkrX1&q=85&s=0eadc7d9764d97bf4238b173cec13db7" style={{width: 854, height: 414}} width="3362" height="1630" data-path="images/kb/ka0Vq0000007KoP-00N5w00000Ri7BU-0EMVq000000SHif.jpg" />
   </Frame>

   * If you choose
     **Image**, select **Choose Image** to browse for an image to upload.
   <Note>
     **Note:**
     The image must be smaller than 2 MB and in either JPG or PNG format.
   </Note>

You have successfully customized the login background.

### Chart Color Palettes

Brand Kit Chart Colors allows you to set custom color palettes to use with your charts, helping to create a default look that is consistent with your branding.

Follow these steps to customize your color palettes:

1. [Access Brand Kit](#access_brand_kit)
   and go to the **Chart Colors** page.
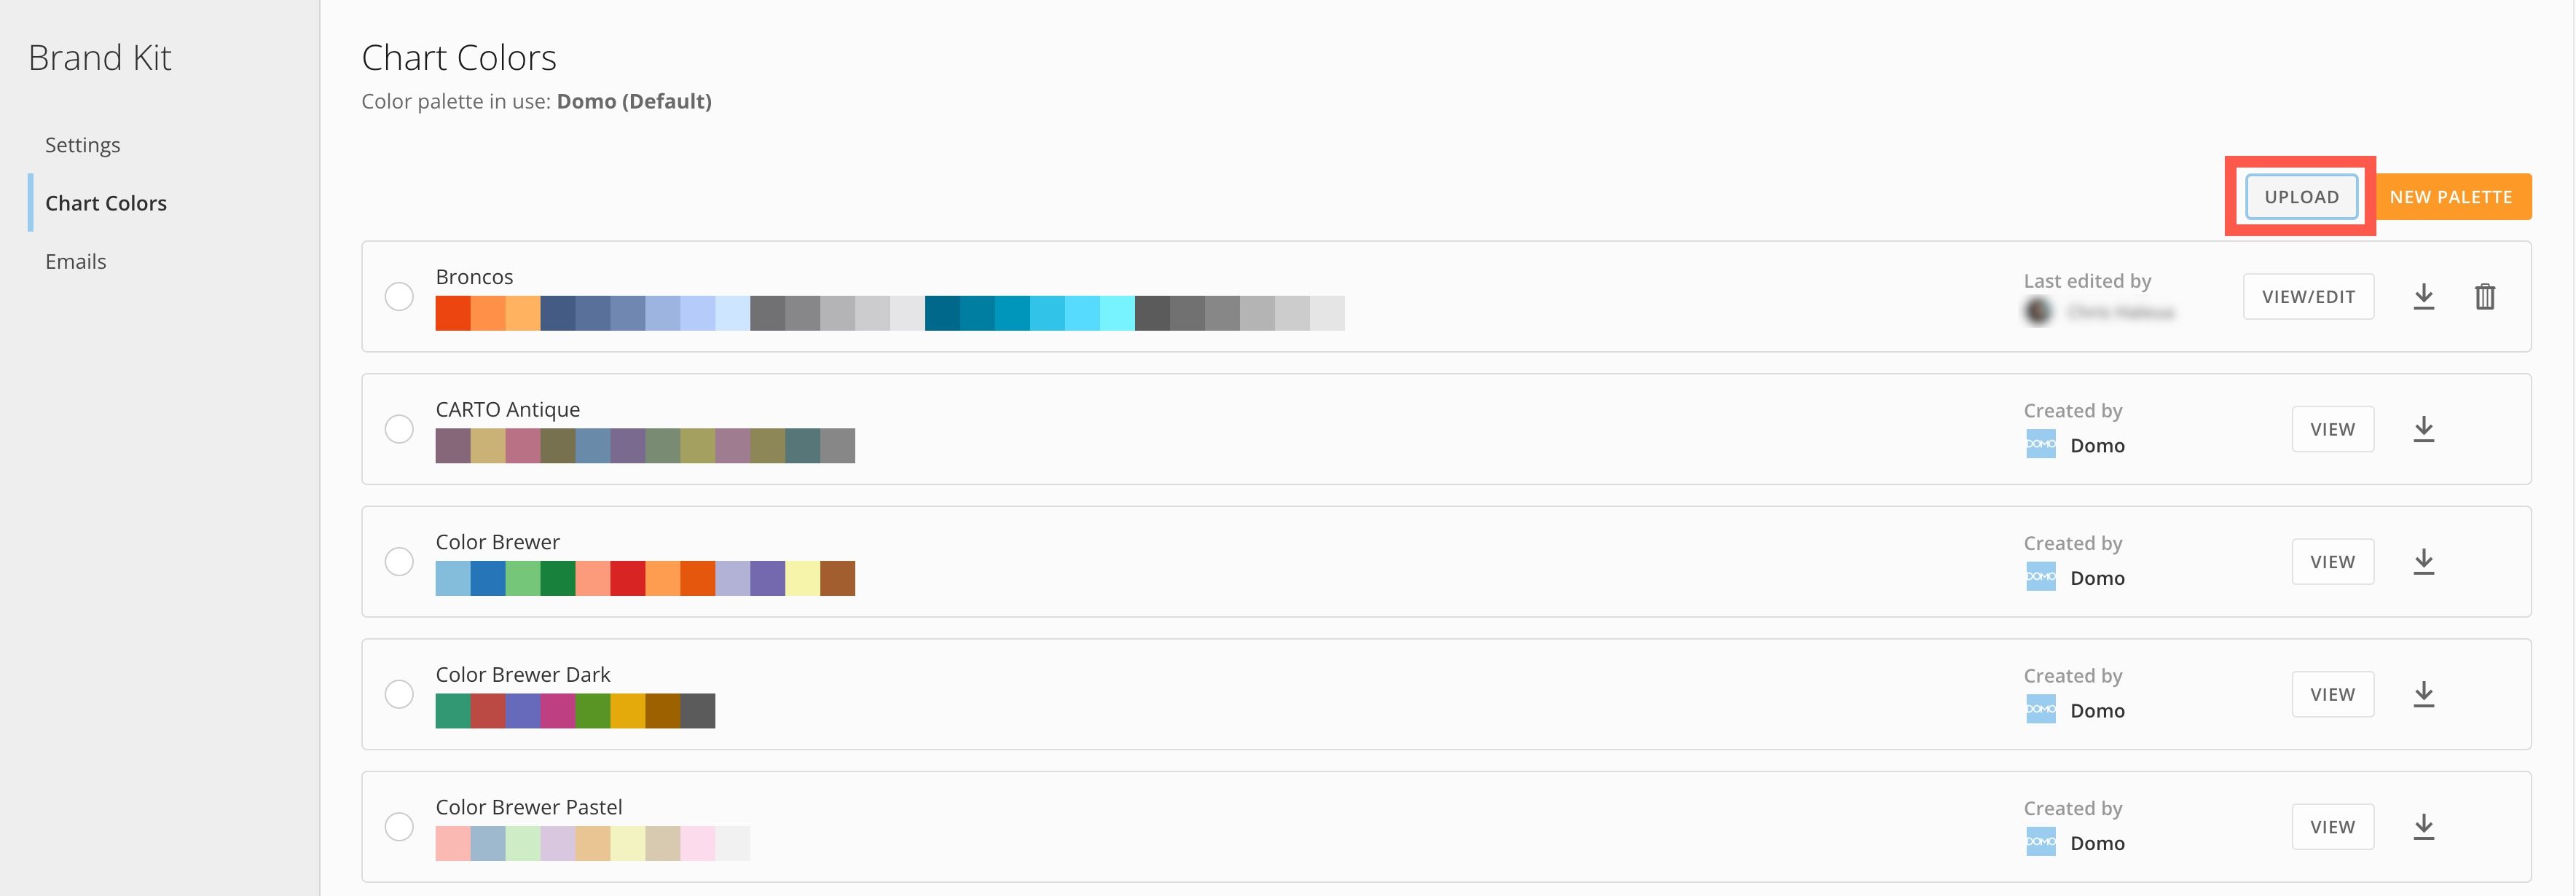
2. (Optional) If you want to upload a color palette, select
   **Upload** to choose one from your machine.

   <Frame>
     <img alt="upload colors.jpg" src="https://mintcdn.com/domoinc-openapi-sync-dataflows/Ii_OEK7nN-EzkrX1/images/kb/ka0Vq0000007KoP-00N5w00000Ri7BU-0EMVq000000SmGD.jpg?fit=max&auto=format&n=Ii_OEK7nN-EzkrX1&q=85&s=f2738ccbc97d6447208130cdd14e525a" style={{width: 797, height: 277}} width="3536" height="1230" data-path="images/kb/ka0Vq0000007KoP-00N5w00000Ri7BU-0EMVq000000SmGD.jpg" />
   </Frame>

# Create New Palette

1. On the
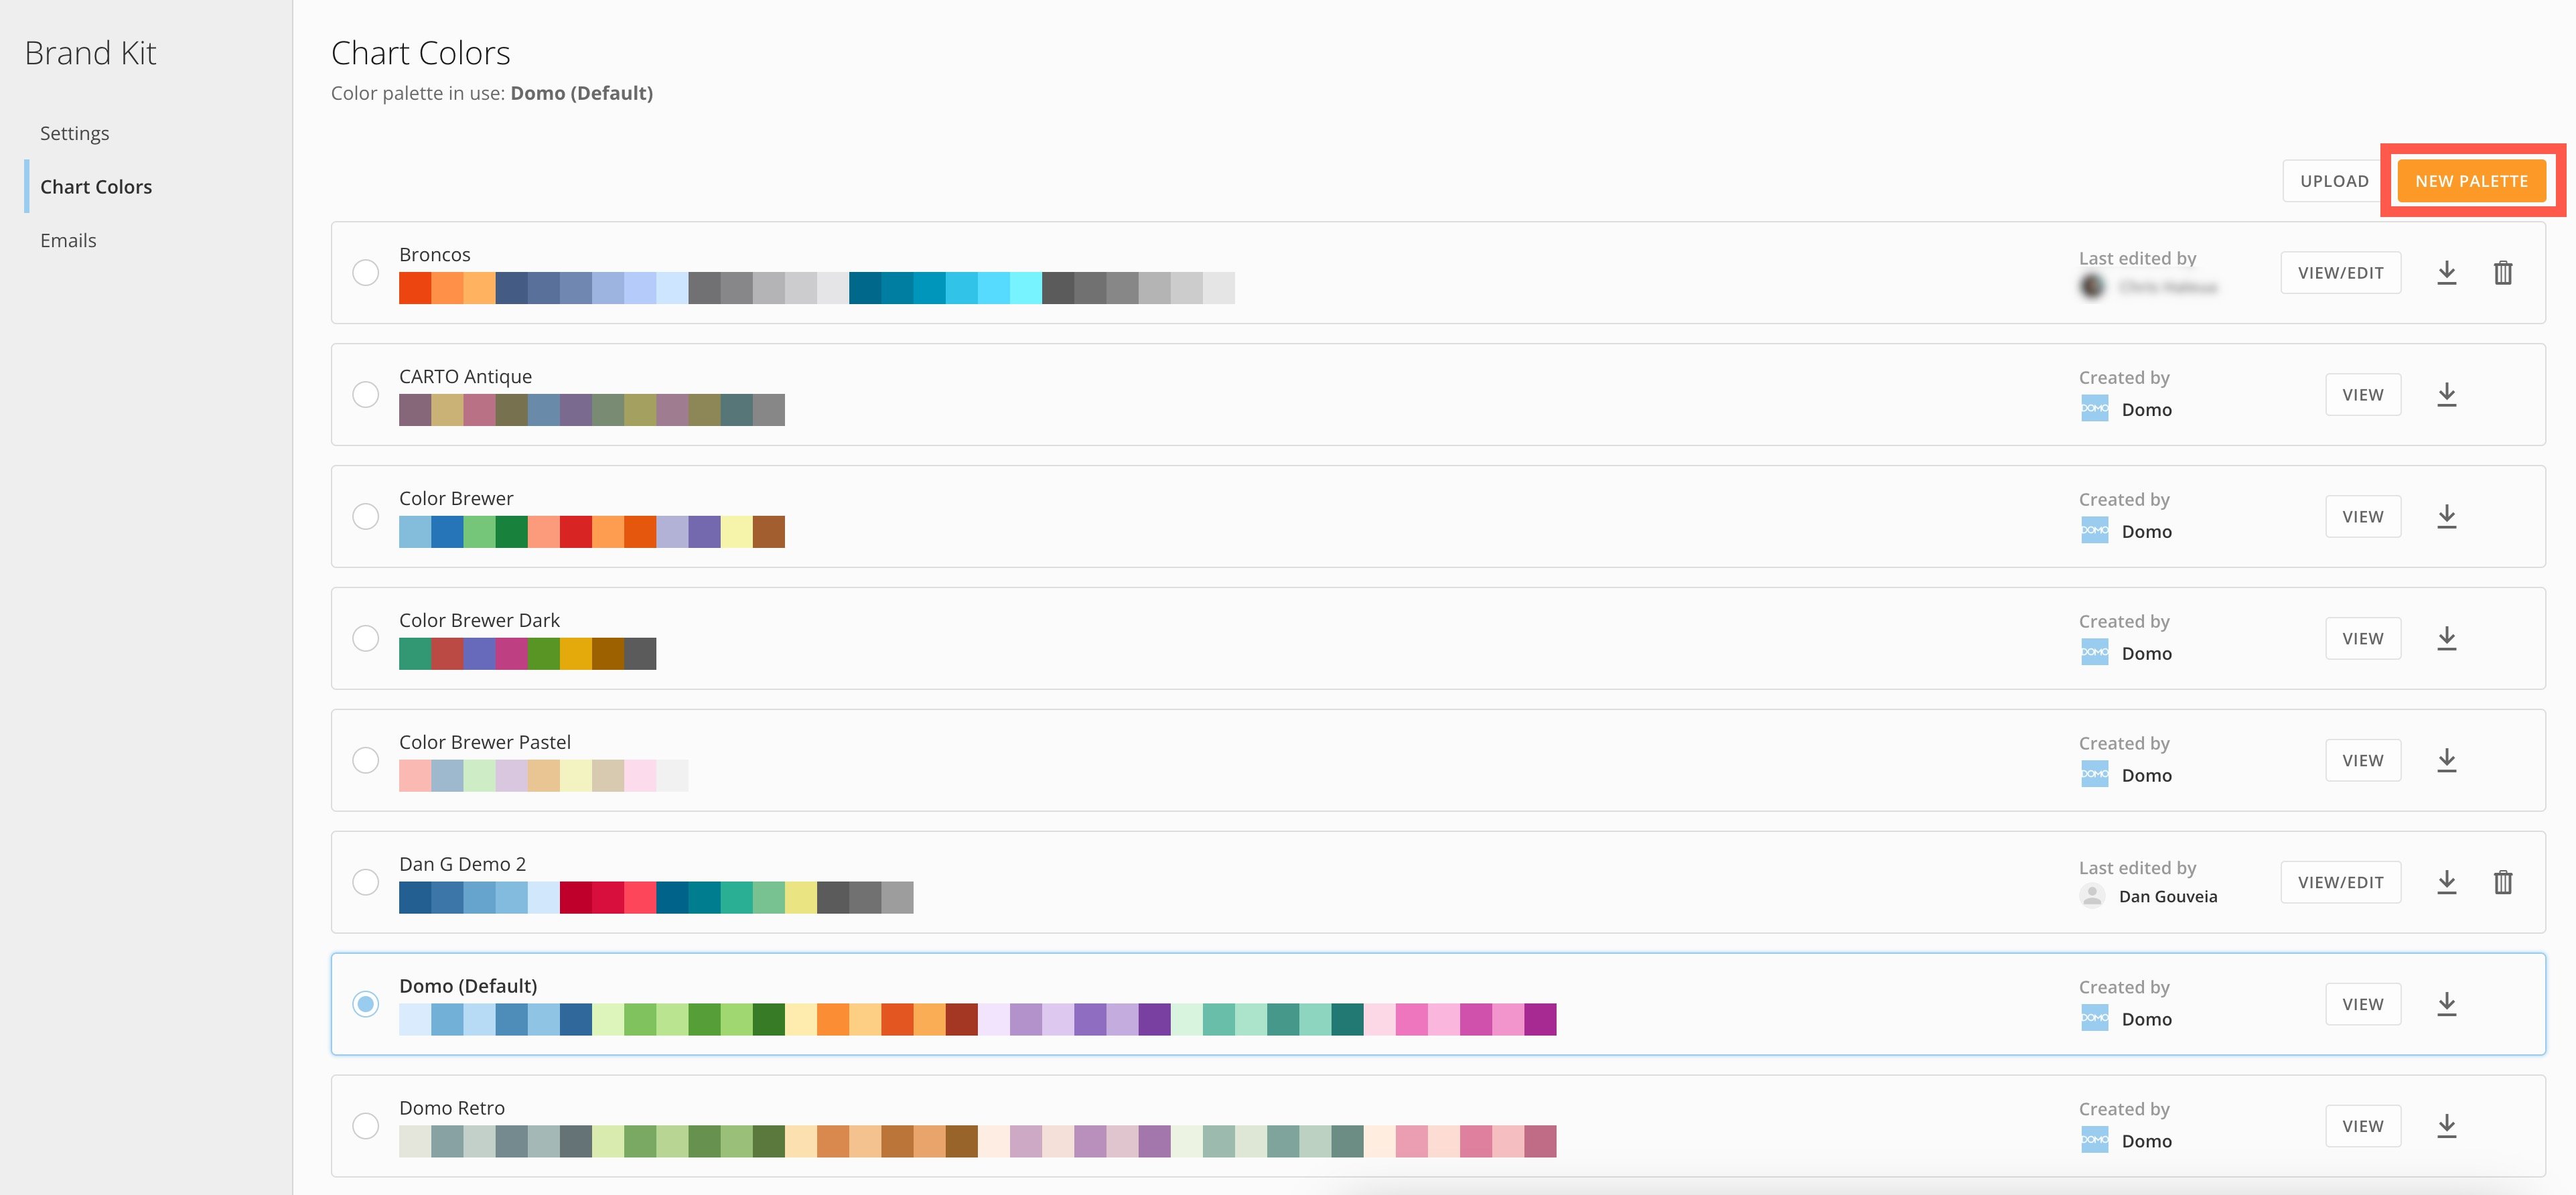
   **Brand Kit** > **Chart Colors** page, select **New Palette**.

   The **Color Creator** displays.
   <Frame>
     <img alt="chart colors brand kit.jpg" src="https://mintcdn.com/domoinc-openapi-sync-dataflows/Ii_OEK7nN-EzkrX1/images/kb/ka0Vq0000007KoP-00N5w00000Ri7BU-0EMVq000000SHp8.jpg?fit=max&auto=format&n=Ii_OEK7nN-EzkrX1&q=85&s=50e6550d4df8d2921a651205eca4cf48" style={{width: 852, height: 395}} width="3846" height="1784" data-path="images/kb/ka0Vq0000007KoP-00N5w00000Ri7BU-0EMVq000000SHp8.jpg" />
   </Frame>

2. In the
   **Color Creator**, follow the steps in the UI. You can preview all selections in Step 5: Review colors.

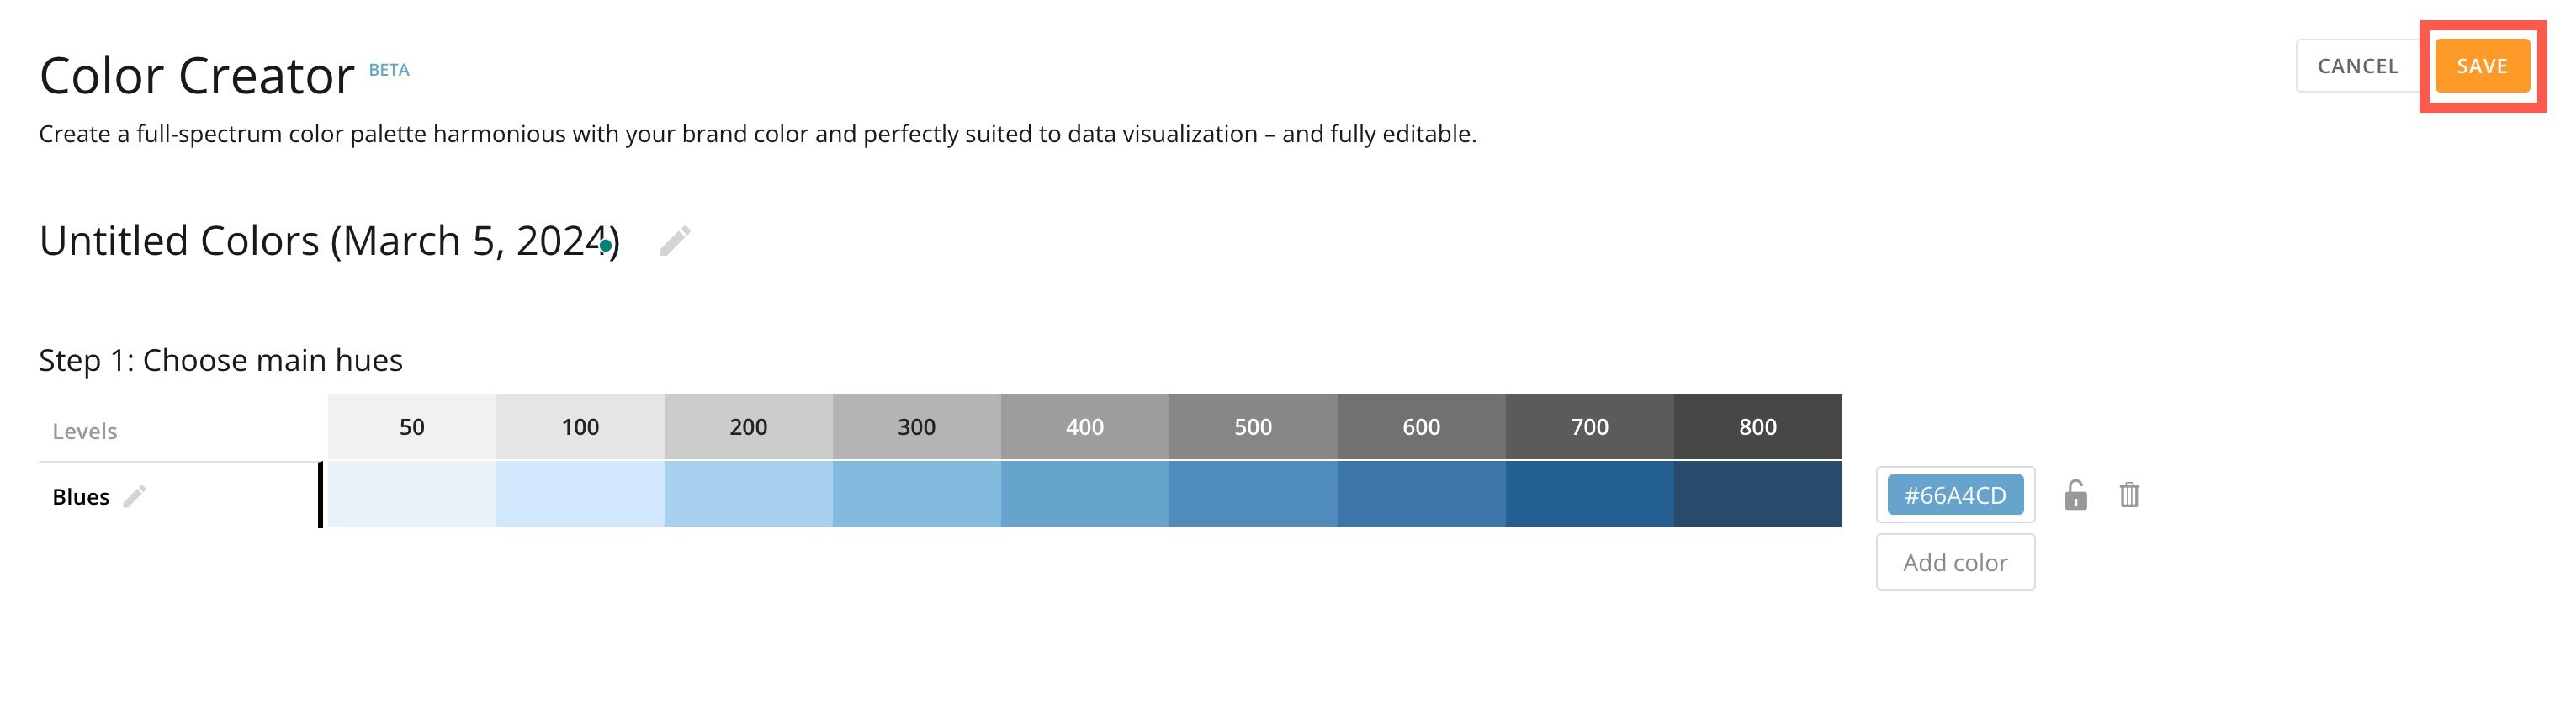
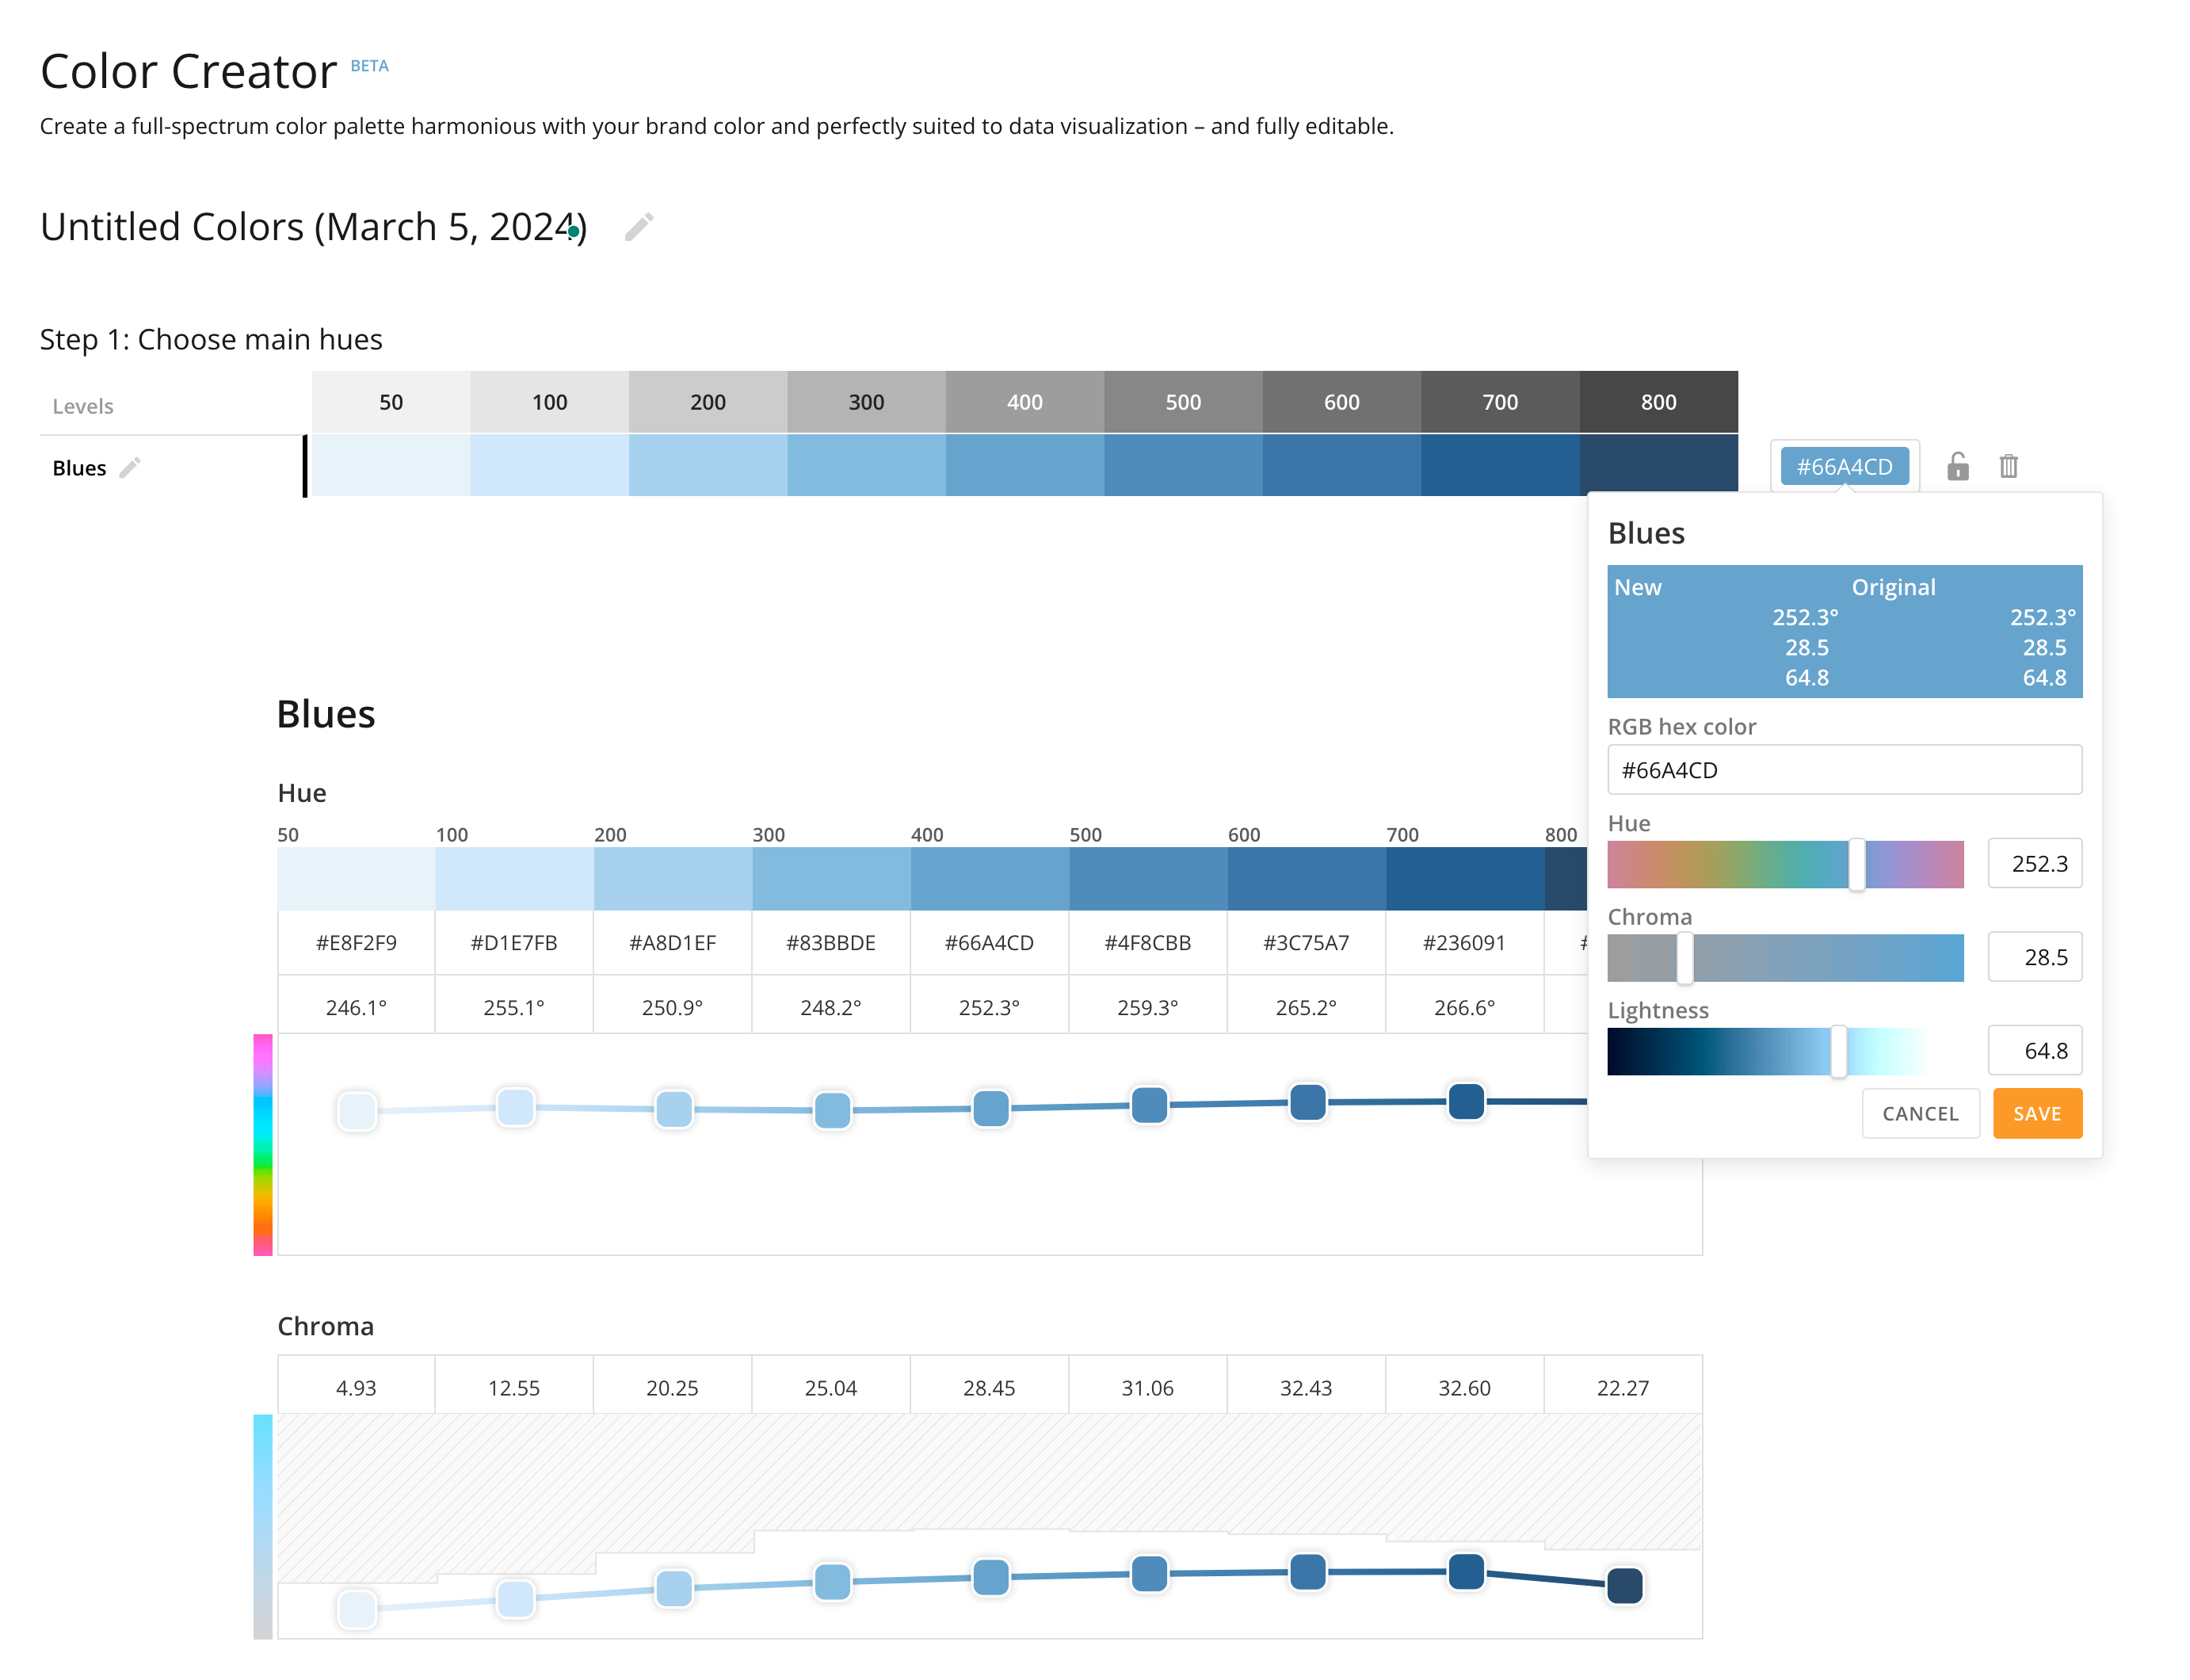
   * Step 1: Choose main hues.

   Select the main hues in your color palette. You can enter an RGB HEX code and adjust the hue, chroma, and lightness. Color Creator automatically gives you a gradient of nine evenly spaced steps from your chosen hue with their HEX codes.
   <Frame>
     <img alt="Screenshot 2024-03-05 at 7.59.41 PM.png" src="https://mintcdn.com/domoinc-openapi-sync-dataflows/Ii_OEK7nN-EzkrX1/images/kb/ka0Vq0000007KoP-00N5w00000Ri7BU-0EMVq000000SmHp.jpg?fit=max&auto=format&n=Ii_OEK7nN-EzkrX1&q=85&s=0028ee80bc2ec541326584dc27532fcd" style={{width: 850, height: 652}} width="2764" height="2120" data-path="images/kb/ka0Vq0000007KoP-00N5w00000Ri7BU-0EMVq000000SmHp.jpg" />
   </Frame>

   The default palette includes blues. You can delete this or any color group by selecting <InlineImage src="/images/kb/ka0Vq0000007KoP-00N5w00000Ri7BU-0EMVq000000SmMf.jpg" /> **Delete**.

   <Frame>
     <img alt="delete colors.jpg" src="https://mintcdn.com/domoinc-openapi-sync-dataflows/Ii_OEK7nN-EzkrX1/images/kb/ka0Vq0000007KoP-00N5w00000Ri7BU-0EMVq000000SmPt.jpg?fit=max&auto=format&n=Ii_OEK7nN-EzkrX1&q=85&s=7a80ee206ad20f53e677ae8ff4407987" style={{width: 802, height: 121}} width="2664" height="402" data-path="images/kb/ka0Vq0000007KoP-00N5w00000Ri7BU-0EMVq000000SmPt.jpg" />
   </Frame>

   You can edit the name of the hue by selecting <InlineImage src="/images/kb/ka0Vq0000007KoP-00N5w00000Ri7BU-0EM5w000005vNkZ.png" /> **Edit.**

   <Frame>
     <img alt="edit hue name.jpg" src="https://mintcdn.com/domoinc-openapi-sync-dataflows/Ii_OEK7nN-EzkrX1/images/kb/ka0Vq0000007KoP-00N5w00000Ri7BU-0EMVq000000SmRV.jpg?fit=max&auto=format&n=Ii_OEK7nN-EzkrX1&q=85&s=bc0fe6e4a50d8de96f6d220e3730422a" style={{width: 802, height: 121}} width="2664" height="402" data-path="images/kb/ka0Vq0000007KoP-00N5w00000Ri7BU-0EMVq000000SmRV.jpg" />
   </Frame>

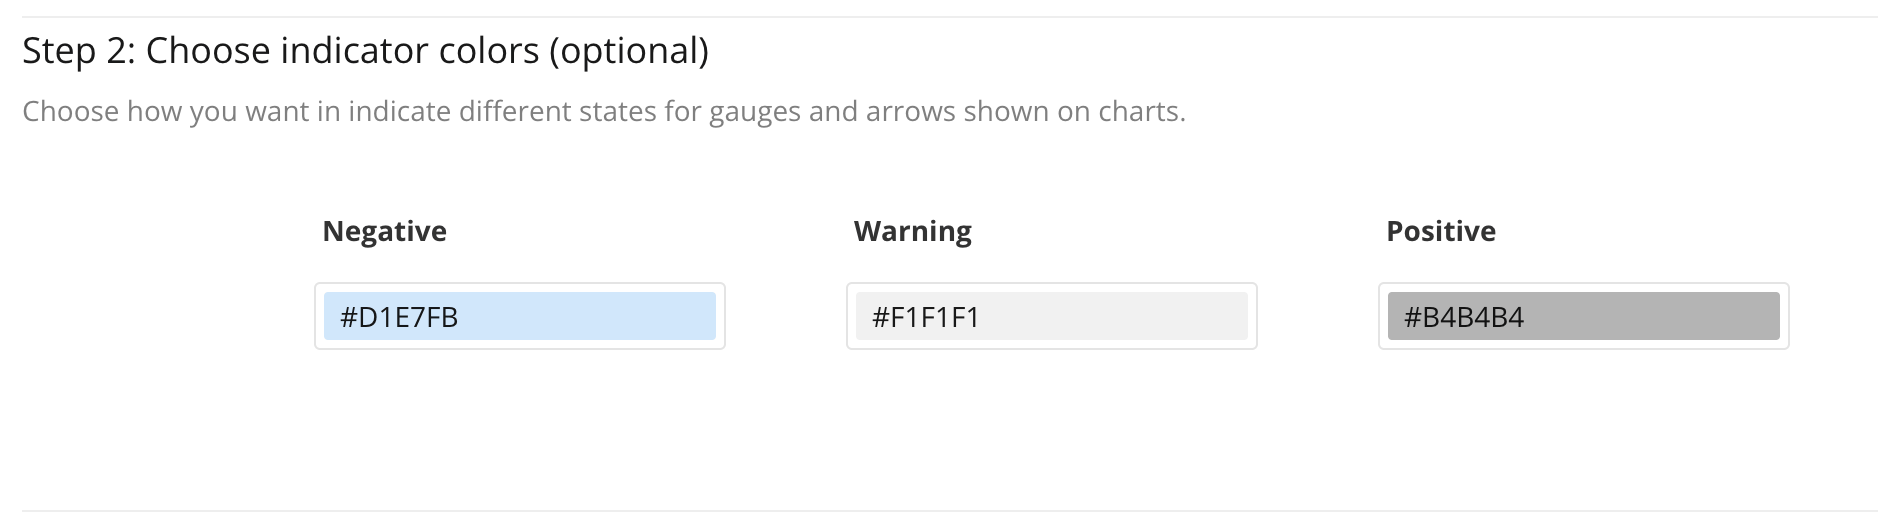
   * (Optional) Step 2: Choose indicator colors

   Choose the Negative, Warning, and Positive color indicators to use in your charts.
   <Frame>
     <img alt="Screenshot 2024-03-05 at 8.07.10 PM.png" src="https://mintcdn.com/domoinc-openapi-sync-dataflows/Ii_OEK7nN-EzkrX1/images/kb/ka0Vq0000007KoP-00N5w00000Ri7BU-0EMVq000000SmWL.jpg?fit=max&auto=format&n=Ii_OEK7nN-EzkrX1&q=85&s=db9f8597606f9ed7bfbb1edbe22d5af5" style={{width: 802, height: 222}} width="1878" height="520" data-path="images/kb/ka0Vq0000007KoP-00N5w00000Ri7BU-0EMVq000000SmWL.jpg" />
   </Frame>

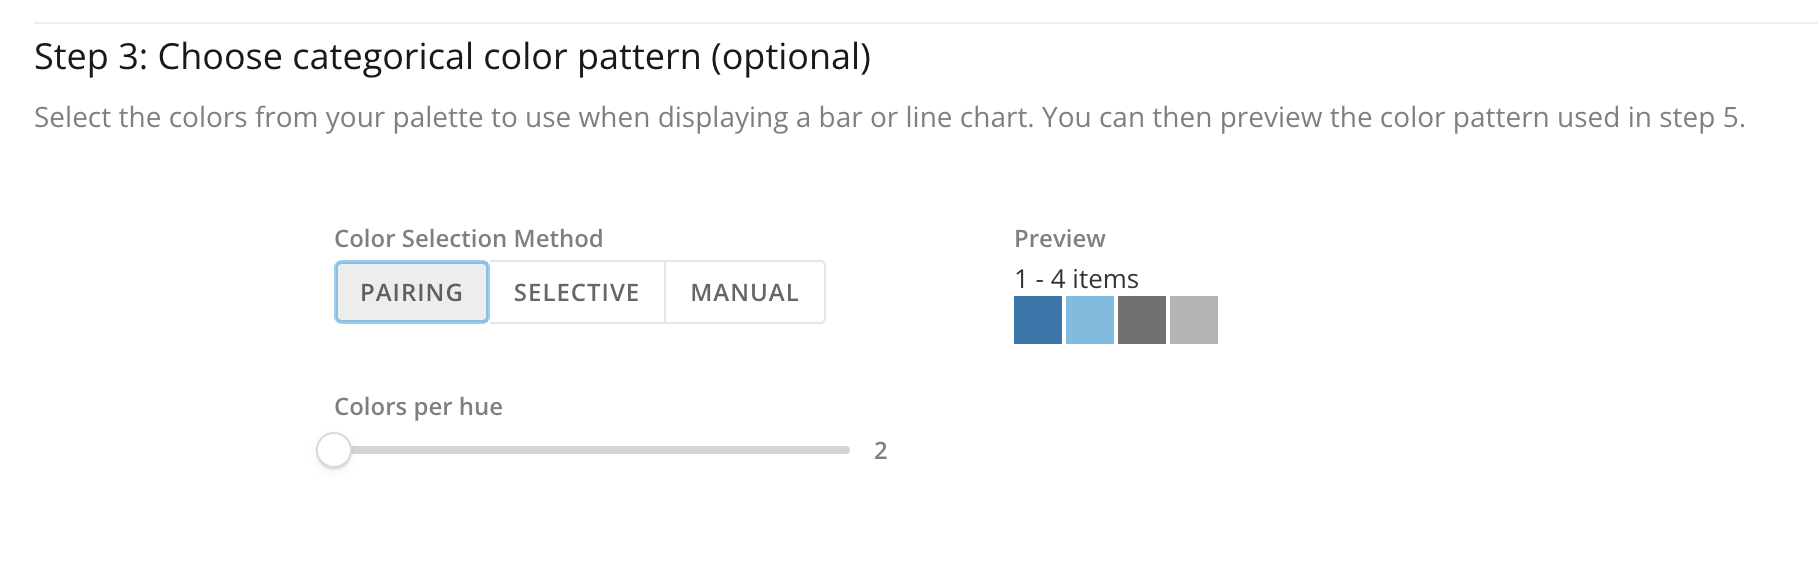
   * (Optional) Step 3: Choose categorical color pattern

   Select the colors from your palette to use for gauges and arrows on charts. There are three selection methods: Pairing, Selective, and Manual.
   <Frame>
     <img alt="Screenshot 2024-03-05 at 8.09.30 PM.png" src="https://mintcdn.com/domoinc-openapi-sync-dataflows/Ii_OEK7nN-EzkrX1/images/kb/ka0Vq0000007KoP-00N5w00000Ri7BU-0EMVq000000SmbB.jpg?fit=max&auto=format&n=Ii_OEK7nN-EzkrX1&q=85&s=ce55ffee7b001855c0df451c55edf8e6" style={{width: 801, height: 259}} width="1818" height="588" data-path="images/kb/ka0Vq0000007KoP-00N5w00000Ri7BU-0EMVq000000SmbB.jpg" />
   </Frame>

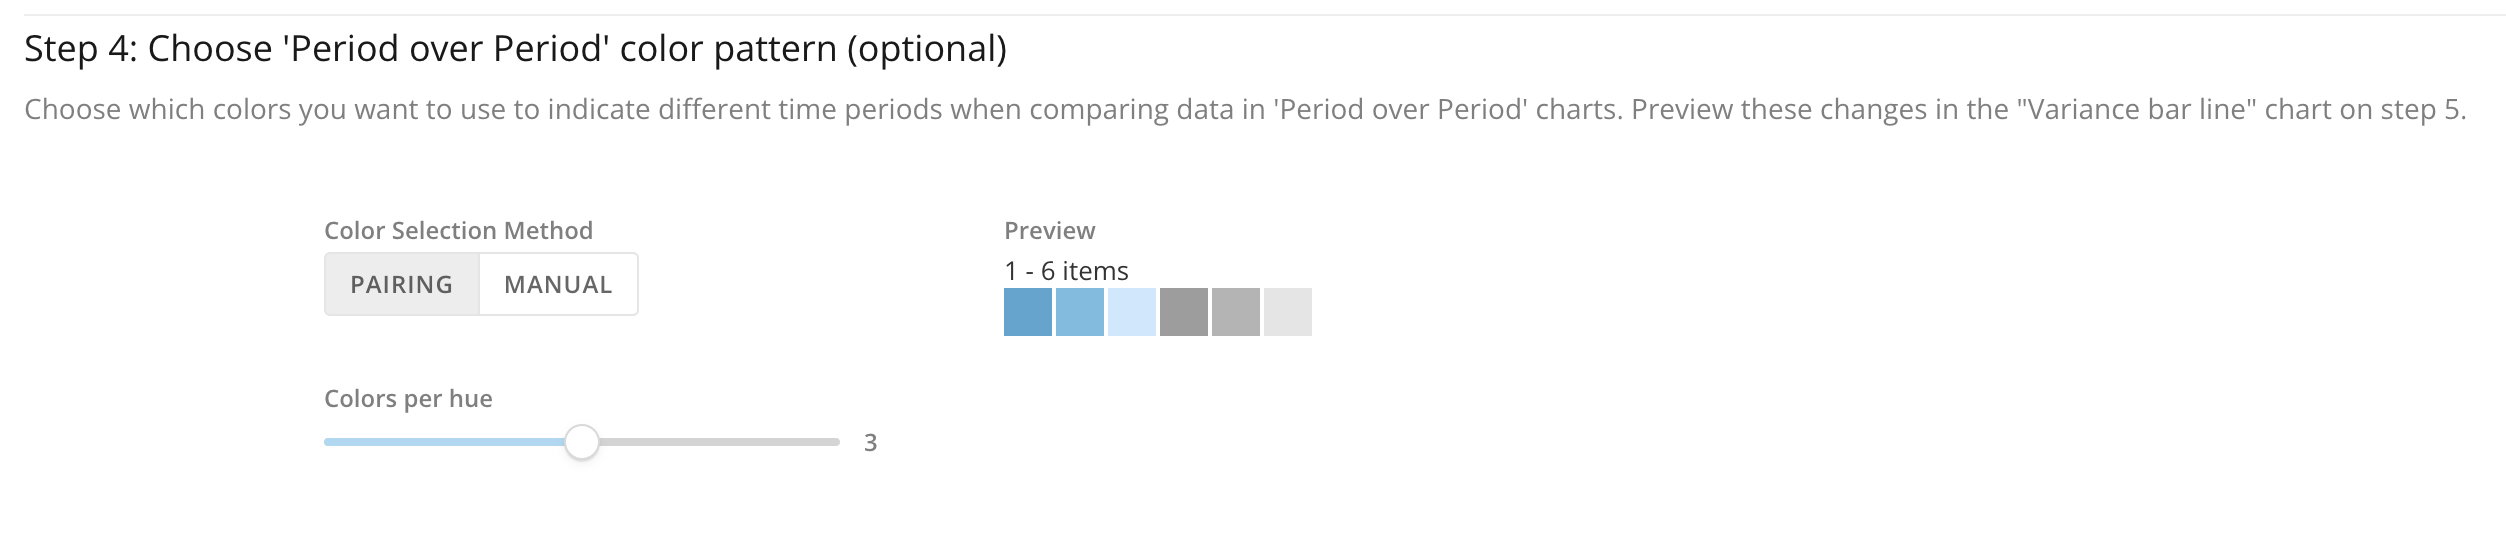
   * (Optional) Step 4: Choose 'Period over Period' color pattern

   Choose which of your colors to use for indicating different time periods. There are two selection methods: Pairing and Manual.
   <Frame>
     <img alt="Screenshot 2024-03-05 at 8.11.00 PM.png" src="https://mintcdn.com/domoinc-openapi-sync-dataflows/Ii_OEK7nN-EzkrX1/images/kb/ka0Vq0000007KoP-00N5w00000Ri7BU-0EMVq000000Smcn.jpg?fit=max&auto=format&n=Ii_OEK7nN-EzkrX1&q=85&s=a9504cc7d776aba98cf7b810ba829aa1" style={{width: 851, height: 184}} width="2506" height="542" data-path="images/kb/ka0Vq0000007KoP-00N5w00000Ri7BU-0EMVq000000Smcn.jpg" />
   </Frame>

   * Step 5: Review colors

   Preview the palette and confirm accessibility by dragging the slider to simulate multiple series.

   <Frame>
     <img alt="Screenshot 2024-03-05 at 8.12.26 PM.png" src="https://mintcdn.com/domoinc-openapi-sync-dataflows/Ii_OEK7nN-EzkrX1/images/kb/ka0Vq0000007KoP-00N5w00000Ri7BU-0EMVq000000Smsv.jpg?fit=max&auto=format&n=Ii_OEK7nN-EzkrX1&q=85&s=b1f69d13f69987158bc6deffd229706e" style={{width: 849, height: 214}} width="3514" height="886" data-path="images/kb/ka0Vq0000007KoP-00N5w00000Ri7BU-0EMVq000000Smsv.jpg" />
   </Frame>

   <Note>
     **Note:**
     The colors in the charts in step 5 are pulled from the preview in step 3, moving from left to right, as you can see in the above screenshots.
   </Note>

3. When you finish creating your palette, select
   **Save**.

   <Frame>
     <img alt="save color palette.jpg" src="https://mintcdn.com/domoinc-openapi-sync-dataflows/Ii_OEK7nN-EzkrX1/images/kb/ka0Vq0000007KoP-00N5w00000Ri7BU-0EMVq000000SmuX.jpg?fit=max&auto=format&n=Ii_OEK7nN-EzkrX1&q=85&s=08b49f3f27dbc12a0b8d87b86659692f" style={{width: 850, height: 236}} width="3062" height="850" data-path="images/kb/ka0Vq0000007KoP-00N5w00000Ri7BU-0EMVq000000SmuX.jpg" />
   </Frame>

4. Return to
   **Chart Colors** in the left navigation.

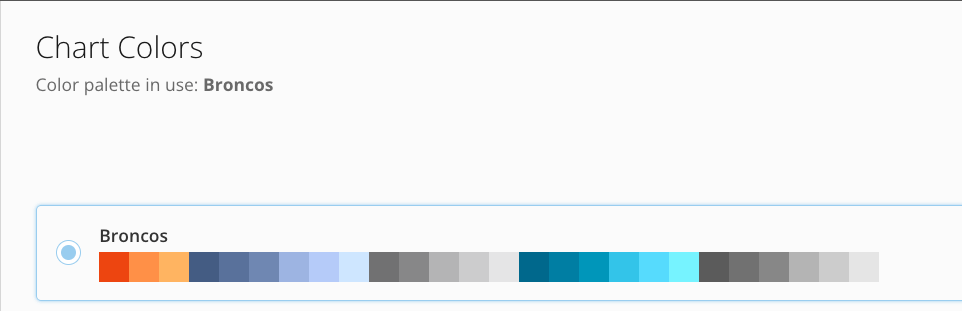
5. Locate and activate your new color palette by selecting its radio button in the Chart Colors list.
<Note>
  **Note:**
  Activating the color palette applies it to all charts in the instance, but color rules at the card level still take precedence.
</Note>

<Frame>
  <img alt="Screen_Shot_2022-08-04_at_1.32.04_PM.png" src="https://mintcdn.com/domoinc-openapi-sync-dataflows/Ii_OEK7nN-EzkrX1/images/kb/ka0Vq0000007KoP-00N5w00000Ri7BU-0EM5w000005vNkb.png?fit=max&auto=format&n=Ii_OEK7nN-EzkrX1&q=85&s=5ad9c9f556ce0024673036d568ef8564" style={{width: 852.99, height: 275.994}} width="962" height="311" data-path="images/kb/ka0Vq0000007KoP-00N5w00000Ri7BU-0EM5w000005vNkb.png" />
</Frame>

### Customize Emails

With Brand Kit, you can send Domo-generated emails to your users through [your own SMTP server](#SMTP_integration), which allows you to choose the "From" address for the email. You can also [customize the header and footer](#header_and_footer) for these emails and preserve your organization's branding. Learn more in the following sections.

# SMTP Integration

This enhancement allows you to send Domo-generated emails through your SMTP server and modify the "From" address. This means that instead of the message coming from Domo ([notifications@domo.com](mailto:notifications@domo.com) ), the message displays to your users as coming from your organization. (For example: notifications@ *yourorganization*.com.)

This is an all-or-nothing feature, meaning either all Domo-generated emails are sent through your SMTP server or none are. If you want to [modify the email header and footer](#header_and_footer), you must send those emails through your SMTP server.

Domo supports the following SMTP servers:

* Gmail
* Mailgun
* Microsoft 365 (Outlook)
* SendGrid
<Note>
  **Note:**
  If your email server requires placing IP address on an allowlist, please see our instructions for
  [how to add these IP addresses to the allowlist](/s/article/360043439173)
  .
</Note>

To get access to this feature, contact your Domo account team.

#### Set Up SMTP Integration

1. Access Brand Kit and go to the
   **Emails** page.

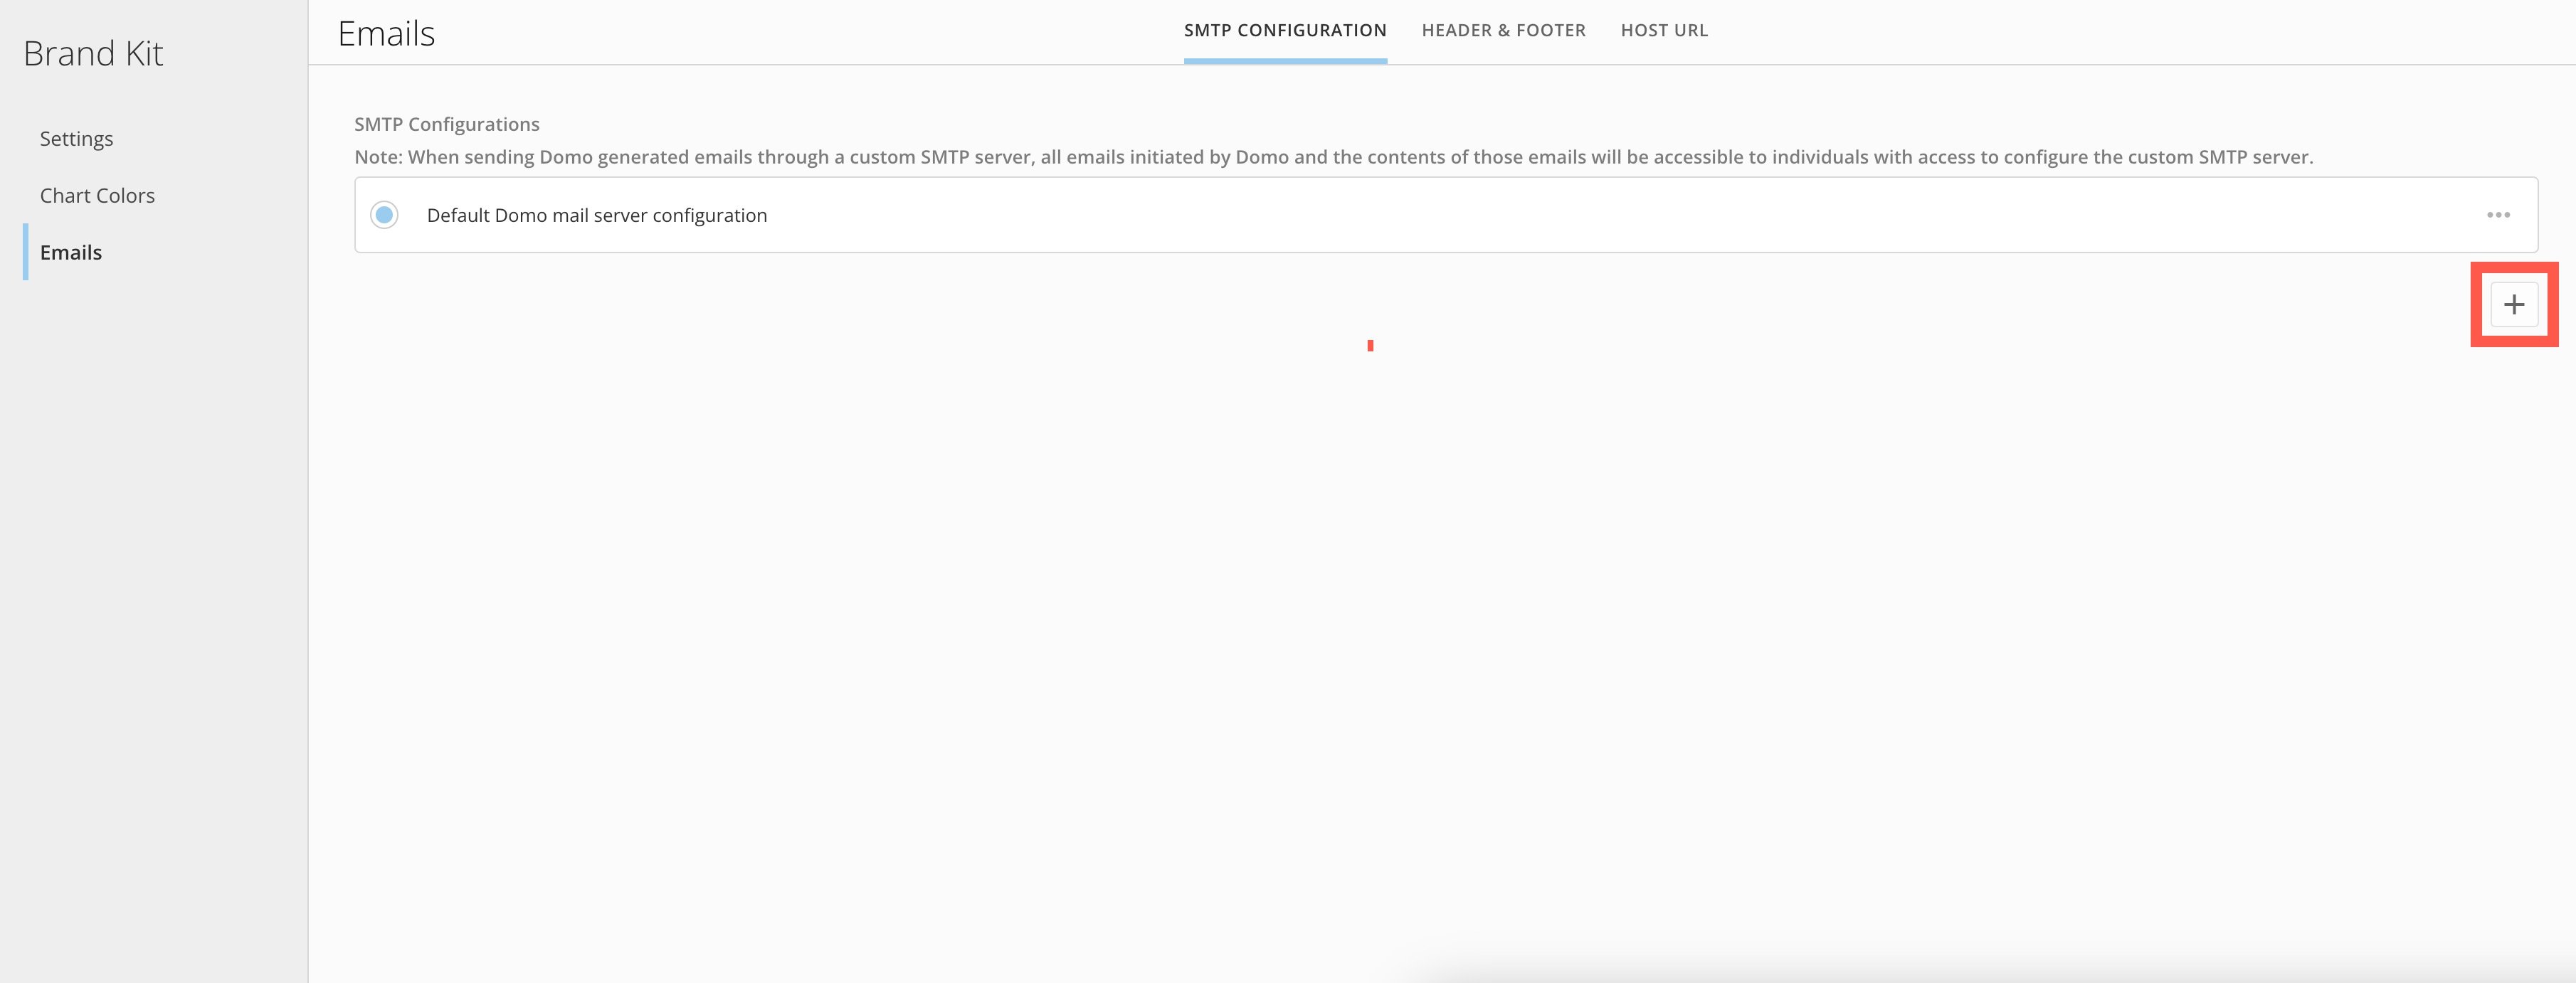
2. In the
   **SMTP Configuration** tab, select <InlineImage src="/images/kb/ka0Vq0000007KoP-00N5w00000Ri7BU-0EM5w000006v1fs.jpg" /> **Add**.

   <Frame>
     <img alt="add config.jpg" src="https://mintcdn.com/domoinc-openapi-sync-dataflows/Ii_OEK7nN-EzkrX1/images/kb/ka0Vq0000007KoP-00N5w00000Ri7BU-0EMVq000000SJ1J.jpg?fit=max&auto=format&n=Ii_OEK7nN-EzkrX1&q=85&s=3effede3ee5729248a1eb2248ef1870e" style={{width: 751, height: 287}} width="3620" height="1382" data-path="images/kb/ka0Vq0000007KoP-00N5w00000Ri7BU-0EMVq000000SJ1J.jpg" />
   </Frame>

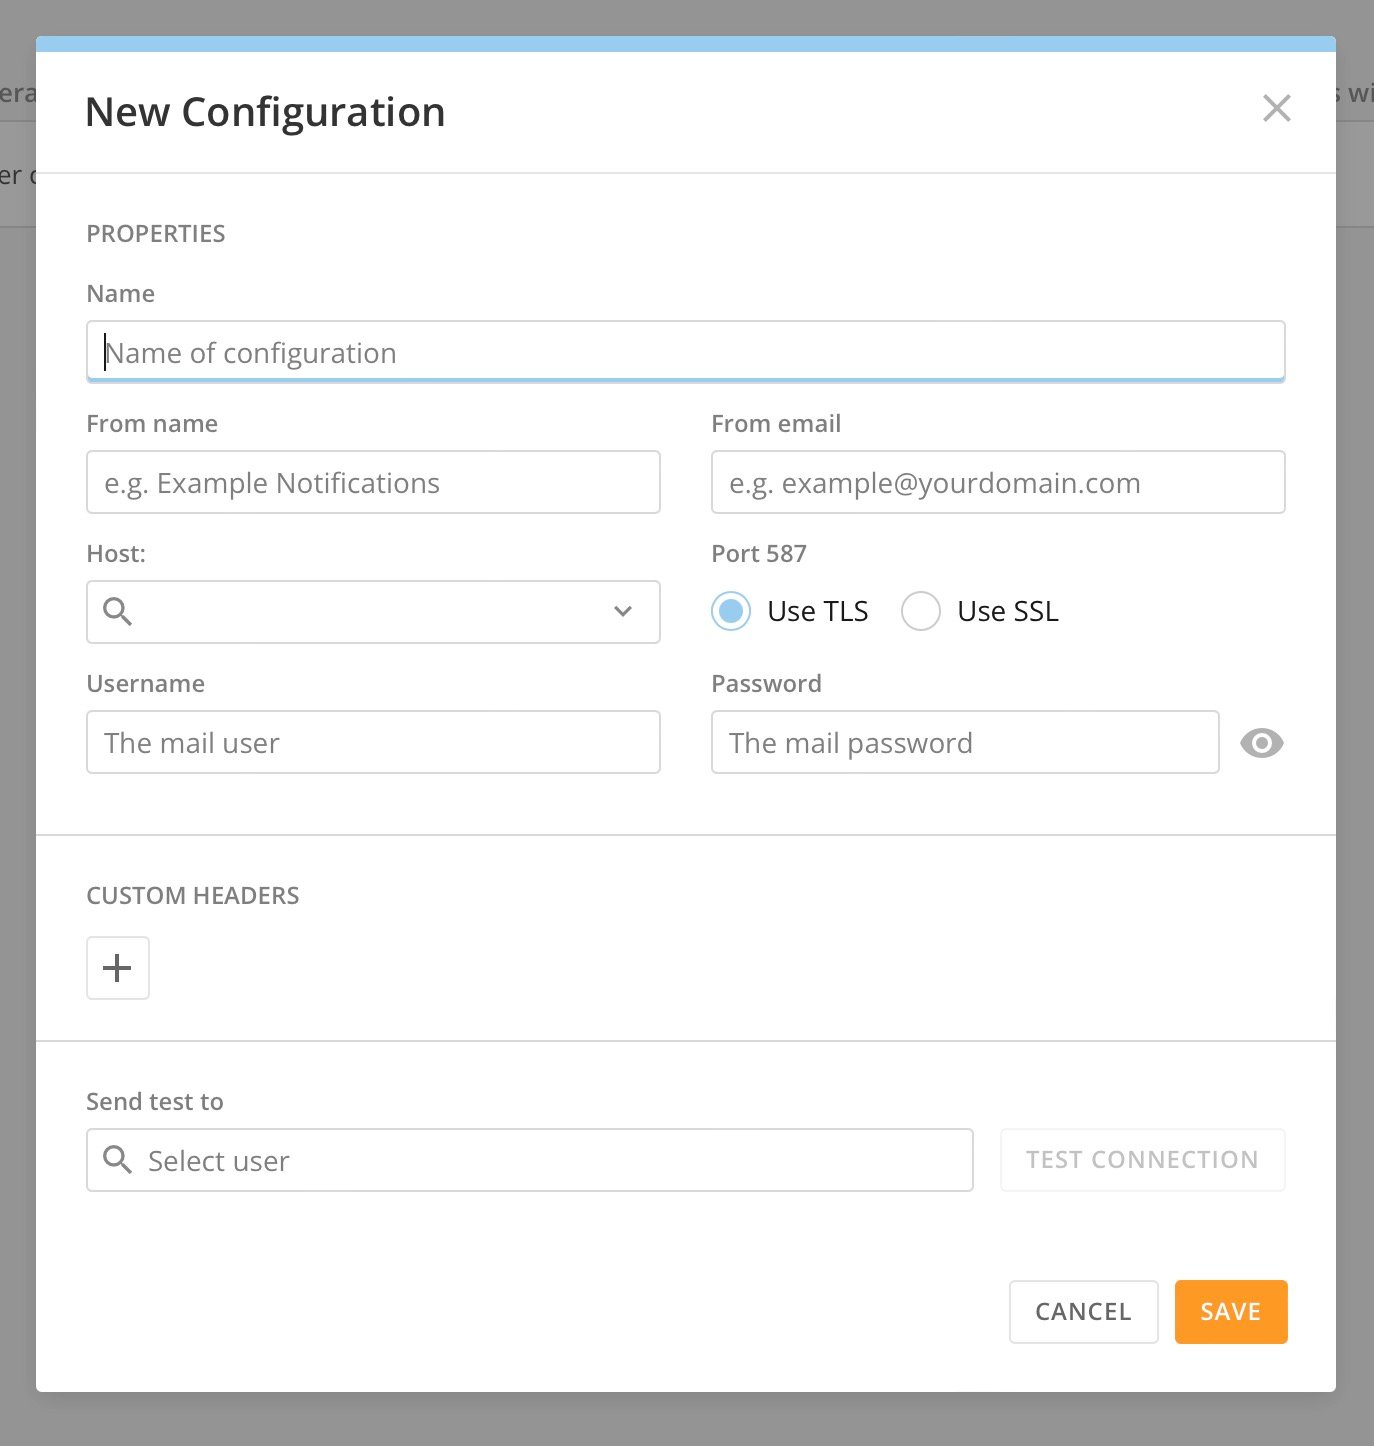
   The **New Configuration** modal displays.
   <Frame>
     <img alt="new configuration model.jpg" src="https://mintcdn.com/domoinc-openapi-sync-dataflows/Ii_OEK7nN-EzkrX1/images/kb/ka0Vq0000007KoP-00N5w00000Ri7BU-0EM5w000006uyZr.jpg?fit=max&auto=format&n=Ii_OEK7nN-EzkrX1&q=85&s=7b945282b2678ba0b132c6f3548a38a7" style={{width: 506.982, height: 533.999}} width="1374" height="1446" data-path="images/kb/ka0Vq0000007KoP-00N5w00000Ri7BU-0EM5w000006uyZr.jpg" />
   </Frame>

3. Provide the following information:

   <table border="1"><tbody><tr><td colspan="1" rowspan="1"><b> Name </b></td><td colspan="1" rowspan="1"> The name for this specific configuration. It is not visible to email recipients. </td></tr><tr><td colspan="1" rowspan="1"><b> From name </b></td><td colspan="1" rowspan="1"> The name that recipients see in the "From" address in the email client. </td></tr><tr><td colspan="1" rowspan="1"><b> From email </b></td><td colspan="1" rowspan="1"> The email that recipients see in the "From" address in the email client. </td></tr><tr><td colspan="1" rowspan="1"><b> Host </b></td><td colspan="1" rowspan="1"> The email server you wish to use. </td></tr><tr><td colspan="1" rowspan="1"><b> Port 587 </b></td><td colspan="1" rowspan="1"> TSL or SSL (based on the SMTP server you are using). </td></tr><tr><td colspan="1" rowspan="1"><b> Username </b></td><td colspan="1" rowspan="1"> The username credential for the email server you want to use. </td></tr><tr><td colspan="1" rowspan="1"><b> Password </b></td><td colspan="1" rowspan="1"> The password associated with the username credential for the email server you want to use. </td></tr><tr><td colspan="1" rowspan="1"><b> (Optional) Customer Headers </b></td><td colspan="1" rowspan="1"> Custom headers to track emails through your email server. </td></tr></tbody></table>

4. (Optional) Locate a user in the
   **Send test to** list and select **Test Connection**. This sends a test email to any Domo user in your instance so that you can see how the "From" address is modified in Domo-generated emails.

5. Select
   **Save** to keep your changes to the configuration.

6. After the connection has been verified, return to the
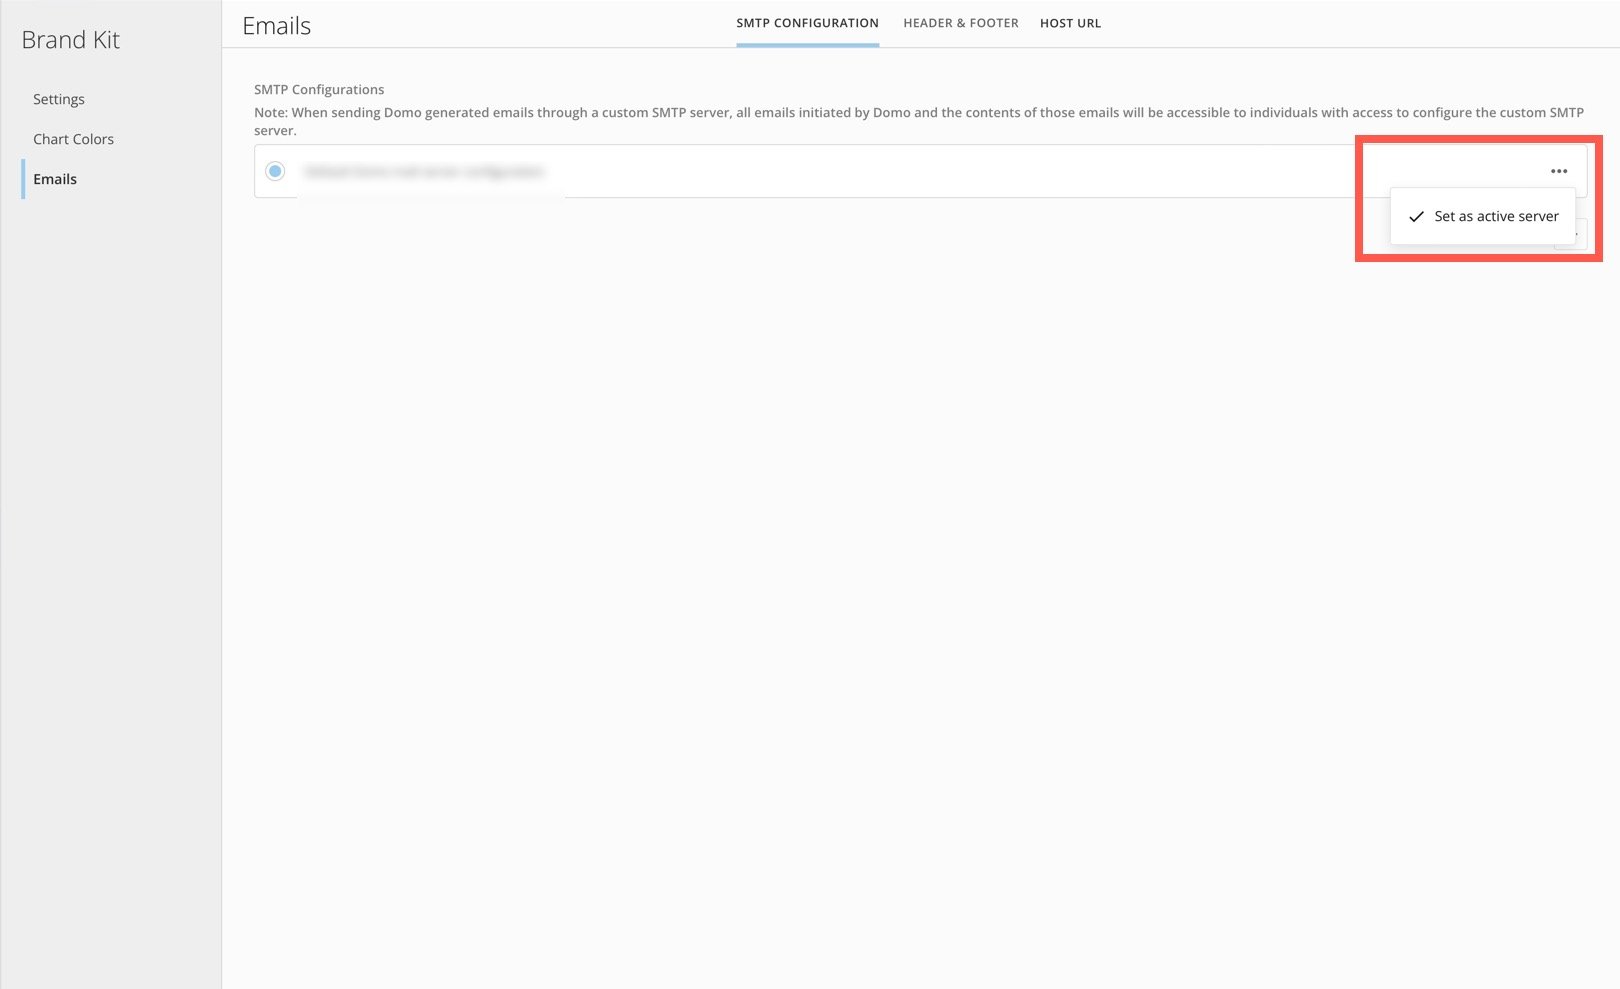
   **SMTP Configuration** tab and locate the row for the new configuration. In that row, select <InlineImage src="/images/kb/ka0Vq0000007KoP-00N5w00000Ri7BU-0EM5w000006v1gC.jpg" /> **More** > **Set as active server**.

   <Frame>
     <img alt="smtp configuration tab.jpeg" src="https://mintcdn.com/domoinc-openapi-sync-dataflows/Ii_OEK7nN-EzkrX1/images/kb/ka0Vq0000007KoP-00N5w00000Ri7BU-0EMVq000000SmBN.jpg?fit=max&auto=format&n=Ii_OEK7nN-EzkrX1&q=85&s=44066d787c96de3bf0ac305c8886813f" style={{width: 751, height: 459}} width="1620" height="989" data-path="images/kb/ka0Vq0000007KoP-00N5w00000Ri7BU-0EMVq000000SmBN.jpg" />
   </Frame>

# Header and Footer

Using HTML, you can modify the standard header and footer on every Domo-generated email to reflect your organization's branding.

To get access to this feature, contact your CSM.

Follow these steps to customize your emails:

1. In the navigation header, go to
   **More** > **Admin**.

   The Admin Settings display.

2. In the
   **Brand Kit** menu, select **Emails.**

3. Go to the
   **Header & Footer** tab.

4. Toggle the switch labeled
   **Use custom email templates**.

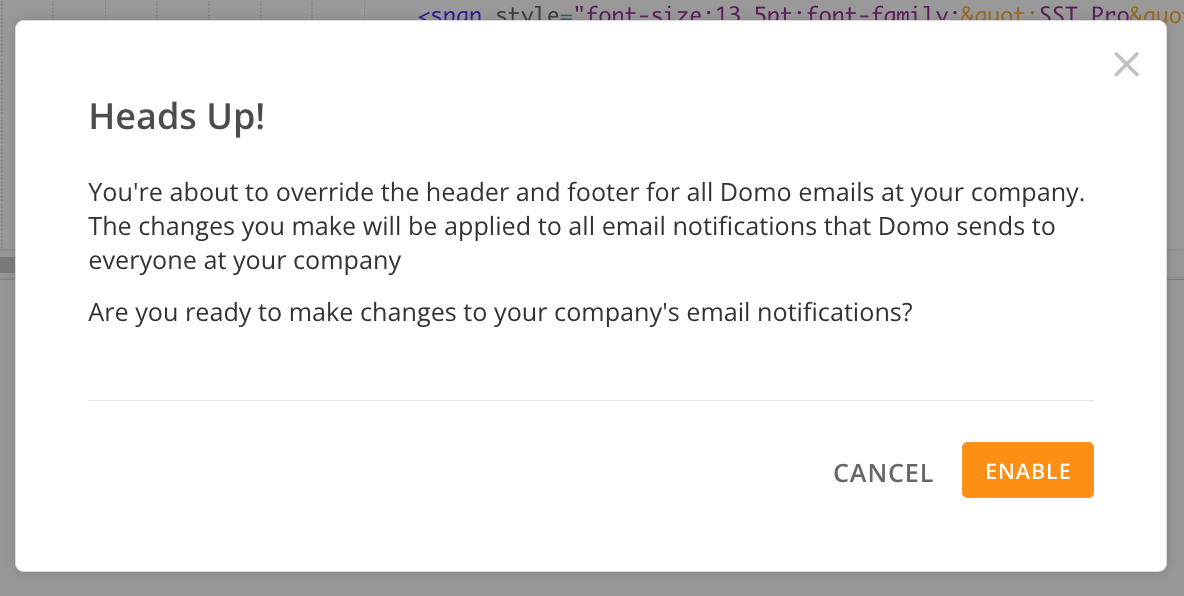
   A dialog displays to advise that you are overriding the header and footer for Domo emails for your organization. Any changes you make apply to all email notifications that Domo sends to everyone at your organization (besides the exceptions listed above).
   <Frame>
     <img alt="Screenshot 2023-06-06 at 2.26.53 PM.png" src="https://mintcdn.com/domoinc-openapi-sync-dataflows/Ii_OEK7nN-EzkrX1/images/kb/ka0Vq0000007KoP-00N5w00000Ri7BU-0EM5w000006uwW2.jpg?fit=max&auto=format&n=Ii_OEK7nN-EzkrX1&q=85&s=f0e9368f212126b999444d7a4959ea6d" style={{width: 445.994, height: 223.999}} width="1184" height="596" data-path="images/kb/ka0Vq0000007KoP-00N5w00000Ri7BU-0EM5w000006uwW2.jpg" />
   </Frame>

5. Select
   **Enable** to move forward.

6. Edit the HTML for the header and footer. Learn about
   [supported tags and attributes](#supported_tags_and_attributes) below.
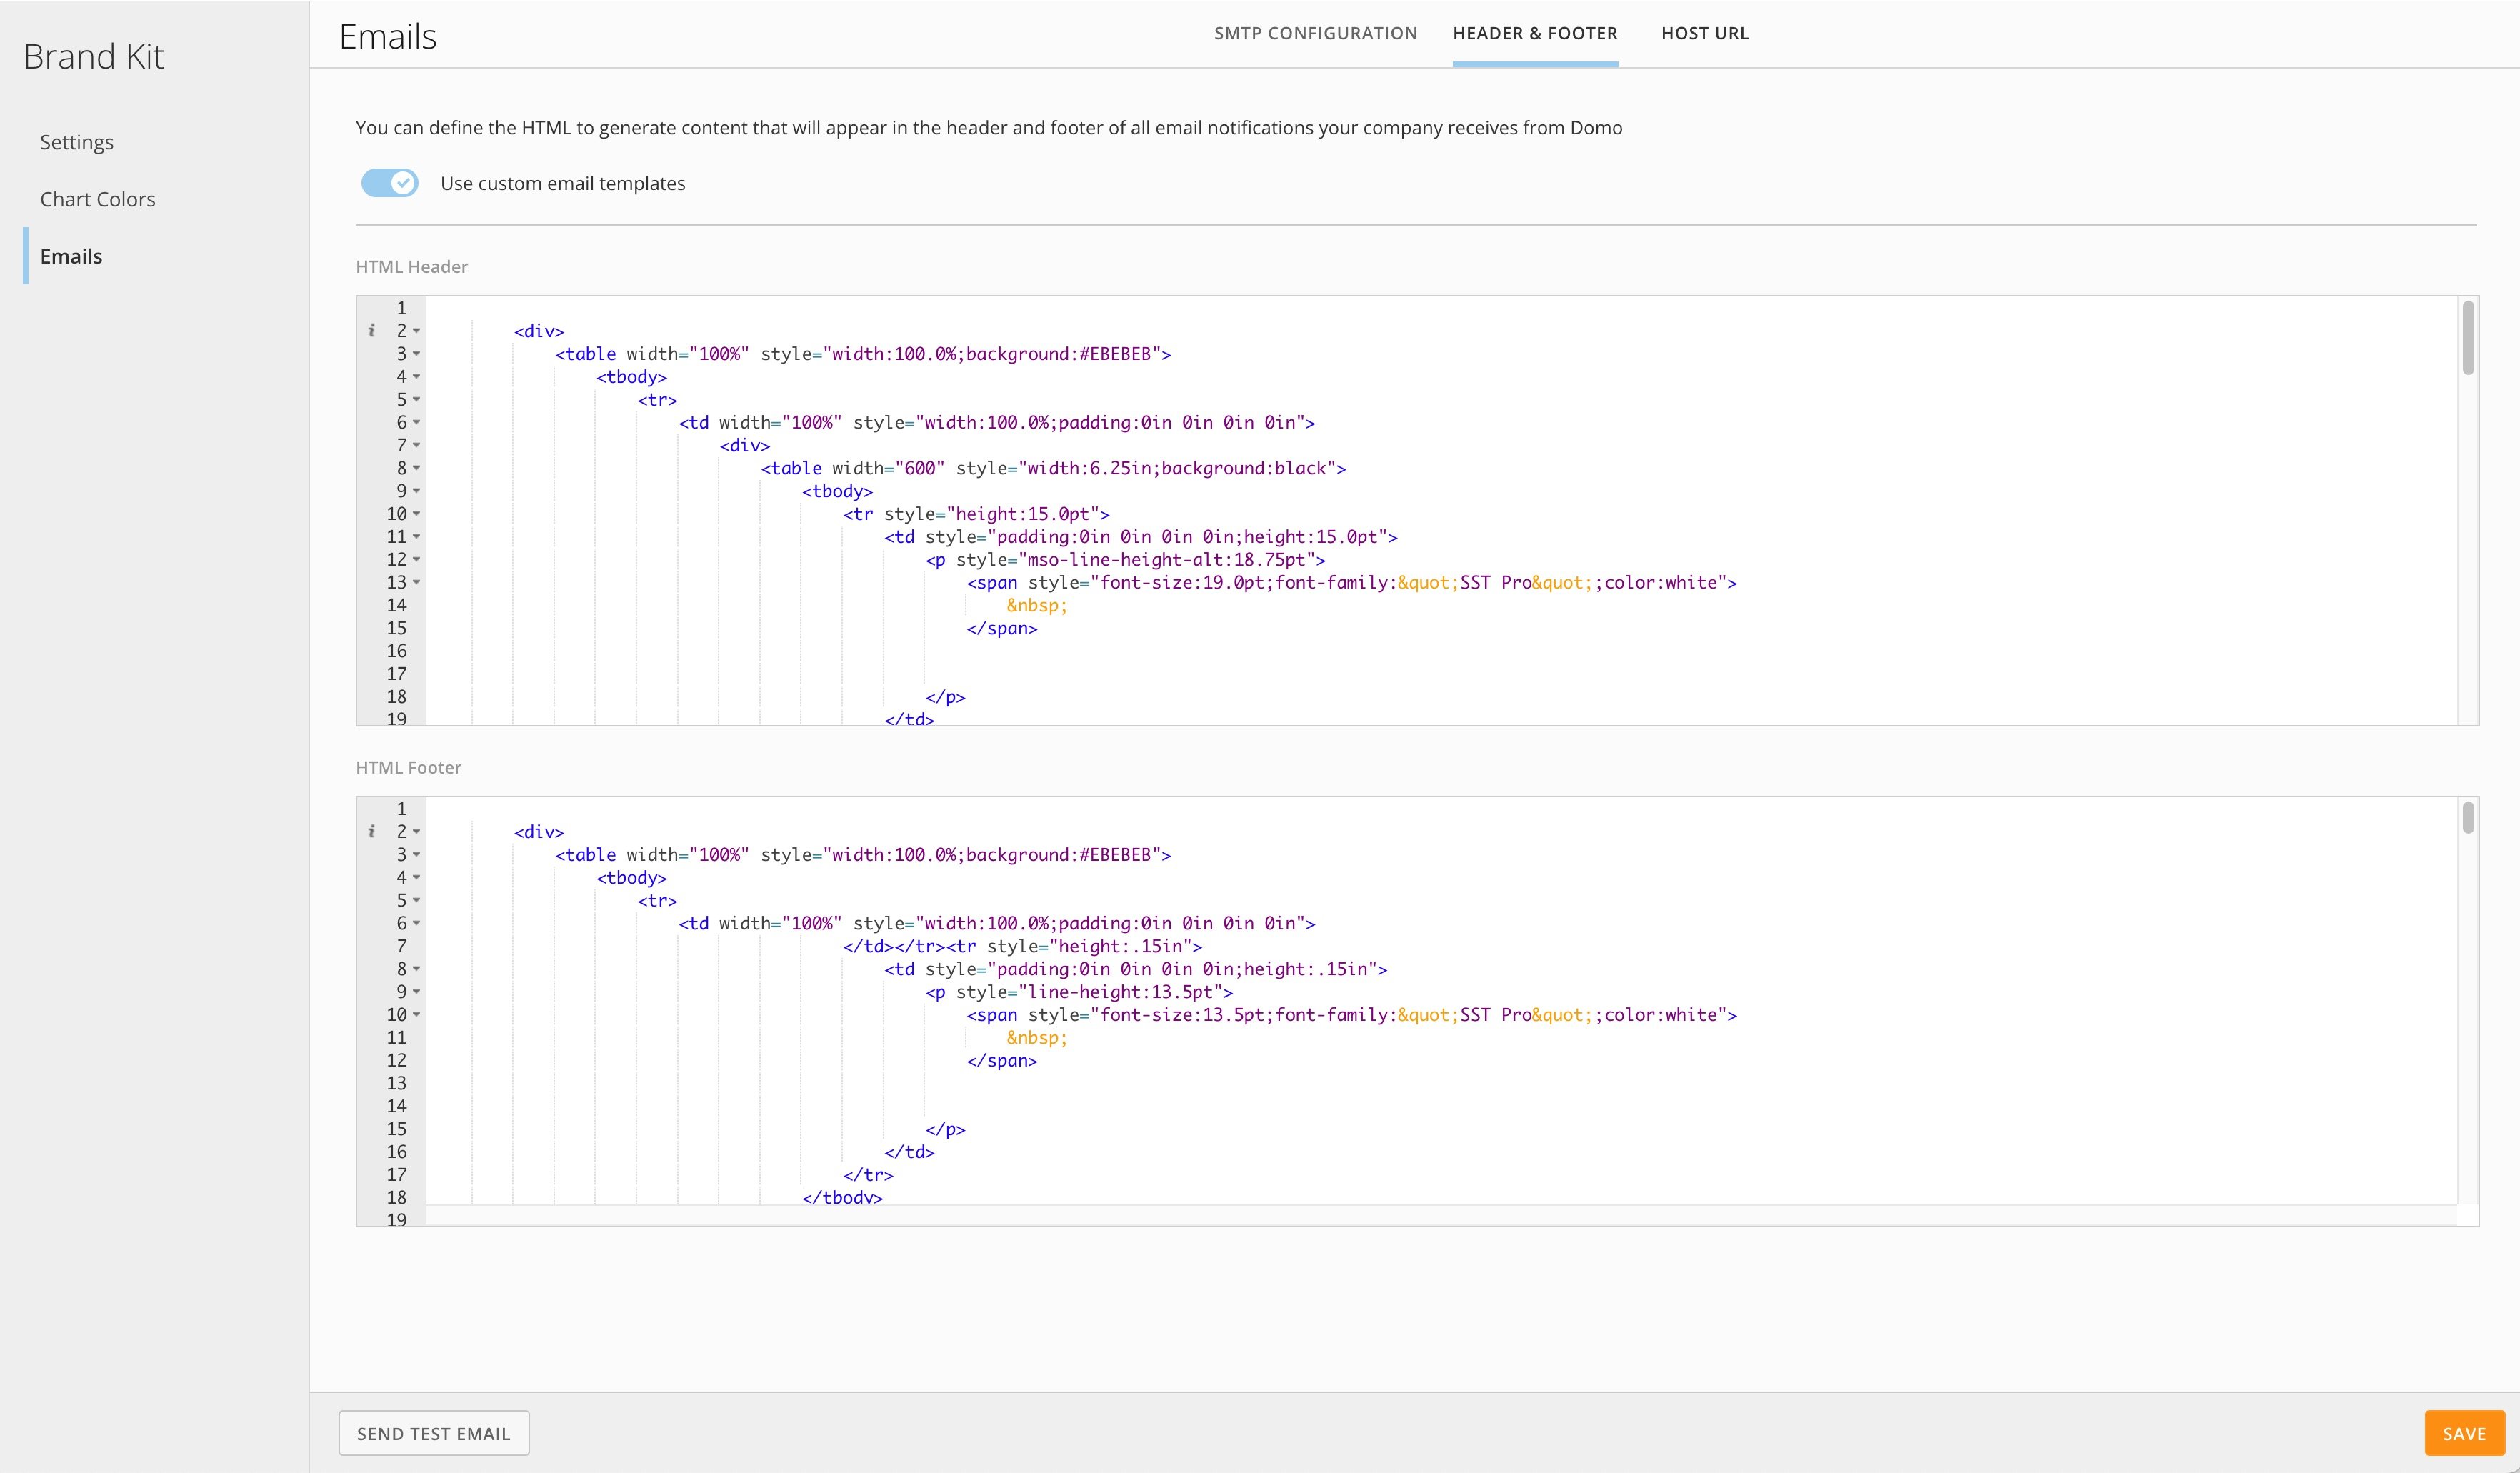
   <Frame>
     <img alt="header and footer.jpeg" src="https://mintcdn.com/domoinc-openapi-sync-dataflows/Ii_OEK7nN-EzkrX1/images/kb/ka0Vq0000007KoP-00N5w00000Ri7BU-0EMVq000000Sm6X.jpg?fit=max&auto=format&n=Ii_OEK7nN-EzkrX1&q=85&s=c76b671c2284ee398249bcaf201d11b7" style={{width: 751, height: 439}} width="3528" height="2062" data-path="images/kb/ka0Vq0000007KoP-00N5w00000Ri7BU-0EMVq000000Sm6X.jpg" />
   </Frame>

7. (Optional) Select
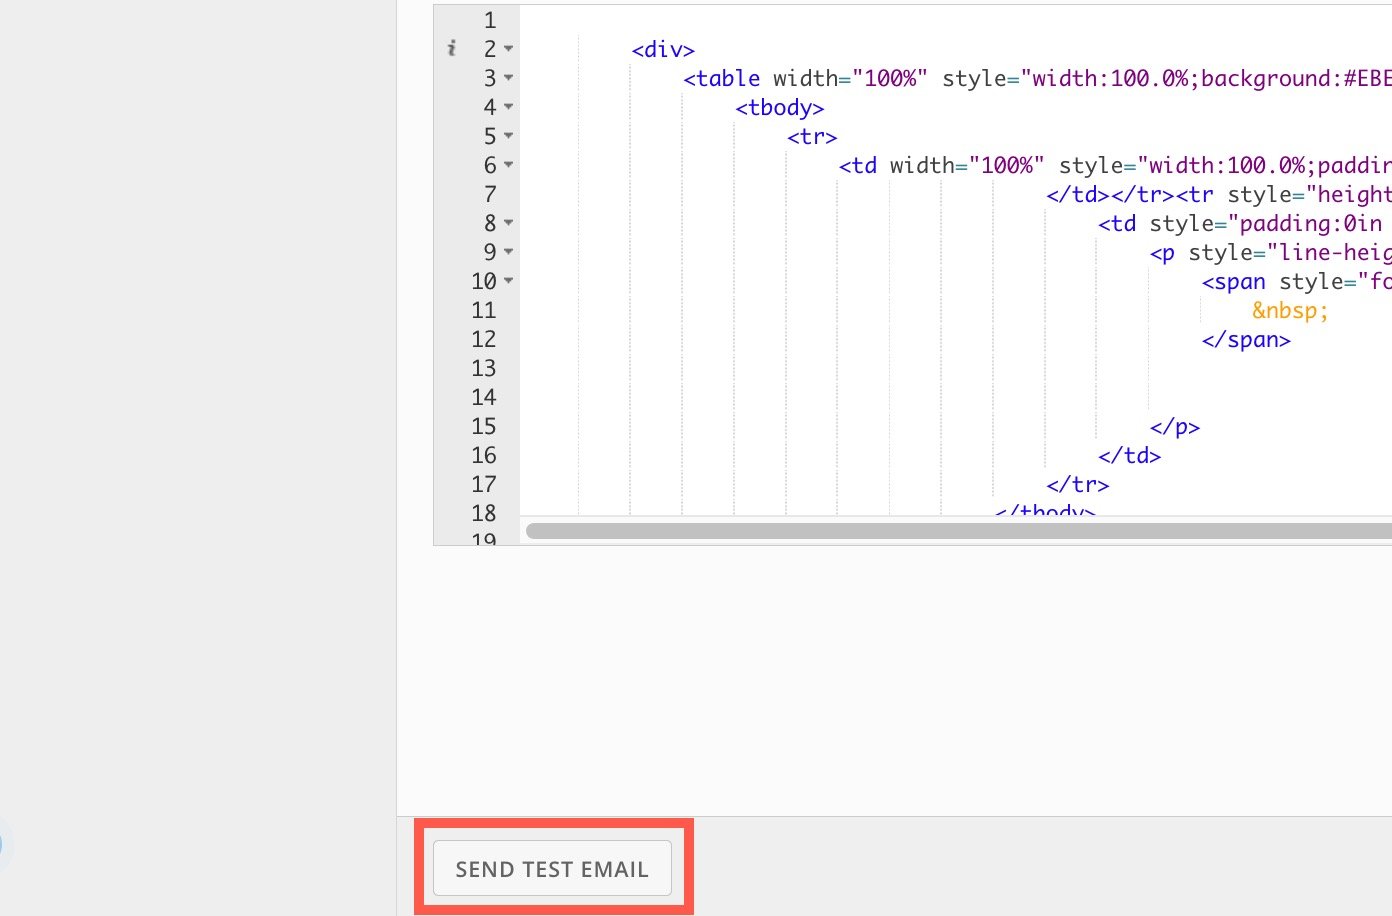
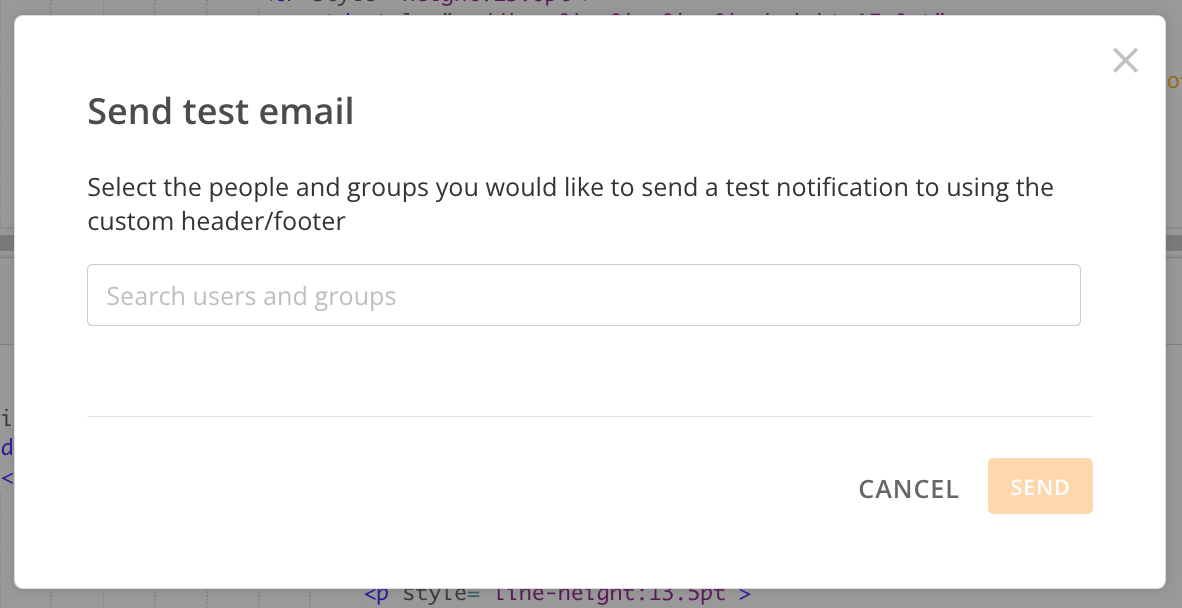
   **Send Test Email** and enter people or groups to whom you want to send an email to test the custom header/footer. Select **Send** to initiate the test email.
   <Frame>
     <img alt="send test email.jpg" src="https://mintcdn.com/domoinc-openapi-sync-dataflows/Ii_OEK7nN-EzkrX1/images/kb/ka0Vq0000007KoP-00N5w00000Ri7BU-0EM5w000006uwWg.jpg?fit=max&auto=format&n=Ii_OEK7nN-EzkrX1&q=85&s=dc9e4cf0f68bff443703095be6c1c273" style={{width: 501.974, height: 330}} width="1392" height="916" data-path="images/kb/ka0Vq0000007KoP-00N5w00000Ri7BU-0EM5w000006uwWg.jpg" />
   </Frame>

   <Frame>
     <img alt="Screenshot 2023-06-06 at 2.31.41 PM.png" src="https://mintcdn.com/domoinc-openapi-sync-dataflows/Ii_OEK7nN-EzkrX1/images/kb/ka0Vq0000007KoP-00N5w00000Ri7BU-0EM5w000006uwWW.jpg?fit=max&auto=format&n=Ii_OEK7nN-EzkrX1&q=85&s=fbc812f07210a8aac72869badd08d12f" style={{width: 445.987, height: 223.991}} width="1182" height="608" data-path="images/kb/ka0Vq0000007KoP-00N5w00000Ri7BU-0EM5w000006uwWW.jpg" />
   </Frame>

8. Select
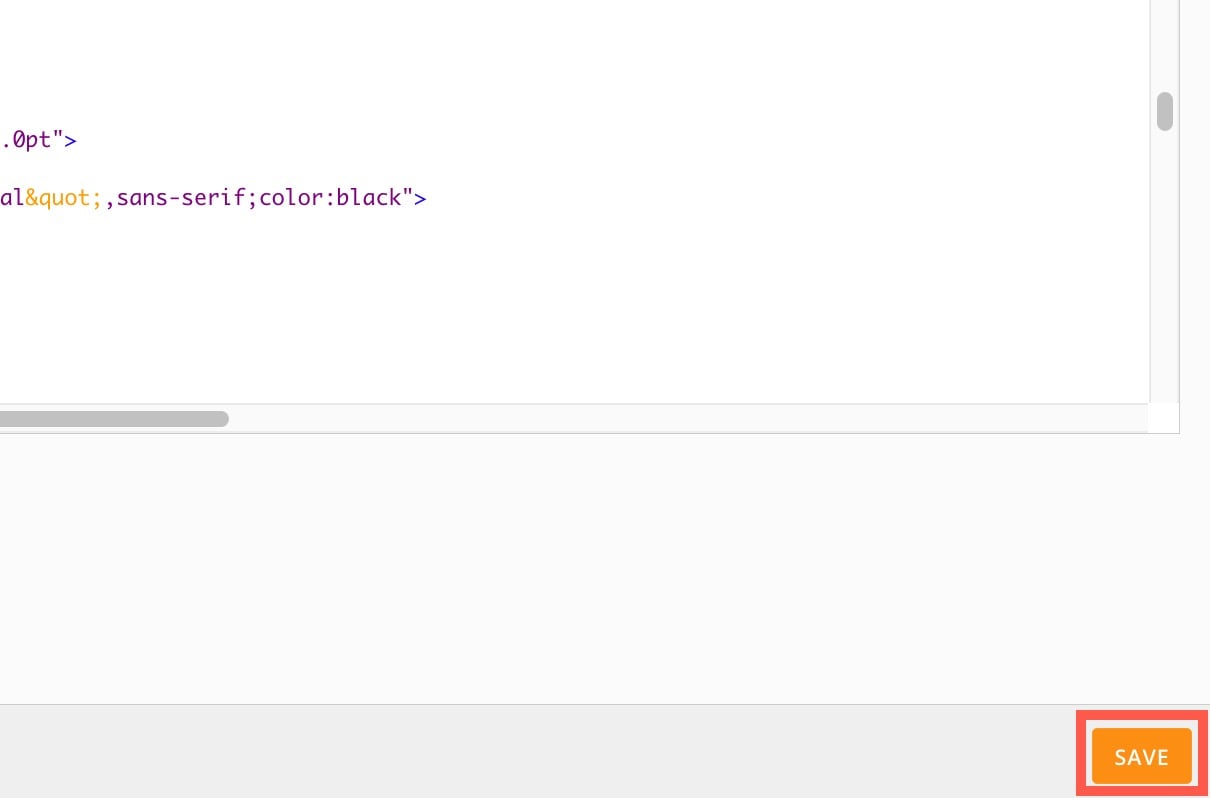
   **Save** to keep your changes to the HTML.
   <Frame>
     <img alt="save.jpg" src="https://mintcdn.com/domoinc-openapi-sync-dataflows/Ii_OEK7nN-EzkrX1/images/kb/ka0Vq0000007KoP-00N5w00000Ri7BU-0EM5w000006uwWv.jpg?fit=max&auto=format&n=Ii_OEK7nN-EzkrX1&q=85&s=cefa19d1ed8823bda5b58dbb4e739375" style={{width: 508.999, height: 335.994}} width="1210" height="798" data-path="images/kb/ka0Vq0000007KoP-00N5w00000Ri7BU-0EM5w000006uwWv.jpg" />
   </Frame>

#### Supported Tags and Attributes

When adding a custom header for your SMTP configuration or customizing the header or footer for emails, Domo supports the following HTML tags and attributes:

<table border="1" data-aura-rendered-by="33:207;a"><thead><tr><th colspan="1" rowspan="1"> Tags </th><th colspan="1" rowspan="1"> Attributes </th></tr></thead><tbody><tr><td colspan="1" rowspan="1"> a </td><td colspan="1" rowspan="1"> href, title, style </td></tr><tr><td colspan="1" rowspan="1"> b </td><td colspan="1" rowspan="1"> style </td></tr><tr><td colspan="1" rowspan="1"> blockquote </td><td colspan="1" rowspan="1"> cite, style </td></tr><tr><td colspan="1" rowspan="1"> br </td><td colspan="1" rowspan="1"> style </td></tr><tr><td colspan="1" rowspan="1"> caption </td><td colspan="1" rowspan="1"> style </td></tr><tr><td colspan="1" rowspan="1"> cite </td><td colspan="1" rowspan="1"> style </td></tr><tr><td colspan="1" rowspan="1"> code </td><td colspan="1" rowspan="1"> style </td></tr><tr><td colspan="1" rowspan="1"> col </td><td colspan="1" rowspan="1"> span, width, style </td></tr><tr><td colspan="1" rowspan="1"> colgroup </td><td colspan="1" rowspan="1"> span, width, style </td></tr><tr><td colspan="1" rowspan="1"> dd </td><td colspan="1" rowspan="1"> style </td></tr><tr><td colspan="1" rowspan="1"> div </td><td colspan="1" rowspan="1"> style </td></tr><tr><td colspan="1" rowspan="1"> dl </td><td colspan="1" rowspan="1"> style </td></tr><tr><td colspan="1" rowspan="1"> dt </td><td colspan="1" rowspan="1"> style </td></tr><tr><td colspan="1" rowspan="1"> em </td><td colspan="1" rowspan="1"> style </td></tr><tr><td colspan="1" rowspan="1"> h1 </td><td colspan="1" rowspan="1"> style </td></tr><tr><td colspan="1" rowspan="1"> h2 </td><td colspan="1" rowspan="1"> style </td></tr><tr><td colspan="1" rowspan="1"> h3 </td><td colspan="1" rowspan="1"> style </td></tr><tr><td colspan="1" rowspan="1"> h4 </td><td colspan="1" rowspan="1"> style </td></tr><tr><td colspan="1" rowspan="1"> h5 </td><td colspan="1" rowspan="1"> style </td></tr><tr><td colspan="1" rowspan="1"> h6 </td><td colspan="1" rowspan="1"> style </td></tr><tr><td colspan="1" rowspan="1"> i </td><td colspan="1" rowspan="1"> style </td></tr><tr><td colspan="1" rowspan="1"> img </td><td colspan="1" rowspan="1"> align, alt, height, src, title, width, style </td></tr><tr><td colspan="1" rowspan="1"> li </td><td colspan="1" rowspan="1"> style </td></tr><tr><td colspan="1" rowspan="1"> ol </td><td colspan="1" rowspan="1"> start, type, style </td></tr><tr><td colspan="1" rowspan="1"> p </td><td colspan="1" rowspan="1"> style </td></tr><tr><td colspan="1" rowspan="1"> pre </td><td colspan="1" rowspan="1"> style </td></tr><tr><td colspan="1" rowspan="1"> q </td><td colspan="1" rowspan="1"> cite, style </td></tr><tr><td colspan="1" rowspan="1"> small </td><td colspan="1" rowspan="1"> style </td></tr><tr><td colspan="1" rowspan="1"> span </td><td colspan="1" rowspan="1"> style </td></tr><tr><td colspan="1" rowspan="1"> strike </td><td colspan="1" rowspan="1"> style </td></tr><tr><td colspan="1" rowspan="1"> strong </td><td colspan="1" rowspan="1"> style </td></tr><tr><td colspan="1" rowspan="1"> sub </td><td colspan="1" rowspan="1"> style </td></tr><tr><td colspan="1" rowspan="1"> sup </td><td colspan="1" rowspan="1"> style </td></tr><tr><td colspan="1" rowspan="1"> table </td><td colspan="1" rowspan="1"> summary, width, style </td></tr><tr><td colspan="1" rowspan="1"> tbody </td><td colspan="1" rowspan="1"> style </td></tr><tr><td colspan="1" rowspan="1"> td </td><td colspan="1" rowspan="1"> abbr, axis, colspan, rowspan, width, style </td></tr><tr><td colspan="1" rowspan="1"> tfoot </td><td colspan="1" rowspan="1"> style </td></tr><tr><td colspan="1" rowspan="1"> th </td><td colspan="1" rowspan="1"> abbr, axis, colspan, rowspan, scope, width, style </td></tr><tr><td colspan="1" rowspan="1"> thead </td><td colspan="1" rowspan="1"> style </td></tr><tr><td colspan="1" rowspan="1"> tr </td><td colspan="1" rowspan="1"> style </td></tr><tr><td colspan="1" rowspan="1"> u </td><td colspan="1" rowspan="1"> style </td></tr><tr><td colspan="1" rowspan="1"> ul </td><td colspan="1" rowspan="1"> type, style </td></tr></tbody></table>

Here is a list of attributes and protocols. The black square in the Protocols column indicates that we do not have any protocol restrictions for that attribute.

<table border="1" data-aura-rendered-by="33:207;a"><thead><tr><th colspan="1" rowspan="1"> Attribute </th><th colspan="1" rowspan="1"> Protocols </th></tr></thead><tbody><tr><td colspan="1" rowspan="1"> — </td><td colspan="1" rowspan="1"> — </td></tr><tr><td colspan="1" rowspan="1"> href </td><td colspan="1" rowspan="1"> ftp, http https, mailto </td></tr><tr><td colspan="1" rowspan="1"> title </td><td colspan="1" rowspan="1"> ■ </td></tr><tr><td colspan="1" rowspan="1"> cite </td><td colspan="1" rowspan="1"> http, https </td></tr><tr><td colspan="1" rowspan="1"> span </td><td colspan="1" rowspan="1"> ■ </td></tr><tr><td colspan="1" rowspan="1"> width </td><td colspan="1" rowspan="1"> ■ </td></tr><tr><td colspan="1" rowspan="1"> align </td><td colspan="1" rowspan="1"> ■ </td></tr><tr><td colspan="1" rowspan="1"> alt </td><td colspan="1" rowspan="1"> ■ </td></tr><tr><td colspan="1" rowspan="1"> height </td><td colspan="1" rowspan="1"> ■ </td></tr><tr><td colspan="1" rowspan="1"> start </td><td colspan="1" rowspan="1"> ■ </td></tr><tr><td colspan="1" rowspan="1"> type </td><td colspan="1" rowspan="1"> ■ </td></tr><tr><td colspan="1" rowspan="1"> abbr </td><td colspan="1" rowspan="1"> ■ </td></tr><tr><td colspan="1" rowspan="1"> axis </td><td colspan="1" rowspan="1"> ■ </td></tr><tr><td colspan="1" rowspan="1"> colspan </td><td colspan="1" rowspan="1"> ■ </td></tr><tr><td colspan="1" rowspan="1"> rowspan </td><td colspan="1" rowspan="1"> ■ </td></tr><tr><td colspan="1" rowspan="1"> scope </td><td colspan="1" rowspan="1"> ■ </td></tr><tr><td colspan="1" rowspan="1"> summary </td><td colspan="1" rowspan="1"> ■ </td></tr><tr><td colspan="1" rowspan="1"> style </td><td colspan="1" rowspan="1"> ■ </td></tr><tr><td colspan="1" rowspan="1"> src </td><td colspan="1" rowspan="1"> http, https <a id="email_host_url" target="_blank" /></td></tr></tbody></table>

# Email Host URL

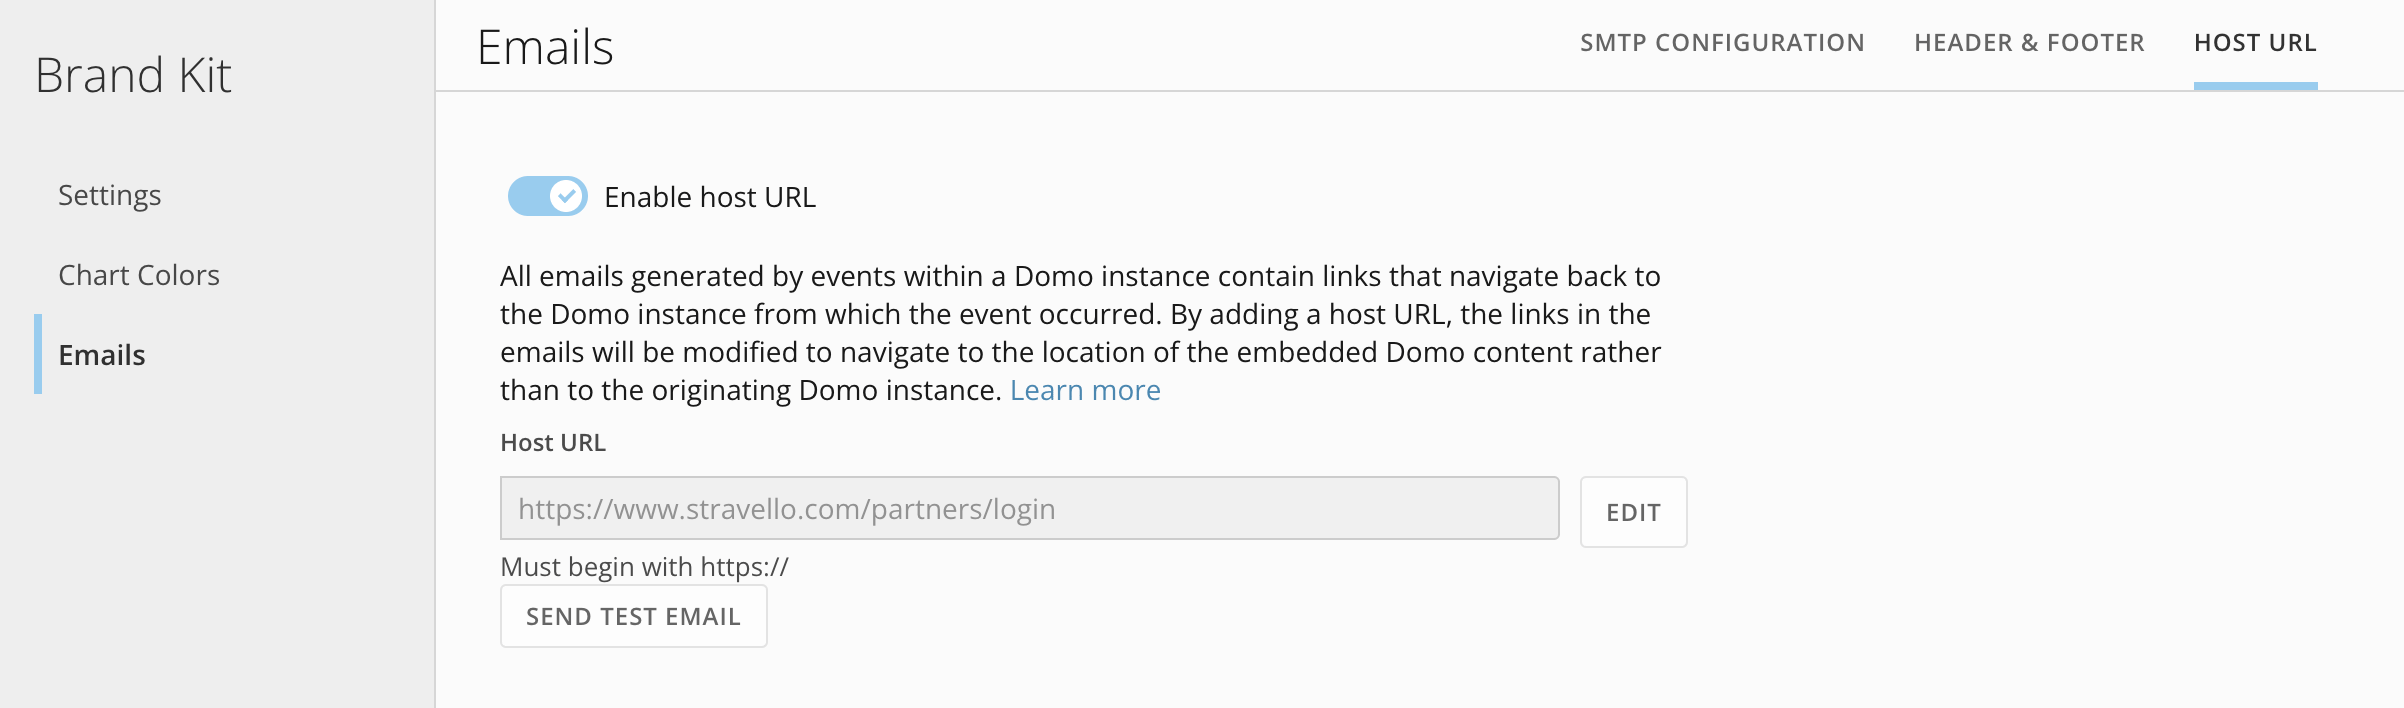
The Email Host URL feature allows you to specify the domain that your email links point to. After you configure the host URL where your Domo platform is embedded, all links in Domo-generated emails update to direct to your chosen portal rather than your Domo instance.

#### Prerequisites

To use this feature, the following grants must be enabled for your role:

* **(Admin-level) Manage All Company Settings —**
  Allows an individual to manage company metadata, security rules and SSO, publishing, and licenses.
* **Embed Content —**
  Allows an individual to embed content externally, with or without authentication.

To learn more about grants, see [Managing Custom Roles](/s/article/360043438973).

#### Configure Email Host URL

Follow these steps to configure your email host URL:

1. [Access Brand Kit](#access_brand_kit)
   and go to the **Emails** section.
2. Go to the
   **Host URL** tab.
3. Toggle
   **Enable host URL**.
4. Beside the
   **Host URL** field, select **Edit** and enter the domain you want to use. **Note:** The URL must begin with " https\://"".
5. Select
   **Save**.

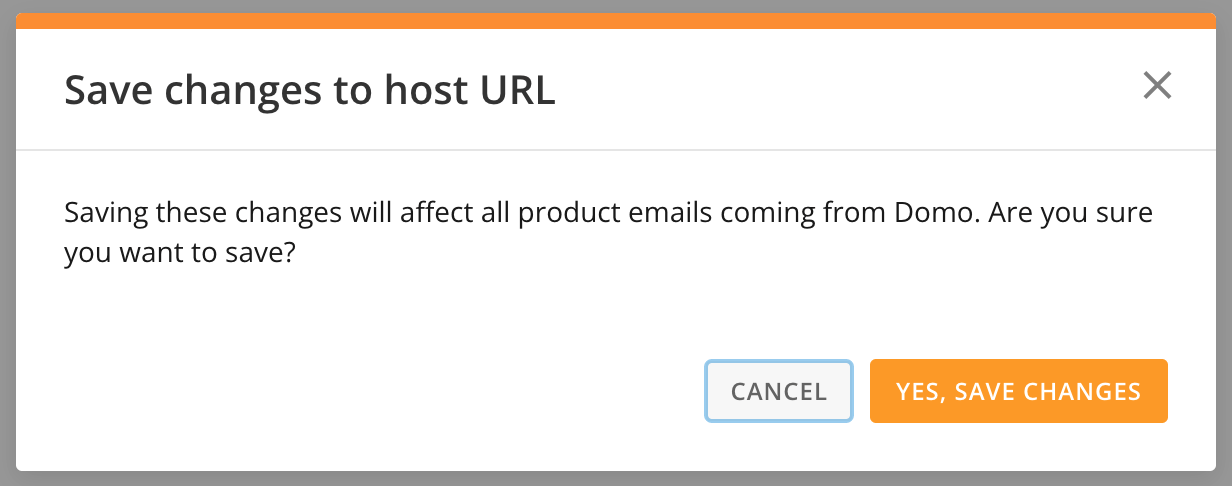
   A confirmation dialog displays. Select **Yes, Save Changes**.

   <Frame>
     <img alt="Screenshot 2024-03-05 at 7.39.50 PM.png" src="https://mintcdn.com/domoinc-openapi-sync-dataflows/Ii_OEK7nN-EzkrX1/images/kb/ka0Vq0000007KoP-00N5w00000Ri7BU-0EMVq000000Slwr.jpg?fit=max&auto=format&n=Ii_OEK7nN-EzkrX1&q=85&s=be04616ada7cea2cf7021c0b32ba2e71" style={{width: 398, height: 157}} width="1232" height="486" data-path="images/kb/ka0Vq0000007KoP-00N5w00000Ri7BU-0EMVq000000Slwr.jpg" />
   </Frame>
6. (Optional) Select
   **Send Test Email** to send and preview an email for your updated host URL.
<Frame>
  <img alt="Screenshot 2024-03-05 at 7.34.39 PM.png" src="https://mintcdn.com/domoinc-openapi-sync-dataflows/Ii_OEK7nN-EzkrX1/images/kb/ka0Vq0000007KoP-00N5w00000Ri7BU-0EMVq000000Sknu.jpg?fit=max&auto=format&n=Ii_OEK7nN-EzkrX1&q=85&s=a0945929ceeae9db990d2297450f7357" style={{width: 750, height: 221}} width="2404" height="708" data-path="images/kb/ka0Vq0000007KoP-00N5w00000Ri7BU-0EMVq000000Sknu.jpg" />
</Frame>

# Remove Email Footer

Follow these steps to remove email footer links from your Domo instances.

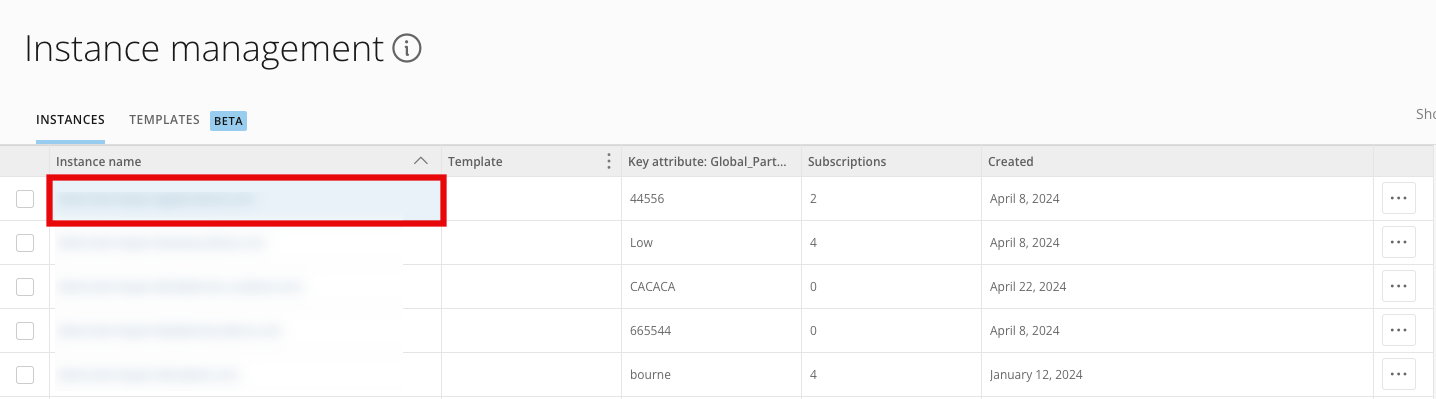
**To begin:** Go to the Admin Settings (**More** > **Admin**). Under **Domo Everywhere**, select **Instance management**.

1. In the
   **Instances** tab of the **Instance management** page, select an instance name from the list.
   <Frame>
     <img alt="Screenshot 2025-02-04 at 11.10.44 AM.png" src="https://mintcdn.com/domoinc-openapi-sync-dataflows/Ii_OEK7nN-EzkrX1/images/kb/ka0Vq0000007KoP-00N5w00000Ri7BU-0EMVq000005Bnc2.jpg?fit=max&auto=format&n=Ii_OEK7nN-EzkrX1&q=85&s=f542fcd9e5a4c03fc73127ae091218e0" style={{width: 871, height: 242}} width="1436" height="399" data-path="images/kb/ka0Vq0000007KoP-00N5w00000Ri7BU-0EMVq000005Bnc2.jpg" />
   </Frame>

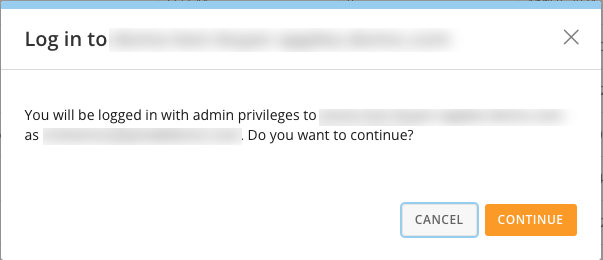
   The subscriber log-in modal displays.
2. Select
   **Continue** from the subscriber log-in modal.

   You are logged into the managed instance with admin privileges.
   <Frame>
     <img alt="Screenshot 2025-02-04 at 11.15.08 AM.png" src="https://mintcdn.com/domoinc-openapi-sync-dataflows/Ii_OEK7nN-EzkrX1/images/kb/ka0Vq0000007KoP-00N5w00000Ri7BU-0EMVq000005BoMo.jpg?fit=max&auto=format&n=Ii_OEK7nN-EzkrX1&q=85&s=9ac2ad8c6fec6a09a2bb9a6f4fcfca61" style={{width: 462, height: 199}} width="603" height="260" data-path="images/kb/ka0Vq0000007KoP-00N5w00000Ri7BU-0EMVq000005BoMo.jpg" />
   </Frame>
3. In the managed instance, navigate to
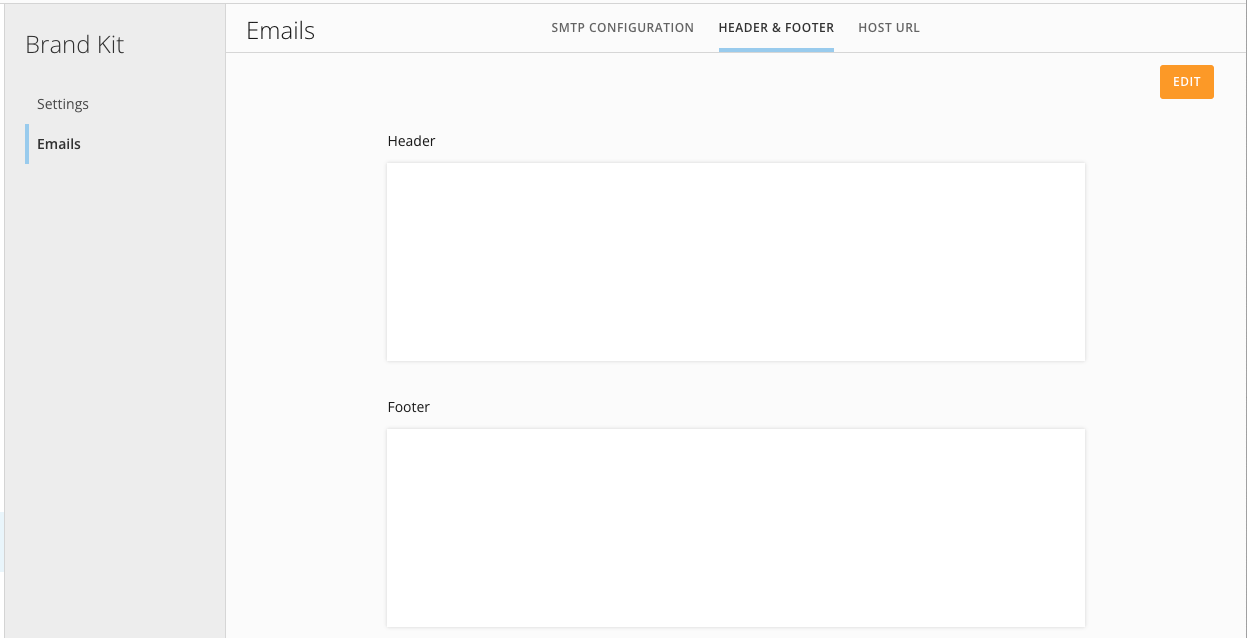
   **Brand** **Kit** > **Emails**.
4. Go to the
   **Header & Footer** tab.
   <Frame>
     <img alt="A screenshot of a computerDescription automatically generated" src="https://mintcdn.com/domoinc-openapi-sync-dataflows/Ii_OEK7nN-EzkrX1/images/kb/ka0Vq0000007KoP-00N5w00000Ri7BU-0EMVq000005BsNB.jpg?fit=max&auto=format&n=Ii_OEK7nN-EzkrX1&q=85&s=7919e1c24459e0e9646377511096cf7e" style={{width: 817, height: 419}} width="1247" height="638" data-path="images/kb/ka0Vq0000007KoP-00N5w00000Ri7BU-0EMVq000005BsNB.jpg" />
   </Frame>
5. Select
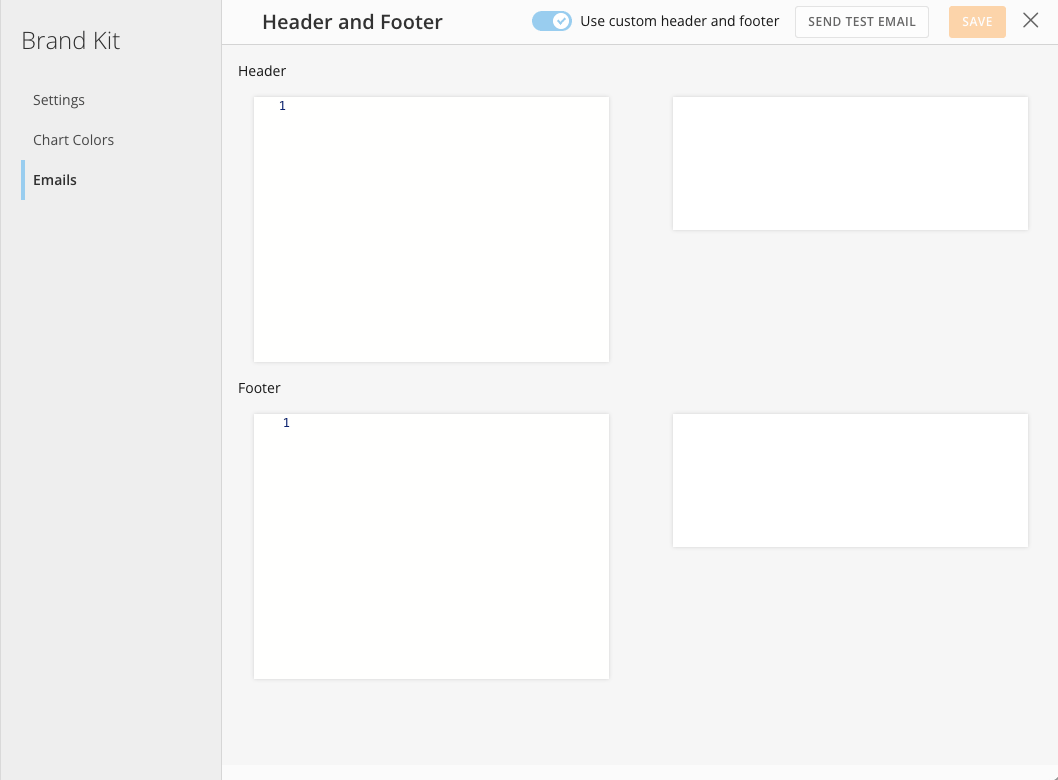
   **Edit** and enable the **Use custom header and footer** toggle.
   <Frame>
     <img alt="image (3).png" src="https://mintcdn.com/domoinc-openapi-sync-dataflows/Ii_OEK7nN-EzkrX1/images/kb/ka0Vq0000007KoP-00N5w00000Ri7BU-0EMVq000005C5Qs.jpg?fit=max&auto=format&n=Ii_OEK7nN-EzkrX1&q=85&s=d187101fff2b383f1ae6d4e0ccf5dfcd" style={{width: 817, height: 602}} width="1058" height="780" data-path="images/kb/ka0Vq0000007KoP-00N5w00000Ri7BU-0EMVq000005C5Qs.jpg" />
   </Frame>
6. Enter
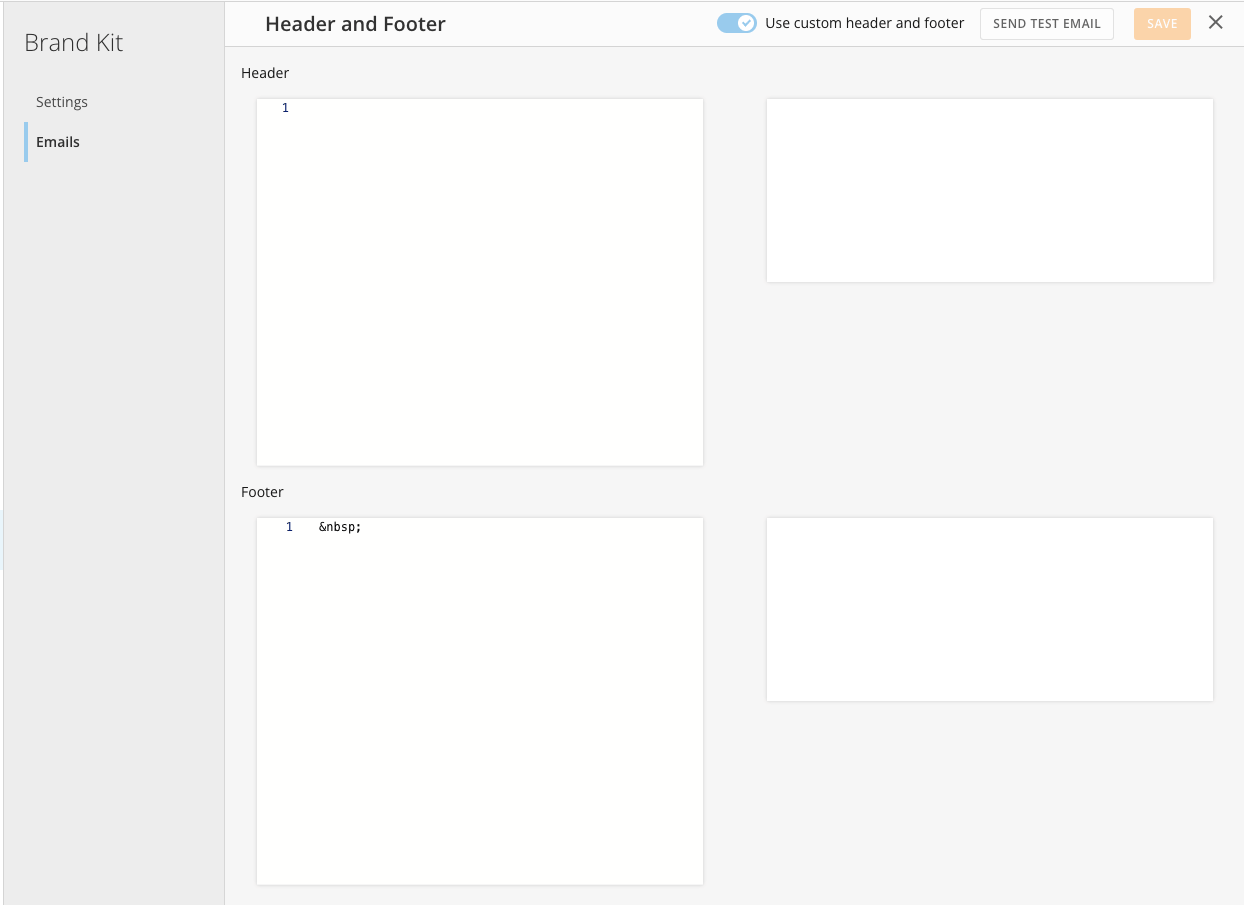
   `&nbsp;` (a non-breaking space) in the **Footer** field and select **Save.**
   <Frame>
     <img alt="A screenshot of a computerDescription automatically generated" src="https://mintcdn.com/domoinc-openapi-sync-dataflows/Ii_OEK7nN-EzkrX1/images/kb/ka0Vq0000007KoP-00N5w00000Ri7BU-0EMVq000005C7u5.jpg?fit=max&auto=format&n=Ii_OEK7nN-EzkrX1&q=85&s=ccf3e87ad3a6faf820051b572e31f050" style={{width: 775, height: 563}} width="1244" height="905" data-path="images/kb/ka0Vq0000007KoP-00N5w00000Ri7BU-0EMVq000005C7u5.jpg" />
   </Frame>

   You can use the **Send Test Email** button to verify the configuration.