![Screenshot 2024-02-08 at 2.03.04 PM[8].jpg](https://mintcdn.com/domoinc-openapi-sync-dataflows/zKZ3HwsBqhLsvFuw/images/kb/ka0Vq00000044g9-00N5w00000Ri7BU-0EMVq000000OOXR.jpg?fit=max&auto=format&n=zKZ3HwsBqhLsvFuw&q=85&s=dda4e00c63390c5c0731f56ee2795a10) ##
### Create a Job
Follow these steps to create a job:
1. Navigate to the Governance Toolkit and select PDP Automation.
* [https://example.domo.com/admin/governance-toolkit/pdp-automation](https://example.domo.com/admin/governance-toolkit/pdp-automation)
2. Click
**+ New Job** at the top right.
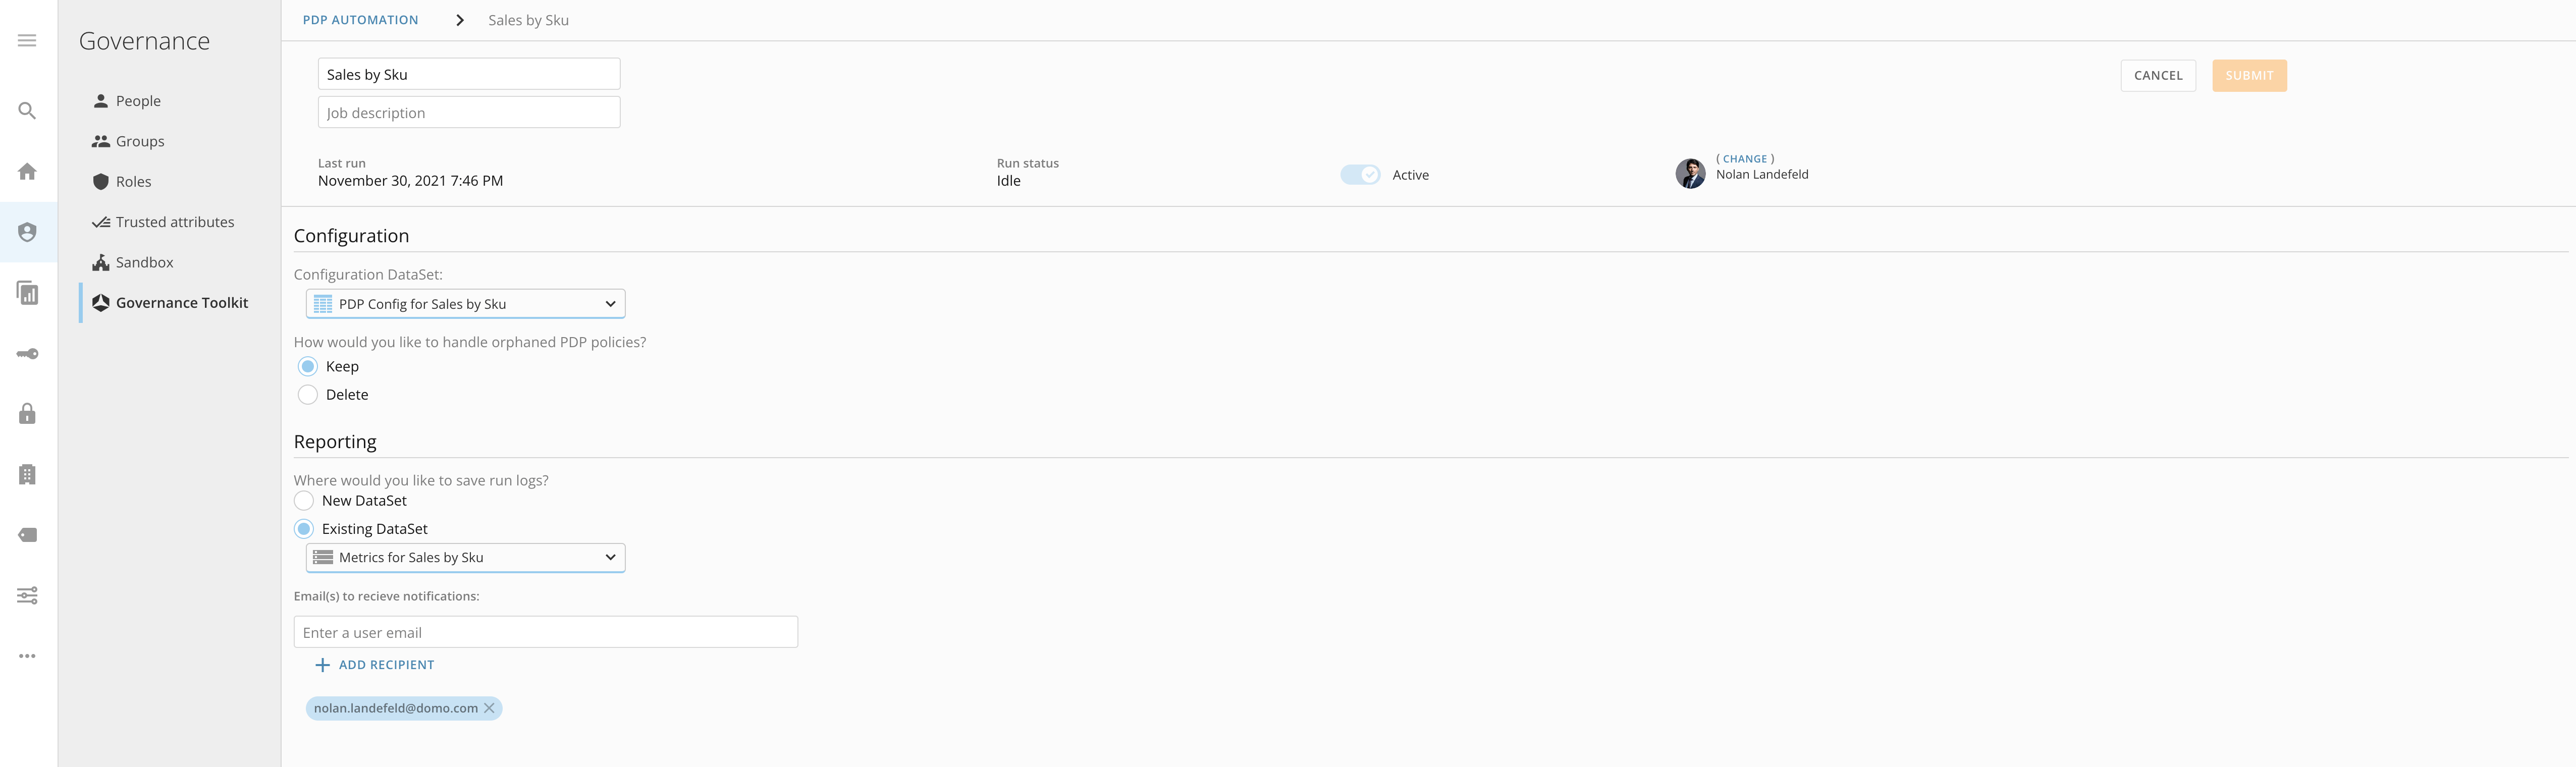
3. Fill out the following information:
* Job Name (required)
* Job Description (optional)
* Configuration DataSet (required)
* This is the DataSet that defines what policies you wish to update or create.
* Orphaned policy management (required)
* Orphaned policies refer to existing PDP policies on your DataSet defined in your configuration DataSet, but policies that are not being updated in your configuration DataSet.
* Keep
* Will leave those existing policies in place with no changes.
* Delete
* Will delete those policies that exist on the DataSet but not in the configuration file.
* Run Logs (required)
* Each job will keep track of executions of the job and information surrounding that.
* New DataSet
* Will create a new DataSet in your Domo instance and all runs of the job will write logging to the new DataSet.
* Existing DataSet
* Existing DataSet will allow you to combine multiple PDP Automation jobs into a single logging DataSet.
* The DataSet must be a DataSet created by the PDP Automation tool.
* DataSet must also already contain rows of data.
* Email notifications (optional)
* You can add user emails to this field.
* Each email will receive an email notification from Domo each time the job runs.
* The notification will outline what the job did during the run and any failures that occurred.
##
### Create a Job
Follow these steps to create a job:
1. Navigate to the Governance Toolkit and select PDP Automation.
* [https://example.domo.com/admin/governance-toolkit/pdp-automation](https://example.domo.com/admin/governance-toolkit/pdp-automation)
2. Click
**+ New Job** at the top right.
3. Fill out the following information:
* Job Name (required)
* Job Description (optional)
* Configuration DataSet (required)
* This is the DataSet that defines what policies you wish to update or create.
* Orphaned policy management (required)
* Orphaned policies refer to existing PDP policies on your DataSet defined in your configuration DataSet, but policies that are not being updated in your configuration DataSet.
* Keep
* Will leave those existing policies in place with no changes.
* Delete
* Will delete those policies that exist on the DataSet but not in the configuration file.
* Run Logs (required)
* Each job will keep track of executions of the job and information surrounding that.
* New DataSet
* Will create a new DataSet in your Domo instance and all runs of the job will write logging to the new DataSet.
* Existing DataSet
* Existing DataSet will allow you to combine multiple PDP Automation jobs into a single logging DataSet.
* The DataSet must be a DataSet created by the PDP Automation tool.
* DataSet must also already contain rows of data.
* Email notifications (optional)
* You can add user emails to this field.
* Each email will receive an email notification from Domo each time the job runs.
* The notification will outline what the job did during the run and any failures that occurred.
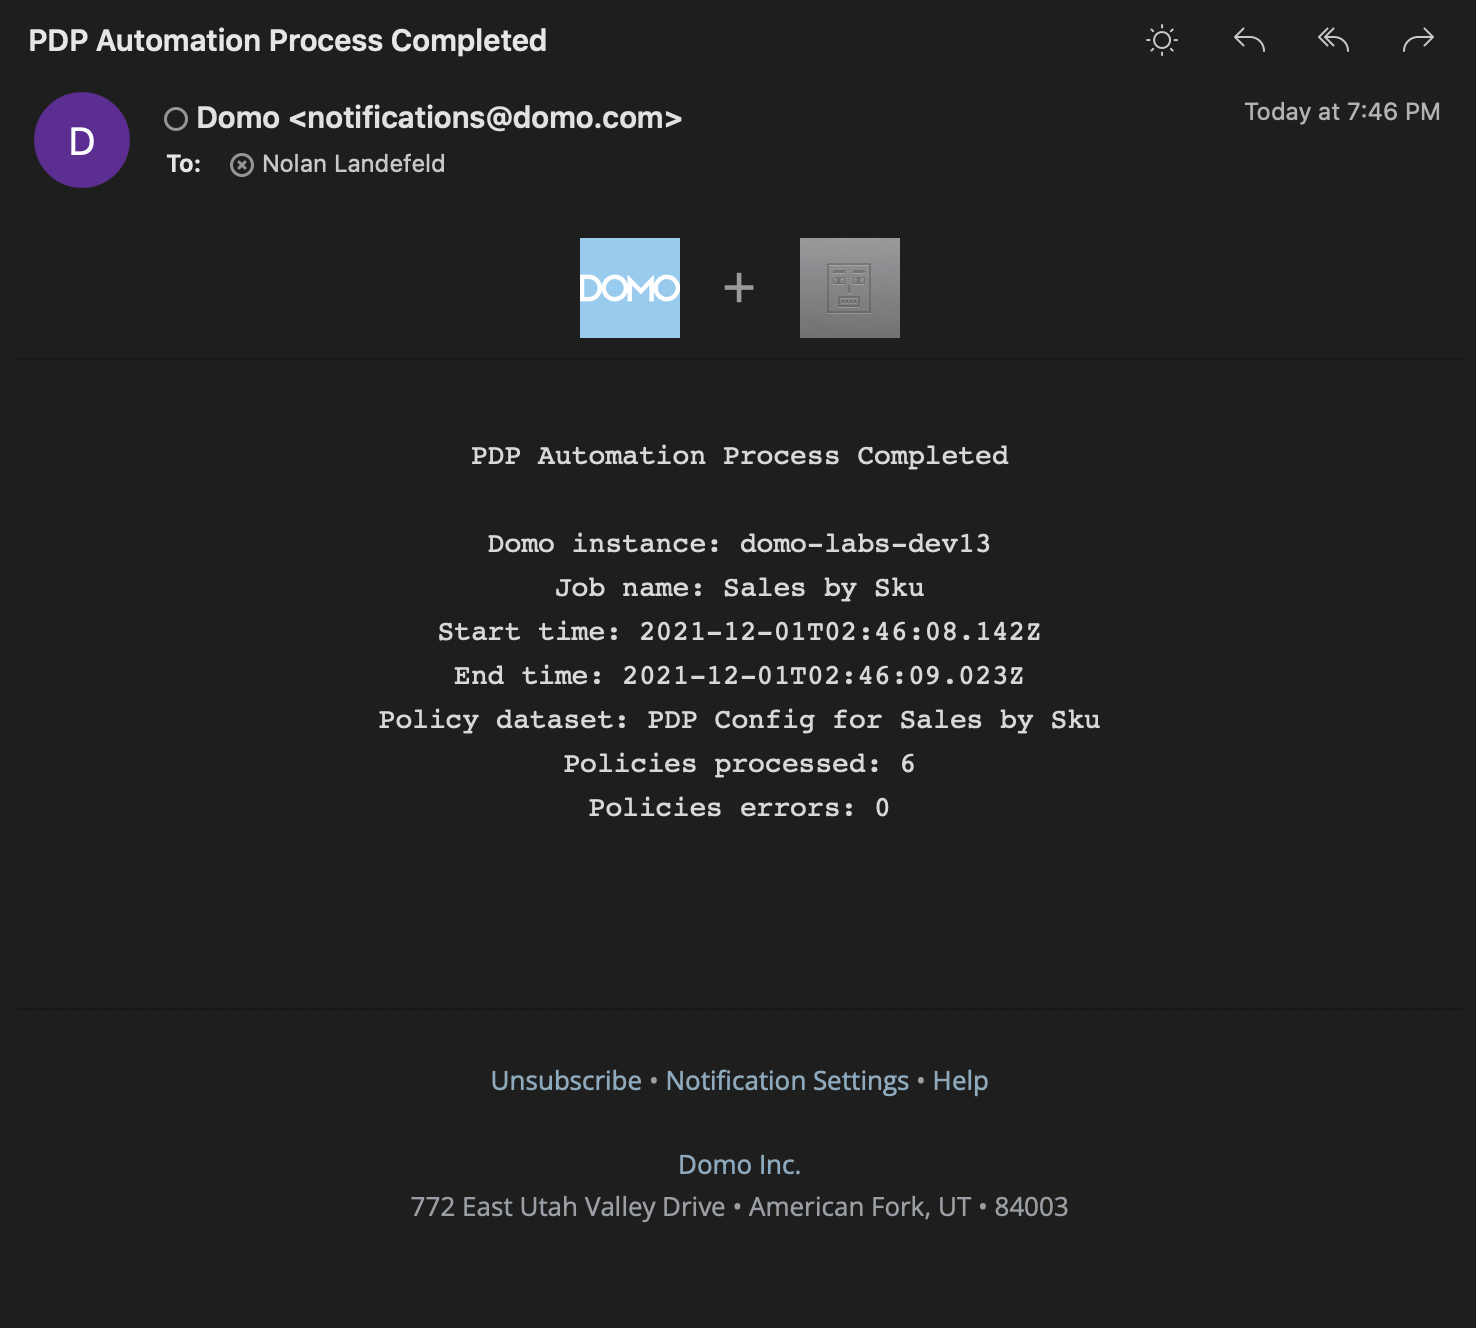
 ### Run a Job
Each job has an Enabled Toggle. This will control how a job is run.
* Preview Only
* The job will only execute when the job is manually run.
* When the job is run it will not update the actual target DataSet(s) from your configuration file. It will update the log DataSet with all the changes it would have made to the DataSet.
* This allows you to validate the job before it updates your DataSets.
* Active
* This will update the PDP policies on your DataSet(s).
* The job will execute every six hours.
* The job will execute every time the configuration DataSet is updated.
### Run a Job
Each job has an Enabled Toggle. This will control how a job is run.
* Preview Only
* The job will only execute when the job is manually run.
* When the job is run it will not update the actual target DataSet(s) from your configuration file. It will update the log DataSet with all the changes it would have made to the DataSet.
* This allows you to validate the job before it updates your DataSets.
* Active
* This will update the PDP policies on your DataSet(s).
* The job will execute every six hours.
* The job will execute every time the configuration DataSet is updated.
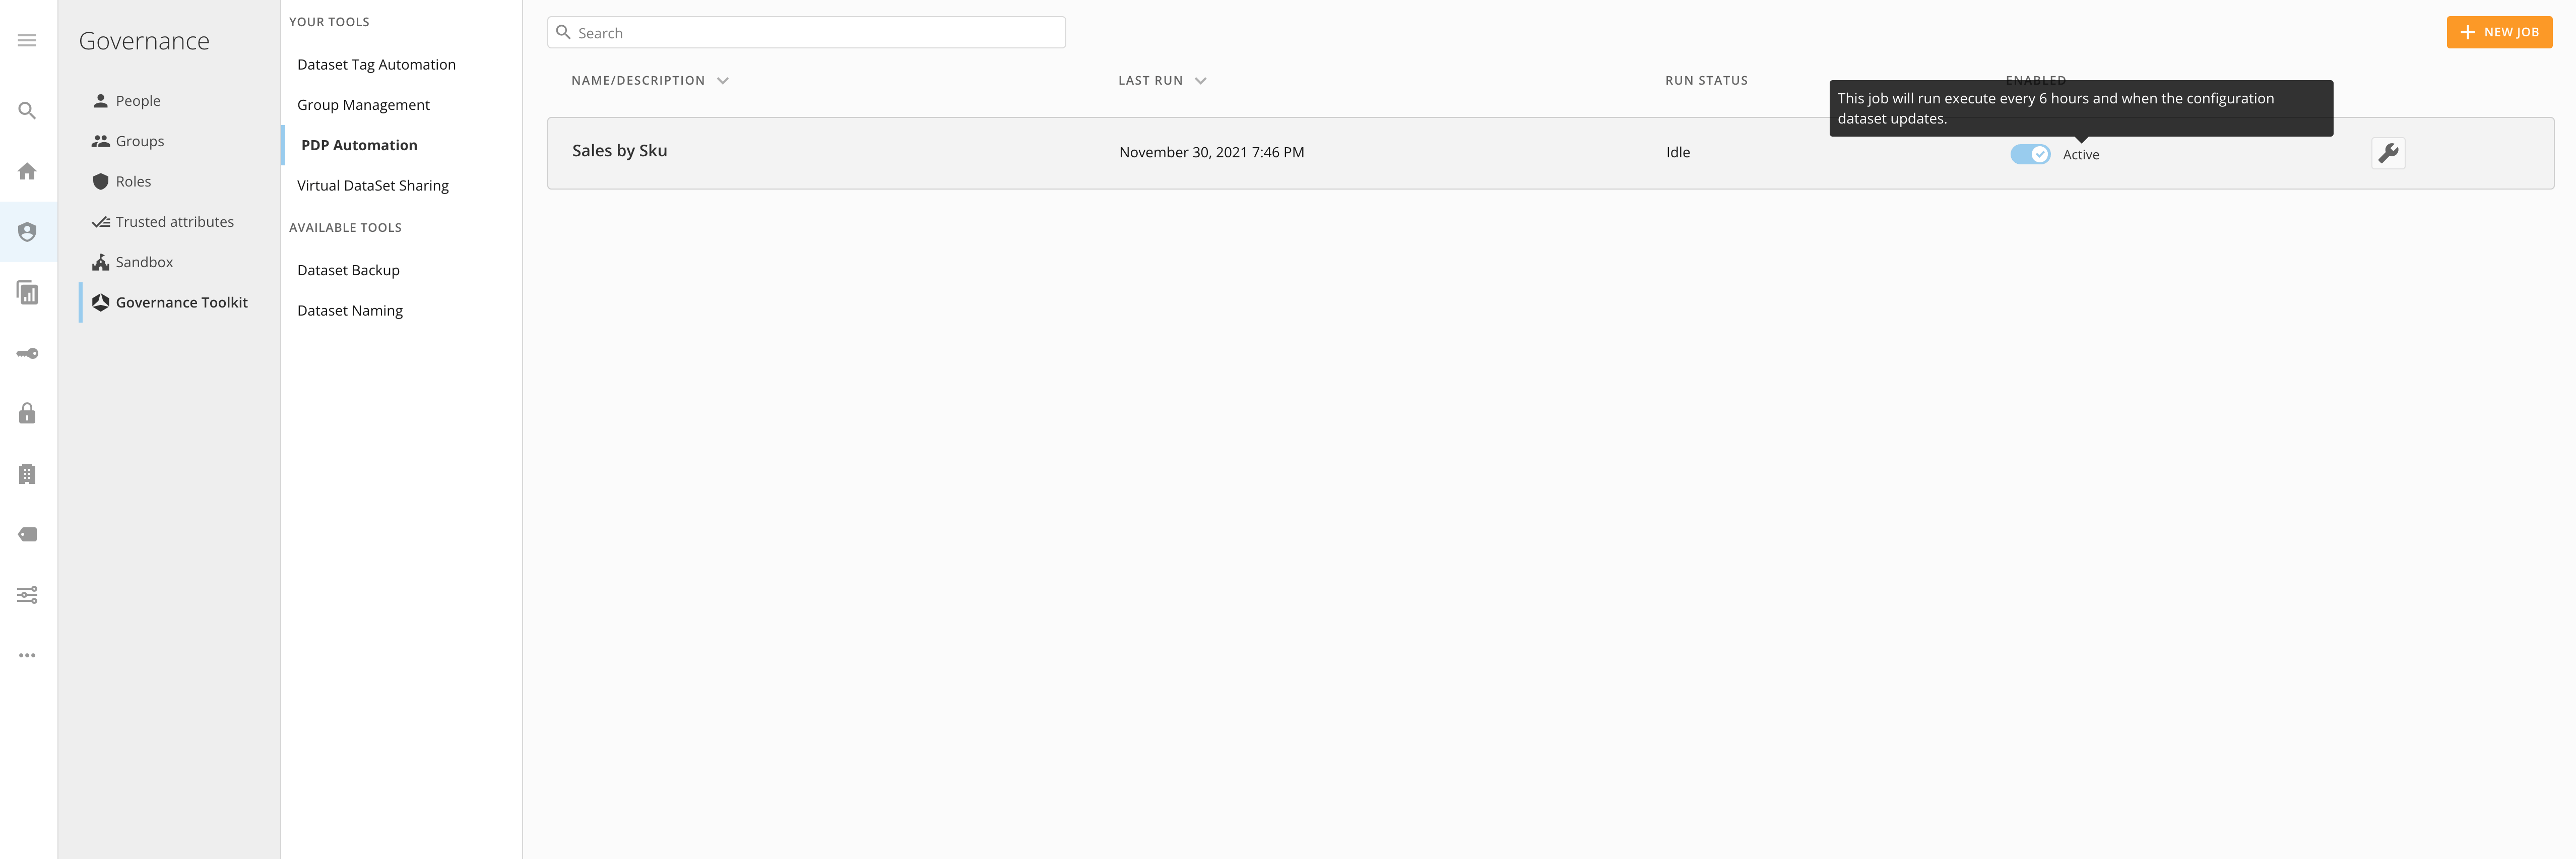 ### Example Job Run
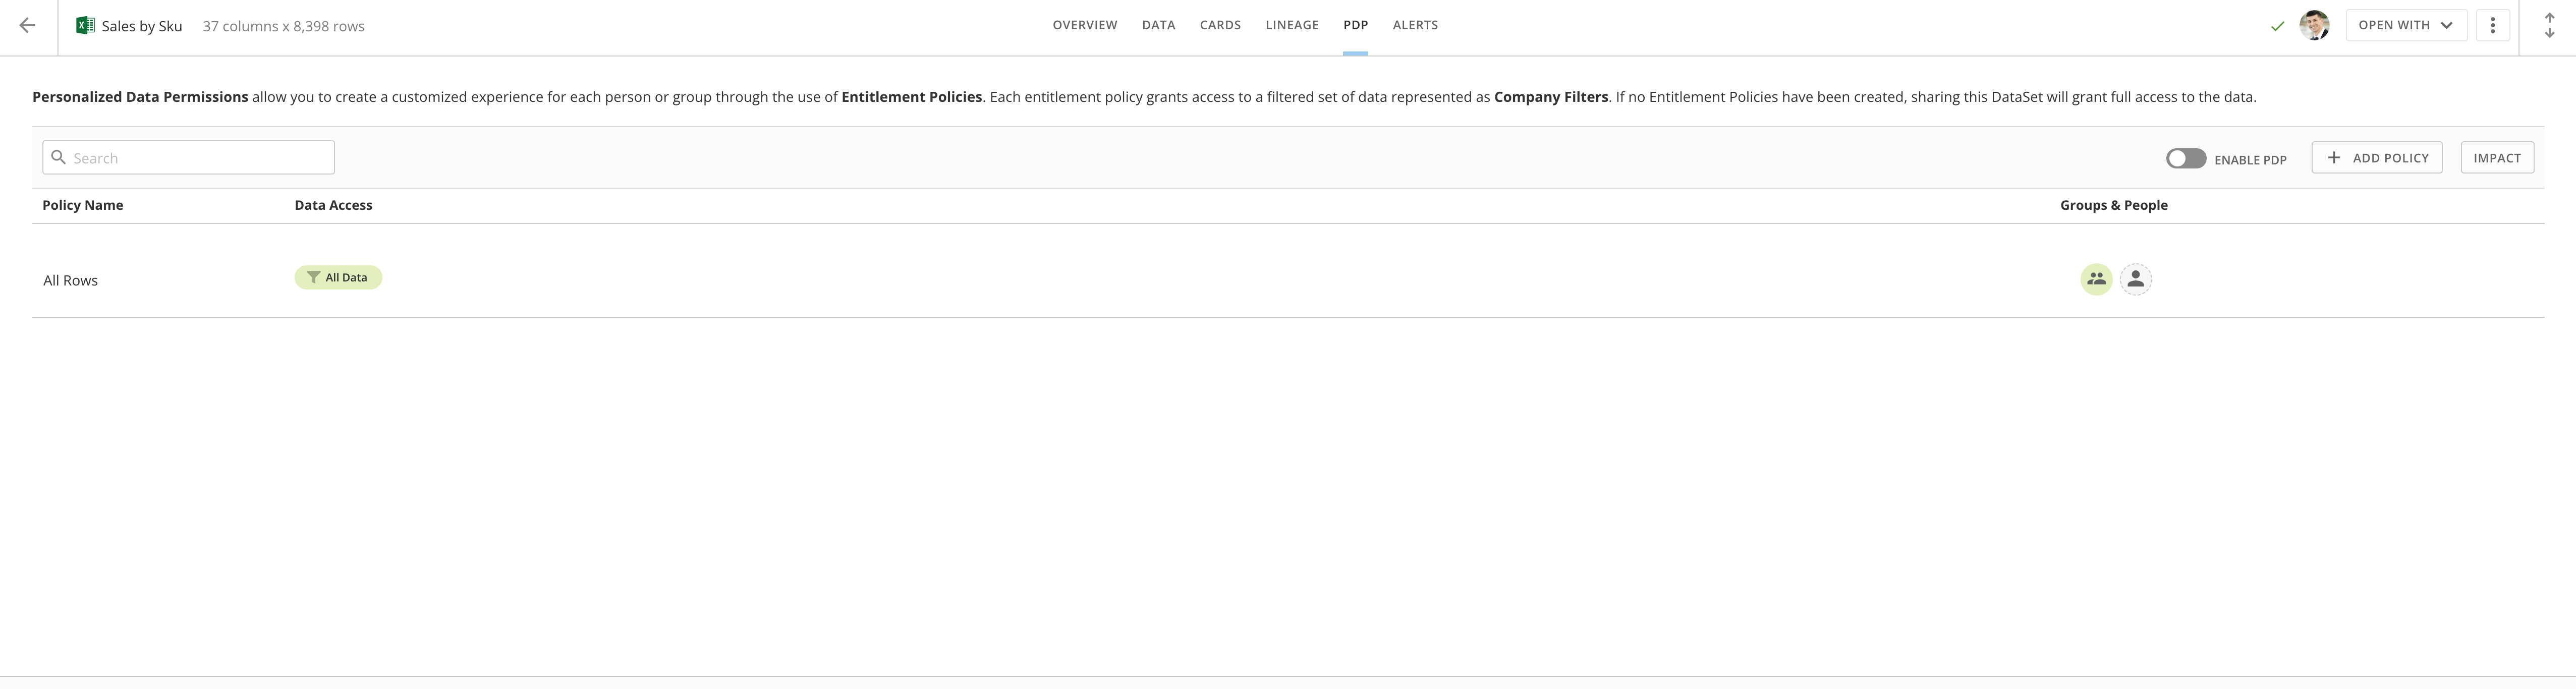
* PDP Before run:
### Example Job Run
* PDP Before run:
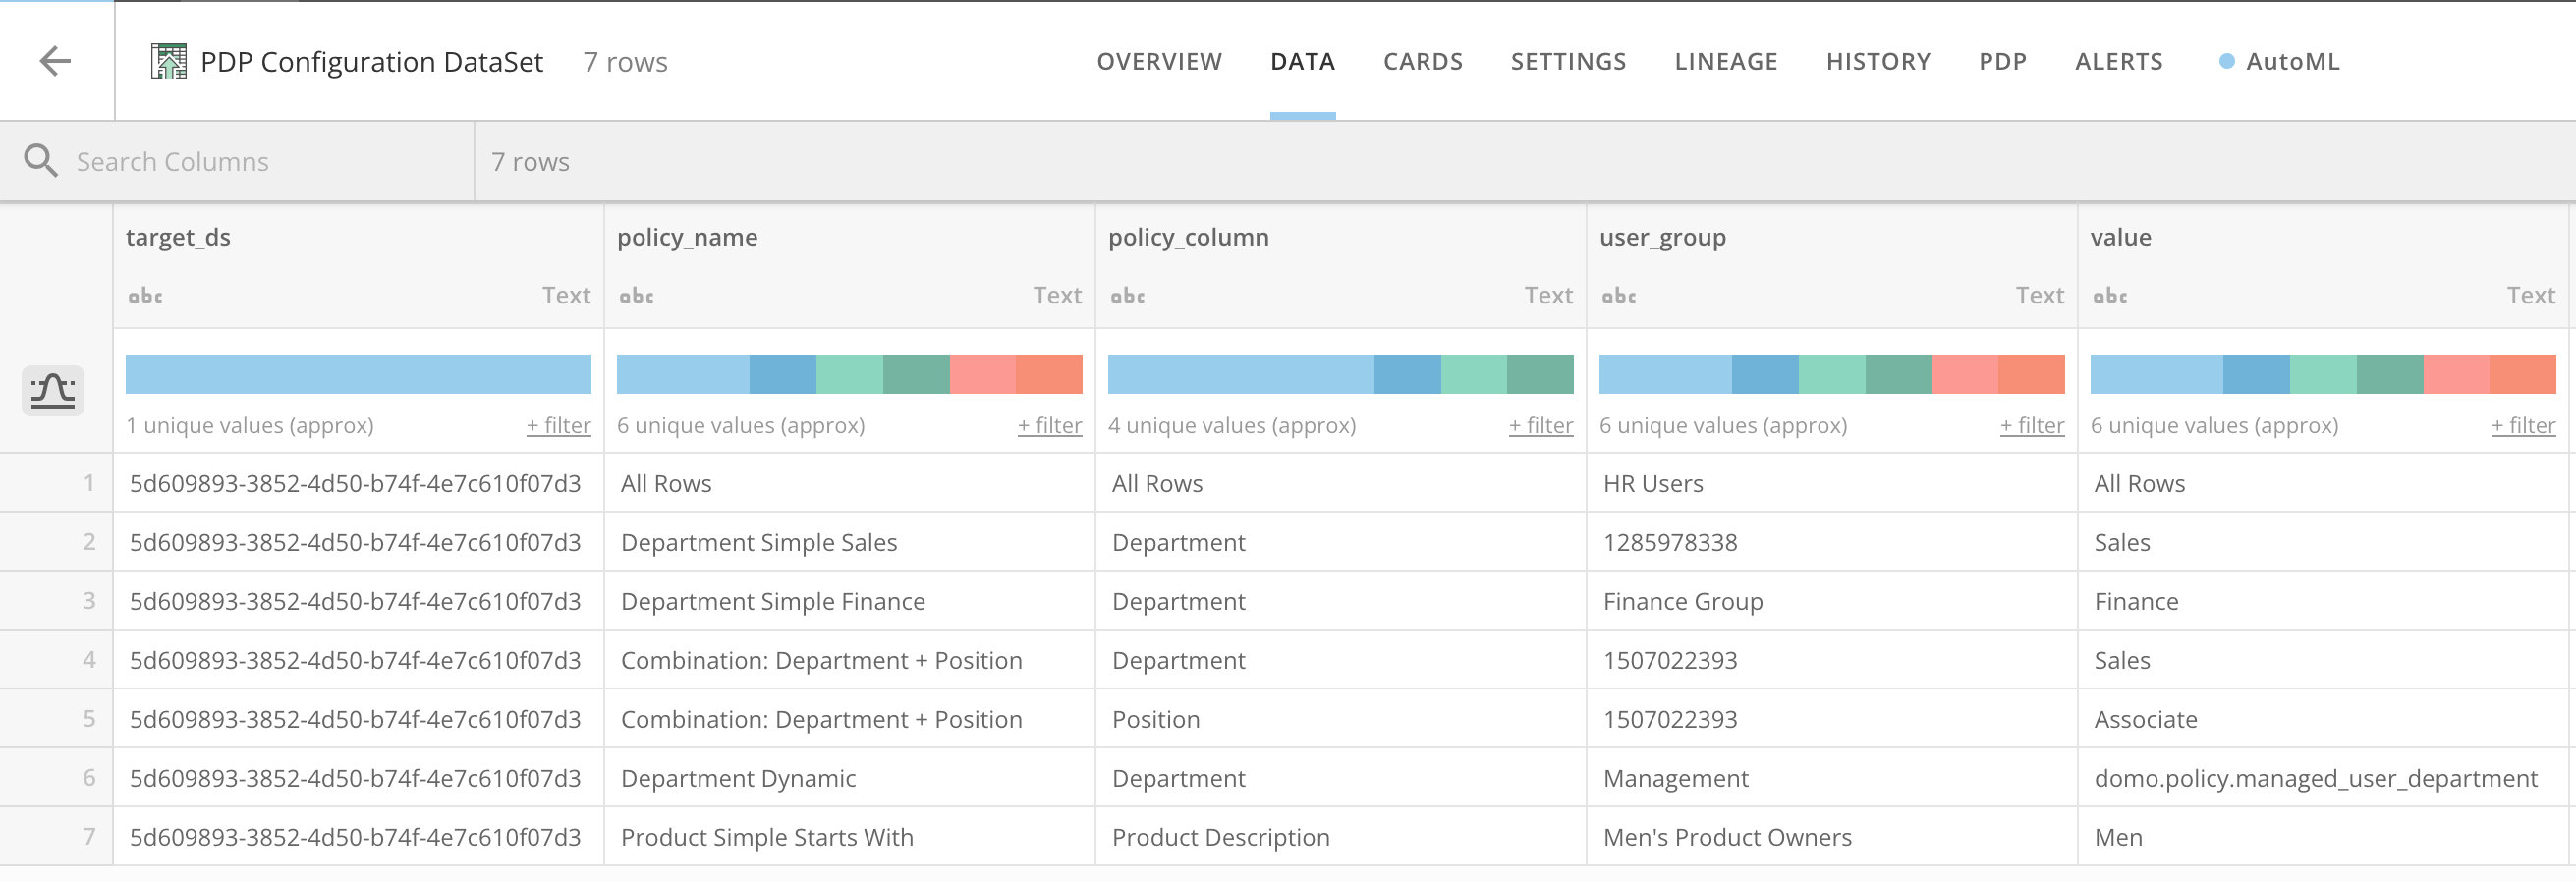
 * Configuration DataSet:
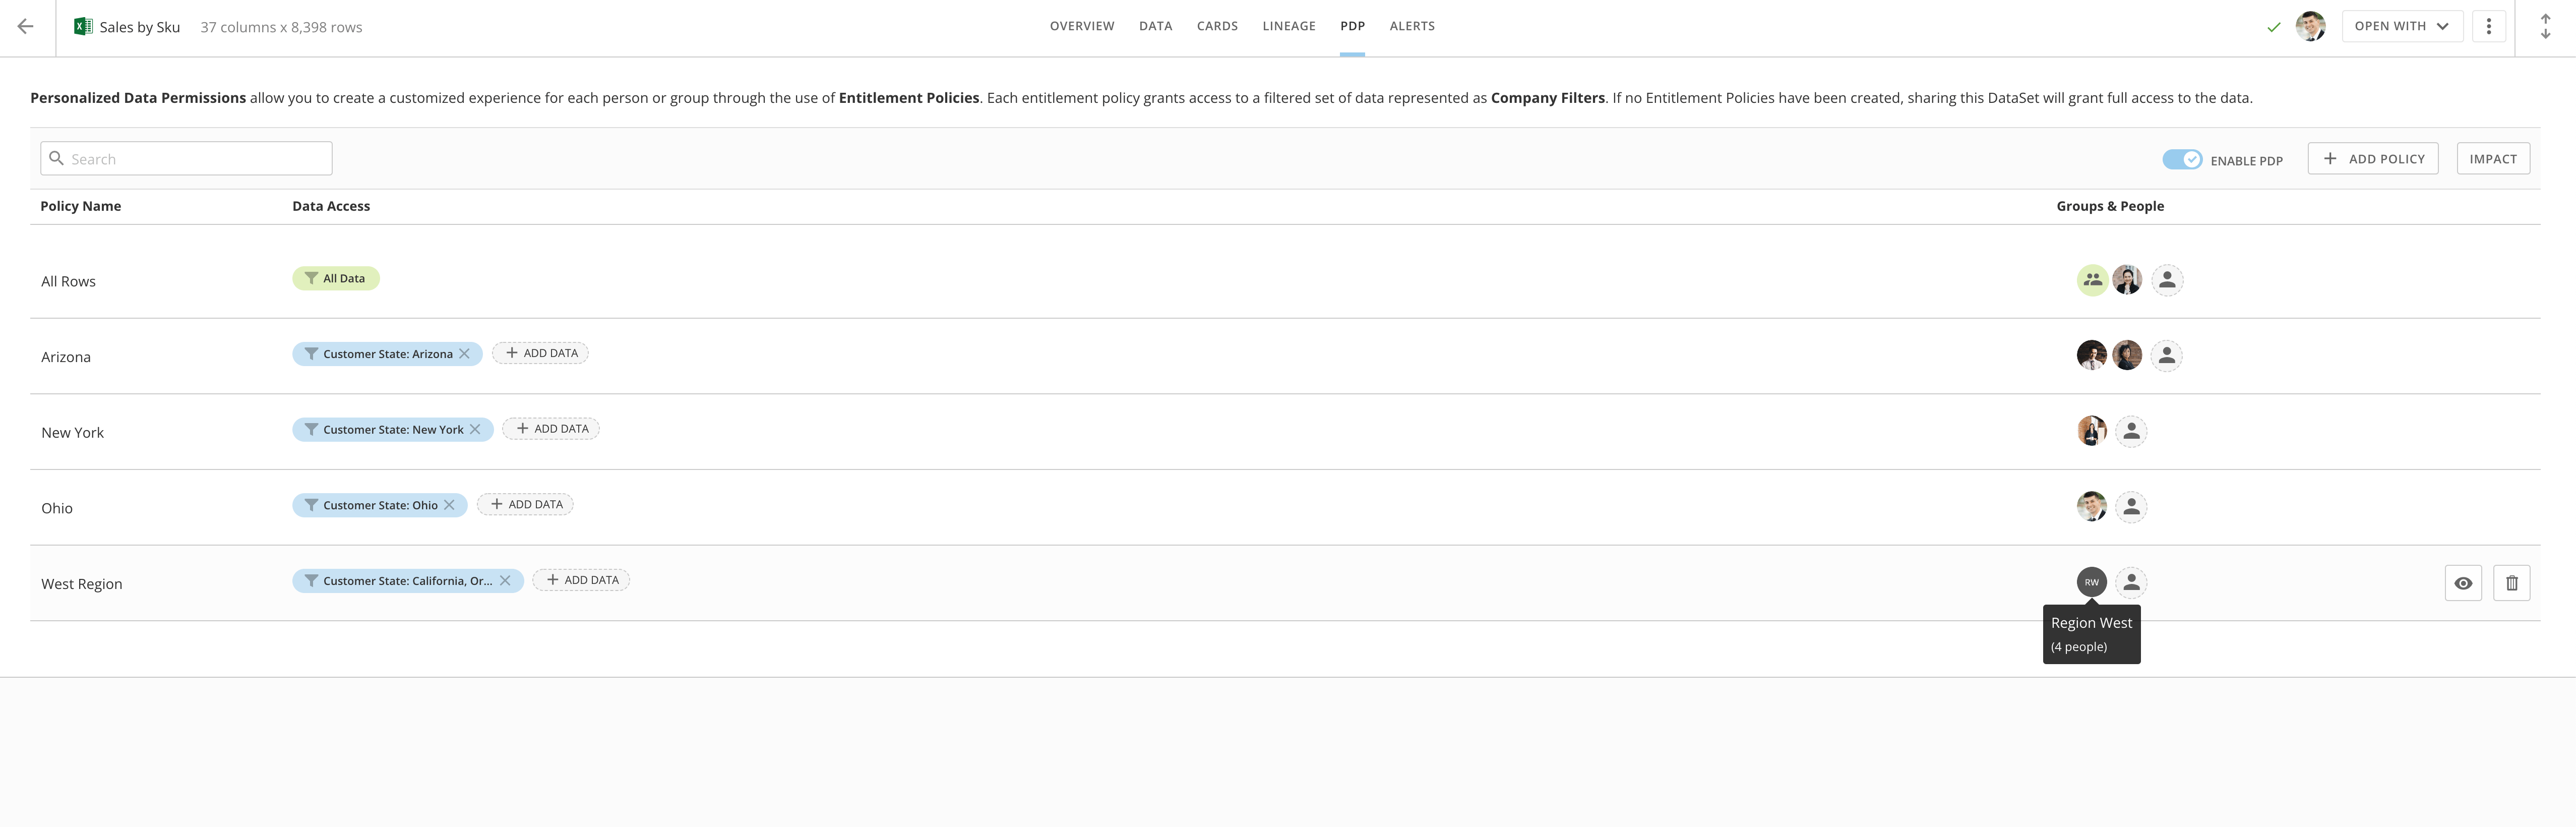
 * PDP after run:
 * Logging DataSet:
 ### Use All Rows Policy
You can give the All Rows policy to users and groups using PDP Automation. Follow the steps below.
1. In the Details view for the DataSet for which you want to extend the All Rows policy, select **Edit Webform**.
**The webform for the DataSet displays.**
2. In the
**user\_group** field of the All Rows policy row, add the email addresses for your user(s) or group(s), using a pipe | as a delimiter.
3. Select
**Save and Continue**.
The user or group is now added to the All Rows policy.
You can also remove users/groups from the All Rows policy in this same area by deleting them from the **user\_group** field.
### Use Dynamic Policies
Dynamic policies can be configured in your configuration file.
To add a dynamic policy, set the ‘policy\_column’ & set the ‘value’ column to the appropriate trusted attribute.
# List of Trusted Attributes
### Use All Rows Policy
You can give the All Rows policy to users and groups using PDP Automation. Follow the steps below.
1. In the Details view for the DataSet for which you want to extend the All Rows policy, select **Edit Webform**.
**The webform for the DataSet displays.**
2. In the
**user\_group** field of the All Rows policy row, add the email addresses for your user(s) or group(s), using a pipe | as a delimiter.
3. Select
**Save and Continue**.
The user or group is now added to the All Rows policy.
You can also remove users/groups from the All Rows policy in this same area by deleting them from the **user\_group** field.
### Use Dynamic Policies
Dynamic policies can be configured in your configuration file.
To add a dynamic policy, set the ‘policy\_column’ & set the ‘value’ column to the appropriate trusted attribute.
# List of Trusted Attributes
| Trusted Attribute | Value |
|---|---|
| Name | domo.policy.managed\_display\_name |
domo.policy.managed\_email\_address | |
| Secondary email | domo.policy.managed\_alternate\_email\_address |
| Employee number | domo.policy.managed\_employee\_number |
| Hire date | domo.policy.managed\_hire\_date |
| Title | domo.policy.managed\_user\_title |
| Department | domo.policy.managed\_user\_department |
| Location | domo.policy.managed\_employee\_location |
| Phone | domo.policy.managed\_phone\_number |
| Desk phone | domo.policy.managed\_desk\_phone\_number |
| Locale | domo.policy.managed\_user\_locale |
| Time zone | domo.policy.managed\_user\_time\_zone |
| Employee ID | domo.policy.managed\_employee\_id |
 ### Use Dynamic PDP with Custom Attributes
To use custom attributes in Dynamic PDP policies, the following must be true:
* The attribute must be set to "managed." Learn about
[attribute management](https://domo-support.domo.com/s/article/000005164?language=en_US#attribute_management).
* In the configuration file, the content in the `Value` column must be the attribute key.
In this example, the custom attribute key is "store" and displays in the `Value` column.
### Use Dynamic PDP with Custom Attributes
To use custom attributes in Dynamic PDP policies, the following must be true:
* The attribute must be set to "managed." Learn about
[attribute management](https://domo-support.domo.com/s/article/000005164?language=en_US#attribute_management).
* In the configuration file, the content in the `Value` column must be the attribute key.
In this example, the custom attribute key is "store" and displays in the `Value` column.
 Finally, add a new column to the configuration file called `is\_dynamic.` The value must be set to "true".
**Note:** For non-custom attribute dynamic policies or non-dynamic policies, the `is\_dynamic` column can be left empty.
### Use Multiple Filters on a Single Policy
To add multiple filters, set the ‘policy\_name’ & ‘user\_group’ to the same values.
Finally, add a new column to the configuration file called `is\_dynamic.` The value must be set to "true".
**Note:** For non-custom attribute dynamic policies or non-dynamic policies, the `is\_dynamic` column can be left empty.
### Use Multiple Filters on a Single Policy
To add multiple filters, set the ‘policy\_name’ & ‘user\_group’ to the same values.
 ### Remote Instance Configuration
Remote instance configuration allows you to be in one Domo instance and configure PDP for other instances to which you have access. To configure PDP remotely, you need a [configuration DataSet](#config_dataset), which is described previously in this article. You also need a [Domo Access Token account](#configure_domo_access_token) configured with either a [Domo Access token](#generate_access_token) or with a username and password for the remote instance.
# Configure PDP Automation for Remote Instance
1. While creating or editing a job for PDP Automation, in the
**Configuration** section, select a configuration DataSet populated with valid values for the remote instance according to PDP Automation guidelines given in this article. See [Configuration DataSet](#config_dataset).
2. Still in the
**Configuration** section, choose **Remote Instance** for where to run the job.
The **Instance Settings** display.
3. In the
**Instance:** field, enter the domain for the remote instance you want to manage PDP for.
4. From the
**Select the account for your instance:** list, select a valid [Domo Access Token account](#configure_domo_access_token). To learn how to configure a Domo Access Token account, see the next section.
5. Fill in the details for the
**Reporting** section.
### Remote Instance Configuration
Remote instance configuration allows you to be in one Domo instance and configure PDP for other instances to which you have access. To configure PDP remotely, you need a [configuration DataSet](#config_dataset), which is described previously in this article. You also need a [Domo Access Token account](#configure_domo_access_token) configured with either a [Domo Access token](#generate_access_token) or with a username and password for the remote instance.
# Configure PDP Automation for Remote Instance
1. While creating or editing a job for PDP Automation, in the
**Configuration** section, select a configuration DataSet populated with valid values for the remote instance according to PDP Automation guidelines given in this article. See [Configuration DataSet](#config_dataset).
2. Still in the
**Configuration** section, choose **Remote Instance** for where to run the job.
The **Instance Settings** display.
3. In the
**Instance:** field, enter the domain for the remote instance you want to manage PDP for.
4. From the
**Select the account for your instance:** list, select a valid [Domo Access Token account](#configure_domo_access_token). To learn how to configure a Domo Access Token account, see the next section.
5. Fill in the details for the
**Reporting** section.
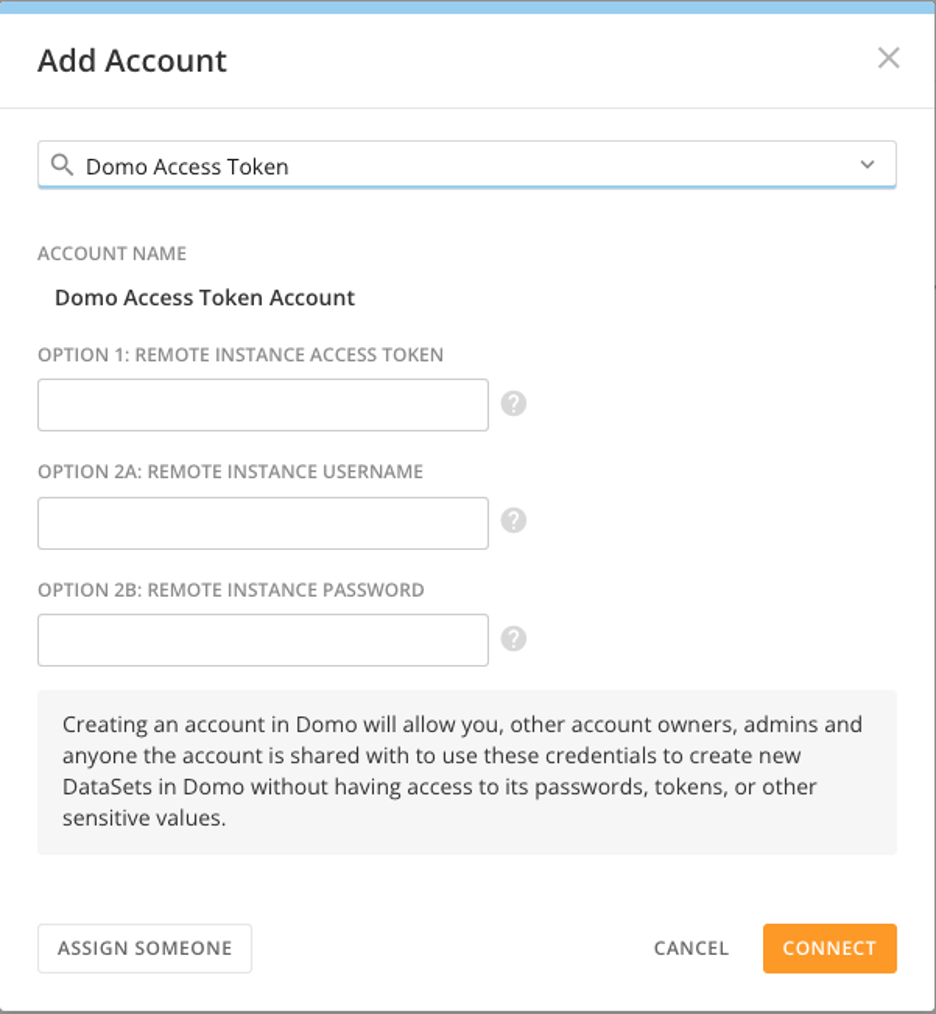 4. In the modal, complete one of the following options:
* **Access Token —**
Enter an access token in the **Remote Instance Access Token** field. To learn how to generate a token, see [Generate Access Token](#generate_access_token).
* **Username and password —**
Enter your credentials in the **Remote Instance Username** and **Remote Instance Password** fields.
5. Select
**Connect**.
#### Generate Access Token
Follow these steps to generate an access token:
1. In the Domo navigation header, select
**More** > **Admin**.
The Admin Settings display.
2. In the
**Authentication** menu of the Admin Settings, select **Access tokens**.
3. On the
**Access tokens** page, select **+ Generate access token**.
4. In the modal, complete one of the following options:
* **Access Token —**
Enter an access token in the **Remote Instance Access Token** field. To learn how to generate a token, see [Generate Access Token](#generate_access_token).
* **Username and password —**
Enter your credentials in the **Remote Instance Username** and **Remote Instance Password** fields.
5. Select
**Connect**.
#### Generate Access Token
Follow these steps to generate an access token:
1. In the Domo navigation header, select
**More** > **Admin**.
The Admin Settings display.
2. In the
**Authentication** menu of the Admin Settings, select **Access tokens**.
3. On the
**Access tokens** page, select **+ Generate access token**.
 4. Enter a description in the
**Access token description** field.
5. Search for and select a user for whom you are generating the access token.
6. Select an expiration interval in the
**Expire after** list.
7. Select
**Generate**.
8. Copy the code to use.
4. Enter a description in the
**Access token description** field.
5. Search for and select a user for whom you are generating the access token.
6. Select an expiration interval in the
**Expire after** list.
7. Select
**Generate**.
8. Copy the code to use.