> ## Documentation Index
> Fetch the complete documentation index at: https://domoinc-openapi-sync-dataflows.mintlify.site/llms.txt
> Use this file to discover all available pages before exploring further.

# Domo Sandbox

export const InlineImage = ({src, alt = '', height = '1.6em'}) => {
  return <img noZoom src={src} alt={alt} style={{
    display: 'inline',
    verticalAlign: 'start',
    height: height,
    margin: '0'
  }} />;
};

### Intro

Domo Sandbox allows you to promote content from one instance to another instance. You can promote pages, cards, DataFlows, App Studio apps, Views, and connectors.

Here are some terms you should know before using Domo Sandbox:

<table data-aura-rendered-by="33:208;a"><thead><tr><td colspan="1" rowspan="1"> Term </td><td colspan="1" rowspan="1"> Definition </td></tr></thead><tbody><tr><td colspan="1" rowspan="1"><b> Repository </b></td><td colspan="1" rowspan="1"> The collection of objects that are being versioned. Over time, multiple versions of the selected objects are stored. An example of what might be included is a dashboard (including cards, Beast Modes, images, etc.) </td></tr><tr><td colspan="1" rowspan="1"><b> Version </b></td><td colspan="1" rowspan="1"> A snapshot of a repository at a given point in time. A repository can have multiple versions. </td></tr><tr><td colspan="1" rowspan="1"><b> Commit </b></td><td colspan="1" rowspan="1"> The action taken to store a new version. This results in a new snapshot of the Domo objects. </td></tr><tr><td colspan="1" rowspan="1"><b> Promote </b></td><td colspan="1" rowspan="1"> The action taken to create or update the objects in the destination Domo instance. An example is promoting a dashboard to production. This creates the dashboard the first time it is promoted or updates the dashboard on subsequent promote actions. </td></tr><tr><td colspan="1" rowspan="1"><b> Same Instance Promotion </b></td><td colspan="1" rowspan="1"><p> Promoting a repository in the same instance where it was created. Use this when you want to be able to manage the versioning process in the same Domo instance. </p></td></tr><tr><td colspan="1" rowspan="1"><b> Source (Dev) Instance </b></td><td colspan="1" rowspan="1"> The location of the source objects. This is typically a development or sandbox Domo instance. </td></tr><tr><td colspan="1" rowspan="1"><b> Destination (Prod) Instance </b></td><td colspan="1" rowspan="1"> The location where the objects are updated. This is typically the production instance. </td></tr></tbody></table>

***

### Access Sandbox

If you are interested in using this feature, contact your Domo account team. If you do not have their contact information, reach out to Technical Support at [support@domo.com](mailto:support@domo.com)

You may be required to complete training before you can use the feature.

### Instance Configuration

Sandbox supports both cross-instance and same-instance promotion. If you want to do cross-instance promotion, contact your Domo account team to have an instance provisioned.

# Invite Production Instance to Sandbox

You must create a commit/promote relationship from your development instance to your production instance by sending a Sandbox invitation from Dev to Prod.

1. Log into your source or Dev instance (see the table in
   for more information).

2. In the navigation header, select
   **More** > **Admin**.

The **Admin Settings** displays.

3. Under **Governance**, select **Sandbox**.

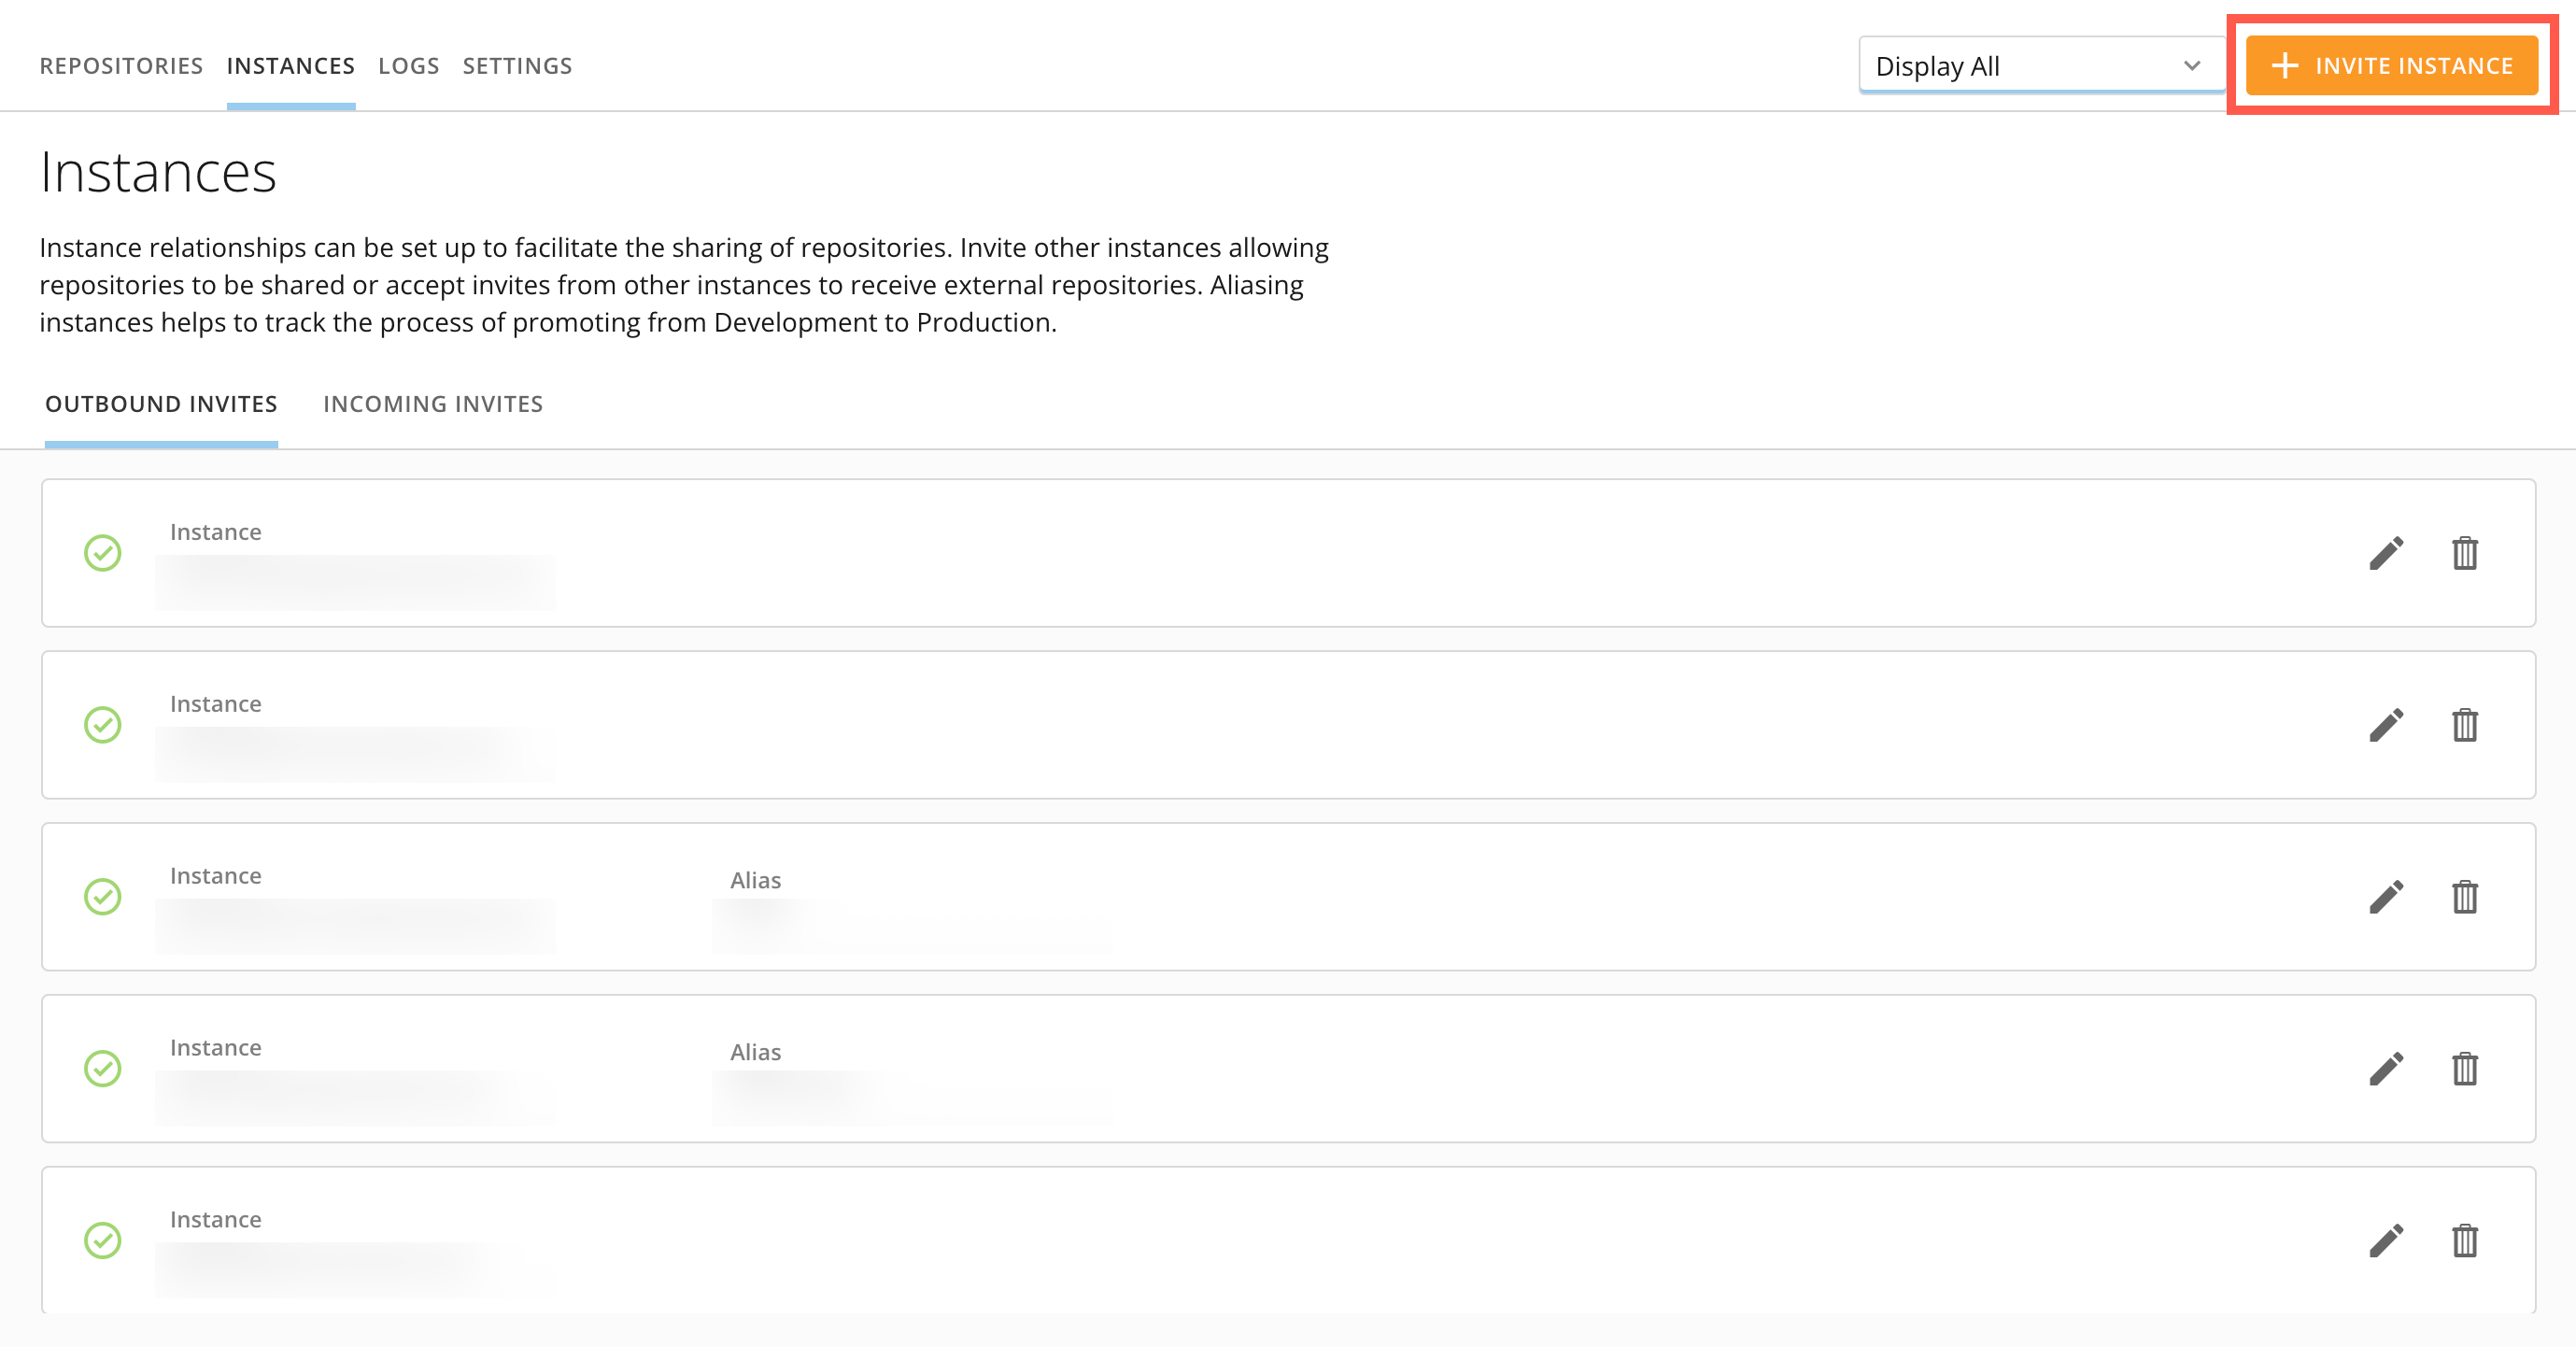
4. Go to the
   **Instances** tab and select **+ Invite Instance.**

<Frame>
  <img alt="2022-10-05_17-01-13.png" src="https://mintcdn.com/domoinc-openapi-sync-dataflows/XLeSvlwfBHPJHbmY/images/kb/ka0Vq000000AnVk-00N5w00000Ri7BU-0EM5w000005vXk4.png?fit=max&auto=format&n=XLeSvlwfBHPJHbmY&q=85&s=8eed0d7b5898022e0c6a7475520d766b" style={{width: 901, height: 471}} width="2758" height="1442" data-path="images/kb/ka0Vq000000AnVk-00N5w00000Ri7BU-0EM5w000005vXk4.png" />
</Frame>

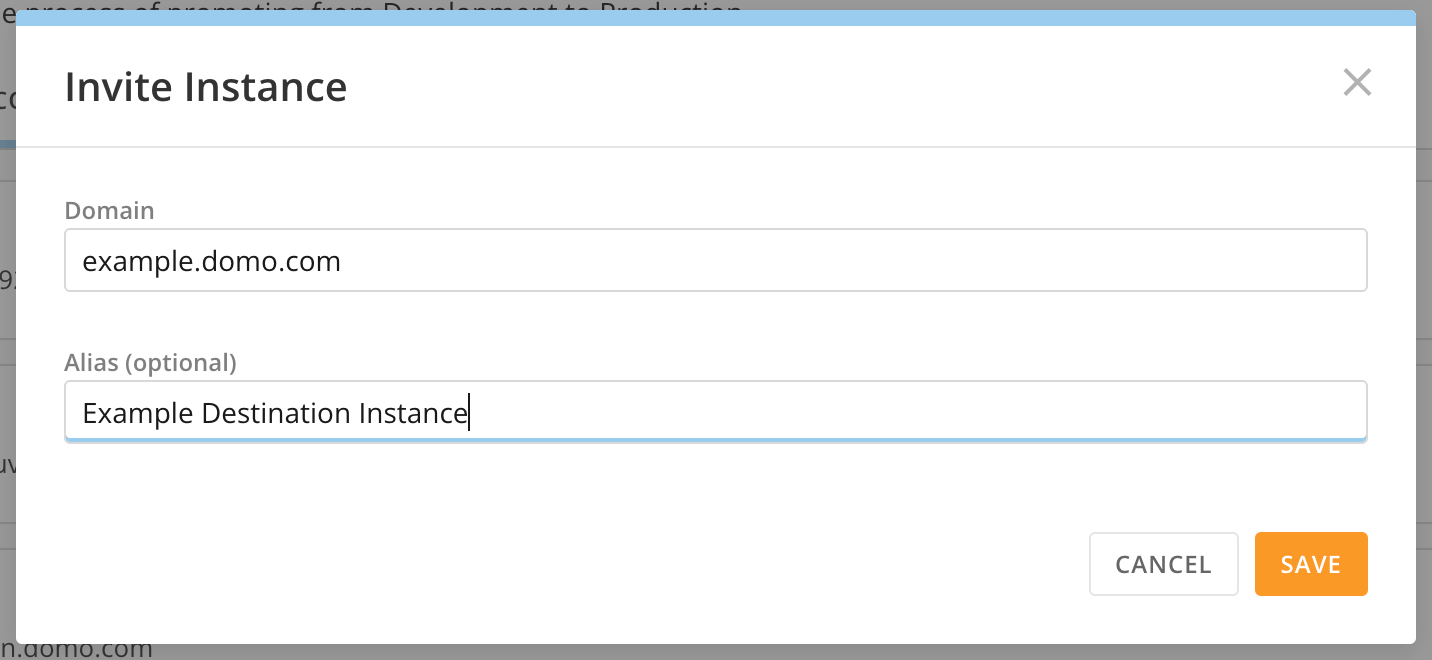
The **Invite Instance** modal displays.
<Frame>
  <img alt="Screen_Shot_2022-10-05_at_5.14.29_PM.png" src="https://mintcdn.com/domoinc-openapi-sync-dataflows/XLeSvlwfBHPJHbmY/images/kb/ka0Vq000000AnVk-00N5w00000Ri7BU-0EM5w000005vXjz.png?fit=max&auto=format&n=XLeSvlwfBHPJHbmY&q=85&s=829250460f47fb5f45e8dc43845e589b" style={{width: 551, height: 254}} width="1432" height="660" data-path="images/kb/ka0Vq000000AnVk-00N5w00000Ri7BU-0EM5w000005vXjz.png" />
</Frame>

5. Type in the Domo domain of the destination or Prod instance, and an optional alias. The alias is the identifier used in other areas of Sandbox.

6. Select
   **Save**.

The invitation is sent to the destination instance.
<Warning>
  **Important:**
  The instance should be entered as "
  *example*
  .
  [domo.com](http://domo.com)
  "
</Warning>

7. Log in to the Prod instance.

8. In the
   **Instances** tab, choose **Incoming Invites** and select **Approve.**

You can now share repositories with the Prod instance and promote them.

# Create a Repository

1. Log into your source instance. In the navigation header, select
   **More** > **Admin**.

The **Admin Settings** displays.

2. Under
   **Governance**, select **Sandbox**.

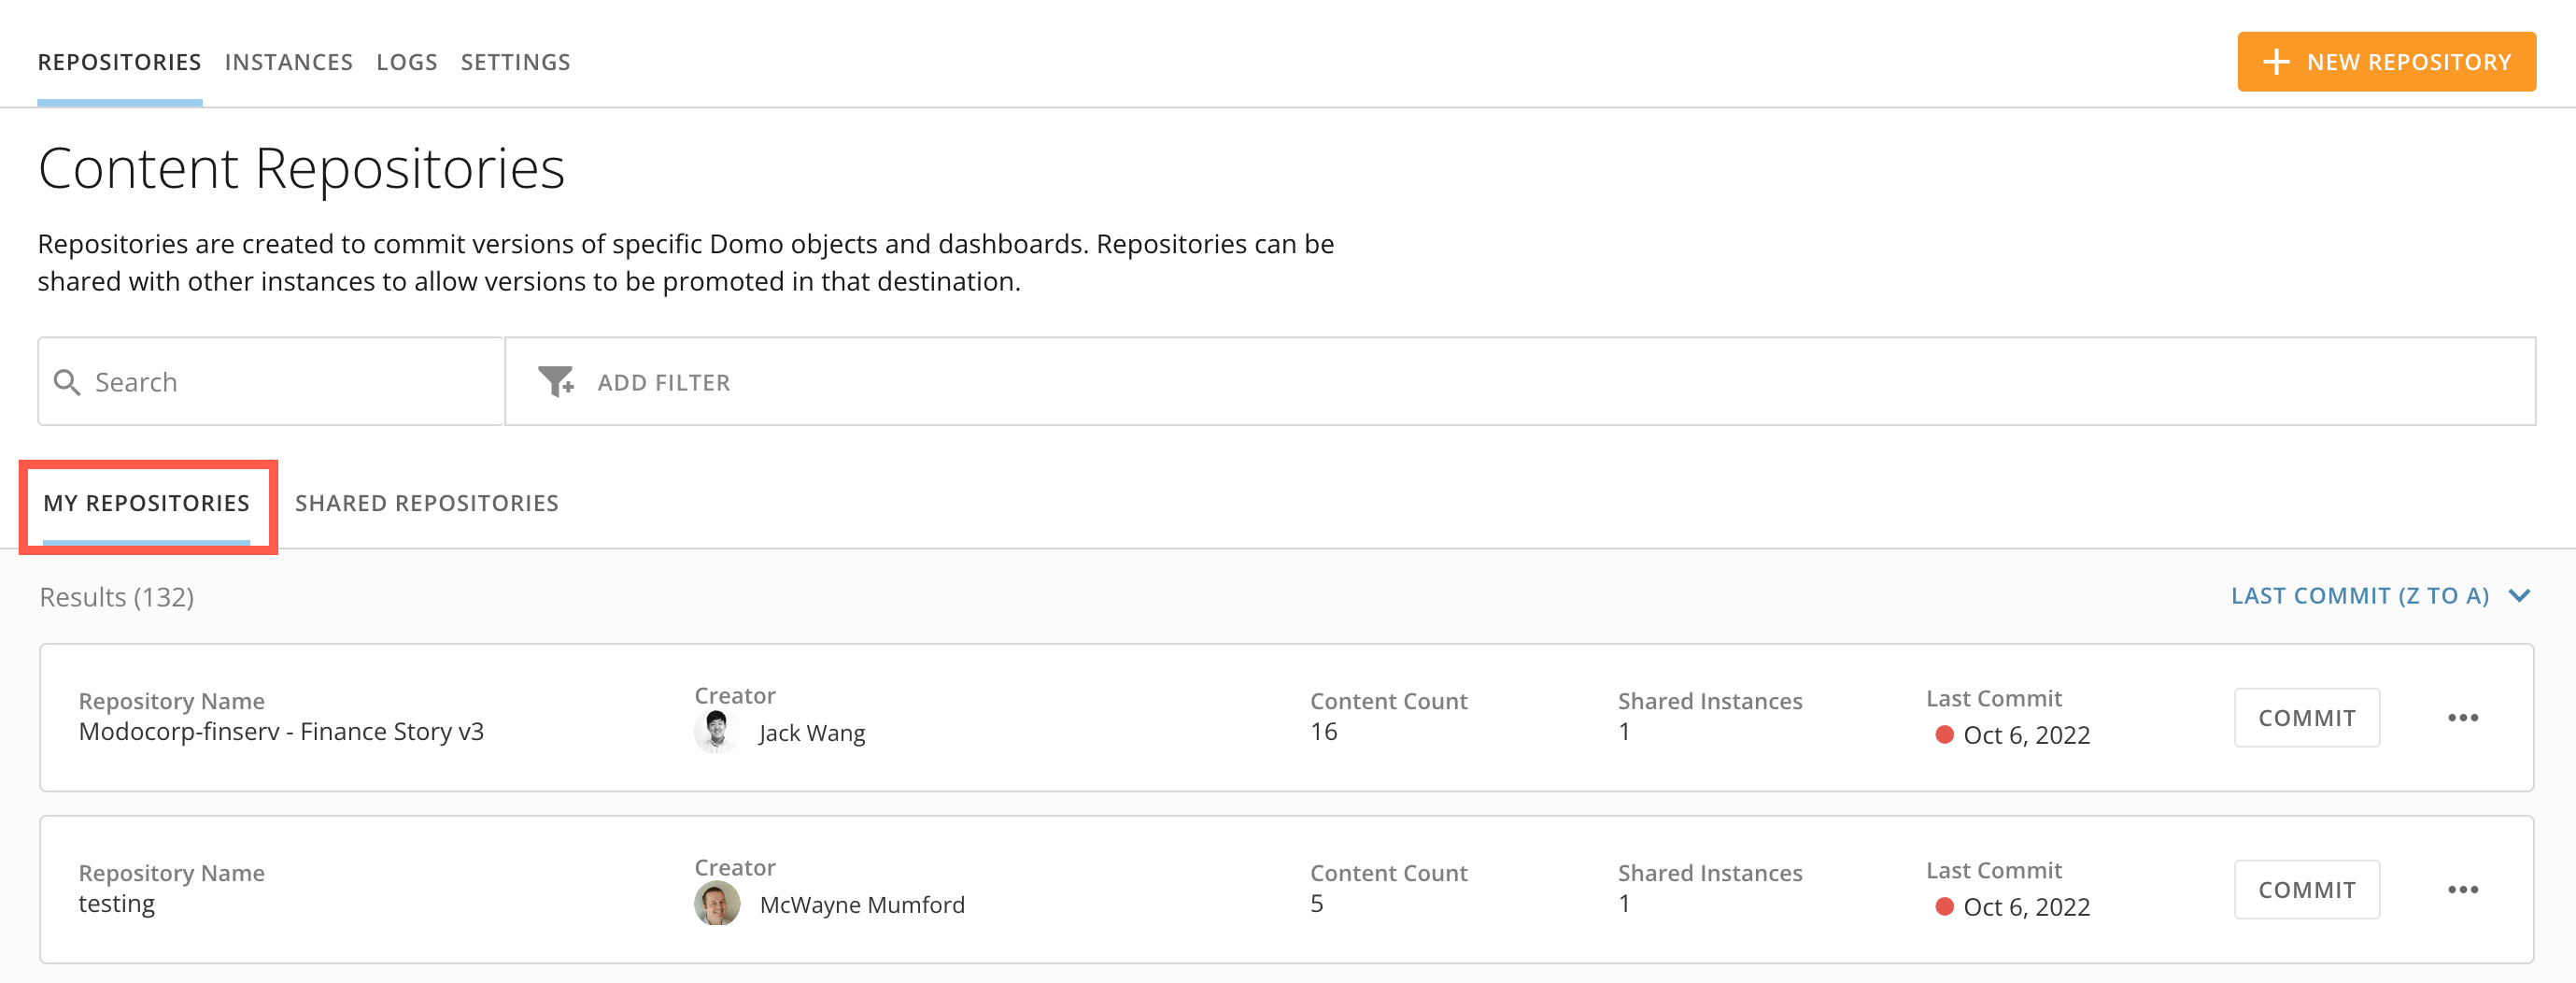
3. Go to the
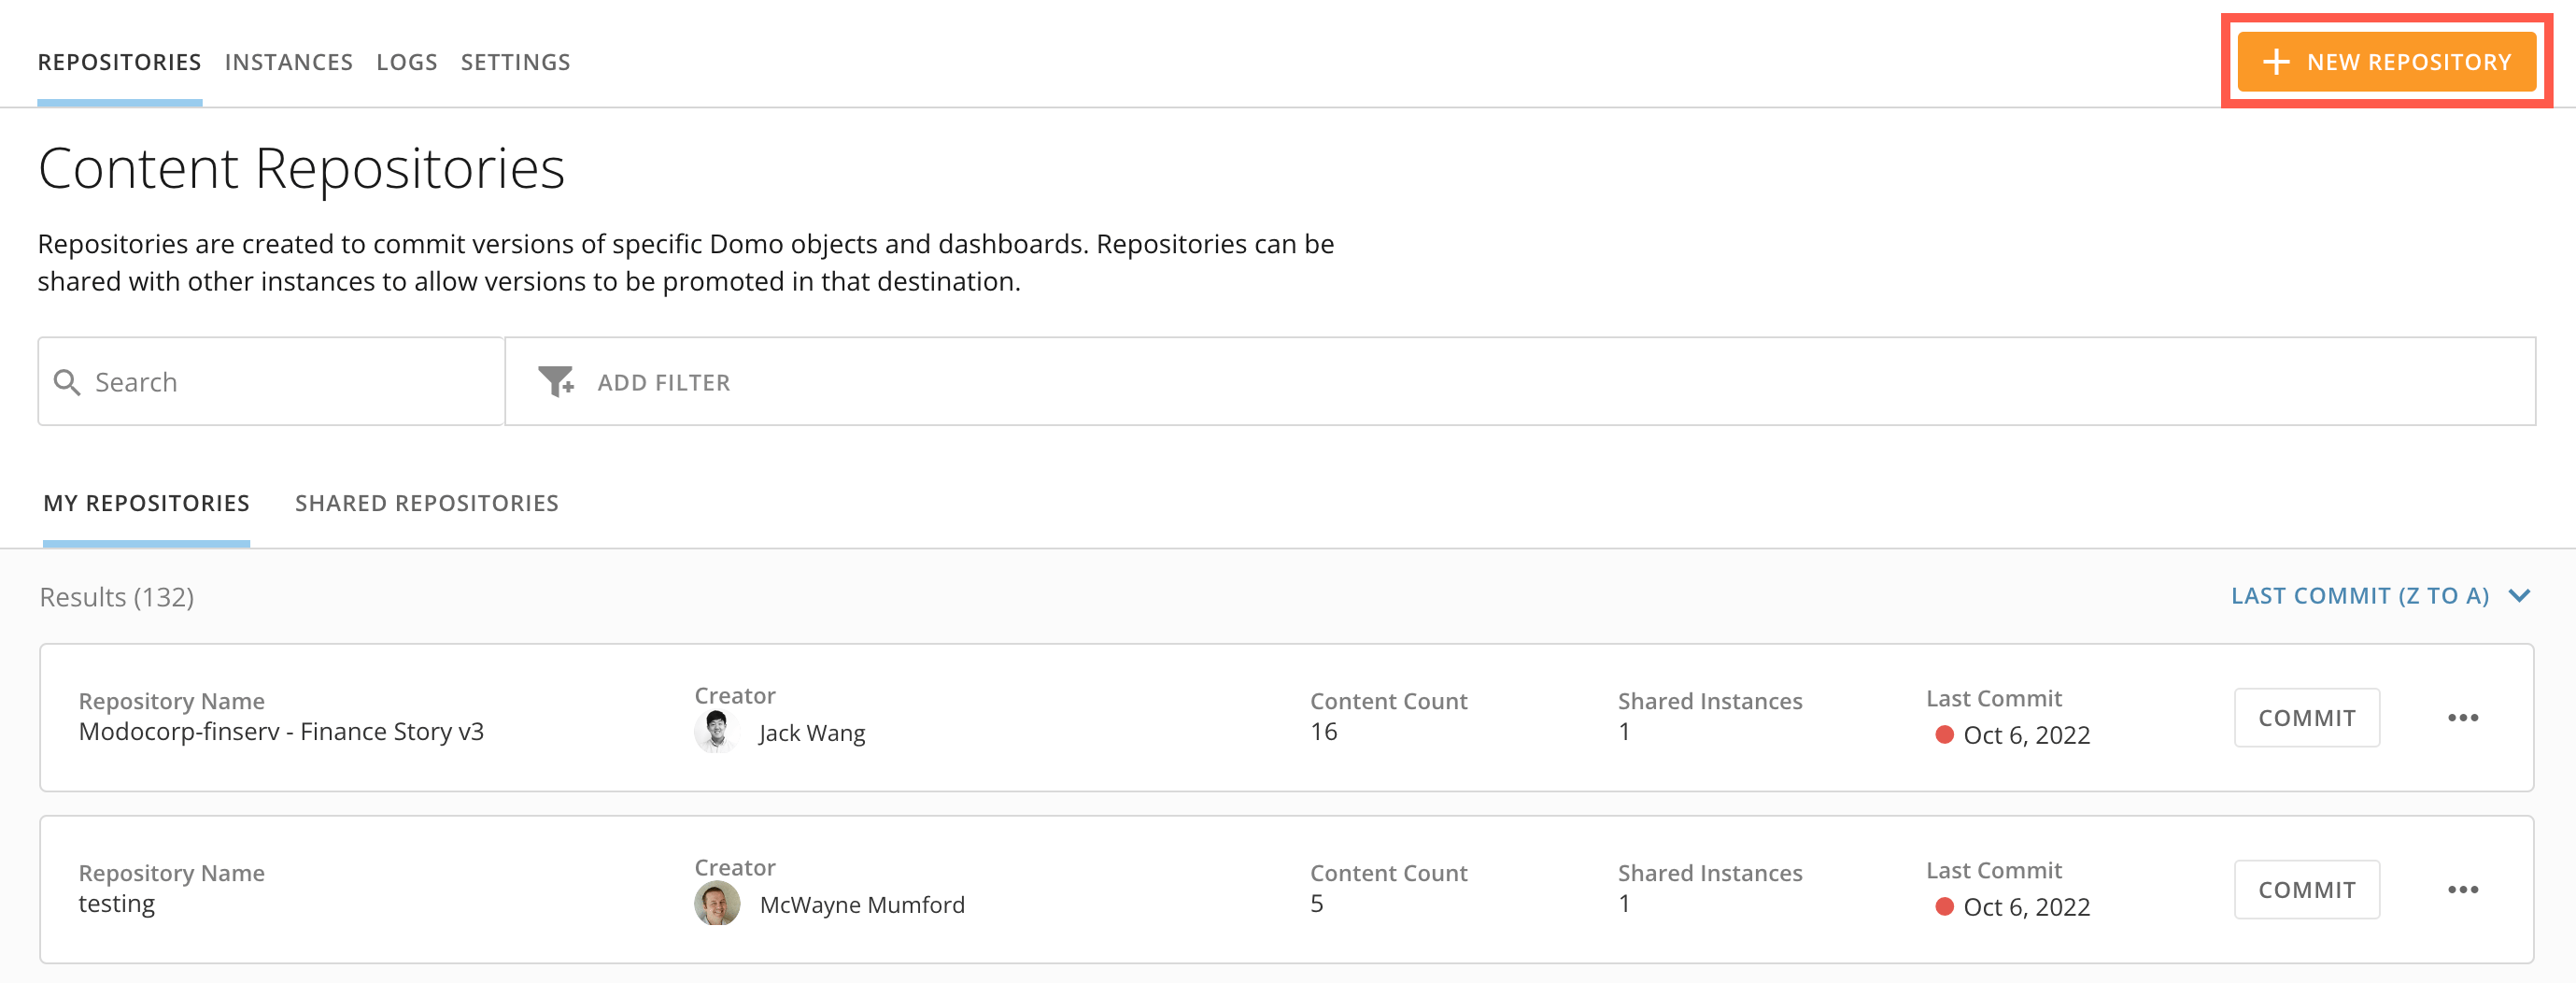
   **My Repositories** tab and select **+ New Repository.**

<Frame>
  <img alt="2022-10-07_11-39-48.png" src="https://mintcdn.com/domoinc-openapi-sync-dataflows/XLeSvlwfBHPJHbmY/images/kb/ka0Vq000000AnVk-00N5w00000Ri7BU-0EM5w000005vXk2.png?fit=max&auto=format&n=XLeSvlwfBHPJHbmY&q=85&s=32671641a203f9fd11839544772f139b" style={{width: 907, height: 346}} width="2758" height="1052" data-path="images/kb/ka0Vq000000AnVk-00N5w00000Ri7BU-0EM5w000005vXk2.png" />
</Frame>

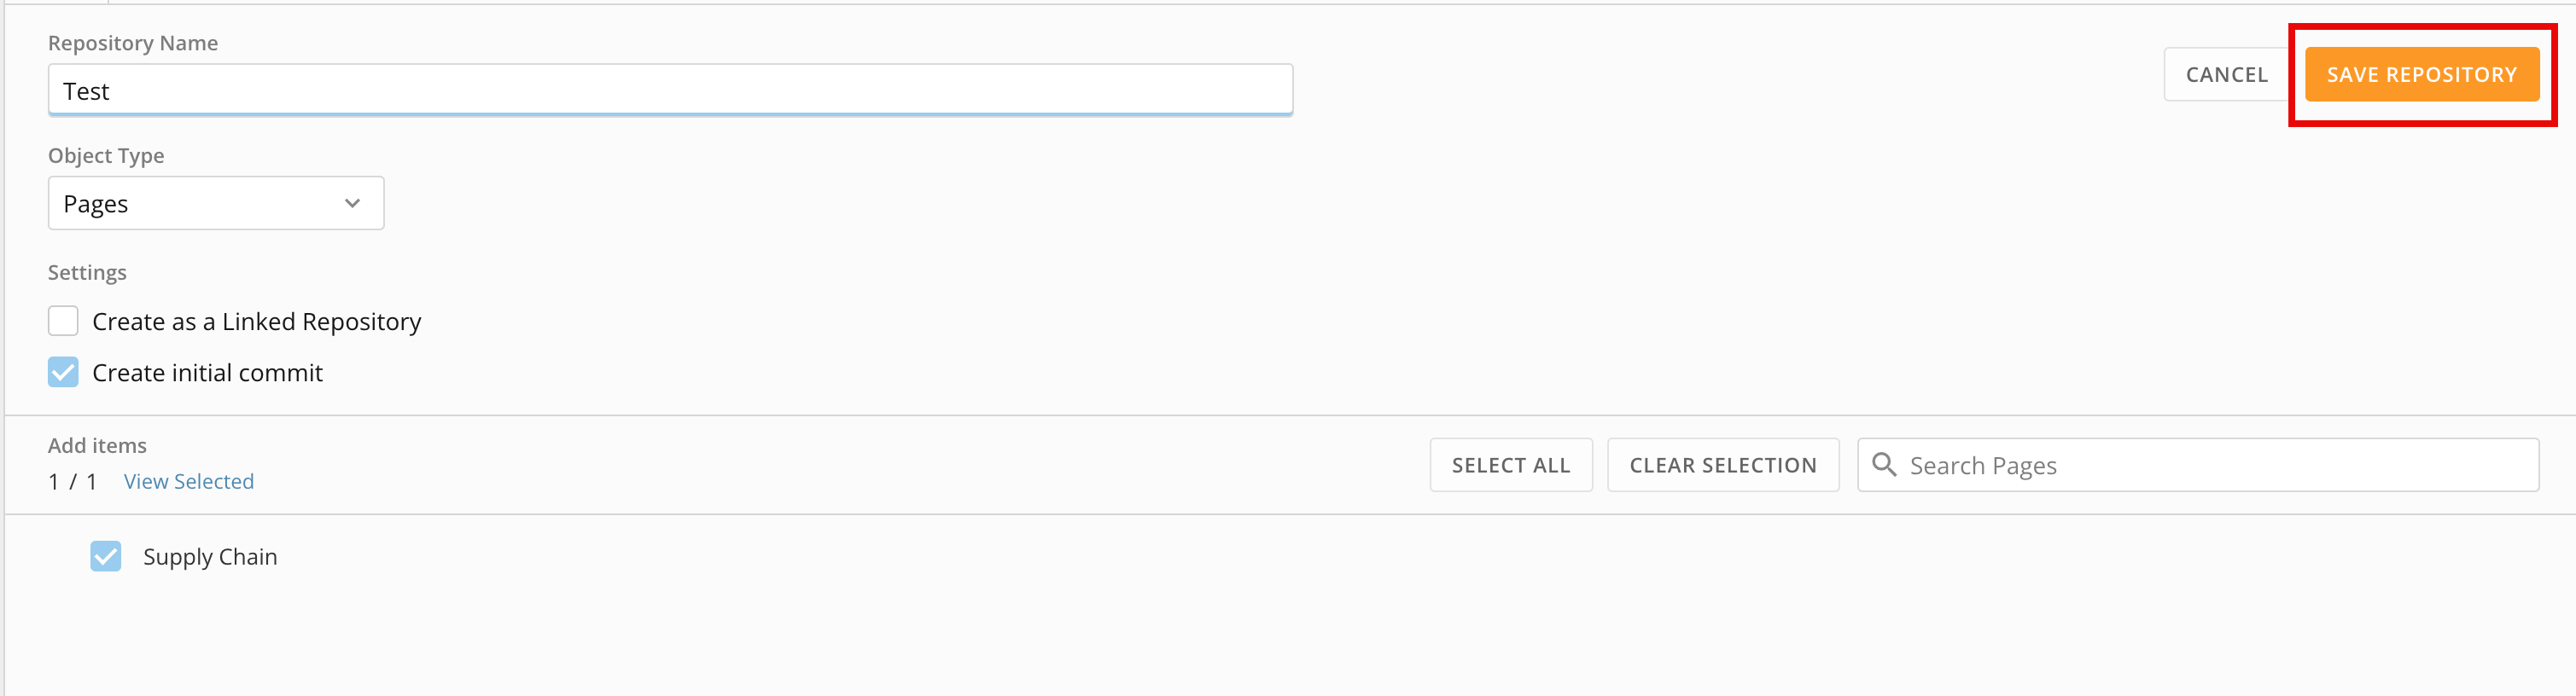
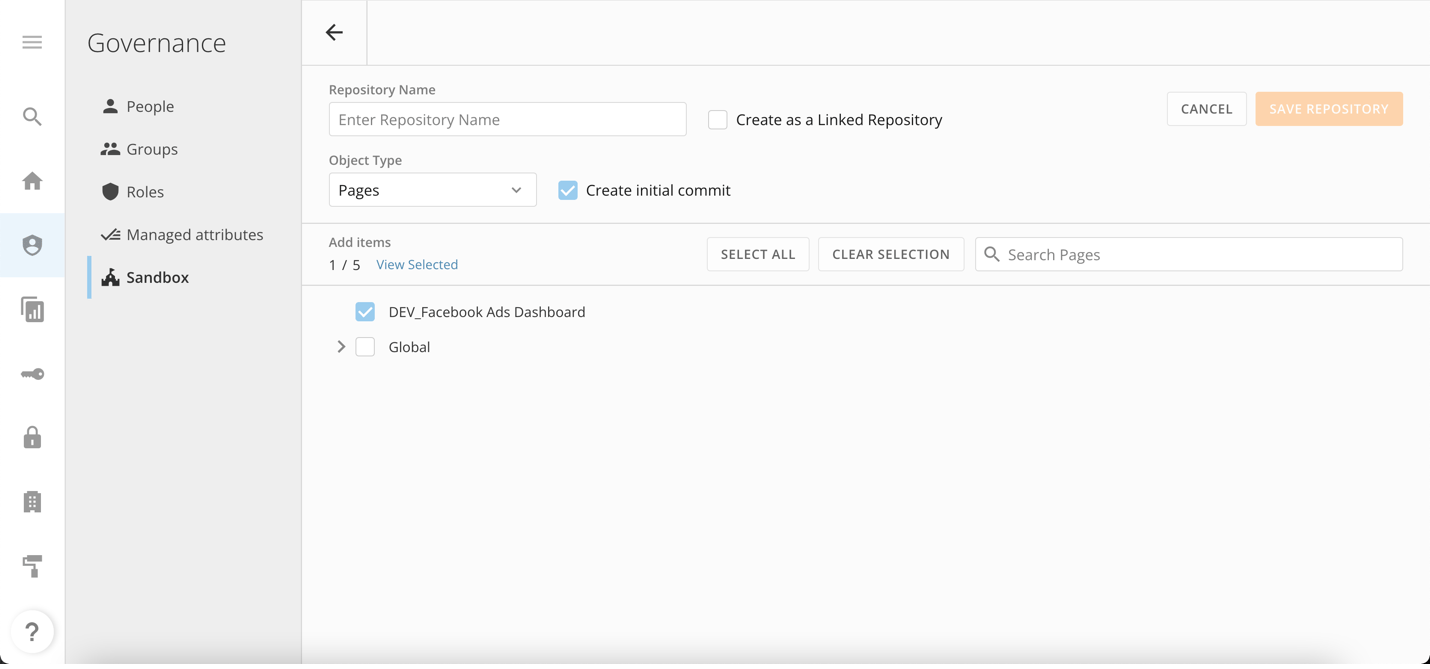
4. Configure the repository by:

* Naming the repository. If you're creating an App Studio repository,
  [return to that task](#create_an_app_studio_repository) now.
* Selecting the object type being versioned.
* Choosing the items to be included in the repository.
<Note>
  **Note:**
  By default,
  **Create initial commit**
  is selected. When the repository is saved, the first version is committed.
</Note>

<Frame>
  <img alt="repositoriestab.png" src="https://mintcdn.com/domoinc-openapi-sync-dataflows/XLeSvlwfBHPJHbmY/images/kb/ka0Vq000000AnVk-00N5w00000Ri7BU-0EM5w000005vXjx.png?fit=max&auto=format&n=XLeSvlwfBHPJHbmY&q=85&s=bd05c9478ef85668dd9969263dcec23a" style={{width: 902, height: 422}} width="1430" height="669" data-path="images/kb/ka0Vq000000AnVk-00N5w00000Ri7BU-0EM5w000005vXjx.png" />
</Frame>

5. Select
   **Save Repository**.

The repository is stored in Sandbox in the **My Repositories** tab.

# Create an App Studio Repository

You can create an App Studio repository object type from Sandbox.

1. Follow the steps to
   [Create a Repository](#create_repository) until you name the repository. Then return here.
2. In the
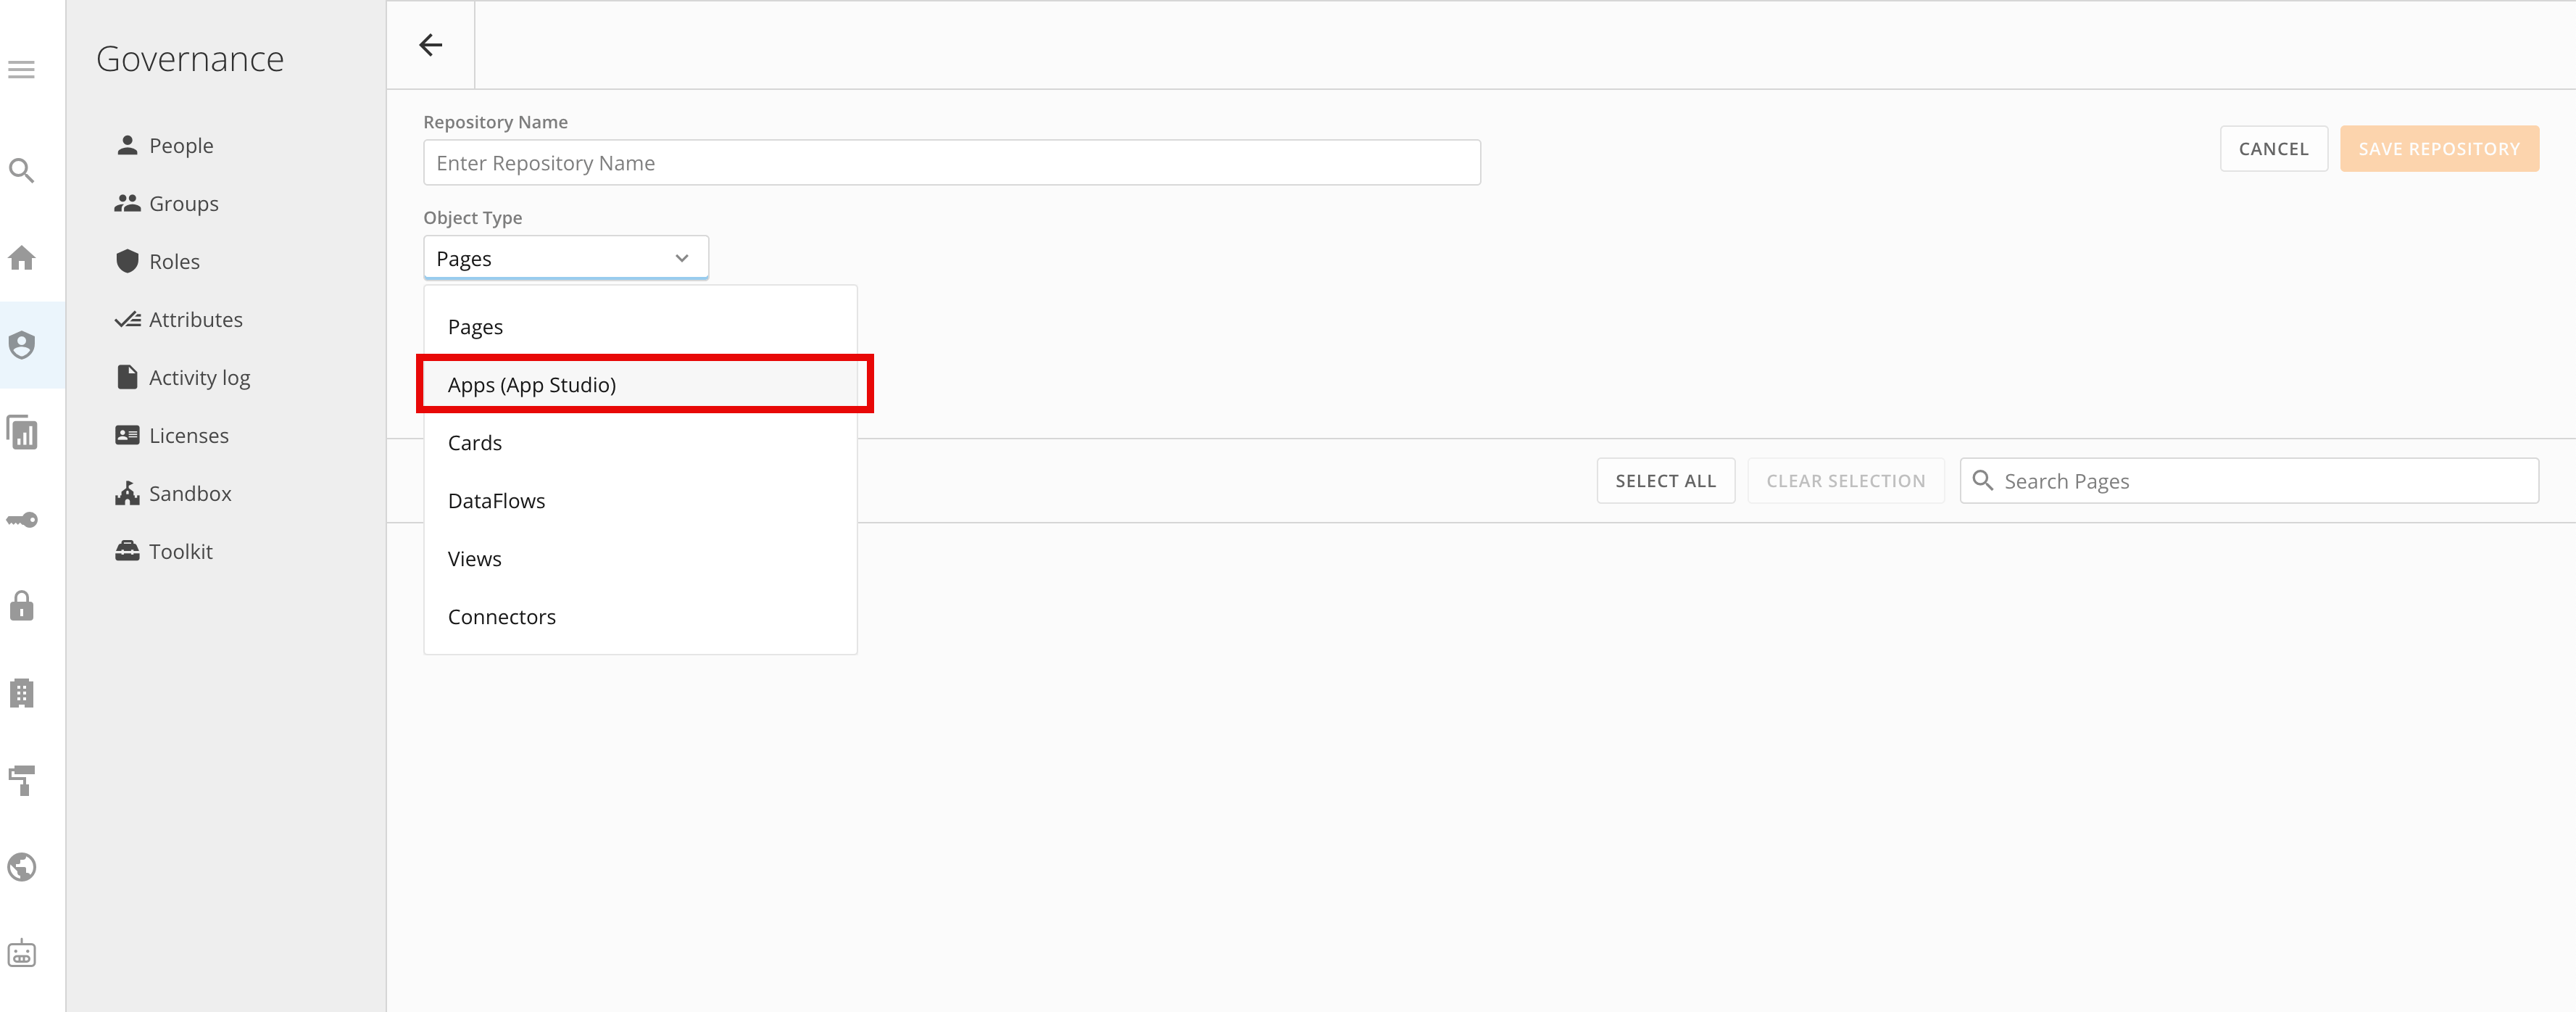
   **Object Type** dropdown, select **Apps (App** **Studio)** to display a list of available App Studio apps.
   <Frame>
     <img alt="Screenshot 2024-05-22 at 8.47.38 AM.png" src="https://mintcdn.com/domoinc-openapi-sync-dataflows/XLeSvlwfBHPJHbmY/images/kb/ka0Vq000000AnVk-00N5w00000Ri7BU-0EMVq0000012VS9.jpg?fit=max&auto=format&n=XLeSvlwfBHPJHbmY&q=85&s=5391c57c71bbb67298b61b17633c4a41" style={{width: 902, height: 354}} width="3554" height="1396" data-path="images/kb/ka0Vq000000AnVk-00N5w00000Ri7BU-0EMVq0000012VS9.jpg" />
   </Frame>
3. Under
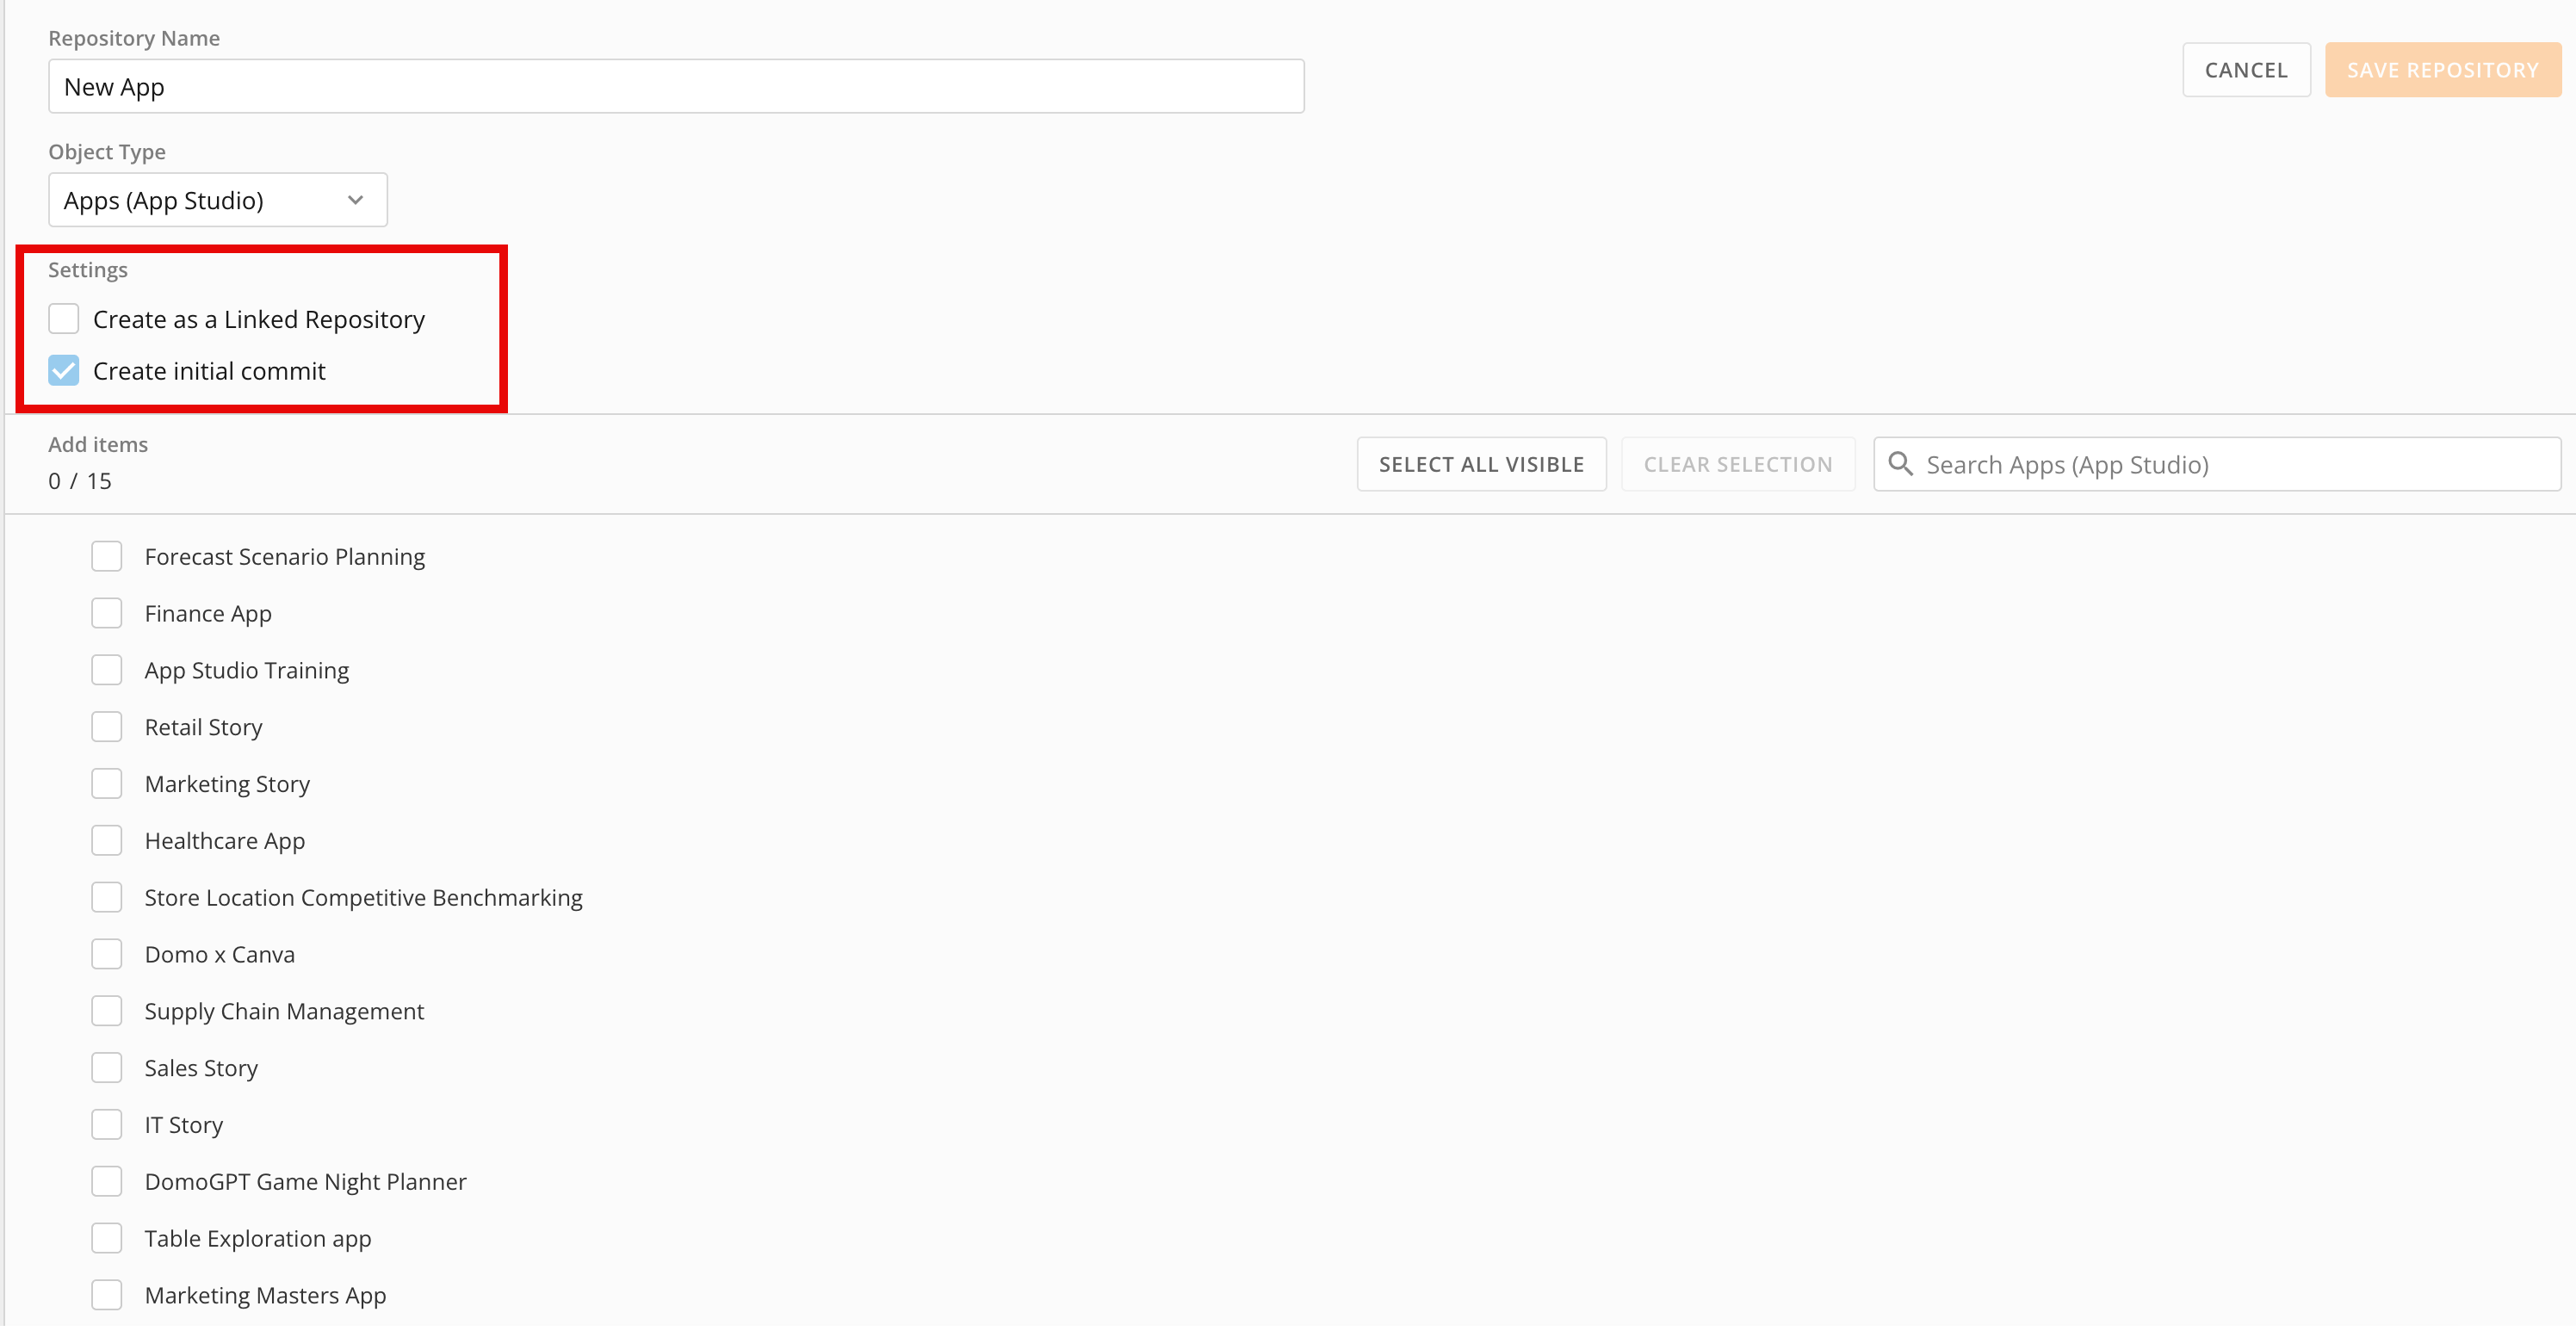
   **Settings,** you can check both of the boxes labeled **Create as a Linked Repository** and **Create initial commit.** Choosing the initial commit option automatically creates a commit. The linked repository option ensures that you are not creating duplicated content in your repositories. To learn about linked repositories, see [Domo Sandbox: Linked Repositories](https://domo-support.domo.com/s/article/000005059?language=en_US).
   <Frame>
     <img alt="Screenshot 2024-05-29 at 2.33.56 PM.png" src="https://mintcdn.com/domoinc-openapi-sync-dataflows/XLeSvlwfBHPJHbmY/images/kb/ka0Vq000000AnVk-00N5w00000Ri7BU-0EMVq00000184qf.jpg?fit=max&auto=format&n=XLeSvlwfBHPJHbmY&q=85&s=df2a60c55e402ebb1514f378ba8a9ad0" style={{width: 900, height: 465}} width="2992" height="1546" data-path="images/kb/ka0Vq000000AnVk-00N5w00000Ri7BU-0EMVq00000184qf.jpg" />
   </Frame>
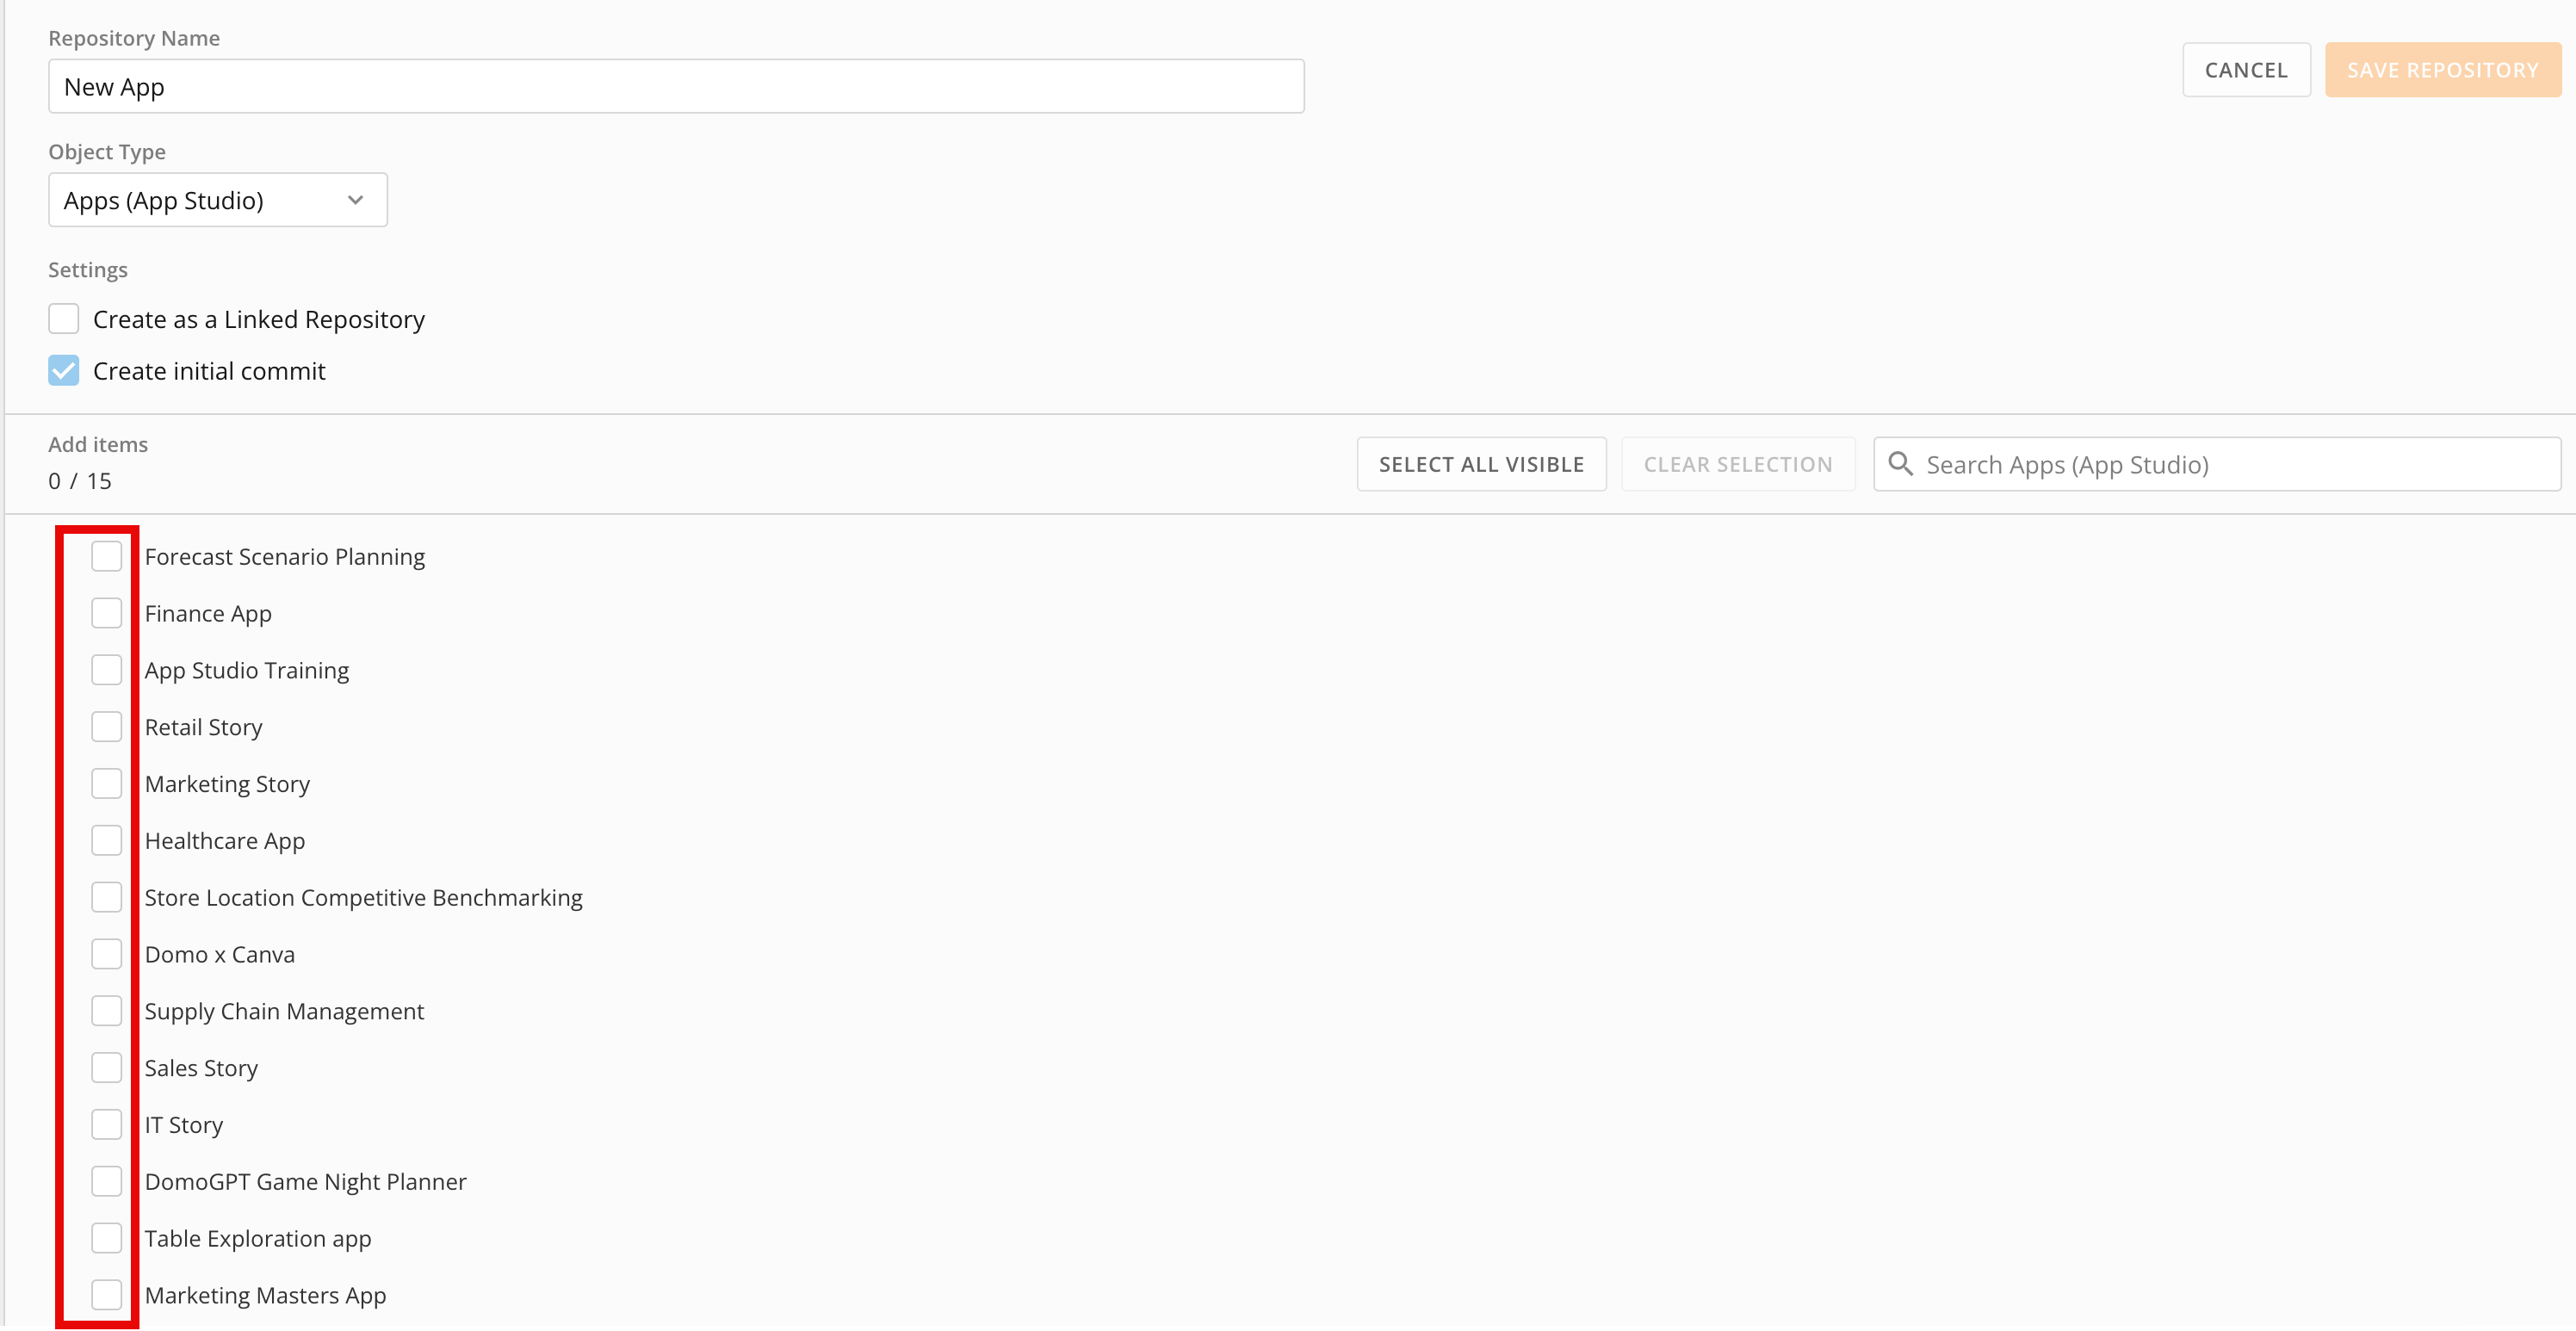
4. Select one or more available apps using the checkboxes to the left of the app name(s).
   * You can search for existing App Studio apps by searching for the app in the
     **Search Apps (App Studio)** search bar above the repository list.
   * Select all of the apps currently visible on the Create a New Repository page by selecting
     **Select All Visible.** In the image, there are fifteen apps on the page, so selecting **Select All Visible** selects all fifteen apps.
   * Clear all your app selections by selecting
     **Clear Selection.**
     <Frame>
       <img alt="Screenshot 2024-05-29 at 2.33.56 PM.png" src="https://mintcdn.com/domoinc-openapi-sync-dataflows/XLeSvlwfBHPJHbmY/images/kb/ka0Vq000000AnVk-00N5w00000Ri7BU-0EMVq00000184HB.jpg?fit=max&auto=format&n=XLeSvlwfBHPJHbmY&q=85&s=16d3faba22f1e5c347e00988a613fa1a" style={{width: 900, height: 465}} width="2992" height="1546" data-path="images/kb/ka0Vq000000AnVk-00N5w00000Ri7BU-0EMVq00000184HB.jpg" />
     </Frame>
5. Select
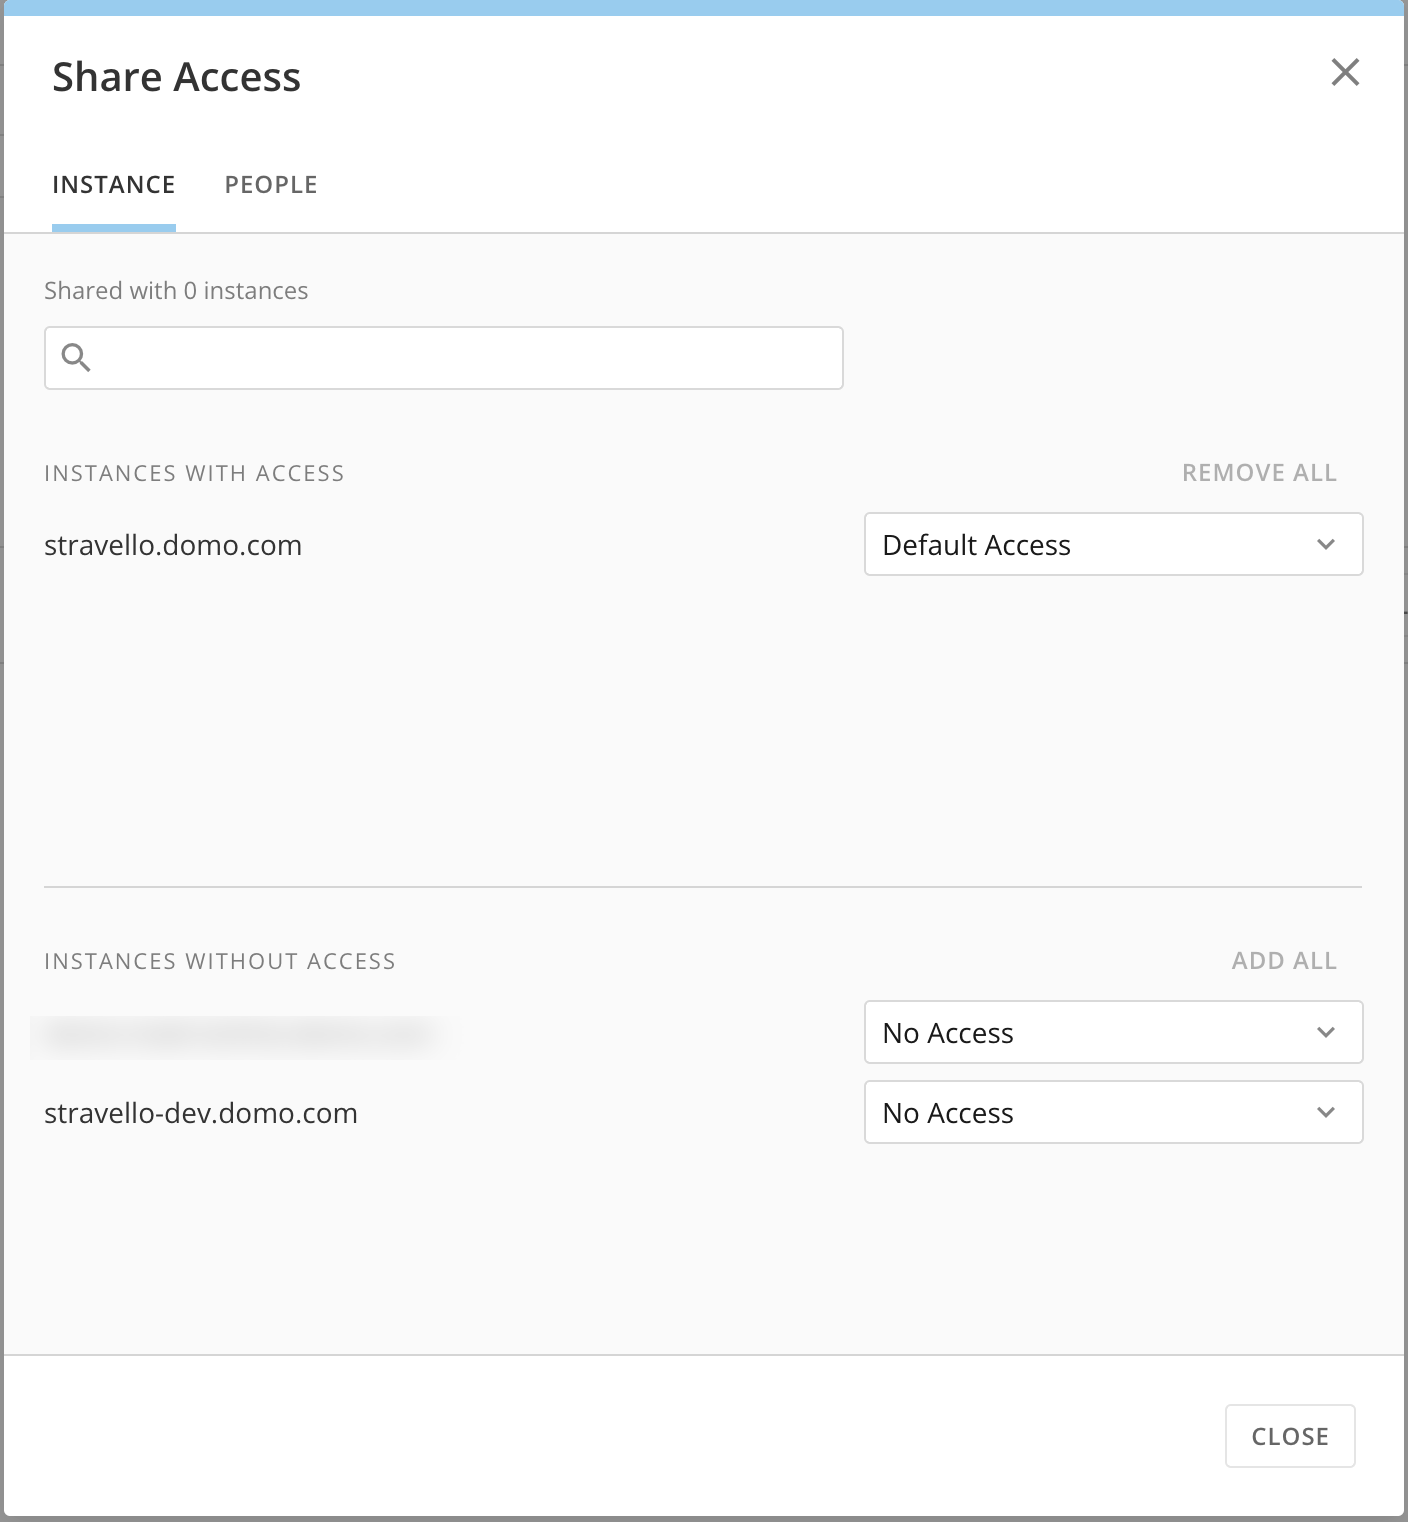
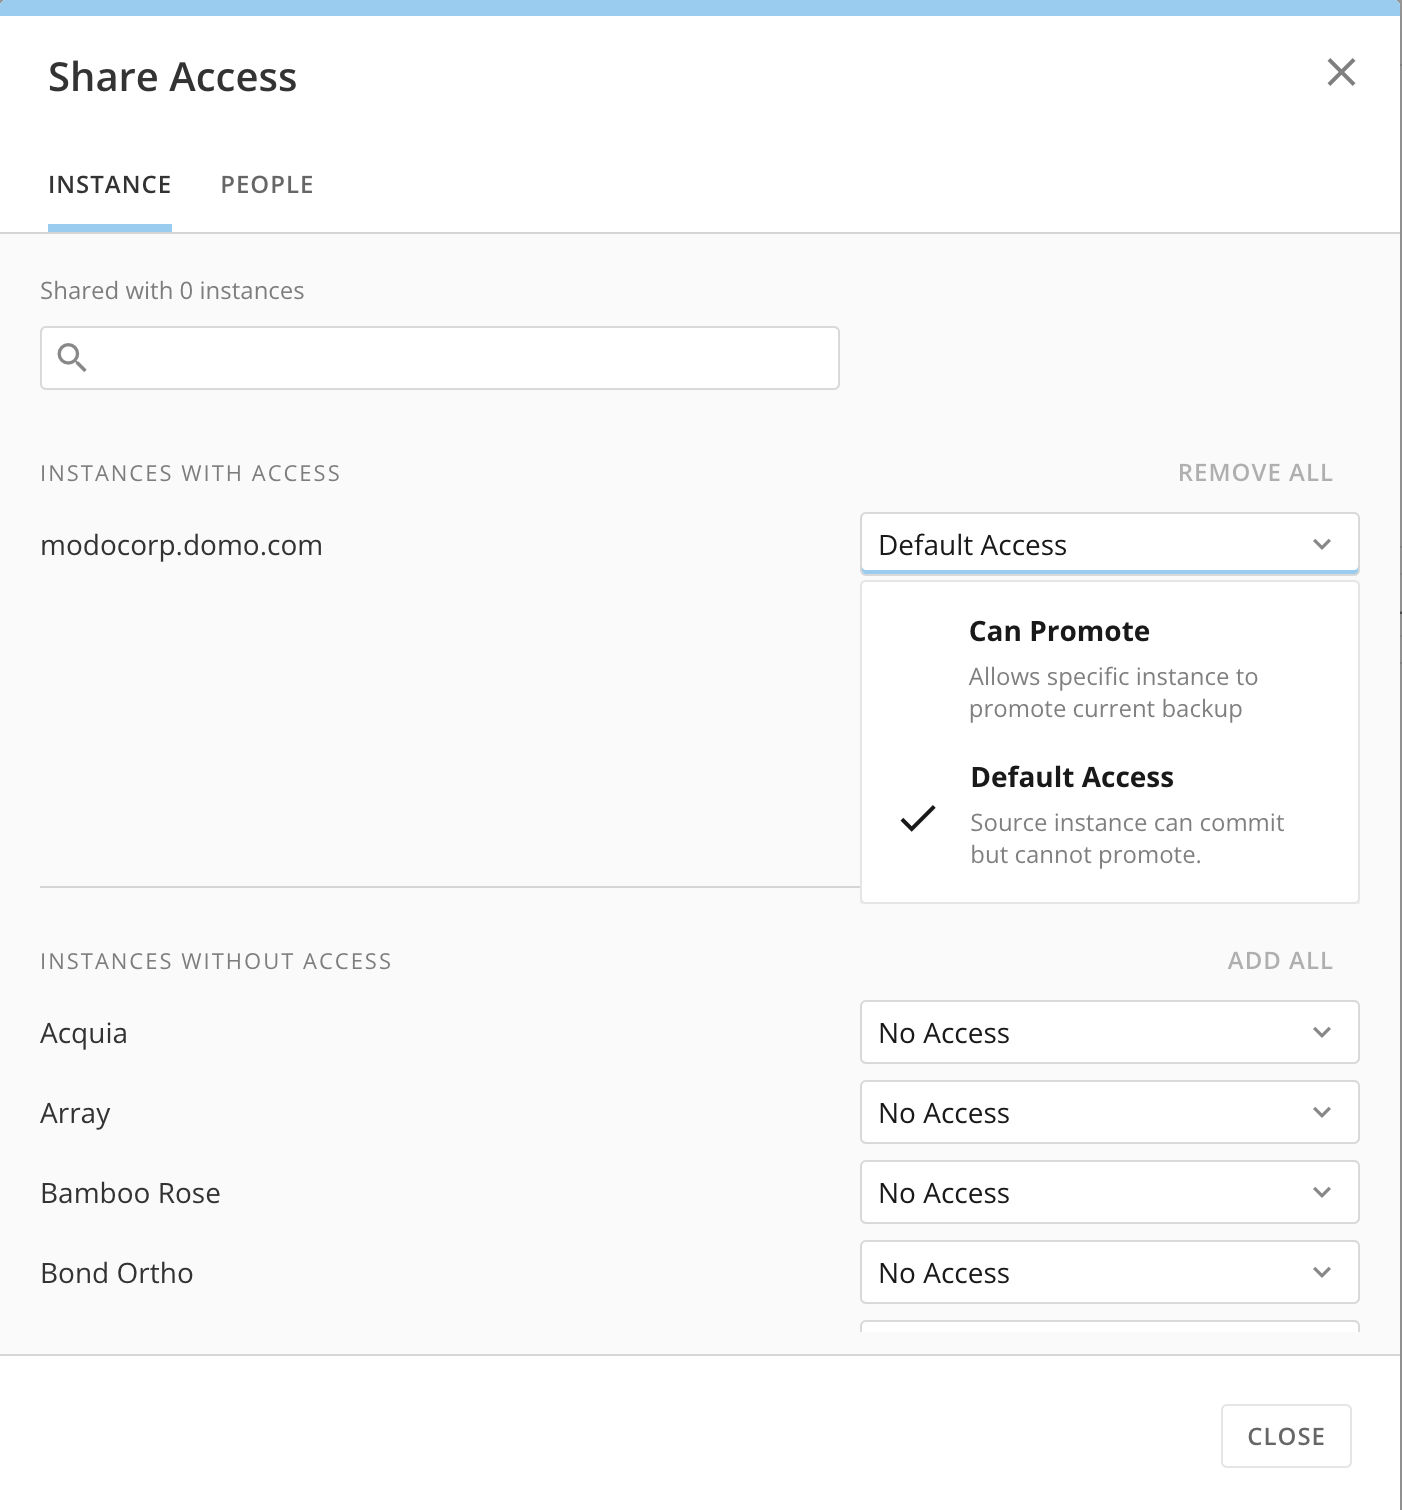
   **Save Repository** to save your selections. **Save Repository** automatically saves the repository in your instance. Selecting and updating instance and user-level access will commit the repository to the identified locations. After saving, the **Share Access** modal opens and allows you to share your App Studio apps with other instances and users in Domo.
   <Columns>
     <Frame>
       <img alt="Screenshot 2024-07-31 at 9.10.57 AM.png" src="https://mintcdn.com/domoinc-openapi-sync-dataflows/XLeSvlwfBHPJHbmY/images/kb/ka0Vq000000AnVk-00N5w00000Ri7BU-0EMVq0000020owX.jpg?fit=max&auto=format&n=XLeSvlwfBHPJHbmY&q=85&s=ea8fb4dc5cd21f6d663b7ca25e50e6a6" style={{width: 902, height: 244}} width="3018" height="816" data-path="images/kb/ka0Vq000000AnVk-00N5w00000Ri7BU-0EMVq0000020owX.jpg" />
     </Frame>

     <Frame>
       <img alt="Screenshot 2024-07-31 at 9.11.46 AM.png" src="https://mintcdn.com/domoinc-openapi-sync-dataflows/XLeSvlwfBHPJHbmY/images/kb/ka0Vq000000AnVk-00N5w00000Ri7BU-0EMVq0000020mLG.jpg?fit=max&auto=format&n=XLeSvlwfBHPJHbmY&q=85&s=8ab6d58d627e274a1c2c83788787a026" style={{width: 431, height: 466}} width="1408" height="1522" data-path="images/kb/ka0Vq000000AnVk-00N5w00000Ri7BU-0EMVq0000020mLG.jpg" />
     </Frame>
   </Columns>
6. You can search for instances using the search bar and select the level of access using the dropdown.
   * **Can Promote —**
     A llows that instance to [promote](#definitions) the current [repository](#definitions).
   * **Default Access
     —** A llows the source instance to [commit](#definitions), but cannot [promote](#definitions).
   * **No Access
     —** R emoves access to the app [repository](#definitions) completely. This means that when the app is shared, it is not committed to that instance.

     <Frame>
       <img alt="Screenshot 2024-05-29 at 2.52.02 PM.png" src="https://mintcdn.com/domoinc-openapi-sync-dataflows/XLeSvlwfBHPJHbmY/images/kb/ka0Vq000000AnVk-00N5w00000Ri7BU-0EMVq00000181Cs.jpg?fit=max&auto=format&n=XLeSvlwfBHPJHbmY&q=85&s=eead209b67c304c8838887bc2d768f4c" style={{width: 454, height: 489}} width="1402" height="1510" data-path="images/kb/ka0Vq000000AnVk-00N5w00000Ri7BU-0EMVq00000181Cs.jpg" />
     </Frame>
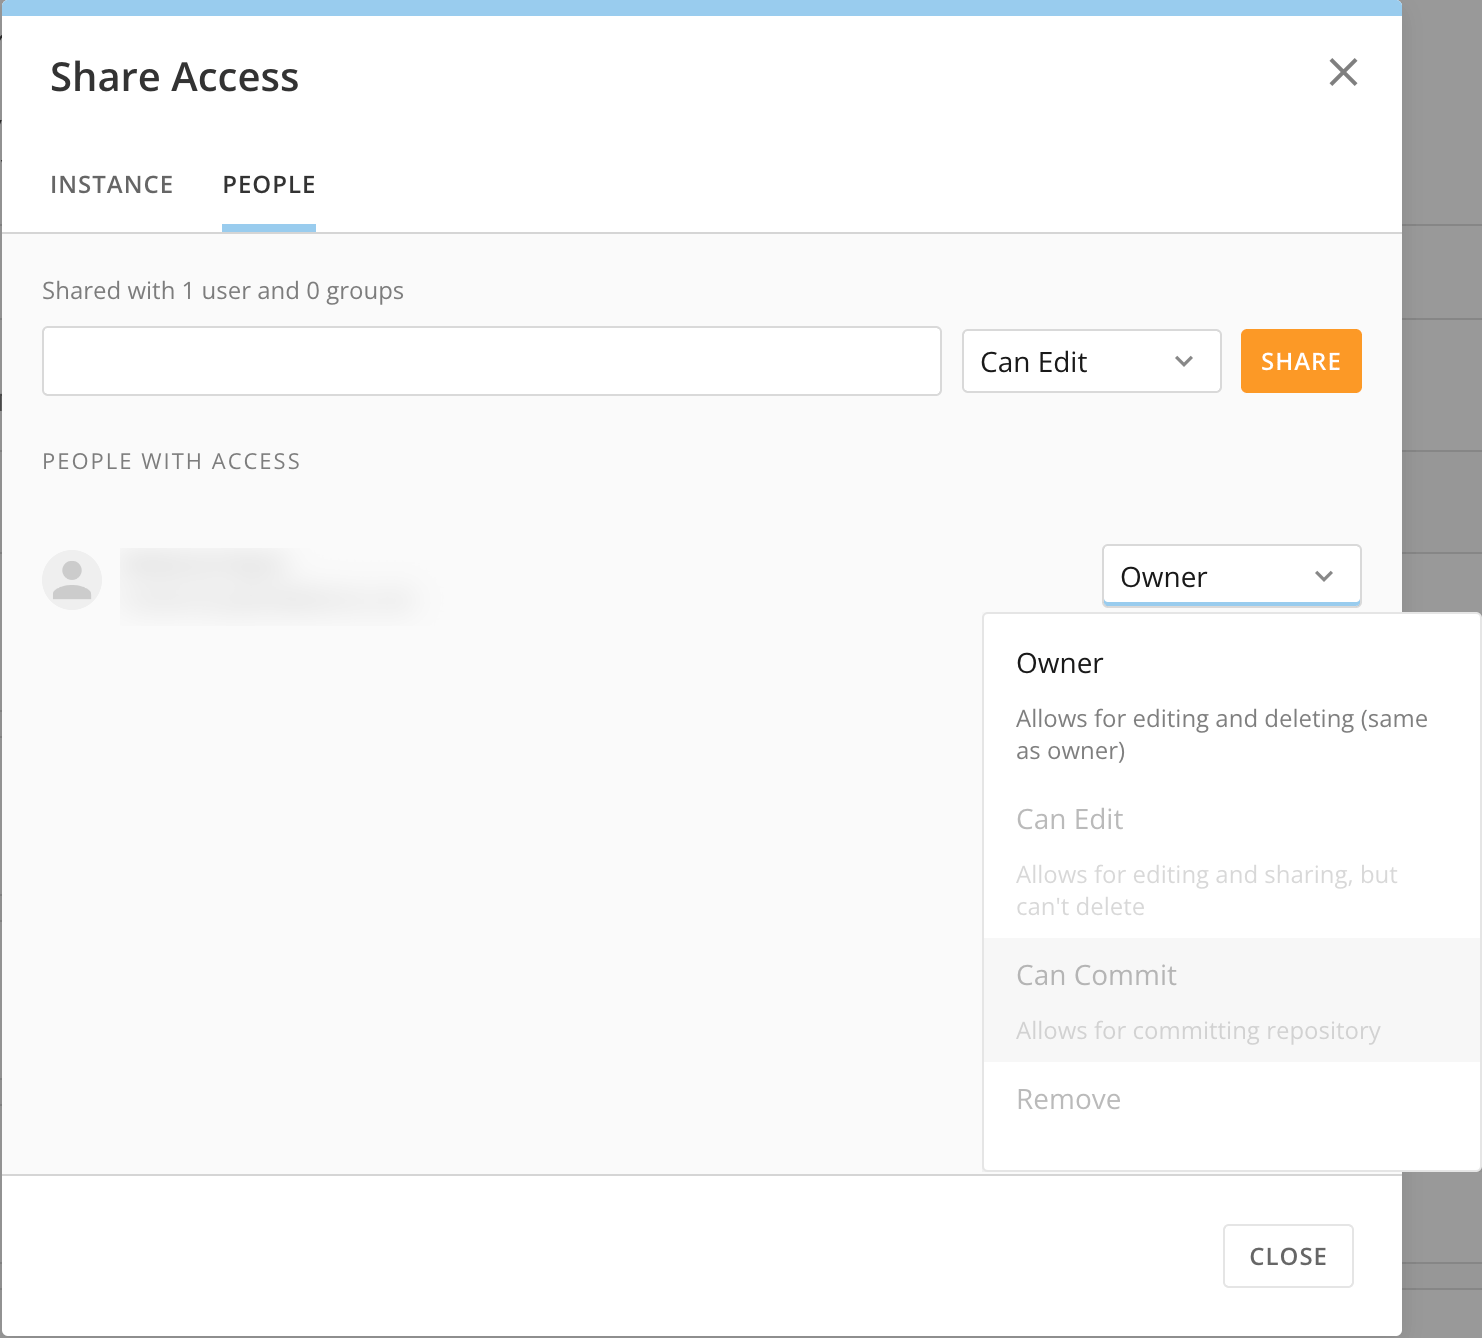
7. Select the
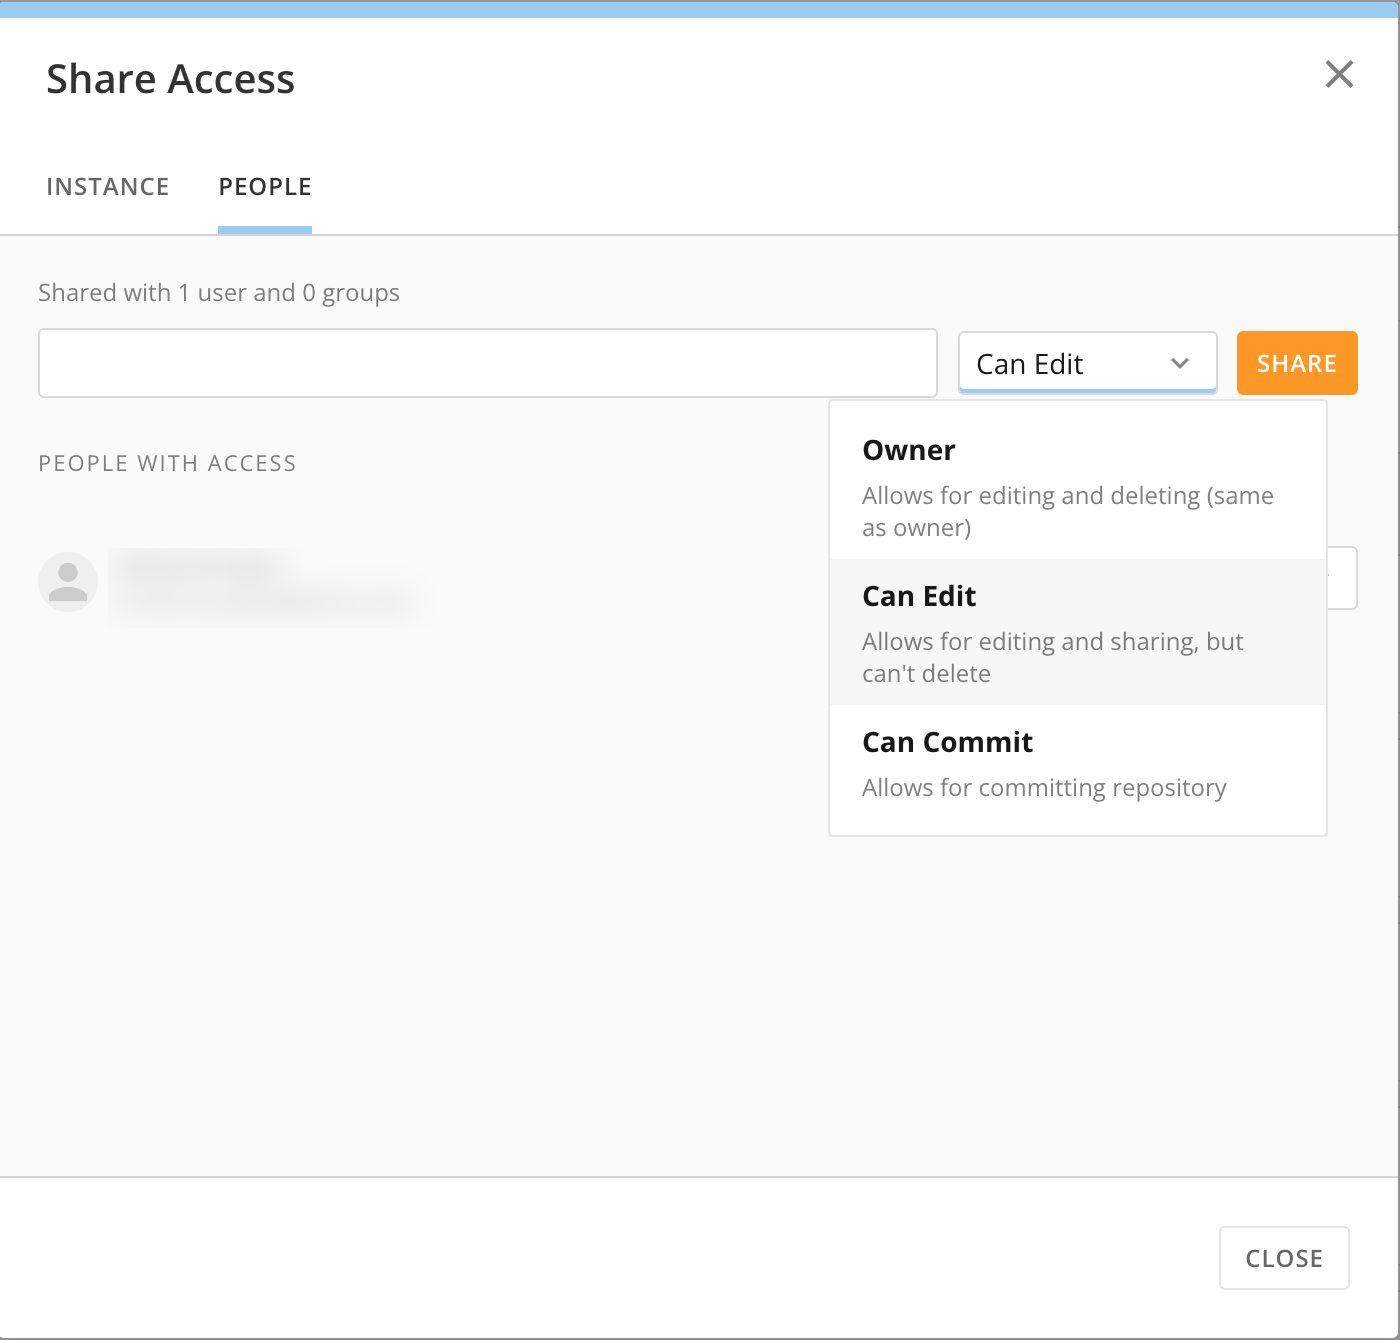
   **People** tab and search for a user or group to share the app repository with other people. People and groups can have owner-level access, edit access, or commit access. You can also remove user access completely.
   * **Owner
     —** Allows users to edit and delete the [repository](#definitions).
   * **Can Edit**
     **—** Allows users to edit and share the [repository](#definitions).
   * **Can Commit**
     **—** A llows users to commit to the [repository](#definitions).
   * **Remove
     —** R emoves access to the app [repository](#definitions) completely. This means that when the app is shared, it is not shared with those individuals or groups.
     <Columns>
       <Frame>
         <img alt="Screenshot 2024-08-01 at 11.31.36 AM.png" src="https://mintcdn.com/domoinc-openapi-sync-dataflows/XLeSvlwfBHPJHbmY/images/kb/ka0Vq000000AnVk-00N5w00000Ri7BU-0EMVq0000022SVJ.jpg?fit=max&auto=format&n=XLeSvlwfBHPJHbmY&q=85&s=6704e59ff8bf85093395c1fd1bdadda9" style={{width: 541, height: 488}} width="1482" height="1338" data-path="images/kb/ka0Vq000000AnVk-00N5w00000Ri7BU-0EMVq0000022SVJ.jpg" />
       </Frame>

       <Frame>
         <img alt="Screenshot 2024-08-01 at 11.31.45 AM.png" src="https://mintcdn.com/domoinc-openapi-sync-dataflows/XLeSvlwfBHPJHbmY/images/kb/ka0Vq000000AnVk-00N5w00000Ri7BU-0EMVq0000022SWv.jpg?fit=max&auto=format&n=XLeSvlwfBHPJHbmY&q=85&s=ac48d48ff0c5c8c7c72e23c855911f47" style={{width: 541, height: 518}} width="1400" height="1340" data-path="images/kb/ka0Vq000000AnVk-00N5w00000Ri7BU-0EMVq0000022SWv.jpg" />
       </Frame>
     </Columns>

     #
8. After you have selected the instances, individuals, or groups you want to share your repository with, the repository is automatically saved and available in the My Repositories tab.

# Commit Version

1. Log into your source instance. In the navigation header, select
   **More** > **Admin**.

The **Admin Settings** displays.

2. Under
   **Governance**, select **Sandbox.**

3. Go to
   **Repositories > My Repositories.**

<Frame>
  <img alt="2022-10-07_11-39-48.png" src="https://mintcdn.com/domoinc-openapi-sync-dataflows/XLeSvlwfBHPJHbmY/images/kb/ka0Vq000000AnVk-00N5w00000Ri7BU-0EM5w000005vXjw.png?fit=max&auto=format&n=XLeSvlwfBHPJHbmY&q=85&s=9e3946442d11d8ed679f7b67a349192d" style={{width: 899, height: 343}} width="2758" height="1052" data-path="images/kb/ka0Vq000000AnVk-00N5w00000Ri7BU-0EM5w000005vXjw.png" />
</Frame>

4. Locate the repository and select
   **Commit** (or, select <InlineImage src="/images/kb/ka0Vq000000B7J7-00N5w00000Ri7BU-0EM5w000005vXk8.png" /> **Repository Options** and **Commit**).
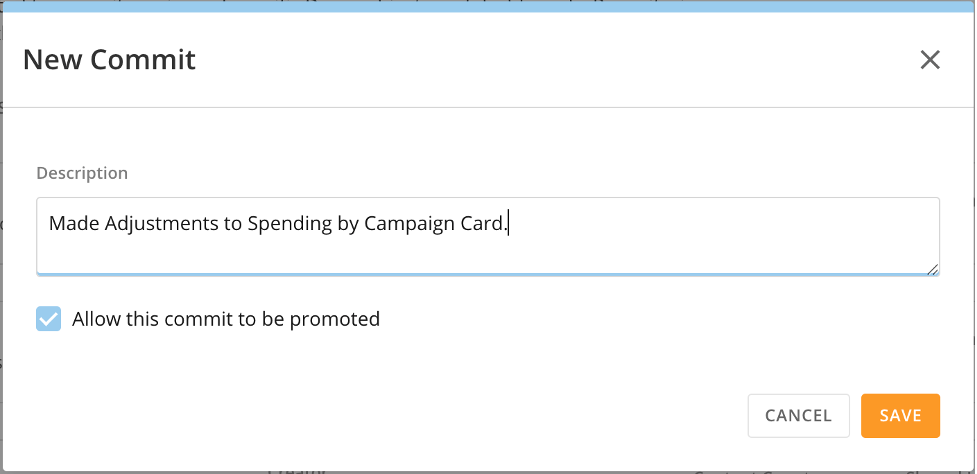
5. Enter a description for the version that you are creating. By default, the version can be promoted. Uncheck
   **Allow this commit to be promoted** to prevent this version from being immediately available for promotion.

<Frame>
  <img alt="7.png" src="https://mintcdn.com/domoinc-openapi-sync-dataflows/enfTkpqxhZnichpt/images/kb/ka05w00000127zH-00N5w00000Ri7BU-0EM5w000005vnUm.jpg?fit=max&auto=format&n=enfTkpqxhZnichpt&q=85&s=3fbdcf3813195a82d186df2929dbd61b" style={{width: 550, height: 267}} width="977" height="474" data-path="images/kb/ka05w00000127zH-00N5w00000Ri7BU-0EM5w000005vnUm.jpg" />
</Frame>

6. Select
   **Save**.

### Manage Repository Sharing

# Instance Sharing

1. Log into your source instance. In the navigation header, select
   **More** > **Admin**.

   The **Admin Settings** displays.
2. Under
   **Governance**, select **Sandbox.**
3. Go to
   **Repositories > My Repositories.**
4. Locate the repository you want to share. Select
   <InlineImage src="/images/kb/ka0Vq000000B7J7-00N5w00000Ri7BU-0EM5w000005vXk8-1.png" /> **Repository Options** and choose **Manage Sharing**.

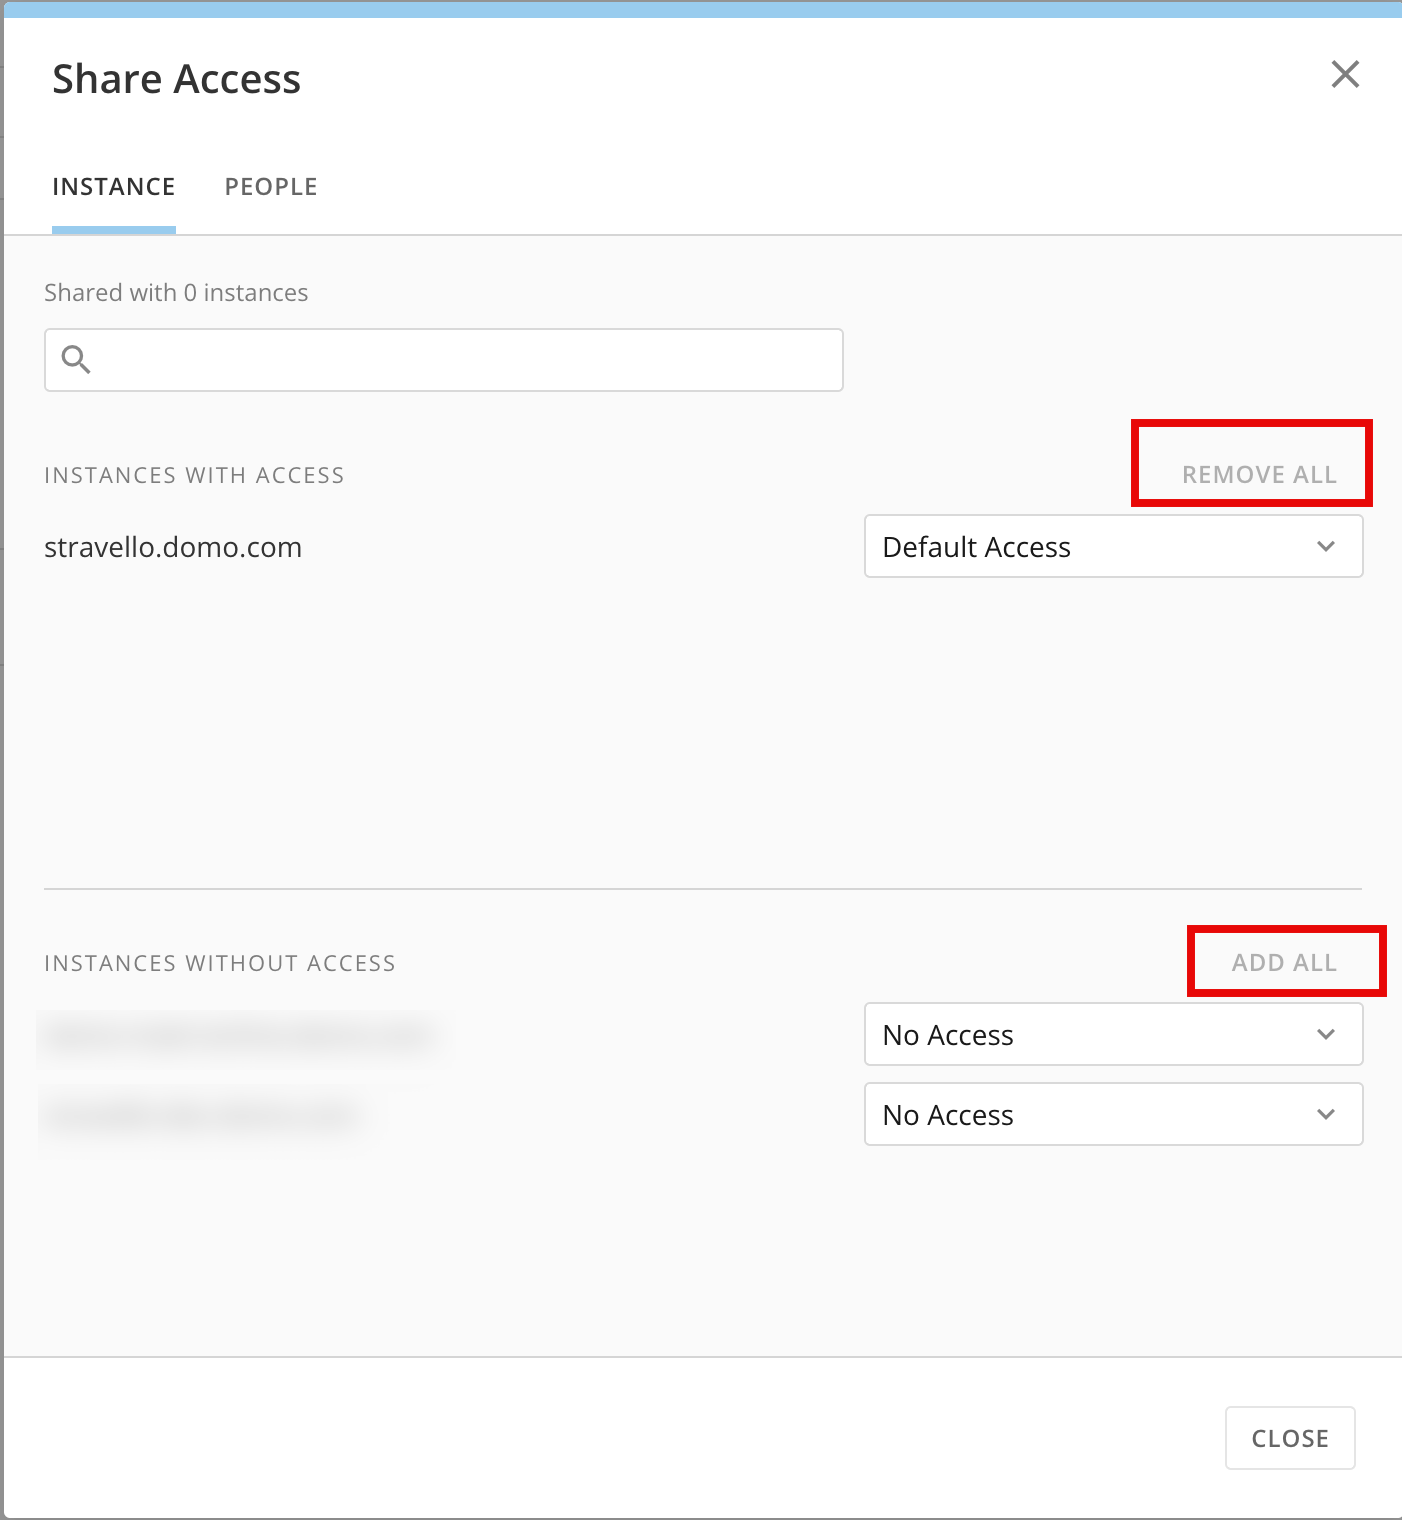
   * To share the repository with a specific instance, select
     **Can Promote**.
   * To share the repository with all instances, select
     **Add All.**
   * For the same instance promotion, share the repository with the source instance by selecting
     **Can Promote.**

     <Note>
       **Note:**
       Access to the repository can be revoked at any time by selecting
       **No Access**
       for specific instances or
       **Remove All**
       for all instances.
     </Note>

   <Frame>
     <img alt="Screenshot 2024-08-12 at 1.57.22 PM.png" src="https://mintcdn.com/domoinc-openapi-sync-dataflows/XLeSvlwfBHPJHbmY/images/kb/ka0Vq000000AnVk-00N5w00000Ri7BU-0EMVq000002BS1S.jpg?fit=max&auto=format&n=XLeSvlwfBHPJHbmY&q=85&s=c481fb24aa41594188f8673c27d1274e" style={{width: 472, height: 512}} width="1402" height="1520" data-path="images/kb/ka0Vq000000AnVk-00N5w00000Ri7BU-0EMVq000002BS1S.jpg" />
   </Frame>
5. Select
   **Close**.

# User Sharing

1. Log into your source instance. In the navigation header, select
   **More** > **Admin**.

   The **Admin Settings** displays.
2. Under
   **Governance**, select **Sandbox.**
3. Go to
   **Repositories > My Repositories.**
4. Locate the repository you want to share. Select
   **<InlineImage src="/images/kb/ka0Vq000000B7J7-00N5w00000Ri7BU-0EM5w000005vXk8-2.png" /> Repository Options** and choose **Manage Sharing.**
5. Select
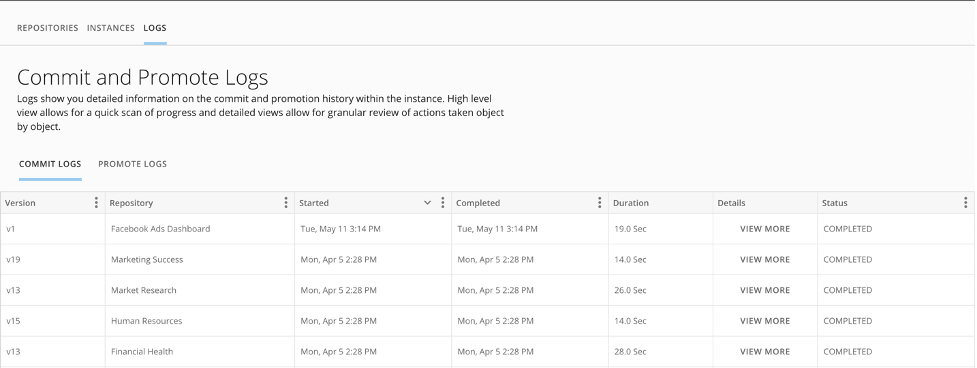
   **People.** Add people and groups, choose the appropriate permission level, and select **Share.**
6. Select
   **Close.**

The repository is updated with access settings.

# Sandbox User Permission Levels

<Note>
  **Note:**
  Users with the Administer Sandbox grant can access all repositories.
</Note>

<table border="1" data-aura-rendered-by="33:208;a"><tbody><tr><td colspan="1" rowspan="1"> Co-Owner </td><td colspan="1" rowspan="1"> Can edit, delete, and share the repository </td></tr><tr><td colspan="1" rowspan="1"> Can Edit </td><td colspan="1" rowspan="1"> Can edit and share but cannot delete the repository </td></tr><tr><td colspan="1" rowspan="1"> Can Commit (in source instance) </td><td colspan="1" rowspan="1"> Can commit the repository but cannot edit, share, or delete. The user must also have the Manage Repositories grant to commit in the instance. </td></tr><tr><td colspan="1" rowspan="1"> Can Promote (in destination instance) </td><td colspan="1" rowspan="1"> Can promote the repository but cannot edit or share. The user must have the Manage Repository Promotions grant as well to promote in the instance. <a id="sandbox_sharing_repositories" target="_blank" /></td></tr></tbody></table>

### Sandbox Sharing Requirements

To successfully commit or promote a repository with the expected results, you must have the correct access permissions to both the repository and its content. If you attempt to commit or promote a repository when you do not have the correct access permissions, the repository may still commit or promote but with unintended consequences.

You must meet the following requirements to successfully share a repository:

1. Anyone who commits the repository must own or have received shared access from the source instance, including the repository and its pages, cards, dashboards, AppDB data, DataFlows, and connectors.
2. Anyone who promotes the repository must own or have received shared access to the destination instance, including the repository and its pages, cards, AppDB data, DataFlows, and connectors.

### Promote Repository

<Note>
  **Note:**
  When promoting a card in a repository, the user doing the promoting is assigned ownership of any Beast Mode that is tied to a DataSet powering that card.
</Note>

1. Log into your target instance and go to the Admin Settings.
2. Under
   **Governance**, select **Sandbox.**
3. Go to
   **Repositories** > **Shared Repositories.**

   All repositories that have been shared with your instance display.
4. Locate the appropriate repository and select
   **Promote.**

   The repository details display.
5. Configure the following:

* Choose the version to be promoted. This defaults to the most recent Committed Version.
* Map dependencies. Depending on the object type of the repository, there may be different mapping requirements. The most common required mapping is data sources.
* In the
  **Advanced** tab, apply settings as necessary. Renaming/removing strings from object names is available primarily to facilitate same-instance promotion, but can be used when promoting across instances.

6. Select
   **Promote**.

The process to either create the objects (on first promotion) or update the objects on subsequent promotions is initiated.

### Sandbox Logs

1. Log into your source instance. In the navigation header, select
   **More** > **Admin**.

   The **Admin Settings** displays.
2. Under
   **Governance**, select **Sandbox.**
3. Select the
   **Logs** tab.

   <Note>
     **Note:**
     **Commit Logs**
     are available in the source instance and
     **Promote Logs**
     are available in the destination instance.
   </Note>

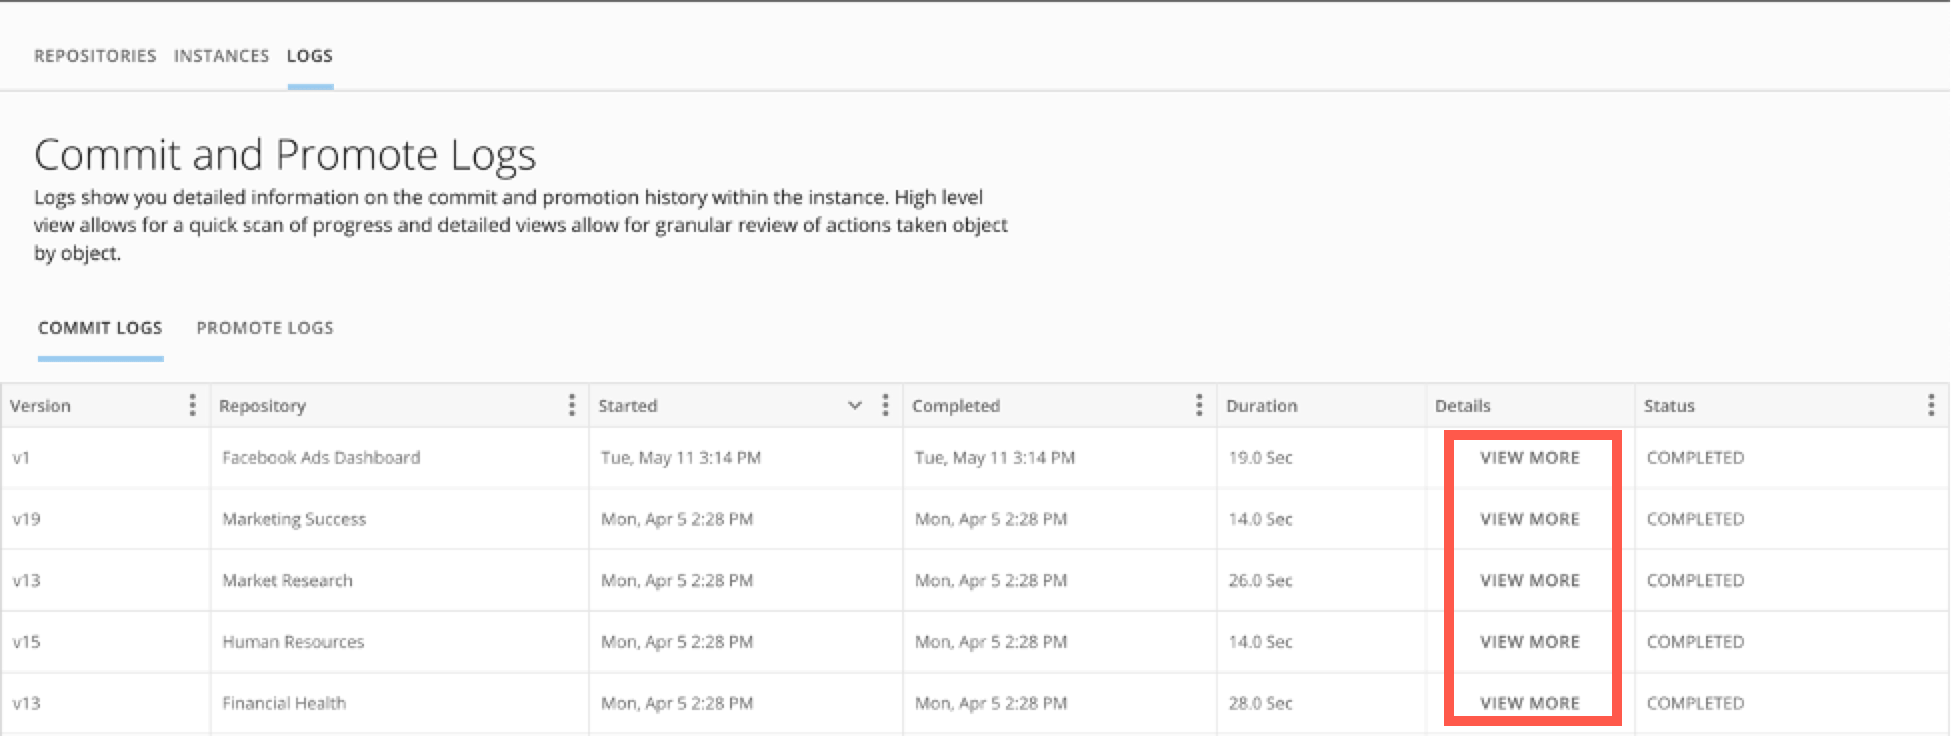
By default, high-level Commit Logs display. To view Promotion Logs, select **Promote Logs**. This view shows the commit or promote actions that have occurred.

<Frame>
  <img alt="12.png" src="https://mintcdn.com/domoinc-openapi-sync-dataflows/XLeSvlwfBHPJHbmY/images/kb/ka0Vq000000AnVk-00N5w00000Ri7BU-0EM5w000005vXk0.png?fit=max&auto=format&n=XLeSvlwfBHPJHbmY&q=85&s=abf8355161dd2279bd6c88b9c57b1122" style={{width: 900, height: 339}} width="977" height="368" data-path="images/kb/ka0Vq000000AnVk-00N5w00000Ri7BU-0EM5w000005vXk0.png" />
</Frame>

To view detailed logs for a specific commit or promote action, select **View More**. This view provides the most detailed information about the commit or promotion that was executed.
<Frame>
  <img alt="commitandpromote.png" src="https://mintcdn.com/domoinc-openapi-sync-dataflows/XLeSvlwfBHPJHbmY/images/kb/ka0Vq000000AnVk-00N5w00000Ri7BU-0EM5w000005vXjy.png?fit=max&auto=format&n=XLeSvlwfBHPJHbmY&q=85&s=4760c655ecd9007614aa37ebce0d594e" style={{width: 850, height: 320}} width="1954" height="736" data-path="images/kb/ka0Vq000000AnVk-00N5w00000Ri7BU-0EM5w000005vXjy.png" />
</Frame>

### Grants

<table border="1" data-aura-rendered-by="33:208;a"><tbody><tr><td class="wysiwyg-text-align-center" colspan="1" rowspan="1"><b> Grant Type </b></td><td class="wysiwyg-text-align-center" colspan="1" rowspan="1"><b> Allows Users To: </b></td></tr><tr><td colspan="1" rowspan="1"> Administer Sandbox </td><td colspan="1" rowspan="1"><ul><li> Send, accept, or deny repository-sharing invitations to/from other Domo instances </li><li> Manage global settings, such as requiring approvals for the promotion of all repositories, or enabling same-instance promotion </li><li> Assign ownership of a shared repository in the destination instance. </li></ul><div class="mdx-embed"><Warning><p><b> Important: </b> Once ownership is assigned, it cannot be changed. </p><p /></Warning></div><ul><li> Configure approval requirement and template for a repository in the destination instance </li><li> Manage all repositories (including repositories not owned or explicitly shared with the user) </li></ul><div class="mdx-embed"><Note><p><b> Note: </b> This grant supersedes the “Manage Repositories” and “Manage Repository Promotions” grants; it provides all the privileges of those grants, and more. </p></Note></div></td></tr><tr><td colspan="1" rowspan="1"> Manage Repositories </td><td colspan="1" rowspan="1"><ul><li> Create and commit a repository </li><li> Manage sharing of a repository with other users/groups in the Domo instance </li><li> Share a repository with another Domo instance </li><li> Manage sharing of repository versions with another Domo instance </li></ul><div class="mdx-embed"><Note><p><b> Note: </b> Only repositories owned by or shared with the user are visible to the user. </p></Note></div></td></tr><tr><td colspan="1" rowspan="1"> Manage Repository Promotion </td><td colspan="1" rowspan="1"><ul><li> Configure a repository for promotion (i.e., dataset mappings, etc.) </li><li> Manage sharing of a repository in the destination instance </li><li> Promote a repository, including selecting which version of a repository is to be promoted </li></ul><div class="mdx-embed"><Note><p><b> Note: </b> Only repositories owned by or shared with the user are visible to the user. Ownership of repositories can only be assigned by a user with the “Administer Sandbox” grant. </p></Note></div></td></tr></tbody></table>

# Grant Examples

To administer Sandbox for a Domo instance, including establishing repository sharing relationships, enabling same-instance promotion, and requiring approval for promotion, a user must:

* Have the Administer Sandbox grant

To create a new repository and/or commit content changes to a repository, a user must:

* Have the “Manage Repositories” grant (and/or the “Administer Sandbox” grant”)
* Have the Manage All Cards, Pages and Apps (App Studio) grant (only required for committing page-type repositories)
* Be the owner of the repository or have had the repository shared with them.
  * “Can Commit” can commit only
  * “Can Edit” can edit the repository content and sharing but cannot delete
  * “Co-Owner” can edit and delete the repository
* Be the owner of the content being committed or have had the content shared with them

<Note>
  **Note:**
  The content must be owned or explicitly shared, not merely accessible via Domo Admin-level grants.
</Note>

To manage incoming shared repositories, including assigning ownership of the repository and establishing a promote approval process, a user must:

* Have the Administer Sandbox grant

To promote a repository, a user must:

* Have the Manage Repository Promotions grant (and/or the Administer Sandbox grant)
* Be the owner of the repository or have had the repository shared with them
  * “Can Promote” can promote only
  * “Can Edit” can edit the repository (i.e., dataset mappings, renaming, etc.) and promote
* Be included in at least one Personalized Date Permissions (PDP) policy for each DataSet (on which PDP is enabled) used in any cards or dashboards in the repository
* Be the owner of the content (or, for cards or dashboards, have had the content shared with the promoting user if the promoting user also has the Manage All Cards, Pages and Apps (App Studio) grant).

<Note>
  **Note:**

  * The content must be owned or explicitly shared; not merely accessible via Domo Admin-level grants.
  * If the repository has never been promoted, the user promoting the repository will be the owner of content created during the promotion.
</Note>

### Unsupported Items

The following items cannot be promoted:

* Unsupported features in App Studio:
  * Forms
  * Workflow widget
  * Queue widget
  * Content links
  * App components
  * Element actions
  * Saved filters
  * Annotations
  * Large file sizes\*
  * Large image sizes\*
* Unsupported items in DataSet Views:
  * Calculated columns
  * SQL Views
  * Non-Domo cloud warehouses
* Unsupported items in pages:
  * Poll Cards
  * Dynamic Summary Numbers in Notebook Cards
  * Annotations
  * Certifications
  * Page ordering
  * Doc Cards with large files\*
  * Content links
  * Filter options
* Unsupported features in DataFlows:
  * Recursive DataFlows
  * Password-protected DataFlows
  * Writeback tile
  * Jupyter DataFlows
  * Split Join tile
  * Split Filter tile
  * Bring your own model AI tiles
  * Non-Domo cloud warehouses
  * PDP in tiles
  * Customized UI layouts
* Unsupported features in connectors:
  * DataSet via email connectors
  * Linked repositories using connectors
* Unsupported features in Custom Apps and Pro-code Apps:
  * Promoting and mapping AppDB collections
* Unsupported general features:
  * [Nested calculations](/s/article/000005307)
  * [Workflows](/s/article/000005108)
  * [Code Engine](/s/article/000005173)
    packages and functions
  * [Queues](/s/article/000005172)
  * Approvals
  * Projects & Tasks
  * Slideshows
  * [Jupyter Notebooks](https://domo-support.domo.com/s/article/36004740075?language=en_US#jupyter_notebooks)
  * Workspaces
  * [Worksheets](https://www.domo.com/docs/s/article/Use-Worksheets)
* Unsupported items for same-instance promotion:
  * [Smart Text](/s/article/4529227357975)
  * Dynamic Summary Numbers

\*Image and file sizes are not exact, as complexity, dimensions, and type can all affect them. To avoid most issues, we suggest keeping files under 100MB.

### FAQ

<AccordionGroup>
  <Accordion title="What Domo objects are supported?">
    Dashboards (includes sub-dashboards, cards, Layouts, files, apps), DataFlows, connectors, and DataSet Views. We plan to add additional objects over time and welcome feedback to help prioritize.
  </Accordion>

  <Accordion title="Are raw data sources supported?">
    Yes. When creating a repository and selecting an object, choose **Connectors.** Sandbox supports Connectors with associated accounts in the primary instance. When mapping your Connector to another instance, you need to have an associated account in the target instance.
  </Accordion>

  <Accordion title="What happens to data when promoting content with Sandbox?">
    Sandbox moves content, not data. The best practice is to keep the data in the production instance and make it available in the development instance using either [Virtual DataSets](https://domo-support.domo.com/s/article/4415826269335?language=en_US) or the [DataSet Copy Connector](/s/article/360043436533).
  </Accordion>

  <Accordion title="Can I revert to a previous version of a dashboard if necessary?">
    Yes, simply repeat the promotion process, but choose the desired version.
  </Accordion>

  <Accordion title="How long are versions stored and maintained?">
    Committed versions are stored indefinitely, but they are only guaranteed to work for one month
  </Accordion>

  <Accordion title="Are users in the destination instance able to make changes to cards/dashboards promoted to them?">
    Yes, however, any changes they made will be overwritten if there is a subsequent promotion from the source instance. If users would like to make changes, they should **Save As** the card/dashboard to another location and make changes there, as these are independent of the Sandbox Repository.
  </Accordion>

  <Accordion title="How large can repositories be?">
    There is a limit of 1,000 cards within a repository. In general, there should be a repository for each dashboard or group of DataFlows/Views.
  </Accordion>

  <Accordion title="What happens when a promotion is aborted?">
    The promotion progress is stopped. Any changes that have been made in the process will remain in place and not reverted.

    ### Troubleshooting

    Sandbox provides logging on commit and promote activity. The best place to start troubleshooting is to review the commit/promote logs for errors. This will usually provide enough information to fix an issue with a specific object.
  </Accordion>

  <Accordion title="Common Areas to Check" />

  <Accordion title="Objects being committed are invalid">
    * Cards: Check all Drill Cards for column errors commonly caused by schema changes in the underlying DataSet.
    * Beast Modes: Invalid calculations can cause issues commonly caused by schema changes in the underlying DataSet.
  </Accordion>

  <Accordion title="Different Features between source and destination instance">
    * Example: If Advanced DataFlow functionality isn’t enabled in the destination, the DataFlows will be inaccessible or won't promote successfully.
  </Accordion>

  <Accordion title="Unsupported items">
    * Most objects and functionality are supported through Sandbox, though there are a handful of items to be aware of that aren’t currently supported. See the
      [FAQ](#faq) section above for supported objects.

    ## Need Help?

    Email: [support@domo.com](mailto:support@domo.com)

    Include the following information:

    * Instance(s) where behavior is occurring
    * Repository Name (if applicable)
    * Description of behavior
    * Screenshot and/or recording of behavior (if applicable)
    * Steps to recreate behavior (if known/applicable)
  </Accordion>
</AccordionGroup>