> ## Documentation Index
> Fetch the complete documentation index at: https://domoinc-openapi-sync-dataflows.mintlify.site/llms.txt
> Use this file to discover all available pages before exploring further.
# Workbench Partition Support
export const InlineImage = ({src, alt = '', height = '1.6em'}) => {
return  ;
};
### Intro
Partitioning is the database process where very large tables are divided into multiple smaller parts. By splitting a large table into smaller and individual tables, queries that access only a fraction of the data can run faster because there is less data to scan.
The main goal of partitioning is to aid in the maintenance of large tables and reduce the overall response time to read and load the data for specific operations. Partitioning enables faster query execution and file distribution over multiple storage devices.
Workbench Partition Support divides your DataSet into sections based on day, month, or year, and then anytime you add new data from one of those sections, Workbench replaces that section with new data.
**Partitioning —** Partitioning is available in Workbench 5.1 and later versions.
### Configure Partition Support in Domo
As you create a new job in Workbench, specify the update method as **Partition** while configuring the job.
You can upload data from external data sources to Domo after specifying connection and data information as a job, which you can save and use again.
# Create a DataSet Job in Workbench
1. In the
**DataSet Jobs** pane, select **+** (plus icon) to create a new job.
;
};
### Intro
Partitioning is the database process where very large tables are divided into multiple smaller parts. By splitting a large table into smaller and individual tables, queries that access only a fraction of the data can run faster because there is less data to scan.
The main goal of partitioning is to aid in the maintenance of large tables and reduce the overall response time to read and load the data for specific operations. Partitioning enables faster query execution and file distribution over multiple storage devices.
Workbench Partition Support divides your DataSet into sections based on day, month, or year, and then anytime you add new data from one of those sections, Workbench replaces that section with new data.
**Partitioning —** Partitioning is available in Workbench 5.1 and later versions.
### Configure Partition Support in Domo
As you create a new job in Workbench, specify the update method as **Partition** while configuring the job.
You can upload data from external data sources to Domo after specifying connection and data information as a job, which you can save and use again.
# Create a DataSet Job in Workbench
1. In the
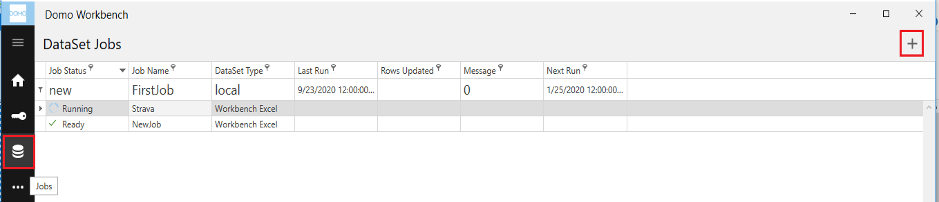
**DataSet Jobs** pane, select **+** (plus icon) to create a new job.
 2. Specify the basic settings for the job, such as the DataSet job name, the method of data transport (such as Local File Provider, ODBC Connection Provider, etc.), the data reader (data source) type (such as JIRA, Excel, etc.), the DataSet name and type, and an optional DataSet description.
**Note:** After creating the job, you can only change the DataSet name. If you want to change any other settings, you must create a new job.
2. Specify the basic settings for the job, such as the DataSet job name, the method of data transport (such as Local File Provider, ODBC Connection Provider, etc.), the data reader (data source) type (such as JIRA, Excel, etc.), the DataSet name and type, and an optional DataSet description.
**Note:** After creating the job, you can only change the DataSet name. If you want to change any other settings, you must create a new job.
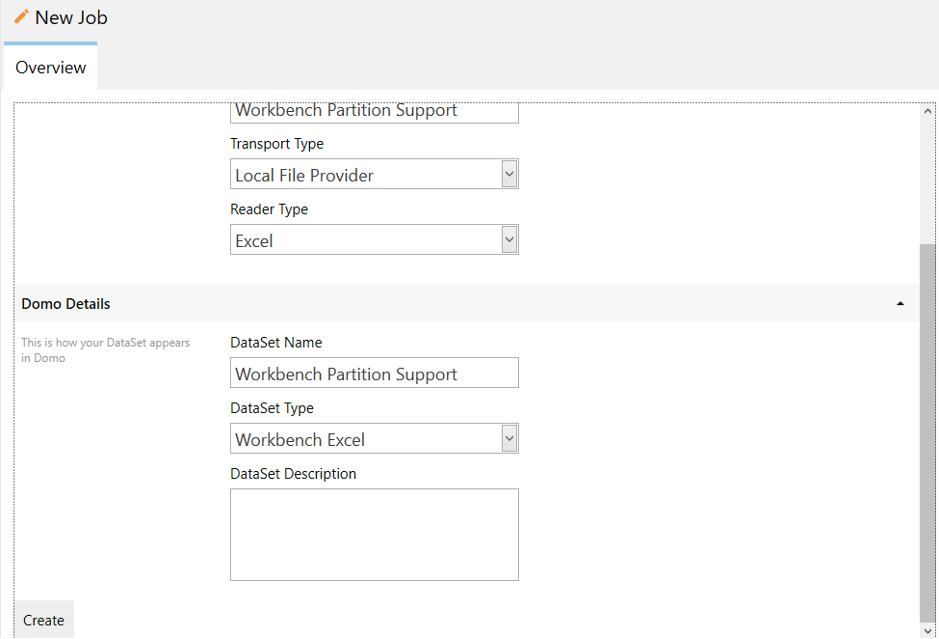 3. After providing the details, select
**Create**.
Your jobs list displays a newly added entry. However, the DataSet job is still not ready for execution at this stage.
# Configure Partitioning
Follow these steps in the job's **Configure** tab:
1. Provide the source of the data in the
**Source** menu. For example, if the data source were a local file, you would select the file path here.
2. In the
**Update method** menu, select **Partition**. Partitioning uses a grain (like day or week) to create groups in your data. Data can then be processed as a group and added or replaced as it changes.
3. After providing the details, select
**Create**.
Your jobs list displays a newly added entry. However, the DataSet job is still not ready for execution at this stage.
# Configure Partitioning
Follow these steps in the job's **Configure** tab:
1. Provide the source of the data in the
**Source** menu. For example, if the data source were a local file, you would select the file path here.
2. In the
**Update method** menu, select **Partition**. Partitioning uses a grain (like day or week) to create groups in your data. Data can then be processed as a group and added or replaced as it changes.
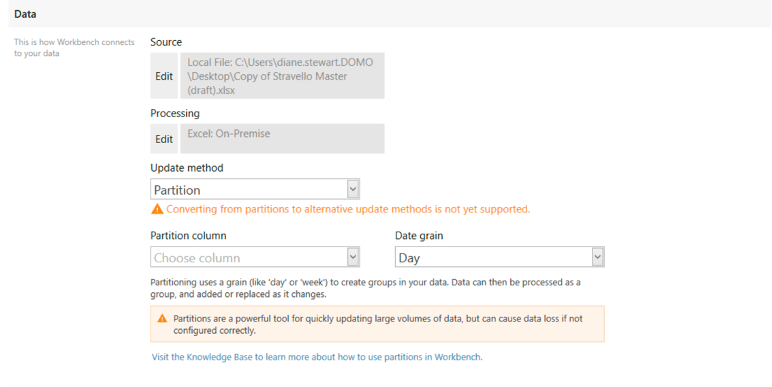 3. In the respective dropdowns, choose the Partition column and Date grain.
The Partition column will only allow you to select columns with Date or DateTime data types.
4. Applying Transforms to your data. Transforms modify your data locally before uploading it to Domo. They are faster, and process on your computer or server without a queue. Choose from a variety of options to transform your data so it’s ready for Domo.
1. Select the desired transform from the dropdown and select the
**+** button next to it.
3. In the respective dropdowns, choose the Partition column and Date grain.
The Partition column will only allow you to select columns with Date or DateTime data types.
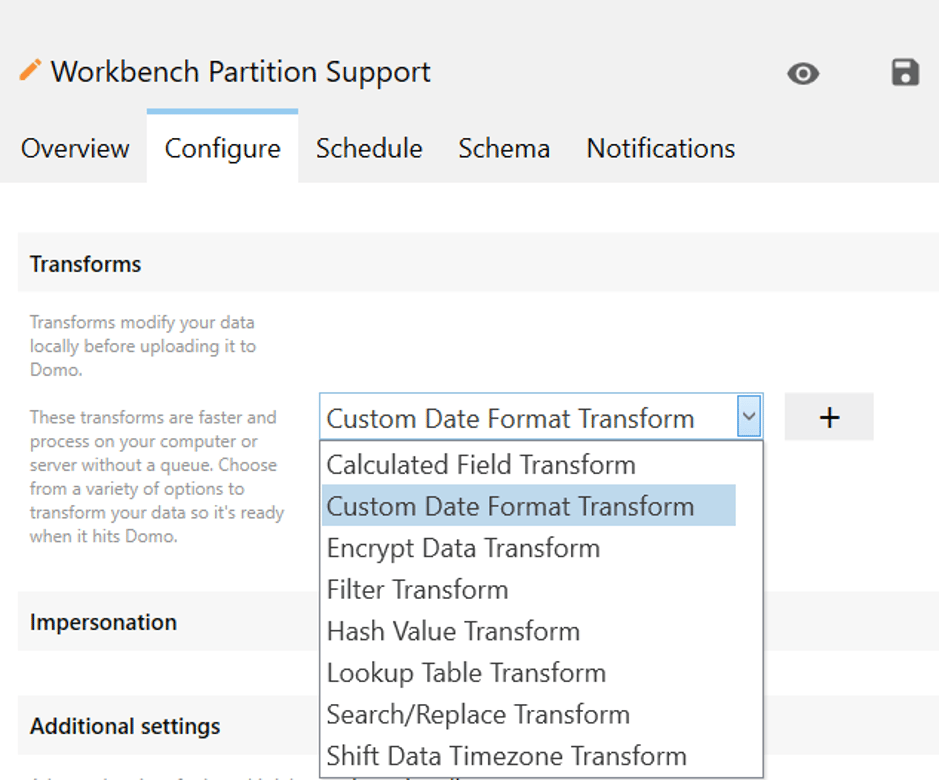
4. Applying Transforms to your data. Transforms modify your data locally before uploading it to Domo. They are faster, and process on your computer or server without a queue. Choose from a variety of options to transform your data so it’s ready for Domo.
1. Select the desired transform from the dropdown and select the
**+** button next to it.
 2. Mention the transform properties for the selected transform and select
**Apply**.
3. You can add multiple transforms to your data.
4. Select
**Edit** (pencil icon) to update the transform properties for a specific transform.
5. Select
**Delete** (trash can icon) to remove a specific transform.
6. Select the
(up and down arrow icons) to interchange the positions of the transforms.
5. **Impersonating your job**: Use of impersonation allows Workbench to run your job as a specific Active Directory user.
1. Select the
**Requires impersonations** check box.
2. Your Active Directory domain name and username will appear.
3. Enter your Active Directory password and click
**Validate**.
6. Set the advanced options for how your job uploads data in Domo in the
**Additional Settings**. You can specify the error handling method and the job run duration and conditions here.
### Schedule Your Job
You can schedule a DataSet job to routinely upload data from external DataSets to Domo.
Set a Basic Schedule
* In the
**Basic Schedule** section, choose whether to update the data manually, when the update file is changed, or choose to schedule your updates.
* If you choose to update on a schedule, you can select the time interval and a specific time window to run the job.
Configure Advanced Scheduling Options
* In the
**Advanced Scheduling** section, you can opt to run the job once a day, more than once a day, every day, specific days of the week/month, every month, or specific months.
Select **Save** (floppy disk icon) to save your changes.
### Use Schema Protection
Domo Workbench offers three different schema protection types. You can control the schema changes by allowing the schema changes safely or permitting the unprotected schema changes, or completely blocking all schema changes. Domo Workbench supports a Protect feature that enables you to control these schema changes in a way. It is available for the **Allow safe schema changes** and **Allow unprotected schema changes** views.
# Protect Column
The Protect column indicates whether your column (data field) is protected while you apply the schema changes to your job.
* If the
**Protect** checkbox is selected for a column, it means that column is protected, and no schema changes can be made. If you try to remove the protection for any column (by unchecking it) while allowing either the **safe schema changes** or **unprotected schema changes**, Domo Workbench 5.1 will give you a warning.
**Important:** Unprotected columns can be changed and deleted, which may break content in Domo.
2. Mention the transform properties for the selected transform and select
**Apply**.
3. You can add multiple transforms to your data.
4. Select
**Edit** (pencil icon) to update the transform properties for a specific transform.
5. Select
**Delete** (trash can icon) to remove a specific transform.
6. Select the
(up and down arrow icons) to interchange the positions of the transforms.
5. **Impersonating your job**: Use of impersonation allows Workbench to run your job as a specific Active Directory user.
1. Select the
**Requires impersonations** check box.
2. Your Active Directory domain name and username will appear.
3. Enter your Active Directory password and click
**Validate**.
6. Set the advanced options for how your job uploads data in Domo in the
**Additional Settings**. You can specify the error handling method and the job run duration and conditions here.
### Schedule Your Job
You can schedule a DataSet job to routinely upload data from external DataSets to Domo.
Set a Basic Schedule
* In the
**Basic Schedule** section, choose whether to update the data manually, when the update file is changed, or choose to schedule your updates.
* If you choose to update on a schedule, you can select the time interval and a specific time window to run the job.
Configure Advanced Scheduling Options
* In the
**Advanced Scheduling** section, you can opt to run the job once a day, more than once a day, every day, specific days of the week/month, every month, or specific months.
Select **Save** (floppy disk icon) to save your changes.
### Use Schema Protection
Domo Workbench offers three different schema protection types. You can control the schema changes by allowing the schema changes safely or permitting the unprotected schema changes, or completely blocking all schema changes. Domo Workbench supports a Protect feature that enables you to control these schema changes in a way. It is available for the **Allow safe schema changes** and **Allow unprotected schema changes** views.
# Protect Column
The Protect column indicates whether your column (data field) is protected while you apply the schema changes to your job.
* If the
**Protect** checkbox is selected for a column, it means that column is protected, and no schema changes can be made. If you try to remove the protection for any column (by unchecking it) while allowing either the **safe schema changes** or **unprotected schema changes**, Domo Workbench 5.1 will give you a warning.
**Important:** Unprotected columns can be changed and deleted, which may break content in Domo.
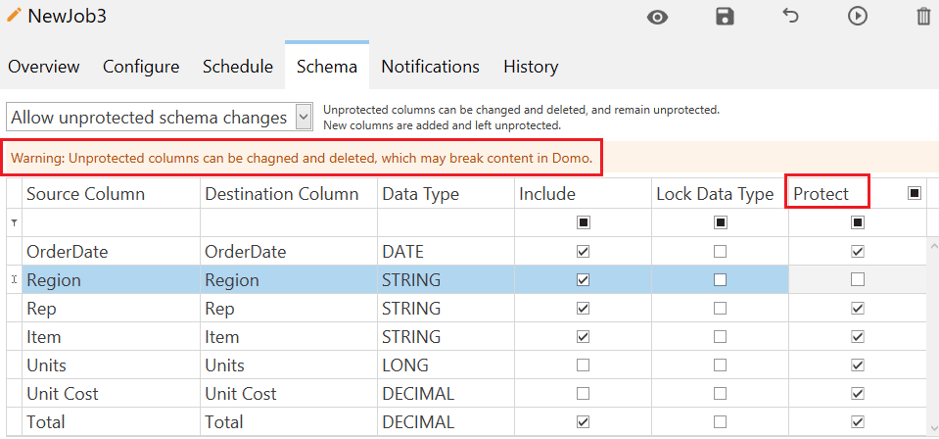 * The Protect column provides you a control to protect or unprotect all columns with a single click. Select the checkbox next to the column header (Protect) to protect all your columns at once. Similarly, you can unprotect your columns at the same time by deselecting this checkbox.
* The column header also provides the control to get a filtered view of protected, unprotected, or both type of entries with a single click.
* When you click to select the regular select view
, the Protect column will display all protected entries.
* When you click to select the unchecked view
, the Protect column will display the unprotected entries.
* When you click to select the mixed view
, the Protect column displays both protected and unprotected entries together.
* You cannot change the name of a protected source column. Domo Workbench 5.1 does not allow the edit operation on a protected source column name. However, you can change the names or properties for other columns.
* The Protect column provides you a control to protect or unprotect all columns with a single click. Select the checkbox next to the column header (Protect) to protect all your columns at once. Similarly, you can unprotect your columns at the same time by deselecting this checkbox.
* The column header also provides the control to get a filtered view of protected, unprotected, or both type of entries with a single click.
* When you click to select the regular select view
, the Protect column will display all protected entries.
* When you click to select the unchecked view
, the Protect column will display the unprotected entries.
* When you click to select the mixed view
, the Protect column displays both protected and unprotected entries together.
* You cannot change the name of a protected source column. Domo Workbench 5.1 does not allow the edit operation on a protected source column name. However, you can change the names or properties for other columns.
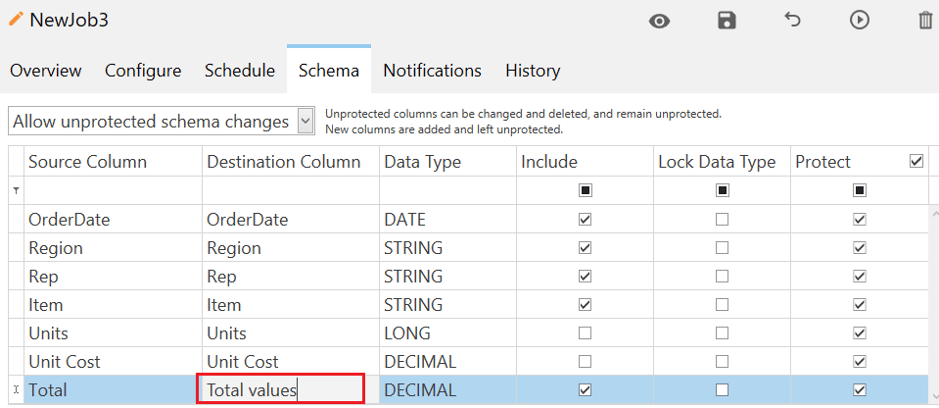 * Similarly, you cannot delete a protected column.
* If you want to allow the schema change, uncheck the column and re-run the job.
# Schema Changes
Select the desired schema from the drop-down to apply schema changes for your job.
* Similarly, you cannot delete a protected column.
* If you want to allow the schema change, uncheck the column and re-run the job.
# Schema Changes
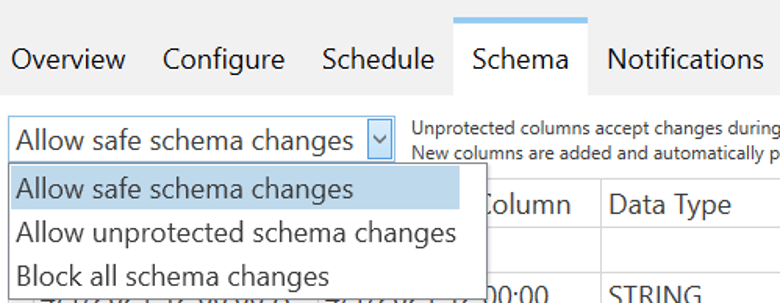
Select the desired schema from the drop-down to apply schema changes for your job.
 **Allow safe schema changes**
If you select this option, the unprotected columns will accept the changes during the next execution, and will automatically be protected after. New columns will be added, and will automatically be protected in future runs. The **Allow safe schema changes** option is the default setting for new jobs.
**Allow unprotected schema changes**
If you choose to allow unprotected schema changes, you will be able to change and delete the unprotected columns, and they will remain unprotected. New columns are added and left unprotected.
**Block all schema changes**
If you choose to block all schema changes, you will not see the Protect option for your columns. If you attempt to make changes to any column and run the job, you will receive an error stating about your forceful change. Also, new columns cannot be added.
**Allow safe schema changes**
If you select this option, the unprotected columns will accept the changes during the next execution, and will automatically be protected after. New columns will be added, and will automatically be protected in future runs. The **Allow safe schema changes** option is the default setting for new jobs.
**Allow unprotected schema changes**
If you choose to allow unprotected schema changes, you will be able to change and delete the unprotected columns, and they will remain unprotected. New columns are added and left unprotected.
**Block all schema changes**
If you choose to block all schema changes, you will not see the Protect option for your columns. If you attempt to make changes to any column and run the job, you will receive an error stating about your forceful change. Also, new columns cannot be added.
 ### Prevent Data Corruption with Partitions
Any change to the data type of the partition key could result in corrupted data. Please avoid making any changes to the partition key after the DataSet has been created.
### Troubleshoot Corrupted Data
If incorrect data is added to your DataSet, you will need to re-run the job with the correct data in the partition that has been affected. After the job has been re-run with the correct data in the partition you wish to correct, the DataSet will be updated and correct data will be available.
Repairing a fully partitioned DataSet is not possible with this version of Workbench partitions.
### FAQ
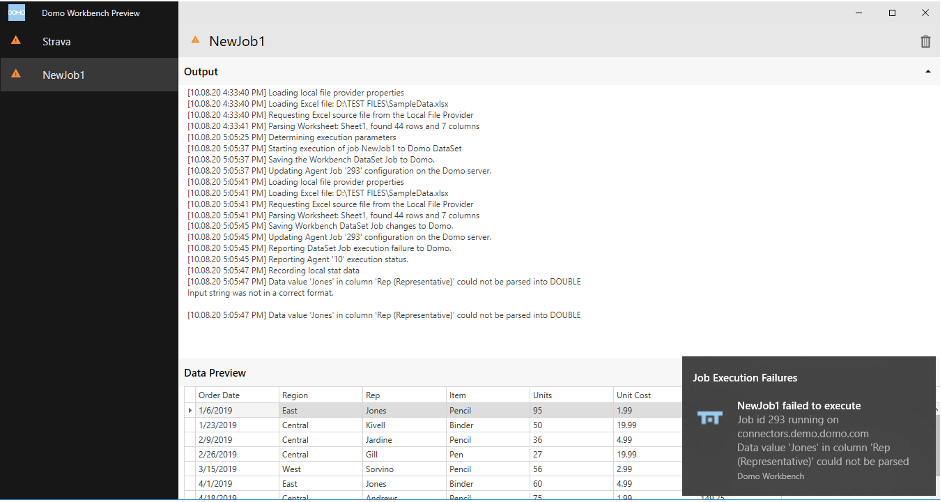
If Domo Workbench detects any invalid data in the partition column, it sends an error while executing the job. Also, if your partition columns contain any null values, the job execution fails.
If you receive an error, check for any invalid or null values in your partition columns.
Workbench allows you to apply partitioning only to a newly created job. To apply partitioning to an existing job, create a new job for that DataSet and select Partition as the update method.
If a null appears in the partition key of your partitioned job, the job will error. This happens because Workbench cannot create a partition from a null value.
### Prevent Data Corruption with Partitions
Any change to the data type of the partition key could result in corrupted data. Please avoid making any changes to the partition key after the DataSet has been created.
### Troubleshoot Corrupted Data
If incorrect data is added to your DataSet, you will need to re-run the job with the correct data in the partition that has been affected. After the job has been re-run with the correct data in the partition you wish to correct, the DataSet will be updated and correct data will be available.
Repairing a fully partitioned DataSet is not possible with this version of Workbench partitions.
### FAQ
If Domo Workbench detects any invalid data in the partition column, it sends an error while executing the job. Also, if your partition columns contain any null values, the job execution fails.
If you receive an error, check for any invalid or null values in your partition columns.
Workbench allows you to apply partitioning only to a newly created job. To apply partitioning to an existing job, create a new job for that DataSet and select Partition as the update method.
If a null appears in the partition key of your partitioned job, the job will error. This happens because Workbench cannot create a partition from a null value.