> ## Documentation Index
> Fetch the complete documentation index at: https://domoinc-openapi-sync-dataflows.mintlify.site/llms.txt
> Use this file to discover all available pages before exploring further.

# Google BigQuery Enterprise Data Connector

## Intro

Google BigQuery Enterprise is a cloud-based big data analytics web service for processing very large read-only data sets. You can use Domo's Google BigQuery Enterprise Data connector to pull data from a specified project and get interactive analysis of massive datasets. Google BigQuery queries are written using a variation of the standard SQL SELECT statement. To learn more about the Google API, visit [https://developer.google.com](https://developer.google.com/ "https://developer.google.com").

You connect to your Google BigQuery Enterprise Data account in the Data Center. This topic discusses the fields and menus that are specific to the Google BigQuery Enterprise Data connector user interface. General information for adding DataSets, setting update schedules, and editing DataSet information is discussed in [Adding a DataSet Using a Data Connector](/s/article/360042926274 "Adding a DataSet Using a Data Connector").

## Prerequisites

To connect to your Google BigQuery Enterprise account and create a DataSet, you must have the following:

* A project created in the Google Developers Console with the APIs and Services enabled
* The Client ID and Client Secret associated with your Google Developers account

The following steps explain in detail how to create your project and obtain the needed credentials.

#### Creating a project in the Google Developers Console

1. Go to [https://console.developers.google.com](https://console.developers.google.com "https://console.developers.google.com").

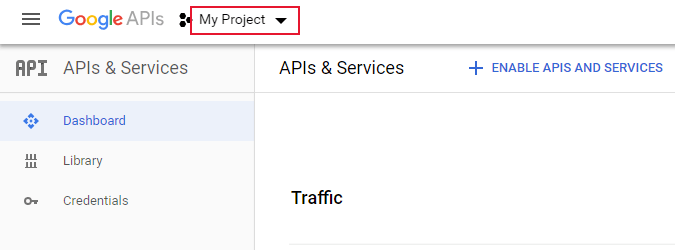
2. Click the dropdown arrow next to **My Project**.

   <Frame>
     <img alt="googlesheets_writeback_1.png" src="https://mintcdn.com/domoinc-openapi-sync-dataflows/blcgkVgnZv6gj_XY/images/kb/ka05w00000123L9-00N5w00000Ri7BU-0EM5w000005vO5e.png?fit=max&auto=format&n=blcgkVgnZv6gj_XY&q=85&s=f03feb392ea59ce30f3bb25369729015" width="675" height="250" data-path="images/kb/ka05w00000123L9-00N5w00000Ri7BU-0EM5w000005vO5e.png" />
   </Frame>

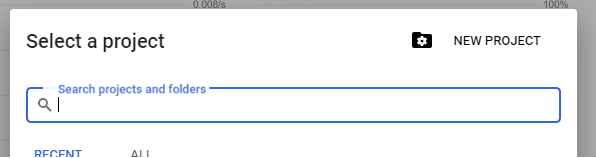
3. Click **New Project**.

   <Frame>
     <img alt="googlesheets_writeback_2.png" src="https://mintcdn.com/domoinc-openapi-sync-dataflows/blcgkVgnZv6gj_XY/images/kb/ka05w00000123L9-00N5w00000Ri7BU-0EM5w000005vO5Z.png?fit=max&auto=format&n=blcgkVgnZv6gj_XY&q=85&s=b44efa97c8a173faf5f4babcd3a21d71" width="596" height="158" data-path="images/kb/ka05w00000123L9-00N5w00000Ri7BU-0EM5w000005vO5Z.png" />
   </Frame>

4. Name your project and select the parent folder.

5. Click **Create**.

   <Note>
     **Note:** You can also use an existing project if you want.
   </Note>

#### Creating the OAuth Client ID and Client Secret

1. Login to [https://console.developers.google.com/](https://console.developers.google.com/).
2. Select your project.
3. Go to **APIs & Services > Credentials**.

<Frame>
  <img alt="clipboard_e2f41627fa6f73db016bc16ff40f8b82c.png" src="https://mintcdn.com/domoinc-openapi-sync-dataflows/blcgkVgnZv6gj_XY/images/kb/ka05w00000123L9-00N5w00000Ri7BU-0EM5w000005vO5h.png?fit=max&auto=format&n=blcgkVgnZv6gj_XY&q=85&s=d0171ce14d9fbf5eebc526ed6d2be55a" width="718" height="106" data-path="images/kb/ka05w00000123L9-00N5w00000Ri7BU-0EM5w000005vO5h.png" />
</Frame>

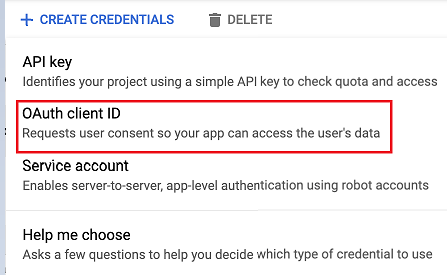
4. Click on **+Create credentials > OAuth client ID**.
<Frame>
  <img alt="clipboard_e7def711e8943bc1c4efbad251022993d.png" src="https://mintcdn.com/domoinc-openapi-sync-dataflows/blcgkVgnZv6gj_XY/images/kb/ka05w00000123L9-00N5w00000Ri7BU-0EM5w000005vO5k.png?fit=max&auto=format&n=blcgkVgnZv6gj_XY&q=85&s=2180b7fbce3ba416e65fdc5aba206696" width="447" height="275" data-path="images/kb/ka05w00000123L9-00N5w00000Ri7BU-0EM5w000005vO5k.png" />
</Frame>

5. Select **OAuth client ID**.

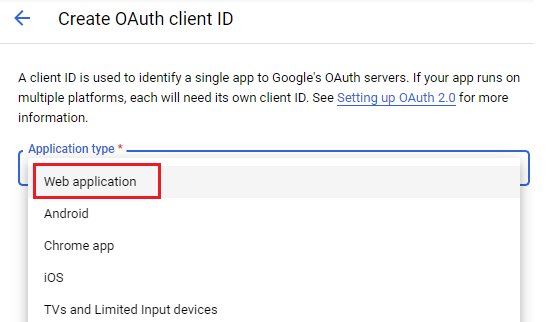
6. Select the **Application Type** as **Web application** from the drop down.
<Frame>
  <img alt="select_web_app.png" src="https://mintcdn.com/domoinc-openapi-sync-dataflows/blcgkVgnZv6gj_XY/images/kb/ka05w00000123L9-00N5w00000Ri7BU-0EM5w000005vO5a.png?fit=max&auto=format&n=blcgkVgnZv6gj_XY&q=85&s=0e70700cdaabc3e4507ed1154d25c406" width="554" height="322" data-path="images/kb/ka05w00000123L9-00N5w00000Ri7BU-0EM5w000005vO5a.png" />
</Frame>

7. Enter the name for your application.

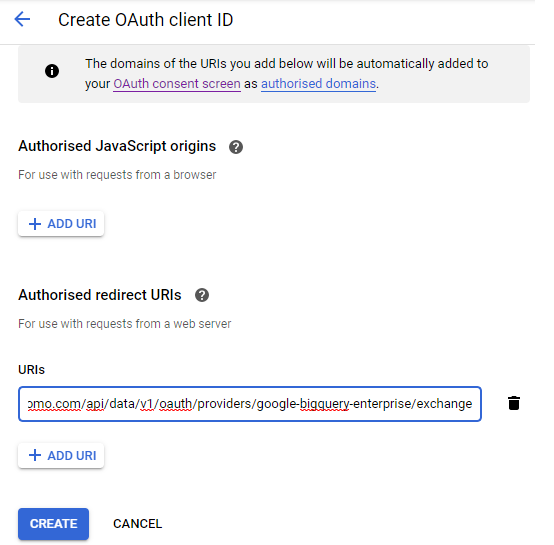
8. Click on
   ****+Add URI**** under ****Authorized redirect URIs****.

9. Add
   **[https://oauth.domo.com/api/data/v1/oauth/providers/google-bigquery-enterprise/exchange](https://oauth.domo.com/api/data/v1/oauth/providers/google-bigquery-enterprise/exchange)** as the redirect  URI.
<Frame>
  <img alt="redirect_URI.png" src="https://mintcdn.com/domoinc-openapi-sync-dataflows/blcgkVgnZv6gj_XY/images/kb/ka05w00000123L9-00N5w00000Ri7BU-0EM5w000005vO5b.png?fit=max&auto=format&n=blcgkVgnZv6gj_XY&q=85&s=d55387a469ef5e098ae814f2b6d95dad" width="554" height="545" data-path="images/kb/ka05w00000123L9-00N5w00000Ri7BU-0EM5w000005vO5b.png" />
</Frame>

10. Click
    ****Create****.

#### Enabling API and Services

1. Login to [https://console.developers.google.com/](https://console.developers.google.com/).

2. Go to
   ****APIs & Services > Dashboard****.

3. Click
   ****+ENABLE APIS AND SERVICES****.

<Frame>
  <img alt="APIs_n_Services.png" src="https://mintcdn.com/domoinc-openapi-sync-dataflows/blcgkVgnZv6gj_XY/images/kb/ka05w00000123L9-00N5w00000Ri7BU-0EM5w000005vO5j.png?fit=max&auto=format&n=blcgkVgnZv6gj_XY&q=85&s=5759cda3d9d3f1955d3d41904a696bf2" width="680" height="87" data-path="images/kb/ka05w00000123L9-00N5w00000Ri7BU-0EM5w000005vO5j.png" />
</Frame>

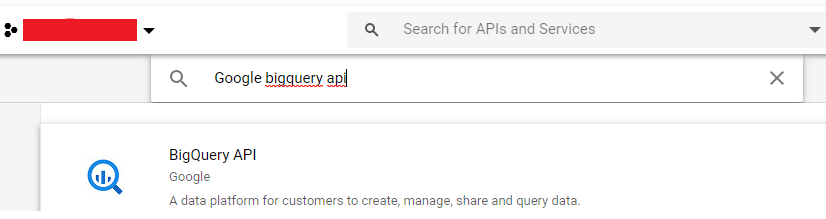
4. Search for
   **Google BigQuey API**.

<Frame>
  <img alt="BigQuery_api.png" src="https://mintcdn.com/domoinc-openapi-sync-dataflows/blcgkVgnZv6gj_XY/images/kb/ka05w00000123L9-00N5w00000Ri7BU-0EM5w000005vO5g.png?fit=max&auto=format&n=blcgkVgnZv6gj_XY&q=85&s=265a90a222979b3ae695b493d2a69409" width="826" height="219" data-path="images/kb/ka05w00000123L9-00N5w00000Ri7BU-0EM5w000005vO5g.png" />
</Frame>

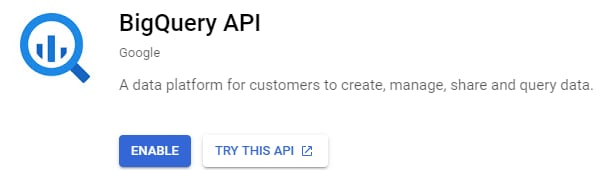
5. Click the
   **ENABLE** button to enable the BigQuery API.
<Frame>
  <img alt="BigQuery_aAPI_enabled.png" src="https://mintcdn.com/domoinc-openapi-sync-dataflows/blcgkVgnZv6gj_XY/images/kb/ka05w00000123L9-00N5w00000Ri7BU-0EM5w000005vO5f.png?fit=max&auto=format&n=blcgkVgnZv6gj_XY&q=85&s=da329eed593bfd6e8281c6ad3e0d7363" width="607" height="170" data-path="images/kb/ka05w00000123L9-00N5w00000Ri7BU-0EM5w000005vO5f.png" />
</Frame>

## Connecting to Your Google BigQuery Enterprise Account

This section enumerates the options in the **Credentials** and **Details** panes in the Google BigQuery Enterprise Data Connector page. The components of the other panes in this page, **Scheduling** and **Name & Describe Your DataSet**, are universal across most connector types and are discussed in greater length in [Adding a DataSet Using a Data Connector](/s/article/360042926274 "Adding a DataSet Using a Data Connector").

### Credentials Pane

This pane contains fields for entering credentials to connect to your Google BigQuery Enterprise account. The following table describes what is needed for each field:

<table border="1" cellpadding="1" cellspacing="1" data-aura-rendered-by="33:195;a"><thead><tr><th colspan="1" rowspan="1"><p><span class="s1"> Field </span></p></th><th colspan="1" rowspan="1"><p><span class="s1"> Description </span></p></th></tr></thead><tbody><tr><td colspan="1" rowspan="1"> Client ID </td><td colspan="1" rowspan="1"> Enter the Client ID associated with your Google Developers account. For more details, see <a href="https://domohelp.domo.com/Connect/Connecting_to_Data_with_Connectors/Configuring_Each_Connector/Connectors_for_Analytics/Google_BigQuery_Enterprise_Data_Connector#Prerequisites" target="_blank" title="Google BigQuery Enterprise Data Connector"> Prerequisites </a>. </td></tr><tr><td colspan="1" rowspan="1"> Client Secret </td><td colspan="1" rowspan="1"> Enter the Client Secret associated with your Google Developers account. For more details, see <a href="https://domohelp.domo.com/Connect/Connecting_to_Data_with_Connectors/Configuring_Each_Connector/Connectors_for_Analytics/Google_BigQuery_Enterprise_Data_Connector#Prerequisites" target="_blank" title="Google BigQuery Enterprise Data Connector"> Prerequisites </a>. </td></tr></tbody></table>

Once you have entered valid credentials, you can use the same account any time you go to create a new Google BigQuery Enterprise DataSet. You can manage connector accounts in the **Accounts** tab in the Data Center. For more information about this tab, see [Managing User Accounts for Connectors](/s/article/360042926054 "Managing User Accounts for Connectors").

### Details Pane

This pane contains a primary **Reports** menu, along with various other menus which may or may not appear depending on the report type you select.

<table border="1" cellpadding="1" cellspacing="1" data-aura-rendered-by="33:196;a"><thead><tr><th colspan="1" rowspan="1"><p>Menu</p></th><th colspan="1" rowspan="1"><p>Description</p></th></tr></thead><tbody><tr><td colspan="1" rowspan="1"><p>Report</p></td><td colspan="1" rowspan="1"><p>Select the Google BigQuery Enterprise report you want to run. The following reports are available:</p><table border="1" cellpadding="1" cellspacing="1"><tbody><tr><td colspan="1" rowspan="1">Query</td><td colspan="1" rowspan="1">Returns the data from Big Query by running legacy or standard SQL.</td></tr><tr><td colspan="1" rowspan="1">Table Information</td><td colspan="1" rowspan="1">Returns the information of the Table.</td></tr><tr><td colspan="1" rowspan="1">Table Data</td><td colspan="1" rowspan="1">Returns the information about the Table data.</td></tr></tbody></table></td></tr><tr><td colspan="1" rowspan="1">What Query Type would you like to use?</td><td colspan="1" rowspan="1">Select whether you would like to use a Legacy SQL Query or a Standard SQL Query. By default, LegacySQL is selected.</td></tr><tr><td colspan="1" rowspan="1">Query</td><td colspan="1" rowspan="1">Enter a fully qualified Google BigQuery query.</td></tr><tr><td colspan="1" rowspan="1">Query Parameter</td><td colspan="1" rowspan="1">Enter the query parameter value. It is the initial value for query parameter. The last run date is optional by default. The value for last run date is '02/01/1700' if it is not provided. Example: `!{lastvalue:_id}!=1,!{lastrundate:start_date}!=02/01/1944`</td></tr><tr><td colspan="1" rowspan="1">Project ID</td><td colspan="1" rowspan="1">Enter the ID for the project you want to retrieve data for.</td></tr><tr><td colspan="1" rowspan="1">Expect Large Results</td><td colspan="1" rowspan="1">Specify whether you would like to get large results. Queries with large results will create a temporary table and delete it when the job is finished. A dataset ID is required to create the temporary table.</td></tr><tr><td colspan="1" rowspan="1">Dataset ID</td><td colspan="1" rowspan="1">Enter the ID for the dataset you want to retrieve data for.</td></tr><tr><td colspan="1" rowspan="1">Projects</td><td colspan="1" rowspan="1">Select project from available list of projects.</td></tr><tr><td colspan="1" rowspan="1">Datasets</td><td colspan="1" rowspan="1">Select dataset from available list of datasets.</td></tr><tr><td colspan="1" rowspan="1">Tables</td><td colspan="1" rowspan="1">Select table from available list of tables.</td></tr><tr><td colspan="1" rowspan="1">Location</td><td colspan="1" rowspan="1">Enter location. Visit <a href="https://cloud.google.com/bigquery/docs/locations" target="_blank" title="https://cloud.google.com/bigquery/docs/locations">Dataset Locations</a> to find more information about Location.</td></tr><tr><td colspan="1" rowspan="1">Selected Fields</td><td colspan="1" rowspan="1">Select fields.</td></tr><tr><td colspan="1" rowspan="1">Max Results</td><td colspan="1" rowspan="1">Max Results is the number of results returned per page of data. By default, it returns 10,000 results per page. If your dataset throws an out of memory error, decrease Max Results.</td></tr></tbody></table>

### Other Panes

For information about the remaining sections of the connector interface, including how to configure scheduling, retry, and update options, see [Adding a DataSet Using a Data Connector](/s/article/360042926274 "Adding a DataSet Using a Data Connector").