> ## Documentation Index
> Fetch the complete documentation index at: https://domoinc-openapi-sync-dataflows.mintlify.site/llms.txt
> Use this file to discover all available pages before exploring further.

# Snowflake Key Pair Authentication Writeback Connector

## Intro

The Snowflake Key Pair Authentication Writeback Connector makes it easy to bring all your data into Domo and normalize it, then send it back to Snowflake while simultaneously making it available for queries. If you are already using Snowflake as a data warehousing solution, this connector helps you use Domo in conjunction with it to get the most from your data. To use this connector, you must have your Snowflake account name, the username used to connect to your Snowflake host, private key, passphrase, and your Domo developer account credentials (client id and client secret). Use Domo's Snowflake Key Pair Authentication Writeback connector to export your data from a Domo dataset to your Snowflake account. For more information about the Snowflake API, visit [https://docs.snowflake.net/manuals](https://docs.snowflake.net/manuals "https://docs.snowflake.net/manuals").

This topic discusses the fields and menus that are specific to the Snowflake Key Pair Authentication Writeback connector user interface. General information for adding DataSets, setting update schedules, and editing DataSet information is discussed in [Adding a DataSet Using a Connector](https://domo-support.domo.com/s/article/360042926274?language=en_US "Adding a DataSet Using a Connector").

<Note>
  **Note:** The owner of a writeback dataset must also be an owner or co-owner of the input dataset.
</Note>

## Prerequisites

To connect to a Snowflake database and create a DataSet, you must have the following:

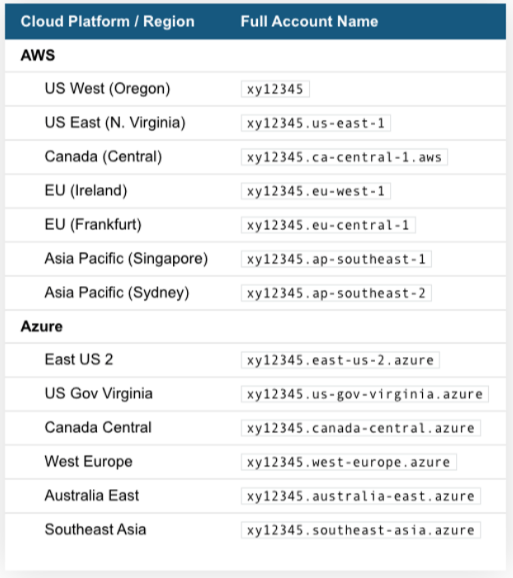
* The full name of your account (provided by Snowflake). This is the portion of your Snowflake URL immediately following https\://.
  Note that your full account name may include additional segments that identify the region and cloud platform where your account is hosted. For US West Region \***\*account\_name\*\*** and All other regions \***\*account\_name.region\_id\*\***. The following table provides account name examples by cloud platform/region. For each row, it assumes your account name is "xy12345."

<Frame>
  <img alt="snowflake_account_names.png" src="https://mintcdn.com/domoinc-openapi-sync-dataflows/blcgkVgnZv6gj_XY/images/kb/ka05w00000123Kt-00N5w00000Ri7BU-0EM5w000005vO5S.png?fit=max&auto=format&n=blcgkVgnZv6gj_XY&q=85&s=94e8a1fb7fbd352130ec6ddef81336bf" width="513" height="578" data-path="images/kb/ka05w00000123Kt-00N5w00000Ri7BU-0EM5w000005vO5S.png" />
</Frame>

* The username used to connect to your Snowflake host.
* The private key.
* The passphrase. If you create an encrypted private key, then OpenSSL prompts for a passphrase used to encrypt the private key file.

<Warning>
  **Important**: You need the CREATE TABLE, COPY INTO, PUT, CREATE FILE FORMAT, REMOVE, and LIST permissions on Snowflake.
</Warning>

### Configuring the public/private key pair

To configure the public/private key pair, follow these steps:

1. From the command line in a terminal window, generate a private key.

   You can generate either an encrypted version of the private key or an unencrypted version of the private key.

   * To generate an unencrypted version, use the following command:
     `$ openssl genrsa -out rsa_key.pem 2048`
   * To generate an encrypted version, use the following command:
     `$ openssl genrsa 2048 | openssl pkcs8 -topk8 -inform PEM -out rsa_key.p8`
     It is typically safer to generate an encrypted version.
     If you use the second command to encrypt the private key, then OpenSSL prompts for a passphrase used to encrypt the private key file. We recommend using a strong passphrase to protect the private key. Record this passphrase in a secure location. You will input it when connecting to Snowflake. Note that the passphrase is only used for protecting the private key and will never be sent to Snowflake.
     The following is a sample PEM private key:
     ```
     -----BEGIN ENCRYPTED PRIVATE KEY-----

     MIIE6TAbBgkqhkiG9w0BBQMwDgQILYPyCppzOwECAggABIIEyLiGSpeeGSe3xHP1

     wHLjfCYycUPennlX2bd8yX8xOxGSGfvB+99+PmSlex0FmY9ov1J8H1H9Y3lMWXbL

     ...

     -----END ENCRYPTED PRIVATE KEY-----
     ```

2. From the command line, generate the public key by referencing the private key. Assuming the private key is encrypted and contained in the file named “rsa\_key.p8”, use the following command:

   `$ openssl rsa -in rsa_key.p8 -pubout -out rsa_key.pub`

   The following is a sample PEM public key:

   ```
   -----BEGIN PUBLIC KEY----- MIIBIjANBgkqhkiG9w0BAQEFAAOCAQ8AMIIBCgKCAQEAy+Fw2qv4Roud3l6tjPH4
   zxybHjmZ5rhtCz9jppCV8UTWvEXxa88IGRIHbJ/PwKW/mR8LXdfI7l/9vCMXX4mk
   ...
   -----END PUBLIC KEY-----
   ```

3. Copy the public and private key files to a local directory for storage. Record the path to the files. Note that the private key is stored using the PKCS#8 (Public Key Cryptography Standards) format and is encrypted using the passphrase you specified in the previous step; however, the file should still be protected from unauthorized access using the file permission mechanism provided by your operating system. It is your responsibility to secure the file when it is not being used.

4. Assign the public key to the Snowflake user using ALTER USER. For example:

   `alter user jsmith set rsa_public_key='MIIBIjANBgkqh...';`

<Note>
  **Notes:**

  * Only security administrators (i.e. users with the SECURITYADMIN role) or higher can alter a user.
  * Exclude the public key header and footer in the SQL statement.
</Note>

5. Verify the user’s public key fingerprint using DESCRIBE USER:

<table>
  <thead>
    <tr>
      <th colspan="1" rowspan="1">
        {" "}

        Property{" "}
      </th>

      <th colspan="1" rowspan="1">
        {" "}

        Value{" "}
      </th>

      <th colspan="1" rowspan="1">
        {" "}

        Default{" "}
      </th>

      <th colspan="1" rowspan="1">
        {" "}

        Description{" "}
      </th>
    </tr>
  </thead>

  <tbody>
    <tr>
      <td colspan="1" rowspan="1">
        {" "}

        Name{" "}
      </td>

      <td colspan="1" rowspan="1">
        {" "}

        JSMITH{" "}
      </td>

      <td colspan="1" rowspan="1">
        {" "}

        null{" "}
      </td>

      <td colspan="1" rowspan="1">
        {" "}

        Name{" "}
      </td>
    </tr>

    <tr>
      <td colspan="1" rowspan="1">
        {" "}

        RSA\_PUBLIC\_KEY\_FP{" "}
      </td>

      <td colspan="1" rowspan="1">
        {" "}

        SHA256:nvnONUsfiuycCLMXIEWG4eTp4FjhVUZQUQbNpbSHXiA={" "}
      </td>

      <td colspan="1" rowspan="1">
        {" "}

        null{" "}
      </td>

      <td colspan="1" rowspan="1">
        {" "}

        Fingerprint of user's RSA public key.{" "}
      </td>
    </tr>

    <tr>
      <td colspan="1" rowspan="1">
        {" "}

        RSA\_PUBLIC\_KEY\_2\_FP{" "}
      </td>

      <td colspan="1" rowspan="1">
        {" "}

        null{" "}
      </td>

      <td colspan="1" rowspan="1">
        {" "}

        null{" "}
      </td>

      <td colspan="1" rowspan="1">
        {" "}

        Fingerprint of user's second RSA public key.{" "}
      </td>
    </tr>
  </tbody>
</table>

<Note>
  **Note:** For more information about the RSA\_PUBLIC\_KEY\_2\_FP property, see [Key
  Rotation](#h_01ES6Z0BJZFCZ3TSR79F91AE6J "Snowflake Key Pair Authentication Writeback Connector").
</Note>

6. Modify and execute the sample code, below. The code decrypts the private key file and passes it to the Snowflake driver to create a connection:

   * Update the security parameters:
     * `<path>` specifies the local path to the private key file you created.
   * Update the session parameters:
     * `<user>` specifies your Snowflake login name.
     * `<account>` specifies the name of your account (provided by Snowflake).
   * The sample code is as follows:

     ```java theme={"dark"}
     import java.util.Properties;
     import java.sql.Connection;
     import java.sql.Statement;
     import java.sql.ResultSet;
     import java.sql.DriverManager;
     import java.io.File;
     import java.io.FileInputStream;
     import java.io.DataInputStream;
     import java.util.Base64;
     import java.security.spec.PKCS8EncodedKeySpec;
     import java.security.KeyFactory;
     import java.security.PrivateKey;
     import javax.crypto.EncryptedPrivateKeyInfo;
     import javax.crypto.SecretKeyFactory;
     import javax.crypto.spec.PBEKeySpec;

     public class TestJdbc
     {
        public static void main(String[] args)
           throws Exception
        {
           File f = new File("<path>/rsa_key.p8");
           FileInputStream fis = new FileInputStream(f);
           DataInputStream dis = new DataInputStream(fis);
           byte[] keyBytes = new byte[(int) f.length()];
           dis.readFully(keyBytes);
           dis.close();

           String encrypted = new String(keyBytes);
           String passphrase = System.getenv("PRIVATE_KEY_PASSPHRASE");
           encrypted = encrypted.replace("-----BEGIN ENCRYPTED PRIVATE KEY-----", "");
           encrypted = encrypted.replace("-----END ENCRYPTED PRIVATE KEY-----", "");
           EncryptedPrivateKeyInfo pkInfo = new EncryptedPrivateKeyInfo(Base64.getMimeDecoder().decode(encrypted));
           PBEKeySpec keySpec = new PBEKeySpec(passphrase.toCharArray());
           SecretKeyFactory pbeKeyFactory = SecretKeyFactory.getInstance(pkInfo.getAlgName());
           PKCS8EncodedKeySpec encodedKeySpec = pkInfo.getKeySpec(pbeKeyFactory.generateSecret(keySpec));
           KeyFactory keyFactory = KeyFactory.getInstance("RSA");
           PrivateKey encryptedPrivateKey = keyFactory.generatePrivate(encodedKeySpec);

           String url = "jdbc:snowflake://<account>.snowflakecomputing.com";
           Properties prop = new Properties();
           prop.put("user", "<user>");
           prop.put("account", "<account>");
           prop.put("privateKey", encryptedPrivateKey);

           Connection conn = DriverManager.getConnection(url, prop);
           Statement stat = conn.createStatement();
           ResultSet res = stat.executeQuery("select 1");
           res.next();
           System.out.println(res.getString(1));
           conn.close();
        }
     }
     ```

#### Key Rotation

Snowflake supports multiple active keys to allow for uninterrupted rotation. Rotate and replace your public and private keys based on the expiration schedule you follow internally.

Currently, you can use the RSA\_PUBLIC\_KEY and RSA\_PUBLIC\_KEY\_2 parameters for ALTER USER to associate up to 2 public keys with a single user.

To rotate your keys,

1. Complete the steps in Using Key Pair Authentication to...
   * Generate a new private and public key set.
   * Assign the public key to the user. Set the public key value to either RSA\_PUBLIC\_KEY or RSA\_PUBLIC\_KEY\_2 (whichever key value is not currently in use).
     For example:
     `alter user jsmith set rsa_public_key_2='JERUEHtcve...';`
2. Update the code to connect to Snowflake. Specify the new private key.
   Snowflake verifies the correct active public key for authentication based on the private key submitted with your connection information.
3. Remove the old public key from the user profile. For example:
   `alter user jsmith unset rsa_public_key;`

## Configuring the connection

This section enumerates the options in the **Credentials** and **Details** panes in the Snowflake Key Pair Authentication Writeback Connector page. The components of the other panes in this page, **Scheduling** and **Name & Describe Your DataSet**, are universal across most connector types and are discussed in greater length in [Adding a DataSet Using a Connector](https://domo-support.domo.com/s/article/360042926274?language=en_US "Adding a DataSet Using a Connector").

### Credentials Pane

This pane contains fields for entering credentials to your Domo developer account as well as your Snowflake account. The following table describes what is needed for each field:

<table border="1" cellpadding="1" cellspacing="1" data-aura-rendered-by="33:195;a">
  <thead>
    <tr>
      <th colspan="1" rowspan="1">
        <p>
          <span class="s1">
            Field
          </span>
        </p>
      </th>

      <th colspan="1" rowspan="1">
        <p>
          <span class="s1">
            Description
          </span>
        </p>
      </th>
    </tr>
  </thead>

  <tbody>
    <tr>
      <td colspan="1" rowspan="1">
        {" "}

        Account Name{" "}
      </td>

      <td colspan="1" rowspan="1">
        {" "}

        Enter the full name of your account (provided by Snowflake.) For US West Region

        <b>
          <b>
            account\_name
          </b>
        </b>

        and All other regions

        <b>
          <b>
            account\_name.region\_id
          </b>
        </b>
      </td>
    </tr>

    <tr>
      <td colspan="1" rowspan="1">
        {" "}

        Username{" "}
      </td>

      <td colspan="1" rowspan="1">
        {" "}

        Enter the username used to connect to your Snowflake host.{" "}
      </td>
    </tr>

    <tr>
      <td colspan="1" rowspan="1">
        {" "}

        Private Key{" "}
      </td>

      <td colspan="1" rowspan="1">
        {" "}

        Enter the private key.{" "}
      </td>
    </tr>

    <tr>
      <td colspan="1" rowspan="1">
        {" "}

        Passphrase{" "}
      </td>

      <td colspan="1" rowspan="1">
        {" "}

        If you create an encrypted private key, then OpenSSL prompts for a passphrase used to encrypt the private key file.
        Enter that passphrase here.{" "}
      </td>
    </tr>

    <tr>
      <td colspan="1" rowspan="1">
        {" "}

        Role{" "}
      </td>

      <td colspan="1" rowspan="1">
        {" "}

        Enter your role.{" "}
      </td>
    </tr>
  </tbody>
</table>

Once you have entered valid credentials, you can use the same account any time you to create a new Domo-Snowflake connection. You can manage connector accounts in the **Accounts** tab in the Data Center. For more information about this tab, see [Manage Connector Accounts](https://domo-support.domo.com/s/article/360042926054?language=en_US "Manage Connector Accounts").

### Details Pane

This pane contains a primary **Reports** menu, along with various other menus which may or may not appear depending on the report type you select.

<table border="1" cellpadding="1" cellspacing="1" data-aura-rendered-by="33:195;a">
  <thead>
    <tr>
      <th colspan="1" rowspan="1">
        <p>
          Menu
        </p>
      </th>

      <th colspan="1" rowspan="1">
        <p>
          Description
        </p>
      </th>
    </tr>
  </thead>

  <tbody>
    <tr>
      <td colspan="1" rowspan="1">
        <p>
          Input DataSet ID
        </p>
      </td>

      <td colspan="1" rowspan="1">
        <p>
          {" "}

          Enter the DataSet ID (GUID) for the DataSet you want to copy to Snowflake. You can find the ID by opening the details
          view for the DataSet in the Data Center and looking at the portion of the URL following datasources/. For example,
          in the URL

          <a href="https://mycompany.domo.com/datasources/845305d8-da3d-4107-a9d6-13ef3f86d4a4/details/overview" target="_blank" title="https://mycompany.domo.com/datasources/845305d8-da3d-4107-a9d6-13ef3f86d4a4/details/overview">
            {" "}

            [https://mycompany.domo.com/datasources/845305d8-da3d-4107-a9d6-13ef3f86d4a4/details/overview\{](https://mycompany.domo.com/datasources/845305d8-da3d-4107-a9d6-13ef3f86d4a4/details/overview\{)" "}
          </a>

          , the DataSet ID is 845305d8-da3d-4107-a9d6-13ef3f86d4a4.{" "}
        </p>
      </td>
    </tr>

    <tr>
      <td colspan="1" rowspan="1">
        <p>
          Select Table Name
        </p>
      </td>

      <td colspan="1" rowspan="1">
        <p>
          {" "}

          Select how you want to name the table where data will be copied.

          <br />

          <br />
        </p>

        <ul>
          <li>
            <b>
              Use Input DataSet GUID
            </b>

            : The table name must be the number you entered for the{" "}

            <b>
              <b>
                Input
              </b>
            </b>

            <b>
              <b>
                <b>
                  <b>
                    DataSet ID
                  </b>
                </b>
              </b>
            </b>

            .{" "}
          </li>

          <li>
            <b>
              Use Input Dataset Name
            </b>

            : The table name must be the name used for naming the Input DataSet.{" "}
          </li>

          <li>
            <b>
              Enter Table Name
            </b>

            : Enter a custom table name in the{" "}

            <b>
              {" "}

              Enter

              <b>
                <b>
                  <b>
                    Table Name
                  </b>
                </b>
              </b>
            </b>

            {" "}

            field.{" "}
          </li>
        </ul>
      </td>
    </tr>

    <tr>
      <td colspan="1" rowspan="1">
        <p>
          Enter Table Name
        </p>
      </td>

      <td colspan="1" rowspan="1">
        <p>
          {" "}

          Enter the name of the Snowflake table you want your data copied to (spaces and special characters will be replaced
          with underscores).{" "}
        </p>
      </td>
    </tr>

    <tr>
      <td colspan="1" rowspan="1">
        <p>
          Warehouses
        </p>
      </td>

      <td colspan="1" rowspan="1">
        <p>
          Select the warehouse.
        </p>
      </td>
    </tr>

    <tr>
      <td colspan="1" rowspan="1">
        <p>
          Databases
        </p>
      </td>

      <td colspan="1" rowspan="1">
        <p>
          Select the database.
        </p>
      </td>
    </tr>

    <tr>
      <td colspan="1" rowspan="1">
        <p>
          Database Schema
        </p>
      </td>

      <td colspan="1" rowspan="1">
        <p>
          Select the schema.
        </p>
      </td>
    </tr>

    <tr>
      <td colspan="1" rowspan="1">
        {" "}

        Use All Caps for Column Names and Table Name{" "}
      </td>

      <td colspan="1" rowspan="1">
        {" "}

        Write back your column names and table name in ALL CAPS, so the names are case insensitive within Snowflake.{" "}
      </td>
    </tr>

    <tr>
      <td colspan="1" rowspan="1">
        {" "}

        How do you want to update your data in snowflake?{" "}
      </td>

      <td colspan="1" rowspan="1">
        <table>
          <tbody>
            <tr>
              <th colspan="1" rowspan="1">
                <p>
                  Table Options
                </p>
              </th>

              <th colspan="1" rowspan="1">
                <p>
                  Description
                </p>
              </th>
            </tr>

            <tr>
              <td colspan="1" rowspan="1">
                <p>
                  Drop Table and Load Data
                </p>
              </td>

              <td colspan="1" rowspan="1">
                <p>
                  Deletes the existing table and creates a new table if the table exists.
                </p>
              </td>
            </tr>

            <tr>
              <td colspan="1" rowspan="1">
                <p>
                  Truncate Table and Load Data
                </p>
              </td>

              <td colspan="1" rowspan="1">
                <p>
                  {" "}

                  Truncates an existing table and loads the new data, if the table already exists. The connector will preserve
                  the schema of the existing table if this option is selected.{" "}
                </p>
              </td>
            </tr>

            <tr>
              <td colspan="1" rowspan="1">
                <p>
                  Append Data to the existing table
                </p>
              </td>

              <td colspan="1" rowspan="1">
                <p>
                  Appends the data to the existing data.
                </p>
              </td>
            </tr>
          </tbody>
        </table>
      </td>
    </tr>

    <tr>
      <td colspan="1" rowspan="1">
        {" "}

        Choose the Escape character{" "}
      </td>

      <td colspan="1" rowspan="1">
        {" "}

        Select the escape character for the input dataset.{" "}
      </td>
    </tr>
  </tbody>
</table>

### FAQs

<AccordionGroup>
  <Accordion title="When should I use this connector?">
    This connector allows you to write data from a Domo dataset to a Snowflake instance using a local username and a
    private key.
  </Accordion>

  <Accordion title="What permissions do I need on Snowflake?">
    You need the CREATE TABLE, COPY INTO, PUT, CREATE FILE FORMAT, REMOVE, and LIST permissions on Snowflake.
  </Accordion>

  <Accordion title="What kind of credentials do I need to power up this connector?">
    You need the account name (provided by Snowflake), your Snowflake username, and private key. If you are creating an
    encrypted private key then you will need a passphrase used to encrypt the private key file. You can also provide
    your role name.
  </Accordion>

  <Accordion title="How frequently will my data update?">
    As often as needed.
  </Accordion>

  <Accordion title="Are there any API limits that I need to be aware of?">
    Limits depend on your server configuration.
  </Accordion>

  <Accordion title="Can I use the same account to create multiple datasets?">
    Yes
  </Accordion>

  <Accordion title="Why can't I connect to my Snowflake database? Do I need to whitelist any IP addresses?">
    Before you can connect to a Snowflake database, you must also whitelist a number of IP addresses on your database
    server on the port you want to connect to. For the full list of IP addresses, see [Whitelisting IP
    Addresses.](/s/article/360043630093 "Whitelisting IP Addresses.")
  </Accordion>

  <Accordion title="How do I find the Input Dataset ID?">
    Your Domo input dataset ID is in the URL of the dataset you are exporting data from. For example
    [https://customer.domo.com/datasources/aaaaaaaa-bbbb-cccc-dddd-eeeeeeeeeeee/details/settings](https://customer.domo.com/datasources/aaaaaaaa-bbbb-cccc-dddd-eeeeeeeeeeee/details/settings)
  </Accordion>
</AccordionGroup>

### Other Panes

For information about the remaining sections of the connector interface, including how to configure scheduling, retry, and update options, see [Adding a DataSet Using a Connector](https://domo-support.domo.com/s/article/360042926274?language=en_US "Adding a DataSet Using a Connector").
