> ## Documentation Index
> Fetch the complete documentation index at: https://domoinc-openapi-sync-dataflows.mintlify.site/llms.txt
> Use this file to discover all available pages before exploring further.

# Microsoft Reports Connector

## Intro

Microsoft Reports connector provides an ease of access to your Microsoft email data in your organization. You can get several details about your Microsoft email data into Domo easily and securely. To do this, you must first create an app in Microsoft Azure. You must have an Admin account or an Admin approval to connect to your Microsoft account. Use Domo's Microsoft Report connector to get data about the email and user activities from your Microsoft account into Domo.

You connect to your Microsoft Reports account in the Data Center. This topic discusses the fields and menus that are specific to the Microsoft Reports connector user interface. General information for adding DataSets, setting update schedules, and editing DataSet information is discussed in [Adding a DataSet Using a Data Connector](/s/article/360042926274 "Adding a DataSet Using a Data Connector").

## Prerequisites

To connect to your Microsoft account and create a DataSet, you must have the following:

* An installed Microsoft Azure app.
* The client ID for your Azure app.
* The client secret for your Azure app. This is generated when you create your Azure app.

##### To find the Client ID, do the following:

1. Go to
   [https://portal.azure.com](https://portal.azure.com "https://portal.azure.com") and sign in using your Microsoft credentials.
2. Select
   ****Azure Active Directory > App registrations****.
3. Find your app and click on it.
4. Locate the "Application ID" from the web app (this is the client ID).

##### To generate a new Client Secret, do the following:

1. Go to
   [https://portal.azure.com](https://portal.azure.com "https://portal.azure.com") and sign in using your Microsoft credentials.
2. Select
   ****Azure Active Directory > App registrations****.
3. Find your app and click on it.
4. Open
   ****Certificates and secrets****.
5. Create the client secret.

### Creating an Azure App for Enterprise OAuth

To create a Microsoft Azure app, do the following:

1. Log into
   [https://portal.azure.com](https://portal.azure.com/ "https://portal.azure.com").

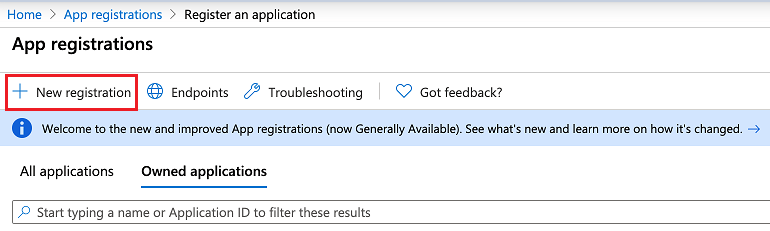
2. Click on
   ****App registrations****.

<Frame>
  <img alt="Capture1.PNG" src="https://mintcdn.com/domoinc-openapi-sync-dataflows/blcgkVgnZv6gj_XY/images/kb/ka05w000001236O-00N5w00000Ri7BU-0EM5w000005vNz7.png?fit=max&auto=format&n=blcgkVgnZv6gj_XY&q=85&s=595e884485e262b8a3b708a307dc1fb7" width="770" height="231" data-path="images/kb/ka05w000001236O-00N5w00000Ri7BU-0EM5w000005vNz7.png" />
</Frame>

3. Click
   ****New registration****.

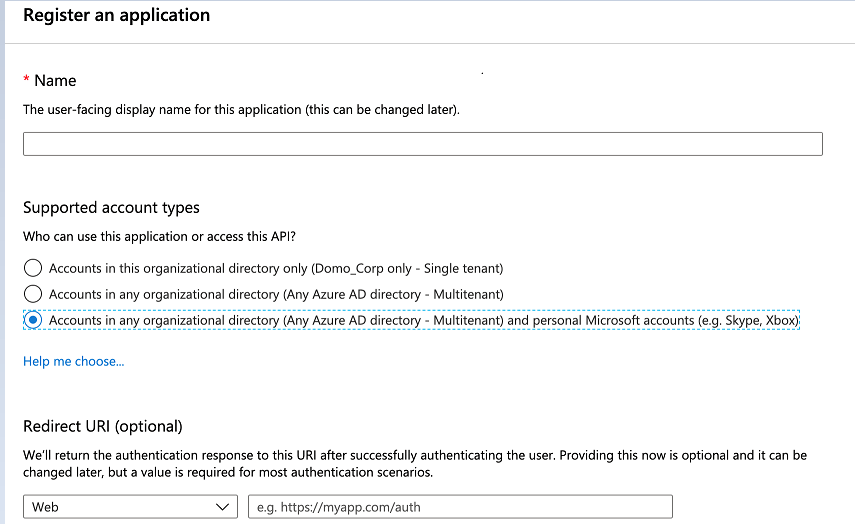
4. Enter the application name and select the supported account type as below. Enter the Redirect URI for Web as [https://oauth.domo.com/api/data/v1/oauth/providers/microsoft-reports/exchange](https://oauth.domo.com/api/data/v1/oauth/providers/microsoft-reports/exchange).
<Frame>
  <img alt="Capture3.PNG" src="https://mintcdn.com/domoinc-openapi-sync-dataflows/blcgkVgnZv6gj_XY/images/kb/ka05w00000123LH-00N5w00000Ri7BU-0EM5w000005vO5p.png?fit=max&auto=format&n=blcgkVgnZv6gj_XY&q=85&s=7614abb6bfa6fa91f7bd85d5633d7cf7" width="855" height="524" data-path="images/kb/ka05w00000123LH-00N5w00000Ri7BU-0EM5w000005vO5p.png" />
</Frame>

5. Click
   ****Register****.

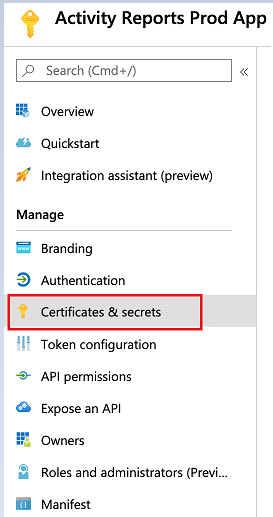
6. Once the application is registered, click on
   **Certificates & Secrets**. Certificates can be used as secrets to prove the application’s identity when requesting a token. Also, can be referred to as public keys.
<Frame>
  <img alt="Capture4.PNG" src="https://mintcdn.com/domoinc-openapi-sync-dataflows/h3wt9z20TJE_4Mbl/images/kb/ka05w000001236O-00N5w00000Ri7BU-0EM5w000005vNyu.png?fit=max&auto=format&n=h3wt9z20TJE_4Mbl&q=85&s=dde60a148ae4c7bfd1defcd0a3536654" width="273" height="517" data-path="images/kb/ka05w000001236O-00N5w00000Ri7BU-0EM5w000005vNyu.png" />
</Frame>

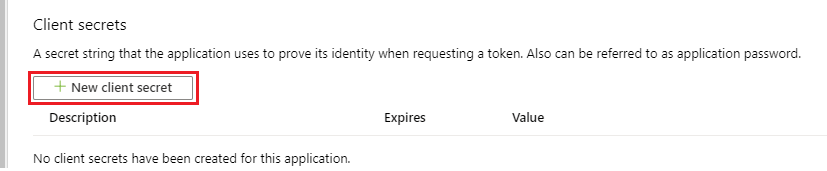
7. Click on
   **+ New Client Secret** button.
<Frame>
  <img alt="Capture5.PNG" src="https://mintcdn.com/domoinc-openapi-sync-dataflows/blcgkVgnZv6gj_XY/images/kb/ka05w000001236O-00N5w00000Ri7BU-0EM5w000005vNz3.png?fit=max&auto=format&n=blcgkVgnZv6gj_XY&q=85&s=ff7b69076096ec99d1c084487abf783a" width="827" height="171" data-path="images/kb/ka05w000001236O-00N5w00000Ri7BU-0EM5w000005vNz3.png" />
</Frame>

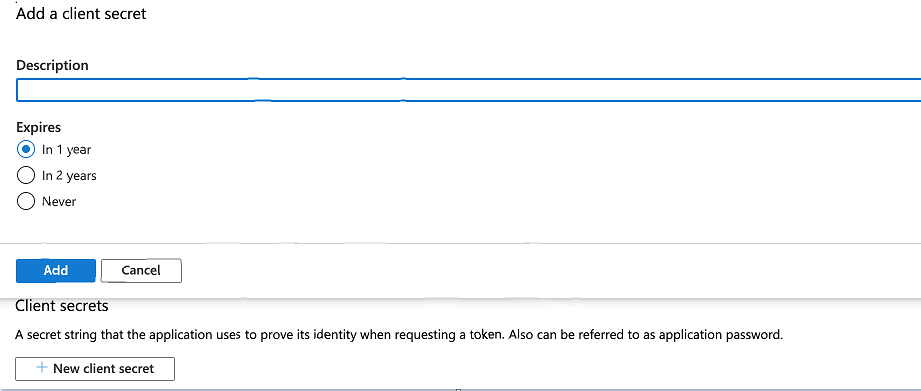
8. Specify the client secret description and the expiry period for your client secret, and click
   ****Add****.
<Frame>
  <img alt="Capture6.PNG" src="https://mintcdn.com/domoinc-openapi-sync-dataflows/blcgkVgnZv6gj_XY/images/kb/ka05w00000123LH-00N5w00000Ri7BU-0EM5w000005vO62.png?fit=max&auto=format&n=blcgkVgnZv6gj_XY&q=85&s=9d631d31df0def4b38c2521b41850730" width="921" height="391" data-path="images/kb/ka05w00000123LH-00N5w00000Ri7BU-0EM5w000005vO62.png" />
</Frame>

9. Copy the value and paste it into the
   ****Client Secret**** field in the Connector credentials section in Domo.

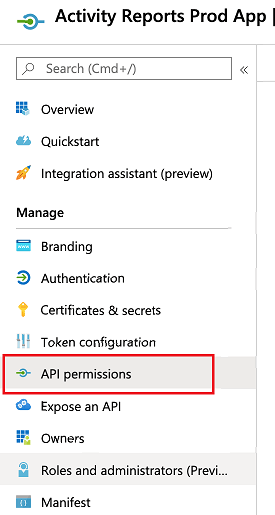
10. Now, click
    **API Permissions**.
<Frame>
  <img alt="Capture7.PNG" src="https://mintcdn.com/domoinc-openapi-sync-dataflows/blcgkVgnZv6gj_XY/images/kb/ka05w00000123LH-00N5w00000Ri7BU-0EM5w000005vO5x.png?fit=max&auto=format&n=blcgkVgnZv6gj_XY&q=85&s=6a8e97dd08e024d747c7083197dd63ff" width="275" height="515" data-path="images/kb/ka05w00000123LH-00N5w00000Ri7BU-0EM5w000005vO5x.png" />
</Frame>

11. Click
    **+Add Permissions** button.

<Frame>
  <img alt="Capture8.PNG" src="https://mintcdn.com/domoinc-openapi-sync-dataflows/blcgkVgnZv6gj_XY/images/kb/ka05w00000123LH-00N5w00000Ri7BU-0EM5w000005vO61.png?fit=max&auto=format&n=blcgkVgnZv6gj_XY&q=85&s=d361854fb29fa710f256f60117e2dab9" width="369" height="62" data-path="images/kb/ka05w00000123LH-00N5w00000Ri7BU-0EM5w000005vO61.png" />
</Frame>

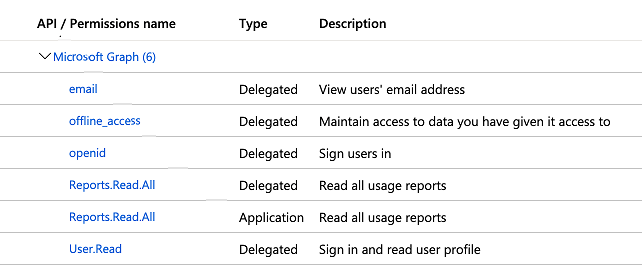
12. After adding the permissions, the configured permissions will be listed as below.
<Frame>
  <img alt="Capture9.PNG" src="https://mintcdn.com/domoinc-openapi-sync-dataflows/blcgkVgnZv6gj_XY/images/kb/ka05w00000123LH-00N5w00000Ri7BU-0EM5w000005vO5t.png?fit=max&auto=format&n=blcgkVgnZv6gj_XY&q=85&s=8ae70092c2803f7001631d0377c87581" width="642" height="270" data-path="images/kb/ka05w00000123LH-00N5w00000Ri7BU-0EM5w000005vO5t.png" />
</Frame>

## Connecting to Your Microsoft Account

This section enumerates the options in the **Credentials** and **Details** panes in the Microsoft Report Connector page. The components of the other panes in this page, **Scheduling** and **Name & Describe Your DataSet**, are universal across most connector types and are discussed in greater length in [Adding a DataSet Using a Data Connector](/s/article/360042926274 "Adding a DataSet Using a Data Connector").

### Credentials Pane

This pane contains fields for entering credentials to connect to your Microsoft account via Azure. The following table describes what is needed for each field:

<table border="1" cellpadding="1" cellspacing="1" data-aura-rendered-by="33:195;a"><thead><tr><th colspan="1" rowspan="1"><p><span class="s1"> Field </span></p></th><th colspan="1" rowspan="1"><p><span class="s1"> Description </span></p></th></tr></thead><tbody><tr><td colspan="1" rowspan="1"> Client ID </td><td colspan="1" rowspan="1"> Enter the client ID for your installed Azure web app. For more information about finding this, see <a href="#h_01EPASWC37FPXGG721GCEXTNNN" target="_self" title="Microsoft Reports Connector"> Prerequisites </a> above. </td></tr><tr><td colspan="1" rowspan="1"> Client Secret </td><td colspan="1" rowspan="1"> Enter the client secret that was generated when you created your app. For more information about finding this, see <a href="#h_01EPASWC37FPXGG721GCEXTNNN" target="_self" title="Microsoft Reports Connector"> Prerequisites </a> above. </td></tr></tbody></table>

Once you have entered valid credentials, you can use the same account any time you go to create a new Microsoft Report DataSet. You can manage connector accounts in the **Accounts** tab in the Data Center. For more information about this tab, see [Managing User Accounts for Connectors](/s/article/360042926054 "Managing User Accounts for Connectors").

### Details Pane

This pane contains a primary **Reports** menu, along with various other menus which may or may not appear depending on the report type you select.

<table border="1" cellpadding="1" cellspacing="1" data-aura-rendered-by="33:195;a"><thead><tr><th colspan="1" rowspan="1"><p> Menu </p></th><th colspan="1" rowspan="1"><p> Description </p></th></tr></thead><tbody><tr><td colspan="1" rowspan="1"><p> Report </p></td><td colspan="1" rowspan="1"><p> Select the report you want to run. The following reports are available: </p><table border="1" cellpadding="1" cellspacing="1"><tbody><tr><td colspan="1" rowspan="1"> Get Email Activity User Detail </td><td colspan="1" rowspan="1"> This report returns details about email activity the users have performed. </td></tr><tr><td colspan="1" rowspan="1"> Get Email Activity Counts </td><td colspan="1" rowspan="1"> This report enables you to understand the trends of email activities (like how many were sent, read, and received) in your organization. </td></tr><tr><td colspan="1" rowspan="1"> Get Email Activity Exchange </td><td colspan="1" rowspan="1"> This report returns the number of emails sent today and yesterday in your organization. </td></tr><tr><td colspan="1" rowspan="1"> Get Email Activity Metrics </td><td colspan="1" rowspan="1"> This report enables you to understand the trends of email activity (like how many were sent, and received) and on the number of unique users who are performing email activities like send, read, and receive. </td></tr><tr><td colspan="1" rowspan="1"> Get Email Activity User Counts </td><td colspan="1" rowspan="1"> This report enables you to understand trends on the number of unique users who are performing email activities like send, read, and receive. </td></tr></tbody></table></td></tr><tr><td colspan="1" rowspan="1"> Period </td><td colspan="1" rowspan="1"> Select the length of time over which the report is aggregated. The supported values for Period are: D7, D30, D90, and D180. These values follow the format Dn where n represents the number of days over which the report is aggregated. </td></tr></tbody></table>

### Other Panes

For information about the remaining sections of the connector interface, including how to configure scheduling, retry, and update options, see [Adding a DataSet Using a Data Connector](/s/article/360042926274 "Adding a DataSet Using a Data Connector").
