> ## Documentation Index
> Fetch the complete documentation index at: https://domoinc-openapi-sync-dataflows.mintlify.site/llms.txt
> Use this file to discover all available pages before exploring further.
# Workbench 5.1
export const InlineImage = ({src, alt = '', height = '1.6em'}) => {
return  ;
};
## Intro
Domo Workbench is a secure, client-side solution for uploading your on-premise data to Domo.
Use Workbench 5.1 to routinely upload data from external DataSets (ODBC, CSV, Microsoft Excel, Jira, QuickBooks, XML, and JSON) to Domo. You can also secure network communication using a proxy server, manage scheduled jobs, add columns based on calculations, transform columns using regular expressions.
## What You Need to Get Started
* Download Domo Workbench from the **Tool Downloads** menu in the **Admin Center**.
## What can Domo Workbench 5.1 do?
* Securely upload DataSets to Domo using helpful interface components.
* Upload data manually or on a schedule.
* Create groups of DataSet jobs that run on the same schedule.
* Import and export job files.
* Preview and validate jobs before you run them.
* Add, create, save, and delete accounts.
* Add, create, save, delete, open, preview, and cancel jobs.
* Revert to a previous version of a job you saved.
* Add/delete transforms to/from jobs, which includes the following:
* Add new columns.
* Change date format.
* Encrypt sensitive data in specific columns.
* Filter columns in the DataSet.
* Set the time zone for the DataSet job.
* Replace column values in the DataSet.
* Combine the DataSet with another DataSet.
* Export/import Excel, CSV, QuickBooks, OLAP, ODBC, JSON, and XML file types.
* View logs.
* Send logs as a zip file.
* Run logs from the command line.
* Add and manage plugins for using Workbench.
* Set up notifications for DataSet jobs that can email you if DataSets are uploaded successfully or if it experiences an error.
## Creating a Job for Uploading Data Using Workbench 5.1
You can upload data from external data sources to Domo after specifying connection and data information as a job, which you can save and use again.
Creating a DataSet job in Workbench 5.1:
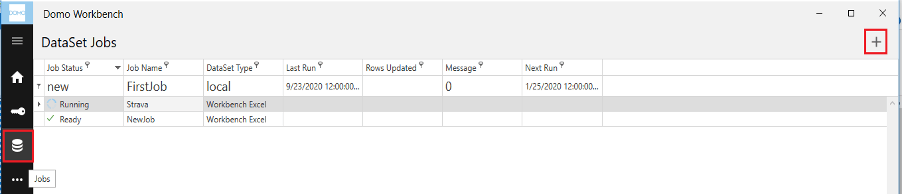
1. In the **Jobs** pane, click the **+** icon to create a new job.
;
};
## Intro
Domo Workbench is a secure, client-side solution for uploading your on-premise data to Domo.
Use Workbench 5.1 to routinely upload data from external DataSets (ODBC, CSV, Microsoft Excel, Jira, QuickBooks, XML, and JSON) to Domo. You can also secure network communication using a proxy server, manage scheduled jobs, add columns based on calculations, transform columns using regular expressions.
## What You Need to Get Started
* Download Domo Workbench from the **Tool Downloads** menu in the **Admin Center**.
## What can Domo Workbench 5.1 do?
* Securely upload DataSets to Domo using helpful interface components.
* Upload data manually or on a schedule.
* Create groups of DataSet jobs that run on the same schedule.
* Import and export job files.
* Preview and validate jobs before you run them.
* Add, create, save, and delete accounts.
* Add, create, save, delete, open, preview, and cancel jobs.
* Revert to a previous version of a job you saved.
* Add/delete transforms to/from jobs, which includes the following:
* Add new columns.
* Change date format.
* Encrypt sensitive data in specific columns.
* Filter columns in the DataSet.
* Set the time zone for the DataSet job.
* Replace column values in the DataSet.
* Combine the DataSet with another DataSet.
* Export/import Excel, CSV, QuickBooks, OLAP, ODBC, JSON, and XML file types.
* View logs.
* Send logs as a zip file.
* Run logs from the command line.
* Add and manage plugins for using Workbench.
* Set up notifications for DataSet jobs that can email you if DataSets are uploaded successfully or if it experiences an error.
## Creating a Job for Uploading Data Using Workbench 5.1
You can upload data from external data sources to Domo after specifying connection and data information as a job, which you can save and use again.
Creating a DataSet job in Workbench 5.1:
1. In the **Jobs** pane, click the **+** icon to create a new job.
 2. Specify the basic settings for the job, such as the DataSet job name, the method of data transport (such as Local File Provider, ODBC Connection Provider, etc.), the data reader (data source) type (such as JIRA, Excel, etc.), the DataSet name and type, and an optional DataSet description.
**Note:** The DataSet name is the only setting you can change after creating the job. If you want to change any other settings, you will need to create a new job.
3. After providing the details, click **Create**. A newly added job entry will appear in your jobs listing. However, at this stage, the DataSet Job is still not ready for execution.
### Configuring and Scheduling your job
1. In the **Configure** subtab for the job:
1. Provide the source of the data in the **Source** menu. For example, if the data source was a local file, you would select the file path here.
2. Specify the basic settings for the job, such as the DataSet job name, the method of data transport (such as Local File Provider, ODBC Connection Provider, etc.), the data reader (data source) type (such as JIRA, Excel, etc.), the DataSet name and type, and an optional DataSet description.
**Note:** The DataSet name is the only setting you can change after creating the job. If you want to change any other settings, you will need to create a new job.
3. After providing the details, click **Create**. A newly added job entry will appear in your jobs listing. However, at this stage, the DataSet Job is still not ready for execution.
### Configuring and Scheduling your job
1. In the **Configure** subtab for the job:
1. Provide the source of the data in the **Source** menu. For example, if the data source was a local file, you would select the file path here.
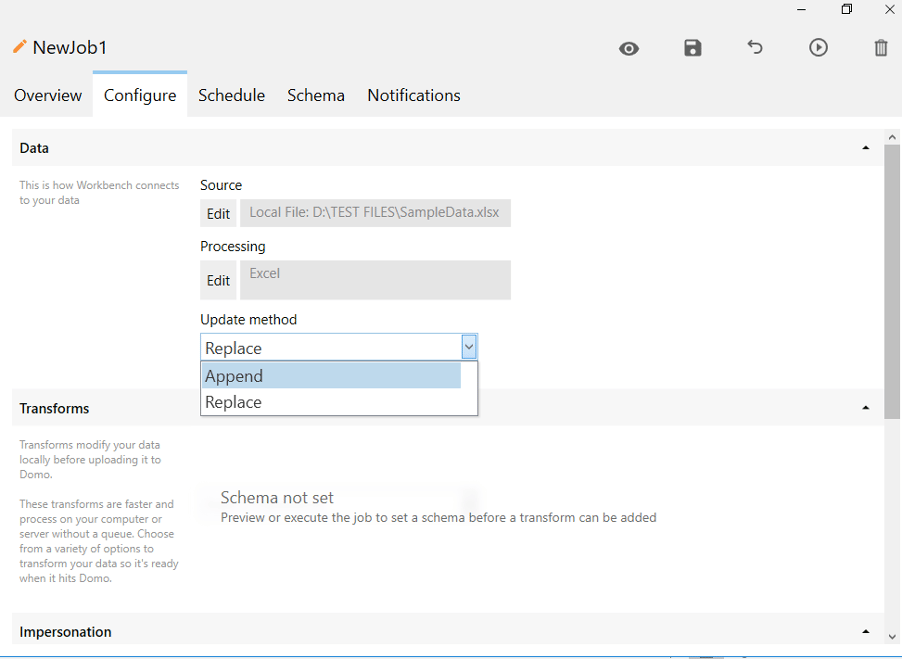 2. You can choose whether you want newly uploaded data to REPLACE the existing data in the DataSet or be APPENDED (added) to the existing data. You do this in the **Update method** menu.
3. You can specify the error handling method, and the job run duration and conditions in the **Advanced Settings**. This section provides the advanced options for how your job uploads data in Domo.
2. You can schedule a DataSet job to routinely upload data from external DataSets to Domo. You can select a **Basic Schedule** (update manually, update when file is changed, or update on a schedule.) Or, you can opt for an **Advanced Schedule** (once a day, specific days of the week/month, etc.) You can also select the **Schedule mode** to be in **Local time** (of your server/Workbench machine) or **UTC time**. You can also see the next five scheduled run times for the job.
**Note:** If you need your DataSet to update faster than every 15 minutes, please reach out to your account team for evaluation.
2. You can choose whether you want newly uploaded data to REPLACE the existing data in the DataSet or be APPENDED (added) to the existing data. You do this in the **Update method** menu.
3. You can specify the error handling method, and the job run duration and conditions in the **Advanced Settings**. This section provides the advanced options for how your job uploads data in Domo.
2. You can schedule a DataSet job to routinely upload data from external DataSets to Domo. You can select a **Basic Schedule** (update manually, update when file is changed, or update on a schedule.) Or, you can opt for an **Advanced Schedule** (once a day, specific days of the week/month, etc.) You can also select the **Schedule mode** to be in **Local time** (of your server/Workbench machine) or **UTC time**. You can also see the next five scheduled run times for the job.
**Note:** If you need your DataSet to update faster than every 15 minutes, please reach out to your account team for evaluation.
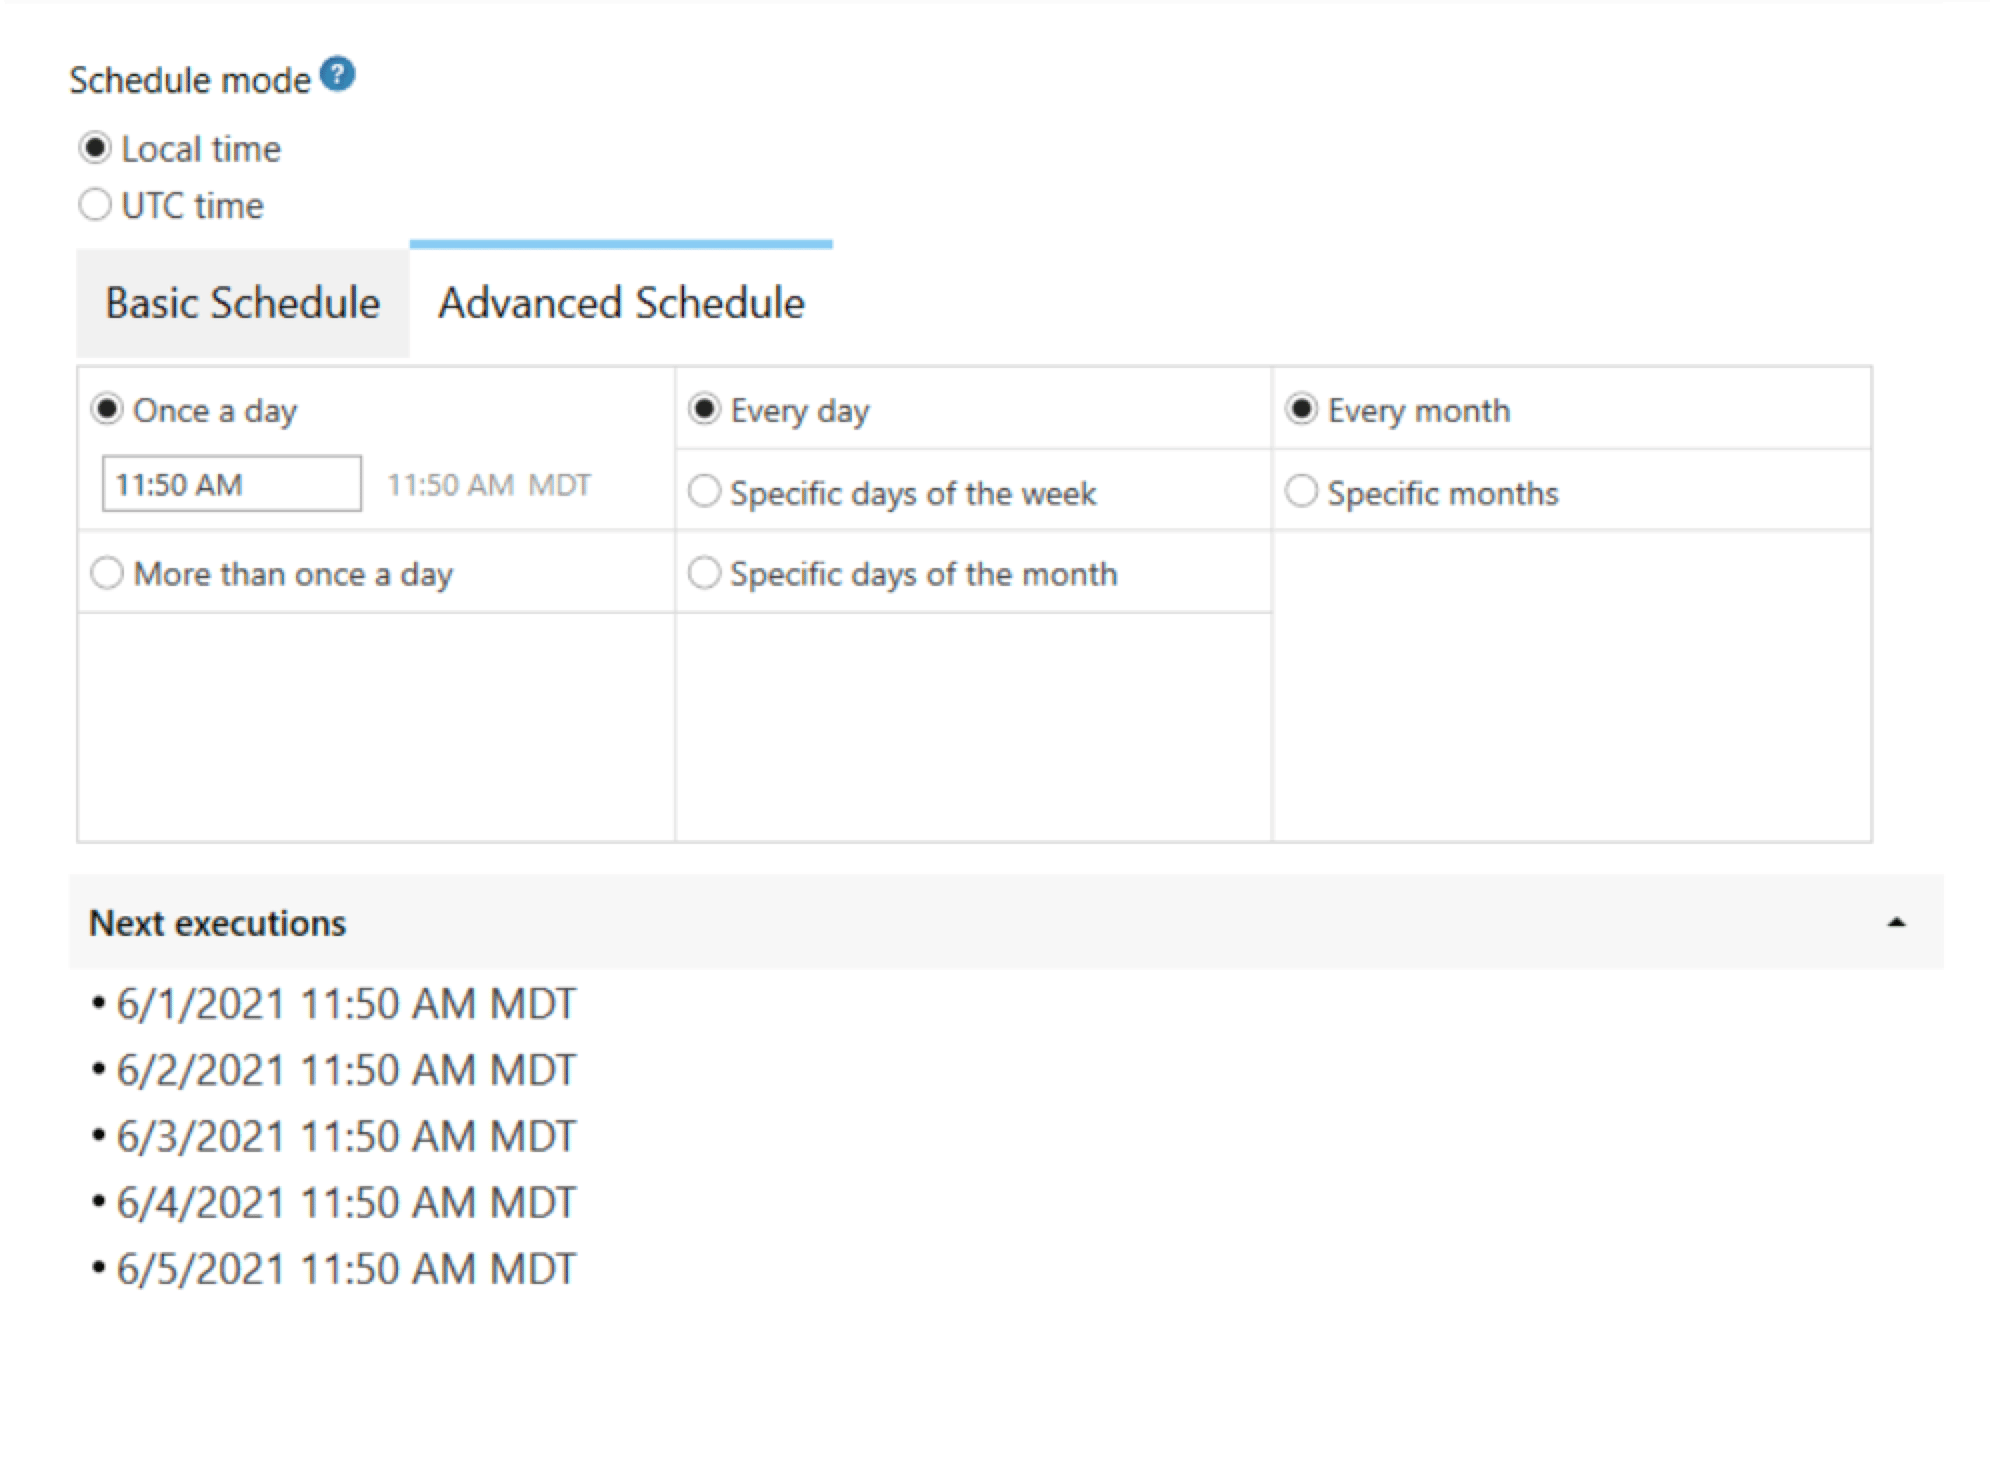 **Note:** To automatically account for Daylight Savings in your Workbench scheduling, select **Local time**. When
the time on your machine changes for Daylight Savings, the Workbench job schedule will automatically sync with the
time on your machine.
3. Click the **Save** button to save your changes.
### Schema Protections for your job
To further improve the robustness of Data Pipelines, Domo has update schema protections in Workbench. With these improvements you can choose columns you want to protect and unprotect from schema changes, and choose between three different options about how you want the job to behave.
**Video - Introduction to Schema Improvements in Workbench 5.1**
### Schema Protection Types
Domo Workbench 5.1 offers three different schema protection types.
* Allow schema changes safely.
* Permit unprotected schema changes.
* Completely block all schema changes.
**Video - Deep Dive on the Three Schema Options in Workbench 5.1**
### Allow safe schema changes
If you select this option, the unprotected columns will accept the changes during the next execution, and will automatically be re-protected afterwards.
**Note:** They are only re-protected if schema changes. If the schema does not change, the columns will remain unprotected until it changes.
New columns will be added, and will automatically be protected in future runs. The “Allow safe schema changes” option is the default setting for new jobs.
### Allow unprotected schema changes
If you choose to allow unprotected schema changes, columns will remain unprotected after the job is executed and any new columns added will automatically be added as unprotected columns.
### Block all schema changes
If you choose to block all schema changes, you will not see the Protect option for your columns. If you attempt to make changes to any column and run the job, you will receive an error stating about your forceful change.
**Note:** To automatically account for Daylight Savings in your Workbench scheduling, select **Local time**. When
the time on your machine changes for Daylight Savings, the Workbench job schedule will automatically sync with the
time on your machine.
3. Click the **Save** button to save your changes.
### Schema Protections for your job
To further improve the robustness of Data Pipelines, Domo has update schema protections in Workbench. With these improvements you can choose columns you want to protect and unprotect from schema changes, and choose between three different options about how you want the job to behave.
**Video - Introduction to Schema Improvements in Workbench 5.1**
### Schema Protection Types
Domo Workbench 5.1 offers three different schema protection types.
* Allow schema changes safely.
* Permit unprotected schema changes.
* Completely block all schema changes.
**Video - Deep Dive on the Three Schema Options in Workbench 5.1**
### Allow safe schema changes
If you select this option, the unprotected columns will accept the changes during the next execution, and will automatically be re-protected afterwards.
**Note:** They are only re-protected if schema changes. If the schema does not change, the columns will remain unprotected until it changes.
New columns will be added, and will automatically be protected in future runs. The “Allow safe schema changes” option is the default setting for new jobs.
### Allow unprotected schema changes
If you choose to allow unprotected schema changes, columns will remain unprotected after the job is executed and any new columns added will automatically be added as unprotected columns.
### Block all schema changes
If you choose to block all schema changes, you will not see the Protect option for your columns. If you attempt to make changes to any column and run the job, you will receive an error stating about your forceful change.
 ### Protect column
The Protect column indicates whether your column (data field) is protected or not when schema changes happen to your job.
* If the Protect checkbox is selected for a column, it means that column is protected, and no schema changes can be made. If you try to remove the protection for any column (by unchecking it) the Domo Workbench will give you a warning. Unchecking the Protect column checkbox will allow schema changes to be made for that specific column.
**Important:** Unprotected columns can be changed and deleted, which may break content in Domo.
### Protect column
The Protect column indicates whether your column (data field) is protected or not when schema changes happen to your job.
* If the Protect checkbox is selected for a column, it means that column is protected, and no schema changes can be made. If you try to remove the protection for any column (by unchecking it) the Domo Workbench will give you a warning. Unchecking the Protect column checkbox will allow schema changes to be made for that specific column.
**Important:** Unprotected columns can be changed and deleted, which may break content in Domo.
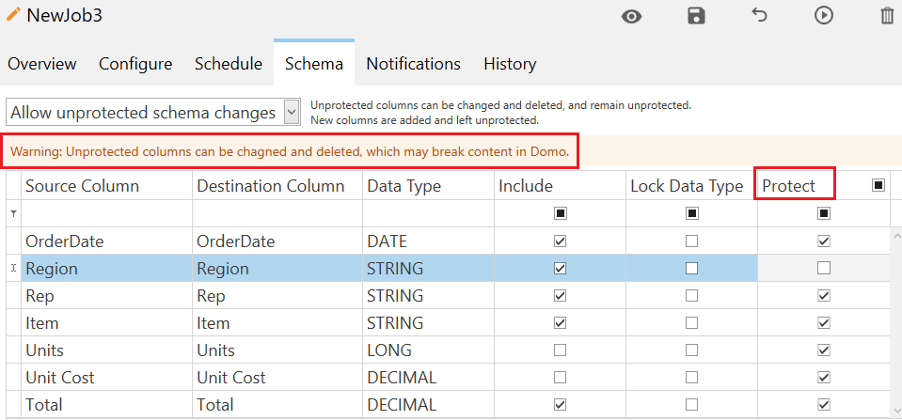 * The Protect column provides you a control to protect or unprotect all columns with a single click. Select the checkbox next to the column header (Protect) to protect all your columns at once. Similarly, you can unprotect your columns at the same time by deselecting this checkbox.
{" "}
* The column header also provides the control to get a filtered view of protected, unprotected, or both type of entries with a single click.
* When you click to select the regular select view
{" "}
, the Protect column will display
all protected entries.
* When you click to select the unchecked view
{" "}
, the Protect column will display
the unprotected entries.
* When you click to select the mixed view
{" "}
, the Protect column displays both
protected and unprotected entries together.
* You can change the names or properties for the Destination Column and the Data Type column, but in order for these changes to take effect, the column will need to be unprotected.
{" "}
* The Protect column provides you a control to protect or unprotect all columns with a single click. Select the checkbox next to the column header (Protect) to protect all your columns at once. Similarly, you can unprotect your columns at the same time by deselecting this checkbox.
{" "}
* The column header also provides the control to get a filtered view of protected, unprotected, or both type of entries with a single click.
* When you click to select the regular select view
{" "}
, the Protect column will display
all protected entries.
* When you click to select the unchecked view
{" "}
, the Protect column will display
the unprotected entries.
* When you click to select the mixed view
{" "}
, the Protect column displays both
protected and unprotected entries together.
* You can change the names or properties for the Destination Column and the Data Type column, but in order for these changes to take effect, the column will need to be unprotected.
{" "}
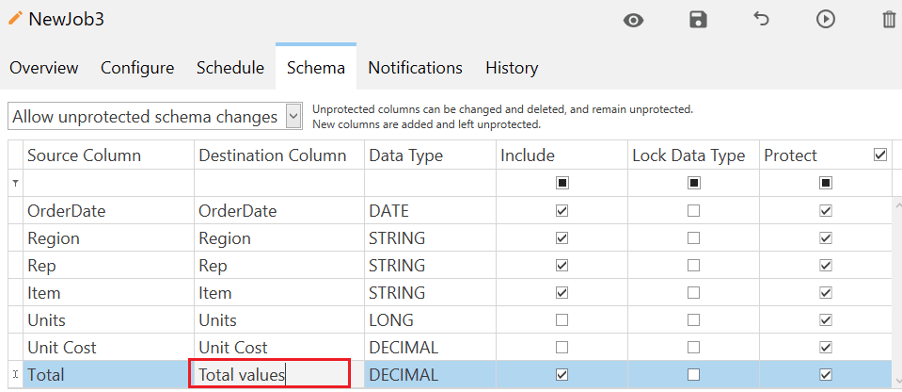 * Similarly, you cannot delete a protected column.
* If you want to allow the schema change, uncheck the column and re-run the job.
### Viewing the Error messages for your job run
When a job errors due to a schema change, Workbench offers error message and color-coding in the schema tab to help you understand what changed in your schema. These error messages will help you to find the changes so you can decide whether to allow the schema change to happen by unprotecting the column, or to find the error in your data and fix it before re-running the job in Workbench.
**Video - Troubleshooting Changing a Data Type in Workbench 5.1**
**Video - Troubleshooting Column Name Changes in Workbench 5.1**
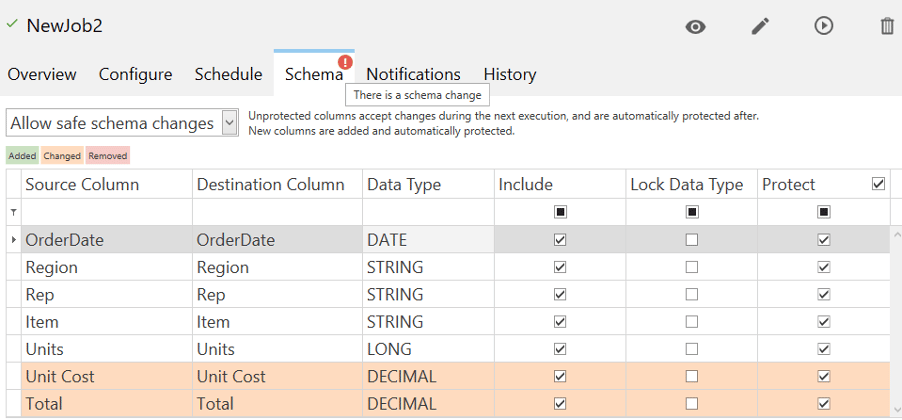
Once you make changes to your schemas and run the job, the Workbench will show a notification in your Schema tab, and the changed columns will appear in the designated color codes.
* Similarly, you cannot delete a protected column.
* If you want to allow the schema change, uncheck the column and re-run the job.
### Viewing the Error messages for your job run
When a job errors due to a schema change, Workbench offers error message and color-coding in the schema tab to help you understand what changed in your schema. These error messages will help you to find the changes so you can decide whether to allow the schema change to happen by unprotecting the column, or to find the error in your data and fix it before re-running the job in Workbench.
**Video - Troubleshooting Changing a Data Type in Workbench 5.1**
**Video - Troubleshooting Column Name Changes in Workbench 5.1**
Once you make changes to your schemas and run the job, the Workbench will show a notification in your Schema tab, and the changed columns will appear in the designated color codes.
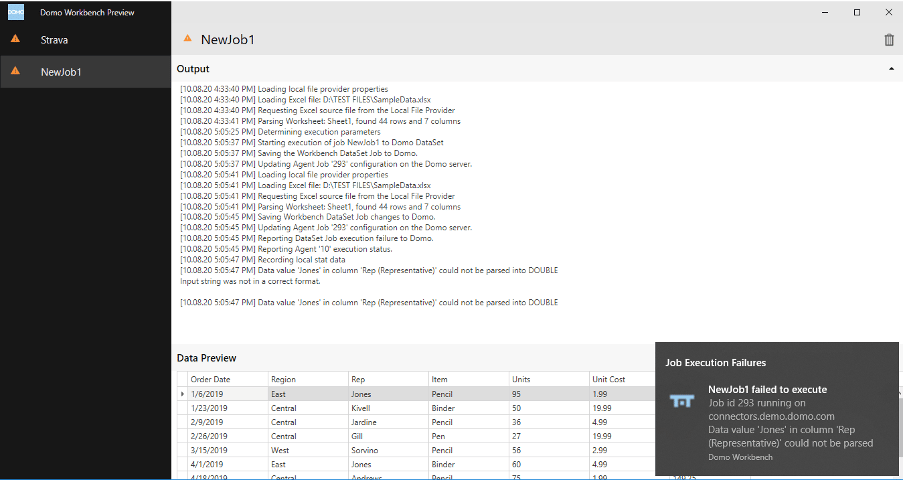
 If any errors occurred during the job run, you can view these errors in the Overview Tab, Preview window, and Logs.
### Overview Tab
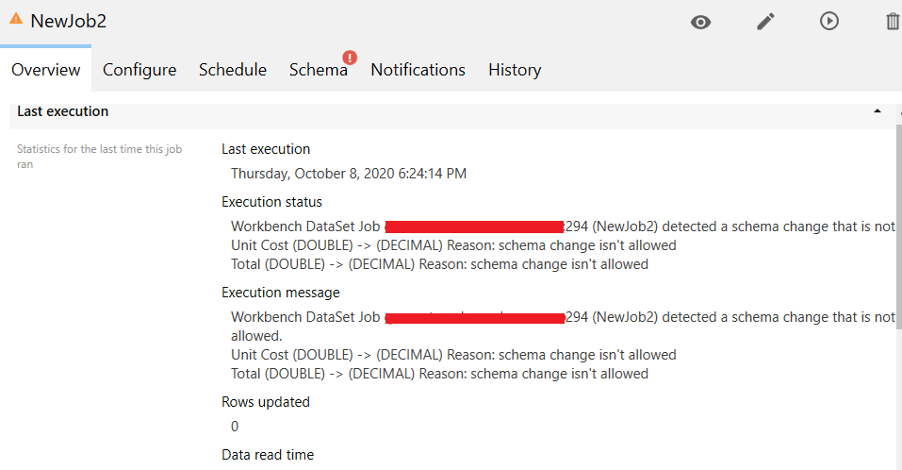
Click on the Overview Tab to view the errors. Here, you can see execution status and the error messages received for your job run.
If any errors occurred during the job run, you can view these errors in the Overview Tab, Preview window, and Logs.
### Overview Tab
Click on the Overview Tab to view the errors. Here, you can see execution status and the error messages received for your job run.
 ### Preview Window
Click on the Preview button in your job view.
### Preview Window
Click on the Preview button in your job view.
 The output window will appear showing the preview for errors for your job.
 ### Log viewer
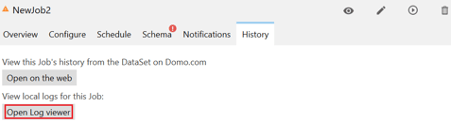
* You can view a detailed log for your job run in the History Tab. This log displays the errors in detail as well.
* Click on the History Tab.
* Here, you will see options for viewing the job’s history from the DataSet and local logs for this job.
* Click the **Open Log Viewer** button.
{" "}
### Log viewer
* You can view a detailed log for your job run in the History Tab. This log displays the errors in detail as well.
* Click on the History Tab.
* Here, you will see options for viewing the job’s history from the DataSet and local logs for this job.
* Click the **Open Log Viewer** button.
{" "}
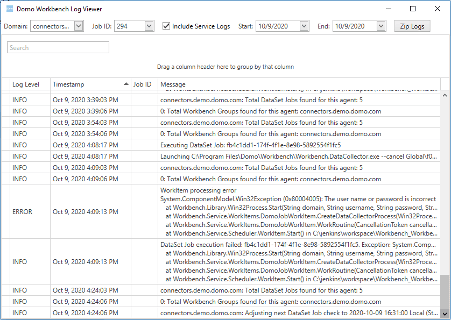
 The Domo Workbench Log Viewer window will appear displaying the detailed log with error messages occurred.
 ### Protecting Data Types while changing Column Names
**Changing the name of a column in the Data Source**
If the name of the column is changed in the data source, the column is unprotected and the Data Type is locked, Workbench will remove the column with a changed name and add it as a new column with the new name. At this point, the column will be reindexed with the data type present in the column at the time it is reindexed.
**Changing the name of a column in the Destination Column of Workbench**
If you want to change the name of a column in Domo while protecting the data type from changing, it is possible with the new schema protection changes in Workbench.
**Video - Protecting Data Types while Changing column Names in Workbench 5.1**
In this example, you want to update the Warranty claims column name in the Destination Column, and the column has been unprotected. The lock data type column has been selected.
### Protecting Data Types while changing Column Names
**Changing the name of a column in the Data Source**
If the name of the column is changed in the data source, the column is unprotected and the Data Type is locked, Workbench will remove the column with a changed name and add it as a new column with the new name. At this point, the column will be reindexed with the data type present in the column at the time it is reindexed.
**Changing the name of a column in the Destination Column of Workbench**
If you want to change the name of a column in Domo while protecting the data type from changing, it is possible with the new schema protection changes in Workbench.
**Video - Protecting Data Types while Changing column Names in Workbench 5.1**
In this example, you want to update the Warranty claims column name in the Destination Column, and the column has been unprotected. The lock data type column has been selected.
 The column has been updated with a new Destination column name “2020 Warranty claims”.
 In addition to Lock Data Type being selected, the error handling options you have chosen in the configuration tab will play a role in how Workbench responds to this configuration.
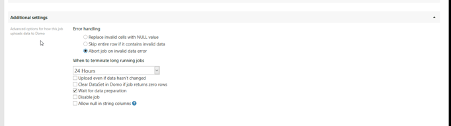 If **Abort job on invalid data error** is the selected option for this job and invalid data is introduced, the job will fail because the data type is locked, even though the column is unprotected.
If **Skip entire row if it contains invalid data** is selected for this job and invalid data is introduced, the job will succeed because the row of data will be skipped and not included in the data sent to Domo. The messaging included in the execution logs will indicate a row has been skipped, and the Data Type will remain the same:
If **Abort job on invalid data error** is the selected option for this job and invalid data is introduced, the job will fail because the data type is locked, even though the column is unprotected.
If **Skip entire row if it contains invalid data** is selected for this job and invalid data is introduced, the job will succeed because the row of data will be skipped and not included in the data sent to Domo. The messaging included in the execution logs will indicate a row has been skipped, and the Data Type will remain the same:
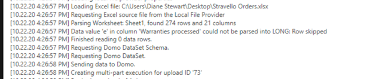 If **Replace invalid cells with NULL value** is selected the job will execute successfully and invalid values will be replaced with NULL, resulting is this messaging in the execution logs. The Data Type will remain unchanged:
 ## Taking over a Connector DataSet
Domo Workbench allows you to import the Workbench DataSet as well as the Connector DataSet. Once you select your DataSet, it will be further maintained by the Workbench.
**Note:** You need to have Editor or Owner permissions on the DataSet to successfully take it over using the Domo Workbench.
**Video - Taking Over a Connector DataSet in Workbench 5.1**
To select your DataSet:
1. Visit the Overview tab of your job, and click the **Browse** button next to your DataSet name. Note that, you can also change your DataSet name here if you wish.
## Taking over a Connector DataSet
Domo Workbench allows you to import the Workbench DataSet as well as the Connector DataSet. Once you select your DataSet, it will be further maintained by the Workbench.
**Note:** You need to have Editor or Owner permissions on the DataSet to successfully take it over using the Domo Workbench.
**Video - Taking Over a Connector DataSet in Workbench 5.1**
To select your DataSet:
1. Visit the Overview tab of your job, and click the **Browse** button next to your DataSet name. Note that, you can also change your DataSet name here if you wish.
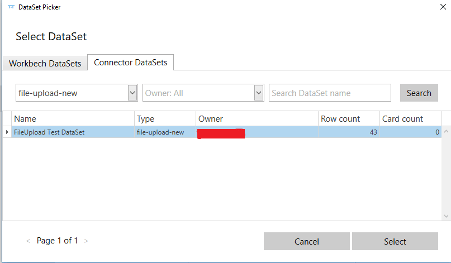
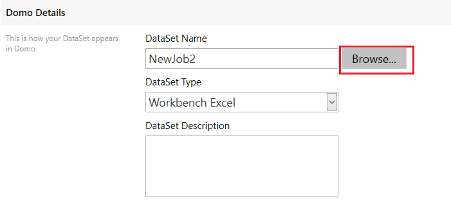 2. The DataSet picker window appears showing the available Workbench DataSets and Connector DataSets.
3. Select the Connector DataSet tab.
4. Here, select your connector DataSet, and click **Select**.
2. The DataSet picker window appears showing the available Workbench DataSets and Connector DataSets.
3. Select the Connector DataSet tab.
4. Here, select your connector DataSet, and click **Select**.
 5. As you chose to update the Connector DataSet through Workbench, you will receive a warning as below saying that the Workbench will take over the connector schedule and stop further updates from the Connector for this DataSet.
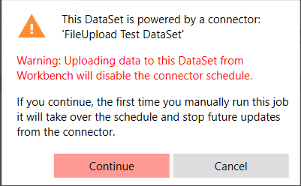 6. Click **Continue**. You can click **Cancel** if you do not wish the Workbench to take over the connector schedule for the selected DataSet.
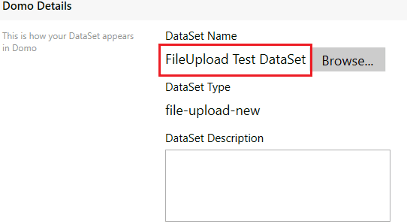
7. Now, in the **Overview** tab, you can see your DataSet Name updated to the selected connector DataSet name.
8. For this change to take effect, save the job.
6. Click **Continue**. You can click **Cancel** if you do not wish the Workbench to take over the connector schedule for the selected DataSet.
7. Now, in the **Overview** tab, you can see your DataSet Name updated to the selected connector DataSet name.
8. For this change to take effect, save the job.
 ## Bulk Actions on your DataSet jobs
As you create multiple DataSets in Workbench, you can perform certain actions in group on your jobs like execute, preview, export, bulk edit, save, revert, and delete.
## Bulk Actions on your DataSet jobs
As you create multiple DataSets in Workbench, you can perform certain actions in group on your jobs like execute, preview, export, bulk edit, save, revert, and delete.
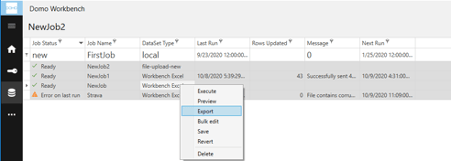 In order to perform these bulk operations on your jobs, you can select all jobs, or selective jobs that you intend to make changes to.
**Video - Bulk Actions in Workbench 5.1**
### Execute
1. Select the desired jobs from your job list and perform a mouse right-click operation.
2. Click on **Execute**. The **Bulk Edit** wizard will appear showing your bulk change request details.
3. Confirm your request and click **Continue**.
In order to perform these bulk operations on your jobs, you can select all jobs, or selective jobs that you intend to make changes to.
**Video - Bulk Actions in Workbench 5.1**
### Execute
1. Select the desired jobs from your job list and perform a mouse right-click operation.
2. Click on **Execute**. The **Bulk Edit** wizard will appear showing your bulk change request details.
3. Confirm your request and click **Continue**.
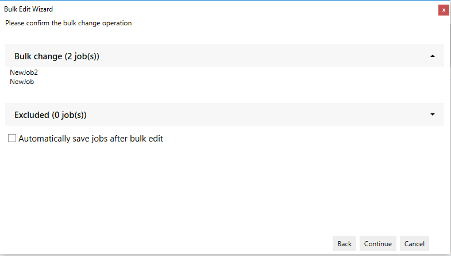 4. The progress bar will appear showing the job execution progress, and the output will be displayed in the output window.
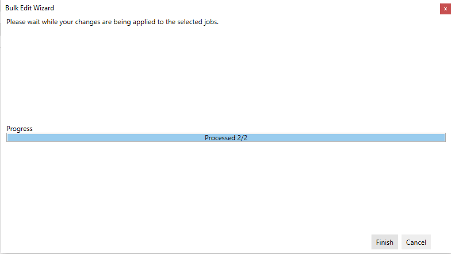 5. Click
**Finish**.
### Preview
1. You can preview your multiple jobs together using the Preview option.
2. Select the desired jobs from your job list and perform a mouse right-click operation.
3. Click on **Preview**.
4. Select continue to execute the Preview.
### Export
1. You can export your multiple jobs together to a local backup using this Export option.
2. Select the desired jobs from your job list and perform a mouse right-click operation.
3. Click on **Export**.
4. Export jobs to a local backup window will appear.
5. Click the … (3dots) and select the local path to save your jobs at and click **Export Jobs**.
5. Click
**Finish**.
### Preview
1. You can preview your multiple jobs together using the Preview option.
2. Select the desired jobs from your job list and perform a mouse right-click operation.
3. Click on **Preview**.
4. Select continue to execute the Preview.
### Export
1. You can export your multiple jobs together to a local backup using this Export option.
2. Select the desired jobs from your job list and perform a mouse right-click operation.
3. Click on **Export**.
4. Export jobs to a local backup window will appear.
5. Click the … (3dots) and select the local path to save your jobs at and click **Export Jobs**.
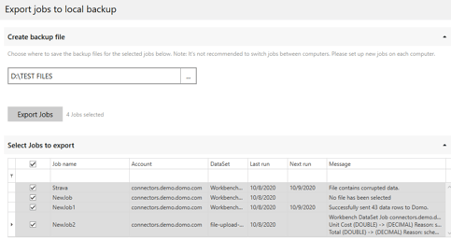 6. A success message will appear as your jobs are exported to the selected location.
### Bulk Edit
1. You can make changes to your job settings, job notifications, provider settings, and reader settings for multiple jobs at a time.
2. Select the desired jobs from your job list and perform a mouse right-click operation.
3. Click on **Bulk edit**.
4. Bulk Edit wizard will appear displaying the choices of changes you can make on jobs together.
5. Select the desired option, and click **Continue**.
6. A success message will appear as your jobs are exported to the selected location.
### Bulk Edit
1. You can make changes to your job settings, job notifications, provider settings, and reader settings for multiple jobs at a time.
2. Select the desired jobs from your job list and perform a mouse right-click operation.
3. Click on **Bulk edit**.
4. Bulk Edit wizard will appear displaying the choices of changes you can make on jobs together.
5. Select the desired option, and click **Continue**.
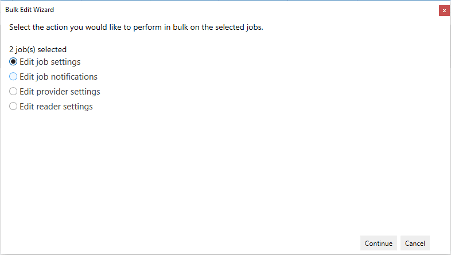 6. Make the desired changes accordingly, and click **Continue**.
7. Click **Back** to choose another option. Click **Cancel** to cancel the operation.
8. You can choose to save the jobs automatically after making the bulk changes.
9. The progress bar will appear showing the job execution progress.
10. Click **Finish**.
11. Your job changes will reflect in the job list.
#### Clearing a field using the Bulk Editor
You can use the bulk editor to clear a field from multiple jobs at the same time. You need to select the Edit checkbox and leave the field blank next to it, that you want to clear.
Let’s take an example where we try to clear the Source File Path provided for our data.
1. Select the jobs from the job list that you want to make bulk changes to, and perform the mouse right-click operation.
2. Click on **Bulk edit**.
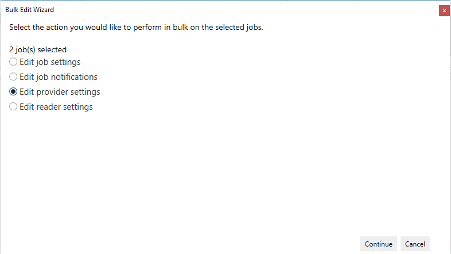
3. The Bulk Edit wizard will appear displaying the choices of changes you can make on jobs together. Here, select Edit provider settings and click **Continue**.
6. Make the desired changes accordingly, and click **Continue**.
7. Click **Back** to choose another option. Click **Cancel** to cancel the operation.
8. You can choose to save the jobs automatically after making the bulk changes.
9. The progress bar will appear showing the job execution progress.
10. Click **Finish**.
11. Your job changes will reflect in the job list.
#### Clearing a field using the Bulk Editor
You can use the bulk editor to clear a field from multiple jobs at the same time. You need to select the Edit checkbox and leave the field blank next to it, that you want to clear.
Let’s take an example where we try to clear the Source File Path provided for our data.
1. Select the jobs from the job list that you want to make bulk changes to, and perform the mouse right-click operation.
2. Click on **Bulk edit**.
3. The Bulk Edit wizard will appear displaying the choices of changes you can make on jobs together. Here, select Edit provider settings and click **Continue**.
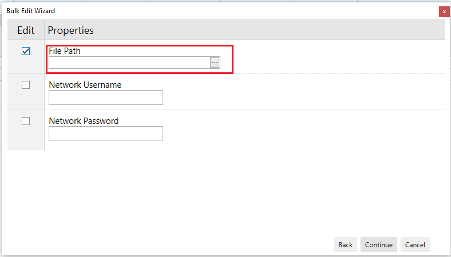
 4. Now, the Bulk Edit wizard will display the fields that you can clear for the selected jobs. Select the Edit checkbox
and leave the File Path field blank
next to it (as we want to clear the file path that was selected while configuring the job.) and click **Continue**.
4. Now, the Bulk Edit wizard will display the fields that you can clear for the selected jobs. Select the Edit checkbox
and leave the File Path field blank
next to it (as we want to clear the file path that was selected while configuring the job.) and click **Continue**.
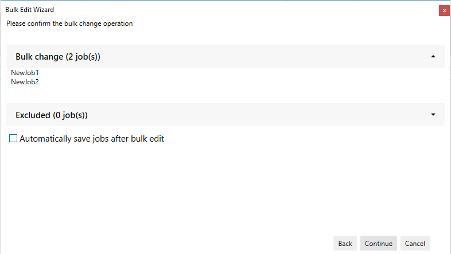
 5. The Bulk Edit wizard will ask you for the change confirmation. Click **Continue**.
 6. The progress bar will appear showing the progress. Click **Finish**.
7. Now, visit the **Configure** Tab of the jobs that you made changes to. You will see that the Source file path that you had selected earlier while configuring the job, doesn’t show up there anymore.
6. The progress bar will appear showing the progress. Click **Finish**.
7. Now, visit the **Configure** Tab of the jobs that you made changes to. You will see that the Source file path that you had selected earlier while configuring the job, doesn’t show up there anymore.
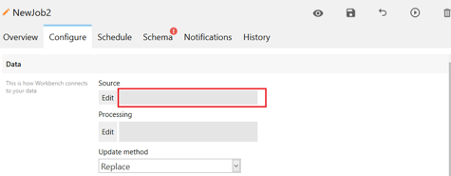 Thus, you can clear different fields for multiple jobs using the Bulk Edit feature.
### Save
1. You can save the changes made to your multiple jobs together using the **Save** option.
2. Select the desired jobs from your job list and perform a mouse right-click operation.
3. Click on **Save**.
4. Select **Continue** to Save.
### Revert
1. You can revert the changes made to your multiple jobs together using the **Revert** option.
2. Select the desired jobs from your job list and perform a mouse right-click operation.
3. Click on **Revert**.
4. Select **Continue** to Revert.
### Delete
1. You can delete your multiple jobs together using the **Delete** option.
2. Select the desired jobs from your job list and perform a mouse right-click operation.
3. Click on **Delete**.
4. Select **Continue** to Delete.
## Database Specific Plugins
For specific databases, Workbench 5.1 has plugins designed explicitly for some of the most popular databases. These plugins read data types directly from the source system which can eliminate any inconsistency between the Workbench and the source system. It also eliminates the chance that the data type will change in Workbench 5.1 after the schema has been set unless the type changes in the source system. The currently supported databases are: MSSQL, MySQL, Oracle, and Postgres. These database plugins are available as optional plugins in the Workbench Installer when you install the latest version of Workbench for the first time. If you choose to install them by selecting the checkbox next to them, they will appear as an option in the **Transport Type** dropdown menu while creating a new job.
Thus, you can clear different fields for multiple jobs using the Bulk Edit feature.
### Save
1. You can save the changes made to your multiple jobs together using the **Save** option.
2. Select the desired jobs from your job list and perform a mouse right-click operation.
3. Click on **Save**.
4. Select **Continue** to Save.
### Revert
1. You can revert the changes made to your multiple jobs together using the **Revert** option.
2. Select the desired jobs from your job list and perform a mouse right-click operation.
3. Click on **Revert**.
4. Select **Continue** to Revert.
### Delete
1. You can delete your multiple jobs together using the **Delete** option.
2. Select the desired jobs from your job list and perform a mouse right-click operation.
3. Click on **Delete**.
4. Select **Continue** to Delete.
## Database Specific Plugins
For specific databases, Workbench 5.1 has plugins designed explicitly for some of the most popular databases. These plugins read data types directly from the source system which can eliminate any inconsistency between the Workbench and the source system. It also eliminates the chance that the data type will change in Workbench 5.1 after the schema has been set unless the type changes in the source system. The currently supported databases are: MSSQL, MySQL, Oracle, and Postgres. These database plugins are available as optional plugins in the Workbench Installer when you install the latest version of Workbench for the first time. If you choose to install them by selecting the checkbox next to them, they will appear as an option in the **Transport Type** dropdown menu while creating a new job.
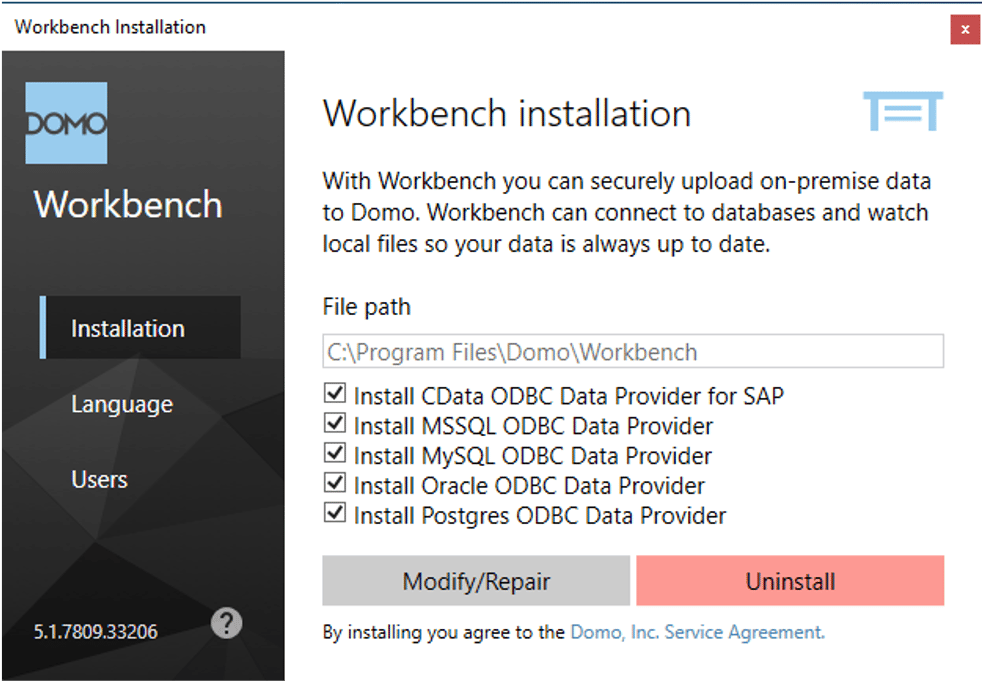 Database specific plugins support advanced query building.
1. While creating a job, select a database plugin as the **Transport type**.
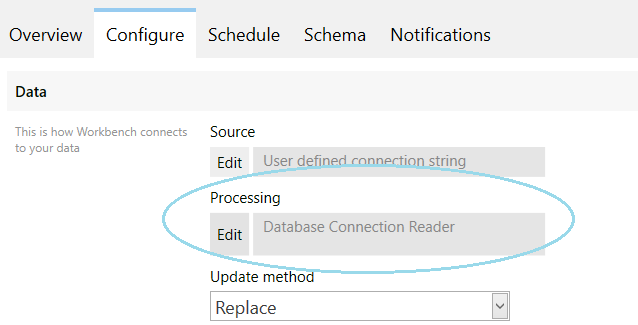
2. In the **Configure** tab, click the **Edit** button under **Processing** (to set up a query.)
Database specific plugins support advanced query building.
1. While creating a job, select a database plugin as the **Transport type**.
2. In the **Configure** tab, click the **Edit** button under **Processing** (to set up a query.)
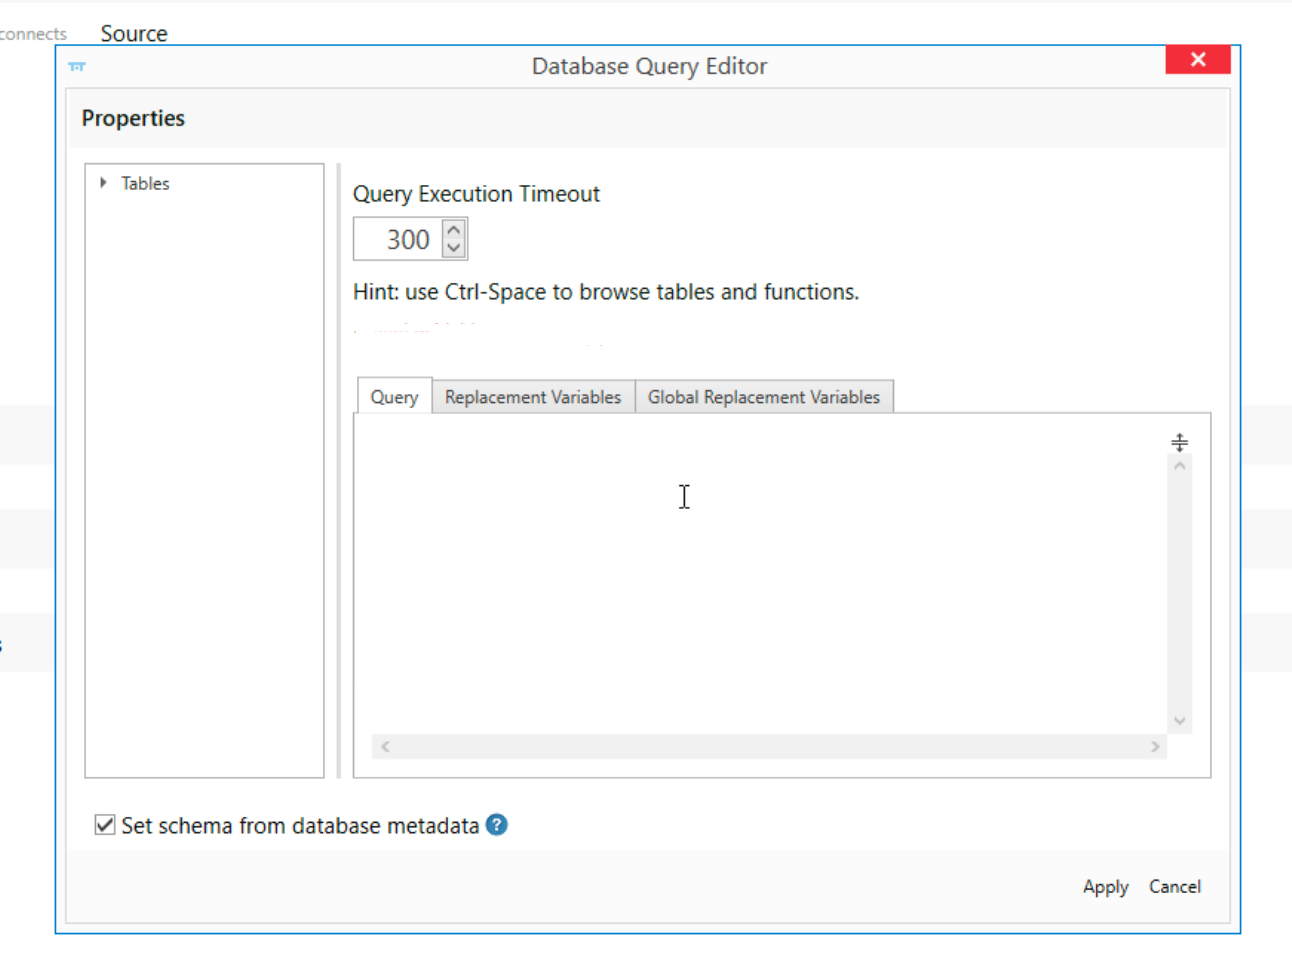
 3. You’ll be able to see a tree structure of your data.
 ## Enhanced Logging
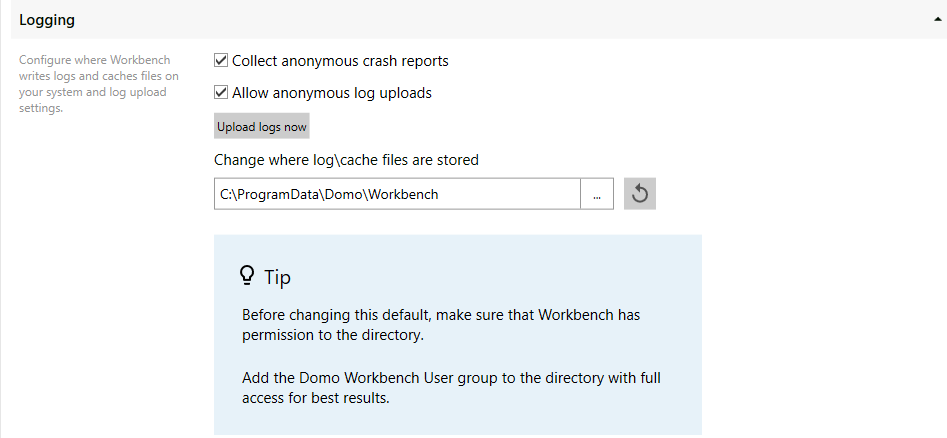
With enhanced logging, Domo can receive anonymous logs for your jobs to get ahead on tackling Workbench issues as soon as they happen.
To access this feature, click **Settings** and scroll down to the **Logging** section.
Enhanced logging is ON by default, and uploads logs daily to Domo (in addition to critical errors.) You can redirect your log directory in the **Change where log/cache files are stored** section. You can choose to opt out of this feature anytime in the Workbench settings. You also can upload logs manually using the **Upload logs now** button to help with more real-time troubleshooting.
## Enhanced Logging
With enhanced logging, Domo can receive anonymous logs for your jobs to get ahead on tackling Workbench issues as soon as they happen.
To access this feature, click **Settings** and scroll down to the **Logging** section.
Enhanced logging is ON by default, and uploads logs daily to Domo (in addition to critical errors.) You can redirect your log directory in the **Change where log/cache files are stored** section. You can choose to opt out of this feature anytime in the Workbench settings. You also can upload logs manually using the **Upload logs now** button to help with more real-time troubleshooting.
 ## Daily Summary Email
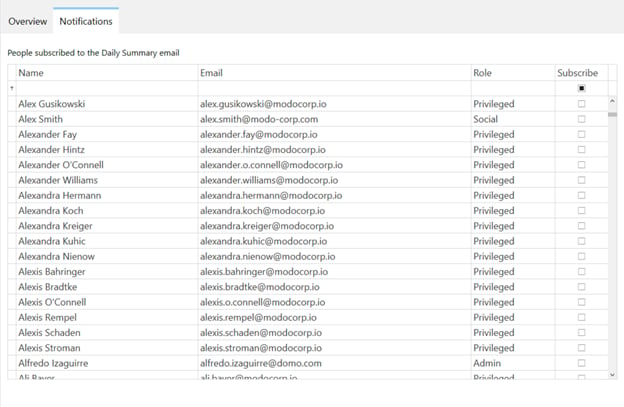
With the daily summary email, you can see a daily review of all your job statuses to stay on the top of your Workbench health.
To subscribe to the daily summary email, click the **Notifications** tab under the **Accounts** section.
## Daily Summary Email
With the daily summary email, you can see a daily review of all your job statuses to stay on the top of your Workbench health.
To subscribe to the daily summary email, click the **Notifications** tab under the **Accounts** section.
 ## Workbench Migration
Workbench migration makes moving your Workbench jobs to a new server or a Workbench machine easy. With a simple import and export experience, you can effortlessly and securely move your Workbench jobs from one machine to another.
**Note:** If you are migrating machines, make sure to turn the service OFF on the machine you are migrating from;
otherwise, you will see job errors frequently. Domo recommends migrating to a clean machine.
Any jobs scheduled to run using local time will run based off the local time of the new machine after the migration.
The migration allows a complete backup of Workbench including the encryption keys. This lets you restore settings and accounts exactly as they are on any computer.
**Note:** Jobs are saved in Domo, so any changes made to the jobs, after the backup, will persist.
### To create backup for your Workbench jobs,
1. Click **Settings**. The **Workbench Backup** section appears.
## Workbench Migration
Workbench migration makes moving your Workbench jobs to a new server or a Workbench machine easy. With a simple import and export experience, you can effortlessly and securely move your Workbench jobs from one machine to another.
**Note:** If you are migrating machines, make sure to turn the service OFF on the machine you are migrating from;
otherwise, you will see job errors frequently. Domo recommends migrating to a clean machine.
Any jobs scheduled to run using local time will run based off the local time of the new machine after the migration.
The migration allows a complete backup of Workbench including the encryption keys. This lets you restore settings and accounts exactly as they are on any computer.
**Note:** Jobs are saved in Domo, so any changes made to the jobs, after the backup, will persist.
### To create backup for your Workbench jobs,
1. Click **Settings**. The **Workbench Backup** section appears.
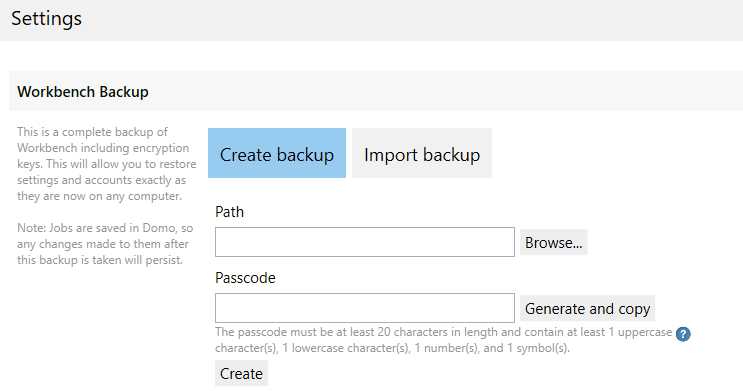 2. Click **Browse** next to the **Path** field, and select or specify the filename for your backup.
3. Click the **Generate and copy** button next to the **Passcode** field if you want Domo to generate a secure passcode for your backup.
**Tip**: You can enter your own passcode that meets the passcode security criteria. Note that your passcode must be at least 20 characters length, including at least one uppercase character(s), one lowercase character(s), one number(s), and one symbol(s).
4. Now, click **Create**.
**Note**: To migrate your Workbench jobs, you need to run the Workbench as an Administrator.
### To import backup,
1. Click **Settings**. The **Workbench Backup** section appears.
2. Click the **Import backup**
2. Click **Browse** next to the **Path** field, and select or specify the filename for your backup.
3. Click the **Generate and copy** button next to the **Passcode** field if you want Domo to generate a secure passcode for your backup.
**Tip**: You can enter your own passcode that meets the passcode security criteria. Note that your passcode must be at least 20 characters length, including at least one uppercase character(s), one lowercase character(s), one number(s), and one symbol(s).
4. Now, click **Create**.
**Note**: To migrate your Workbench jobs, you need to run the Workbench as an Administrator.
### To import backup,
1. Click **Settings**. The **Workbench Backup** section appears.
2. Click the **Import backup**
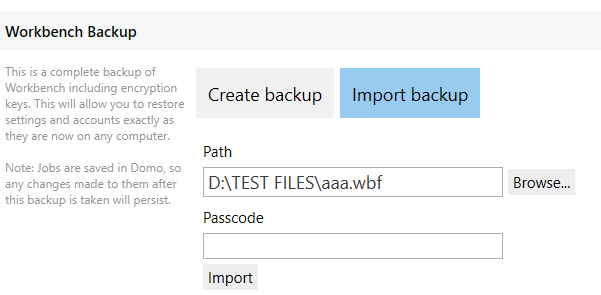 3. Click **Browse** next to the **Path** field, and select the Workbench backup file that you want to import.
4. (Optional) Enter the **Passcode** that you generated for this backup file.
5. Click **Import**.
## FAQs
The plugins are available to install from the Workbench installer. Select the plugins you would like to install by choosing the checkbox next to them on install.
It is not mandatory to use the plugins. You can still use the generic plugins to connect to your database.
Workbench will read the datatypes directly from the database meaning you do not have to worry that Workbench will interpret the data type differently than your database.
Any DataSets that were created by a Connector and for which you have Edit permissions or above.
No, moving DataSets from Workbench 5.1 back to a Connector is currently not supported.
No, you will need to set up a new job in Workbench 5.1 and set up the schedule you would like to use in Workbench 5.1, and then choose the DataSet.
Workbench 5.1 has added an extra confirm step so you can ensure you would like to delete DataSets. Once they have been deleted, they cannot be recovered.
No, any actions that can be configured on a job can also be adjusted using the Bulk Actions menu.
For some Bulk Action options, Workbench 5.1 will ask you to choose which provider jobs you would like to update first because the configuration steps are often different between providers.
Yes, when this option is selected, absolutely no schema changes will be allowed and Workbench 5.1 will automatically fail the job.
Yes, the new protect column allows you to choose which columns will have schema protection and which ones will not. This option is not available when **Block all schema changes** is selected.
It depends, if you choose to **Allow safe schema changes**, Workbench 5.1 will prevent schema changes on existing columns while allowing new columns to be added to the DataSet.
Partitioning will be available for all column types.
Partitioning is only available on new DataSets in this version. Converting to partitioned DataSets will be available in a future release.
3. Click **Browse** next to the **Path** field, and select the Workbench backup file that you want to import.
4. (Optional) Enter the **Passcode** that you generated for this backup file.
5. Click **Import**.
## FAQs
The plugins are available to install from the Workbench installer. Select the plugins you would like to install by choosing the checkbox next to them on install.
It is not mandatory to use the plugins. You can still use the generic plugins to connect to your database.
Workbench will read the datatypes directly from the database meaning you do not have to worry that Workbench will interpret the data type differently than your database.
Any DataSets that were created by a Connector and for which you have Edit permissions or above.
No, moving DataSets from Workbench 5.1 back to a Connector is currently not supported.
No, you will need to set up a new job in Workbench 5.1 and set up the schedule you would like to use in Workbench 5.1, and then choose the DataSet.
Workbench 5.1 has added an extra confirm step so you can ensure you would like to delete DataSets. Once they have been deleted, they cannot be recovered.
No, any actions that can be configured on a job can also be adjusted using the Bulk Actions menu.
For some Bulk Action options, Workbench 5.1 will ask you to choose which provider jobs you would like to update first because the configuration steps are often different between providers.
Yes, when this option is selected, absolutely no schema changes will be allowed and Workbench 5.1 will automatically fail the job.
Yes, the new protect column allows you to choose which columns will have schema protection and which ones will not. This option is not available when **Block all schema changes** is selected.
It depends, if you choose to **Allow safe schema changes**, Workbench 5.1 will prevent schema changes on existing columns while allowing new columns to be added to the DataSet.
Partitioning will be available for all column types.
Partitioning is only available on new DataSets in this version. Converting to partitioned DataSets will be available in a future release.