> ## Documentation Index
> Fetch the complete documentation index at: https://domoinc-openapi-sync-dataflows.mintlify.site/llms.txt
> Use this file to discover all available pages before exploring further.

# JSON No Code OAuth Connector

## Intro

JavaScript Object Notation (JSON) is a lightweight data-interchange format that is easy to use. The JSON No Code With Oauth connector allows you to import files from HTTPS sources using OAuth authentication. To learn more about the JSON API, visit their page [https://jsonapi.org/](https://jsonapi.org/ "https://jsonapi.org/").

You connect to your JSON No Code OAuth account in the Data Center. This topic discusses the fields and menus that are specific to the JSON No Code OAuth connector user interface. General information for adding DataSets, setting update schedules, and editing DataSet information is discussed in [Adding a DataSet Using a Connector](https://domo-support.domo.com/s/article/360042926274?language=en_US "Adding a DataSet Using a Connector").

## Prerequisites

To connect to your JSON No Code OAuth account and create a DataSet, you must add a JSON-OAUTH account and have the following:

* Client Id
* Client Secret
* OAuth Type
* Authorization URL
* Access Token Url
* Authorization type
* Refresh Token Url
* Scopes

## Connecting to your custom data with the JSON No Code OAuth Connector

This section enumerates the options in the **Credentials** and **Details** panes in the JSON No Code OAuth Connector page. For detailed information on configuring the Data Selection, refer to the [Connecting with the JSON No Code and JSON No Code OAuth connectors](https://domo-support.domo.com/s/article/000005360?language=en_US "Connecting with the JSON No Code and JSON No Code OAuth connectors") article. The components of the other panes in this page, **Scheduling** and **Name & Describe Your DataSet,** are universal across most connector types and are discussed in great detail in [Adding a DataSet Using a Connector](https://domo-support.domo.com/s/article/360042926274?language=en_US "Adding a DataSet Using a Connector").

## Creating a new JSON No Code OAuth Account Without Overwriting Existing Account

When creating a new account for the JSON No Code OAuth connector, If you don't change the account name, then the existing account gets overwritten with the new credentials and this causes the other datasets and its connections to break.

Follow the below steps to create a new account without overwriting the existing account:

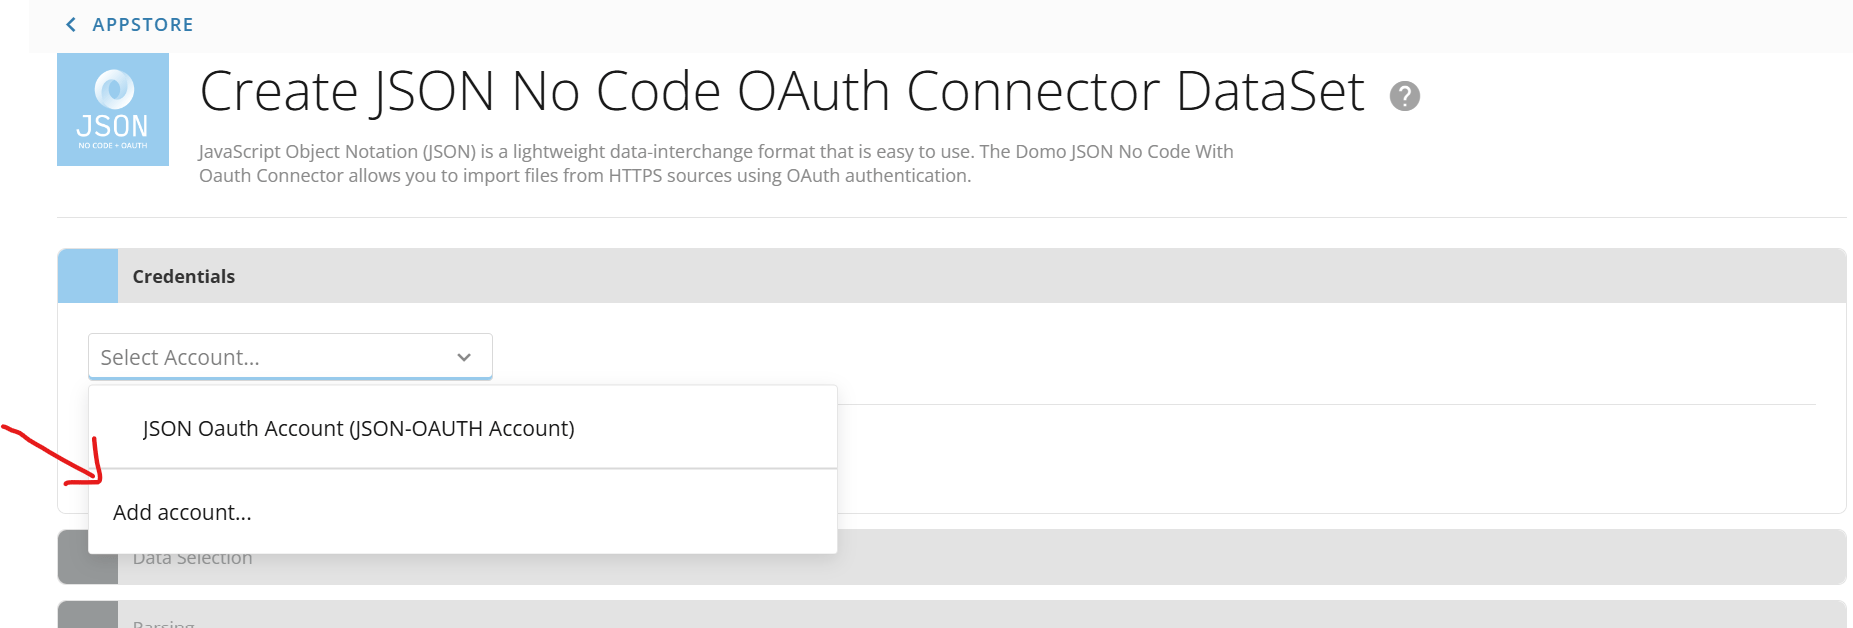
1. Click **Add account**.

   <Frame>
     <img src="https://mintcdn.com/domoinc-openapi-sync-dataflows/G0VLFwhKwFtlENBF/images/kb/ka0Vq0000005KKf-00N5w00000Ri7BU-0EMVq000004BuW1.jpg?fit=max&auto=format&n=G0VLFwhKwFtlENBF&q=85&s=a6973d2bfde97fec4585a0c5b098bff9" style={{width: 688, height: 233}} width="1853" height="628" data-path="images/kb/ka0Vq0000005KKf-00N5w00000Ri7BU-0EMVq000004BuW1.jpg" />
   </Frame>

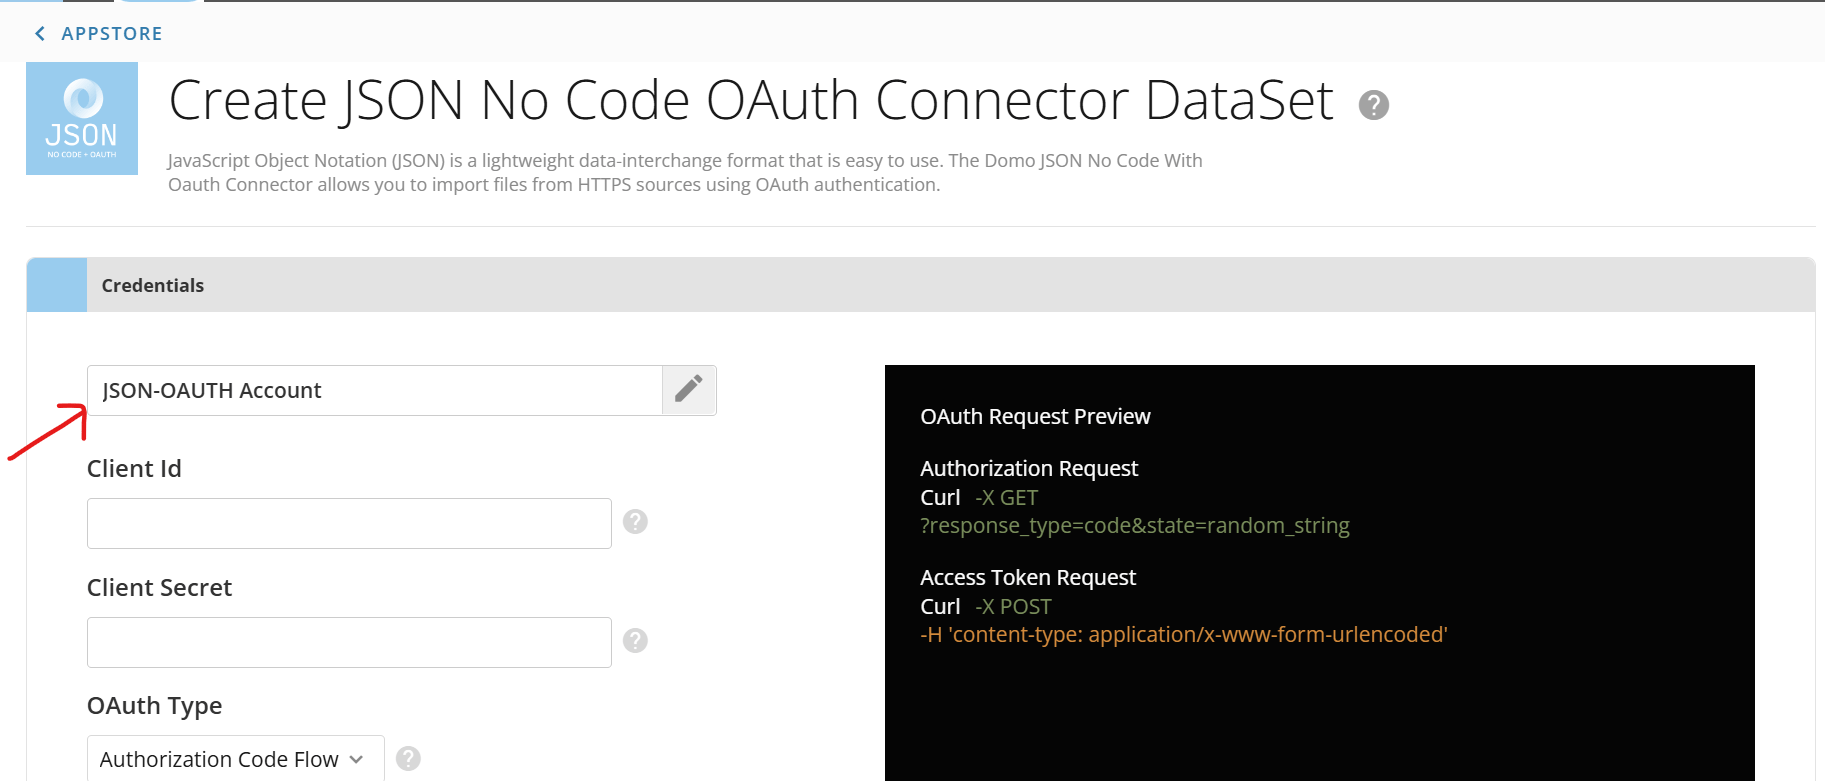
2. When you hover the cursor over the account name,  you have the option to edit the account name.
   <Frame>
     <img src="https://mintcdn.com/domoinc-openapi-sync-dataflows/G0VLFwhKwFtlENBF/images/kb/ka0Vq0000005KKf-00N5w00000Ri7BU-0EMVq000004Bue5.jpg?fit=max&auto=format&n=G0VLFwhKwFtlENBF&q=85&s=362f816f40e933c318226f6abd05e99c" style={{width: 697, height: 298}} width="1825" height="781" data-path="images/kb/ka0Vq0000005KKf-00N5w00000Ri7BU-0EMVq000004Bue5.jpg" />
   </Frame>

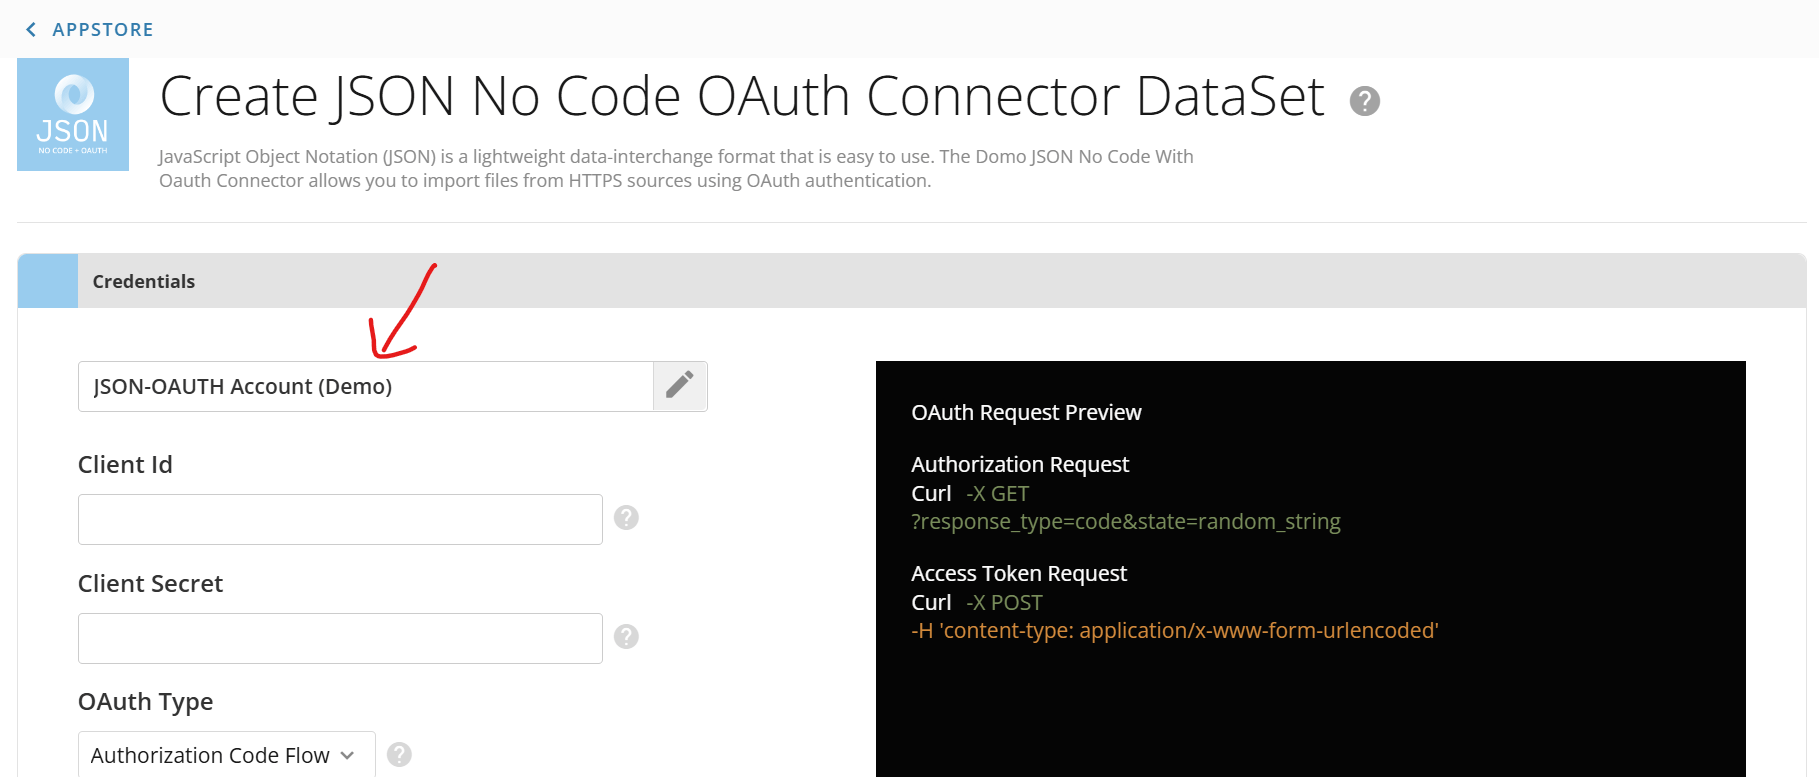
3. Add a new name account name, enter the remaining credentials and click **Next**.
<Frame>
  <img src="https://mintcdn.com/domoinc-openapi-sync-dataflows/G0VLFwhKwFtlENBF/images/kb/ka0Vq0000005KKf-00N5w00000Ri7BU-0EMVq000004Bunl.jpg?fit=max&auto=format&n=G0VLFwhKwFtlENBF&q=85&s=a8321a69d61834e24dc14cf4de23dc49" style={{width: 693, height: 296}} width="1819" height="777" data-path="images/kb/ka0Vq0000005KKf-00N5w00000Ri7BU-0EMVq000004Bunl.jpg" />
</Frame>

The new account gets successfully added without overwriting the existing account.

<Frame>
  <img src="https://mintcdn.com/domoinc-openapi-sync-dataflows/G0VLFwhKwFtlENBF/images/kb/ka0Vq0000005KKf-00N5w00000Ri7BU-0EMVq000004BuxR.jpg?fit=max&auto=format&n=G0VLFwhKwFtlENBF&q=85&s=2044a680117475c698d215ab3138c352" style={{width: 749, height: 149}} width="1799" height="358" data-path="images/kb/ka0Vq0000005KKf-00N5w00000Ri7BU-0EMVq000004BuxR.jpg" />
</Frame>

## Credentials Pane

This pane contains fields for entering credentials to connect to your JSON No Code OAuth account. The following table describes what is needed for each field:

<table border="1" data-aura-rendered-by="33:201;a"><tbody><tr><th colspan="1" rowspan="1"> Field </th><th colspan="1" rowspan="1"> Description </th></tr><tr><td colspan="1" rowspan="1"> JSON-OAUTH Account </td><td colspan="1" rowspan="1"> You can enter an account name of your choice. </td></tr><tr><td colspan="1" rowspan="1"> Client ID </td><td colspan="1" rowspan="1"> Client ID for your OAuth authentication. </td></tr><tr><td colspan="1" rowspan="1"> Client Secret </td><td colspan="1" rowspan="1"> Client Secret for your OAuth authentication </td></tr><tr><td colspan="1" rowspan="1"> OAuth Type </td><td colspan="1" rowspan="1"> If your API does not specify the type of flow it uses, look for the 'grant\_type' parameter required by the API to determine which flow to be used. </td></tr><tr><td colspan="1" rowspan="1"> Authorization URL </td><td colspan="1" rowspan="1"> API authorization endpoint. This is the endpoint used for the first call in the OAuth handshake. </td></tr><tr><td colspan="1" rowspan="1"> Additional parameters for the authorization url API call (optional) </td><td colspan="1" rowspan="1"> Add additional parameters required by your API to be used with the authorization URL (optional). </td></tr><tr><td colspan="1" rowspan="1"> Access Token Url </td><td colspan="1" rowspan="1"> This endpoint will return the access token used to authenticate other API calls. </td></tr><tr><td colspan="1" rowspan="1"><div> Additional parameters for the access token url API call </div></td><td colspan="1" rowspan="1"> Add additional parameters required by your API to be used with the access token URL (optional). </td></tr><tr><td colspan="1" rowspan="1"> Authorization type </td><td colspan="1" rowspan="1"> When you use the authorization code flow, rarely you need to pass the client id and secret in the header. </td></tr><tr><td colspan="1" rowspan="1"> Refresh Token Url </td><td colspan="1" rowspan="1"> For most API, the refresh token url and the access token url are the same. Leave the input blank if this is the case. </td></tr><tr><td colspan="1" rowspan="1"> Scopes (optional) </td><td colspan="1" rowspan="1"> Enter the scopes needed for this connection (optional). Scopes are usually separated by a space. </td></tr><tr><td colspan="1" rowspan="1"> State Type </td><td colspan="1" rowspan="1"> Select the type of state required by your Oauth. (Rarely you need to modify this selection) </td></tr><tr><td colspan="1" rowspan="1"> State Location </td><td colspan="1" rowspan="1"> Select if you want to send the state as a query parameter or in the path. </td></tr><tr><td colspan="1" rowspan="1"> Response Type </td><td colspan="1" rowspan="1"> Select the response type you want to use with the authorization url (Rarely you need to modify this selection). </td></tr><tr><td colspan="1" rowspan="1"> Use redirect uri when refreshing access token </td><td colspan="1" rowspan="1"><span> Select whether the redirect URI needs to be passed to the API when refreshing the access token (this is rare). </span></td></tr><tr><td colspan="1" rowspan="1"> Force token refresh on every run </td><td colspan="1" rowspan="1"><span> Select this option if you want to refresh the access token for every run of the connector. This may be necessary if your token is regularly invalidated outside Domo, but this is rare. </span></td></tr></tbody></table>

The JSON No Code OAuth account connector uses OAuth to connect, so there is no need to enter the credentials for your authorization server within Domo. Click **Connect** (or select **Add Account** if you have existing JSON No Code OAuth accounts in Domo) to open the authorization server OAuth screen where you can enter your authorization server email address and password. Once you have entered valid JSON No Code OAuth credentials, you can use the same account any time you go to create a new JSON No Code OAuth DataSet. You can manage connector accounts in the **Accounts** tab in the Data Center. For more information about this tab, see [Manage Connector Accounts](https://domo-support.domo.com/s/article/360042926054?language=en_US "Manage Connector Accounts").

<Note>
  **Note:** If you are already logged into your authorization server account when you connect in Domo, you are authenticated automatically when you click **Add account**. If you want to connect to an account that is different from the one you are logged into, you must first log out of your authorization server account.
</Note>

## Data Selection Pane

In this pane, you specify the server/SFTP site to connect to, the name of the JSON file, and other configuration settings.

<table border="1" cellpadding="1" cellspacing="1" data-aura-rendered-by="33:201;a"><thead><tr><th colspan="1" rowspan="1"><p> Menu </p></th><th colspan="1" rowspan="1"><p> Description </p></th></tr></thead><tbody><tr><td colspan="1" rowspan="1"> Choose the HTTP Method to use </td><td colspan="1" rowspan="1"> Choose from either GET or POST as the HTTP method. </td></tr><tr><td colspan="1" rowspan="1"> Enter the URL to your JSON file </td><td colspan="1" rowspan="1"> Enter the URL of your JSON file. </td></tr><tr><td colspan="1" rowspan="1"> How will you provide the certificate </td><td colspan="1" rowspan="1"><p> Choose the method in which the certificate will be provided: </p><ul><li><p> No certificate </p></li><li><p> URL Path to the Certificate </p></li><li><p> Certificate Content </p></li></ul></td></tr></tbody></table>

## Advanced Settings

<table data-aura-rendered-by="33:201;a"><thead><tr><th colspan="1" rowspan="1"> Menu </th><th colspan="1" rowspan="1"> Description </th></tr></thead><tbody><tr><td colspan="1" rowspan="1"> HTTPS Headers </td><td colspan="1" rowspan="1"> Enter the Key and Value of the HTTPS Headers. </td></tr><tr><td colspan="1" rowspan="1"> Query Parameters </td><td colspan="1" rowspan="1"> Enter the Key and Value of the Query Parameters. Specify whether you want to encode query parameters. </td></tr><tr><td colspan="1" rowspan="1"> Date Query Parameters </td><td colspan="1" rowspan="1"> Select No Date Filter, Single Date, or Date Range as the Date Query Parameter. </td></tr><tr><td colspan="1" rowspan="1"> JSON Settings </td><td colspan="1" rowspan="1"> Specify whether your JSON text requires a line reader and if the backslash character should be escaped. </td></tr></tbody></table>

## Parsing

#### Pagination

Select how to paginate the data:

* No Paging
* Get next URL from results
* Get next page token from results
* Offset by records
* Offset by pages

#### Parsing

Using the data preview, you can click on a column to format the data for parsing.

## Other Panes

For information about the remaining sections of the connector interface, including how to configure scheduling, retry, and update options, see [Adding a DataSet Using a Connector](https://domo-support.domo.com/s/article/360042926274?language=en_US "Adding a DataSet Using a Connector").

## FAQ

<AccordionGroup>
  <Accordion title="What redirect URI do I need to register?">
    The redirect URI you need to register is:

    [https://oauth.domo.com/api/data/v1/oauth/providers/json-oauth/exchange](https://oauth.domo.com/api/data/v1/oauth/providers/json-oauth/exchange)
  </Accordion>

  <Accordion title="Does this connector support paging?">
    Yes. To activate paging, select the paging type supported by your API and fill out the requested details.
  </Accordion>

  <Accordion title="How do I parse my data?">
    1. Select the column containing the data you want to expand or modify in the **Parsing** tab of the **Parsing Pane**.
    2. Hover over the suggested actions to see the effect and click on the desired action.
    3. Repeat until the data looks the way you want it to look.
    4. Use the **history section** on the right to undo actions if needed.
  </Accordion>
</AccordionGroup>
