> ## Documentation Index
> Fetch the complete documentation index at: https://domoinc-openapi-sync-dataflows.mintlify.site/llms.txt
> Use this file to discover all available pages before exploring further.
# Enabling SSO with Okta
Follow the steps in this topic to set up Okta in Domo. You must have an "Admin" default security role or a custom role with "Manage All Company Settings" enabled to set up SAML. For more information about default roles, see [Managing Custom Roles](/s/article/360043438973 "Default Security Role Reference").
**To set up Okta in Domo,**
1. Navigate to
[okta.com](http://okta.com) /domo.
2. Fill out the fields in the **Give Okta a spin** form and submit it.
You should receive an email from Okta with a temporary password.
3. Finish the initial creation of your Okta account from the email sent.
4. In your Okta account, click **Admin** in the top right.
5. Click the **Applications** tab.
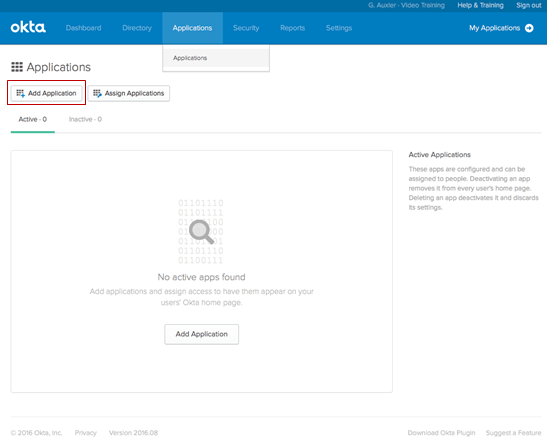
6. Click **Add Application**.
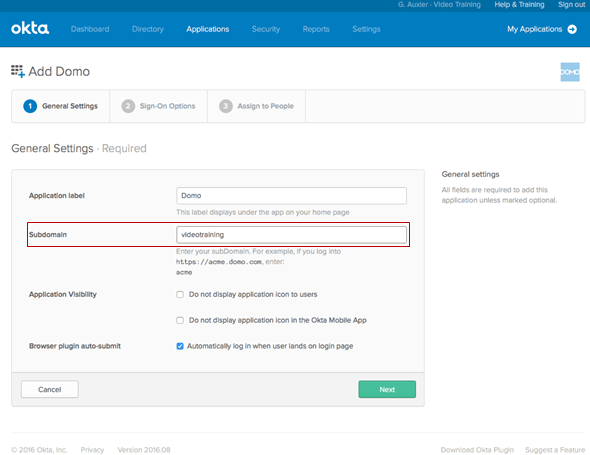
 7. In the **Application label** field, enter `Domo`.
8. In the **Subdomain** field, enter your Domo domain.
For example, if your Domo URL was " [videotraining.domo.com](http://videotraining.domo.com)," you would enter `videotraining` as your subdomain.
7. In the **Application label** field, enter `Domo`.
8. In the **Subdomain** field, enter your Domo domain.
For example, if your Domo URL was " [videotraining.domo.com](http://videotraining.domo.com)," you would enter `videotraining` as your subdomain.
 9. Click **Next** to proceed to the **Sign-On Options** screen.
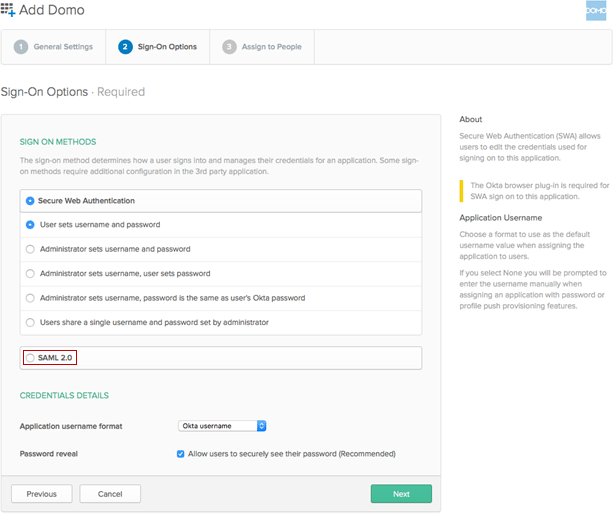
10. Select **SAML 2.0** from the list of sign-on methods.
9. Click **Next** to proceed to the **Sign-On Options** screen.
10. Select **SAML 2.0** from the list of sign-on methods.
 11. Complete your SAML 2.0 configuration by clicking **View Setup Instructions** and following the instructions.
12. Click **Save**.
13. Click the **Directory** tab.
14. (Conditional) If you need to import groups from Okta, do the following:
1. Check the box for **Import groups from identity provider**.
2. In Okta, select the **Sign On** tab for the Domo app.
3. Click **Edit**.
4. Select your preferred **Group** filter from the dropdown list. Use the Regex rule with the value " `.*` " to send all groups to the Domo instance.
5. Click **Save**.
For more information, see [http://saml-doc.okta.com/SAML\_Docs/How-to-Configure-SAML-2.0-for-Domo-Groups.html.](http://saml-doc.okta.com/SAML_Docs/How-to-Configure-SAML-2.0-for-Domo-Groups.html)
15. Add groups by clicking **Add Group** and entering a name and group description into the form.
11. Complete your SAML 2.0 configuration by clicking **View Setup Instructions** and following the instructions.
12. Click **Save**.
13. Click the **Directory** tab.
14. (Conditional) If you need to import groups from Okta, do the following:
1. Check the box for **Import groups from identity provider**.
2. In Okta, select the **Sign On** tab for the Domo app.
3. Click **Edit**.
4. Select your preferred **Group** filter from the dropdown list. Use the Regex rule with the value " `.*` " to send all groups to the Domo instance.
5. Click **Save**.
For more information, see [http://saml-doc.okta.com/SAML\_Docs/How-to-Configure-SAML-2.0-for-Domo-Groups.html.](http://saml-doc.okta.com/SAML_Docs/How-to-Configure-SAML-2.0-for-Domo-Groups.html)
15. Add groups by clicking **Add Group** and entering a name and group description into the form.
 **Note:** A good best practice is to have a group set up for each client. You can add people from each client into those groups to gain access to their cards. If an employee is no longer affiliated with the client, you can remove him from the group, and his access will be revoked.
16. Add people by clicking **Add Person** and filling in the fields in the form.
You can add people into groups by entering the group names into the **Groups** field.
**Note:** A good best practice is to have a group set up for each client. You can add people from each client into those groups to gain access to their cards. If an employee is no longer affiliated with the client, you can remove him from the group, and his access will be revoked.
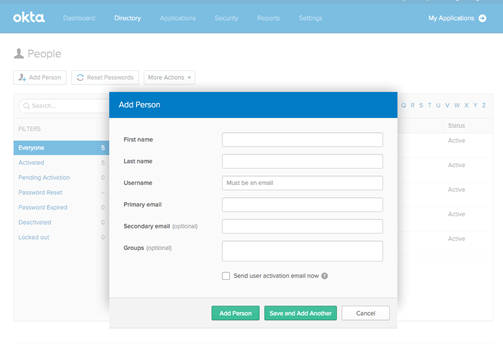
16. Add people by clicking **Add Person** and filling in the fields in the form.
You can add people into groups by entering the group names into the **Groups** field.
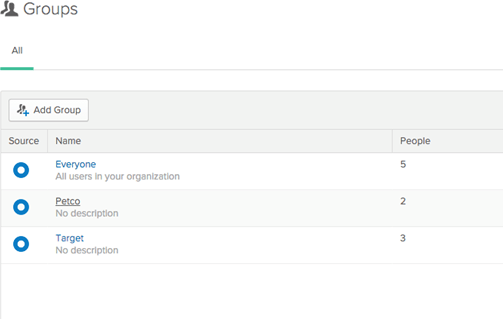
 17. (Optional) Manage groups by doing the following:
1. Click the group in the **Groups** list.
17. (Optional) Manage groups by doing the following:
1. Click the group in the **Groups** list.
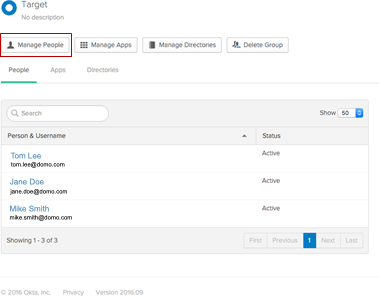
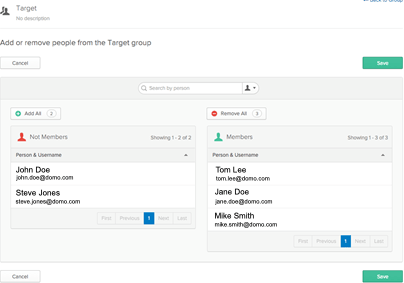
 2. Use **Manage People** to grant access to new users and remove old users from the group.
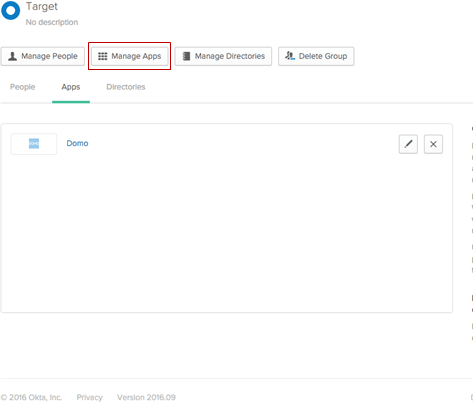
 3. Use **Manage Apps** to grant access to Domo for new groups.
When Domo access is granted, you should see it under the **Apps** tab of the group, as shown below:
3. Use **Manage Apps** to grant access to Domo for new groups.
When Domo access is granted, you should see it under the **Apps** tab of the group, as shown below:
 18. Add new people to Domo by doing the following:
1. Click on the person in the **People** subpage you want to add to Domo.
2. Click **Assign Applications**.
3. Grant Domo access to the individual or to the group the individual belongs to.
18. Add new people to Domo by doing the following:
1. Click on the person in the **People** subpage you want to add to Domo.
2. Click **Assign Applications**.
3. Grant Domo access to the individual or to the group the individual belongs to.
 **Note:** In the **People** tab in Okta, you can see the current status of all users. When a person is added as a user, they are sent an email from Okta to create a unique password. Once they do this, the status is marked "Active" and access is granted.
Once the SSO setup is complete, a new box appears in the publication groups configuration in Domo. In the **Add Group** section you can now enter the individual user email with Domo application access from Okta OR the group with access to Domo.
**Note:** In the **People** tab in Okta, you can see the current status of all users. When a person is added as a user, they are sent an email from Okta to create a unique password. Once they do this, the status is marked "Active" and access is granted.
Once the SSO setup is complete, a new box appears in the publication groups configuration in Domo. In the **Add Group** section you can now enter the individual user email with Domo application access from Okta OR the group with access to Domo.
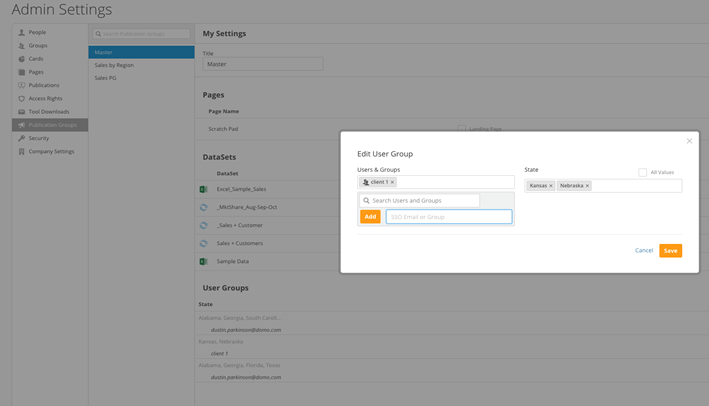 Clients can now get access by doing either of the following:
* Visiting the Okta instance (URL will reflect the company name you entered during the setup) and clicking the Domo application. They are then taken to the prepared view of Domo.
Clients can now get access by doing either of the following:
* Visiting the Okta instance (URL will reflect the company name you entered during the setup) and clicking the Domo application. They are then taken to the prepared view of Domo.
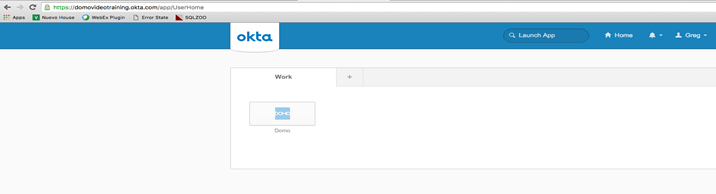 * Log in to the Domo instance. They would then select Single Sign-On. They will then be prompted to enter Okta credentials (the email and password they created for Okta), or they will be logged in automatically through the portal.