> ## Documentation Index
> Fetch the complete documentation index at: https://domoinc-openapi-sync-dataflows.mintlify.site/llms.txt
> Use this file to discover all available pages before exploring further.
# Enabling SSO with Google
export const InlineImage = ({src, alt = '', height = '1.6em'}) => {
return  ;
};
### Intro
Follow the steps in this article to configure Google as a SAML identity provider for Domo. After completing the process, users can sign into Domo using their Google credentials.
# Prerequisites
To complete the configuration process, you must be signed in as a super administrator in Google. (Learn more about [admin roles in Google](https://support.google.com/a/answer/33325?hl=en) .)
And in Domo, you must have an Admin default security role OR a custom role with the (admin-level) Manage All Company Settings grant enabled. Learn more about [default roles](/s/article/360043438973).
### Part 1: Set Up Google as a SAML Provider
1. [Sign in](https://admin.google.com/) to your [Google Admin console](https://support.google.com/a/answer/182076). You must sign in using a Google *administrator account.*
2. From the Admin console Home page, go to ****Apps**** > ****SAML Apps****. To see Apps on the Home page, you may need to select ****More controls**** at the bottom.
3. Select the plus (+) icon at bottom right.
4. Locate and select ****Domo**** in the application list.
5. On the ****Google IDP Information**** page:
1. Copy and save the SSO URL.
2. Copy and save the Entity ID.
3. Download the certificate.
6. Select ****Next****.
The ****Basic information**** window shows the ****Application name**** and ****Description**** seen by users.
7. Select ****Next****.
8. Edit the ****Service Provider Details**** as follows:
* ****ACS URL —**** Replace *\{your‑domain}* with your domain name.
* ****Entity ID —**** Paste the "Entity ID" copied in step 5.
;
};
### Intro
Follow the steps in this article to configure Google as a SAML identity provider for Domo. After completing the process, users can sign into Domo using their Google credentials.
# Prerequisites
To complete the configuration process, you must be signed in as a super administrator in Google. (Learn more about [admin roles in Google](https://support.google.com/a/answer/33325?hl=en) .)
And in Domo, you must have an Admin default security role OR a custom role with the (admin-level) Manage All Company Settings grant enabled. Learn more about [default roles](/s/article/360043438973).
### Part 1: Set Up Google as a SAML Provider
1. [Sign in](https://admin.google.com/) to your [Google Admin console](https://support.google.com/a/answer/182076). You must sign in using a Google *administrator account.*
2. From the Admin console Home page, go to ****Apps**** > ****SAML Apps****. To see Apps on the Home page, you may need to select ****More controls**** at the bottom.
3. Select the plus (+) icon at bottom right.
4. Locate and select ****Domo**** in the application list.
5. On the ****Google IDP Information**** page:
1. Copy and save the SSO URL.
2. Copy and save the Entity ID.
3. Download the certificate.
6. Select ****Next****.
The ****Basic information**** window shows the ****Application name**** and ****Description**** seen by users.
7. Select ****Next****.
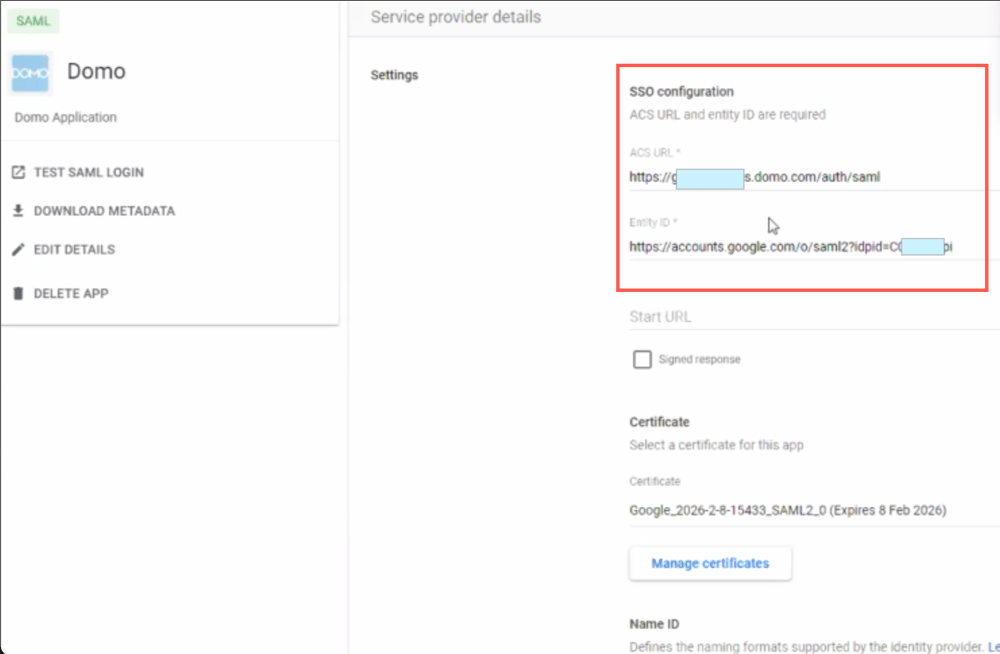
8. Edit the ****Service Provider Details**** as follows:
* ****ACS URL —**** Replace *\{your‑domain}* with your domain name.
* ****Entity ID —**** Paste the "Entity ID" copied in step 5.
 * Set ****Name ID Format**** to "Email."
9. Select ****Finish****.
### Part 2: Configure the Google IDP in Domo
1. Open a new incognito browser window.
2. Sign in to your Domo instance. You *must* have an Admin default security role OR a custom role with the Manage All Company Settings grant enabled to set up SSO. Learn more about [default roles](/s/article/360043438973).
3. Go to the Admin Settings.
4. Under Authentication, select **SAML (SSO)**.
5. Toggle the switch to ****Enable SSO****.
6. Enter the Google identity provider information you obtained from Part 1 in this article in the listed fields:
* ****Identity Provider endpoint URL —**** The SSO URL you copied in step 5a in Part 1.
* ****Entity ID —**** The Entity ID you copied in step 5b in Part 1.
* ****X.509 certificate —**** Upload ****t**** he certificate you downloaded in step 5c in Part 1.
7. Select ****Save Config**** at the top of the page.
### Part 3: Enable Domo in the Google Admin Console
1. Sign in to your Google Admin console. You must sign in using a Google *administrator account.*
2. From the Admin console Home page, go to ****Apps**** > ****SAML Apps****. To see Apps on the Home page, you might have to select ****More controls**** at the bottom.
3. Select ****Domo****.
4. At the top right of the gray box, select **Edit Service**.
5. (Conditional) To apply settings to all organizations, select **On for everyone** / ****Off for everyone****, then select ****Save****.
To apply settings to individual organizational units, do the following:
1. At the left, select the organizational unit that contains the users whose settings you want to change.
2. To change the setting, select ****On**** or ****Off****. To keep the setting the same, even if the parent setting changes, select ****Override****.
3. (Conditional) If the organization's status is already ****Overridden****, choose an option:
****Inherit** —** Reverts to the same setting as its parent.
****Save** —** Saves your new setting (even if the parent setting changes).
6. Confirm that your Domo user account email IDs match those in the domain for your Google service.
### Part 4: Verify that the SSO is Working
1. Close all browser windows.
2. Attempt to sign in to your Domo instance.
You should be automatically redirected to the Google sign-in page.
3. Enter your sign-in credentials.
4. After your credentials are authenticated, you are automatically redirected back to Domo.
* Set ****Name ID Format**** to "Email."
9. Select ****Finish****.
### Part 2: Configure the Google IDP in Domo
1. Open a new incognito browser window.
2. Sign in to your Domo instance. You *must* have an Admin default security role OR a custom role with the Manage All Company Settings grant enabled to set up SSO. Learn more about [default roles](/s/article/360043438973).
3. Go to the Admin Settings.
4. Under Authentication, select **SAML (SSO)**.
5. Toggle the switch to ****Enable SSO****.
6. Enter the Google identity provider information you obtained from Part 1 in this article in the listed fields:
* ****Identity Provider endpoint URL —**** The SSO URL you copied in step 5a in Part 1.
* ****Entity ID —**** The Entity ID you copied in step 5b in Part 1.
* ****X.509 certificate —**** Upload ****t**** he certificate you downloaded in step 5c in Part 1.
7. Select ****Save Config**** at the top of the page.
### Part 3: Enable Domo in the Google Admin Console
1. Sign in to your Google Admin console. You must sign in using a Google *administrator account.*
2. From the Admin console Home page, go to ****Apps**** > ****SAML Apps****. To see Apps on the Home page, you might have to select ****More controls**** at the bottom.
3. Select ****Domo****.
4. At the top right of the gray box, select **Edit Service**.
5. (Conditional) To apply settings to all organizations, select **On for everyone** / ****Off for everyone****, then select ****Save****.
To apply settings to individual organizational units, do the following:
1. At the left, select the organizational unit that contains the users whose settings you want to change.
2. To change the setting, select ****On**** or ****Off****. To keep the setting the same, even if the parent setting changes, select ****Override****.
3. (Conditional) If the organization's status is already ****Overridden****, choose an option:
****Inherit** —** Reverts to the same setting as its parent.
****Save** —** Saves your new setting (even if the parent setting changes).
6. Confirm that your Domo user account email IDs match those in the domain for your Google service.
### Part 4: Verify that the SSO is Working
1. Close all browser windows.
2. Attempt to sign in to your Domo instance.
You should be automatically redirected to the Google sign-in page.
3. Enter your sign-in credentials.
4. After your credentials are authenticated, you are automatically redirected back to Domo.