> ## Documentation Index
> Fetch the complete documentation index at: https://domoinc-openapi-sync-dataflows.mintlify.site/llms.txt
> Use this file to discover all available pages before exploring further.

# Enable SSO with Entra ID Directory

export const InlineImage = ({src, alt = '', height = '1.6em'}) => {
  return <img noZoom src={src} alt={alt} style={{
    display: 'inline',
    verticalAlign: 'start',
    height: height,
    margin: '0'
  }} />;
};

### Intro

Microsoft's Entra application gallery is a collection of software as a service (SaaS) applications preintegrated with Microsoft Entra ID. Users can search for and deploy apps that are tested and certified by Microsoft. Both Premium and Standard users can integrate with Domo for Single Sign-On (SSO). To set up SSO, you must have a Domo Admin system role or a custom role with the Manage All Company Settings grant enabled. Learn more about [grants and custom roles](/s/article/360043438973).

This article describes how to implement SSO with Entra ID.

***

### Implement SSO with Entra ID

<Warning>
  **Important:** You are responsible for properly setting up your Entra ID instance. This includes creating a directory, adding users to the directory, and entering all user information. For more information, you can read [Microsoft Entra's tutorial for SSO integration with Domo](https://learn.microsoft.com/en-us/entra/identity/saas-apps/domo-tutorial) <InlineImage src="/images/kb/ka0Vq00000001FR-00N5w00000Ri7BU-0EMVq0000000XDh.jpg" />.
</Warning>

1. Sign in to the Microsoft Entra admin center, at least as a Cloud Application Administrator.

2. Go to **Identity** > **Applications** > **Enterprise applications** > **Domo** > **Single sign-on**.

3. On the **Select a single sign-on method** page, select **SAML**.

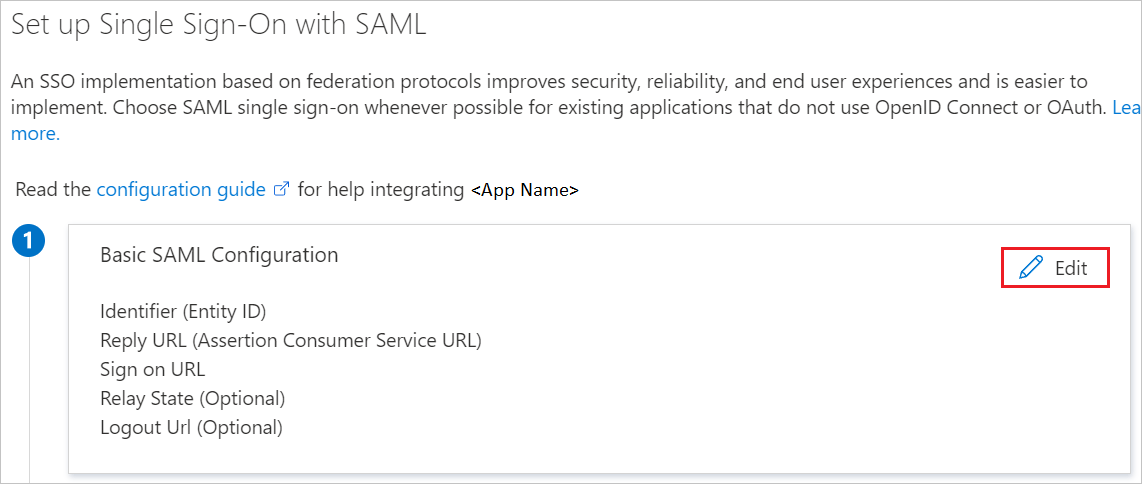
4. On the **Set up single sign-on with SAML** page, select **Edit**.

   <Frame>
     <img alt="edit callout.png" src="https://mintcdn.com/domoinc-openapi-sync-dataflows/fpoofI6keqS4BAx0/images/kb/ka0Vq0000007hhl-00N5w00000Ri7BU-0EMVq000005K1eb.jpg?fit=max&auto=format&n=fpoofI6keqS4BAx0&q=85&s=08c27cf74517df2e8c74a84a6536631d" style={{width: 750, height: 318}} width="1142" height="484" data-path="images/kb/ka0Vq0000007hhl-00N5w00000Ri7BU-0EMVq000005K1eb.jpg" />
   </Frame>

5. In a separate browser tab, log into Domo as an Admin user and navigate to **More** > **Admin** to view the Admin Settings.

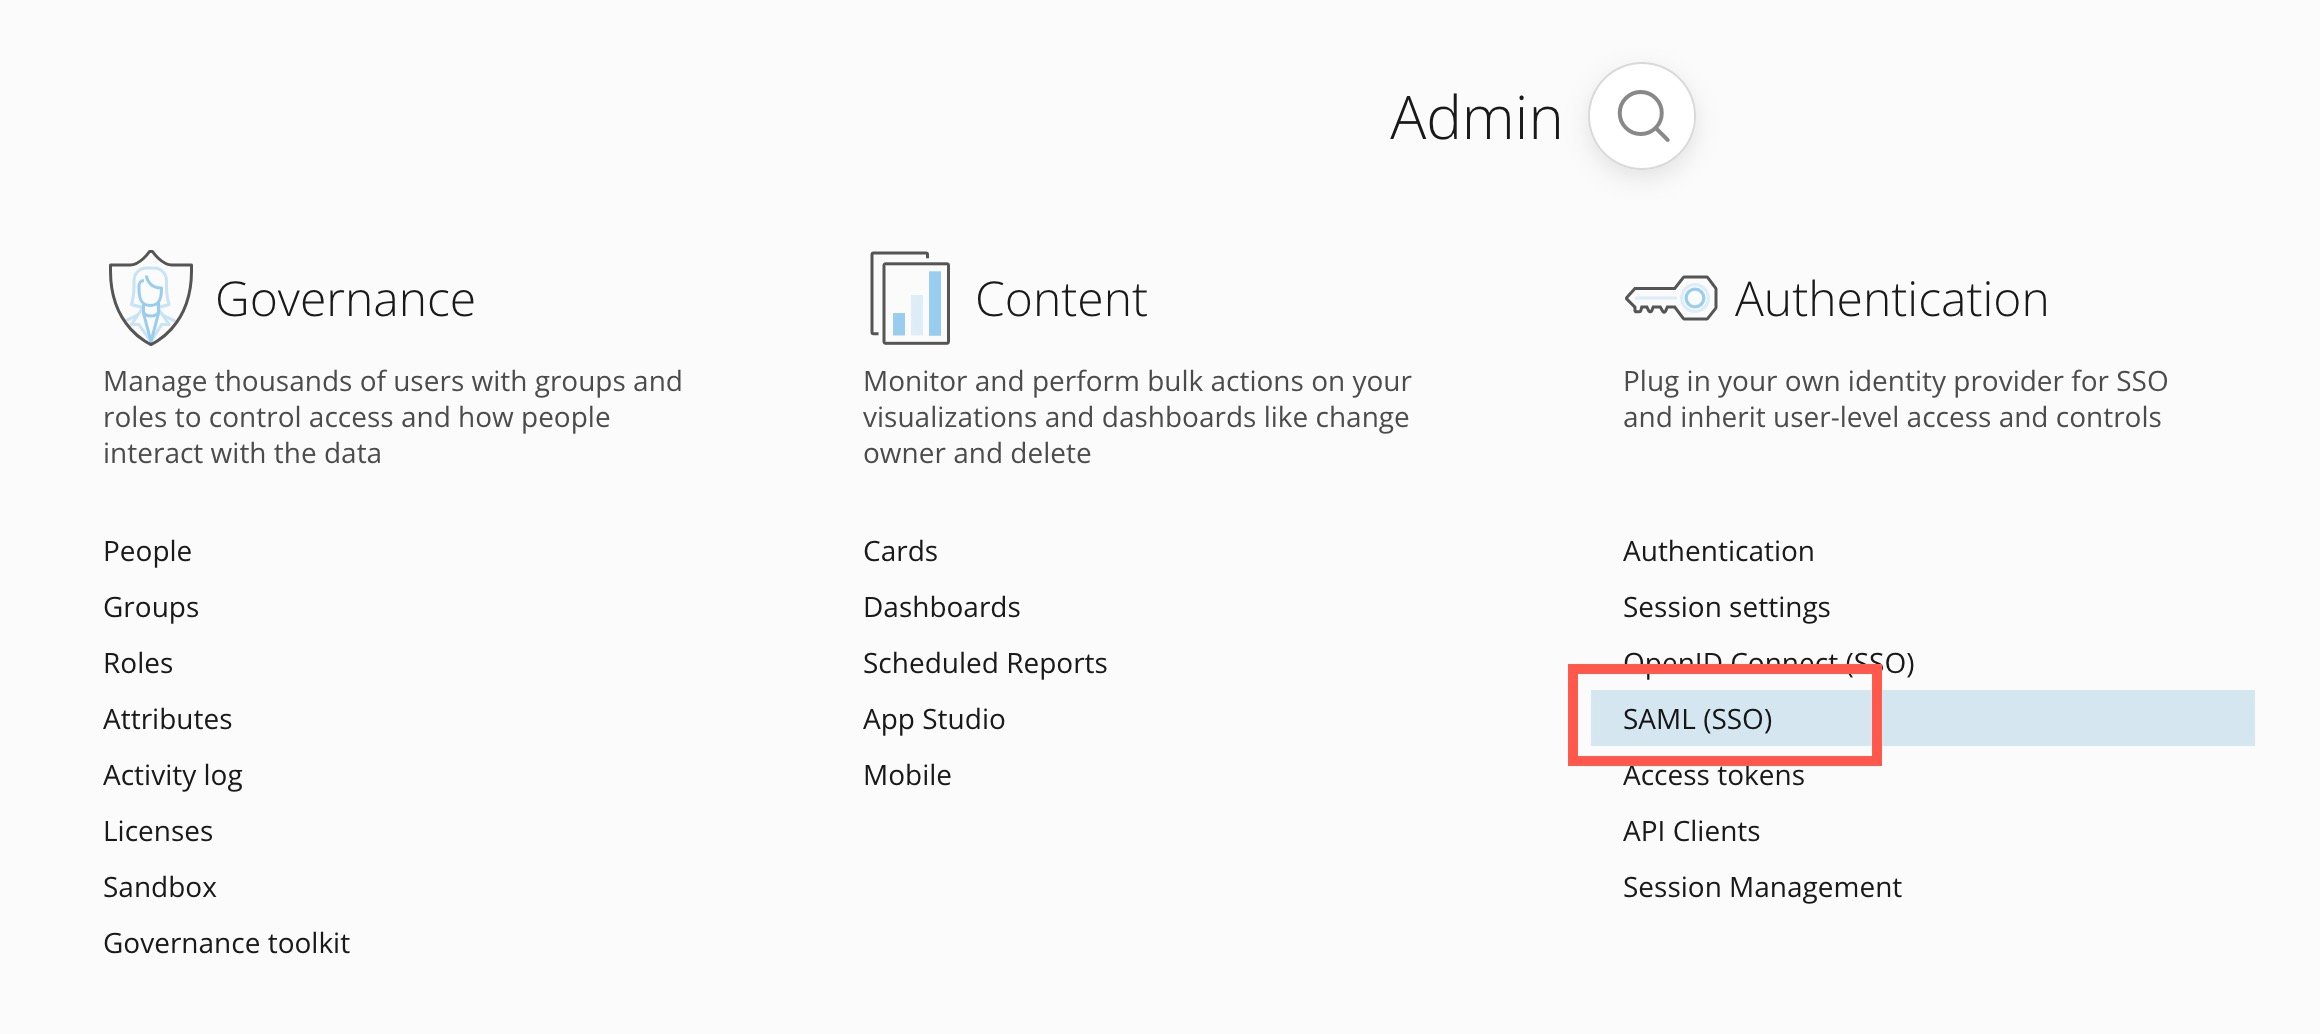
6. Under **Authentication**, select **SAML (SSO)**.
   <Frame>
     <img alt="select saml.jpg" src="https://mintcdn.com/domoinc-openapi-sync-dataflows/fpoofI6keqS4BAx0/images/kb/ka0Vq0000007hhl-00N5w00000Ri7BU-0EMVq000005K261.jpg?fit=max&auto=format&n=fpoofI6keqS4BAx0&q=85&s=80ec0a94b8ea3460c9e035e309ab7f24" style={{width: 799, height: 356}} width="2320" height="1034" data-path="images/kb/ka0Vq0000007hhl-00N5w00000Ri7BU-0EMVq000005K261.jpg" />
   </Frame>

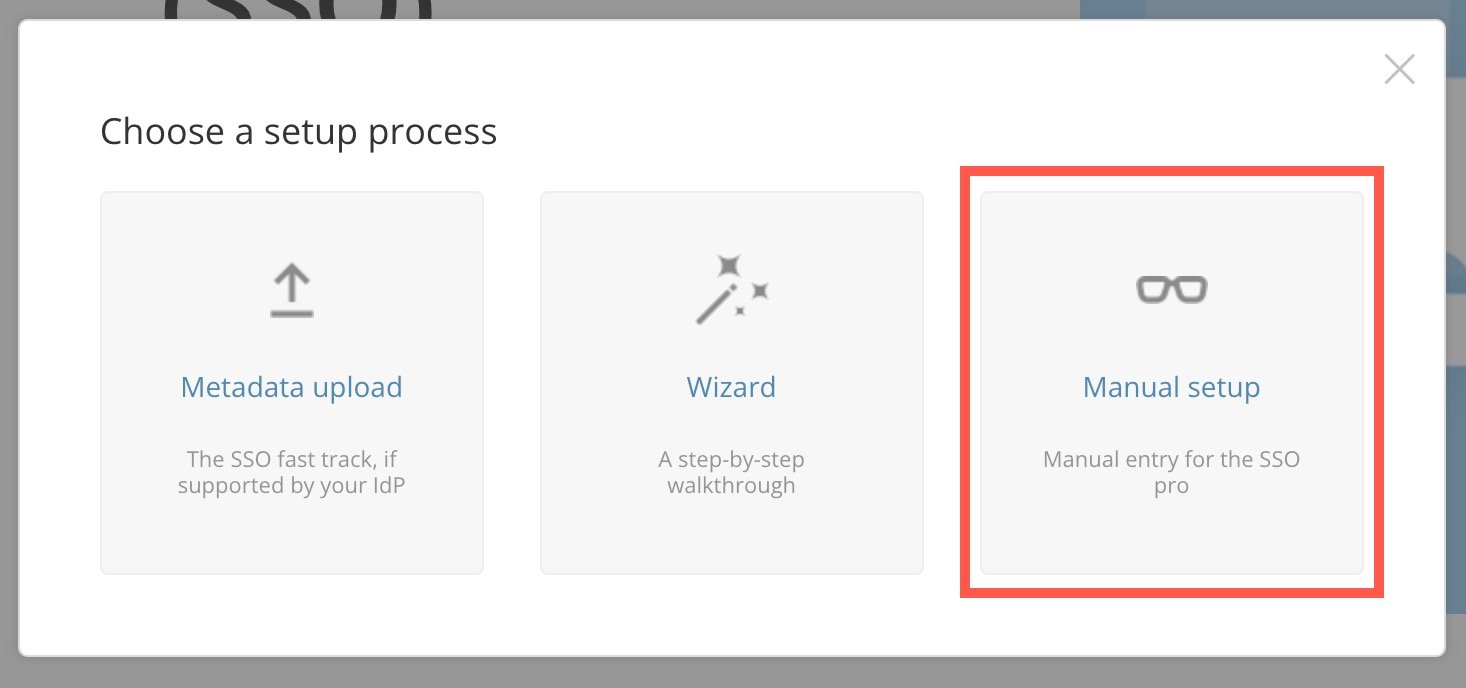
7. On the **SAML (SSO)** page, select **Start Setup** > **Manual setup**.
   <Frame>
     <img alt="manual setup.jpg" src="https://mintcdn.com/domoinc-openapi-sync-dataflows/fpoofI6keqS4BAx0/images/kb/ka0Vq0000007hhl-00N5w00000Ri7BU-0EMVq000005K2cH.jpg?fit=max&auto=format&n=fpoofI6keqS4BAx0&q=85&s=6466250d34e64450574fc02579a5602b" style={{width: 499, height: 234}} width="1466" height="688" data-path="images/kb/ka0Vq0000007hhl-00N5w00000Ri7BU-0EMVq000005K2cH.jpg" />
   </Frame>

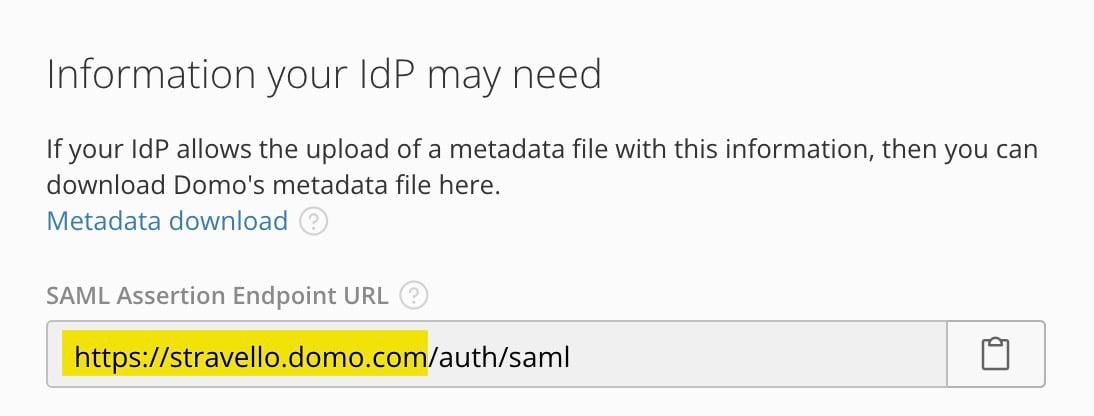
8. Under **Information your IdP may need**, copy the URL in the **SAML Assertion Endpoint URL** field up to ".com" (the highlighted portion in the image below). This will be used for both the Entra **Sign On URL** and **Identifier (Entity ID)** fields.
   <Frame>
     <img alt="highlighed portion.jpg" src="https://mintcdn.com/domoinc-openapi-sync-dataflows/fpoofI6keqS4BAx0/images/kb/ka0Vq0000007hhl-00N5w00000Ri7BU-0EMVq000005K3DN.jpg?fit=max&auto=format&n=fpoofI6keqS4BAx0&q=85&s=53a7d9514a04154240c4f8314bdeeaf4" style={{width: 550, height: 209}} width="1094" height="416" data-path="images/kb/ka0Vq0000007hhl-00N5w00000Ri7BU-0EMVq000005K3DN.jpg" />
   </Frame>

9. Return to the Entra browser tab.

10. In the **Basic SAML Configuration** section, enter the values for the following fields:
    1. In the **Sign on URL** text box, paste the URL you copied from Domo.
    2. In the **Identifier (Entity ID)** text box, paste the same URL you copied from Domo.

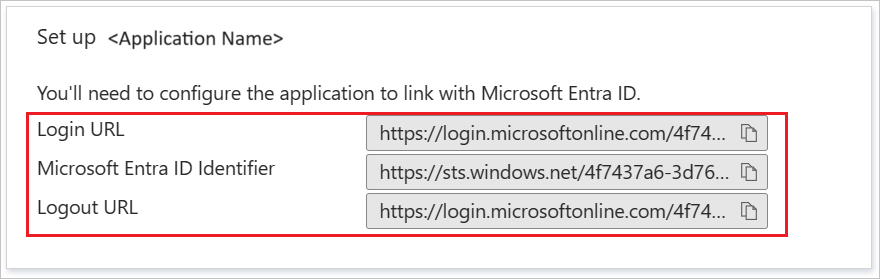
11. Copy the URL from the **Login URL** field. (Note that this URL is the same as the one in the **Logout URL**.)

    **Note:** You may ignore the **Microsoft Entra ID Identifier** URL as this is not used.
    <Frame>
      <img alt="login url callout.png" src="https://mintcdn.com/domoinc-openapi-sync-dataflows/fpoofI6keqS4BAx0/images/kb/ka0Vq0000007hhl-00N5w00000Ri7BU-0EMVq000005Jxcc.jpg?fit=max&auto=format&n=fpoofI6keqS4BAx0&q=85&s=0383857afce1ee4cd1d07cb8c4eee99c" style={{width: 603, height: 191}} width="880" height="279" data-path="images/kb/ka0Vq0000007hhl-00N5w00000Ri7BU-0EMVq000005Jxcc.jpg" />
    </Frame>

12. Return to Domo.

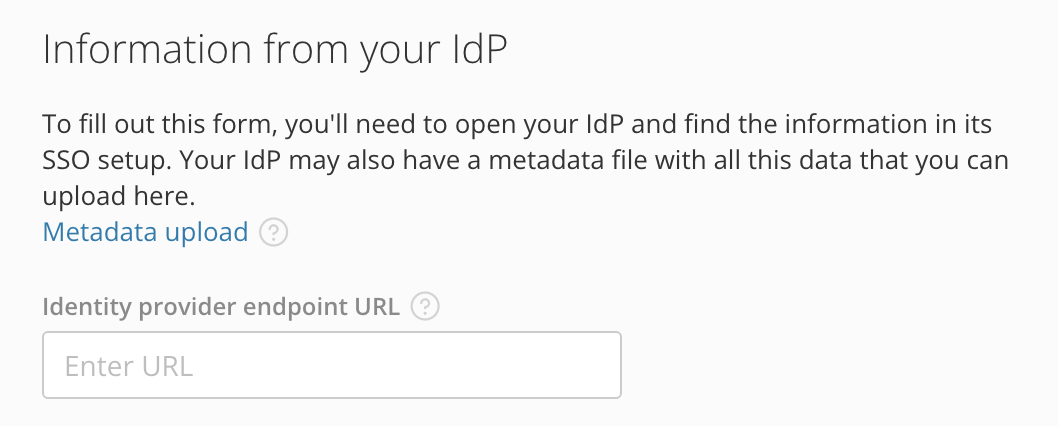
13. Under **Information from your IdP**, paste the URL from the previous step into the **Identity provider endpoint URL** field.
    <Frame>
      <img alt="Screenshot 2025-02-11 at 12.15.20 PM.png" src="https://mintcdn.com/domoinc-openapi-sync-dataflows/fpoofI6keqS4BAx0/images/kb/ka0Vq0000007hhl-00N5w00000Ri7BU-0EMVq000005K4Sn.jpg?fit=max&auto=format&n=fpoofI6keqS4BAx0&q=85&s=5fa17481a7e4fcb0655b7c9e6fcb7f79" style={{width: 551, height: 222}} width="1058" height="426" data-path="images/kb/ka0Vq0000007hhl-00N5w00000Ri7BU-0EMVq000005K4Sn.jpg" />
    </Frame>

14. In the **Entity ID** field, paste the value from step 8 (the highlighted portion).

    <Frame>
      <img alt="Screenshot 2025-02-11 at 12.18.11 PM.png" src="https://mintcdn.com/domoinc-openapi-sync-dataflows/fpoofI6keqS4BAx0/images/kb/ka0Vq0000007hhl-00N5w00000Ri7BU-0EMVq000005K4nl.jpg?fit=max&auto=format&n=fpoofI6keqS4BAx0&q=85&s=87e779df9c129eb727fb99663fa2481c" style={{width: 548, height: 84}} width="1070" height="164" data-path="images/kb/ka0Vq0000007hhl-00N5w00000Ri7BU-0EMVq000005K4nl.jpg" />
    </Frame>

15. Return to Entra.

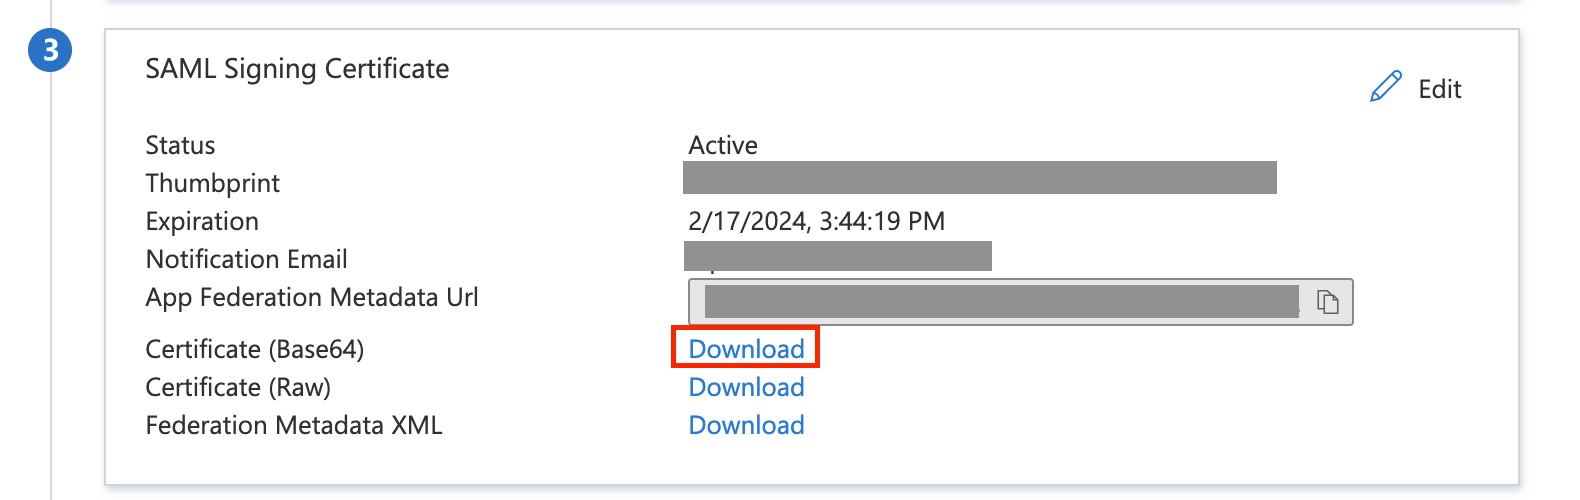
16. On the **Set up single sign-on with SAML** page, in the **SAML Signing Certificate** section, find **Certificate (Base64)** and select **Download** to download the certificate and save it to your computer.
    <Frame>
      <img alt="SAML_Signing_Certificate.png" src="https://mintcdn.com/domoinc-openapi-sync-dataflows/Ii_OEK7nN-EzkrX1/images/kb/ka0Vq0000007hhl-00N5w00000Ri7BU-0EM5w000005vNra.png?fit=max&auto=format&n=Ii_OEK7nN-EzkrX1&q=85&s=c471f924009ea5e0b9e333b2275b8432" style={{width: 746, height: 236}} width="1580" height="500" data-path="images/kb/ka0Vq0000007hhl-00N5w00000Ri7BU-0EM5w000005vNra.png" />
    </Frame>

17. Return to Domo.

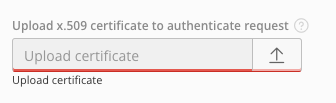
18. Under **Information from your IdP**, select <InlineImage src="/images/kb/ka0Vq0000007hhl-00N5w00000Ri7BU-0EMVq000005KE3y.jpg" /> **Upload** (up arrow icon) in the **Upload x.509 certificate to authenticate request** field and add the Base64 certificate you just downloaded.
    <Frame>
      <img alt="Screenshot 2025-02-11 at 2.32.04 PM.png" src="https://mintcdn.com/domoinc-openapi-sync-dataflows/fpoofI6keqS4BAx0/images/kb/ka0Vq0000007hhl-00N5w00000Ri7BU-0EMVq000005KLwi.jpg?fit=max&auto=format&n=fpoofI6keqS4BAx0&q=85&s=9f59a98c91accbcbde829be2dd585c5c" style={{width: 349, height: 107}} width="336" height="103" data-path="images/kb/ka0Vq0000007hhl-00N5w00000Ri7BU-0EMVq000005KLwi.jpg" />
    </Frame>

19. (Optional) Check the boxes under **Advanced settings** to configure them. A few are defined below:
    * **Only invited people can access Domo —** This prevents Entra ID users from logging into Domo through SSO until they are invited to Domo. (By default, when SSO is enabled in Domo, any user in your Entra ID directory can log into Domo.)
    * **Import guests from identity provider —** This copies your groups from Entra to Domo. **Note:** Entra doesn't currently support groups that represent company departments, so Domo doesn't recommend enabling this option.
      <Note>
        **Note:** Entra sometimes imports the Group ID rather than the name of the group. You can edit the group name in the Domo Admin Settings under **Governance** > **Groups**.
      </Note>

20. At the top of the **Single Sign-On (SSO)** page, toggle the switch labeled **Enable SSO**.

21. Return to Entra.

22. Before continuing, you must configure your Domo SAML token attributes. If you don't, then the Entra ID default settings will be used and usernames within Domo will be overwritten with email addresses.

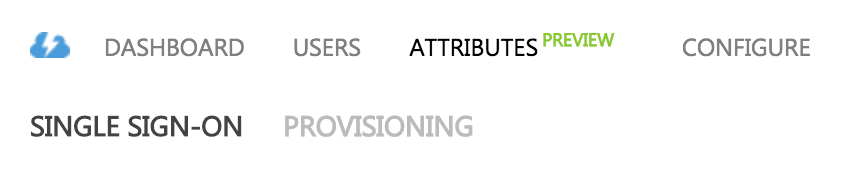
23. To configure your SAML token attributes, select **ATTRIBUTES**.

    <Frame>
      <img alt="azure_ad_attributes.png" src="https://mintcdn.com/domoinc-openapi-sync-dataflows/Ii_OEK7nN-EzkrX1/images/kb/ka0Vq0000007hhl-00N5w00000Ri7BU-0EM5w000005vNrY.png?fit=max&auto=format&n=Ii_OEK7nN-EzkrX1&q=85&s=87f3bcbc0c53d0e752cba1337187ba09" style={{width: 600, height: 136}} width="856" height="194" data-path="images/kb/ka0Vq0000007hhl-00N5w00000Ri7BU-0EM5w000005vNrY.png" />
    </Frame>

24. Configure the user information that is sent to Domo.

    Domo accepts the following attribute names, and Entra allows you to assign values. When defining attributes passed back to Domo, use the attribute names listed in the table below. The `email` attribute is required; all others are optional.

    <Warning>
      **Important:** All attribute names should be lowercase except for `SAML\_SUBJECT` attribute. The Domo Attribute Key value should match the SSO provider's attribute name so the values can map back properly.
    </Warning>

<table border="1" cellpadding="1" cellspacing="1" class="mt-responsive-table"><thead><tr><th colspan="1" rowspan="1"><p> Attribute </p></th><th colspan="1" rowspan="1"><p> Description </p></th></tr></thead><tbody><tr><td colspan="1" rowspan="1"><p> name </p></td><td colspan="1" rowspan="1"><p> The full name of the user </p></td></tr><tr><td colspan="1" rowspan="1"><p> name.personal </p></td><td colspan="1" rowspan="1"><p> The user's first name </p></td></tr><tr><td colspan="1" rowspan="1"><p> name.family </p></td><td colspan="1" rowspan="1"><p> The user's last name </p></td></tr><tr><td colspan="1" rowspan="1"><p> email\* </p></td><td colspan="1" rowspan="1"><p> The email address of the user </p></td></tr><tr><td colspan="1" rowspan="1"><p> email.secondary </p></td><td colspan="1" rowspan="1"><p> A secondary email address for the user </p></td></tr><tr><td colspan="1" rowspan="1"><p> title </p></td><td colspan="1" rowspan="1"><p> The job title of the user </p></td></tr><tr><td colspan="1" rowspan="1"><p> user.phone </p></td><td colspan="1" rowspan="1"><p> The primary phone number of the user, usually a mobile phone number </p></td></tr><tr><td colspan="1" rowspan="1"><p> desk.phone </p></td><td colspan="1" rowspan="1"><p> The number for the user's desk phone </p></td></tr><tr><td colspan="1" rowspan="1"><p> group </p></td><td colspan="1" rowspan="1"><p> The group that the user belongs to, usually a department name </p></td></tr><tr><td colspan="1" rowspan="1"><p> role </p></td><td colspan="1" rowspan="1"><p> The user's role in the company </p></td></tr><tr><td colspan="1" rowspan="1"><p> employee. id </p></td><td colspan="1" rowspan="1"><p> The user's employee ID </p></td></tr><tr><td colspan="1" rowspan="1"><p> hire.date </p></td><td colspan="1" rowspan="1"><p> The user's hire date </p></td></tr><tr><td colspan="1" rowspan="1"><p> title </p></td><td colspan="1" rowspan="1"><p> The user's job title </p></td></tr><tr><td colspan="1" rowspan="1"><p> department </p></td><td colspan="1" rowspan="1"><p> The user's department in the company </p></td></tr><tr><td colspan="1" rowspan="1"><p> location </p></td><td colspan="1" rowspan="1"><p> The company location for the user </p></td></tr><tr><td colspan="1" rowspan="1"><p> locale </p></td><td colspan="1" rowspan="1"><p> The user's locale, which determines settings such as number formats, measurements, etc. </p></td></tr><tr><td colspan="1" rowspan="1"><p> timezone </p></td><td colspan="1" rowspan="1"><p> The user's time zone </p></td></tr></tbody></table>

Attributes marked with an asterisk (\*) are required.

The email can appear in two places in the SAML assertion—as the subject and the email attribute. Either will be accepted.

<Tip>
  **Tip** **:** Due to the way that Entra ID supports groups, Domo doesn't recommend sending a "group" attribute.
</Tip>

The next few steps explain how to set the `name` and `email` attributes within Entra ID.

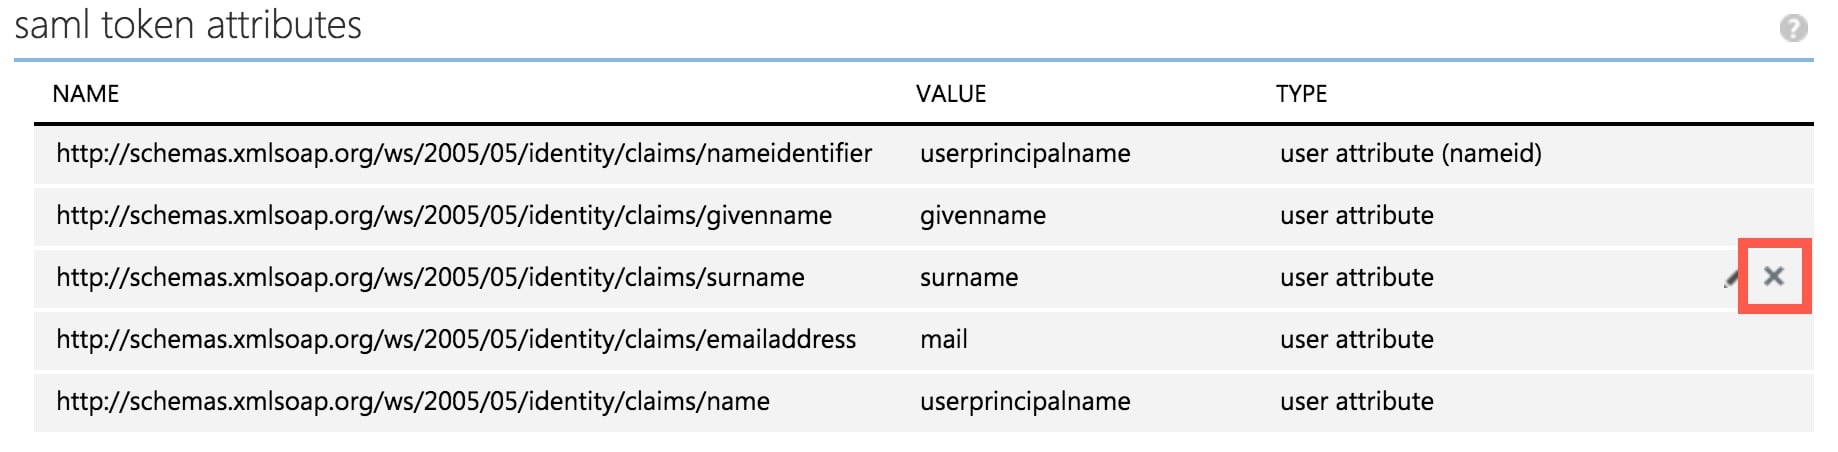
25. Below are the default Entra ID attributes. Delete all rows (except for the first row, which cannot be removed). To delete a row, hover over it and select the **Delete** (x icon). Delete rows with names ending in `claims/givenname,` `claims/surname,` `claims/emailaddress,` and `claims/name.`

    <Frame>
      <img alt="delete row.jpg" src="https://mintcdn.com/domoinc-openapi-sync-dataflows/fpoofI6keqS4BAx0/images/kb/ka0Vq0000007hhl-00N5w00000Ri7BU-0EMVq000005KK1P.jpg?fit=max&auto=format&n=fpoofI6keqS4BAx0&q=85&s=0cc1d290d65903e7a2d02b5a30f452c8" style={{width: 748, height: 184}} width="1838" height="452" data-path="images/kb/ka0Vq0000007hhl-00N5w00000Ri7BU-0EMVq000005KK1P.jpg" />
    </Frame>

    If you make a mistake, Entra allows you to "reset to default" and start over.

    After you delete the unnecessary rows, your list should look like the list below. It contains only one row with a name ending in `claims/nameidentifier.`

    <Frame>
      <img alt="azure_ad_deleted_rows.png" src="https://mintcdn.com/domoinc-openapi-sync-dataflows/fpoofI6keqS4BAx0/images/kb/ka0Vq0000007hhl-00N5w00000Ri7BU-0EM5w000005vNri.png?fit=max&auto=format&n=fpoofI6keqS4BAx0&q=85&s=59dbc4443a61683609f0842f0e390e21" style={{width: 753, height: 88}} width="1377" height="161" data-path="images/kb/ka0Vq0000007hhl-00N5w00000Ri7BU-0EM5w000005vNri.png" />
    </Frame>
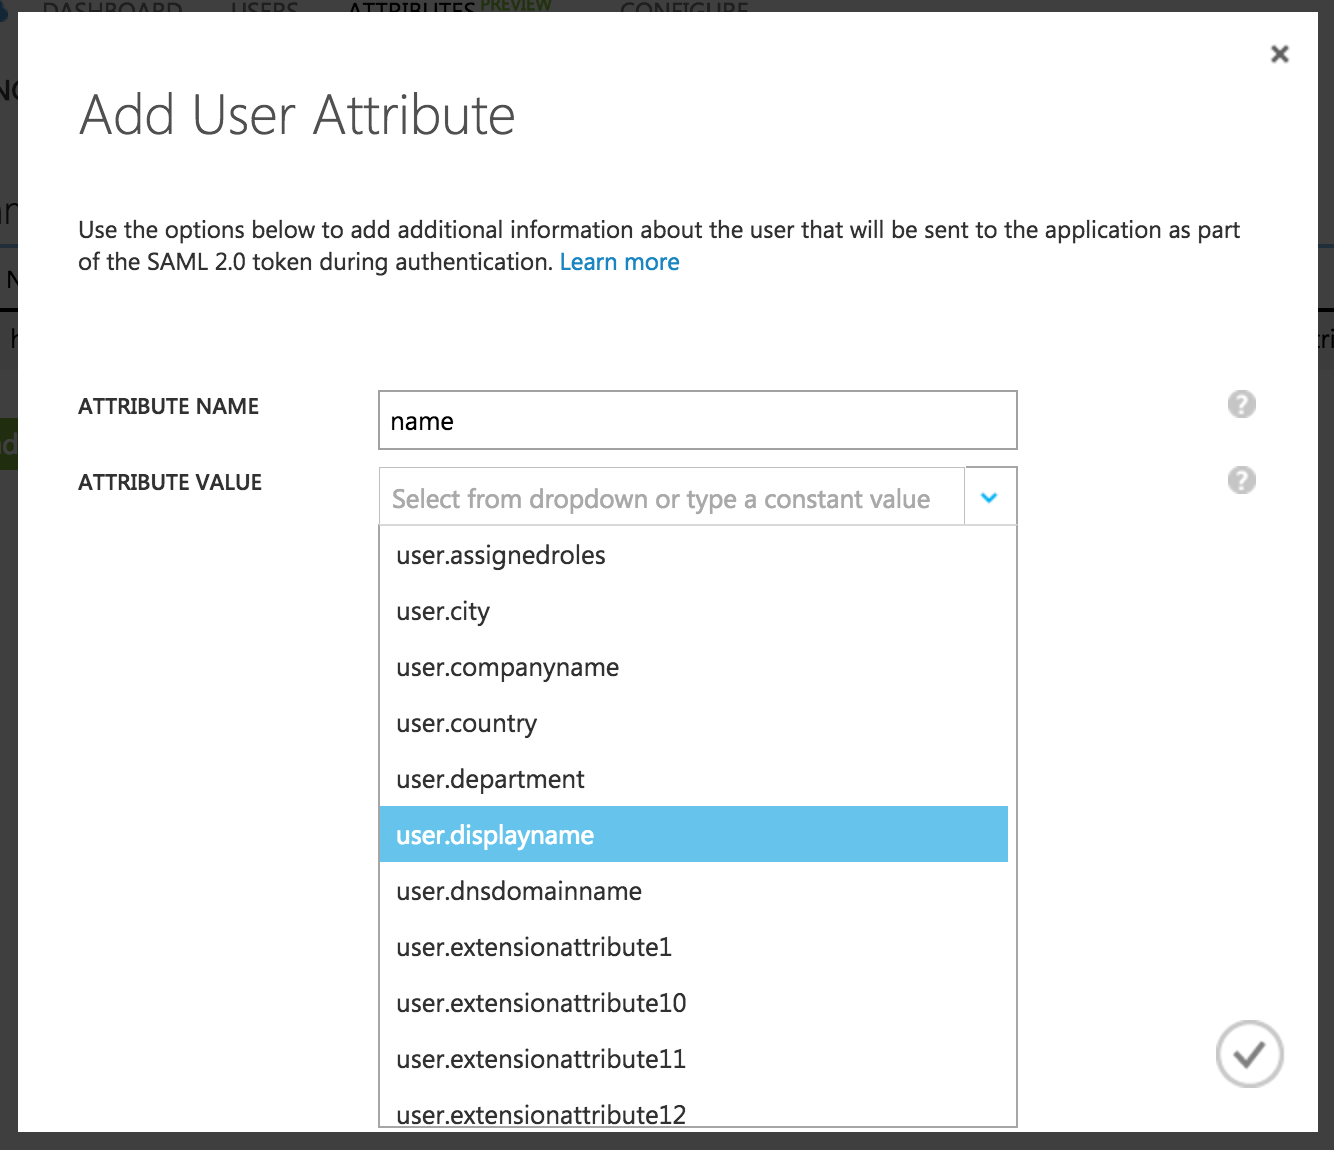
26. Add two new rows for `name` and `email` with values that Domo expects.

    1. To add a row for `name,` do the following:

       1. Select **add user attribute**.

          The **Add User Attribute** modal displays.
       2. Enter `name` in the **ATTRIBUTE NAME** field.
       3. Select **user.displayname** in the **ATTRIBUTE VALUE** dropdown.
          <Frame>
            <img alt="azure_ad_add_user_attribute_1.png" src="https://mintcdn.com/domoinc-openapi-sync-dataflows/Ii_OEK7nN-EzkrX1/images/kb/ka0Vq0000007hhl-00N5w00000Ri7BU-0EM5w000005vNrc.png?fit=max&auto=format&n=Ii_OEK7nN-EzkrX1&q=85&s=7bde000ea48f97f35daf7e5f8c77be3c" style={{width: 597, height: 515}} width="1334" height="1150" data-path="images/kb/ka0Vq0000007hhl-00N5w00000Ri7BU-0EM5w000005vNrc.png" />
          </Frame>
       4. Select the checkmark at the bottom right of the modal.
       <Note>
         **Note:** **Display Name** is the default field that contains the user's full name. If you customize this field or do not use it, you may need to contact the Entra team for help in identifying which field to use to get the user's full name.
       </Note>

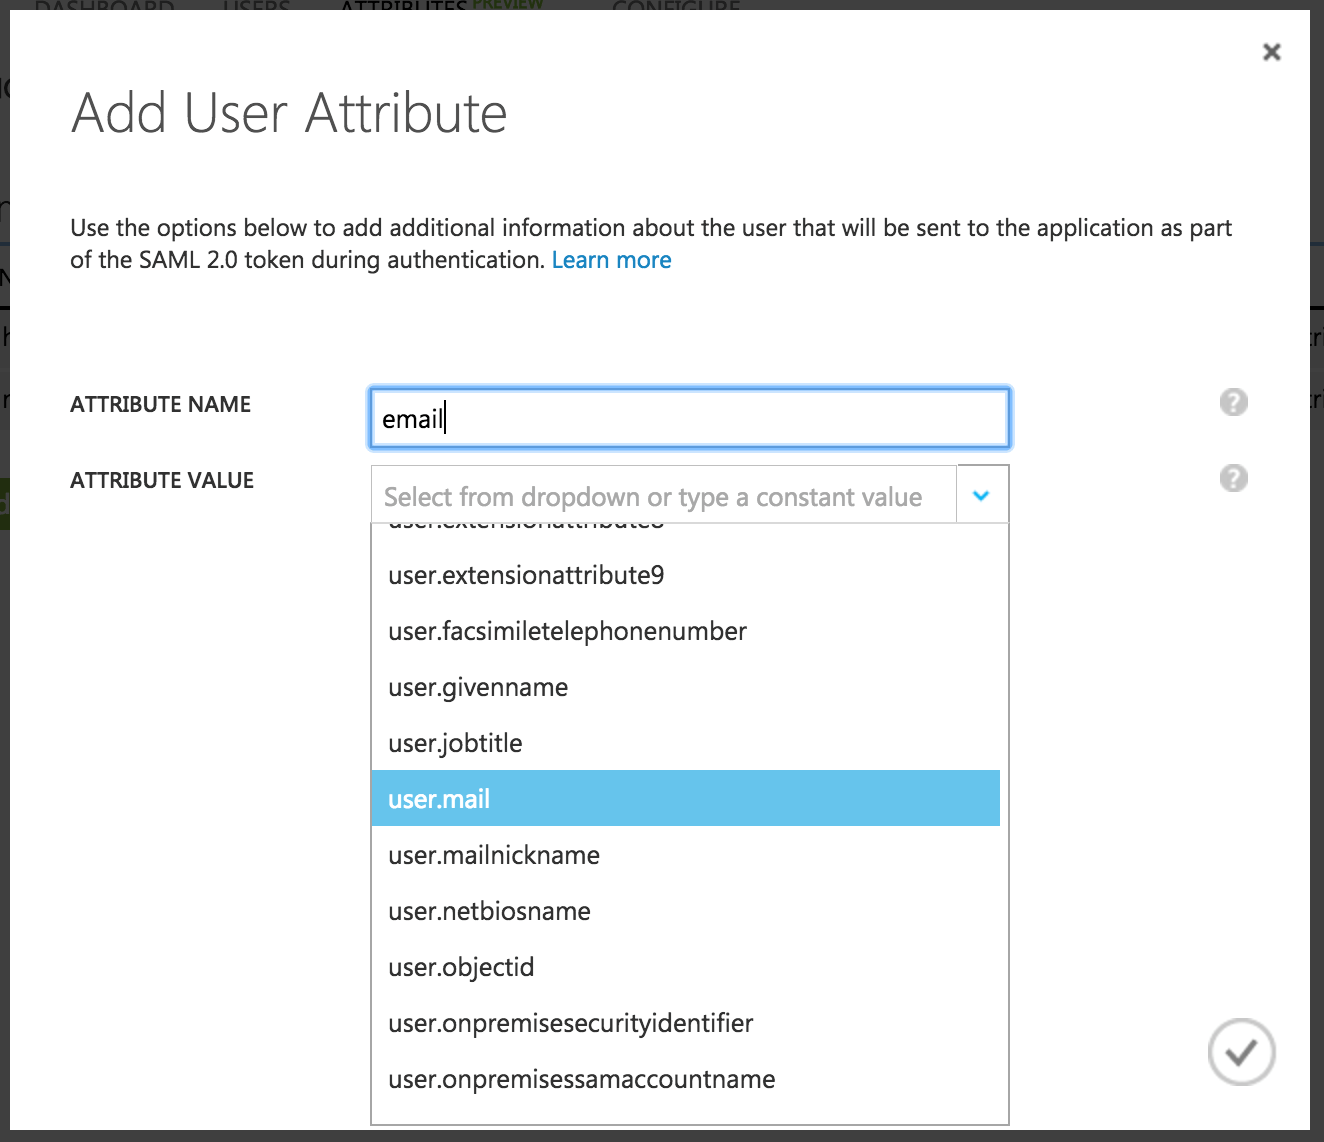
    2. To add a row for `email,` do the following:

       1. Select **add user attribute**.

          The **Add User Attribute** modal displays.
       2. Enter `email` in the **ATTRIBUTE NAME** field.
       3. Select "user.mail" in the **ATTRIBUTE VALUE** dropdown.

          <Frame>
            <img alt="azure_ad_add_user_attribute_2.png" src="https://mintcdn.com/domoinc-openapi-sync-dataflows/fpoofI6keqS4BAx0/images/kb/ka0Vq0000007hhl-00N5w00000Ri7BU-0EM5w000005vNrm.png?fit=max&auto=format&n=fpoofI6keqS4BAx0&q=85&s=c4f8c422a548ab2ebe82eb1205d31230" style={{width: 601, height: 518}} width="1324" height="1142" data-path="images/kb/ka0Vq0000007hhl-00N5w00000Ri7BU-0EM5w000005vNrm.png" />
          </Frame>
       4. Select the checkmark at the bottom right of the modal.

          Your final attributes should look like the screenshot below:

          <Frame>
            <img alt="azure_ad_final_attributes.png" src="https://mintcdn.com/domoinc-openapi-sync-dataflows/fpoofI6keqS4BAx0/images/kb/ka0Vq0000007hhl-00N5w00000Ri7BU-0EM5w000005vNrf.png?fit=max&auto=format&n=fpoofI6keqS4BAx0&q=85&s=311e91532cfd762a395168944e644808" style={{width: 900, height: 160}} width="1378" height="245" data-path="images/kb/ka0Vq0000007hhl-00N5w00000Ri7BU-0EM5w000005vNrf.png" />
          </Frame>

    3. (Optional) If you want to add a title, phone, and/or group, do so now using the same workflow that you did for `name` and `email.`
27. Select **Apply Changes**.

    This concludes the SSO setup within Entra.
28. In Domo, select **Save Config**.

### Test Connection to Domo

Test your connection in Domo by clicking the **Test Config** button at the top of the **Single Sign-On (SSO)** page.

**Note:** Entra may take up to five minutes to apply your settings, so the connection test may not immediately work.

If you followed all the implementation steps correctly, you should see a success message. If not, review the above steps or contact [Domo Support](https://domo-support.domo.com/s/) <InlineImage src="/images/kb/ka0Vq00000001FR-00N5w00000Ri7BU-0EMVq0000000XDh.jpg" />.