Connect to Domo | Lets you connect to a specified Domo instance. You can be connected to multiple instances at once. If you are already connected to an instance, this button reads Connected . In this case, you can add new connections or delete connections using this option. |
Download | Lets you download a DataSet from your connected Domo instance. If you are connected to multiple instances, you can choose which instance to download from. Important: Your downloaded DataSet will replace whatever content is appearing in the current sheet in Domo. For this reason, it is strongly recommended that you open a blank sheet before downloading a DataSet. |
Upload | Lets you upload your edited DataSet back to Domo. You can choose from either of these upload options: Note: If the original DataSet was created and uploaded from the Excel Plugin, both of these options are available. If the originally downloaded DataSet is not an Excel DataSet, only the second option is available. |
Refresh | Refreshes this DataSet. If any changes have been made to the DataSet on the Domo side, those changes will be made in the Excel version of the DataSet. In essence, you are doing a "re-download" of the DataSet data. |
Linked/Not Linked | Indicates whether this DataSet is linked to the same DataSet on the Domo side. You can unlink the DataSet by clicking Linked and choosing the Unlink option. Or, you can link an unlinked DataSet back to its Domo DataSet by clicking Not Linked and choosing the Link option. |
| Query Table | Lets you add a "query table" to this Excel sheet—a subset of data from a DataSet in which you can optionally add filters or aggregations. |
Help | Lets you see the version number for this version of Domo Excel as well as check for newer versions. |
 The **add-in** displays this way:
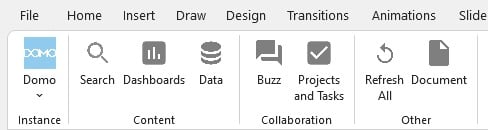 The Domo Microsoft Office **add-ins** support Excel, PowerPoint, and Word (Domo for Office); and Outlook (Domo for Outlook). With the **add-ins**, you receive the latest functionality as soon as it's released.
Download the **add-ins** from Microsoft AppSource using these links:
* [Domo for Office](https://appsource.microsoft.com/en-US/product/office/WA200005264?exp=ubp8)
* [Domo for Outlook](https://appsource.microsoft.com/en-US/product/office/WA200005307?exp=ubp8\&tab=Overview)
Learn more in our [Domo Add-ins for Microsoft 365 Apps User Guide](/s/article/000005143).
Learn how to [convert content](/s/article/000005409) inserted by plugins to work with the Domo add-ins.
The Domo Microsoft Office **add-ins** support Excel, PowerPoint, and Word (Domo for Office); and Outlook (Domo for Outlook). With the **add-ins**, you receive the latest functionality as soon as it's released.
Download the **add-ins** from Microsoft AppSource using these links:
* [Domo for Office](https://appsource.microsoft.com/en-US/product/office/WA200005264?exp=ubp8)
* [Domo for Outlook](https://appsource.microsoft.com/en-US/product/office/WA200005307?exp=ubp8\&tab=Overview)
Learn more in our [Domo Add-ins for Microsoft 365 Apps User Guide](/s/article/000005143).
Learn how to [convert content](/s/article/000005409) inserted by plugins to work with the Domo add-ins.
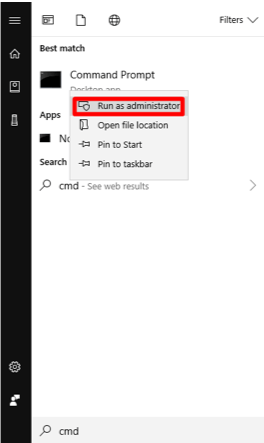 4. Select **Yes**. The **Administrator: Command Prompt** program opens.
5. Locate the Domo Excel plugin installer file on your machine.
6. In **Command Prompt**, run a command line using the file pathway that points to the Domo Excel plugin downloaded file in this format: `C:\Windows\system32>\Users\user_account_name\Downloads\domoexcelsetup.msi` The Domo Excel Add-in Setup Wizard executes.
7. Follow the prompts to install the Domo Excel plugin.
# Use the Plugin
Follow the steps below to be able to use the plugin:
1. Connect to the server for the Domo instance you want to retrieve DataSets from.
2. Download the desired DataSet into Excel.
3. Edit the DataSet in Excel as desired.
4. Upload the DataSet back into Domo.
5. Refresh the data as necessary to keep everything up to date.
# Parts of the Domo Tab in Excel
After you have installed the Domo Excel plugin, a **Domo** tab appears near the end of the main tab row in Excel. This tab appears as follows:
4. Select **Yes**. The **Administrator: Command Prompt** program opens.
5. Locate the Domo Excel plugin installer file on your machine.
6. In **Command Prompt**, run a command line using the file pathway that points to the Domo Excel plugin downloaded file in this format: `C:\Windows\system32>\Users\user_account_name\Downloads\domoexcelsetup.msi` The Domo Excel Add-in Setup Wizard executes.
7. Follow the prompts to install the Domo Excel plugin.
# Use the Plugin
Follow the steps below to be able to use the plugin:
1. Connect to the server for the Domo instance you want to retrieve DataSets from.
2. Download the desired DataSet into Excel.
3. Edit the DataSet in Excel as desired.
4. Upload the DataSet back into Domo.
5. Refresh the data as necessary to keep everything up to date.
# Parts of the Domo Tab in Excel
After you have installed the Domo Excel plugin, a **Domo** tab appears near the end of the main tab row in Excel. This tab appears as follows:
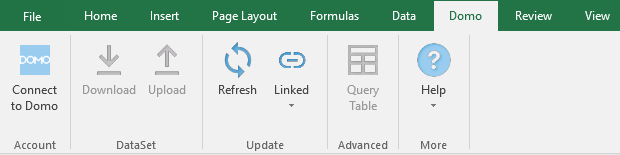 The following table describes the components of this tab:
 2. Select **Add**.
3. Enter the URL for your Domo server in the field, then select **Next**.
2. Select **Add**.
3. Enter the URL for your Domo server in the field, then select **Next**.
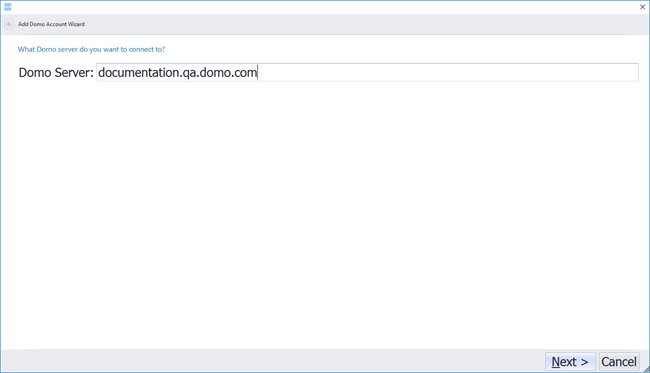 4. Enter your Domo **Email** and **Password** **,** then select **Next**. If you have entered your credentials correctly, a **Success** dialog displays.
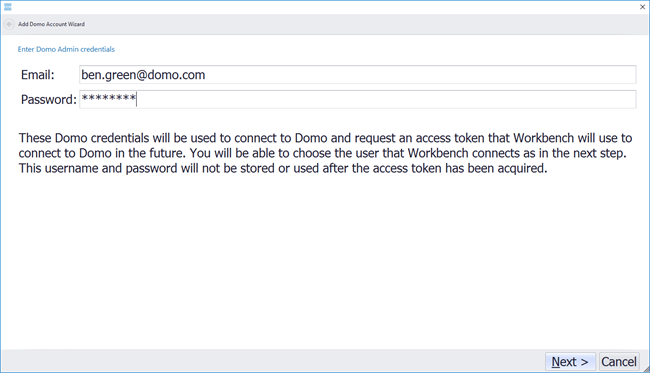 5. Select **Finish**.
# Delete a Server Connection
You can delete a connection to a server in the same dialog in which you add a server connection.
**To delete a server connection,**
1. Click the **Connected** button on the left side of the Domo tab in Excel.
2. Select the server you want to disconnect from.
3. Click **Delete.**
4. Click **Yes** to confirm the deletion.
# Download a DataSet from Domo to Excel
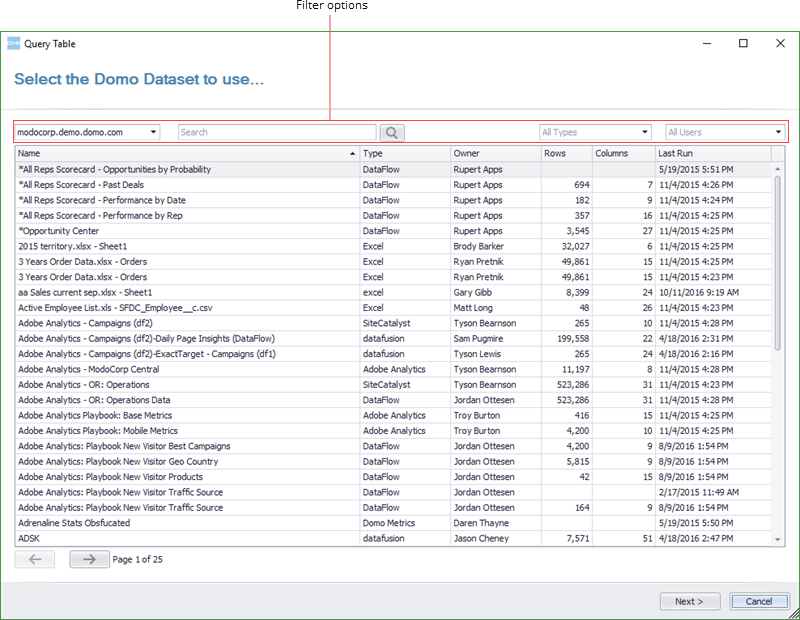
After you have connected to a Domo server, you can download a DataSet from that instance into Excel. You do this by clicking **Download** then following the steps in the wizard.
5. Select **Finish**.
# Delete a Server Connection
You can delete a connection to a server in the same dialog in which you add a server connection.
**To delete a server connection,**
1. Click the **Connected** button on the left side of the Domo tab in Excel.
2. Select the server you want to disconnect from.
3. Click **Delete.**
4. Click **Yes** to confirm the deletion.
# Download a DataSet from Domo to Excel
After you have connected to a Domo server, you can download a DataSet from that instance into Excel. You do this by clicking **Download** then following the steps in the wizard.
 4. (Conditional) Select the radio button for the desired option:
* Select **Select a subset of columns from this DataSet** if you want to pull specified columns into your DataSet in Excel. If you want to pull all columns (not a subset of columns), choose this option and then simply leave all boxes checked.
* Choose **Create an aggregate from the DataSet** if you want to aggregate a specified value column.
5. (Conditional) If you chose to select a subset of columns in step 4, uncheck the boxes for all columns you do not want in your query table. If you chose to create an aggregate, select the value column to aggregate in the first dropdown, then select the desired aggregation type in the second dropdown.
4. (Conditional) Select the radio button for the desired option:
* Select **Select a subset of columns from this DataSet** if you want to pull specified columns into your DataSet in Excel. If you want to pull all columns (not a subset of columns), choose this option and then simply leave all boxes checked.
* Choose **Create an aggregate from the DataSet** if you want to aggregate a specified value column.
5. (Conditional) If you chose to select a subset of columns in step 4, uncheck the boxes for all columns you do not want in your query table. If you chose to create an aggregate, select the value column to aggregate in the first dropdown, then select the desired aggregation type in the second dropdown.
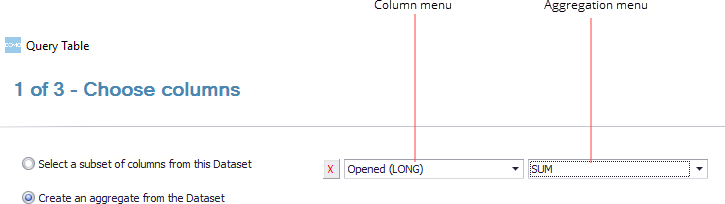 6. (Optional) Add additional aggregates if desired by clicking **Add an aggregation** then repeating the aggregation steps in the previous step.
7. (Optional) Once you have selected your options in this pane, click **Refresh** to show how the subset of data will appear.
8. Click **Next** to proceed to the next screen.
9. (Optional) Configure filters as follows:
1. In the first dropdown, select the column you want to filter.
2. In the second dropdown, select the condition for the filter.
3. In the last dropdown, enter the value for the condition.
6. (Optional) Add additional aggregates if desired by clicking **Add an aggregation** then repeating the aggregation steps in the previous step.
7. (Optional) Once you have selected your options in this pane, click **Refresh** to show how the subset of data will appear.
8. Click **Next** to proceed to the next screen.
9. (Optional) Configure filters as follows:
1. In the first dropdown, select the column you want to filter.
2. In the second dropdown, select the condition for the filter.
3. In the last dropdown, enter the value for the condition.
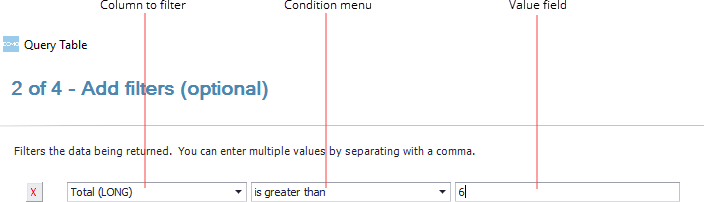 For example, if you wanted your query table to show only those rows in which your number of daily visitors is less than 20, you would select "Daily Visitors" in the first dropdown, select **is less than** in the second dropdown, and enter `20` in the last dropdown.
10. (Optional) Add additional filters if desired by clicking **Add a filter** then repeating the previous step.
11. (Optional) Once you have selected your options in this pane, click **Refresh** to show how the subset of data will appear.
12. Click **Next** to proceed to the next screen.
13. (Optional) To change the order of rows in your query table, select the column to order by in the first dropdown under "Order rows by," then select the order type (**ascending** or **descending**) in the next dropdown.
For example, if you wanted your query table to show only those rows in which your number of daily visitors is less than 20, you would select "Daily Visitors" in the first dropdown, select **is less than** in the second dropdown, and enter `20` in the last dropdown.
10. (Optional) Add additional filters if desired by clicking **Add a filter** then repeating the previous step.
11. (Optional) Once you have selected your options in this pane, click **Refresh** to show how the subset of data will appear.
12. Click **Next** to proceed to the next screen.
13. (Optional) To change the order of rows in your query table, select the column to order by in the first dropdown under "Order rows by," then select the order type (**ascending** or **descending**) in the next dropdown.
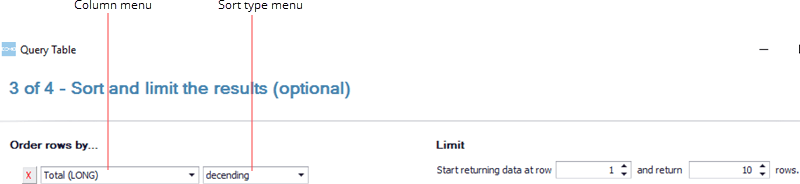 14. (Optional) To limit the rows of data returned, enter the row number in which you want to begin returning data in the first dropdown under "Limit," then specify the number of rows of data to return in the next dropdown.
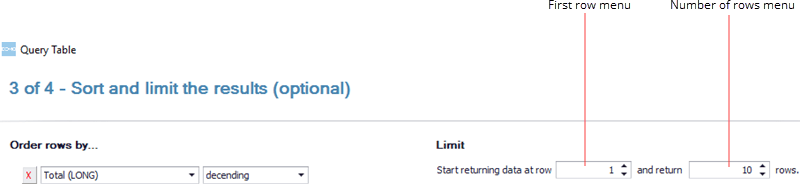 For example, if you only wanted to return rows 10 through 20, you would enter `10` in both dropdowns (the first signifying that the import should begin at row 10, and the second signifying that 10 rows of data should be imported).
15. (Optional) Once you have selected your options in this pane, click **Refresh** to show how the subset of data will appear.
16. Click **Next** to proceed to the next screen.
For example, if you only wanted to return rows 10 through 20, you would enter `10` in both dropdowns (the first signifying that the import should begin at row 10, and the second signifying that 10 rows of data should be imported).
15. (Optional) Once you have selected your options in this pane, click **Refresh** to show how the subset of data will appear.
16. Click **Next** to proceed to the next screen.
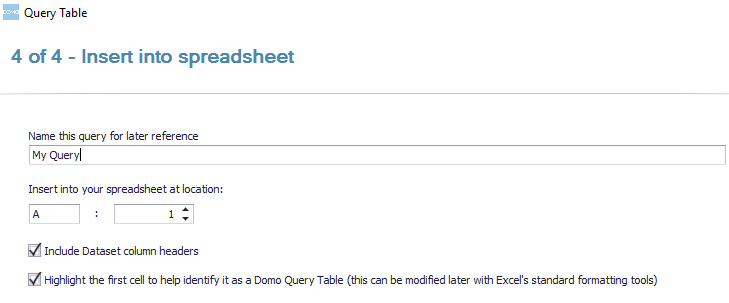 17. Provide a name for your query in the top field.
When you go back into the **Query Table** wizard after importing your table, the table will be referred to by the name you enter.
18. In the two fields under "Insert into your spreadsheet at location," enter the column and row where you want the query table to appear.
Be aware that if any data already exists within the area you specify, that data will be replaced with the data in your query table.
19. (Conditional) If you do not want headers to be included in your query table, uncheck the first checked box; otherwise leave it checked.
20. (Conditional) If you do not want the first cell in your query table to be highlighted (to indicate that it is a query table), uncheck the first box; otherwise leave it checked.
21. Click **Next** to download your query table into Excel.
# Upload a DataSet from Excel to Domo
After you have made your desired changes to a Domo DataSet in Excel, you can upload it back to Domo. You have two options for doing this:
* You can upload the DataSet back to the same DataSet you pulled it from.
* You can upload the DataSet into a new DataSet.
If the original DataSet was created and uploaded from the Excel Plugin, both of these options are available. If the originally downloaded DataSet is not an Excel DataSet, only the second option is available.
### Uploading a DataSet back to its original DataSet
When you upload a DataSet to Domo using this method, the updated content replaces the content in the original DataSet.
**To upload a DataSet back to its original DataSet,**
1. Click **Upload** in the Domo toolbar.
2. Select **Upload data to currently linked DataSet "\[your DataSet]"** then click **Next**.
A warning appears stating that the data in the DataSet in DOmo will be replaced if you continue.
3. Click **Next**.
4. Click **Finish** after the upload completes.
#### Create a New DataSet
When you use this option, a new DataSet is created in Domo using the content in the currently open sheet. You specify the DataSet name and the Domo instance (if you are connected to more than one Domo server). You can also set a few other optional settings, such as whether headers appear in the first row.
**To create a new DataSet using the data in the currently open sheet,**
1. Click **Upload** in the Domo toolbar.
2. Select **Create a new DataSet in Domo** then click **Next**.
3. In the **Data Handling** dialog, set options as follows:
1. Enter the name for the new DataSet in the **DataSet Name** field.
2. (Conditional) If you are connected to more than one Domo server, select the instance where you want the new DataSet in the **Domo Instance** menu.
3. (Optional) Check the **First row contains headers** box if you want the first row in your DataSet to be the header row.
4. (Optional) Specify a range of data to be pulled into your DataSet by entering the numbers of first and last rows to be ignored. For example, if you wanted the new DataSet to contain all data from the second row to the last (i.e. skipping the first row), you would enter `1` in the **Ignore First Rows** box.
4. Click **Next** when you have specified all options.
5. Click **Next**.
6. When the upload has finished, click **Finish**.
# Refresh Data in a Sheet
If your currently open Excel sheet contains data downloaded from a DataSet and any data changes in that DataSet in Domo, a dialog appears asking if you would like to refresh the data in the sheet. If you choose yes, the data from the DataSet in Domo replaces the data in the currently open sheet. You can open this dialog manually by choosing the **Refresh** option. If the original DataSet has been unlinked, this option is not available.
**To refresh the data in a sheet,**
1. Click **Refresh** in the Domo tab to open the Domo Datasource Download Wizard. (If the data changes in the linked DataSet in Domo, a dialog appears asking if you want to refresh the data; click **Yes** to proceed to the wizard.)
2. Click **Next**.
3. After the download has completed, click **Finish**.
# Unlink or Relink a DataSet
When you download a DataSet from Domo, by default the downloaded data stays linked to the original DataSet. As a preventative measure, you may want to unlink the downloaded data from the DataSet in Domo until you are ready to upload. That way, changes to one version of the data will not immediately affect the other.
**To unlink the downloaded data from the original DataSet,**
1. Click the **Linked** button in the Domo toolbar.
2. Click **Unlink from "\[DataSet Name]."**
**To relink the downloaded data to its original DataSet,**
1. Click the **Not Linked** button in the Domo toolbar.
2. Click **Link to "\[DataSet Name]."**
# Troubleshooting
Several customers have reported an issue in which Microsoft disables the plugin after a crash; hence the plugin is still installed but is in a disabled state, so the **Domo** tab doesn't appear. Reinstalling the plugin leaves it in the disabled state. Below are instructions to re-enable the plugin.
Follow these steps to re-enable the Excel Plugin:
1. Open Excel.
2. Select **File** > **Options**.
3. Select **Add-ins**.
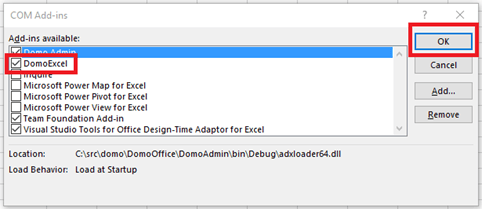
4. In the **Manage** dropdown, select **COM Add-ins**, then click **Go**.
17. Provide a name for your query in the top field.
When you go back into the **Query Table** wizard after importing your table, the table will be referred to by the name you enter.
18. In the two fields under "Insert into your spreadsheet at location," enter the column and row where you want the query table to appear.
Be aware that if any data already exists within the area you specify, that data will be replaced with the data in your query table.
19. (Conditional) If you do not want headers to be included in your query table, uncheck the first checked box; otherwise leave it checked.
20. (Conditional) If you do not want the first cell in your query table to be highlighted (to indicate that it is a query table), uncheck the first box; otherwise leave it checked.
21. Click **Next** to download your query table into Excel.
# Upload a DataSet from Excel to Domo
After you have made your desired changes to a Domo DataSet in Excel, you can upload it back to Domo. You have two options for doing this:
* You can upload the DataSet back to the same DataSet you pulled it from.
* You can upload the DataSet into a new DataSet.
If the original DataSet was created and uploaded from the Excel Plugin, both of these options are available. If the originally downloaded DataSet is not an Excel DataSet, only the second option is available.
### Uploading a DataSet back to its original DataSet
When you upload a DataSet to Domo using this method, the updated content replaces the content in the original DataSet.
**To upload a DataSet back to its original DataSet,**
1. Click **Upload** in the Domo toolbar.
2. Select **Upload data to currently linked DataSet "\[your DataSet]"** then click **Next**.
A warning appears stating that the data in the DataSet in DOmo will be replaced if you continue.
3. Click **Next**.
4. Click **Finish** after the upload completes.
#### Create a New DataSet
When you use this option, a new DataSet is created in Domo using the content in the currently open sheet. You specify the DataSet name and the Domo instance (if you are connected to more than one Domo server). You can also set a few other optional settings, such as whether headers appear in the first row.
**To create a new DataSet using the data in the currently open sheet,**
1. Click **Upload** in the Domo toolbar.
2. Select **Create a new DataSet in Domo** then click **Next**.
3. In the **Data Handling** dialog, set options as follows:
1. Enter the name for the new DataSet in the **DataSet Name** field.
2. (Conditional) If you are connected to more than one Domo server, select the instance where you want the new DataSet in the **Domo Instance** menu.
3. (Optional) Check the **First row contains headers** box if you want the first row in your DataSet to be the header row.
4. (Optional) Specify a range of data to be pulled into your DataSet by entering the numbers of first and last rows to be ignored. For example, if you wanted the new DataSet to contain all data from the second row to the last (i.e. skipping the first row), you would enter `1` in the **Ignore First Rows** box.
4. Click **Next** when you have specified all options.
5. Click **Next**.
6. When the upload has finished, click **Finish**.
# Refresh Data in a Sheet
If your currently open Excel sheet contains data downloaded from a DataSet and any data changes in that DataSet in Domo, a dialog appears asking if you would like to refresh the data in the sheet. If you choose yes, the data from the DataSet in Domo replaces the data in the currently open sheet. You can open this dialog manually by choosing the **Refresh** option. If the original DataSet has been unlinked, this option is not available.
**To refresh the data in a sheet,**
1. Click **Refresh** in the Domo tab to open the Domo Datasource Download Wizard. (If the data changes in the linked DataSet in Domo, a dialog appears asking if you want to refresh the data; click **Yes** to proceed to the wizard.)
2. Click **Next**.
3. After the download has completed, click **Finish**.
# Unlink or Relink a DataSet
When you download a DataSet from Domo, by default the downloaded data stays linked to the original DataSet. As a preventative measure, you may want to unlink the downloaded data from the DataSet in Domo until you are ready to upload. That way, changes to one version of the data will not immediately affect the other.
**To unlink the downloaded data from the original DataSet,**
1. Click the **Linked** button in the Domo toolbar.
2. Click **Unlink from "\[DataSet Name]."**
**To relink the downloaded data to its original DataSet,**
1. Click the **Not Linked** button in the Domo toolbar.
2. Click **Link to "\[DataSet Name]."**
# Troubleshooting
Several customers have reported an issue in which Microsoft disables the plugin after a crash; hence the plugin is still installed but is in a disabled state, so the **Domo** tab doesn't appear. Reinstalling the plugin leaves it in the disabled state. Below are instructions to re-enable the plugin.
Follow these steps to re-enable the Excel Plugin:
1. Open Excel.
2. Select **File** > **Options**.
3. Select **Add-ins**.
4. In the **Manage** dropdown, select **COM Add-ins**, then click **Go**.
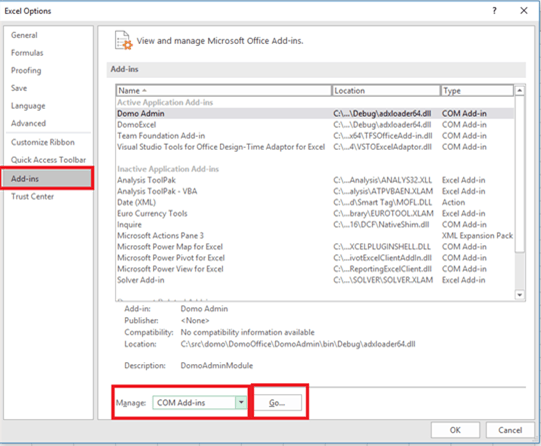 5. Check the box next to **DomoExcel** then click **OK**.
 If the box is already checked and the **Domo** tab still doesn't appear, make sure you don't have multiple versions of the plugin installed. You can remove extra instances by doing the following:
1. In the Windows Control Panel, go to **Add/Remove Programs**.
2. Remove all instances of "Domo Excel."
3. Reinstall the plugin.
If you are receiving the error message "There was a problem authenticating with *company*. [domo.com](http://domo.com)" when attempting to connect to your Domo instance, try the following items:
1. If it isn't already, set your default internet browser to Chrome so that when the authentication window opens, it does so in Chrome.
2. Sign out of Domo before attempting to authenticate in the Excel plugin.
3. Uninstall and reinstall the plugin as an administrator on your own machine.
If the steps above do not work, you might need to clear out your Windows registry for the Excel plugin. Follow the steps below to clear out the registry:
1. (Recommended) Perform a system backup before moving to the next step.
2. Open **Windows Run** (WIN + R).
3. Enter: "Regedit"
4. In the **Registry Editor**, go to HKEY\_CURRENT\_USER\SOFTWARE\Domo\Office\Connection
5. Right-click and choose **Delete Registries**.
6. Go to the following path: HKEY\_LOCAL\_MACHINE\SOFTWARE\Microsoft\Office\ClickToRun\REGISTRY\MACHINE\Software\Wow6432Node\Domo\Office\Connection
7. Right-click and choose **Delete Registries**.
8. Reinstall the Excel plugin.
**Video - Domo Excel Plugin**
If the box is already checked and the **Domo** tab still doesn't appear, make sure you don't have multiple versions of the plugin installed. You can remove extra instances by doing the following:
1. In the Windows Control Panel, go to **Add/Remove Programs**.
2. Remove all instances of "Domo Excel."
3. Reinstall the plugin.
If you are receiving the error message "There was a problem authenticating with *company*. [domo.com](http://domo.com)" when attempting to connect to your Domo instance, try the following items:
1. If it isn't already, set your default internet browser to Chrome so that when the authentication window opens, it does so in Chrome.
2. Sign out of Domo before attempting to authenticate in the Excel plugin.
3. Uninstall and reinstall the plugin as an administrator on your own machine.
If the steps above do not work, you might need to clear out your Windows registry for the Excel plugin. Follow the steps below to clear out the registry:
1. (Recommended) Perform a system backup before moving to the next step.
2. Open **Windows Run** (WIN + R).
3. Enter: "Regedit"
4. In the **Registry Editor**, go to HKEY\_CURRENT\_USER\SOFTWARE\Domo\Office\Connection
5. Right-click and choose **Delete Registries**.
6. Go to the following path: HKEY\_LOCAL\_MACHINE\SOFTWARE\Microsoft\Office\ClickToRun\REGISTRY\MACHINE\Software\Wow6432Node\Domo\Office\Connection
7. Right-click and choose **Delete Registries**.
8. Reinstall the Excel plugin.
**Video - Domo Excel Plugin**