
> ## Documentation Index
> Fetch the complete documentation index at: https://domoinc-openapi-sync-dataflows.mintlify.site/llms.txt
> Use this file to discover all available pages before exploring further.

# Microsoft OneDrive Writeback Connector

## Intro

Microsoft OneDrive is an online file sharing and personal cloud content management service for businesses. Use this connector to export your data from a Domo DataSet to a specified OneDrive folder. For more information about the OneDrive API, see [https://msdn.microsoft.com/en-us/lib.../dn659752.aspx](https://msdn.microsoft.com/en-us/library/office/dn659752.aspx "https://msdn.microsoft.com/en-us/library/office/dn659752.aspx").

You export data to OneDrive in the Data Center. This topic discusses the fields and menus that are specific to the Microsoft OneDrive Writeback connector user interface. General information for adding DataSets, setting update schedules, and editing DataSet information is discussed in [Adding a DataSet Using a Data Connector](/s/article/360042926274 "Adding a DataSet Using a Data Connector").

<Note>
  **Note:** The owner of a writeback dataset must also be an owner or co-owner of the input dataset.
</Note>

## Prerequisites

To configure this connector, you need the following:

* An installed Microsoft Azure app.
* The client ID and client secret associated with your Domo Developer account.
* The Secret ID and Value associated with your Microsoft Azure app.

#### To obtain your Domo Client ID and Client Secret:

1. Log into the [Domo developer account](https://developer.domo.com/login "https://developer.domo.com/login").
2. In the top right corner under **My Account** click **New Client**.
3. Enter the application name and description.
4. Provide the application scope by selecting the checkboxes for **Data** and **User**.
5. Click **Create**. Once you have created a client, you can manage the client by clicking on **Manage Client**.
6. Your **Client Secret** will appear in the **Manage Client** section.

#### To obtain your Secret (client) ID:

1. Go to [https://portal.azure.com](https://portal.azure.com/ "https://portal.azure.com").
2. Select **Azure Active Directory > App registrations**.
3. Find and click on your web app.
4. The "application ID" is your **Client ID**.

#### To obtain your Secret Value:

1. Go to [https://portal.azure.com](https://portal.azure.com/ "https://portal.azure.com").
2. Select **Azure Active Directory > App registrations**.
3. Find and click on your web app.
4. Open **Certificates and secrets**.
5. Click **+New client secret**.
6. Provide the client secret description and the expiry period for your secret. Click **Add**.
7. Your new client secret will appear. Copy it and paste in your Domo connector Client Secret field.

### Microsoft Permissions

Having the correct permissions within Microsoft allows Domo to effectively access your data using the Microsoft OneDrive Writeback connector.

#### Setting Permissions for New Apps

These steps pertain only to new apps.

1. Navigate to [https://apps.dev.microsoft.com/](https://apps.dev.microsoft.com/ "https://apps.dev.microsoft.com/") and sign in.

2. Click ****Add an app****.

   <Frame>
     <img alt="onedrive_1.png" src="https://mintcdn.com/domoinc-openapi-sync-dataflows/blcgkVgnZv6gj_XY/images/kb/ka05w00000123QC-00N5w00000Ri7BU-0EM5w000005vO9h.png?fit=max&auto=format&n=blcgkVgnZv6gj_XY&q=85&s=4743570d704009544244e3e532b86f68" width="800" height="116" data-path="images/kb/ka05w00000123QC-00N5w00000Ri7BU-0EM5w000005vO9h.png" />
   </Frame>

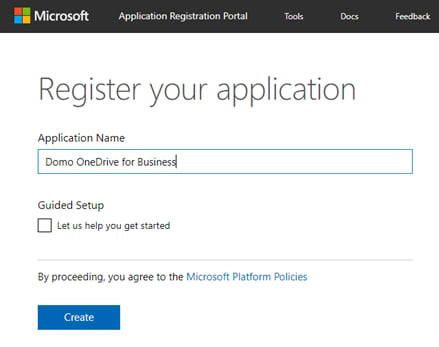
3. Name the app.

4. Click ****Create****.
   <Frame>
     <img alt="onedrive_2.png" src="https://mintcdn.com/domoinc-openapi-sync-dataflows/blcgkVgnZv6gj_XY/images/kb/ka05w00000123QC-00N5w00000Ri7BU-0EM5w000005vO9i.png?fit=max&auto=format&n=blcgkVgnZv6gj_XY&q=85&s=21ef10de81cccd6353d48b83f463570f" width="439" height="347" data-path="images/kb/ka05w00000123QC-00N5w00000Ri7BU-0EM5w000005vO9i.png" />
   </Frame>

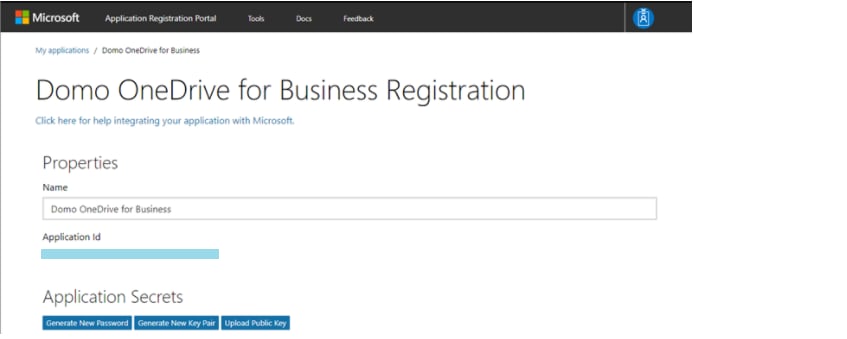
   The APP ID that appears is the Client ID.
   <Frame>
     <img alt="Application_ID.png" src="https://mintcdn.com/domoinc-openapi-sync-dataflows/blcgkVgnZv6gj_XY/images/kb/ka05w00000123QC-00N5w00000Ri7BU-0EM5w000005vO9b.png?fit=max&auto=format&n=blcgkVgnZv6gj_XY&q=85&s=1e025c963d166c0022c6a7e790ea76ff" width="847" height="339" data-path="images/kb/ka05w00000123QC-00N5w00000Ri7BU-0EM5w000005vO9b.png" />
   </Frame>

5. Click ****Generate new password****.<br />
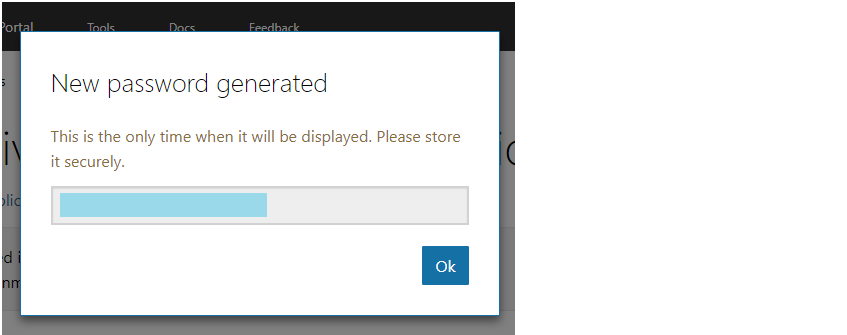
   Be sure to SAVE THIS—you will not see it again. This is your Secret.

   <Frame>
     <img alt="Password.png" src="https://mintcdn.com/domoinc-openapi-sync-dataflows/blcgkVgnZv6gj_XY/images/kb/ka05w00000123QC-00N5w00000Ri7BU-0EM5w000005vO9c.png?fit=max&auto=format&n=blcgkVgnZv6gj_XY&q=85&s=57d4f72ca5b8ea8c71aca91b80f59b10" width="847" height="335" data-path="images/kb/ka05w00000123QC-00N5w00000Ri7BU-0EM5w000005vO9c.png" />
   </Frame>

6. Click ****OK****.

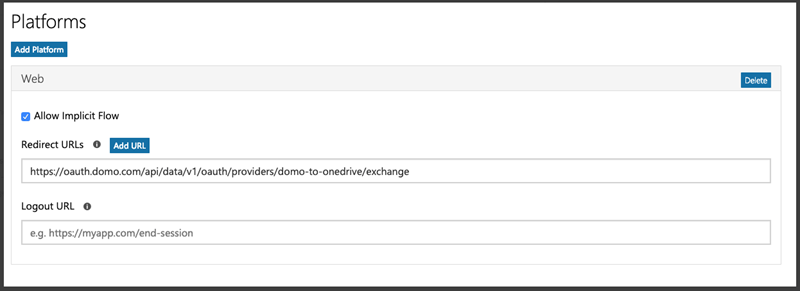
7. Click ****Add platform****.

8. Select ****Web****.

9. In the ****Redirect URLs**** field, enter the URL **[https://oauth.domo.com/api/data/v1/o...drive/exchange](https://oauth.domo.com/api/data/v1/o...drive/exchange)**.
   <Frame>
     <img alt="ms_onedrive_writeback_1.png" src="https://mintcdn.com/domoinc-openapi-sync-dataflows/blcgkVgnZv6gj_XY/images/kb/ka05w00000123QC-00N5w00000Ri7BU-0EM5w000005vO9e.png?fit=max&auto=format&n=blcgkVgnZv6gj_XY&q=85&s=9527e2c2c67c973e174229d0fc5ea70f" width="800" height="291" data-path="images/kb/ka05w00000123QC-00N5w00000Ri7BU-0EM5w000005vO9e.png" />
   </Frame>

10. Click ****Save****.

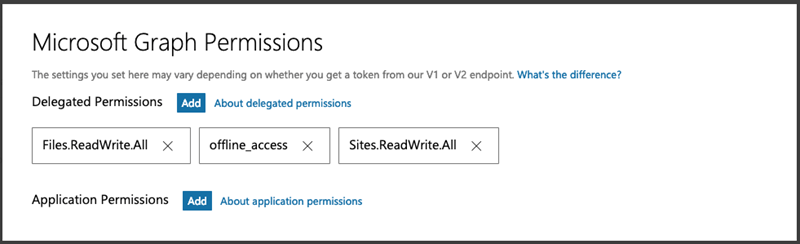
11. Add permissions for Files.Read.All, offline\_access, and Sites.ReadWrite.All.
    <Frame>
      <img alt="ms_onedrive_writeback_2.png" src="https://mintcdn.com/domoinc-openapi-sync-dataflows/blcgkVgnZv6gj_XY/images/kb/ka05w00000123QC-00N5w00000Ri7BU-0EM5w000005vO9d.png?fit=max&auto=format&n=blcgkVgnZv6gj_XY&q=85&s=f478bf6cd9468f034eb8531e4cbd18ed" width="800" height="244" data-path="images/kb/ka05w00000123QC-00N5w00000Ri7BU-0EM5w000005vO9d.png" />
    </Frame>

12. Click ****Save****.

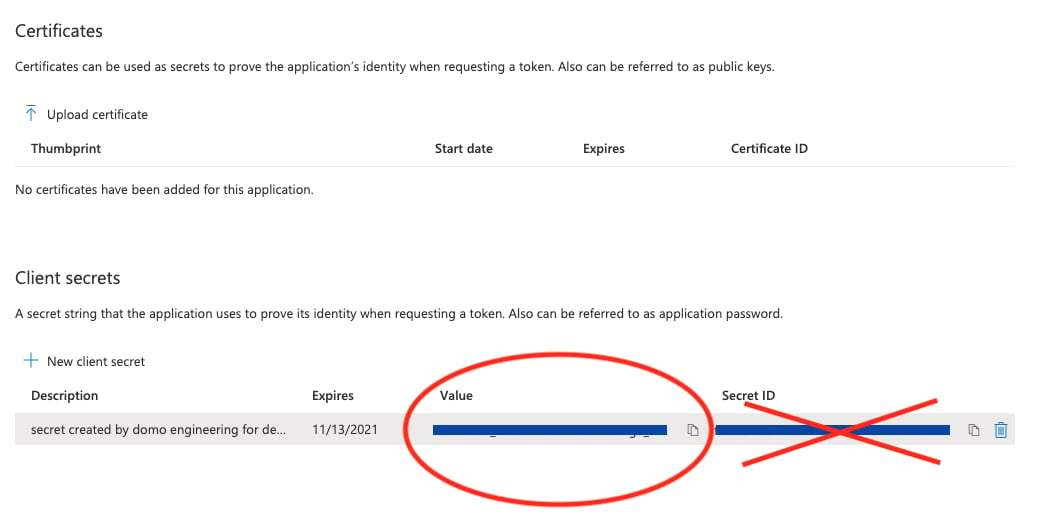
13. Select **Certificates & Secrets** under Manage. Certificates can be used as secrets to prove the application’s identity when requesting a token. Also, can be referred to as public keys.

14. Select the + **New client secret** button.

15. Enter a value in Description, select a suitable option for Expires and click **Add**.
    <Warning>
      **Important:** Ensure to copy the client secret Value (not the Secret ID) before leaving the page. It's not displayed again after you leave this page.
    </Warning>

    <Frame>
      <img alt="Secret_Value_selection.png" src="https://mintcdn.com/domoinc-openapi-sync-dataflows/blcgkVgnZv6gj_XY/images/kb/ka05w00000123QC-00N5w00000Ri7BU-0EM5w000005vO9g.png?fit=max&auto=format&n=blcgkVgnZv6gj_XY&q=85&s=2f8d837ac4eec7ddcebe55ff4923cbac" width="1047" height="521" data-path="images/kb/ka05w00000123QC-00N5w00000Ri7BU-0EM5w000005vO9g.png" />
    </Frame>

16. Go to Domo Connector and use the Client ID and Secret to connect.

## Configuring the Connection

This section enumerates the options in the **Credentials** and **Details** panes in the Microsoft OneDrive Writeback Connector page. The components of the other panes in this page, **Scheduling** and **Name & Describe Your DataSet**, are universal across most connector types and are discussed in greater length in [Adding a DataSet Using a Data Connector](/s/article/360042926274 "Adding a DataSet Using a Data Connector").

### Credentials Pane

This pane contains fields for entering credentials to connect to your Domo developer account. The following table describes what is needed for each field:

<table border="1" cellpadding="1" cellspacing="1" data-aura-rendered-by="33:195;a"><thead><tr><th colspan="1" rowspan="1"><p><span class="s1"> Field </span></p></th><th colspan="1" rowspan="1"><p><span class="s1"> Description </span></p></th></tr></thead><tbody><tr><td colspan="1" rowspan="1"><p> OneDrive App Client ID </p></td><td colspan="1" rowspan="1"><p> Enter the client ID associated with your registered OneDrive app. </p></td></tr><tr><td colspan="1" rowspan="1"><p> OneDrive App Client Secret </p></td><td colspan="1" rowspan="1"><p> Enter the client secret associated with your registered OneDrive app. </p></td></tr><tr><td colspan="1" rowspan="1"><p> Domo Client ID </p></td><td colspan="1" rowspan="1"><p> Enter your client ID associated with your Domo Developer account. </p></td></tr><tr><td colspan="1" rowspan="1"><p> Domo Client Secret </p></td><td colspan="1" rowspan="1"> Enter your client secret associated with your Domo Developer account. </td></tr></tbody></table>

Once you have entered valid credentials, you can use the same account any time you go to set up a new Domo-OneDrive connection. You can manage connector accounts in the **Accounts** tab in the Data Center. For more information about this tab, see [Managing User Accounts for Connectors](/s/article/360042926054 "Managing User Accounts for Connectors").

### Details Pane

This pane contains a number of fields for specifying your data and indicating where it's going.

<table border="1" cellpadding="1" cellspacing="1" data-aura-rendered-by="33:195;a"><thead><tr><th colspan="1" rowspan="1"><p> Menu </p></th><th colspan="1" rowspan="1"><p> Description </p></th></tr></thead><tbody><tr><td colspan="1" rowspan="1"><p> Input DataSet ID </p></td><td colspan="1" rowspan="1"><p> Enter the DataSet ID (GUID) for the DataSet you want to copy to a OneDrive folder or workspace. You can find the ID by opening the details view for the DataSet in the Data Center and looking at the portion of the URL following <span class="mt-font-courier-new"> datasources/ </span>. </p><p> For example, in the URL <span class="mt-font-courier-new"><span class="nowiki"><a href="https://mycompany.domo.com/datasources/845305d8-da3d-4107-a9d6-13ef3f86d4a4/details/overview" rel="noopener" target="_blank"> [https://mycompany.domo.com/datasources/845305d8-da3d-4107-a9d6-13ef3f86d4a4/details/overview](https://mycompany.domo.com/datasources/845305d8-da3d-4107-a9d6-13ef3f86d4a4/details/overview) </a></span></span>, the DataSet ID is <span class="mt-font-courier-new"> 845305d8-da3d-4107-a9d6-13ef3f86d4a4. </span></p></td></tr><tr><td colspan="1" rowspan="1"><p> Enter Folder Path </p></td><td colspan="1" rowspan="1"><p><span> Enter complete folder path (not case-sensitive) in which you want to writeback data. If you leave this blank, data will be written back into the root folder. </span></p><p><span> Example: <b> Test/Test1/Test2/ </b> will writeback data into Test2 folder in onedrive. </span></p></td></tr><tr><td colspan="1" rowspan="1"><p> Select Filename </p></td><td colspan="1" rowspan="1"><p> Select how you want to choose the file where data will be copied. </p><ul><li><p><b><b> Use Input DataSet GUID </b></b>. The filename will be the number you entered for <b><b> Domo DataSet ID </b></b>. </p></li><li><p><b><b> Use Input DataSet Name </b></b>. The filename will be the same as that of the input DataSet. </p></li><li><p><b><b> Enter File Name </b></b>. You will give the file a custom name in the <b><b> File Name </b></b> field. </p></li></ul></td></tr><tr><td colspan="1" rowspan="1"><p> Filename </p></td><td colspan="1" rowspan="1"><p><span> Enter output file name. </span></p><p><span> If you wish to add current date to the file name please use the macro \<current\_date> or \<current\_date-1>. Example: If fileName is <b> domo\_current\_date </b>. Output file generated in Onedrive would be domo\_(todays date in format yyyy-MM-dd) like domo\_2019-07-16. </span></p></td></tr><tr><td colspan="1" rowspan="1"><p> Select File Encoding </p></td><td colspan="1" rowspan="1"><span> Select the encoding with which the file is to be written back to Onedrive. If no encoding is selected, the file is written back in UTF-8 encoding. </span></td></tr></tbody></table>

### Other Panes

For information about the remaining sections of the connector interface, including how to configure scheduling, retry, and update options, see [Adding a DataSet Using a Data Connector](/s/article/360042926274 "Adding a DataSet Using a Data Connector").
