> ## Documentation Index
> Fetch the complete documentation index at: https://domoinc-openapi-sync-dataflows.mintlify.site/llms.txt
> Use this file to discover all available pages before exploring further.

# Google BigQuery Writeback Connector

## Intro

Google BigQuery is a cloud-based big data analytics web service for processing very large read-only datasets. Use this connector to export your data from a Domo DataSet into a BigQuery table. To learn more about the BigQuery API, go to [https://cloud.google.com/bigquery/docs/reference/v2/](https://cloud.google.com/bigquery/docs/reference/v2/ "https://cloud.google.com/bigquery/docs/reference/v2/").

You export data to BigQuery in the Data Center. This topic discusses the fields and menus that are specific to the BigQuery Writeback connector user interface. General information for adding DataSets, setting update schedules, and editing DataSet information is discussed in [Adding a DataSet Using a Connector](https://domo-support.domo.com/s/article/360042926274?language=en_US "Adding a DataSet Using a Connector").

<Note>
  **Note:** The owner of a writeback dataset must also be an owner or co-owner of the input dataset.
</Note>

## Prerequisites

To configure this connector, you will need the following:

* A Domo Client ID and Client Secret.
* A Google Service Token JSON file.

The following subsections explain in detail how to obtain the above credentials.

### Creating a Domo Client ID and Client Secret

Please refer to [Creating a Developer Client and Auth Token](/s/article/000005240#create-api-clients) for instructions on how to get your Client ID and Secret.

### Obtaining a Service Token JSON File

To obtain a Google Service Token JSON file, do the following:

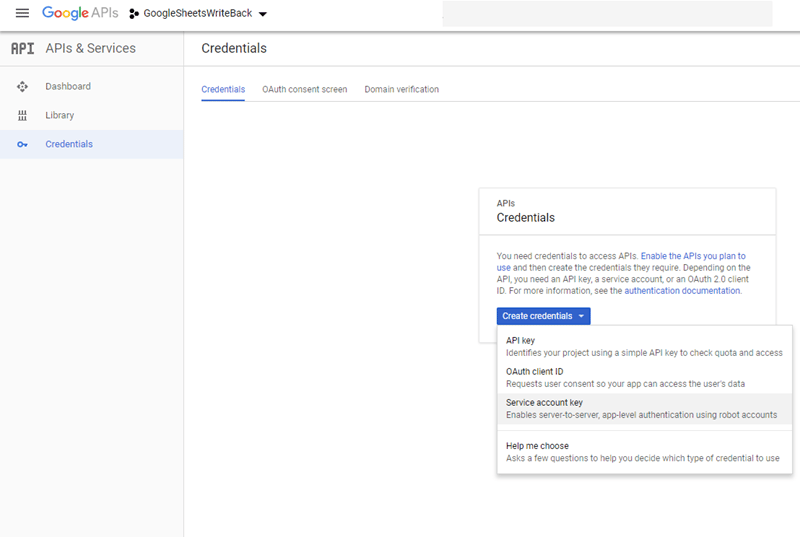
1. In the Google Developers Console, open the **Credentials** tab.

2. Click **Create credentials** then select **Service account key**.

   <Frame>
     <img alt="googlesheets_writeback_5.png" src="https://mintcdn.com/domoinc-openapi-sync-dataflows/blcgkVgnZv6gj_XY/images/kb/ka05w00000123QW-00N5w00000Ri7BU-0EM5w000005vOAJ.png?fit=max&auto=format&n=blcgkVgnZv6gj_XY&q=85&s=4f1f8ff66904b3dda13783fc66ef02a2" width="800" height="537" data-path="images/kb/ka05w00000123QW-00N5w00000Ri7BU-0EM5w000005vOAJ.png" />
   </Frame>

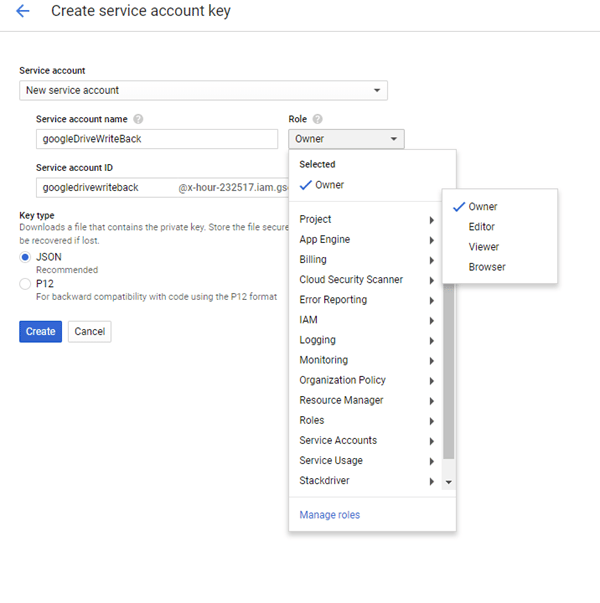
3. Select **New service account**.

4. Name the new service account.

5. In the **Role** dropdown, select **Project > Owner**.

6. For the **Key type**, select **JSON**.
   <Frame>
     <img alt="googledrive_writeback_2.png" src="https://mintcdn.com/domoinc-openapi-sync-dataflows/blcgkVgnZv6gj_XY/images/kb/ka05w00000123QW-00N5w00000Ri7BU-0EM5w000005vOAH.png?fit=max&auto=format&n=blcgkVgnZv6gj_XY&q=85&s=185c0264e3a4d27502c4560622c8563f" width="600" height="603" data-path="images/kb/ka05w00000123QW-00N5w00000Ri7BU-0EM5w000005vOAH.png" />
   </Frame>

7. Click **Create**, then **Save**.

8. Select a safe location for the file, as you will need it soon.

## Configuring the Connection

This section enumerates the options in the **Credentials** and **Details** panes in the Google BigQuery Writeback Connector page. The components of the other panes in this page, **Scheduling** and **Name & Describe Your DataSet**, are universal across most connector types and are discussed in greater length in [Adding a DataSet Using a Connector](https://domo-support.domo.com/s/article/360042926274?language=en_US "Adding a DataSet Using a Connector").

### Credentials Pane

This pane contains fields for entering credentials to connect to your Domo developer account as well as your destination table in BigQuery. The following table describes what is needed for each field:

<table border="1" cellpadding="1" cellspacing="1" data-aura-rendered-by="33:195;a"><thead><tr><th colspan="1" rowspan="1"><p><span class="s1"> Field </span></p></th><th colspan="1" rowspan="1"><p><span class="s1"> Description </span></p></th></tr></thead><tbody><tr><td colspan="1" rowspan="1"><p> Domo Client ID </p></td><td colspan="1" rowspan="1"><p> Paste the Domo client ID you copied in Step 4: Creating a Domo Client ID and Client Secret, in the "Prerequisites" section above. </p></td></tr><tr><td colspan="1" rowspan="1"><p> Domo Client Secret </p></td><td colspan="1" rowspan="1"> Paste the Domo client secret you copied in Step 4: Creating a Domo Client ID and Client Secret, in the "Prerequisites" section above. </td></tr><tr><td colspan="1" rowspan="1"><p> Service Token JSON </p></td><td colspan="1" rowspan="1"><p> Paste the JSON Service Token you generated in Step 3: Creating a Service Account, in the "Prerequisites," above. </p></td></tr></tbody></table>

Once you have entered valid credentials, you can use the same account any time you go to set up a new Domo-Google BigQuery connection. You can manage connector accounts in the **Accounts** tab in the Data Center. For more information about this tab, see [Manage Connector/Adapter Accounts](https://domo-support.domo.com/s/article/360042926054?language=en_US "Manage Connector/Adapter Accounts").

### Details Pane

This pane contains a number of fields for specifying your data and indicating where it's going.

<table border="1" cellpadding="1" cellspacing="1" data-aura-rendered-by="33:195;a"><thead><tr><th colspan="1" rowspan="1"><p> Menu </p></th><th colspan="1" rowspan="1"><p> Description </p></th></tr></thead><tbody><tr><td colspan="1" rowspan="1"><p> Input BigQuery Table Name </p></td><td colspan="1" rowspan="1"><p> Enter the name of the BigQuery table you want to send Domo data to. The table you indicate will be deleted and recreated with each run. </p></td></tr><tr><td colspan="1" rowspan="1"><p> Input BigQuery DataSet Name </p></td><td colspan="1" rowspan="1"><p> Enter the name of the BigQuery dataset in which the table is found. </p></td></tr><tr><td colspan="1" rowspan="1"><p> Input Domo DataSet ID </p></td><td colspan="1" rowspan="1"><p> Enter the DataSet ID (GUID) for the DataSet you want to copy to a BigQuery table. You can find the ID by opening the details view for the DataSet in the Data Center and looking at the portion of the URL following <span class="mt-font-courier-new"> datasources/ </span>. For example, in the URL <span class="mt-font-courier-new"><span class="nowiki"><a href="https://mycompany.domo.com/datasources/845305d8-da3d-4107-a9d6-13ef3f86d4a4/details/overview" rel="noopener" target="_blank"> [https://mycompany.domo.com/datasources/845305d8-da3d-4107-a9d6-13ef3f86d4a4/details/overview](https://mycompany.domo.com/datasources/845305d8-da3d-4107-a9d6-13ef3f86d4a4/details/overview) </a></span></span>, the DataSet ID is <span class="mt-font-courier-new"> 845305d8-da3d-4107-a9d6-13ef3f86d4a4. </span></p></td></tr><tr><td colspan="1" rowspan="1"><p> Use BigDecimal (checkbox) </p></td><td colspan="1" rowspan="1"><p> Select this checkbox to use BigDecimal for all numeric values. This option is useful for preserving precision when working with large numbers. Select this option if your data contains numbers with more than 9 decimal places. </p></td></tr><tr><td colspan="1" rowspan="1"><p> Keep Special Characters in Headers (checkbox) </p></td><td colspan="1" rowspan="1"><p> Select this checkbox to keep Special Characters in headers. If this option is not selected and headers of columns contains special characters then these will get replaced with underscore in the generated BigQuery Table. </p></td></tr></tbody></table>

### Other Panes

For information about the remaining sections of the connector interface, including how to configure scheduling, retry, and update options, see [Adding a DataSet Using a Connector](https://domo-support.domo.com/s/article/360042926274?language=en_US "Adding a DataSet Using a Connector").
