> ## Documentation Index
> Fetch the complete documentation index at: https://domoinc-openapi-sync-dataflows.mintlify.site/llms.txt
> Use this file to discover all available pages before exploring further.

# Amazon S3 Advanced Connector

## Intro

Amazon S3 is an online file storage web service offered by Amazon Web Services that you can use to store and retrieve any amount of data, at any time, from anywhere on the web. To learn more about the Amazon S3 API, visit their page ([http://docs.aws.amazon.com/AmazonS3/...I/Welcome.html](http://docs.aws.amazon.com/AmazonS3/latest/API/Welcome.html "http://docs.aws.amazon.com/AmazonS3/latest/API/Welcome.html") ).

The Amazon S3 and Amazon S3 Advanced connectors are almost the same. The only difference is in how they handle multiple files that begin with the prefix string you provide in the **Details** section of the connector. The standard Amazon S3 connector will only import the latest modified file. The Amazon S3 Advanced connector will import all files with the provided prefix, assuming they all have the same schema. However, the Amazon S3 Advanced connector will only get files modified since the last run or new files after the first run. For information about the standard version of the connector, see [Amazon S3 Connector](/s/article/360043436393 "Amazon S3 Connector").

The Amazon S3 Advanced connector is a "File" connector, meaning it retrieves files and outputs them to Domo. In the Data Center, you can access the connector page for this and other File connectors by clicking **File** in the toolbar at the top of the window.

You connect to your Amazon S3 account in the Data Center. This topic discusses the fields and menus that are specific to the Amazon S3 Advanced connector user interface. General information for adding DataSets, setting update schedules, and editing DataSet information is discussed in [Adding a DataSet Using a Connector](https://domo-support.domo.com/s/article/360042926274?language=en_US "Adding a DataSet Using a Connector").

<table class="mt-responsive-table" data-aura-rendered-by="33:195;a"><tbody><tr><td class="mt-noheading" colspan="1" rowspan="1"><p><b> Primary Use Cases </b></p></td><td class="mt-noheading" colspan="1" rowspan="1"><p> This connector is an excellent choice for retrieving flat files when APIs are not an option. </p></td></tr><tr><td class="mt-noheading" colspan="1" rowspan="1"><p><b> Primary Metrics </b></p></td><td class="mt-noheading" colspan="1" rowspan="1"><p> N/A </p></td></tr><tr><td class="mt-noheading" colspan="1" rowspan="1"><p><b> Primary Company Roles </b></p></td><td class="mt-noheading" colspan="1" rowspan="1"><ul><li> Data specialists </li><li> Marketing roles </li><li> Finance roles </li><li> Anyone who has data stored in S3 </li></ul></td></tr><tr><td class="mt-noheading" colspan="1" rowspan="1"><p><b> Average Implementation Time </b></p></td><td class="mt-noheading" colspan="1" rowspan="1"><p> Less than an hour if you have the correct file types in S3. </p></td></tr><tr><td class="mt-noheading" colspan="1" rowspan="1"><p><b> Ease of Use (on a 1-to-10 scale with 1 being easiest) </b></p></td><td class="mt-noheading" colspan="1" rowspan="1"><p> 4 </p></td></tr></tbody></table>

## Best Practices

Understanding the data stored in S3 and its relation to other S3 databases will be a huge asset in using this connector.

## Prerequisites

To connect to your Amazon S3 account and create a DataSet, you must have the following:

* Your AWS access key. You can find this in the
  **Security Credentials** section of the AWS Console. Alternatively, if you are using IAM, you can find it under **Users**.
* Your AWS secret key, which was provided when you created your access key. You can generate a new secret key in the AWS Console.
* The name of the AWS S3 Bucket you want to retrieve files from.

### Creating a User with the Proper Permissions

You must create a user with the proper permissions in the IAM Amazon Console before you can connect to S3 data in Domo.

**To configure your user in the IAM Amazon Console,**

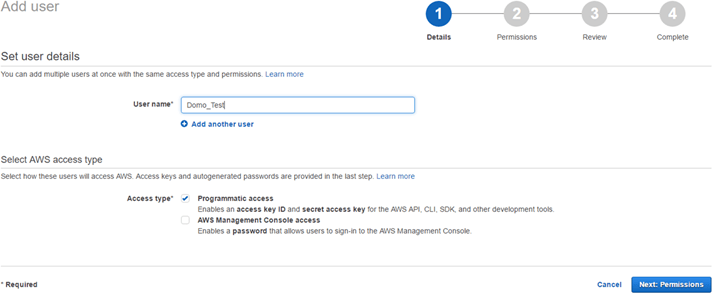
1. Add a new user, setting options as follows:

   1. In the
      **Details** pane, check the box for **Programmatic Access** under **Select AWS access type**.

      <Frame>
        <img alt="" src="https://mintcdn.com/domoinc-openapi-sync-dataflows/blcgkVgnZv6gj_XY/images/kb/ka05w00000123KN-00N5w00000Ri7BU-0EM5w000005vO5B.png?fit=max&auto=format&n=blcgkVgnZv6gj_XY&q=85&s=55e8dda2b9fc6ba60995aa40a79916ff" width="712" height="293" data-path="images/kb/ka05w00000123KN-00N5w00000Ri7BU-0EM5w000005vO5B.png" />
      </Frame>

   2. In the
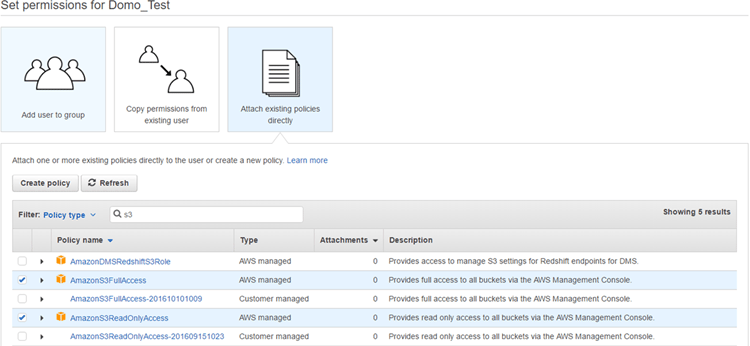
      **Permissions** pane, select **Attach existing policies directly**, then check the box for either **AmazonS3FullAccess** or **AmazonS3ReadOnlyAccess**.

      Customer-managed policies *do not work*.
      <Frame>
        <img alt="" src="https://mintcdn.com/domoinc-openapi-sync-dataflows/blcgkVgnZv6gj_XY/images/kb/ka05w00000123KN-00N5w00000Ri7BU-0EM5w000005vO5G.png?fit=max&auto=format&n=blcgkVgnZv6gj_XY&q=85&s=e069e890c14b1a9ad44836f9c4c686f8" width="750" height="346" data-path="images/kb/ka05w00000123KN-00N5w00000Ri7BU-0EM5w000005vO5G.png" />
      </Frame>

   3. In the
      **Review** pane, click **Create User**.
2. After you create your user, copy the access and secret keys to use in the
   **Credentials** pane in Domo.

## Connecting to Your Amazon S3 Account

This section enumerates the options in the **Credentials** and **Details** panes in the Amazon S3 Advanced Connector page. The components of the other panes on this page, **Scheduling,** and **Name & Describe Your DataSet**, are universal across most connector types and are discussed in greater length in [Adding a DataSet Using a Connector](https://domo-support.domo.com/s/article/360042926274?language=en_US "Adding a DataSet Using a Connector").

### Credentials Pane

This pane contains fields for entering credentials to connect to your Amazon S3 account. The following table describes what is needed for each field:

<table border="1" cellpadding="1" cellspacing="1" data-aura-rendered-by="33:195;a"><thead><tr><th colspan="1" rowspan="1"><p><span class="s1"> Field </span></p></th><th colspan="1" rowspan="1"><p><span class="s1"> Description </span></p></th></tr></thead><tbody><tr><td colspan="1" rowspan="1"><p> Access Key </p></td><td colspan="1" rowspan="1"><p> Enter your AWS access key. For information about finding your access key, see "Prerequisites," above. </p></td></tr><tr><td colspan="1" rowspan="1"><p> Secret Key </p></td><td colspan="1" rowspan="1"><p> Enter your AWS secret key. For information about finding your secret key, see "Prerequisites," above. </p></td></tr><tr><td colspan="1" rowspan="1"><p> Bucket </p></td><td colspan="1" rowspan="1"><p> Enter the Amazon S3 Bucket you want to pull files from. </p></td></tr><tr><td colspan="1" rowspan="1"><p> Region </p></td><td colspan="1" rowspan="1"><p> Select the desired Amazon S3 Bucket region. </p></td></tr></tbody></table>

Once you have entered valid Amazon S3 credentials, you can use the same account any time you go to create a new Amazon S3 Advanced DataSet. You can manage connector accounts in the **Accounts** tab in the Data Center. For more information about this tab, see [Manage Connector/Adapter Accounts](https://domo-support.domo.com/s/article/360042926054?language=en_US "Manage Connector/Adapter Accounts").

### Details Pane

This pane contains various menus for locating and configuring the file you want to pull into Domo.

<table border="1" cellpadding="1" cellspacing="1" data-aura-rendered-by="33:195;a"><thead><tr><th colspan="1" rowspan="1"><p> Menu </p></th><th colspan="1" rowspan="1"><p> Description </p></th></tr></thead><tbody><tr><td colspan="1" rowspan="1"><p> File Type to Import </p></td><td colspan="1" rowspan="1"><p> Select the type of file you want to import into Domo, either CSV, JSON, or XML. </p></td></tr><tr><td colspan="1" rowspan="1"><p> How Would You Like to Choose Your Filename? </p></td><td colspan="1" rowspan="1"><p> Select how you want Domo to identify your file. Options are as follows: </p><table border="1" cellpadding="1" cellspacing="1" class="mt-responsive-table"><tbody><tr><td class="mt-noheading" colspan="1" rowspan="1"><p> Complete Filename </p></td><td class="mt-noheading" colspan="1" rowspan="1"><p> You enter the complete path to the file. </p></td></tr><tr><td class="mt-noheading" colspan="1" rowspan="1"><p> Partial Filename </p></td><td class="mt-noheading" colspan="1" rowspan="1"><p> You enter a partial file name and specify whether the file to retrieve starts with or contains the name you have entered. </p></td></tr><tr><td class="mt-noheading" colspan="1" rowspan="1"><p> FilesDiscovery </p></td><td class="mt-noheading" colspan="1" rowspan="1"><p> A list of files in the selected bucket appears and you choose the one you want. This option is available <em> only </em> when your selected S3 bucket contains fewer than 100 files. </p></td></tr></tbody></table></td></tr><tr><td colspan="1" rowspan="1"><p> Prefix (Optional) </p></td><td colspan="1" rowspan="1"><p> Enter a prefix to filter results by. A prefix limits results to only those keys that begin with the given prefix. Note that this advanced version of the S3 connector imports <em> all </em> files with the provided prefix, assuming they all have the same schema. </p></td></tr><tr><td colspan="1" rowspan="1"><p> Enter Complete Filepath </p></td><td colspan="1" rowspan="1"><p> Enter the complete path for the desired file. </p></td></tr><tr><td colspan="1" rowspan="1"><p> File Name </p></td><td colspan="1" rowspan="1"><p> Enter the name of the file you want to import, with or without the file path. For example: <span class="mt-font-courier-new"><em> folder\_name/file\_name </em></span></p></td></tr><tr><td colspan="1" rowspan="1"><p> File Name Match Type </p></td><td colspan="1" rowspan="1"><p> Specify whether the file you want to retrieve starts with or contains the text you entered under <b> File Name </b>. </p></td></tr><tr><td colspan="1" rowspan="1"><p> File Compression Type </p></td><td colspan="1" rowspan="1"><p> Select the compression type for the file you want to retrieve. If the file is not compressed, select <b> None </b>. </p></td></tr><tr><td colspan="1" rowspan="1"><p> File Encoding </p></td><td colspan="1" rowspan="1"><p> This field appears only for txt, tsv, or csv file types. </p><p> Select file encoding <b>. </b> UTF-8 is the default encoding. </p></td></tr><tr><td colspan="1" rowspan="1"><p> Are Headers Present in CSV File? </p></td><td colspan="1" rowspan="1"><p> Select <b> Yes </b> if the CSV file you are importing contains headers; otherwise, select <b> No </b>. </p></td></tr><tr><td colspan="1" rowspan="1"><p> Date Columns and Formats </p></td><td colspan="1" rowspan="1"><p> Enter the desired date column names and their respective formats as specified below, in the same order they exist in the file. <br /> Example: columnName1:dateFormat1,columnName2:dateFormat2 <br /> columnName1:dd-MM-yyyy,columnName2:MM-dd-yyyy </p></td></tr><tr><td colspan="1" rowspan="1"><p> Convert Data Type of Columns Containing Leading 0's to String </p></td><td colspan="1" rowspan="1"><p> Select this checkbox, if you want to convert the data type of the columns which contain leading 0's to String. If this checkbox is not selected, then the leading 0's will be truncated from the columns and the data type will be updated to new data type. </p></td></tr><tr><td colspan="1" rowspan="1"><p> Enable filtering for Newly Created & Updated S3 Objects when using the Merge/Upsert Update Mode </p></td><td colspan="1" rowspan="1"><p> Select this checkbox to get the files modified/updated/created since the last run. </p></td></tr><tr><td colspan="1" rowspan="1"><p> List of Files </p></td><td colspan="1" rowspan="1"><p> Select the file you want to retrieve. </p></td></tr><tr><td colspan="1" rowspan="1"><p> Select the Delimiting Character </p></td><td colspan="1" rowspan="1"><p> Select the delimiter used in the CSV file you want to retrieve. If your delimiter is not listed, select <b> Other </b>. </p></td></tr><tr><td colspan="1" rowspan="1"><p> Quote Character </p></td><td colspan="1" rowspan="1"><p> Select a quote character to parse the CSV file you want to retrieve. A double quote (") is the CSV standard. </p></td></tr><tr><td colspan="1" rowspan="1"><p> Escape Character </p></td><td colspan="1" rowspan="1"><p> Select an escape character to parse the CSV file you want to retrieve. A backslash () is the CSV standard. </p></td></tr><tr><td colspan="1" rowspan="1"><p> Enable Parsing for Large JSON Files? </p></td><td colspan="1" rowspan="1"><p> Specify whether parsing is enabled for large JSON files. </p></td></tr><tr><td colspan="1" rowspan="1"><p> Does Your JSON Text Require a Line Reader? </p></td><td colspan="1" rowspan="1"><p> Specify whether the text in your JSON file includes multiple lines that should be read. </p></td></tr><tr><td colspan="1" rowspan="1"><p> Should the Backslash be Escaped? </p></td><td colspan="1" rowspan="1"><p> Specify whether the text in your JSON file contains backslash characters that should be escaped. </p></td></tr><tr><td colspan="1" rowspan="1"><p> Enter Your Data Tag </p></td><td colspan="1" rowspan="1"><p> Enter the tag for the data in your JSON or XML file. </p></td></tr><tr><td colspan="1" rowspan="1"><p> Enter Fields to Exclude </p></td><td colspan="1" rowspan="1"><p> Provide a comma-separated list of fields to exclude in your JSON/XML import. </p></td></tr><tr><td colspan="1" rowspan="1"><p> Enter Your Header Tag </p></td><td colspan="1" rowspan="1"><p> Enter the tag for the header in your JSON or XML file. </p></td></tr><tr><td colspan="1" rowspan="1"><p> Do You Require Attributes in Data? </p></td><td colspan="1" rowspan="1"><p> Specify whether you require attributes values as part of your XML data. </p></td></tr><tr><td colspan="1" rowspan="1"><p> Enter XPath Expression </p></td><td colspan="1" rowspan="1"><p> Enter your XPath expression. </p></td></tr><tr><td colspan="1" rowspan="1"><p> Is Password Protected? </p></td><td colspan="1" rowspan="1"><p> Select <b> Yes </b> if the file you are retrieving is password-protected; otherwise select <b> No </b>. </p></td></tr><tr><td colspan="1" rowspan="1"><p> Header Start Row </p></td><td colspan="1" rowspan="1"><p> Enter the number of the header row in the Excel file you are retrieving. </p></td></tr><tr><td colspan="1" rowspan="1"><p> Data Start Row </p></td><td colspan="1" rowspan="1"><p> Enter the number of the first data row in the Excel file you are retrieving. </p></td></tr><tr><td colspan="1" rowspan="1"><p> Footer </p></td><td colspan="1" rowspan="1"><p> Enter the number of the footer row in the Excel file you are retrieving. </p></td></tr><tr><td colspan="1" rowspan="1"><p> Blank Rows </p></td><td colspan="1" rowspan="1"><p> Select the action that should be taken if blank rows are encountered. If you select <b> Skip blank rows </b>, any blank rows are skipped; if you select <b> Stop at the first blank column </b>, the data import stops when a column with a blank row is encountered. </p></td></tr><tr><td colspan="1" rowspan="1"><p> Empty Column Headers </p></td><td colspan="1" rowspan="1"><p> Specify what should happen if empty column headers are encountered. If you choose <b> Add blank columns </b>, column names are automatically generated for the new columns. If you select <b> Stop at the first blank column </b>, the data import stops when an empty header is encountered. </p></td></tr></tbody></table>

### Other Panes

For information about the remaining sections of the connector interface, including how to configure scheduling, retry, and update options, see [Adding a DataSet Using a Connector](https://domo-support.domo.com/s/article/360042926274?language=en_US "Adding a DataSet Using a Connector").

## Troubleshooting

* Ensure that the file is present in the S3 bucket and that the correct file type is specified in the connector settings.
* NULL columns
  *must* be removed before the connector can successfully retrieve data.
* If you run into a "Failed to Import Successfully" error when trying to import a CSV file, you can often get around this by changing the option in the
  **Quote Character** menu to **Null Character**.

## FAQ

<AccordionGroup>
  <Accordion title="How frequently will my data update?">
    As often as needed.
  </Accordion>

  <Accordion title="Can I use the same Amazon S3 account to create multiple DataSets?">
    Yes.
  </Accordion>

  <Accordion title="Are there any API limits that I need to be aware of?">
    You may encounter a limit of 100 Amazon S3 buckets per account.
  </Accordion>

  <Accordion title="Why is the connector unable to pull the data?">
    Ensure that the file is present in the S3 bucket and specify the correct file type in the connector settings. Also, remove null columns to allow the connector to retrieve the data.
  </Accordion>

  <Accordion title="What's the difference between the standard Amazon S3 connector and the advanced version?">
    The Amazon S3 connector and the Amazon S3 Advanced connector both use the same SDK. They differ in how they handle multiple files.

    If your Amazon S3 bucket contains multiple files that begin with the prefix string you provide in the Details section of the connector, the Amazon S3 connector will only import the latest modified file. The Amazon S3 Advanced connector will import all files with the provided prefix, assuming they all have the same schema.
  </Accordion>

  <Accordion title="How do I import all the files in my S3 subdirectory using Amazon S3 Advanced connector?">
    The Amazon S3 Advanced connector can be used to import multiple files if,

    1. All the files have the same prefix.
    2. All the files share a common string in their name, such as the extension.

    To set up the connector to ingest all files in a subdirectory, do the following:

    1. If you have not previously done this, create an S3 Advanced Connector Account for the bucket that contains the files.
    2. Select the files types to be imported. All files must be of the same type.
    3. In the
       **Prefix** field, enter the prefix for the files. The prefix is the subdirectory where the files reside. You don't have to include leading and lagging slashes.
    4. In the
       **File Name** field, enter the extension for the files, for example,.csv or.txt.
    5. When you enter a value in the
       **File Name** field, the **File Name Match Type** option appears.
    6. From the options, select
       **File name contains the specified string**.
    7. Select the remaining options in the connector, when they relate to the format of the files you are trying to ingest.

    **Note:** The connector looks for any files that have been created or modified since the last run of the connector and fits the criteria entered in steps 2 - 6. The connector will not reimport a file that has not updated since the last time the connector ran.
  </Accordion>
</AccordionGroup>