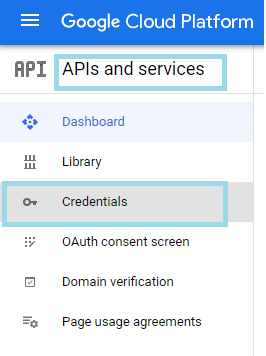
 3. Click Create
**Credentials > Service account**.
3. Click Create
**Credentials > Service account**.
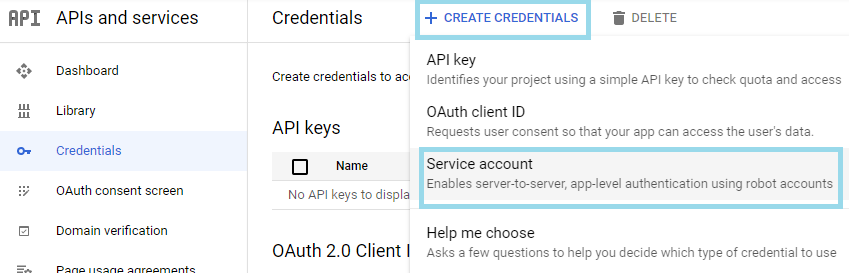 4. In the Create service account pane, enter a name and description for the service account, and click
**Create and continue**.
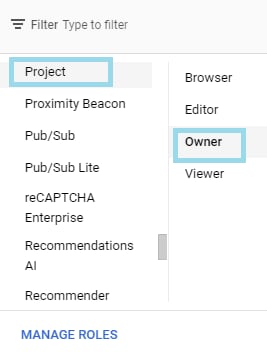
5. In the
**Grant this service account access to the project** section, select **Project > Owner** from the **Select a role** dropdown.
4. In the Create service account pane, enter a name and description for the service account, and click
**Create and continue**.
5. In the
**Grant this service account access to the project** section, select **Project > Owner** from the **Select a role** dropdown.
 6. Click
**Done**.
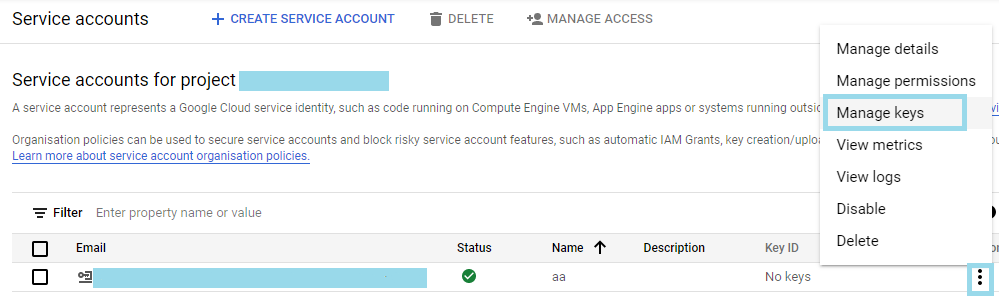
7. To create a new JSON key, in the
**Service accounts** pane, click the three dots (expansion menu) and select **Manage keys**.
6. Click
**Done**.
7. To create a new JSON key, in the
**Service accounts** pane, click the three dots (expansion menu) and select **Manage keys**.
 8. In the
**Keys** section, click **Add Key > Create new key**.
8. In the
**Keys** section, click **Add Key > Create new key**.
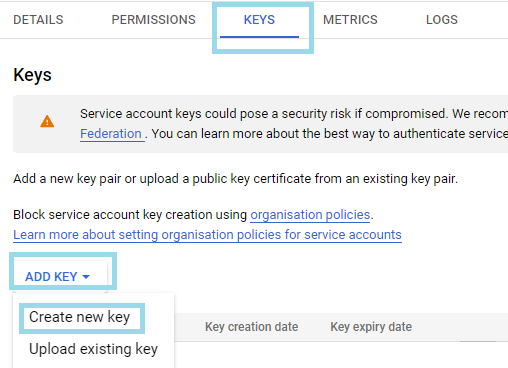 9. Select
**JSON** as the key type and click **Create**.
9. Select
**JSON** as the key type and click **Create**.
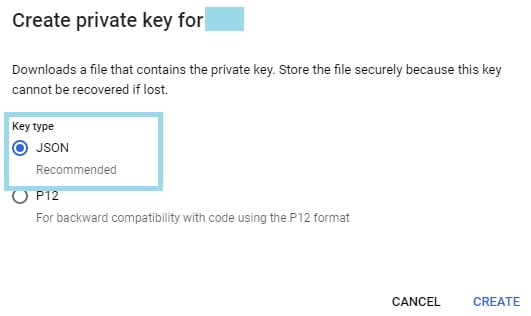 10. Click
**Create**.
A private key will be saved to your computer.
#### To Enable domain-wide delegation to the service key
1. Locate the newly-created service account in the table. Under **Actions**, click the three dots (expansion menu) and click **Manage Details**.
2. In the service account details, click and expand **Show domain-wide delegation**, then ensure the **Enable Google Workspace Domain-wide Delegation** checkbox is checked.
10. Click
**Create**.
A private key will be saved to your computer.
#### To Enable domain-wide delegation to the service key
1. Locate the newly-created service account in the table. Under **Actions**, click the three dots (expansion menu) and click **Manage Details**.
2. In the service account details, click and expand **Show domain-wide delegation**, then ensure the **Enable Google Workspace Domain-wide Delegation** checkbox is checked.
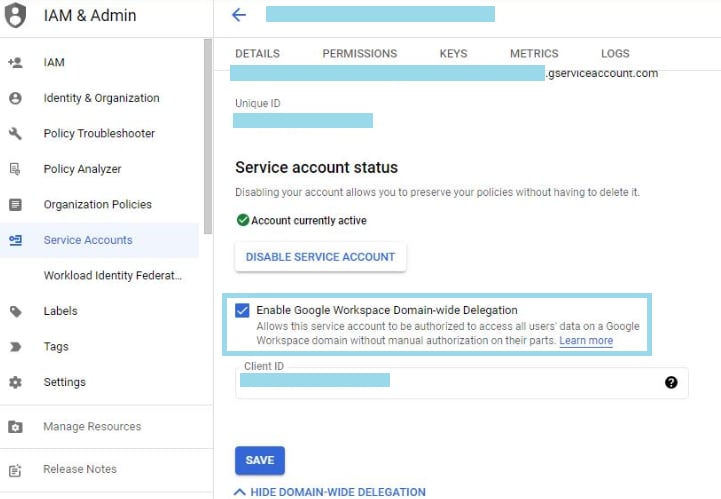 3. Click **Save** to update the service account, and return to the table of service accounts. A new column, **Domain-wide delegation**, can be seen.
4. Click **View Client ID**, to obtain and make a note of the client ID.
#### To delegate domain-wide authority to your service account
To access user data on a Google Workspace domain, the service account that you created needs to be granted access by a super administrator for the domain. For more information about domain-wide delegation, see [Control Google Workspace API access with domain-wide delegation](https://support.google.com/a/answer/162106?hl=en "Control Google Workspace API access with domain-wide delegation").
1. From your Google Workspace domain’s
[Admin console](https://accounts.google.com/ServiceLogin/webreauth?continue=https%3A%2F%2Fadmin.google.com%2F\&authuser=0\&passive=3600\&osid=1\&flowName=GlifWebSignIn\&flowEntry=ServiceLogin "Admin console"), go to **Main menu > Security > API controls**.
2. In the
**Domain wide delegation** pane, select **Manage Domain Wide Delegation**.
3. Click
**Add new**.
3. Click **Save** to update the service account, and return to the table of service accounts. A new column, **Domain-wide delegation**, can be seen.
4. Click **View Client ID**, to obtain and make a note of the client ID.
#### To delegate domain-wide authority to your service account
To access user data on a Google Workspace domain, the service account that you created needs to be granted access by a super administrator for the domain. For more information about domain-wide delegation, see [Control Google Workspace API access with domain-wide delegation](https://support.google.com/a/answer/162106?hl=en "Control Google Workspace API access with domain-wide delegation").
1. From your Google Workspace domain’s
[Admin console](https://accounts.google.com/ServiceLogin/webreauth?continue=https%3A%2F%2Fadmin.google.com%2F\&authuser=0\&passive=3600\&osid=1\&flowName=GlifWebSignIn\&flowEntry=ServiceLogin "Admin console"), go to **Main menu > Security > API controls**.
2. In the
**Domain wide delegation** pane, select **Manage Domain Wide Delegation**.
3. Click
**Add new**.
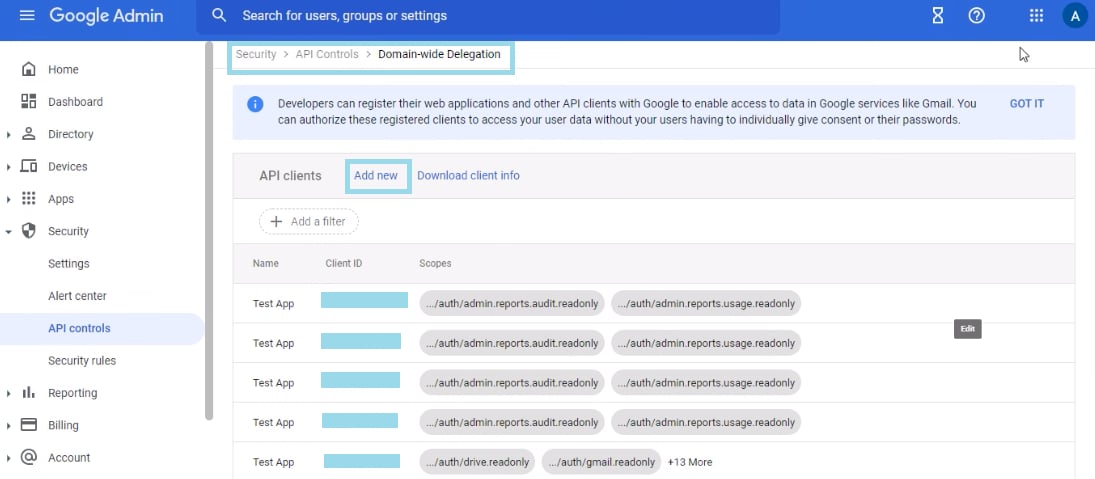 4. In the
**Client ID** field, enter the client ID obtained from the service account creation steps above.
4. In the
**Client ID** field, enter the client ID obtained from the service account creation steps above.
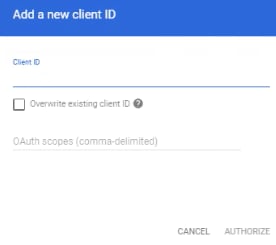 5. In the
**OAuth Scopes** field, enter a comma-delimited list of the scopes required for your application (for a list of possible scopes, see Authorize requests).
For example, if you need domain-wide access to activity reports, enter:
* [https://www.googleapis.com/auth/admin.reports.audit.readonly](https://www.googleapis.com/auth/admin.reports.audit.readonly)
* [https://www.googleapis.com/auth/admin.reports.usage.readonly](https://www.googleapis.com/auth/admin.reports.usage.readonly)
6. Click **Authorize**.
## Connecting to Your Google Admin SDK Reports Account
This section enumerates the options in the **Credentials** and **Details** panes in the Google Admin SDK Reports Connector page. The components of the other panes in this page, **Scheduling** and **Name & Describe Your DataSet,** are universal across most connector types and are discussed in greater length in [Adding a DataSet Using a Data Connector](https://domo-support.domo.com/s/article/360042926274?language=en_US "Adding a DataSet Using a Data Connector").
### Credentials Pane
This pane contains fields for entering credentials to connect to a Google service account. The following table describes what is needed for each field:
5. In the
**OAuth Scopes** field, enter a comma-delimited list of the scopes required for your application (for a list of possible scopes, see Authorize requests).
For example, if you need domain-wide access to activity reports, enter:
* [https://www.googleapis.com/auth/admin.reports.audit.readonly](https://www.googleapis.com/auth/admin.reports.audit.readonly)
* [https://www.googleapis.com/auth/admin.reports.usage.readonly](https://www.googleapis.com/auth/admin.reports.usage.readonly)
6. Click **Authorize**.
## Connecting to Your Google Admin SDK Reports Account
This section enumerates the options in the **Credentials** and **Details** panes in the Google Admin SDK Reports Connector page. The components of the other panes in this page, **Scheduling** and **Name & Describe Your DataSet,** are universal across most connector types and are discussed in greater length in [Adding a DataSet Using a Data Connector](https://domo-support.domo.com/s/article/360042926274?language=en_US "Adding a DataSet Using a Data Connector").
### Credentials Pane
This pane contains fields for entering credentials to connect to a Google service account. The following table describes what is needed for each field:
Field | Description |
|---|---|
Service Account Key JSON | Copy and paste the JSON for your Google service account key. For information about creating a key, see "Prerequisites," above. |
Service Account User | Enter your service account username. Example: [es@xyz.com](mailto:es@xyz.com) |
Menu | Description | ||||||||
|---|---|---|---|---|---|---|---|---|---|
Report | Select the Google Admin SDK Reports report you want to run. The following reports are available:
| ||||||||
Duration | Select whether you want to pull data for a specific date or a date range. | ||||||||
Report Date | Select whether the report data is for a specific date or for a relative number of days back from today. | ||||||||
Select Specific Date | Select the date for the report. | ||||||||
Days Back | Enter the number of past days that should appear in the report. | ||||||||
Start Date | Specify whether the first date in your date range is a specific or relative date. You select the last date in your range in End Date . | ||||||||
End Date | Specify whether the second date in your date range is a specific or relative date. You select the first date in your range in Start Date . | ||||||||
Select Specific Start Date | Select the first date in your date range. | ||||||||
Select Specific End Date | Select the second date in your date range. | ||||||||
Days Back to Start From | Enter the number of the farthest day back that should be represented in the report. Combine with Days Back to End At to create a range of represented days. For example, if you entered 10 for Days Back to Start From and 5 for Days Back to End At , the report would contain data for 10 days ago up until 5 days ago. | ||||||||
Days Back to End At | Enter the number of the most recent day back that should be represented in the report. Combine with Days Back to Start From to create a range of represented days. For example, if you entered 10 for Days Back to Start From and 5 for Days Back to End At , the report would contain data for 10 days ago up until 5 days ago. |