> ## Documentation Index
> Fetch the complete documentation index at: https://domoinc-openapi-sync-dataflows.mintlify.site/llms.txt
> Use this file to discover all available pages before exploring further.

# Xero Connector

## Intro

Xero develops cloud-based accounting software for small- and medium-sized businesses. You can use this connector to retrieve data about bank accounts, transactions, expense claims, contacts, and the like. To establish the connection between Domo and Xero, a user must first authenticate to Xero and then grant Domo permission to access his or her data. To learn more about the Xero API, visit their page ([http://developer.xero.com/documentat.../api-overview/](http://developer.xero.com/documentation/api/api-overview/ "http://developer.xero.com/documentation/api/api-overview/") ).

You connect to your Xero account in the Data Center. This topic discusses the fields and menus that are specific to the Xero connector user interface. General information for adding DataSets, setting update schedules, and editing DataSet information is discussed in [Adding a DataSet Using a Connector](https://domo-support.domo.com/s/article/360042926274?language=en_US "Adding a DataSet Using a Connector").

## Prerequisites

To connect to your Xero account and create a DataSet, you must have the email address and password you use to log into your Xero account.

## Connecting to Your Xero Account

This section enumerates the options in the **Credentials** and **Details** panes in the Xero Connector page. The components of the other panes in this page, **Scheduling** and **Name & Describe Your DataSet,** are universal across most connector types and are discussed in greater length in [Adding a DataSet Using a Connector](https://domo-support.domo.com/s/article/360042926274?language=en_US "Adding a DataSet Using a Connector").

### Credentials Pane

The Domo Xero connector uses OAuth to connect, so there is no need to enter credentials within Domo. Click **Connect** (or select **Add Account** if you have existing Xero accounts in Domo) to open the Xero OAuth screen where you can enter your Xero credentials. Once you have entered valid Xero credentials, you can use the same account any time you go to create a new Xero DataSet. You can manage connector accounts in the **Accounts** tab in the Data Center. For more information about this tab, see [Manage Connector/Adapter Accounts](https://domo-support.domo.com/s/article/360042926054?language=en_US "Manage Connector/Adapter Accounts").

<Warning>
  **Note:** You can only have one Xero account authenticated at a time with a given set of credentials. If you try to use OAuth with Xero anywhere else, it will invalidate your Xero account in Domo.
</Warning>

***

<Note>
  **Note:** If you are already logged into Xero when you connect in Domo, you are authenticated automatically when you click **Add account**. If you want to connect to an account that is different from the one you are logged into, you must first log out of Xero.
</Note>

### Details Pane

This pane contains a primary **Reports** menu, along with various other menus which may or may not appear depending on the report type you select.

<table border="1" cellpadding="1" cellspacing="1" data-aura-rendered-by="33:195;a"><thead><tr><th colspan="1" rowspan="1"><p> Menu </p></th><th colspan="1" rowspan="1"><p> Description </p></th></tr></thead><tbody><tr><td colspan="1" rowspan="1"><p> Report </p></td><td colspan="1" rowspan="1"><p> Select the Xero report you want to run. The following reports are available: </p><table border="1" cellpadding="1" cellspacing="1"><tbody><tr><td colspan="1" rowspan="1"><b> Report Name </b></td><td colspan="1" rowspan="1"><b> Description </b></td></tr><tr><td colspan="1" rowspan="1"> Accounts </td><td colspan="1" rowspan="1"> Returns account information, including ID, name, description, status, type, etc. </td></tr><tr><td colspan="1" rowspan="1"> Aged Payables by Contact </td><td colspan="1" rowspan="1"> Returns aged payables for a specified contact. </td></tr><tr><td colspan="1" rowspan="1"> Aged Receivables by Contact </td><td colspan="1" rowspan="1"> Returns aged receivables for a specified contact. </td></tr><tr><td colspan="1" rowspan="1"> Balance Sheet </td><td colspan="1" rowspan="1"> Returns balance sheet information for the current month. </td></tr><tr><td colspan="1" rowspan="1"> Bank Statement </td><td colspan="1" rowspan="1"> Returns statement lines for a specified bank account. </td></tr><tr><td colspan="1" rowspan="1"> Bank Summary </td><td colspan="1" rowspan="1"> Returns balances and cash movements for all bank accounts. </td></tr><tr><td colspan="1" rowspan="1"> Bank Transactions </td><td colspan="1" rowspan="1"> Returns all spend and receive money transactions. </td></tr><tr><td colspan="1" rowspan="1"> Bank Transfers </td><td colspan="1" rowspan="1"> Returns information about bank transfers. </td></tr><tr><td colspan="1" rowspan="1"> Branding Themes </td><td colspan="1" rowspan="1"> Returns a list of defined branding themes. </td></tr><tr><td colspan="1" rowspan="1"> Budget Summary </td><td colspan="1" rowspan="1"> Returns a monthly budget summary. </td></tr><tr><td colspan="1" rowspan="1"> Contacts </td><td colspan="1" rowspan="1"> Returns information on your contacts, including ID, first and last name, email address, physical address, etc. </td></tr><tr><td colspan="1" rowspan="1"> Credit Notes </td><td colspan="1" rowspan="1"> Returns information about credit notes, including issue date, type, status, etc. </td></tr><tr><td colspan="1" rowspan="1"> Currencies </td><td colspan="1" rowspan="1"> Returns information about currencies used in your account. </td></tr><tr><td colspan="1" rowspan="1"> Employees </td><td colspan="1" rowspan="1"> Returns information about payroll employees, including first and last name, job title, contact information, salary information, etc. </td></tr><tr><td colspan="1" rowspan="1"> Executive Summary </td><td colspan="1" rowspan="1"> Returns a summary that includes monthly totals and common business ratios. </td></tr><tr><td colspan="1" rowspan="1"> Expense Claims </td><td colspan="1" rowspan="1"> Returns submitted expense claims with their status. </td></tr><tr><td colspan="1" rowspan="1"> Invoices </td><td colspan="1" rowspan="1"> Returns invoices, including contact name and ID, invoice date, status, totals and subtotals, amount paid, etc. </td></tr><tr><td colspan="1" rowspan="1"> Items </td><td colspan="1" rowspan="1"> Returns items, including purchase and sales details. </td></tr><tr><td colspan="1" rowspan="1"><p> Journals (deprecated) </p></td><td colspan="1" rowspan="1"> Returns a list of journal entries. Xero no longer supports the functionality of this report, and its accuracy cannot be guaranteed. Use the Journals (Append) report instead. </td></tr><tr><td colspan="1" rowspan="1"><p> Journals (Append) </p></td><td colspan="1" rowspan="1"> Returns a list of journal entries created or modified after the specified date. </td></tr><tr><td colspan="1" rowspan="1"> Manual Journals </td><td colspan="1" rowspan="1"> Returns manual journals, including date, status, URL, etc. </td></tr><tr><td colspan="1" rowspan="1"> Organizations </td><td colspan="1" rowspan="1"> Returns information about organizations, including name, address, business type, tax status, etc. </td></tr><tr><td colspan="1" rowspan="1"> Payments </td><td colspan="1" rowspan="1"> Returns information about payments for invoices and credit notes. </td></tr><tr><td colspan="1" rowspan="1"> Profit and Loss </td><td colspan="1" rowspan="1"> Returns profit and loss information for the current months. </td></tr><tr><td colspan="1" rowspan="1"> Purchase Orders </td><td colspan="1" rowspan="1"> Returns a list of purchase orders. </td></tr><tr><td colspan="1" rowspan="1"> Receipts </td><td colspan="1" rowspan="1"> Returns draft expense claim receipt information, including user, date, totals, tax, etc. </td></tr><tr><td colspan="1" rowspan="1"> Repeating Invoices </td><td colspan="1" rowspan="1"> Returns repeating invoice templates. </td></tr><tr><td colspan="1" rowspan="1"> Tax Rates </td><td colspan="1" rowspan="1"> Returns tax rates, including tax type, status, tax and effective rates, etc. </td></tr><tr><td colspan="1" rowspan="1"> Tracking Categories </td><td colspan="1" rowspan="1"> Returns tracking categories and options. </td></tr><tr><td colspan="1" rowspan="1"> Trial Balance </td><td colspan="1" rowspan="1"> Returns trial balance information, including provider name, report name and date, debit and credit amounts, etc. </td></tr><tr><td colspan="1" rowspan="1"> Users </td><td colspan="1" rowspan="1"> Returns account user information, including ID, first and last name, email address, etc. </td></tr></tbody></table></td></tr><tr><td colspan="1" rowspan="1"><p> Include Tracking Categories </p></td><td colspan="1" rowspan="1"><p> Select this checkbox to include the tracking category data for each line item in the journal entry. As journal entries may contain more than one tracking category, this will include 1 row of data per tracking category. </p></td></tr><tr><td colspan="1" rowspan="1"><p> Select the field to flatten </p></td><td colspan="1" rowspan="1"><p> Some Xero reports returns additional arrays of data. For example, the 'Invoices' report has a list of payments that are a part of that invoice. If you chose to flatten on payments, and a single invoice had 5 payments, you would get 5 records for that one invoice. </p></td></tr><tr><td colspan="1" rowspan="1"><p> Select Date filter field </p></td><td colspan="1" rowspan="1"><p> Select the Date filter to view the <b> Date of transaction </b> or the <b> Last modified date in UTC format </b>. </p></td></tr><tr><td colspan="1" rowspan="1"><p> Date Entry Method </p></td><td colspan="1" rowspan="1"><p> Select the date function that you would like to run for this report, or enter a date manually. </p></td></tr><tr><td colspan="1" rowspan="1"><p> Fiscal Month </p></td><td colspan="1" rowspan="1"><p> Select the month from when your fiscal calendar begins. </p></td></tr><tr><td colspan="1" rowspan="1"><p> Fiscal Day </p></td><td colspan="1" rowspan="1"><p> Enter the day from when your fiscal calendar begins. </p></td></tr><tr><td colspan="1" rowspan="1"><p> Week Start Day </p></td><td colspan="1" rowspan="1"><p> Select the day from when your week begins. </p></td></tr><tr><td colspan="1" rowspan="1"><p> Contacts Filter Type </p></td><td colspan="1" rowspan="1"><table><tbody><tr><th colspan="1" rowspan="1"> Filter Type </th><th colspan="1" rowspan="1"> Description </th></tr><tr><td colspan="1" rowspan="1"> None </td><td colspan="1" rowspan="1"> No filtering will be performed. </td></tr><tr><td colspan="1" rowspan="1"> Filter by contact ID </td><td colspan="1" rowspan="1"> Only data for specified contact IDs will be returned. </td></tr><tr><td colspan="1" rowspan="1"> Filter by contact date </td><td colspan="1" rowspan="1"> Only data for contacts that have been modified since the specified date will be returned </td></tr></tbody></table></td></tr><tr><td colspan="1" rowspan="1"><p> Contact IDs </p></td><td colspan="1" rowspan="1"> Enter a comma separated list of contacts. </td></tr><tr><td colspan="1" rowspan="1"><p> Report Date </p></td><td colspan="1" rowspan="1"> Select the report date using relative or specific dates. Relative indicates the number of days from today or a specific date using the date selector. </td></tr><tr><td colspan="1" rowspan="1"><p> Select Specific Date </p></td><td colspan="1" rowspan="1"> Select the report date using the date selector. </td></tr><tr><td colspan="1" rowspan="1"><p> Days back </p></td><td colspan="1" rowspan="1"><p> The number of days back for which you would like to get data. Specify either today or 0, yesterday or 1, or today-7 or 7 to get the data for 7 days into the past. </p></td></tr><tr><td colspan="1" rowspan="1"><p> Duration </p></td><td colspan="1" rowspan="1"> Select the duration for the report (a Single Date, or a Date Range). </td></tr><tr><td colspan="1" rowspan="1"><p> Days back </p></td><td colspan="1" rowspan="1"><p> The number of days back for which you would like to fetch the data. Specify either today or 0, yesterday or 1, or today-7 or 7 to get data for 7 days into the past. </p></td></tr><tr><td colspan="1" rowspan="1"><p> Start Date </p></td><td colspan="1" rowspan="1"><p> Select the report start date using relative or specific dates. Relative indicates the number of days from today or a specific date using the date selector. </p></td></tr><tr><td colspan="1" rowspan="1"><p> Select Specific Start Date </p></td><td colspan="1" rowspan="1"><p> Select the report date using the date selector. </p></td></tr><tr><td colspan="1" rowspan="1"><p> Days back to start from </p></td><td colspan="1" rowspan="1"><p> The number of days back for which you would like to fetch the data from (start day). Specify either today or 0, yesterday or 1, or today-7 or 7 to get data for 7 days into the past. </p></td></tr><tr><td colspan="1" rowspan="1"><p> End Date </p></td><td colspan="1" rowspan="1"><p> Select the report end date using relative or specific dates. Relative indicates the number of days from today or a specific date using the date selector. </p></td></tr><tr><td colspan="1" rowspan="1"><p> Select Specific End Date </p></td><td colspan="1" rowspan="1"><p> Select the report date using the date selector. </p></td></tr><tr><td colspan="1" rowspan="1"><p> Days back to end at </p></td><td colspan="1" rowspan="1"><p> The number of days back for which you would like to fetch the data (end day). Specify either today or 0, yesterday or 1, or today-7 or 7 to get data for 7 days into the past. </p></td></tr><tr><td colspan="1" rowspan="1"><p> Select the period count </p></td><td colspan="1" rowspan="1"><p> Select the period count. </p></td></tr><tr><td colspan="1" rowspan="1"><p> Select the timeframe type </p></td><td colspan="1" rowspan="1"><p> Select the timeframe type. </p></td></tr><tr><td colspan="1" rowspan="1"><p> Tracking Category ID </p></td><td colspan="1" rowspan="1"><p> Filter your results based on a tracking category ID. This field is optional. </p></td></tr><tr><td colspan="1" rowspan="1"><p> Journal History in Days </p></td><td colspan="1" rowspan="1"><p> Enter the number of days of Journal History you would like to retrieve. After the initial run, the connector will only retrieve newly created or updated journals. </p></td></tr><tr><td colspan="1" rowspan="1"><p> Include Date in Amount Header </p></td><td colspan="1" rowspan="1"><p> Select this checkbox to append the date returned by the API to the amount column, allowing you to distinguish between different amounts with varying dates. </p></td></tr><tr><td colspan="1" rowspan="1"><p> Select the tenant to request data from </p></td><td colspan="1" rowspan="1"><p> If you have authenticated against multiple tenants, you must specify which tenant you wish to query. If you do not specify, the first tenant in the list will be used as a default. </p></td></tr></tbody></table>

### Other Panes

For information about the remaining sections of the connector interface, including how to configure scheduling, retry, and update options, see [Adding a DataSet Using a Connector](https://domo-support.domo.com/s/article/360042926274?language=en_US "Adding a DataSet Using a Connector").

## Troubleshooting for Consulting/Support

### Dates in Column Names

Some Xero reports return data in which the run date is used as a column name. For example, if you were to run the "Profit & Loss" report on Feburary 17th, 2017, an amount column called "Row\_\_17\_Feb\_17" would appear. This prevents these columns from being used in a DataFlow or card, as the name of the column changes with each scheduled DataSet update.

To resolve this issue, we recommend replacing dates in column names with generic column names. You can use a Domo SQL query to replace the faulty column with a generically named column, which can then be referred to in a Magic DataFlow.

In the following example, we replace the column name "Row\_\_16\_Feb\_17" with the name "ProfitLossAmount."

<Frame>
  <img alt="" src="https://mintcdn.com/domoinc-openapi-sync-dataflows/gDOtiCXH_3EtosfI/images/kb/ka0Vq000000068f-00N5w00000Ri7BU-0EM5w000005vO1n.png?fit=max&auto=format&n=gDOtiCXH_3EtosfI&q=85&s=7da9826886933598a959bd7d69e4b317" style={{width: 941, height: 81}} width="782" height="67" data-path="images/kb/ka0Vq000000068f-00N5w00000Ri7BU-0EM5w000005vO1n.png" />
</Frame>

```sql theme={"dark"}
select NULL AS Row_Id, NULL AS Row_ProviderName, NULL AS Row_DateTimeUTC, NULL AS Row_ReportName, NULL AS Row_ReportDate, NULL ​AS Row_UpdatedDateUTC, NULL AS Row_ReportTitle, NULL AS Row_column_0, NULL AS ProfitLossAmount, NULL AS _BATCH_ID_, NULL AS _BATCH_LAST_RUN_ from xero_profit_and_loss_report
where 1 = 0 --this row returns nothing but allows setting the column names for the query
union all
select * from xero_profit_and_loss_report
```

### Unwanted Pivot Tables

Often, data with the column naming issue described above is represented as a pivot table. You cannot use the Collapse Columns action IN ETL to unpivot this data because the column names change for each scheduled run. An example of this is the "Budget" report.

To resolve this issue, unpivot columns that have been named with dates, but retain date values as rows so the output DataSet has one date row per column.

In the following example, we first use a Domo SQL query to rename the columns to generic names. Then we use a Magic ETL DataFlow to perform a **Collapse Columns** action and then convert the generic column name (which is now row data) back into a date.

1. Create a Domo SQL query as follows:

   Input: Xero DataSet created using the report "Budget"

   <Frame>
     <img alt="xero_unpivot_1.png" src="https://mintcdn.com/domoinc-openapi-sync-dataflows/gDOtiCXH_3EtosfI/images/kb/ka0Vq000000068f-00N5w00000Ri7BU-0EM5w000005vO1l.png?fit=max&auto=format&n=gDOtiCXH_3EtosfI&q=85&s=ada28349e52fad46fdd57441ccc2e3aa" width="783" height="117" data-path="images/kb/ka0Vq000000068f-00N5w00000Ri7BU-0EM5w000005vO1l.png" />
   </Frame>

   Transform: Replace the column names "Row\_\_Feb-17," "Row\_\_Mar-17," etc. with "Month1," "Month2," etc. using the method described above.

   Output Format: Renamed columns

   <Frame>
     <img alt="xero_unpivot_2.png" src="https://mintcdn.com/domoinc-openapi-sync-dataflows/gDOtiCXH_3EtosfI/images/kb/ka0Vq000000068f-00N5w00000Ri7BU-0EM5w000005vO1q.png?fit=max&auto=format&n=gDOtiCXH_3EtosfI&q=85&s=c2418220b56440681d63bd82cb9abafa" width="783" height="117" data-path="images/kb/ka0Vq000000068f-00N5w00000Ri7BU-0EM5w000005vO1q.png" />
   </Frame>

2. In a Domo Magic DataFlow, unpivot the output data defined above and replace the Month1, Month2 etc. values with dates based on the \_BATCH\_LAST\_RUN date.

   <Frame>
     <img alt="xero_unpivot_3.png" src="https://mintcdn.com/domoinc-openapi-sync-dataflows/gDOtiCXH_3EtosfI/images/kb/ka0Vq000000068f-00N5w00000Ri7BU-0EM5w000005vO1o.png?fit=max&auto=format&n=gDOtiCXH_3EtosfI&q=85&s=cca57b4214ce08386f3a73594fda68d2" width="781" height="105" data-path="images/kb/ka0Vq000000068f-00N5w00000Ri7BU-0EM5w000005vO1o.png" />
   </Frame>

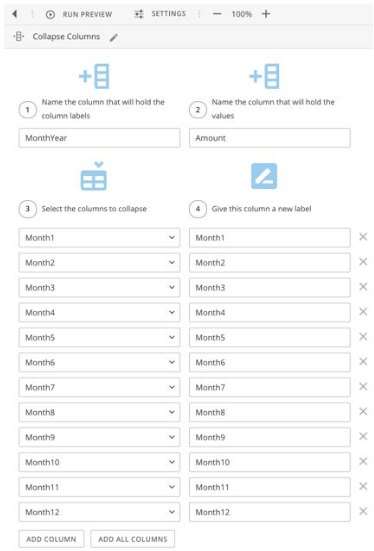
   1. Perform a **Collapse Columns** action in which you unpivot the 12 date columns.
      <Frame>
        <img alt="xero_unpivot_4.png" src="https://mintcdn.com/domoinc-openapi-sync-dataflows/gDOtiCXH_3EtosfI/images/kb/ka0Vq000000068f-00N5w00000Ri7BU-0EM5w000005vO1m.png?fit=max&auto=format&n=gDOtiCXH_3EtosfI&q=85&s=b4e1b711c866e04eb3b7a7f58b24b49f" width="374" height="551" data-path="images/kb/ka0Vq000000068f-00N5w00000Ri7BU-0EM5w000005vO1m.png" />
      </Frame>

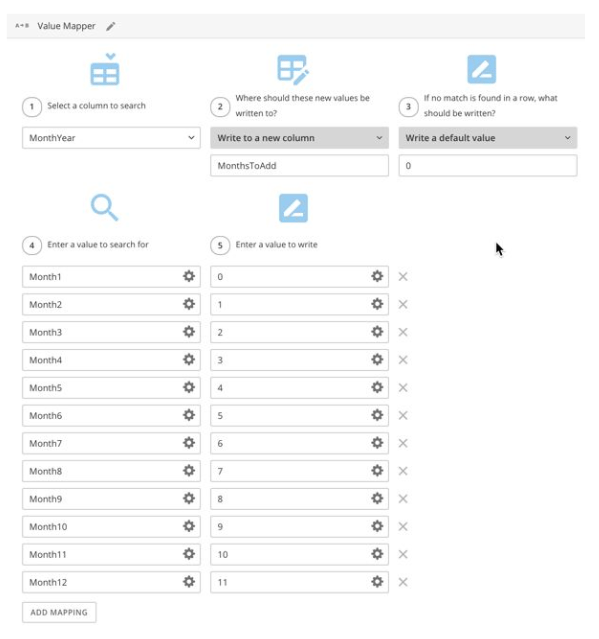
   2. Perform a **Value Mapper** action in which you create a new field that contains the number of months to add to the BATCH\_LAST\_RUN\_ date to get the correct date field for the row.
      <Frame>
        <img alt="xero_unpivot_5.png" src="https://mintcdn.com/domoinc-openapi-sync-dataflows/gDOtiCXH_3EtosfI/images/kb/ka0Vq000000068f-00N5w00000Ri7BU-0EM5w000005vO1r.png?fit=max&auto=format&n=gDOtiCXH_3EtosfI&q=85&s=4a56c4a2ce33438c25026ff9c4a6444a" width="599" height="639" data-path="images/kb/ka0Vq000000068f-00N5w00000Ri7BU-0EM5w000005vO1r.png" />
      </Frame>

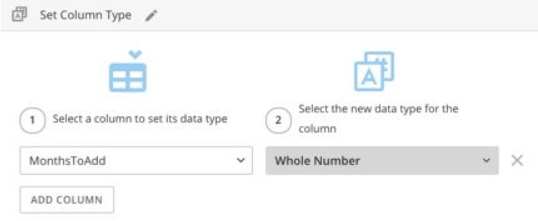
   3. Perform a **Set Column Type** action in which you change the data type of the number of months column to a numeric type.
      <Frame>
        <img alt="xero_unpivot_6.png" src="https://mintcdn.com/domoinc-openapi-sync-dataflows/gDOtiCXH_3EtosfI/images/kb/ka0Vq000000068f-00N5w00000Ri7BU-0EM5w000005vO1k.png?fit=max&auto=format&n=gDOtiCXH_3EtosfI&q=85&s=ec8d32da2ec565b34386716676b67477" width="538" height="221" data-path="images/kb/ka0Vq000000068f-00N5w00000Ri7BU-0EM5w000005vO1k.png" />
      </Frame>

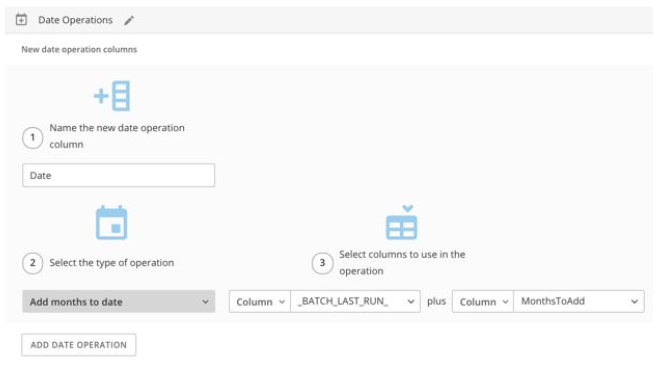
   4. Perform a **Date Operations** action in which you use the **Add Months to Date** operation to add the number of months to the \_BATCH\_LAST\_RUN\_ date to determine the date for the row.
      <Frame>
        <img alt="xero_unpivot_7.png" src="https://mintcdn.com/domoinc-openapi-sync-dataflows/gDOtiCXH_3EtosfI/images/kb/ka0Vq000000068f-00N5w00000Ri7BU-0EM5w000005vO1p.png?fit=max&auto=format&n=gDOtiCXH_3EtosfI&q=85&s=0b9d7e828ab1e75bee40ccae304c28a3" width="664" height="379" data-path="images/kb/ka0Vq000000068f-00N5w00000Ri7BU-0EM5w000005vO1p.png" />
      </Frame>

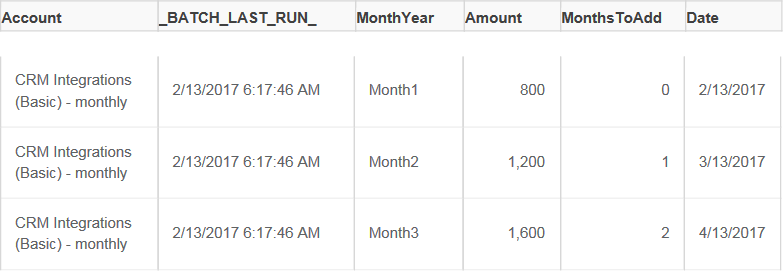
Your output format should be as follows: one row per month instead of one column per month
<Frame>
  <img alt="xero_unpivot_8.png" src="https://mintcdn.com/domoinc-openapi-sync-dataflows/gDOtiCXH_3EtosfI/images/kb/ka0Vq000000068f-00N5w00000Ri7BU-0EM5w000005vO1s.png?fit=max&auto=format&n=gDOtiCXH_3EtosfI&q=85&s=53466ab7a3a6a19e41ed91faaec57a70" width="783" height="271" data-path="images/kb/ka0Vq000000068f-00N5w00000Ri7BU-0EM5w000005vO1s.png" />
</Frame>
