> ## Documentation Index
> Fetch the complete documentation index at: https://domoinc-openapi-sync-dataflows.mintlify.site/llms.txt
> Use this file to discover all available pages before exploring further.

# Bing Ads Connector

## Intro

Bing Ads is a service that provides pay-per-click advertising on both the Bing and Yahoo! search engines. Use Domo's Bing Ads connector to pull Bing Ads data from marketing, sales, operations, and finance for true closed-loop reporting. This service supports a subset of the Bing Ads web application reports.

The reports that you can request are grouped into the following categories.

* **Delivery**

  Show the overall effectiveness and cost of ads and keywords for a specified period. You can include details in the reports—such as clicks, conversions, and spending—that you can use to identify the ads and keywords that are performing well and those that you may need to adjust.
* **Budget**

  Shows your monthly budget, how much you have spent to date, and whether you are on target to spend your monthly budget.
* **Targeting**

  Determine whether your ads are reaching their intended audiences.
* **Campaign Analytics**

  Used to measure the effectiveness of the account’s ad campaigns, primarily in terms of return on investment. In addition, you can use the reports to learn which pages on your website are most commonly abandoned by visitors and then use this information to change the design of your website to improve conversions.

To learn more about the Bing Ads API, visit their page ([https://msdn.microsoft.com/en-us/library/bing-ads-getting-started.aspx](https://msdn.microsoft.com/en-us/library/bing-ads-getting-started.aspx "https://msdn.microsoft.com/en-us/library/bing-ads-getting-started.aspx") ).

The Bing Ads connector is a "Cloud App" connector, meaning it retrieves data stored in the cloud. In the Data Center, you can access the connector page for this and other Cloud App connectors by clicking **Cloud App** in the toolbar at the top of the window.

You connect to your Bing Ads account in the Data Center. This topic discusses the fields and menus that are specific to the Bing Ads connector user interface. General information for adding DataSets, setting update schedules, and editing DataSet information is discussed in [Adding a DataSet Using a Connector](/s/article/360042926274 "Adding a DataSet Using a Connector").

<table class="mt-responsive-table" data-aura-rendered-by="33:195;a"><tbody><tr><td class="mt-noheading" colspan="1" rowspan="1"><p><b> Primary Use Cases </b></p></td><td class="mt-noheading" colspan="1" rowspan="1"><p> Ad conversion </p></td></tr><tr><td class="mt-noheading" colspan="1" rowspan="1"><p><b> Primary Metrics </b></p></td><td class="mt-noheading" colspan="1" rowspan="1"><p> Ad click-thru rates </p></td></tr><tr><td class="mt-noheading" colspan="1" rowspan="1"><p><b> Primary Company Roles </b></p></td><td class="mt-noheading" colspan="1" rowspan="1"><p> Web marketing roles </p></td></tr><tr><td class="mt-noheading" colspan="1" rowspan="1"><p><b> Average Implementation Time </b></p></td><td class="mt-noheading" colspan="1" rowspan="1"><p> \~1 hour </p></td></tr><tr><td class="mt-noheading" colspan="1" rowspan="1"><p><b> Ease of Use (on a 1-to-10 scale with 1 being easiest) </b></p></td><td class="mt-noheading" colspan="1" rowspan="1"><p> 4 </p></td></tr></tbody></table>

## Best Practices

Use the backfill to pull in historic data. The first time the report runs, historic data will be retrieved. Subsequent runs will only pull in the date ranges specified.

## Prerequisites

To connect to your Bing Ads account and create a DataSet, you must have the following:

* Your Bing Ads developer token. For information about obtaining a developer token, see
  [https://msdn.microsoft.com/en-us/library/bing-ads-getting-started.aspx](https://msdn.microsoft.com/en-us/library/bing-ads-getting-started.aspx "https://msdn.microsoft.com/en-us/library/bing-ads-getting-started.aspx").
* Secret ID and Value associated with your Microsoft Azure app
* You will also need to set the following redirect URI:
  **[https://oauth.domo.com/api/data/v1/oauth/providers/bingads/exchange](https://oauth.domo.com/api/data/v1/oauth/providers/bingads/exchange)**

### Obtaining your Developer Token

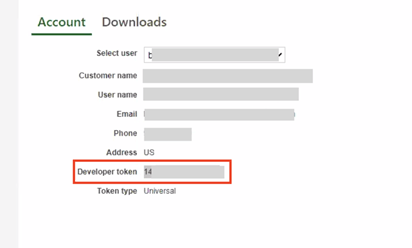
To find your developer token:

1. Go to [https://developers.ads.microsoft.com/Account](https://developers.ads.microsoft.com/Account "https://developers.ads.microsoft.com/Account")
2. Make sure it's a Super Admin account and that the token is a Universal token, and verify that it's the same account that is creating the Azure portal app.

<Frame>
  <img alt="clipboard_e16d8414c35f3cdea9ef73fd020d591d2.png" src="https://mintcdn.com/domoinc-openapi-sync-dataflows/AxiXLKkg9sLcFgsR/images/kb/ka0Vq000000703J-00N5w00000Ri7BU-0EM5w000005vO3P.png?fit=max&auto=format&n=AxiXLKkg9sLcFgsR&q=85&s=bd90d0cf9218bf841ba0c167dfa89b5d" width="412" height="248" data-path="images/kb/ka0Vq000000703J-00N5w00000Ri7BU-0EM5w000005vO3P.png" />
</Frame>

### Configuring your Azure App to obtain your Secret ID and Value

1. Login into
   [Azure Portal](https://portal.azure.com/#home "https://portal.azure.com/#home").
2. Select
   ****Azure Active Directory > App Registrations > New Registration****.

<Frame>
  <img alt="New_registration.png" src="https://mintcdn.com/domoinc-openapi-sync-dataflows/GXvfa618wDUsB9JU/images/kb/ka05w00000127Jz-00N5w00000Ri7BU-0EM5w000005vO99.png?fit=max&auto=format&n=GXvfa618wDUsB9JU&q=85&s=794d67a3a5db8f53571f6afce26ce99f" width="783" height="104" data-path="images/kb/ka05w00000127Jz-00N5w00000Ri7BU-0EM5w000005vO99.png" />
</Frame>

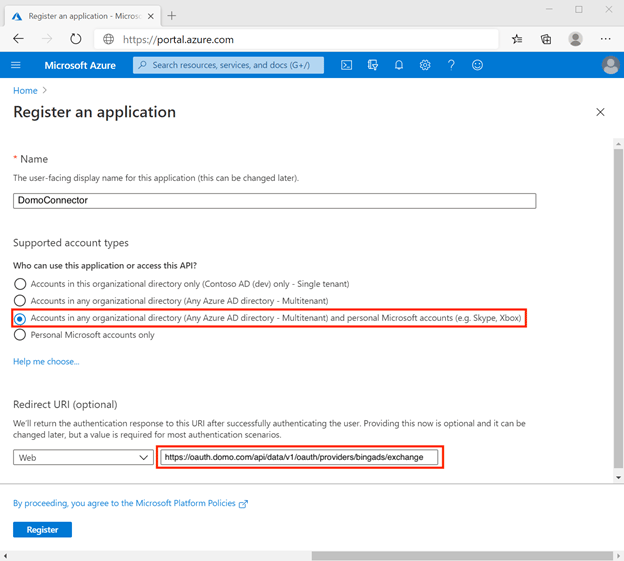
3. Fill out the registration form as follows:

* Name: enter a meaningful application name that will be displayed to users of the app, for example, 'DomoConnector'.
* Supported account types: Select
  **Accounts in any organizational directory (Any Azure AD directory – Multitenant) and personal Microsoft accounts**.
* Redirect URI: Add and save the following URI:
  **[https://oauth.domo.com/api/data/v1/oauth/providers/bingads/exchange](https://oauth.domo.com/api/data/v1/oauth/providers/bingads/exchange)**. The authentication response is sent to this URI after successfully authenticating the user. Providing the URI at this stage is optional and it can be changed later, but a value is required for most of the authentication scenarios.

4. Click
   **Register** to create the application. An overview of your registered App will appear.
<Frame>
  <img alt="clipboard_e182d798536c1739a92a68e5460154f73.png" src="https://mintcdn.com/domoinc-openapi-sync-dataflows/AxiXLKkg9sLcFgsR/images/kb/ka0Vq000000703J-00N5w00000Ri7BU-0EM5w000005vO3Q.png?fit=max&auto=format&n=AxiXLKkg9sLcFgsR&q=85&s=89769ce2a7fb53f185b6a28ab7e37fc0" width="624" height="561" data-path="images/kb/ka0Vq000000703J-00N5w00000Ri7BU-0EM5w000005vO3Q.png" />
</Frame>

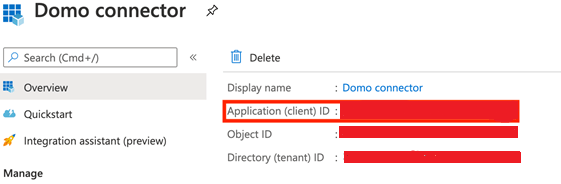
5. The
   ****Application ID**** that appears here is the ****Client ID**** you will enter in the ****Credentials**** pane in Domo.
<Frame>
  <img alt="clipboard_ed4d398399f9f9430f75bd609d6bdbc83.png" src="https://mintcdn.com/domoinc-openapi-sync-dataflows/AxiXLKkg9sLcFgsR/images/kb/ka0Vq000000703J-00N5w00000Ri7BU-0EM5w000005vO2h.png?fit=max&auto=format&n=AxiXLKkg9sLcFgsR&q=85&s=86e261048cda9a03117c648375299379" width="561" height="184" data-path="images/kb/ka0Vq000000703J-00N5w00000Ri7BU-0EM5w000005vO2h.png" />
</Frame>

6. Select
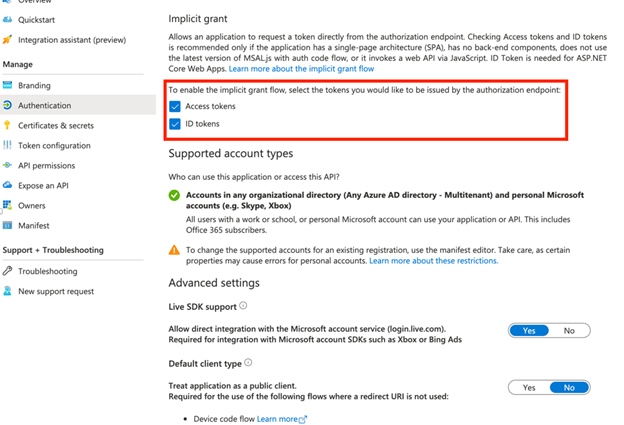
   **Authentication** under Manage. Under **Implicit Grant**, check the box to enable both Access Tokens and ID Tokens. Select **Save** at the top of the page to save the changes.
<Frame>
  <img alt="clipboard_eaa283cf721974a3f4aba17d1cc195efa.png" src="https://mintcdn.com/domoinc-openapi-sync-dataflows/Ii_OEK7nN-EzkrX1/images/kb/ka0Vq000000703J-00N5w00000Ri7BU-0EM5w000005vO3S.png?fit=max&auto=format&n=Ii_OEK7nN-EzkrX1&q=85&s=3e31157b4fcfaf336910e5afaf711d8b" width="624" height="425" data-path="images/kb/ka0Vq000000703J-00N5w00000Ri7BU-0EM5w000005vO3S.png" />
</Frame>

7. Select
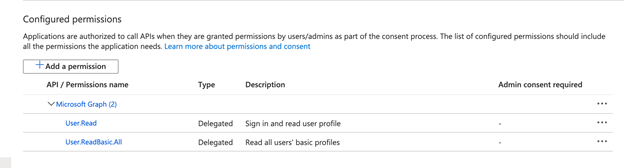
   **API Permissions** under Manage. You will need the **User.Rea** **d** and **User.ReadBasic.All** permissions.

8. To add permissions, select
   **Add a Permission**. Select Microsoft Graph API, and then Delegated Permissions. Type or Navigate to **User.ReadBasic.All**, check the box, and click **Add Permissions**.
<Frame>
  <img alt="clipboard_e647c7731599144cdd8772f2f24584978.png" src="https://mintcdn.com/domoinc-openapi-sync-dataflows/AxiXLKkg9sLcFgsR/images/kb/ka0Vq000000703J-00N5w00000Ri7BU-0EM5w000005vO3O.png?fit=max&auto=format&n=AxiXLKkg9sLcFgsR&q=85&s=e2940160d6debc188d9102e8672d8944" width="624" height="168" data-path="images/kb/ka0Vq000000703J-00N5w00000Ri7BU-0EM5w000005vO3O.png" />
</Frame>

9. Select
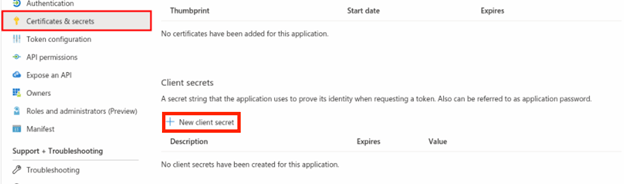
   **Certificates & Secrets** under Manage. Certificates can be used as secrets to prove the application’s identity when requesting a token. Also, can be referred to as public keys.

10. Select the +
    **New client secret** button.
<Frame>
  <img alt="clipboard_ed1a25153bb6f42452f69844e51a34d99.png" src="https://mintcdn.com/domoinc-openapi-sync-dataflows/AxiXLKkg9sLcFgsR/images/kb/ka0Vq000000703J-00N5w00000Ri7BU-0EM5w000005vO3L.png?fit=max&auto=format&n=AxiXLKkg9sLcFgsR&q=85&s=eba1c01de88ade94a04fdeee8b5e4f2c" width="624" height="184" data-path="images/kb/ka0Vq000000703J-00N5w00000Ri7BU-0EM5w000005vO3L.png" />
</Frame>

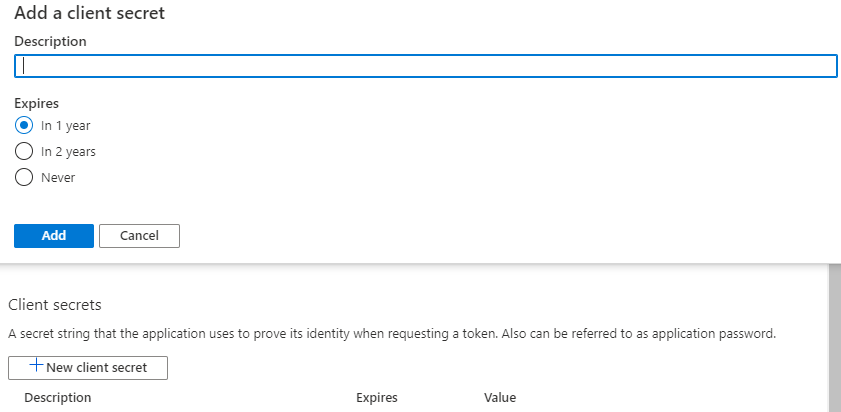
11. Enter a value in Description, select a suitable option for Expires, and click
    **Add**.
<Frame>
  <img alt="Add_client_secret.png" src="https://mintcdn.com/domoinc-openapi-sync-dataflows/Ii_OEK7nN-EzkrX1/images/kb/ka0Vq000000703J-00N5w00000Ri7BU-0EM5w000005vO3T.png?fit=max&auto=format&n=Ii_OEK7nN-EzkrX1&q=85&s=3bd1c24743477587a2380634a423248d" width="841" height="412" data-path="images/kb/ka0Vq000000703J-00N5w00000Ri7BU-0EM5w000005vO3T.png" />
</Frame>

<Warning>
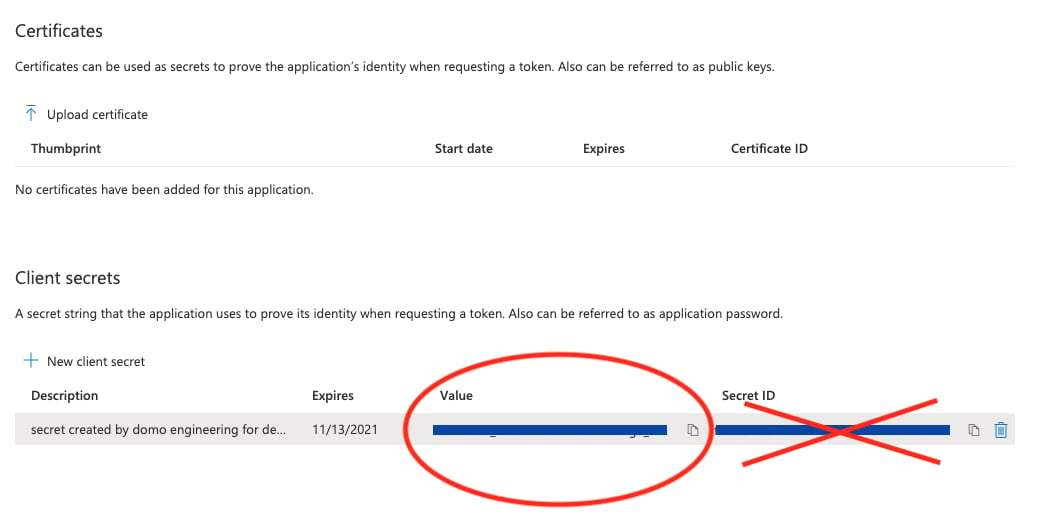
  **Important:** Ensure to c opy the client secret Value (not the Secret ID) before leaving the page. It's not displayed again after you leave this page.
</Warning>

<Frame>
  <img alt="Secret_Value_selection.png" src="https://mintcdn.com/domoinc-openapi-sync-dataflows/blcgkVgnZv6gj_XY/images/kb/ka05w00000123QC-00N5w00000Ri7BU-0EM5w000005vO9g.png?fit=max&auto=format&n=blcgkVgnZv6gj_XY&q=85&s=2f8d837ac4eec7ddcebe55ff4923cbac" width="1047" height="521" data-path="images/kb/ka05w00000123QC-00N5w00000Ri7BU-0EM5w000005vO9g.png" />
</Frame>

This will be the Client Secret within Domo.

12. Now, enter the
    **Developer Token**, **Client ID**, and **Client Secret** in Domo under the Credentials section for the Bing Ads connector, and click Connect. There will be a popup to Log in to Microsoft. Login using your Super Admin account and follow the prompts to complete the connection.

### Debugging the Azure portal app and BingAds account

While creating your account, if you get an error "There was a problem creating your account. Please try again", you can check the following configuration to debug your Azure portal app and BingAds account.

1. In your Azure portal app, check the following:

* Under Authentication -> Supported account types, select "Accounts in any organizational directory (Any Azure AD directory – Multitenant) and personal Microsoft accounts"

<Frame>
  <img alt="clipboard_ec16519b5018b601429a348c3d1d0b086.png" src="https://mintcdn.com/domoinc-openapi-sync-dataflows/AxiXLKkg9sLcFgsR/images/kb/ka0Vq000000703J-00N5w00000Ri7BU-0EM5w000005vO3N.png?fit=max&auto=format&n=AxiXLKkg9sLcFgsR&q=85&s=66514763f73a7d49fadb9cc353f590c0" width="1579" height="55" data-path="images/kb/ka0Vq000000703J-00N5w00000Ri7BU-0EM5w000005vO3N.png" />
</Frame>

* Verify that the redirect URI is **[https://oauth.domo.com/api/data/v1/oauth/providers/bingads/exchange](https://oauth.domo.com/api/data/v1/oauth/providers/bingads/exchange)**
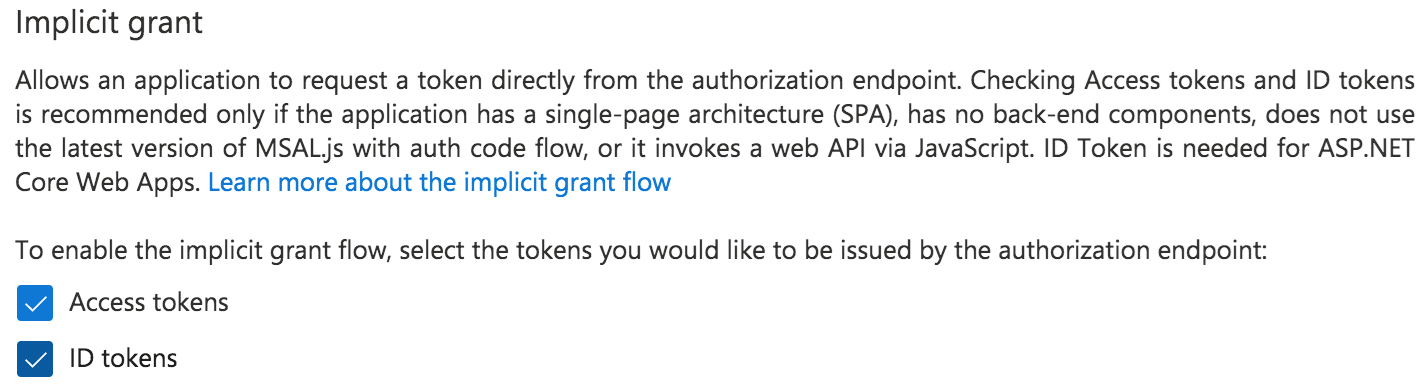
* Under Authentication -> Implicit grant, check Access tokens and ID tokens
<Frame>
  <img alt="clipboard_e7d684428067470d26a41cec3dce46759.png" src="https://mintcdn.com/domoinc-openapi-sync-dataflows/AxiXLKkg9sLcFgsR/images/kb/ka0Vq000000703J-00N5w00000Ri7BU-0EM5w000005vO3M.png?fit=max&auto=format&n=AxiXLKkg9sLcFgsR&q=85&s=180968769ee83fa8e2bf0f63d0d7666c" width="1419" height="387" data-path="images/kb/ka0Vq000000703J-00N5w00000Ri7BU-0EM5w000005vO3M.png" />
</Frame>

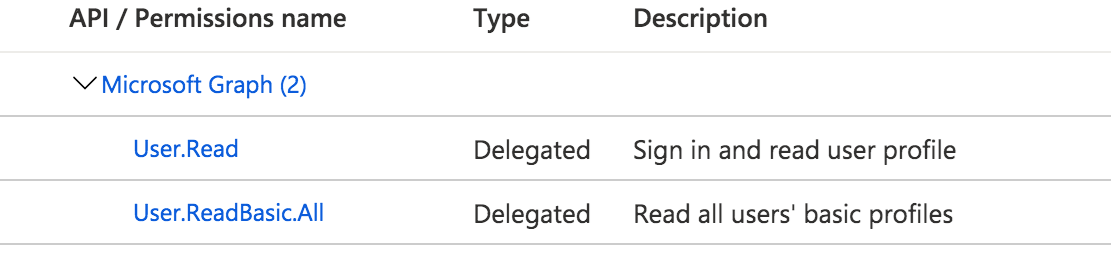
* Under API permissions, select User.Read and User.ReadBasic.All
<Frame>
  <img alt="clipboard_e5745d4f728b4e7e3f1200218556f2ed1.png" src="https://mintcdn.com/domoinc-openapi-sync-dataflows/AxiXLKkg9sLcFgsR/images/kb/ka0Vq000000703J-00N5w00000Ri7BU-0EM5w000005vO3R.png?fit=max&auto=format&n=AxiXLKkg9sLcFgsR&q=85&s=1400d0983d82ad8a4971ac407c8277d1" width="1111" height="255" data-path="images/kb/ka0Vq000000703J-00N5w00000Ri7BU-0EM5w000005vO3R.png" />
</Frame>

2. In your Developer Token which you can find at
   [https://developers.ads.microsoft.com/Account](https://developers.ads.microsoft.com/Account "https://developers.ads.microsoft.com/Account"), make sure it's a Super Admin account and that the token is a Universal token, and verify that it's the same account that is creating the Azure portal app.

3. You need to create a new client secret in the app that you previously created, copy the Value of that secret, and use that to create the Bing Ads account in Domo. If that doesn't work, create a new app and use those credentials.

## Connecting to Your Bing Ads Account

This section enumerates the options in the **Credentials** and **Details** panes in the Bing Ads Connector page. The components of the other panes in this page, **Scheduling** and **Name & Describe Your DataSet**, are universal across most connector types and are discussed in greater length in [Adding a DataSet Using a Connector](/s/article/360042926274 "Adding a DataSet Using a Connector").

### Credentials Pane

<table border="1" data-aura-rendered-by="33:195;a"><tbody><tr><td colspan="1" rowspan="1"><b> Field </b></td><td colspan="1" rowspan="1"><b> Description </b></td></tr><tr><td colspan="1" rowspan="1"> Developer Token </td><td colspan="1" rowspan="1"> Enter the developer token. To get a developer token, login to Bing Ads as a Super Admin user and click Request Token. For more help, see <a href="https://docs.microsoft.com/en-us/advertising/guides/get-started#get-developer-token" target="_blank" title="Bing Ads"> Bing Ads. </a></td></tr><tr><td colspan="1" rowspan="1"> Client ID </td><td colspan="1" rowspan="1"> Go to <a href="http://portal.azure.com" rel="noopener" target="_blank"> portal.azure.com </a> > Azure Active directory > App registrations. Find and select the web app. The Application ID from the web app is the client id. </td></tr><tr><td colspan="1" rowspan="1"> Client Secret Value </td><td colspan="1" rowspan="1"> Go to <a href="http://portal.azure.com" rel="noopener" target="_blank"> portal.azure.com </a> > Azure Active directory > App registrations. Find and select the web app. Go to Settings > Keys. Create the client secret. </td></tr></tbody></table>

This pane contains three field where you enter your Bing Ads developer token, Client ID and Client Secret Value.  You are then taken to the Microsoft OAuth page where you are required to enter your Microsoft username and password. Once you have entered valid Microsoft credentials, you can use the same account any time you go to create a new Bing Ads DataSet. You can manage connector accounts in the **Accounts** tab in the **Data Center**. For more information about this tab, see [Manage Connector/Adapter Accounts](/s/article/360042926054 "Manage Connector/Adapter Accounts").

## Details Pane

This pane contains a primary **Report** menu, along with various other menus which may or may not appear depending on the report type you select.

<table border="1" cellpadding="1" cellspacing="1" data-aura-rendered-by="33:195;a"><thead><tr><th colspan="1" rowspan="1"><p><span class="s1"><b> Menu </b></span></p></th><th colspan="1" rowspan="1"><p><span class="s1"><b> Description </b></span></p></th></tr></thead><tbody><tr><td colspan="1" rowspan="1"><p> Report </p></td><td colspan="1" rowspan="1"><p><span class="s1"> Select the Bing Ads report you want to run. The following reports are available: </span></p><table border="1" cellpadding="1" cellspacing="1"><tbody><tr><td colspan="1" rowspan="1"><p><b><span class="s1"> Report Name </span></b></p></td><td colspan="1" rowspan="1"><p><b><span class="s1"> Description </span></b></p></td></tr><tr><td colspan="1" rowspan="1"><p><span class="s1"> Account Performance Report </span></p></td><td colspan="1" rowspan="1"><p><span class="s1"> Shows the long-term account performance and trends. </span></p></td></tr><tr><td colspan="1" rowspan="1"><p><span class="s1"> Ad Dynamic Text Performance Report </span></p></td><td colspan="1" rowspan="1"><p><span class="s1"> Identifies the dynamic text strings that are performing well and which strings you should consider changing. </span></p></td></tr><tr><td colspan="1" rowspan="1"><p><span class="s1"> Ad Extension by Ads Report </span></p></td><td colspan="1" rowspan="1"><p><span class="s1"> Used to compare how well the different versions of your ad extensions are performing with each ad. </span></p></td></tr><tr><td colspan="1" rowspan="1"><p><span class="s1"> Ad Extension by Keyword Report </span></p></td><td colspan="1" rowspan="1"><p><span class="s1"> Used to compare how well the different versions of your ad extensions are performing for each keyword. </span></p></td></tr><tr><td colspan="1" rowspan="1"><p><span class="s1"> Ad Extension Detail Report </span></p></td><td colspan="1" rowspan="1"><p><span class="s1"> Used to discover the effectiveness of individual ad extension items, such as each link of a sitelink extension. </span></p></td></tr><tr><td colspan="1" rowspan="1"><p><span class="s1"> Ad Group Performance Report </span></p></td><td colspan="1" rowspan="1"><p><span class="s1"> Used to compare the delivery performance statistics by ad group, campaign, or account attributes, rather than at the keyword level. </span></p></td></tr><tr><td colspan="1" rowspan="1"><p><span class="s1"> Ad Performance Report </span></p></td><td colspan="1" rowspan="1"><p><span class="s1"> Used to determine which ads lead to clicks and conversions, and which are not performing. </span></p></td></tr><tr><td colspan="1" rowspan="1"><p><span class="s1"> Age Gender Audience Report </span></p></td><td colspan="1" rowspan="1"><p><span class="s1"> Used to discover how your campaigns and ad groups are resonating with audiences of diverse age and gender. </span></p></td></tr><tr><td colspan="1" rowspan="1"><p> Audience Performance Report </p><p><span class="s1" /></p></td><td colspan="1" rowspan="1"><p><span class="s1"> Compares the delivery performance statistics by audience, ad group, campaign, or account attributes. </span></p></td></tr><tr><td colspan="1" rowspan="1"><p><span class="s1"> Budget Summary Report </span></p></td><td colspan="1" rowspan="1"><p><span class="s1"> Used to discover how your budget is performing for the month. The report shows your monthly budget, how much you have spent to date, and whether you are on target to stay within your monthly budget. </span></p></td></tr><tr><td colspan="1" rowspan="1"><p><span class="s1"> Call Detail Report </span></p></td><td colspan="1" rowspan="1"><p><span class="s1"> Used to discover which accounts, campaigns, or ad groups are driving the most completed phone calls. </span></p></td></tr><tr><td colspan="1" rowspan="1"><p><span class="s1"> Campaign Performance Report </span></p></td><td colspan="1" rowspan="1"><p><span class="s1"> Used to view high-level performance statistics and quality attributes for each campaign or account. This is also a quick way to flag any major campaign or account problems. </span></p></td></tr><tr><td colspan="1" rowspan="1"><p><span class="s1"> Conversion Performance Report </span></p></td><td colspan="1" rowspan="1"><p><span class="s1"> Used to discover which campaigns and keywords are leading an audience to complete a purchase or other conversion action. </span></p></td></tr><tr><td colspan="1" rowspan="1"><p><span class="s1"> Destination URL Performance Report </span></p></td><td colspan="1" rowspan="1"><p><span class="s1"> Used to identify landing pages that met audience expectations and potentially resulted in high click-through or conversion rates. </span></p></td></tr><tr><td colspan="1" rowspan="1"><p><span class="s1"> DSA Auto Target Performance Report </span></p></td><td colspan="1" rowspan="1"><p><span class="s1"> This report provides the performance data specifically for Dynamic Search Ads (DSA) auto targets. </span></p></td></tr><tr><td colspan="1" rowspan="1"><p><span class="s1"> DSA Category Performance Report </span></p></td><td colspan="1" rowspan="1"><p><span class="s1"> This report provides insights into how your Dynamic Search Ads (DSA) perform across different product or service categories. </span></p></td></tr><tr><td colspan="1" rowspan="1"><p><span class="s1"> DSA Search Query Performance Report </span></p></td><td colspan="1" rowspan="1"><p><span class="s1"> This report provides valuable insights into the specific search terms that triggered your Dynamic Search Ads (DSA) to appear. </span></p></td></tr><tr><td colspan="1" rowspan="1"><p><span class="s1"> Geographic Performance Report </span></p></td><td colspan="1" rowspan="1"><p><span class="s1"> This report provides insights into how your ads perform across different geographic locations. </span></p></td></tr><tr><td colspan="1" rowspan="1"><p><span class="s1"> Goals and Funnels Report </span></p></td><td colspan="1" rowspan="1"><p><span class="s1"> Used to discover whether your audience completes each step through the land, browse, prospect, and conversion pages of your website. For example, you can use this report to determine the step in which users leave the conversion funnel, so that you can improve or remove that step to increase the chance that the user will continue to the next step. </span></p></td></tr><tr><td colspan="1" rowspan="1"><p><span class="s1"> Hotel Dimension Performance Report </span></p></td><td colspan="1" rowspan="1"><p><span class="s1"> Provides in-depth insights into the performance of your hotel advertising campaigns. </span></p></td></tr><tr><td colspan="1" rowspan="1"><p><span class="s1"> Hotel Group Performance Report </span></p></td><td colspan="1" rowspan="1"><p><span class="s1"> Provides insights into the performance of your hotel advertising campaigns, specifically focusing on the performance of different hotel groups within your campaigns. </span></p></td></tr><tr><td colspan="1" rowspan="1"><p><span class="s1"> Keyword Performance Report </span></p></td><td colspan="1" rowspan="1"><p><span class="s1"> Used to discover which keywords are performing well and which are not. </span></p></td></tr><tr><td colspan="1" rowspan="1"><p><span class="s1"> Negative Keyword Conflict Report </span></p></td><td colspan="1" rowspan="1"><p><span class="s1"> Used to discover which keywords and negative keywords are in conflict, and whether the conflict is at the campaign or ad group level. </span></p></td></tr><tr><td colspan="1" rowspan="1"><p><span class="s1"> Publisher Usage Performance Report </span></p></td><td colspan="1" rowspan="1"><p><span class="s1"> Used to discover if any website URLs aren’t performing well enough for your campaign or ad group target settings. For example, if ad impressions at those URLs yield a low click-through rate, then you might decide to exclude those websites from your campaign. </span></p></td></tr><tr><td colspan="1" rowspan="1"><p><span class="s1"> Search Campaign Change History Report </span></p></td><td colspan="1" rowspan="1"><p><span class="s1"> Used to discover when changes to an account were made, as well as which user made the changes. </span></p></td></tr><tr><td colspan="1" rowspan="1"><p><span class="s1"> Search Query Performance Report </span></p></td><td colspan="1" rowspan="1"><p><span class="s1"> Used to discover what your audience is searching for when your ads are shown. You can use this information to make informed additions, removals, or edits to both your keyword and negative keyword lists. </span></p></td></tr><tr><td colspan="1" rowspan="1"><p><span class="s1"> Share of Voice Report </span></p></td><td colspan="1" rowspan="1"><p><span class="s1"> Used to view impression share (%) of successful bids for each keyword, and identify opportunities to increase impression share. </span></p></td></tr><tr><td colspan="1" rowspan="1"> User Location Performance Report </td><td colspan="1" rowspan="1"> Used to show where your traffic is coming from broken out by the physical location and the location people are searching for. </td></tr></tbody></table></td></tr><tr><td colspan="1" rowspan="1"><p><span class="s1"> Aggregate By </span></p></td><td colspan="1" rowspan="1"><p><span class="s1"> Select how data in the report is broken down. For example, <b> Weekly </b> breaks down data by week. </span></p></td></tr><tr><td colspan="1" rowspan="1"><p> Duration </p></td><td colspan="1" rowspan="1"><p> Select whether you want to pull data for a specific date or a date range. </p></td></tr><tr><td colspan="1" rowspan="1"><p> Report Date </p></td><td colspan="1" rowspan="1"><p> Select whether the report data is for a specific date or for a relative number of days back from today. </p></td></tr><tr><td colspan="1" rowspan="1"><p> Select Specific Date </p></td><td colspan="1" rowspan="1"><p> Select the date for the report. </p></td></tr><tr><td colspan="1" rowspan="1"><p> Days Back </p></td><td colspan="1" rowspan="1"><p> Enter the number of past days that should appear in the report. </p></td></tr><tr><td colspan="1" rowspan="1"><p> Start Date </p></td><td colspan="1" rowspan="1"><p> Specify whether the first date in your date range is a specific or relative date. You select the last date in your range in <b> End Date </b>. </p></td></tr><tr><td colspan="1" rowspan="1"><p> End Date </p></td><td colspan="1" rowspan="1"><p> Specify whether the second date in your date range is a specific or relative date. You select the first date in your range in <b> Start Date </b>. </p></td></tr><tr><td colspan="1" rowspan="1"><p> Select Specific Start Date </p></td><td colspan="1" rowspan="1"><p> Select the first date in your date range. </p></td></tr><tr><td colspan="1" rowspan="1"><p> Select Specific End Date </p></td><td colspan="1" rowspan="1"><p> Select the second date in your date range. </p></td></tr><tr><td colspan="1" rowspan="1"><p> Days Back to Start From </p></td><td colspan="1" rowspan="1"><p> Enter the number of the farthest day back that should be represented in the report. Combine with <b> Days Back to End At </b> to create a range of represented days. </p><p> For example, if you entered <span class="mt-font-courier-new"> 10 </span> for <b> Days Back to Start From </b> and <span class="mt-font-courier-new"> 5 </span> for <b> Days Back to End At </b>, the report would contain data for 10 days ago up until 5 days ago. </p></td></tr><tr><td colspan="1" rowspan="1"><p> Days Back to End At </p></td><td colspan="1" rowspan="1"><p> Enter the number of the most recent day back that should be represented in the report. Combine with <b> Days Back to Start From </b> to create a range of represented days. </p><p> For example, if you entered <span class="mt-font-courier-new"> 10 </span> for <b> Days Back to Start From </b> and <span class="mt-font-courier-new"> 5 </span> for <b> Days Back to End At </b>, the report would contain data for 10 days ago up until 5 days ago. </p></td></tr><tr><td colspan="1" rowspan="1"> Backfill </td><td colspan="1" rowspan="1"> Enter the number of days before the start date that should be backfilled. This action will be performed <em> only </em> the first time the data source runs. On subsequent runs, the specified <b> Start Date </b> to <b> End Date </b> range is used. </td></tr></tbody></table>

## Other Panes

For information about the remaining sections of the connector interface, including how to configure scheduling, retry, and update options, see [Adding a DataSet Using a Connector](/s/article/360042926274 "Adding a DataSet Using a Connector").

## Troubleshooting

* Double-check the API key.
* Try to access the data directly from the API.

## FAQ

<AccordionGroup>
  <Accordion title="How frequently will my data update?">
    As often as needed.
  </Accordion>

  <Accordion title="What type of input parameters do I need to consider while creating a Bing Ads DataSet?">
    You need to provide the Report type, Aggregated by (daily/weekly/hourly etc.) and PastDays value (backfill) while creating a new Bing Ads dataset.
  </Accordion>

  <Accordion title="Are there any API limits that I need to be aware of?">
    No.
  </Accordion>

  <Accordion title="Does the Bing Ads connector support backfilling?">
    Backfilling is supported in Bing Ads connector for the first attempt only. As you set the backfill value, the Bing Ads connector pulls the data for the mentioned number of days before the start date, along with the data between the specified start and end dates.
  </Accordion>
</AccordionGroup>