> ## Documentation Index
> Fetch the complete documentation index at: https://domoinc-openapi-sync-dataflows.mintlify.site/llms.txt
> Use this file to discover all available pages before exploring further.
# Create an Alert for a Visualization Card
export const InlineImage = ({src, alt = '', height = '1.6em'}) => {
return  ;
};
### Intro
When you set an Alert on a Visualization Card, you are notified whenever certain conditions (which you specify) are met, such as a value going above or below a certain threshold.
You can choose whether you receive Alerts via email or text. For more information, see [Configuring Notification and Alert Settings](/s/article/360042925814 "Customizing Notification and Alert Settings").
**Note:** You can set Alerts only for PDP (Personalized Data Permissions) policies you are a member of. For example, if you are a member of a policy with permissions to view data for western states only, any Alert you created would apply only to those states. For more information, see [PDP and Alerts](/s/article/360042934634 "PDP and Alerts").
***
### Create an Alert
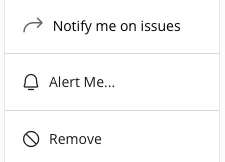
You can create an Alert while viewing a card. Select **Card options** > **Alert Me...**.
;
};
### Intro
When you set an Alert on a Visualization Card, you are notified whenever certain conditions (which you specify) are met, such as a value going above or below a certain threshold.
You can choose whether you receive Alerts via email or text. For more information, see [Configuring Notification and Alert Settings](/s/article/360042925814 "Customizing Notification and Alert Settings").
**Note:** You can set Alerts only for PDP (Personalized Data Permissions) policies you are a member of. For example, if you are a member of a policy with permissions to view data for western states only, any Alert you created would apply only to those states. For more information, see [PDP and Alerts](/s/article/360042934634 "PDP and Alerts").
***
### Create an Alert
You can create an Alert while viewing a card. Select **Card options** > **Alert Me...**.
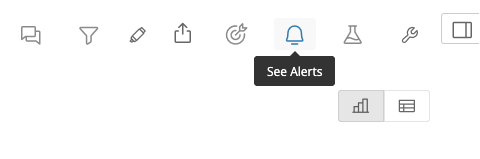
 From the card Details view, choose **See** **Alerts**.
 The **Alerts** tab opens.
Select **+ New Alert** to open the Alert wizard. The wizard has three steps: setting up the Alert rule, composing the Alert message, and sharing the Alert. These steps are described below.
#### Step 1: Set Up The Alert Rule
The Alert rule includes the conditions that trigger your Alert and how often Domo checks to see if the Alert has triggered.
**PDP:** If PDP (Personalized Data Permissions) have been set on the DataSet that powers the card, you can choose how the PDP are applied in this step. See [PDP and Alerts](/s/article/360042934634 "PDP and Alerts") to learn more.
Choose a metric on the card, a condition that must be met, and an associate value. For example, you can choose the card's Summary Number as the metric, the condition as "less then or equal to" and set a value of 7. That means that the Alert triggers when the Summary Number is less than or equal to 7.
**Note:** If your card has a Summary Number, you can create an alert based on the Summary Number. Some chart types only allow alerts on Summary Numbers, meaning that for these chart types, if there is no Summary Number, you cannot create an alert for that card.
#### Step 2: Compose the Alert Message
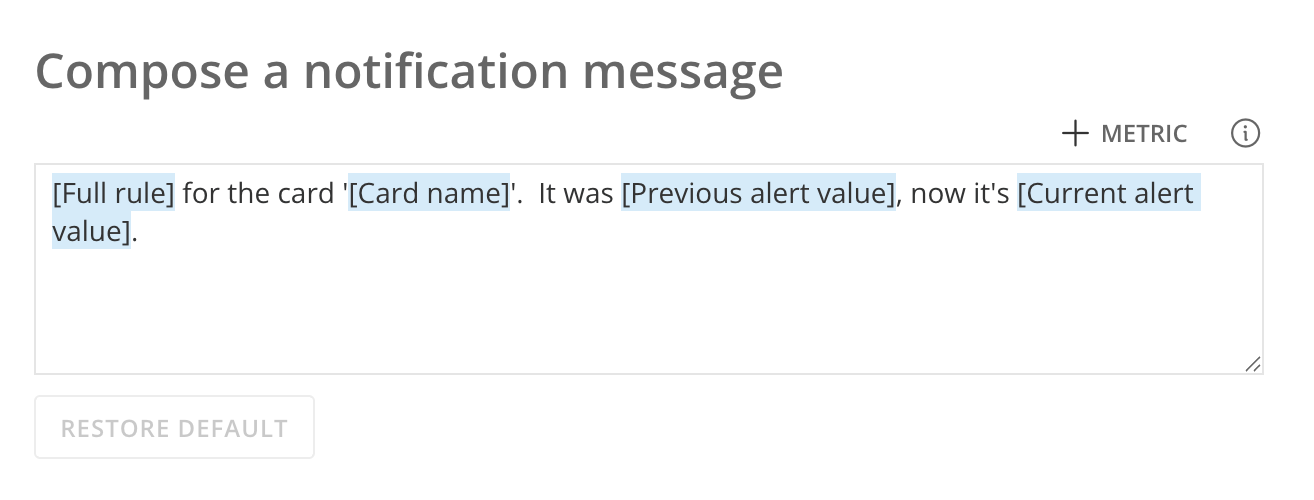
In step two, you compose the message sent when the Alert triggers. The message uses a variety of different macros to communicate available metrics.
Macros reference different variables related to your Alert such as Alert name, previous or current value, Alert owner, and change in Alert value.
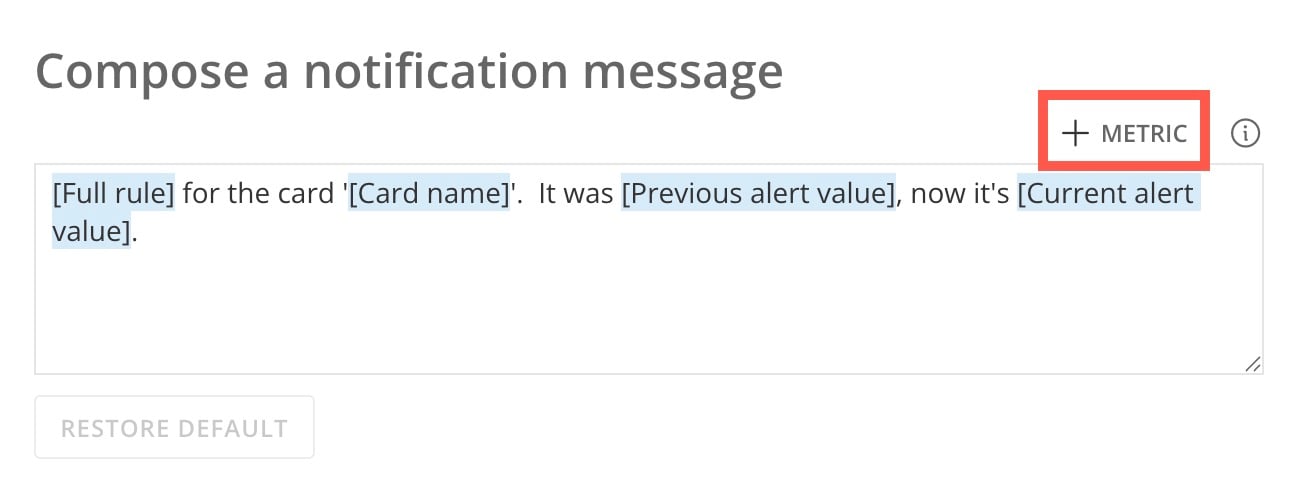
In this image, the default message uses macros to indicate the Alert rule you configured in step one, the name of the card where the Alert is configured, the previous Alert value, and the current Alert value.
The **Alerts** tab opens.
Select **+ New Alert** to open the Alert wizard. The wizard has three steps: setting up the Alert rule, composing the Alert message, and sharing the Alert. These steps are described below.
#### Step 1: Set Up The Alert Rule
The Alert rule includes the conditions that trigger your Alert and how often Domo checks to see if the Alert has triggered.
**PDP:** If PDP (Personalized Data Permissions) have been set on the DataSet that powers the card, you can choose how the PDP are applied in this step. See [PDP and Alerts](/s/article/360042934634 "PDP and Alerts") to learn more.
Choose a metric on the card, a condition that must be met, and an associate value. For example, you can choose the card's Summary Number as the metric, the condition as "less then or equal to" and set a value of 7. That means that the Alert triggers when the Summary Number is less than or equal to 7.
**Note:** If your card has a Summary Number, you can create an alert based on the Summary Number. Some chart types only allow alerts on Summary Numbers, meaning that for these chart types, if there is no Summary Number, you cannot create an alert for that card.
#### Step 2: Compose the Alert Message
In step two, you compose the message sent when the Alert triggers. The message uses a variety of different macros to communicate available metrics.
Macros reference different variables related to your Alert such as Alert name, previous or current value, Alert owner, and change in Alert value.
In this image, the default message uses macros to indicate the Alert rule you configured in step one, the name of the card where the Alert is configured, the previous Alert value, and the current Alert value.
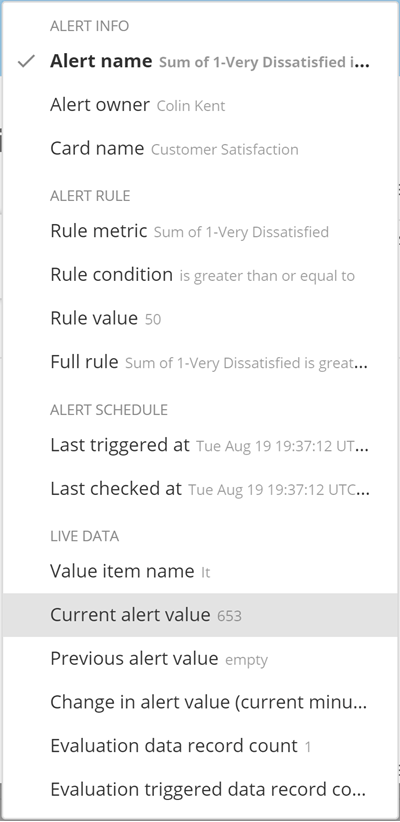
 In the left panel of the wizard, under **Message**, you can preview the message with the variables switched in for the macros. For the default message shown above, this message might read as follows: "Sum of 1-Very Dissatisfied is greater than or equal to 50 from the card `Customer Satisfaction`. It was empty, now it's 653."
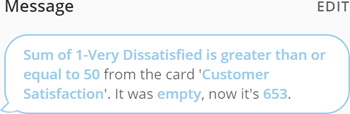 In this example, \[Full rule] has been replaced by "Sum of 1-Very Dissatisfied is greater than or equal to 50"; \[Card Name] has been replaced by "Customer Satisfaction"; \[Previous Alert value] has been replaced by "empty" (because there is no previous value for this Alert); and \[Current Alert value] has been replaced by "653."
You can see a list of macros by clicking the **+** **Metric** button above the template.
In this example, \[Full rule] has been replaced by "Sum of 1-Very Dissatisfied is greater than or equal to 50"; \[Card Name] has been replaced by "Customer Satisfaction"; \[Previous Alert value] has been replaced by "empty" (because there is no previous value for this Alert); and \[Current Alert value] has been replaced by "653."
You can see a list of macros by clicking the **+** **Metric** button above the template.
 The list shows the name of the corresponding variable in your Alert for each macro, so you can see if you are pulling over the right information.
 If you edit the message, you can revert to the default by selecting **Restore Default**.
#### (Optional) Step 2.1: Choose What Should Happen When the Alert Triggers (Attach an Action)
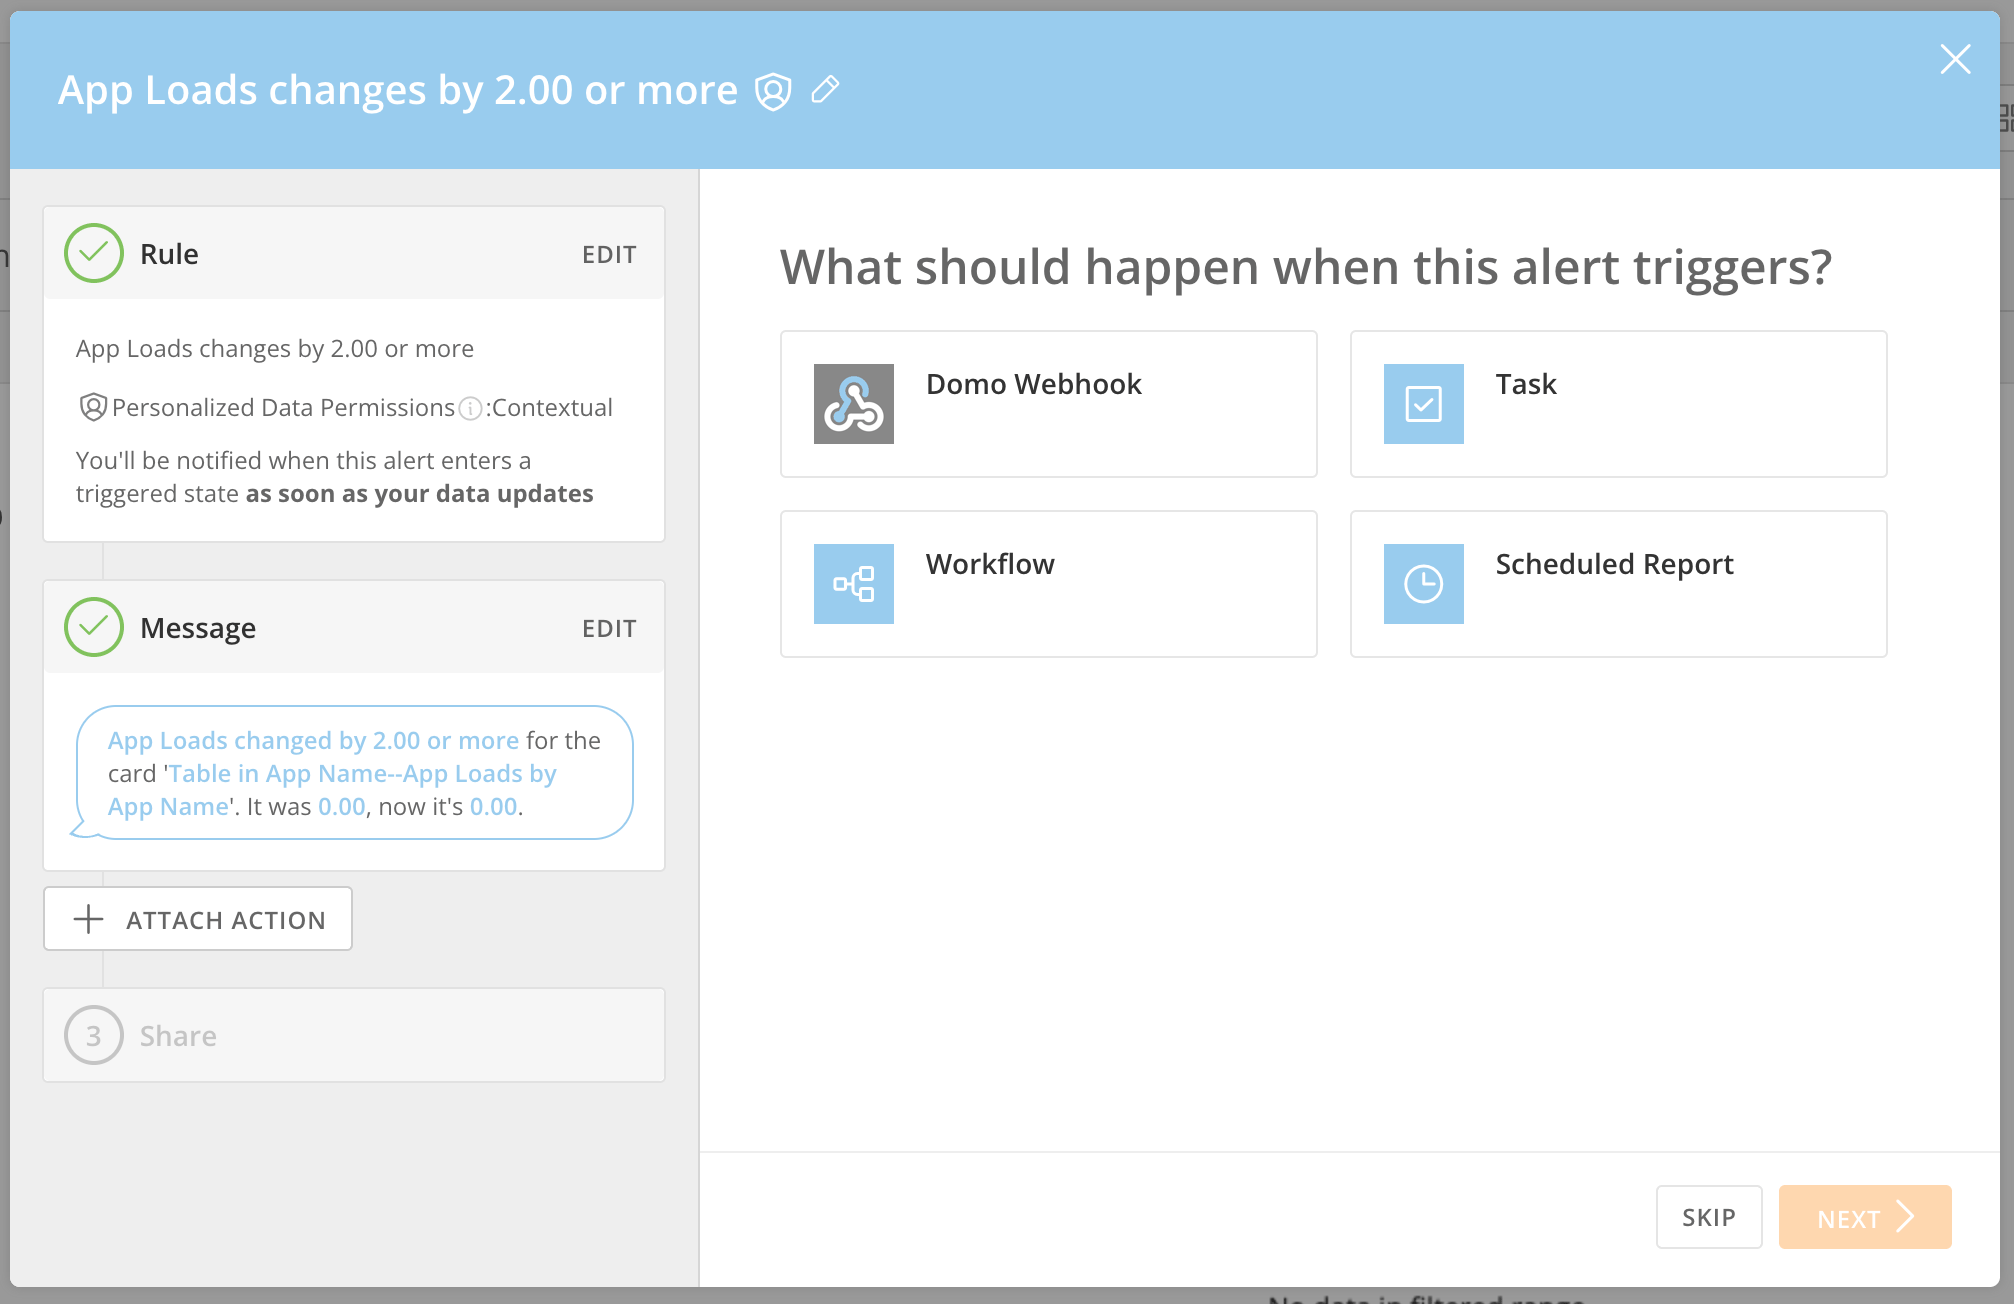
You can also use your trigger to take an action. In the wizard's left panel under **Message**, select **+** **Attach Action**. The available actions are sending a Domo webhook, creating a task inside Projects & Tasks, initiating a workflow, and sending a scheduled report.
Learn more about [Workflows](/s/article/000005331) and [Scheduled Reports](/s/article/360043437773). Webhook and task actions are described in more detail below.
If you edit the message, you can revert to the default by selecting **Restore Default**.
#### (Optional) Step 2.1: Choose What Should Happen When the Alert Triggers (Attach an Action)
You can also use your trigger to take an action. In the wizard's left panel under **Message**, select **+** **Attach Action**. The available actions are sending a Domo webhook, creating a task inside Projects & Tasks, initiating a workflow, and sending a scheduled report.
Learn more about [Workflows](/s/article/000005331) and [Scheduled Reports](/s/article/360043437773). Webhook and task actions are described in more detail below.
 ##### Webhook Actions
Attaching a webhook action to your Alert can initiate an event in a third-party system when your Alert is triggered. For example, a CFO might create a webhook that causes a celebratory message to be posted to their company's social media when the stock value reaches a certain price.
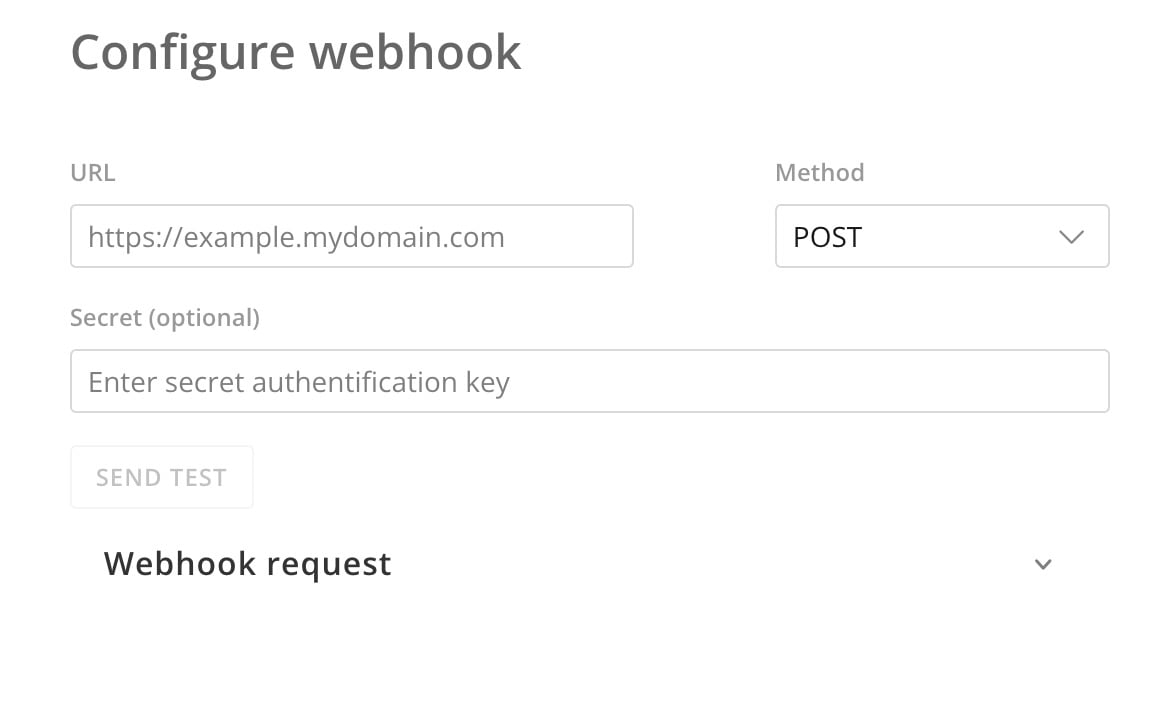
To create a webhook action, enter the webhook URL, choose the HTTP API method (POST, DELETE, PATCH, GET, and PUT are available), and enter a secret authorization key if required. You cannot edit the webhook body except for the customized Alert message described in step 2.
After configuring your webhook action, you can test it by clicking **Send Test**.
##### Webhook Actions
Attaching a webhook action to your Alert can initiate an event in a third-party system when your Alert is triggered. For example, a CFO might create a webhook that causes a celebratory message to be posted to their company's social media when the stock value reaches a certain price.
To create a webhook action, enter the webhook URL, choose the HTTP API method (POST, DELETE, PATCH, GET, and PUT are available), and enter a secret authorization key if required. You cannot edit the webhook body except for the customized Alert message described in step 2.
After configuring your webhook action, you can test it by clicking **Send Test**.
 ##### Task Actions
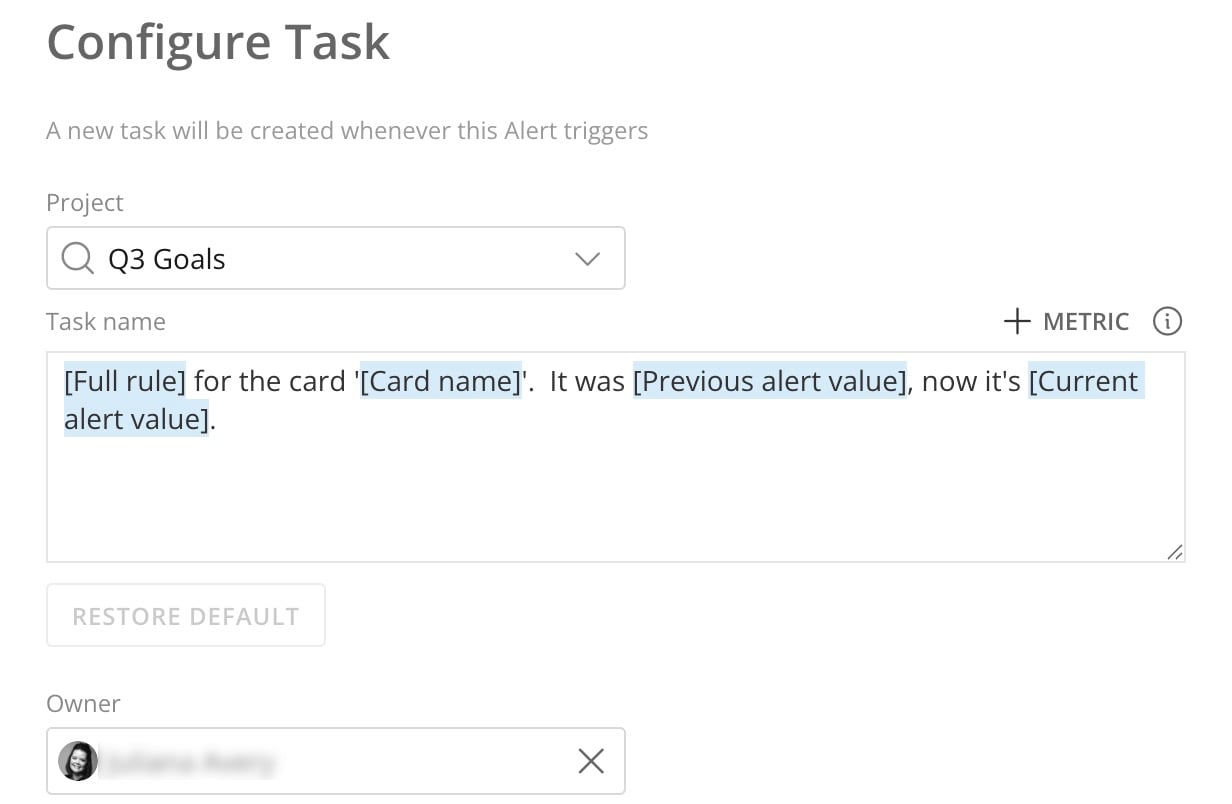
Attaching a task action allows you to create a task and add it to an existing project inside Domo Projects & Tasks, choosing an owner for the new task. Your customized message from step 2 above becomes the task name.
As soon as the Alert threshold is reached, the new task is added and assigned to the configured owner. Learn more about [Projects and Tasks](https://domo-support.domo.com/s/topic/0TO5w000000Zao5GAC/projects-and-tasks?language=en_US "Projects and Tasks").
##### Task Actions
Attaching a task action allows you to create a task and add it to an existing project inside Domo Projects & Tasks, choosing an owner for the new task. Your customized message from step 2 above becomes the task name.
As soon as the Alert threshold is reached, the new task is added and assigned to the configured owner. Learn more about [Projects and Tasks](https://domo-support.domo.com/s/topic/0TO5w000000Zao5GAC/projects-and-tasks?language=en_US "Projects and Tasks").
 #### Step 3: Share the Alert
In step three of the wizard, you can choose to share an Alert with other Domo users/groups or in Buzz so that the users/groups will receive an email or a Buzz conversation will receive a notification every time the Alert triggers. You can also write a custom message to let users know what is happening and delete users and groups who should no longer be able to see the Alert. You can delete users and groups only if you have an "Admin" default security profile or a custom role with "Manage All Groups" enabled. For more information about default security profiles, see [Managing Custom Roles](/s/article/360043438973 "Security Role Reference").
Learn more about [Configuring Notification and Alert Settings](/s/article/360042925814 "Configuring Notification and Alert Settings").
When you share Alerts with other users in your Domo, they automatically gain access to the cards to which those Alerts are tied.
Follow these steps to share an alert with users/groups:
1. In the **Share this alert** step of the alert creation wizard, add a person or group to share with by clicking in the **Enter users, groups, or emails** field and selecting the desired user, group, or email.
**Note:** In order to share an alert with a group when the DataSet powering a card has PDP policies applied, there must be a PDP policy set specifically for that group.
When you select a user or group, that user or group's name appears in the field. You can share with multiple users and/or groups by selecting all of their names and adding them to the field.
2. (Optional) Write a message in the "I thought you might find this interesting" field to let users know what is happening.
3. Click **Save**.
The Alert is shared with the selected users, including any added message.
##### Stop Sharing an Alert
3 images
Follow these steps to remove users/groups from the shared list for an Alert:
1. In the Details view for the card, select **See Alerts**.
2. Click the **Share** button for the Alert you want to remove users from.
3. Expand the section at the bottom of the dialog by clicking the message reading "Already shared with \[person]."
This displays rows for all users and/or groups the Alert is being shared with.
4. Remove a user or group from the shared list by clicking the "x" for that user or group.
The user or group is removed from the shared list and no longer receives Notifications when this Alert is triggered.
Follow these steps to share an Alert in a Buzz channel:
1. In the **Share this Alert** step of the Alert creation wizard, click the **Buzz** tab.
2. (Optional) Use the **Filter Buzz channels and chats** field to search for conversations you want to share this Alert in.
3. Check the boxes for all conversations you want to share the Alert in.
4. Click **Share**.
The Alert is shared in the selected conversations. Any users following those conversations will now receive Notifications any time the Alert is triggered.
1. **Share this alert**. Here you specify the users, groups, and Buzz conversations that receive notifications when the alert is triggered.
### Configure Alert Rule
If the data in the Card is filtered via either Page or Card Filters, you are given the option to specify whether the Alert is applied to the filtered or unfiltered version of the Card.
### Specify the Alert Conditions
Alerts are made up of the following parts:
* The item being measured (the "metric"). This could be a specific category or series in your chart, the current value of the chart, or the total of all items in the chart. It could also be a calculation applied to a specific category or series. For example, you could apply an "Average" calculation to a given category, then configure your Alert to trigger whenever that value fell below a specified threshold. Domo provides a number of such calculations, from simple arithmetic operations like "Sum of" to advanced statistical operations such as "Skewness of" and "Kurtosis of."
* A conditional statement that connects the measure to the value or percentage and determines when your Alert is sent. Domo provides a variety of condition statements to choose from, including greater than, less than, and equal statements and combinations of these. You can also specify a particular degree of change using the **changes by**, **increases by**, and **decreases by** condition statements.
* The numerical value or percentage used as the threshold in your Alert.
You can build an Alert by specifying these components in the three fields in Step 1 ("Rule") of the Alert wizard.
#### Step 3: Share the Alert
In step three of the wizard, you can choose to share an Alert with other Domo users/groups or in Buzz so that the users/groups will receive an email or a Buzz conversation will receive a notification every time the Alert triggers. You can also write a custom message to let users know what is happening and delete users and groups who should no longer be able to see the Alert. You can delete users and groups only if you have an "Admin" default security profile or a custom role with "Manage All Groups" enabled. For more information about default security profiles, see [Managing Custom Roles](/s/article/360043438973 "Security Role Reference").
Learn more about [Configuring Notification and Alert Settings](/s/article/360042925814 "Configuring Notification and Alert Settings").
When you share Alerts with other users in your Domo, they automatically gain access to the cards to which those Alerts are tied.
Follow these steps to share an alert with users/groups:
1. In the **Share this alert** step of the alert creation wizard, add a person or group to share with by clicking in the **Enter users, groups, or emails** field and selecting the desired user, group, or email.
**Note:** In order to share an alert with a group when the DataSet powering a card has PDP policies applied, there must be a PDP policy set specifically for that group.
When you select a user or group, that user or group's name appears in the field. You can share with multiple users and/or groups by selecting all of their names and adding them to the field.
2. (Optional) Write a message in the "I thought you might find this interesting" field to let users know what is happening.
3. Click **Save**.
The Alert is shared with the selected users, including any added message.
##### Stop Sharing an Alert
3 images
Follow these steps to remove users/groups from the shared list for an Alert:
1. In the Details view for the card, select **See Alerts**.
2. Click the **Share** button for the Alert you want to remove users from.
3. Expand the section at the bottom of the dialog by clicking the message reading "Already shared with \[person]."
This displays rows for all users and/or groups the Alert is being shared with.
4. Remove a user or group from the shared list by clicking the "x" for that user or group.
The user or group is removed from the shared list and no longer receives Notifications when this Alert is triggered.
Follow these steps to share an Alert in a Buzz channel:
1. In the **Share this Alert** step of the Alert creation wizard, click the **Buzz** tab.
2. (Optional) Use the **Filter Buzz channels and chats** field to search for conversations you want to share this Alert in.
3. Check the boxes for all conversations you want to share the Alert in.
4. Click **Share**.
The Alert is shared in the selected conversations. Any users following those conversations will now receive Notifications any time the Alert is triggered.
1. **Share this alert**. Here you specify the users, groups, and Buzz conversations that receive notifications when the alert is triggered.
### Configure Alert Rule
If the data in the Card is filtered via either Page or Card Filters, you are given the option to specify whether the Alert is applied to the filtered or unfiltered version of the Card.
### Specify the Alert Conditions
Alerts are made up of the following parts:
* The item being measured (the "metric"). This could be a specific category or series in your chart, the current value of the chart, or the total of all items in the chart. It could also be a calculation applied to a specific category or series. For example, you could apply an "Average" calculation to a given category, then configure your Alert to trigger whenever that value fell below a specified threshold. Domo provides a number of such calculations, from simple arithmetic operations like "Sum of" to advanced statistical operations such as "Skewness of" and "Kurtosis of."
* A conditional statement that connects the measure to the value or percentage and determines when your Alert is sent. Domo provides a variety of condition statements to choose from, including greater than, less than, and equal statements and combinations of these. You can also specify a particular degree of change using the **changes by**, **increases by**, and **decreases by** condition statements.
* The numerical value or percentage used as the threshold in your Alert.
You can build an Alert by specifying these components in the three fields in Step 1 ("Rule") of the Alert wizard.
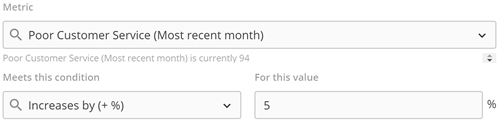 In the preceding screenshot, the user has selected **Poor Customer Service (Most recent month)** as the measure and **Increases by (+ %)** as the conditional statement, and has entered `5` as the numerical value. This Alert triggers when the "Poor Customer Service (Most recent month)" percentage increases by 5%.
### Specify the Alert Frequency
Also in this tab, you can specify how often Domo checks checks to see if the Alert is in a triggered state. You do this by clicking the arrow at the bottom right of the configuration options and selecting the desired option.
In the preceding screenshot, the user has selected **Poor Customer Service (Most recent month)** as the measure and **Increases by (+ %)** as the conditional statement, and has entered `5` as the numerical value. This Alert triggers when the "Poor Customer Service (Most recent month)" percentage increases by 5%.
### Specify the Alert Frequency
Also in this tab, you can specify how often Domo checks checks to see if the Alert is in a triggered state. You do this by clicking the arrow at the bottom right of the configuration options and selecting the desired option.
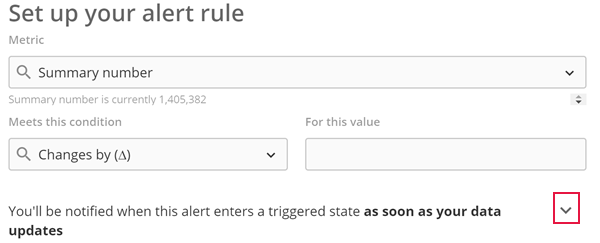 Options include **Every time the data updates**, **Hourly**, **Daily**, **Weekly**, and **Monthly**.
* If you select **Every time the data updates**, Domo checks the Alert any time the data in the Card is refreshed.
* If you select **Hourly** or **Daily**, you can choose whether to include weekends in your evaluation. You can also set the specific time of day when you choose **Daily**.
* If you select **Weekly**, you can select the specific day of the week along with the time of day.
* If you select **Monthly**, you can select a specific date or the first/last day of the month, along with the time of day.
Depending on the Alert condition you've selected, a checkbox may also appear reading **Keep sending Notifications while in a triggered state**. When this box is checked, instead of sending out a single Notification as soon as the Alert enters a triggered state (which is the default functionality), Domo sends out Notifications based on the selected frequency *until the Alert conditions are no longer met*. For example, let's user Gus creates the Alert rule "Summary number is greater than 500," selects **Weekly** as the frequency, then checks this box. As soon as the summary number surpasses 500, a Notification is sent. Then, as long as the summary number remains above 500, new Notifications are sent on the specified weekday at the specified time. If the number drops below 500, Notifications will stop being sent. If, on the other hand, Gus doesn't check this box, only an initial Notification is sent when the Alert is triggered.
The **Keep sending Notifications while in a triggered state** checkbox appears only for threshold-based Alerts, as opposed to those one-time Alerts that trigger when a certain degree of change is met. For example, for an "Is greater than" Alert (e.g. an Alert that triggers when its value surpasses 1000), this box would be available because the Alert still applies as long as the value remains above the threshold. But for a "Changes by" Alert, the box is not available because once the given value is reached, only a single Notification needs be sent—the Alert's work is then done.
#### Determine Whether to Honor Filters
If filters have been set on this card on either the dashboard or card level, an option appears allowing you to toggle whether those Filters are honored in the Alert. If you uncheck the box, the Alert will be applied to the unfiltered version of the card. You can select **Show filters** option to see the currently applied Filters.
## Save an Alert
After you've selected the desired Alert components and entered a value, click **Save**.
Your new Alert appears in the **Alerts** tab of the **Details** view. You can do any of the following with this Alert:
* Open it for editing.
* "Unsubscribe" from it so you do *not* receive Notifications when it is triggered. By default, when you create an Alert, you are set to follow it.
* See how many times it has been triggered.
* Delete it.
* Set instant, daily, or weekly Notifications on the Alert.
* See a listing of Alert events.
* See a list of followers.
### Access Alerts
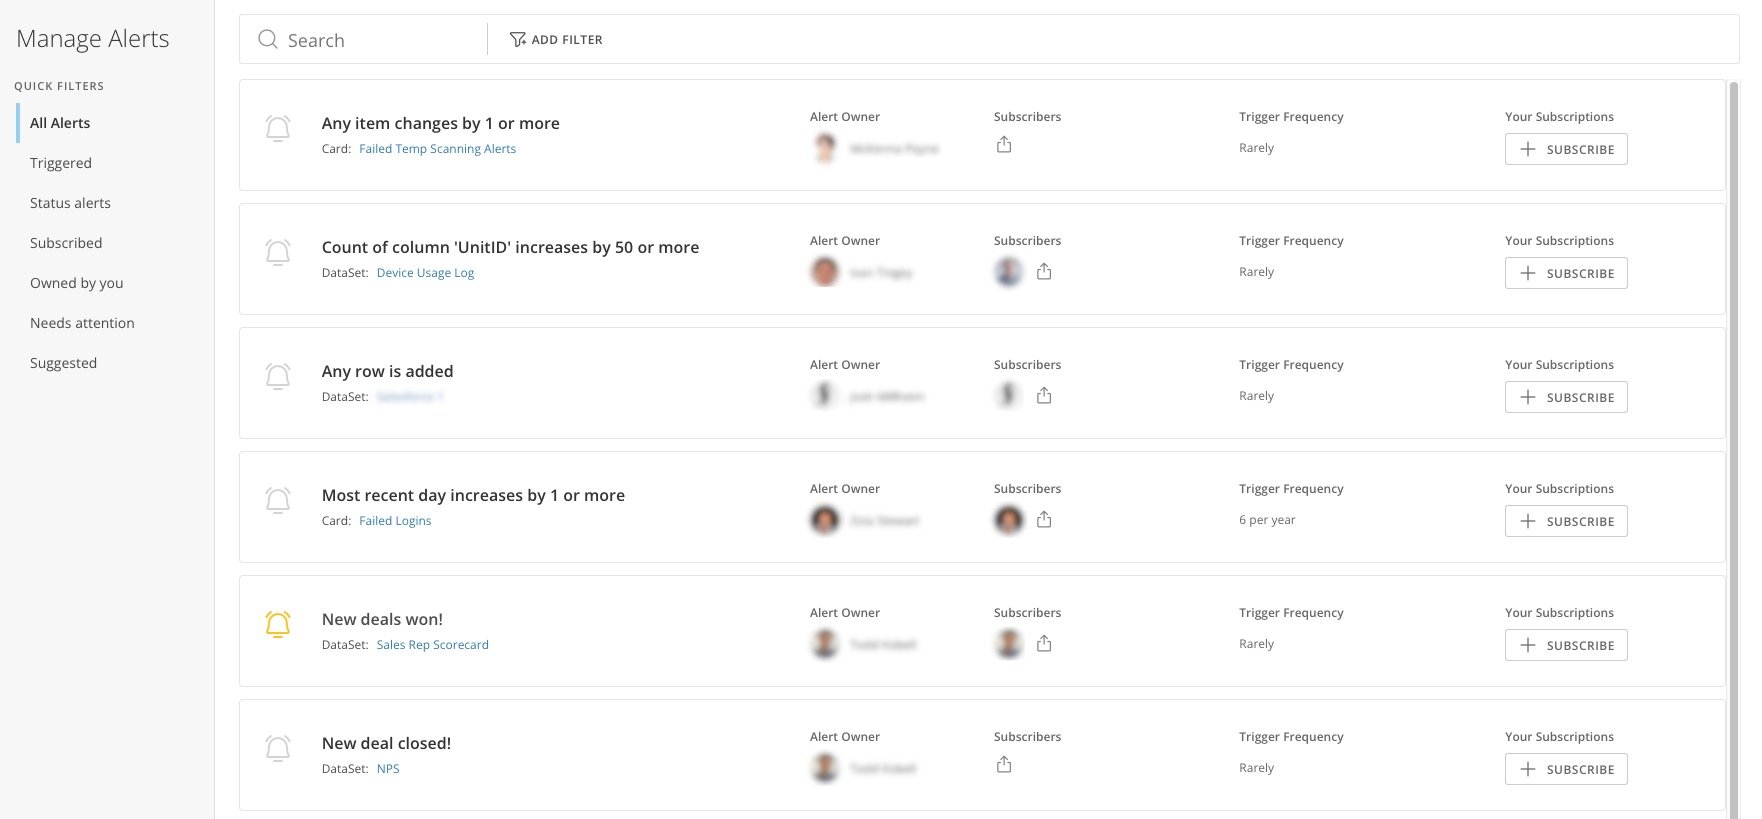
Navigate to **Manage Alerts** to open the Alerts Center, using the search tool if needed.
Options include **Every time the data updates**, **Hourly**, **Daily**, **Weekly**, and **Monthly**.
* If you select **Every time the data updates**, Domo checks the Alert any time the data in the Card is refreshed.
* If you select **Hourly** or **Daily**, you can choose whether to include weekends in your evaluation. You can also set the specific time of day when you choose **Daily**.
* If you select **Weekly**, you can select the specific day of the week along with the time of day.
* If you select **Monthly**, you can select a specific date or the first/last day of the month, along with the time of day.
Depending on the Alert condition you've selected, a checkbox may also appear reading **Keep sending Notifications while in a triggered state**. When this box is checked, instead of sending out a single Notification as soon as the Alert enters a triggered state (which is the default functionality), Domo sends out Notifications based on the selected frequency *until the Alert conditions are no longer met*. For example, let's user Gus creates the Alert rule "Summary number is greater than 500," selects **Weekly** as the frequency, then checks this box. As soon as the summary number surpasses 500, a Notification is sent. Then, as long as the summary number remains above 500, new Notifications are sent on the specified weekday at the specified time. If the number drops below 500, Notifications will stop being sent. If, on the other hand, Gus doesn't check this box, only an initial Notification is sent when the Alert is triggered.
The **Keep sending Notifications while in a triggered state** checkbox appears only for threshold-based Alerts, as opposed to those one-time Alerts that trigger when a certain degree of change is met. For example, for an "Is greater than" Alert (e.g. an Alert that triggers when its value surpasses 1000), this box would be available because the Alert still applies as long as the value remains above the threshold. But for a "Changes by" Alert, the box is not available because once the given value is reached, only a single Notification needs be sent—the Alert's work is then done.
#### Determine Whether to Honor Filters
If filters have been set on this card on either the dashboard or card level, an option appears allowing you to toggle whether those Filters are honored in the Alert. If you uncheck the box, the Alert will be applied to the unfiltered version of the card. You can select **Show filters** option to see the currently applied Filters.
## Save an Alert
After you've selected the desired Alert components and entered a value, click **Save**.
Your new Alert appears in the **Alerts** tab of the **Details** view. You can do any of the following with this Alert:
* Open it for editing.
* "Unsubscribe" from it so you do *not* receive Notifications when it is triggered. By default, when you create an Alert, you are set to follow it.
* See how many times it has been triggered.
* Delete it.
* Set instant, daily, or weekly Notifications on the Alert.
* See a listing of Alert events.
* See a list of followers.
### Access Alerts
Navigate to **Manage Alerts** to open the Alerts Center, using the search tool if needed.
 ### Edit an Alert
You can open an Alert for editing by doing any of the following:
* Select **Alert Me** from the Card's menu in the Card Page, click in the top portion of the Alert Card, then click **Edit**.
* Click
on the Card in the Card page, click in the top portion of the Alert Card, then click **Edit**. (This icon *only* appears if one or more Alerts has been triggered on the Card.)
* Select **Alerts** in the app toolbar at the top of the screen, locate and click on the Alert you want to edit, then click the **Edit** button next to "Rule" or "Message Preview" and make your desired changes.
* Open the Card Details view, click
to open the **Alerts** tab, click in the top portion of the Alert Card, then click **Edit**.
**Video - Alerts Overview**
**Video - Alert Actions Overview**
### Edit an Alert
You can open an Alert for editing by doing any of the following:
* Select **Alert Me** from the Card's menu in the Card Page, click in the top portion of the Alert Card, then click **Edit**.
* Click
on the Card in the Card page, click in the top portion of the Alert Card, then click **Edit**. (This icon *only* appears if one or more Alerts has been triggered on the Card.)
* Select **Alerts** in the app toolbar at the top of the screen, locate and click on the Alert you want to edit, then click the **Edit** button next to "Rule" or "Message Preview" and make your desired changes.
* Open the Card Details view, click
to open the **Alerts** tab, click in the top portion of the Alert Card, then click **Edit**.
**Video - Alerts Overview**
**Video - Alert Actions Overview**