> ## Documentation Index
> Fetch the complete documentation index at: https://domoinc-openapi-sync-dataflows.mintlify.site/llms.txt
> Use this file to discover all available pages before exploring further.

# Adding a Notebook Card

export const InlineImage = ({src, alt = '', height = '1.6em'}) => {
  return <img noZoom src={src} alt={alt} style={{
    display: 'inline',
    verticalAlign: 'start',
    height: height,
    margin: '0'
  }} />;
};

## Intro

You can create a Notebook Card in Domo. Notebook cards are Cards containing text you enter. You can type or paste text in a Notebook Card. You can format text using bold, italics, strikethrough, and numbered and bulleted lists by selecting options in the toolbar. You can also add images, hyperlinks, tables, and dynamic Summary Numbers to Notebook Cards.

<Note>
  **Note:** When you paste text certain formatting may be preserved, including bold, italics, lists, tables, font size, and headings. The formatting that is preserved varies, depending on the source. Typically, formatting associated with basic HTML tags is preserved, although styles may differ. Pasted images are stripped out. If you want to add images, use the Image Uploader.
</Note>

**Video - Notebook Cards**

<iframe allowfullscreen="" frameborder="1" height="315" src="//www.youtube-nocookie.com/embed/9BQFGApjpN4" width="560" />

## Adding Notebook Content

**To add a Notebook Card to Domo,**

1. Navigate to the page where you want the Notebook Card to appear.

2. Click
   <InlineImage src="/images/kb/ka05w00000123Ti-00N5w00000Ri7BU-0EM5w000005vOHg.png" /> **> Create new Card**.

   A dialog appears with a number of card creation options to choose from.

   <Tip>
     **Tip:** You can also open this dialog from anywhere in Domo by selecting <InlineImage src="/images/kb/ka05w0000012340-00N5w00000Ri7BU-0EM5w000005vNwt.png" /> in the app toolbar and selecting **Card**.
   </Tip>

3. Click **Notebook**.

   The Notebook create view appears.

4. (Optional) To change the default title, click the title field and replace the text with your desired title text. You can also add a description and Smart Text.

5. Enter your text in the blank field.

6. Apply formatting and add tables, hyperlinks, images, and dynamic Summary Numbers as desired.

   The following table describes the available toolbar options:

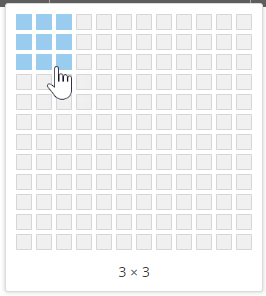
   <table class="mt-responsive-table"><thead><tr><th colspan="1" rowspan="1"><p> Option </p></th><th colspan="1" rowspan="1"><p> Description </p></th></tr></thead><tbody><tr><td colspan="1" rowspan="1"><p> Font Size Picker </p></td><td colspan="1" rowspan="1"><p> Lets you change the font size of selected text. Four sizes are available— <b> Header </b> (largest), <b> Title </b>, <b> Subtitle </b>, and <b> Text </b> (smallest). </p></td></tr><tr><td colspan="1" rowspan="1"><p> Styling Options </p><p><InlineImage src="/images/kb/ka05w00000124mU-00N5w00000Ri7BU-0EM5w000005vOFs.png" /></p></td><td colspan="1" rowspan="1"><p> Lets you change the styling of selected text. </p><ul><li><p> Click <InlineImage src="/images/kb/ka05w00000124mU-00N5w00000Ri7BU-0EM5w000005vOHB.png" /> to apply bold style to the selected text. </p></li><li><p> Click <InlineImage src="/images/kb/ka05w00000124mU-00N5w00000Ri7BU-0EM5w000005vOGe.png" /> to apply italic style to the selected text. </p></li><li><p> Click <InlineImage src="/images/kb/ka05w00000124mU-00N5w00000Ri7BU-0EM5w000005vOGm.png" /> to apply strikethrough style to the selected text. </p></li><li><p> Click <InlineImage src="/images/kb/ka05w00000124mU-00N5w00000Ri7BU-0EM5w000005vOGo.png" /> to open the color picker for the selected text. </p></li></ul></td></tr><tr><td colspan="1" rowspan="1"><p> Bulleted List </p><p><InlineImage src="/images/kb/ka05w00000124mU-00N5w00000Ri7BU-0EM5w000005vOGb.png" /></p></td><td colspan="1" rowspan="1"><p> Adds a bulleted list to the card. When you add a bulleted list, a new bullet item is added each time you hit Enter. To turn off the list, hit Enter or click the icon a second time. </p></td></tr><tr><td colspan="1" rowspan="1"><p> Numbered List </p><p><InlineImage src="/images/kb/ka05w00000124mU-00N5w00000Ri7BU-0EM5w000005vOFr.png" /></p></td><td colspan="1" rowspan="1"><p> Adds a numbered list to the card. When you add a numbered list, a new list item is added each time you hit Enter. To turn off the list, hit Enter or click the icon a second time. </p></td></tr><tr><td colspan="1" rowspan="1"><p> Horizontal Alignment </p><p><InlineImage src="/images/kb/ka05w00000124mU-00N5w00000Ri7BU-0EM5w000005vOGf.png" /></p></td><td colspan="1" rowspan="1"> Lets you change the horizontal alignment on the page of the line of text that currently contains the cursor. Note that this option is used to change the alignment of just one line, while the <b> Vertical Alignment </b> option changes the alignment of all text on the page. </td></tr><tr><td colspan="1" rowspan="1"><p> Vertical Alignment </p><p><InlineImage src="/images/kb/ka05w00000124mU-00N5w00000Ri7BU-0EM5w000005vOH0.png" /></p></td><td colspan="1" rowspan="1"> Lets you change the vertical alignment of all the text on the page. Note that this option is used to change the alignment of all text on the page, while the <b> Horizontal Alignment </b> option changes the alignment of just one line. </td></tr><tr><td colspan="1" rowspan="1"><p> Table </p><p><InlineImage src="/images/kb/ka05w00000124mU-00N5w00000Ri7BU-0EM5w000005vOH7.png" /></p></td><td colspan="1" rowspan="1"><p> Lets you add a table to the card. When you click this icon, a grid image appears; you can mouse over this image to select the desired number of rows and columns in the table then click the bottom-rightmost square to add the table. In the following example, the user wants a 3x3 table, so he mouses over the grid as shown here: </p><p><img alt="notebook_table_grid_new.png" src="https://mintcdn.com/domoinc-openapi-sync-dataflows/YY6W1U347GpqLSJS/images/kb/ka05w00000124mU-00N5w00000Ri7BU-0EM5w000005vOGu.png?fit=max&auto=format&n=YY6W1U347GpqLSJS&q=85&s=f9495ce8ec2d6b9aadf0319e49bde0a7" width="266" height="296" data-path="images/kb/ka05w00000124mU-00N5w00000Ri7BU-0EM5w000005vOGu.png" /></p><p> The user then clicks on the square in the bottom right to add the table. </p><p> Tables in Notebook Cards size columns automatically depending on the amount of text entered. You can change column width manually by clicking and dragging on the column borders. </p><p> When you click in a table cell, an options icon <InlineImage src="/images/kb/ka05w00000124mU-00N5w00000Ri7BU-0EM5w000005vOGX.png" /> appears. Click on this to open an options menu for the table. These options are as follows: </p><table class="mt-responsive-table"><tbody><tr><td class="mt-noheading" colspan="1" rowspan="1"><p> Add column left </p></td><td class="mt-noheading" colspan="1" rowspan="1"><p> Adds a column to the left of the selected row. </p></td></tr><tr><td class="mt-noheading" colspan="1" rowspan="1"><p> Add column right </p></td><td class="mt-noheading" colspan="1" rowspan="1"><p> Adds a column to the right of the selected row. </p></td></tr><tr><td class="mt-noheading" colspan="1" rowspan="1"><p> Delete column </p></td><td class="mt-noheading" colspan="1" rowspan="1"><p> Deletes the selected column. </p></td></tr><tr><td class="mt-noheading" colspan="1" rowspan="1"><p> Add row above </p></td><td class="mt-noheading" colspan="1" rowspan="1"><p> Adds a row above the row with the cursor. </p></td></tr><tr><td class="mt-noheading" colspan="1" rowspan="1"><p> Add row below </p></td><td class="mt-noheading" colspan="1" rowspan="1"><p> Adds a row below the row with the cursor. </p></td></tr><tr><td class="mt-noheading" colspan="1" rowspan="1"><p> Delete row </p></td><td class="mt-noheading" colspan="1" rowspan="1"><p> Deletes the selected row. </p></td></tr><tr><td class="mt-noheading" colspan="1" rowspan="1"><p> Delete table </p></td><td class="mt-noheading" colspan="1" rowspan="1"><p> Deletes the entire table. </p></td></tr></tbody></table></td></tr><tr><td colspan="1" rowspan="1"><p> Summary Number </p><p><InlineImage src="/images/kb/ka05w00000124mU-00N5w00000Ri7BU-0EM5w000005vOFt.png" /></p></td><td colspan="1" rowspan="1"> Lets you add a dynamically changing Summary Number to this card, <a href="/s/article/360043428753" target="_blank" title="Configuring Your Chart Summary Number"> similar to those that appear in most cards with charts </a>. You choose the DataSet with data you want to summarize, along with the column and the desired aggregation type. You can also configure display options. Once you have added a Summary Number to your Notebook Card, it will update automatically anytime the data updates. The process for adding Summary Numbers to Notebook Cards is discussed in more detail later in this article. </td></tr><tr><td colspan="1" rowspan="1"><p> Image Uploader </p><p><InlineImage src="/images/kb/ka05w00000124mU-00N5w00000Ri7BU-0EM5w000005vOH9.png" /></p></td><td colspan="1" rowspan="1"><p> Opens the Image Uploader tool, which lets you select and upload an image from your computer. JPEGs, PNGs, and GIFs are all supported. </p><p> You can delete an image by either selecting it or moving the cursor to the right of it then pressing Backspace/Delete. </p></td></tr><tr><td colspan="1" rowspan="1"><p> Hyperlink </p><p><InlineImage src="/images/kb/ka05w00000124mU-00N5w00000Ri7BU-0EM5w000005vOH2.png" /></p></td><td colspan="1" rowspan="1"><p> Lets you add a hyperlink to the card. When you add a hyperlink, you can define the action that takes place when a user clicks on it. These actions include either opening a specified web page or opening other content in Domo, either in the same browser tab or in a different tab. This is discussed in more detail later in this article. </p></td></tr><tr><td colspan="1" rowspan="1"><p> Smart Text </p><p><InlineImage src="/images/kb/ka05w00000124mU-00N5w00000Ri7BU-0EM5w000005vOGc.png" /></p></td><td colspan="1" rowspan="1"> Lets you add dynamically changing text to this Card. You can choose to display DataSet info, Filters, Segments, or Date range data. Once you have added the Smart Text to your Notebook Card, it will update automatically anytime the data updates. The process for adding Smart Text to Notebook Cards is discussed in more detail later in this article. </td></tr></tbody></table>
7. Click **Done** when you are finished.

   You can close without creating a Notebook Card by clicking the "x" in the top right corner.

After you click **Done**, a Notebook Card containing your text is added to Domo.

## Defining Hyperlink Actions

When adding a hyperlink to a Notebook Card, you can define the action that occurs when a user clicks on it. These actions may be either of the following:

* Opening other content in Domo, either in the same browser tab or in a different tab
* Opening a specified web page

****To configure specified Domo content to open when the link is clicked,****

1. Open the Notebook Card and go into the editor by clicking **Edit** in the upper right corner.
2. Click
   <InlineImage src="/images/kb/ka05w00000124mU-00N5w00000Ri7BU-0EM5w000005vOH2.png" /> in the editor toolbar.
3. In Section 1, select the ****Link to anything in Domo**** radio button.
4. In Section 2, click the ****Select Content**** button.
5. Locate the content you want to open when this card is clicked.
6. Click ****Save****.
7. (Optional) If you want the link to display with custom text, enter the desired text in the **Display as** field.
8. (Optional) If you want the new content to open in a new browser tab when the card is clicked, check the ****Open link in a new tab**** box.
9. Click ****Save**** again.

****To configure an external web page to open when a card is clicked,****

1. Open the Notebook Card and go into the editor by clicking **Edit** in the upper right corner.
2. Click
   <InlineImage src="/images/kb/ka05w00000124mU-00N5w00000Ri7BU-0EM5w000005vOH2.png" /> in the editor toolbar.
3. In Section 1, select the ****Link to external web page**** radio button.
4. In Section 2, in the ****Web page address**** field, enter the URL of the page you want to open when the card is clicked.
5. (Optional) If you want the URL to open with a custom name, enter the name in the ****Display as**** field.
6. (Optional) If you want the new content to open in a new browser tab when the card is clicked, check the ****Open link in a new tab**** box.
7. Click ****Save**** again.

## Adding Summary Numbers

You can add a Summary Number to your Notebook Card referencing a given DataSet column. Thereafter, anytime the underlying data changes, the Summary Number will change automatically. To add a Summary Number, you choose the DataSet with data you want to summarize, along with the column and the desired aggregation type. If you want, you can filter your selected column as well as configure display options. Once you have added a Summary Number to your Notebook Card, it will update automatically anytime the underlying data updates.

Personalized Data Permissions (PDP) are respected when adding Summary Numbers to Notebook Cards. For more information about PDP, see [Personalized Data Permissions (PDP)](/s/article/360042934614 "Personalized Data Permissions (PDP)").

**To add a Summary Number to a Notebook Card,**

1. Create a new Notebook Card or open an existing Notebook Card and go into the editor by clicking **Edit** in the upper right corner.
2. Click
   <InlineImage src="/images/kb/ka05w00000124mU-00N5w00000Ri7BU-0EM5w000005vOFt.png" /> in the editor toolbar.

   This opens the **Create Summary Number** dialog, in which you set all of the options for your Summary Number.
3. In Section 1, do the following:

   1. In the **DataSet** field, select the DataSet containing the column you want to derive your Summary Number from.
   2. (Optional) In the **Label** field, enter a description that will appear when a user hovers over the Summary Number.
   3. In the **Data to summarize** menu, select the DataSet column you want to derive your Summary Number from.
   4. In the **Displayed by** field, select how you want the data to be aggregated.

      For example, if your Summary Number is to reflect a monetary value, you would probably want to select **Sum** or **Average**.
   5. (Optional) If you want to filter the values in the column, click **Add Filter**, choose the column you want to filter on, then configure your filters.

      Filter options differ depending on the type of data you're filtering.

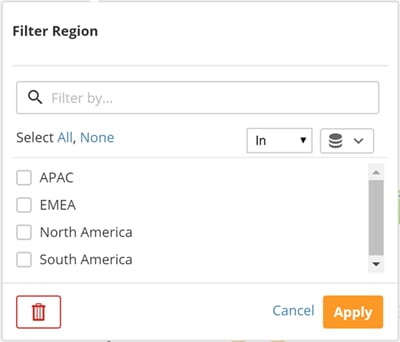
      * (Conditional) If the selected column contains series data,

        <Frame>
          <img alt="notebook_summary_number_series_filter.png" src="https://mintcdn.com/domoinc-openapi-sync-dataflows/YY6W1U347GpqLSJS/images/kb/ka05w00000124mU-00N5w00000Ri7BU-0EM5m000005vOGy.png?fit=max&auto=format&n=YY6W1U347GpqLSJS&q=85&s=4b5dc4c3395ef503ac4a9f656edc14c7" width="400" height="342" data-path="images/kb/ka05w00000124mU-00N5w00000Ri7BU-0EM5m000005vOGy.png" />
        </Frame>

        1. Select the checkboxes for each series you want to pass your filters.

           You can select all of the checkboxes by clicking ****All**** or deselect all of the checkboxes by clicking ****None****.

           You can filter the series that appear in the list by entering a keyword or a string of characters found in a keyword in the ****Filter by**** field.
        2. Specify whether the items you have checked appear or do not appear in your chart by selecting ****In**** or ****Not In**** from the menu in the top right.
        3. Click ****Apply****.
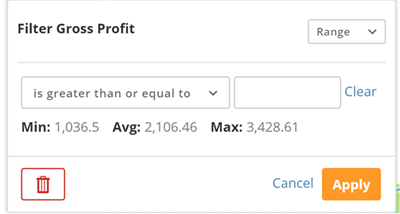
      * (Conditional) If the selected column contains amount data,
        <Frame>
          <img alt="notebook_summary_number_amount_filter.png" src="https://mintcdn.com/domoinc-openapi-sync-dataflows/YY6W1U347GpqLSJS/images/kb/ka05w00000124mU-00N5w00000Ri7BU-0EM5w000005vOGV.png?fit=max&auto=format&n=YY6W1U347GpqLSJS&q=85&s=232602b612d60fd33eb53c3f2fab91cb" width="400" height="214" data-path="images/kb/ka05w00000124mU-00N5w00000Ri7BU-0EM5w000005vOGV.png" />
        </Frame>

        1. Do one of the following:

           * If you want to filter amounts based on a range...

             1. Leave the dropdown menu in the upper right corner set to ****Range****.
             2. Select a condition statement from the menu.

                One or more fields may appear, depending on the condition statement.
             3. (Conditional) If one or more fields appeared when you selected a condition statement, enter the desired amounts in the fields.

                For example, if you wanted your Summary Number to reflect amounts between 200,000 and 300,000, you would select ****is between**** from the menu, enter "200,000" in the first field, and enter "300,000" in the second field.
           * If you want to filter amounts based on specific values from your DataSet...

             1. Select ****Selection**** in the dropdown menu in the upper right corner.
             2. Check the boxes for all of the values you want to filter on.

                You can select all of the checkboxes by clicking ****All**** or deselect all of the checkboxes by clicking ****None.**** Or you can filter the values that appear in the list by entering a string of numbers in the ****Filter by**** field. Finally, you can specify whether the items you have checked appear or do not appear in your chart by selecting ****In**** or ****Not In**** from the menu in the top right.
        2. Click ****Apply****.
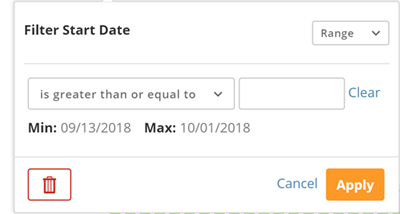
      * (Conditional) If the selected column contains date data,
        <Frame>
          <img alt="notebook_summary_number_date_filter.png" src="https://mintcdn.com/domoinc-openapi-sync-dataflows/YY6W1U347GpqLSJS/images/kb/ka05w00000124mU-00N5w00000Ri7BU-0EM5w000005vOGW.png?fit=max&auto=format&n=YY6W1U347GpqLSJS&q=85&s=5890d2f309f9709b13a22d18713b5504" width="400" height="214" data-path="images/kb/ka05w00000124mU-00N5w00000Ri7BU-0EM5w000005vOGW.png" />
        </Frame>

        1. Do one of the following:

           * If you want to filter dates based on a range...

             1. Leave the dropdown menu in the upper right corner set to ****Range****.
             2. Select a condition statement from the menu.

                One or more fields may appear, depending on the condition statement.
             3. Enter the desired dates in the fields as necessary.

                For example, if you wanted your Summary Number to reflect dates between 1-31-2014 and 4-30-2015, you would select ****is between**** from the menu, select January 1, 2014 in the first field, and select April 30, 2015 in the second field.
           * If you want to filter dates based on specific dates from your DataSet...

             1. Select ****Selection**** in the dropdown menu in the upper right corner.
             2. Check the boxes for all of the dates you want to filter on.

                You can select all of the checkboxes by clicking ****All**** or deselect all of the checkboxes by clicking ****None.**** Or you can filter the dates that appear in the list by entering a filter string in the ****Filter by**** field. (For example, if you wanted to filter down to dates from 2010, you would enter "2010" into this field.) Finally, you can specify whether the dates you have checked appear or do not appear in your chart by selecting ****In**** or ****Not In**** from the menu in the top right.
        2. Click ****Apply****.
4. In Section 2, do the following:

   1. In the **Display as** field, select the desired number format for the Summary Number.

      If you select **Number**, no special format is applied to the number. If you select **Currency**, a currency symbol will be appended to the number. If you select **Percentage**, a percent symbol will be appended.
   2. Do one of the following:

      * If you selected **Number** or **Percentage** in the previous step, choose the desired number of decimals in the **Decimals** menu.
      * If you selected **Currency** in the previous step...

        1. Select the desired currency symbol in the first dropdown menu.
        2. Select the desired number of decimals in the **Decimals** menu
   3. (Optional) If you want to abbreviate the number (e.g. "200,000" becomes "2K"), check the **Abbreviate** box.
   4. (Optional) If you want to use commas to separate thousands in the number, check the **Use thousands separator** box.
   5. Click **Save**.

## Adding Smart Text

You can add Smart Text to your Notebook Card referencing DataSet info, Filters, Segments, or Date range data. Thereafter, anytime the underlying data changes, the Smart Text will change automatically. Personalized Data Permissions (PDP) are respected when adding Smart Text to Notebook Cards. For more information about PDP, see [Personalized Data Permissions (PDP)](/s/article/360042934614).

**Video - Smart Text Overview**

<iframe allowfullscreen="" frameborder="1" height="315" src="//www.youtube-nocookie.com/embed/63NfWxnVVzg" width="560" />

**To add Smart Text to a Notebook Card,**

1. Create a new Notebook Card or open an existing Notebook Card and go into the editor by clicking **Edit** in the upper right corner.

2. Click
   <InlineImage src="/images/kb/ka05w00000124mU-00N5w00000Ri7BU-0EM5w000005vOGc.png" /> in the editor toolbar.

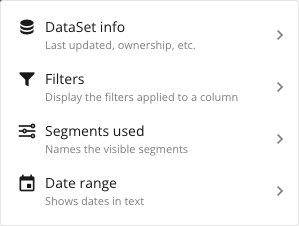
   This opens the **Smart Text** menu, in which you select what data you would like to display.

3. Select one of the following options:

   <Frame>
     <img alt="Smart_Text_Types.png" src="https://mintcdn.com/domoinc-openapi-sync-dataflows/YY6W1U347GpqLSJS/images/kb/ka05w00000124mU-00N5w00000Ri7BU-0EM5w000005vOGi.png?fit=max&auto=format&n=YY6W1U347GpqLSJS&q=85&s=8ae814d84cd168ca4ac877aa53ec1fa3" width="299" height="226" data-path="images/kb/ka05w00000124mU-00N5w00000Ri7BU-0EM5w000005vOGi.png" />
   </Frame>

   * **DataSet info** - Allows you to display the
     **Name**, **Owner**, or **Date last updated** for a specific DataSet.
   * **Filters** - Allows you to display the filters applied to a column or
     **Display any filter**.
   * **Segments used** - Allows you to display the
     **Segment name** or **Segment description** of the visible Segments.
   * **Date range** - Allows you to display the **Date range** or **Graph by** dates.

     <Note>
       **Note:** The steps for configuring the different Smart Text options are listed in the sections below.
     </Note>

4. Fill out the information in the **Apply logic to this text** menu.

5. Click **Apply**.

### DataSet Info Smart Text Configuration

Allows you to display the **Name**, **Owner**, or **Date last updated** for a specific DataSet.

#### DataSet Name Smart Text

**To configure the DataSet info Name Smart Text,**

1. Create a new Notebook Card or open an existing Notebook Card and go into the editor by clicking **Edit** in the upper right corner.
2. Click
   <InlineImage src="/images/kb/ka05w00000124mU-00N5w00000Ri7BU-0EM5w000005vOGc.png" /> in the editor toolbar.
3. Select **DataSet info**.
4. Search for and select the DataSet you want to use.
5. Click **Choose DataSet**.
6. Select **Name**.
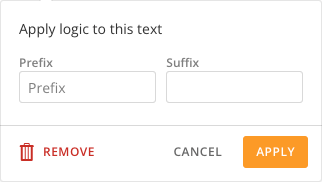
7. Fill out the **Apply logic to this text** menu.

   <Frame>
     <img alt="DataSet_Info_and_Segment_Options.png" src="https://mintcdn.com/domoinc-openapi-sync-dataflows/YY6W1U347GpqLSJS/images/kb/ka05w00000124mU-00N5w00000Ri7BU-0EM5w000005vOGk.png?fit=max&auto=format&n=YY6W1U347GpqLSJS&q=85&s=aff889f2e283071ea9e4bbb84294c791" width="322" height="182" data-path="images/kb/ka05w00000124mU-00N5w00000Ri7BU-0EM5w000005vOGk.png" />
   </Frame>

   1. (Optional) Apply a **Prefix**.
   2. (Optional) Apply a **Suffix**.
8. Click **Apply**.

#### DataSet Owner Smart Text

**To configure the DataSet info Owner Smart Text,**

1. Create a new Notebook Card or open an existing Notebook Card and go into the editor by clicking **Edit** in the upper right corner.
2. Click
   <InlineImage src="/images/kb/ka05w00000124mU-00N5w00000Ri7BU-0EM5w000005vOGc.png" /> in the editor toolbar.
3. Select **DataSet info**.
4. Search for and select the DataSet you want to use.
5. Click **Choose DataSet**.
6. Select **Owner**.
7. Fill out the **Apply logic to this text** menu.

   <Frame>
     <img alt="DataSet_Info_and_Segment_Options.png" src="https://mintcdn.com/domoinc-openapi-sync-dataflows/YY6W1U347GpqLSJS/images/kb/ka05w00000124mU-00N5w00000Ri7BU-0EM5w000005vOGk.png?fit=max&auto=format&n=YY6W1U347GpqLSJS&q=85&s=aff889f2e283071ea9e4bbb84294c791" width="322" height="182" data-path="images/kb/ka05w00000124mU-00N5w00000Ri7BU-0EM5w000005vOGk.png" />
   </Frame>

   1. (Optional) Apply a **Prefix**.
   2. (Optional) Apply a **Suffix**.
8. Click **Apply**.

#### DataSet Date Last Updated Smart Text

**To configure the DataSet info Date last updated Smart Text,**

1. Create a new Notebook Card or open an existing Notebook Card and go into the editor by clicking **Edit** in the upper right corner.
2. Click
   <InlineImage src="/images/kb/ka05w00000124mU-00N5w00000Ri7BU-0EM5w000005vOGc.png" /> in the editor toolbar.
3. Select **DataSet info**.
4. Search for and select the DataSet you want to use.
5. Click **Choose DataSet**.
6. Select **Date last updated**.
7. Fill out the **Apply logic to this text** menu.

   <Frame>
     <img alt="DataSet_Info_and_Segment_Options.png" src="https://mintcdn.com/domoinc-openapi-sync-dataflows/YY6W1U347GpqLSJS/images/kb/ka05w00000124mU-00N5w00000Ri7BU-0EM5w000005vOGk.png?fit=max&auto=format&n=YY6W1U347GpqLSJS&q=85&s=aff889f2e283071ea9e4bbb84294c791" width="322" height="182" data-path="images/kb/ka05w00000124mU-00N5w00000Ri7BU-0EM5w000005vOGk.png" />
   </Frame>

   1. (Optional) Apply a **Prefix**.
   2. (Optional) Apply a **Suffix**.
8. Click **Apply**.

### Filters Smart Text Configuration

Allows you to display the filters applied to a column or **Display any filter**.

#### Filter (Column Specific) Smart Text

**To configure the Filters applied to a specific column Smart Text,**

1. Create a new Notebook Card or open an existing Notebook Card and go into the editor by clicking **Edit** in the upper right corner.
2. Click
   <InlineImage src="/images/kb/ka05w00000124mU-00N5w00000Ri7BU-0EM5w000005vOGc.png" /> in the editor toolbar.
3. Select **Filters**.
4. Search for and select one or multiple columns you wish to show.
5. Click **Select**.
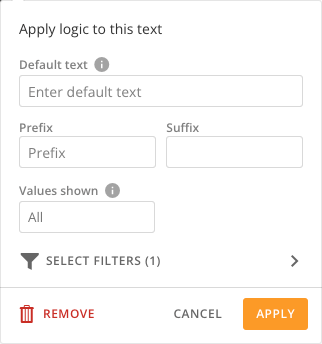
6. Fill out the **Apply logic to this text** menu.

   <Frame>
     <img alt="Filters_Options.png" src="https://mintcdn.com/domoinc-openapi-sync-dataflows/YY6W1U347GpqLSJS/images/kb/ka05w00000124mU-00N5w00000Ri7BU-0EM5w000005vOH4.png?fit=max&auto=format&n=YY6W1U347GpqLSJS&q=85&s=9840b3393034e1930791c8478d44e0a7" width="322" height="344" data-path="images/kb/ka05w00000124mU-00N5w00000Ri7BU-0EM5w000005vOH4.png" />
   </Frame>

   1. (Optional) Enter the **Default text**. The default is to show the name of the column if only one is selected or to display **Filters(x)** where x is the number of columns you have selected. (This will show when no filters are applied and in search results when searching for this Card.)
   2. (Optional) Apply a **Prefix**.
   3. (Optional) Apply a **Suffix**.
   4. (Optional) Enter the desired amount of **Values shown**. The default is **All**. (Any values selected that exceed the threshold will be shown in a tooltip.)
7. Click **Apply**.

#### Filter (Display Any Filter) Smart Text

**To configure the Filters Display any filter Smart Text,**

1. Create a new Notebook Card or open an existing Notebook Card and go into the editor by clicking **Edit** in the upper right corner.
2. Click
   <InlineImage src="/images/kb/ka05w00000124mU-00N5w00000Ri7BU-0EM5w000005vOGc.png" /> in the editor toolbar.
3. Check the box for **Display any filter**.
4. Click **Select**.
5. Fill out the **Apply logic to this text** menu.

   <Frame>
     <img alt="Filters_Options.png" src="https://mintcdn.com/domoinc-openapi-sync-dataflows/YY6W1U347GpqLSJS/images/kb/ka05w00000124mU-00N5w00000Ri7BU-0EM5w000005vOH4.png?fit=max&auto=format&n=YY6W1U347GpqLSJS&q=85&s=9840b3393034e1930791c8478d44e0a7" width="322" height="344" data-path="images/kb/ka05w00000124mU-00N5w00000Ri7BU-0EM5w000005vOH4.png" />
   </Frame>

   1. (Optional) Enter the **Default text**. The default is to show **Display any filter**. (This will show when no filters are applied and in search results when searching for this Card.)
   2. (Optional) Apply a **Prefix**.
   3. (Optional) Apply a **Suffix**.
   4. (Optional) Enter the desired amount of **Values shown**. The default is **All**. (Any values selected that exceed the threshold will be shown in a tooltip.)
6. Click **Apply**.

### Segments Used Smart Text Configuration

Allows you to display the **Segment name** or **Segment description** of the visible Segments.

#### Segment Name Smart Text

**To configure the Segments used Segment name Smart Text,**

1. Create a new Notebook Card or open an existing Notebook Card and go into the editor by clicking **Edit** in the upper right corner.
2. Click
   <InlineImage src="/images/kb/ka05w00000124mU-00N5w00000Ri7BU-0EM5w000005vOGc.png" /> in the editor toolbar.
3. Select **Segments used**.
4. Click **Segment name**.
5. Fill out the **Apply logic to this text** menu.

   <Frame>
     <img alt="DataSet_Info_and_Segment_Options.png" src="https://mintcdn.com/domoinc-openapi-sync-dataflows/YY6W1U347GpqLSJS/images/kb/ka05w00000124mU-00N5w00000Ri7BU-0EM5w000005vOGk.png?fit=max&auto=format&n=YY6W1U347GpqLSJS&q=85&s=aff889f2e283071ea9e4bbb84294c791" width="322" height="182" data-path="images/kb/ka05w00000124mU-00N5w00000Ri7BU-0EM5w000005vOGk.png" />
   </Frame>

   1. (Optional) Apply a **Prefix**.
   2. (Optional) Apply a **Suffix**.
6. Click **Apply**.

#### Segment Description Smart Text

**To configure the Segments used Segment description Smart Text,**

1. Create a new Notebook Card or open an existing Notebook Card and go into the editor by clicking **Edit** in the upper right corner.
2. Click
   <InlineImage src="/images/kb/ka05w00000124mU-00N5w00000Ri7BU-0EM5w000005vOGc.png" /> in the editor toolbar.
3. Select **Segments used**.
4. Click **Segment description**.
5. Fill out the **Apply logic to this text** menu.

   <Frame>
     <img alt="DataSet_Info_and_Segment_Options.png" src="https://mintcdn.com/domoinc-openapi-sync-dataflows/YY6W1U347GpqLSJS/images/kb/ka05w00000124mU-00N5w00000Ri7BU-0EM5w000005vOGk.png?fit=max&auto=format&n=YY6W1U347GpqLSJS&q=85&s=aff889f2e283071ea9e4bbb84294c791" width="322" height="182" data-path="images/kb/ka05w00000124mU-00N5w00000Ri7BU-0EM5w000005vOGk.png" />
   </Frame>

   1. (Optional) Apply a **Prefix**.
   2. (Optional) Apply a **Suffix**.
6. Click **Apply**.

### Date Range Smart Text Configuration

Allows you to display the **Date range** or **Graph by** dates.
#### Date Range Smart Text

**To configure the Date range Smart Text,**

1. Create a new Notebook Card or open an existing Notebook Card and go into the editor by clicking **Edit** in the upper right corner.
2. Click
   <InlineImage src="/images/kb/ka05w00000124mU-00N5w00000Ri7BU-0EM5w000005vOGc.png" /> in the editor toolbar.
3. Select **Date range**.
4. Click **Date range**.
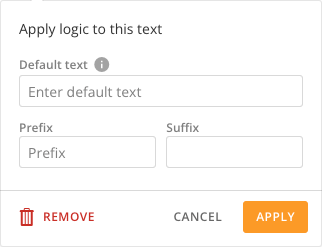
5. Fill out the **Apply logic to this text** menu.

   <Frame>
     <img alt="Date_Range_Options.png" src="https://mintcdn.com/domoinc-openapi-sync-dataflows/YY6W1U347GpqLSJS/images/kb/ka05w00000124mU-00N5w00000Ri7BU-0EM5w000005vOH5.png?fit=max&auto=format&n=YY6W1U347GpqLSJS&q=85&s=5ac53921764f5d7455cf0a148cc338c1" width="322" height="247" data-path="images/kb/ka05w00000124mU-00N5w00000Ri7BU-0EM5w000005vOH5.png" />
   </Frame>

   1. (Optional) Enter the **Default text**. The default is to show **Date Range**. (This will show when no filters are applied and in search results when searching for this Card.)
   2. (Optional) Apply a **Prefix**.
   3. (Optional) Apply a **Suffix**.
6. Click **Apply**.

#### Graph By Smart Text

**To configure the Date range Graph by Smart Text,**

1. Create a new Notebook Card or open an existing Notebook Card and go into the editor by clicking **Edit** in the upper right corner.
2. Click
   <InlineImage src="/images/kb/ka05w00000124mU-00N5w00000Ri7BU-0EM5w000005vOGc.png" /> in the editor toolbar.
3. Select **Date range**.
4. Click **Graph by**.
5. Fill out the **Apply logic to this text** menu.

   <Frame>
     <img alt="Date_Range_Options.png" src="https://mintcdn.com/domoinc-openapi-sync-dataflows/YY6W1U347GpqLSJS/images/kb/ka05w00000124mU-00N5w00000Ri7BU-0EM5w000005vOH5.png?fit=max&auto=format&n=YY6W1U347GpqLSJS&q=85&s=5ac53921764f5d7455cf0a148cc338c1" width="322" height="247" data-path="images/kb/ka05w00000124mU-00N5w00000Ri7BU-0EM5w000005vOH5.png" />
   </Frame>

   1. (Optional) Enter the **Default text**. The default is to show **Graph by**. (This will show when no filters are applied and in search results when searching for this Card.)
   2. (Optional) Apply a **Prefix**.
   3. (Optional) Apply a **Suffix**.
6. Click **Apply**.

## Editing Notebook Cards

For information on how to edit a Notebook Card, see [Editing a Notebook Card](/s/article/360042925654 "Editing a Notebook Card").