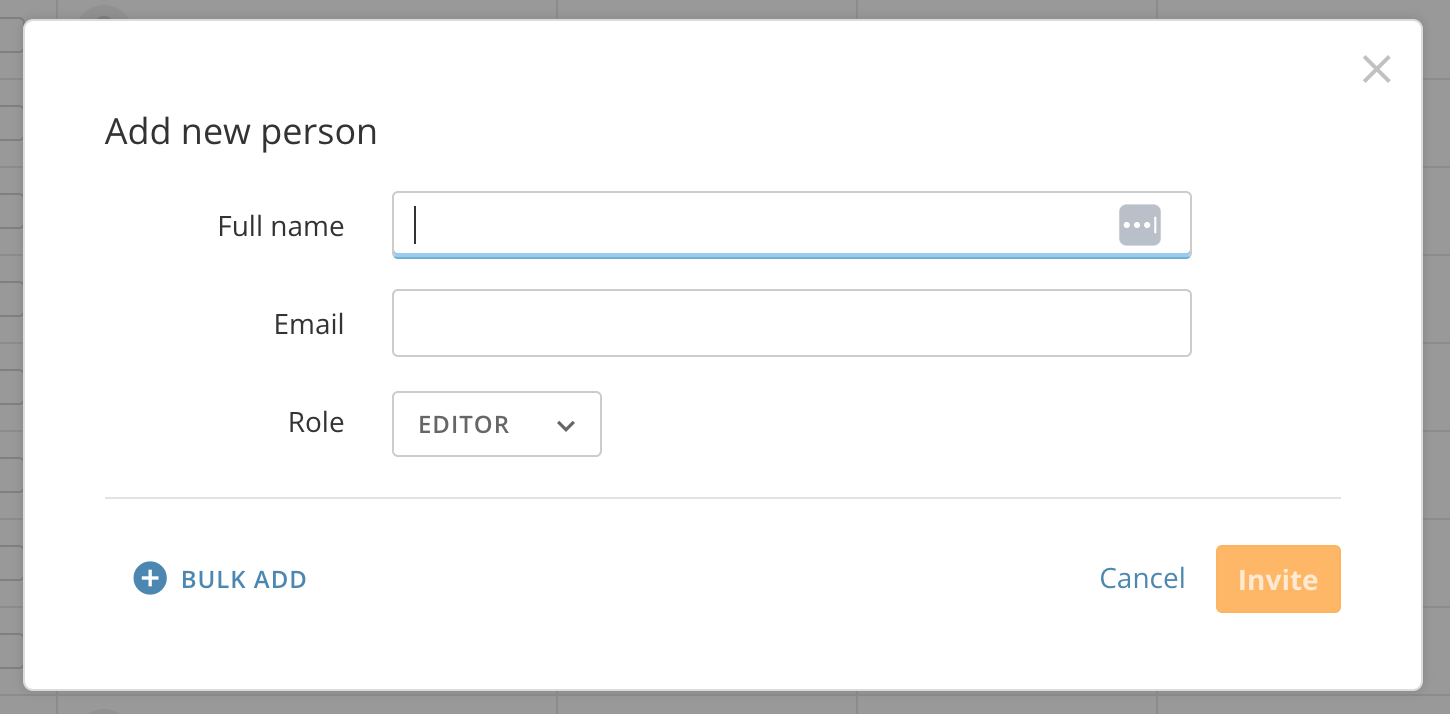
 2. Enter the user's full name and email address in the appropriate fields.
3. Select a security role for the user from the menu. For more information about security roles, see the
[Default Security Role Reference](/s/article/360043438953).
4. Select **Invite**.
The new user's [Profile page](http://wiki.domo.com/confluence/display/DHCS/Viewing+and+managing+user+profiles "Profile Page Layout") displays, and their name and basic information appears in the **People** page of the Governance settings. In addition, an email is sent to the address you entered for the user, providing instructions on how to join Domo. Invited users must then complete several more steps to join Domo.
**Note:** If an error message indicates you need to provide a proper email address and the email address you specified is properly formed, then you cannot add that person because that email domain is not authorized. For more information, see [Specifying Authorized Domains for Invited Users](/s/article/360042934534 "Specifying Authorized Domains for Invited Users").
5. (Optional) On their **Profile** page, you can enter the user's phone number, title, and employee number.
2. Enter the user's full name and email address in the appropriate fields.
3. Select a security role for the user from the menu. For more information about security roles, see the
[Default Security Role Reference](/s/article/360043438953).
4. Select **Invite**.
The new user's [Profile page](http://wiki.domo.com/confluence/display/DHCS/Viewing+and+managing+user+profiles "Profile Page Layout") displays, and their name and basic information appears in the **People** page of the Governance settings. In addition, an email is sent to the address you entered for the user, providing instructions on how to join Domo. Invited users must then complete several more steps to join Domo.
**Note:** If an error message indicates you need to provide a proper email address and the email address you specified is properly formed, then you cannot add that person because that email domain is not authorized. For more information, see [Specifying Authorized Domains for Invited Users](/s/article/360042934534 "Specifying Authorized Domains for Invited Users").
5. (Optional) On their **Profile** page, you can enter the user's phone number, title, and employee number.
 The **Bulk import** dialog displays.
 In the dialog, you can upload a CSV file with your user information. See an [example list](#example_list) of columns to include in your CSV file below. The required columns are indicated with an asterisk (\*). You can also download a sample CSV file with the columns you need to fill in with your own data (select **Download example** in the dialog).
 Fill in the sample file with the required information and any other information you would like to include. Then save the file and upload it to the dialog.
4. (Conditional) Select an option for entries in your file:
* Add new people
* Add new people and edit existing profiles
**Note:** Empty values in the new DataSet override current values. Omitting the column maintains the current values.
5. (Conditional) If the import file contains group data for your users, check **Create new group(s)** to bring those groups into Domo.
6. (Optional) Indicate whether to enforce UTF-8 format. Enforcing UTF-8 requires the presence of a UTF-8 BOM (Byte Order Mark) at the beginning of the file that allows the reader to more reliably know that the file is correctly encoded in UTF-8 format. To learn how to save your CSV file using UTF-8 encoding, see
[below](#save_csv_file_with_utf-8).
7. Finally, drag your import file into the upload area or select **Browse** and navigate to the file on your computer. All of the users in the spreadsheet are imported to Domo and their new or updated information populates the correct fields in the Admin Settings and user **Profile** pages.
# Save CSV File with UTF-8
If you intend to save your CSV import file using UTF-8 encoding, you cannot simply change the encoding type when saving; otherwise you receive an error telling you to check the names of your column headers. As a workaround to this issue, you can do the following:
1. Save the file in CSV format.
2. Open the file in a text application.
3. Save the file with UTF-8 encoding. The way to do this depends on the application.
You can now upload the file by returning to the [bulk import workflow](#add_users_bulk) above.
# Example List
Required columns are indicated by an asterisk (\*).
Fill in the sample file with the required information and any other information you would like to include. Then save the file and upload it to the dialog.
4. (Conditional) Select an option for entries in your file:
* Add new people
* Add new people and edit existing profiles
**Note:** Empty values in the new DataSet override current values. Omitting the column maintains the current values.
5. (Conditional) If the import file contains group data for your users, check **Create new group(s)** to bring those groups into Domo.
6. (Optional) Indicate whether to enforce UTF-8 format. Enforcing UTF-8 requires the presence of a UTF-8 BOM (Byte Order Mark) at the beginning of the file that allows the reader to more reliably know that the file is correctly encoded in UTF-8 format. To learn how to save your CSV file using UTF-8 encoding, see
[below](#save_csv_file_with_utf-8).
7. Finally, drag your import file into the upload area or select **Browse** and navigate to the file on your computer. All of the users in the spreadsheet are imported to Domo and their new or updated information populates the correct fields in the Admin Settings and user **Profile** pages.
# Save CSV File with UTF-8
If you intend to save your CSV import file using UTF-8 encoding, you cannot simply change the encoding type when saving; otherwise you receive an error telling you to check the names of your column headers. As a workaround to this issue, you can do the following:
1. Save the file in CSV format.
2. Open the file in a text application.
3. Save the file with UTF-8 encoding. The way to do this depends on the application.
You can now upload the file by returning to the [bulk import workflow](#add_users_bulk) above.
# Example List
Required columns are indicated by an asterisk (\*).
Example: TRUE/FALSE
Example: [johnsmith@newDomain.com](mailto:johnsmith@newDomain.com)
Enter a number:
1 (Admin)
2 (Privileged)
3 (Editor)
4 (Participant)
5 (Social)
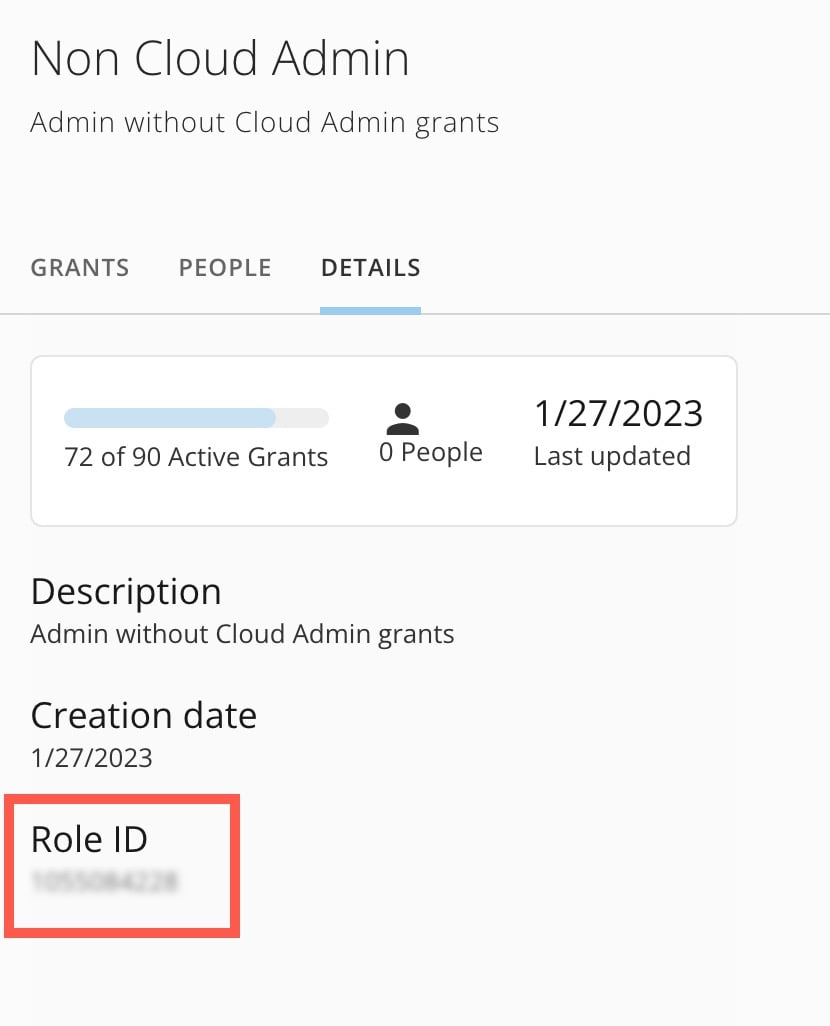
Note: If the Custom Role feature is enabled for your instance, you can also enter a user's custom Role ID.
Find the Role ID by going to Admin > Governance > Roles . Select the role from the list and go to the Details tab. Locate the Role ID.
Example: 123
Example: ABC123
de-DE, de-AT, de-CH, en-AU, en-CA, en-150, en-HK, en-IE, en-IL, en-MO, en-NZ, en-SG, en-GB, en-US, en-001, es-ES, es-US, es-419, es-MX, fr-BE, fr-CA, fr-FR, fr-CH, nl-BE, nl-NL, pt-BR, pt-PT, ja-JP, zh-CN, zh-Hans-HK, zh-Hans-MO, zh-Hans-SG
Example: TRUE/FALSE