> ## Documentation Index
> Fetch the complete documentation index at: https://domoinc-openapi-sync-dataflows.mintlify.site/llms.txt
> Use this file to discover all available pages before exploring further.

# Outreach Writeback Connector

## Intro

Outreach is a sales communication platform that makes your team's communication workflows faster and reveals the performance insights that make them more effective at selling. Use Domo's Outreach Writeback connector to create and update prospects, accounts and opportunities in Outreach. To learn more about the Outreach API, visit their page ([https://www.outreach.io/platform/](https://www.outreach.io/platform/ "https://www.outreach.io/platform/") ).

You connect to your Outreach Writeback account in the Data Center. This topic discusses the fields and menus that are specific to the Outreach Writeback connector user interface. General information for adding DataSets, setting update schedules, and editing DataSet information is discussed in [Adding a DataSet Using a Connector](https://domo-support.domo.com/s/article/360042926274?language=en_US "Adding a DataSet Using a Connector").

<Note>
  **Note:** The owner of a writeback dataset must also be an owner or co-owner of the input dataset.
</Note>

## Prerequisites

To connect to your Outreach account and create a DataSet, you must have the following:

* Your Domo Client ID and Client Secret.
* Your Outreach Client ID and Client Secret, created when registering an OAuth app with Outreach. Use the following redirect URI while registering the app -
  [https://oauth.domo.com/api/data/v1/oauth/providers/outreachwriteback/exchange](https://oauth.domo.com/api/data/v1/oauth/providers/outreachwriteback/exchange "https://oauth.domo.com/api/data/v1/oauth/providers/outreachwriteback/exchange")

##### To obtain the Domo Client ID and Client Secret, do the following:

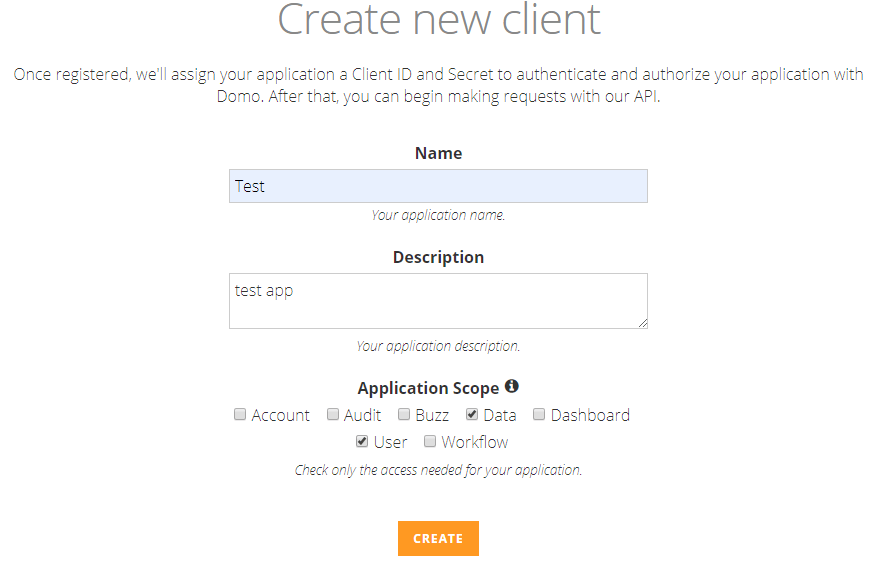
1. Log into your [Domo developer account](https://developer.domo.com/login "https://developer.domo.com/login").

2. In the top right corner, click **My Accounts** >> **New Client**.

3. Enter the name and description for your application.

4. Provide the application scope by selecting the checkboxes for ****Data**** and ****User****.

   <Frame>
     <img alt="clipboard_e8a13bf2a8a4858ac498feb4d345cdc07.png" src="https://mintcdn.com/domoinc-openapi-sync-dataflows/Se_X3Rr-QW-5nUF_/images/kb/ka0Vq000000COeT-00N5w00000Ri7BU-0EM5w000005vO9f.png?fit=max&auto=format&n=Se_X3Rr-QW-5nUF_&q=85&s=c39d132c0dd74b941d1d7b37f308353c" width="871" height="564" data-path="images/kb/ka0Vq000000COeT-00N5w00000Ri7BU-0EM5w000005vO9f.png" />
   </Frame>

5. Click **Create**.

Once you have created a client, you can manage the client by clicking on **Manage Client**. Your **Client Secret** will appear in the **Manage Client** section.

## Configuring the connection

This section enumerates the options in the **Credentials** and **Details** panes in the Outreach Writeback Connector page. The components of the other panes in this page, **Scheduling** and **Name & Describe Your DataSet**, are universal across most connector types and are discussed in greater length in [Adding a DataSet Using a Connector](https://domo-support.domo.com/s/article/360042926274?language=en_US "Adding a DataSet Using a Connector").

### Credentials Pane

This pane contains fields for entering credentials for your Domo developer account as well as your Outreach account. The following table describes what is needed for each field:

<table border="1" cellpadding="1" cellspacing="1" data-aura-rendered-by="33:195;a"><thead><tr><th colspan="1" rowspan="1"><p><span class="s1"> Field </span></p></th><th colspan="1" rowspan="1"><p><span class="s1"> Description </span></p></th></tr></thead><tbody><tr><td colspan="1" rowspan="1"> Account Name </td><td colspan="1" rowspan="1"> Choose a name for your Outreach Account. </td></tr><tr><td colspan="1" rowspan="1"> Domo Client ID </td><td colspan="1" rowspan="1"> Enter your Domo Client ID. For more information, see <a href="#h_e72c10ac-bc9f-4448-9354-c10c2c756cc5" target="_blank" title="Outreach Writeback Connector"> Prerequisites </a>. </td></tr><tr><td colspan="1" rowspan="1"> Domo Client Secret </td><td colspan="1" rowspan="1"> Enter your Domo Client secret. For more information, see <a href="#h_e72c10ac-bc9f-4448-9354-c10c2c756cc5" target="_blank" title="Outreach Writeback Connector"> Prerequisites </a>. </td></tr><tr><td colspan="1" rowspan="1"> Outreach Client ID </td><td colspan="1" rowspan="1"> Enter your Outreach Client ID. You will need to register an app within Outreach. </td></tr><tr><td colspan="1" rowspan="1"> Outreach Client Secret </td><td colspan="1" rowspan="1"> Enter your Outreach Client Secret. You will need to register an app within Outreach. </td></tr></tbody></table>

Once you have entered valid credentials, you can use the same account any time you go to create a new Outreach Writeback DataSet. You can manage connector accounts in the **Accounts** tab in the Data Center. For more information about this tab, see [Manage Connector/Adapter Accounts](https://domo-support.domo.com/s/article/360042926054?language=en_US "Manage Connector/Adapter Accounts").

### Details Pane

This pane contains a primary **Reports** menu, along with various other menus which may or may not appear depending on the report type you select.

<table border="1" cellpadding="1" cellspacing="1" data-aura-rendered-by="33:195;a"><thead><tr><th colspan="1" rowspan="1"><p> Menu </p></th><th colspan="1" rowspan="1"><p> Description </p></th></tr></thead><tbody><tr><td colspan="1" rowspan="1"><p> Report </p></td><td colspan="1" rowspan="1"><p> Select the Outreach Writeback report you want to run. The following reports are available: </p><table border="1" cellpadding="1" cellspacing="1"><tbody><tr><td colspan="1" rowspan="1"><b> Report Name </b></td><td colspan="1" rowspan="1"><b> Description </b></td><td colspan="1" rowspan="1"><b> Required Scope </b></td></tr><tr><td colspan="1" rowspan="1"> Account </td><td colspan="1" rowspan="1"> This report is used to update the details about accounts that are associated with logged in user. </td><td colspan="1" rowspan="1"><ul><li><span> accounts.read </span></li><li><span> accounts.write </span></li><li><span> users.read </span></li></ul></td></tr><tr><td colspan="1" rowspan="1"> Prospects </td><td colspan="1" rowspan="1"> This report is used to create a new prospect resource or to update an existing prospect that is associated with logged in user. </td><td colspan="1" rowspan="1"><ul><li><span> prospects.read </span></li><li><span> prospects.write </span></li><li><span> users.read </span></li></ul></td></tr><tr><td colspan="1" rowspan="1"> Opportunity </td><td colspan="1" rowspan="1"> This report is used to create a new opportunity resource or to update an existing opportunity for a sale or pending deal. </td><td colspan="1" rowspan="1"><ul><li><span> opportunities.read </span></li><li><span> opportunities.write </span></li><li><span> users.read </span></li></ul></td></tr></tbody></table></td></tr></tbody></table>

### Other Panes

For information about the remaining sections of the connector interface, including how to configure scheduling, retry, and update options, see [Adding a DataSet Using a Connector](https://domo-support.domo.com/s/article/360042926274?language=en_US "Adding a DataSet Using a Connector").
