> ## Documentation Index
> Fetch the complete documentation index at: https://domoinc-openapi-sync-dataflows.mintlify.site/llms.txt
> Use this file to discover all available pages before exploring further.

# Google Drive Service Connector

<Warning>
  ********Important********: Due to Google’s change in allowing Domo connectors to use OAuth authentication, all users must now use service account key authentication to create new data connections. To create new Google Drive DataSets, use this connector. All pre-existing Google Drive DataSets will continue to run normally.
</Warning>

## Intro

Google Drive is a file storage and synchronization service developed by Google that allows users to store files in the cloud, synchronize files across devices, and share files. Use Domo's Google Drive Service connector to retrieve Excel and CSV files from a Google Drive account and output them as Domo DataSets. To learn more about the Google Drive API, visit their page ([https://developers.google.com/drive/](https://developers.google.com/drive/ "https://developers.google.com/drive/") ).

You connect to your Google account in the Data Center. This topic discusses the fields and menus that are specific to the Google Drive connector user interface. General information for adding DataSets, setting update schedules, and editing DataSet information is discussed in [Adding a DataSet Using a Data Connector](/s/article/360042926274).

## Prerequisites

To connect to a Google service account, you must have a Google service account JSON key.

Before creating your service account JSON key, you need to first enable the Google Drive API for your project in Google Cloud Platform console.

#### Enabling the Google Drive API

To enable the Google Drive API for your project, do the following:

1. Go to the [GCP Console](https://console.cloud.google.com/apis/dashboard).

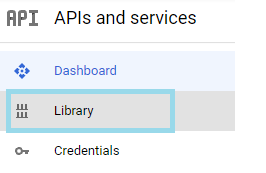
2. Click **Library** under **APIs and services** in the left pane.

<Frame>
  <img alt="Library.png" src="https://mintcdn.com/domoinc-openapi-sync-dataflows/Gw_GOG2-ZFDgkOCF/images/kb/ka0Vq000000HncD-00N5w00000Ri7BU-0EM5w000005vO7b.png?fit=max&auto=format&n=Gw_GOG2-ZFDgkOCF&q=85&s=573dde19aed8e338d9cd476b74f46f40" width="266" height="173" data-path="images/kb/ka0Vq000000HncD-00N5w00000Ri7BU-0EM5w000005vO7b.png" />
</Frame>

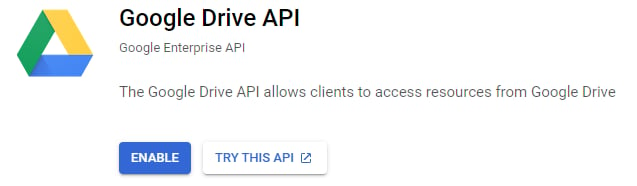
3. Search for the **Google Drive API** and click on it.

4. Towards the top of the screen you will see an **ENABLE** button.
<Frame>
  <img alt="Google_Drive_API.png" src="https://mintcdn.com/domoinc-openapi-sync-dataflows/Gw_GOG2-ZFDgkOCF/images/kb/ka0Vq000000HncD-00N5w00000Ri7BU-0EM5w000005vO7W.png?fit=max&auto=format&n=Gw_GOG2-ZFDgkOCF&q=85&s=2f925f226e0a302fdd4af81b6f39a930" width="637" height="186" data-path="images/kb/ka0Vq000000HncD-00N5w00000Ri7BU-0EM5w000005vO7W.png" />
</Frame>

5. Click **Enable**.

#### To generate a service account JSON key, do the following:

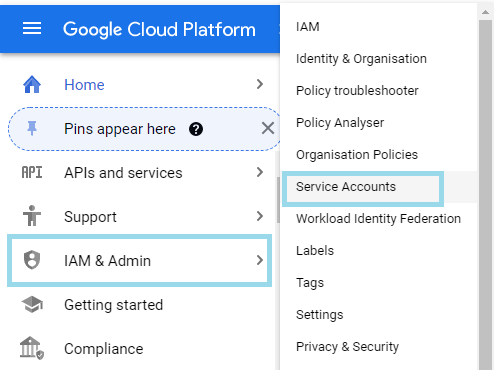
1. In the [GCP Console](https://console.cloud.google.com/apis/dashboard), open the ****IAM & Admin**** page.

2. Click ********Service accounts******** in the left-hand navigation pane.
<Frame>
  <img alt="GCP_screen.png" src="https://mintcdn.com/domoinc-openapi-sync-dataflows/Gw_GOG2-ZFDgkOCF/images/kb/ka0Vq000000HncD-00N5w00000Ri7BU-0EM5w000005vO7T.png?fit=max&auto=format&n=Gw_GOG2-ZFDgkOCF&q=85&s=771662d81d5e0cdf96a106777ced15c1" width="494" height="370" data-path="images/kb/ka0Vq000000HncD-00N5w00000Ri7BU-0EM5w000005vO7T.png" />
</Frame>

3. Click ********Create Service Account********.

4. In the **Service account details** section, enter a name and description for the service account.

5. Click **Create and Continue**.

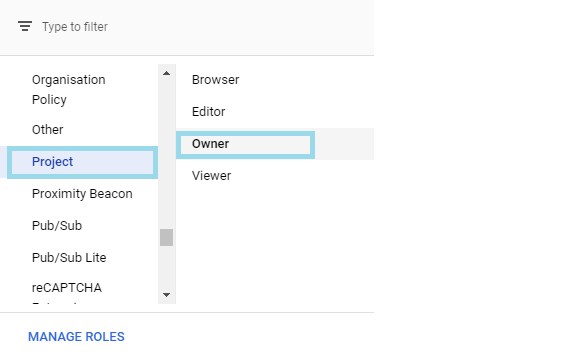
6. Now, in the **Grant this service account access to the project** section, click **Select a role** drop down.

7. Select **Project-> Owner**.
<Frame>
  <img alt="Project-Owner.png" src="https://mintcdn.com/domoinc-openapi-sync-dataflows/Gw_GOG2-ZFDgkOCF/images/kb/ka0Vq000000HncD-00N5w00000Ri7BU-0EM5w000005vO7Y.png?fit=max&auto=format&n=Gw_GOG2-ZFDgkOCF&q=85&s=a5d7899ec3ab2da93391d2e41aaab43f" width="562" height="361" data-path="images/kb/ka0Vq000000HncD-00N5w00000Ri7BU-0EM5w000005vO7Y.png" />
</Frame>

8. Click **Continue**.

9. Click **Done**. An overview of your service account will appear.

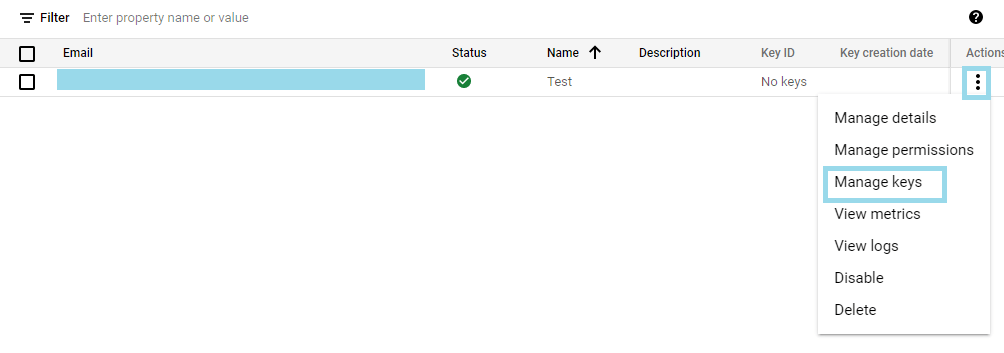
10. In the **Actions** column, click the three dots to expand the menu. Click **Manage Keys**.
<Frame>
  <img alt="Actions-Manage_Keys.png" src="https://mintcdn.com/domoinc-openapi-sync-dataflows/Gw_GOG2-ZFDgkOCF/images/kb/ka0Vq000000HncD-00N5w00000Ri7BU-0EM5w000005vO7U.png?fit=max&auto=format&n=Gw_GOG2-ZFDgkOCF&q=85&s=a11951e58d3a4ce4594784ae5c9b7df3" width="1004" height="353" data-path="images/kb/ka0Vq000000HncD-00N5w00000Ri7BU-0EM5w000005vO7U.png" />
</Frame>

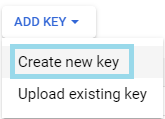
11. Click **Add Key**. Select **Create new key**.
<Frame>
  <img alt="Add_Key-Create_new_key.png" src="https://mintcdn.com/domoinc-openapi-sync-dataflows/Gw_GOG2-ZFDgkOCF/images/kb/ka0Vq000000HncD-00N5w00000Ri7BU-0EM5w000005vO7V.png?fit=max&auto=format&n=Gw_GOG2-ZFDgkOCF&q=85&s=bc0938d9255b21578d7694a8f0ad71b5" width="165" height="119" data-path="images/kb/ka0Vq000000HncD-00N5w00000Ri7BU-0EM5w000005vO7V.png" />
</Frame>

12. **Create private key** window will appear. Select private key type as **JSON** and click **Create**.

13. A private key will be saved to your computer.

## Connecting to Your Google Service Account

This section enumerates the options in the **Credentials** and **Details** panes in the Google Drive Service Connector page. The components of the other panes in this page, **Scheduling** and **Name & Describe Your DataSet,** are universal across most connector types and are discussed in greater length in [Adding a DataSet Using a Data Connector](/s/article/360042926274).

### Credentials Pane

This pane contains fields for entering credentials to connect to a Google service account. The following table describes what is needed for each field:

<table border="1" cellpadding="1" cellspacing="1" data-aura-rendered-by="33:195;a"><thead><tr><th colspan="1" rowspan="1"><p> Field </p></th><th colspan="1" rowspan="1"><p> Description </p></th></tr></thead><tbody><tr><td colspan="1" rowspan="1"><p> Service Account Key JSON </p></td><td colspan="1" rowspan="1"><p> Copy and paste the JSON for your Google service account key. For information about creating a key, see "Prerequisites," above. </p></td></tr></tbody></table>

Once you have entered a valid key, you can use the same account any time you go to create a new Google Drive Service DataSet. You can manage connector accounts in the ********Accounts******** tab in the Data Center. For more information about this tab, see [Managing User Accounts for Connectors](/s/article/360042926054 "Managing User Accounts for Connectors").

### Details Pane

In this pane, you can choose to import a list of files in your Google Drive account or specify a Google Drive file to import into Domo and set options for how you want the data to appear.

<table border="1" cellpadding="1" cellspacing="1" data-aura-rendered-by="33:195;a"><thead><tr><th colspan="1" rowspan="1"><p> Menu </p></th><th colspan="1" rowspan="1"><p> Description </p></th></tr></thead><tbody><tr><td colspan="1" rowspan="1"><p> Report </p></td><td colspan="1" rowspan="1"><p> Select whether you want to import a list of files ("Files") or download a specific files ("FileDownload"). </p><table border="1"><tbody><tr><td colspan="1" rowspan="1"> Files </td><td colspan="1" rowspan="1"><span> Returns list of files in drive. </span></td></tr><tr><td colspan="1" rowspan="1"> File Download </td><td colspan="1" rowspan="1"><span> Imports a file from google drive into Domo. </span></td></tr><tr><td colspan="1" rowspan="1"> Fetch Data from Shared Drives </td><td colspan="1" rowspan="1"> Select <b> Yes </b> if you want the connector to fetch data from the Shared Drives. </td></tr></tbody></table></td></tr><tr><td colspan="1" rowspan="1"><p> How Would You Like to Choose Your File? </p></td><td colspan="1" rowspan="1"><p> Select how you want to choose the file you intend to import into Domo. Select <b><b> Enter File Name </b></b> or <b> Enter File ID </b> to enter the name or ID yourself. Select <b><b> Files Discovery </b></b> to choose your file from a list of files. </p></td></tr><tr><td colspan="1" rowspan="1"> How would you like to match the Sheet Name? </td><td colspan="1" rowspan="1"> If the user selects <b> Contains </b>, the connector will retrieve the most recently uploaded file. </td></tr><tr><td colspan="1" rowspan="1"><p> File ID </p></td><td colspan="1" rowspan="1"><p> Enter the ID of the file you want to import. To see all IDs for files in your account, run the "Files" report. </p></td></tr><tr><td colspan="1" rowspan="1"><p> File Name </p></td><td colspan="1" rowspan="1"><p> Enter the name of the file you want to import from Google Drive. </p></td></tr><tr><td colspan="1" rowspan="1"><p> Files Discovery </p></td><td colspan="1" rowspan="1"><p> Select the file you want to import into Domo. </p> <Note><div class="info-box-wrapper"><div class="info-box-icon-container" /><div class="info-box-content-container"><div class="info-box-content"><b> Note: </b> The File Discovery option is available only if the number of files in the Google Drive account is less than or equal to 100. </div></div></div> </Note></td></tr><tr><td colspan="1" rowspan="1"><p> MIME Type </p></td><td colspan="1" rowspan="1"><p> Select the MIME type of the file you want to import into Domo. </p></td></tr><tr><td colspan="1" rowspan="1"><p> What File Type Would You Like to Import? </p></td><td colspan="1" rowspan="1"><p><span> Select the file type that you would like to parse and import. </span></p></td></tr><tr><td colspan="1" rowspan="1"><p><span> Select the delimiting character </span></p></td><td colspan="1" rowspan="1"><p><span> Select the delimiting character used in your file. If your delimiter is not listed select 'Other.' </span></p></td></tr><tr><td colspan="1" rowspan="1"><p><span> Specify your delimiter </span></p></td><td colspan="1" rowspan="1"><p><span> Enter the character used to delimit your character separated values (CSV) text. </span></p></td></tr><tr><td colspan="1" rowspan="1"><p><span> Quote Character </span></p></td><td colspan="1" rowspan="1"><p><span> Select the desired quote character for parsing CSV files. (Double quote is the default quote character for CSV standard). </span></p></td></tr><tr><td colspan="1" rowspan="1"><p> Custom Quote Character </p></td><td colspan="1" rowspan="1"><p> Enter the custom quote character you want to use to parse your CSV file. </p></td></tr><tr><td colspan="1" rowspan="1"><p> Escape Character </p></td><td colspan="1" rowspan="1"><p> Select the escape character to use to parse your CSV file. To choose a custom escape character, select <b><b> Other </b></b>, then enter your delimiter in the <b><b> Custom Escape Character </b></b> field. </p></td></tr><tr><td colspan="1" rowspan="1"><p> Custom Escape Character </p></td><td colspan="1" rowspan="1"><p> Enter the custom quote character you want to use to parse your CSV file. </p></td></tr><tr><td colspan="1" rowspan="1"><p><span> Date Format </span></p></td><td colspan="1" rowspan="1"><p><span> Select the date format that is used in the selected file. </span></p></td></tr><tr><td colspan="1" rowspan="1"><p> Header Start Row </p></td><td colspan="1" rowspan="1"><p> Enter the header start row for your Excel file. </p></td></tr><tr><td colspan="1" rowspan="1"><p> Data Start Row </p></td><td colspan="1" rowspan="1"><p> Enter the data start row for your Excel file. </p></td></tr><tr><td colspan="1" rowspan="1"><p> Footer Rows to Skip </p></td><td colspan="1" rowspan="1"><p> Enter the number of rows to skip at the end of your Excel file, if any. </p></td></tr><tr><td colspan="1" rowspan="1"><p><span> How would you like to match the sheet name? </span></p></td><td colspan="1" rowspan="1"><p><span> Select whether you would like to match the sheet name with a sheet that contains the provided name or is exactly equivalent to the provided name. </span></p></td></tr><tr><td colspan="1" rowspan="1"><p><span> File Password </span></p></td><td colspan="1" rowspan="1"><p><span> If your file is password protected please enter file password. </span></p></td></tr><tr><td colspan="1" rowspan="1"><p><span> Sheet Name </span></p></td><td colspan="1" rowspan="1"><p><span> Enter the sheet name you want to retrieve from the specified spreadsheet be sure to check sheet name for accidental spaces, first sheet of the workbook will be used if the field is left blank. </span></p></td></tr><tr><td colspan="1" rowspan="1"><p><span> Blank Rows </span></p></td><td colspan="1" rowspan="1"><p><span> If you encounter blank rows, you can either skip the blank rows or stop at the first blank row. </span></p></td></tr></tbody></table>

### Other Panes

For information about the remaining sections of the connector interface, including how to configure scheduling, retry, and update options, see [Adding a DataSet Using a Data Connector](/s/article/360042926274).

## FAQs

<AccordionGroup>
  <Accordion title="What do I do if my Google Drive file is not visible in the &#x22;Files&#x22; report?">
    If you are unable to locate the driver file, please share the file or directory with the service account email (client\_email found in the JSON key). You can find the email in Service Accounts.
  </Accordion>

  <Accordion title="My DataSet is returning a '403 Forbidden' error. Why?">
    You need to enable the Google Drive API for your project in Google Cloud Platform console. For more details, see the 'Enabling the Google Drive API' section under Prerequisites.
  </Accordion>

  <Accordion title="How often can the data be updated?">
    As often as needed.
  </Accordion>

  <Accordion title="Are there any API limits I should be aware of?">
    No.
  </Accordion>
</AccordionGroup>
