> ## Documentation Index
> Fetch the complete documentation index at: https://domoinc-openapi-sync-dataflows.mintlify.site/llms.txt
> Use this file to discover all available pages before exploring further.

# Instagram Business Connector

## Intro

The Instagram Business Connector allows you to access Instagram Business Account Pages so you can view comments and metadata and get insights and metrics about them. To learn more about the Instagram API, visit their page ([https://developers.facebook.com/docs/instagram-api](https://developers.facebook.com/docs/instagram-api "https://developers.facebook.com/docs/instagram-api") ).

You connect to your Instagram Business account in the Data Center. To successfully connect to Instagram Business, you must first connect your Instagram account to a Facebook page and then grant connector access to your Facebook user. The steps for doing this are described in continuation.

This topic discusses the fields and menus that are specific to the Instagram Business connector user interface. General information for adding DataSets, setting update schedules, and editing DataSet information is discussed in [Adding a DataSet Using a Data Connector](https://domo-support.domo.com/s/article/360042926274?language=en_US "Adding a DataSet Using a Data Connector").

## Prerequisites

To use the Instagram Business connector, you need the following:

* An Instagram Business account. (**Note:** The Instagram Business Connector only allows access to Instagram Business Account Pages. Any standard pages owned by the same account will not be available to select).

* A Facebook page URL that will be linked to the Instagram account. Each Facebook page can be connected to ONE Instagram Business account.

* A Facebook administrator user account URL for the page you are linking to Instagram.

<Note>
  **Note:** A Facebook user must have a registered Facebook Developer account. To receive the invite, use the Instagram
  Business Connector. You can do this by selecting the following link
  [https://developers.facebook.com/settings/developer/requests/](https://developers.facebook.com/settings/developer/requests/) and click "Register Now".
</Note>

## Connecting to Your Instagram Business Account

This section enumerates the options in the **Credentials** and **Details** panes on the Instagram Business Connector page. The components of the other panes on this page, **Scheduling,** and **Name & Describe Your DataSet**, are universal across most connector types and are discussed in greater length in [Adding a DataSet Using a Data Connector](https://domo-support.domo.com/s/article/360042926274?language=en_US "Adding a DataSet Using a Data Connector")

## Credentials Pane

In the **Credentials** pane, you connect to your Instagram Business account via Facebook. This can only be done once you have 1) c onnected Instagram to a Facebook page, and 2) e nabled access for your Facebook user. Steps for accomplishing these tasks are provided in continuation.

Once you have connected to Instagram Business through Facebook, you can use the same account any time you go to create a new Instagram Business DataSet. You can manage connector accounts in the **Accounts** tab in the Data Center. For more information about this tab, see [Managing User Accounts for Connectors](https://domo-support.domo.com/s/article/360042926054?language=en_US "Managing User Accounts for Connectors").

#### Connecting Instagram to Facebook

To connect your Facebook page to Instagram, follow these instructions:

1. Log into Facebook and navigate to the page you want to connect to Instagram.

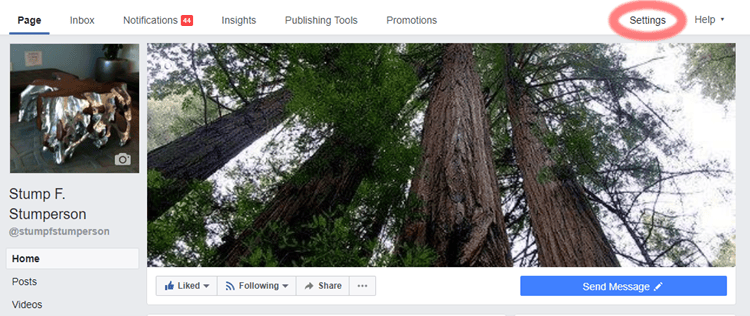
2. Click on
   **Settings** in the top right corner.

   <Frame>
     <img alt="instagram_biz_1.png" src="https://mintcdn.com/domoinc-openapi-sync-dataflows/J3x-O8qWbl7BB1F9/images/kb/ka0Vq000000EZKT-00N5w00000Ri7BU-0EM5w000005vO0Z.png?fit=max&auto=format&n=J3x-O8qWbl7BB1F9&q=85&s=f27c6d2500da7df81326fa7ebc872e0f" width="750" height="316" data-path="images/kb/ka0Vq000000EZKT-00N5w00000Ri7BU-0EM5w000005vO0Z.png" />
   </Frame>

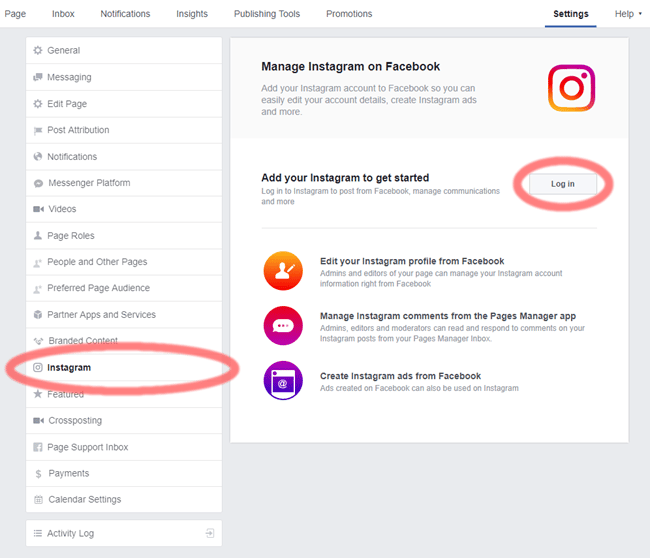
3. In the
   **Settings** screen, select **Instagram** in the list on the left, then click **Login** in the **Manage Instagram on Facebook** pane.
   <Frame>
     <img alt="instagram_biz_2.png" src="https://mintcdn.com/domoinc-openapi-sync-dataflows/J3x-O8qWbl7BB1F9/images/kb/ka0Vq000000EZKT-00N5w00000Ri7BU-0EM5w000005vO0i.png?fit=max&auto=format&n=J3x-O8qWbl7BB1F9&q=85&s=9bb5b44f06a83dd9730d180b9d0fec3f" width="650" height="558" data-path="images/kb/ka0Vq000000EZKT-00N5w00000Ri7BU-0EM5w000005vO0i.png" />
   </Frame>

4. In the Instagram login screen, enter the username and password of the Instagram account you want to connect to Facebook.<br />
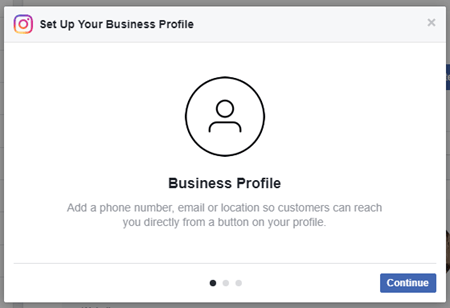
   If the Instagram account is not a business account, you are prompted to switch to a Business profile, as shown here:

   <Frame>
     <img alt="instagram_biz_4.png" src="https://mintcdn.com/domoinc-openapi-sync-dataflows/J3x-O8qWbl7BB1F9/images/kb/ka0Vq000000EZKT-00N5w00000Ri7BU-0EM5w000005vO0g.png?fit=max&auto=format&n=J3x-O8qWbl7BB1F9&q=85&s=d7ad2151c2cfaddb8260536172e138a7" width="450" height="308" data-path="images/kb/ka0Vq000000EZKT-00N5w00000Ri7BU-0EM5w000005vO0g.png" />
   </Frame>

5. (Conditional) If the preceding dialog appears, click
   **Continue**, then click **Done**.

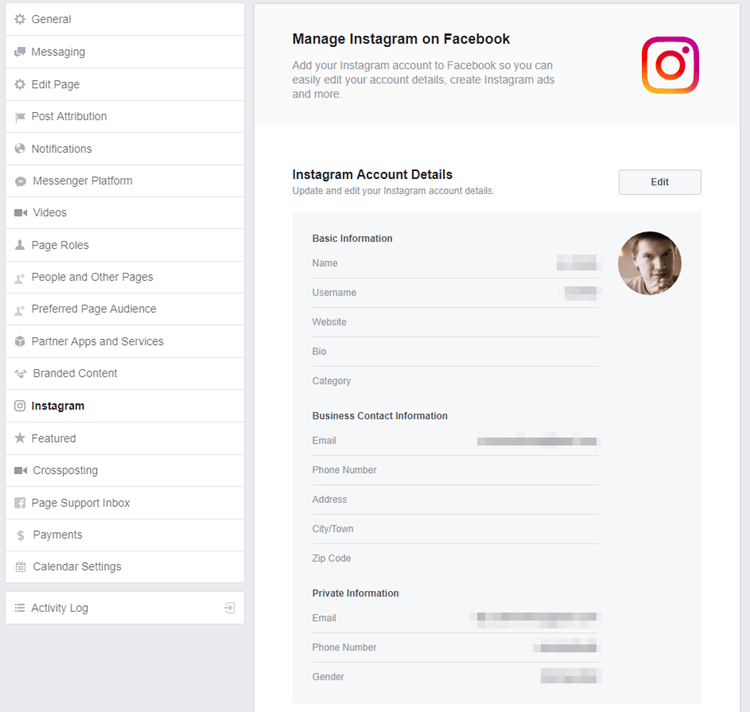
Once the linking is complete, you will see your Instagram profile's business information in your Facebook page's settings.
<Frame>
  <img alt="instagram_biz_6.png" src="https://mintcdn.com/domoinc-openapi-sync-dataflows/J3x-O8qWbl7BB1F9/images/kb/ka0Vq000000EZKT-00N5w00000Ri7BU-0EM5w000005vO0b.png?fit=max&auto=format&n=J3x-O8qWbl7BB1F9&q=85&s=8168ce0f5cca09b015cc10845fbc8d73" style={{ width: 542, height: 515 }} width="750" height="712" data-path="images/kb/ka0Vq000000EZKT-00N5w00000Ri7BU-0EM5w000005vO0b.png" />
</Frame>

#### Enabling Your Facebook User

Once you have linked your Instagram account to a Facebook Page, you must ask Domo to enable your Facebook user to have access to the connector. This can be done by [contacting Domo Support](/s/article/360042922874) and asking for access. You will need to provide the following information:

* The URL of your company Domo instance (e.g.
  [mycompany.domo.com](http://mycompany.domo.com) )
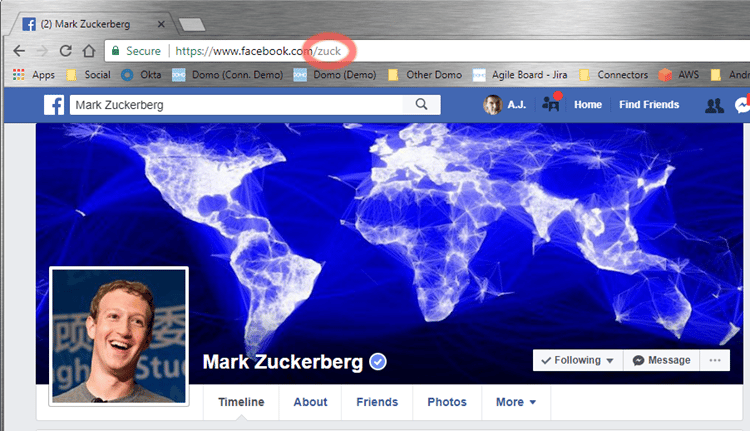
* Your Facebook username. This must be the username of the user who will be using the connector. This is
  *not* the name of the Page or Instagram account. You can find your username in the Facebook URL when you go to your Facebook profile:
  <Frame>
    <img alt="instagram_biz_7.png" src="https://mintcdn.com/domoinc-openapi-sync-dataflows/J3x-O8qWbl7BB1F9/images/kb/ka0Vq000000EZKT-00N5w00000Ri7BU-0EM5w000005vO0c.png?fit=max&auto=format&n=J3x-O8qWbl7BB1F9&q=85&s=330b7a3eefd43eea0551213988e78816" width="750" height="431" data-path="images/kb/ka0Vq000000EZKT-00N5w00000Ri7BU-0EM5w000005vO0c.png" />
  </Frame>

Once your user has been enabled (which can take up to 5 business days,) you will need to accept the invitation in your Facebook notifications.

To learn more about What's the difference between a Facebook profile and a Facebook page, visit their page ([https://www.facebook.com/help/337881706729661](https://www.facebook.com/help/337881706729661)).

**Note:** The notification may not be visible in the mobile app and we recommend checking on a desktop.

## Details Pane

This pane contains a primary **Reports** menu, along with various other menus which may or may not appear depending on the report type you select.
<table border="1" cellpadding="1" cellspacing="1" data-aura-rendered-by="33:201;a">
  <thead>
    <tr>
      <th colspan="1" rowspan="1">
        <p> Menu </p>
      </th>

      <th colspan="1" rowspan="1">
        <p> Description </p>
      </th>
    </tr>
  </thead>

  <tbody>
    <tr>
      <td colspan="1" rowspan="1">
        <p> Report </p>
      </td>

      <td colspan="1" rowspan="1">
        <p> Select the Instagram Business report you want to run. The following reports are available: </p>

        <table border="1" cellpadding="1" cellspacing="1">
          <tbody>
            <tr>
              <td colspan="1" rowspan="1">
                <p>
                  <b> Report Name </b>
                </p>
              </td>

              <td colspan="1" rowspan="1">
                <p>
                  <b> Description </b>
                </p>
              </td>
            </tr>

            <tr>
              <td colspan="1" rowspan="1">
                <p> Hashtag Recent Media </p>
              </td>

              <td colspan="1" rowspan="1">
                <p> Get the most recently published photos and videos published with a specific hashtag. </p>
              </td>
            </tr>

            <tr>
              <td colspan="1" rowspan="1">
                <p> Hashtag Top Media </p>
              </td>

              <td colspan="1" rowspan="1">
                <p> Get the most popular photos and videos that have been tagged with a specific hashtag. </p>
              </td>
            </tr>

            <tr>
              <td colspan="1" rowspan="1">
                <p> Media Comments </p>
              </td>

              <td colspan="1" rowspan="1">
                <p> Read comments for a particular media object. </p>
              </td>
            </tr>

            <tr>
              <td colspan="1" rowspan="1">
                <p> Media Insights </p>
              </td>

              <td colspan="1" rowspan="1">
                <p> Get insights data for an individual media object. </p>
              </td>
            </tr>

            <tr>
              <td colspan="1" rowspan="1">
                <p> Other Users </p>
              </td>

              <td colspan="1" rowspan="1">
                <p> Get the basic metadata for Instagram pages associated with other Instagram Business Accounts. </p>
              </td>
            </tr>

            <tr>
              <td colspan="1" rowspan="1">
                <p> Other User's Media </p>
              </td>

              <td colspan="1" rowspan="1">
                <p>
                  {" "}

                  Get the media information for Instagram pages associated with other Instagram Business Accounts.{" "}
                </p>
              </td>
            </tr>

            <tr>
              <td colspan="1" rowspan="1">
                <p> Recently Searched Hashtags </p>
              </td>

              <td colspan="1" rowspan="1">
                <p> Get the hashtags that an Instagram Business User has searched for within the last 7 days. </p>
              </td>
            </tr>

            <tr>
              <td colspan="1" rowspan="1">
                <p> User </p>
              </td>

              <td colspan="1" rowspan="1">
                <p> Get metadata for the current user. </p>
              </td>
            </tr>

            <tr>
              <td colspan="1" rowspan="1">
                <p> User Insights </p>
              </td>

              <td colspan="1" rowspan="1">
                <p> Get insights for your Instagram Business account. </p>
              </td>
            </tr>

            <tr>
              <td colspan="1" rowspan="1">
                <p> User Media </p>
              </td>

              <td colspan="1" rowspan="1">
                <p> Get media objects for an Instagram Business account. </p>
              </td>
            </tr>

            <tr>
              <td colspan="1" rowspan="1">
                <p> User Stories </p>
              </td>

              <td colspan="1" rowspan="1">
                <p> Get user stories for an Instagram Business account. </p>
              </td>
            </tr>
          </tbody>
        </table>
      </td>
    </tr>

    <tr>
      <td colspan="1" rowspan="1">
        <p> Instagram Business Account Page </p>
      </td>

      <td colspan="1" rowspan="1">
        <p> Select the Facebook page your Instagram Business account is linked to. </p>
      </td>
    </tr>

    <tr>
      <td colspan="1" rowspan="1">
        <p> Hashtag Name </p>
      </td>

      <td colspan="1" rowspan="1">
        <p> Enter the name of the hashtag that you want to search. </p>
      </td>
    </tr>

    <tr>
      <td colspan="1" rowspan="1">
        <p> Reporting Timeframe </p>
      </td>

      <td colspan="1" rowspan="1">
        <p> Select the timeframe for each day in the report. </p>
      </td>
    </tr>

    <tr>
      <td colspan="1" rowspan="1">
        <p> Other Instagram Business Account Pages </p>
      </td>

      <td colspan="1" rowspan="1">
        <p> Enter a comma-separated list of Instagram page names. For example, Domo, Nike. </p>
      </td>
    </tr>

    <tr>
      <td colspan="1" rowspan="1">
        <p> Include New Metrics </p>
      </td>

      <td colspan="1" rowspan="1">
        <p> Select if you want to request only the new metrics. </p>
      </td>
    </tr>

    <tr>
      <td colspan="1" rowspan="1">
        <p> Results Breakdown </p>
      </td>

      <td colspan="1" rowspan="1">
        <p> Select the breakdown to break down the result set into subsets. </p>
      </td>
    </tr>

    <tr>
      <td colspan="1" rowspan="1">
        <p> User Metric </p>
      </td>

      <td colspan="1" rowspan="1">
        <p> Select the metrics to include in the final report. </p>
      </td>
    </tr>

    <tr>
      <td colspan="1" rowspan="1">
        <p> Media Type </p>
      </td>

      <td colspan="1" rowspan="1">
        <p>
          {" "}

          Select the media type you want to retrieve data for. When selecting <b> Story </b>, keep in mind that media data
          for stories can usually be retrieved for only 24 hours after the story's creation.{" "}
        </p>
      </td>
    </tr>

    <tr>
      <td colspan="1" rowspan="1">
        <p> Media Metrics </p>
      </td>

      <td colspan="1" rowspan="1">
        <p> Select the metrics you want to include in your report. </p>
      </td>
    </tr>

    <tr>
      <td colspan="1" rowspan="1">
        <p> Media Items </p>
      </td>

      <td colspan="1" rowspan="1">
        <p>
          {" "}

          Select whether you want to pull data for a single media item, for a range of items, or for all media items ("User
          Media" report only).{" "}
        </p>
      </td>
    </tr>

    <tr>
      <td colspan="1" rowspan="1">
        <p> Media </p>
      </td>

      <td colspan="1" rowspan="1">
        <p> Select the media item you want to retrieve data for. </p>
      </td>
    </tr>

    <tr>
      <td colspan="1" rowspan="1">
        <p> Backfill Data </p>
      </td>

      <td colspan="1" rowspan="1">
        <p>
          {" "}

          Select the Backfill Data checkbox if you want to retrieve previous data by selecting the Start Date and End Date.{" "}
        </p>
      </td>
    </tr>

    <tr>
      <td colspan="1" rowspan="1">
        <p> Start Date </p>
      </td>

      <td colspan="1" rowspan="1">
        <p>
          {" "}

          Select the report start date using relative or specific dates. Relative indicates the number of days from today
          or a specific date using the date selector.{" "}
        </p>
      </td>
    </tr>

    <tr>
      <td colspan="1" rowspan="1">
        {" "}

        Select Specific Start Date{" "}
      </td>

      <td colspan="1" rowspan="1">
        {" "}

        Select the report date using the date selector.{" "}
      </td>
    </tr>

    <tr>
      <td colspan="1" rowspan="1">
        {" "}

        Days back to start from{" "}
      </td>

      <td colspan="1" rowspan="1">
        {" "}

        The number of days back that you would like to get data from (start day). Specify either today or 0, yesterday or
        1, or today-7 or 7 to get data for 7 days into the past.{" "}
      </td>
    </tr>

    <tr>
      <td colspan="1" rowspan="1">
        {" "}

        End Date{" "}
      </td>

      <td colspan="1" rowspan="1">
        {" "}

        Select the report end date using relative or specific dates. Relative indicates the number of days from today or
        a specific date using the date selector.{" "}
      </td>
    </tr>

    <tr>
      <td colspan="1" rowspan="1">
        {" "}

        Select Specific End Date{" "}
      </td>

      <td colspan="1" rowspan="1">
        {" "}

        Select the report date using the date selector.{" "}
      </td>
    </tr>

    <tr>
      <td colspan="1" rowspan="1">
        {" "}

        Days back to end at{" "}
      </td>

      <td colspan="1" rowspan="1">
        {" "}

        The number of days back that you would like to get data to (end day). Specify either today or 0, yesterday or 1,
        or today-7 or 7 to get data for 7 days into the past.{" "}
      </td>
    </tr>

    <tr>
      <td colspan="1" rowspan="1">
        {" "}

        Page Size Limit{" "}
      </td>

      <td colspan="1" rowspan="1">
        {" "}

        The maximum number of items/records to be returned in a single page call. The default value is 100.{" "}
      </td>
    </tr>
  </tbody>
</table>

## Other Panes

For information about the remaining sections of the connector interface, including how to configure scheduling, retry, and update options, see [Adding a DataSet Using a Data Connector](https://domo-support.domo.com/s/article/360042926274?language=en_US "Adding a DataSet Using a Data Connector").

## FAQs

<AccordionGroup>
  <Accordion title="What do I need to know about connecting via Facebook's OAuth?">
    **Important**: Due to the limits of the Facebook API, around every 60 days you will have to re-connect your Facebook account with Domo to avoid unauthorized errors. The easiest way to do this is to navigate to the Accounts tab in the Data Center, search for your Instagram Business account, then click on the wrench icon, and select "Re-connect".

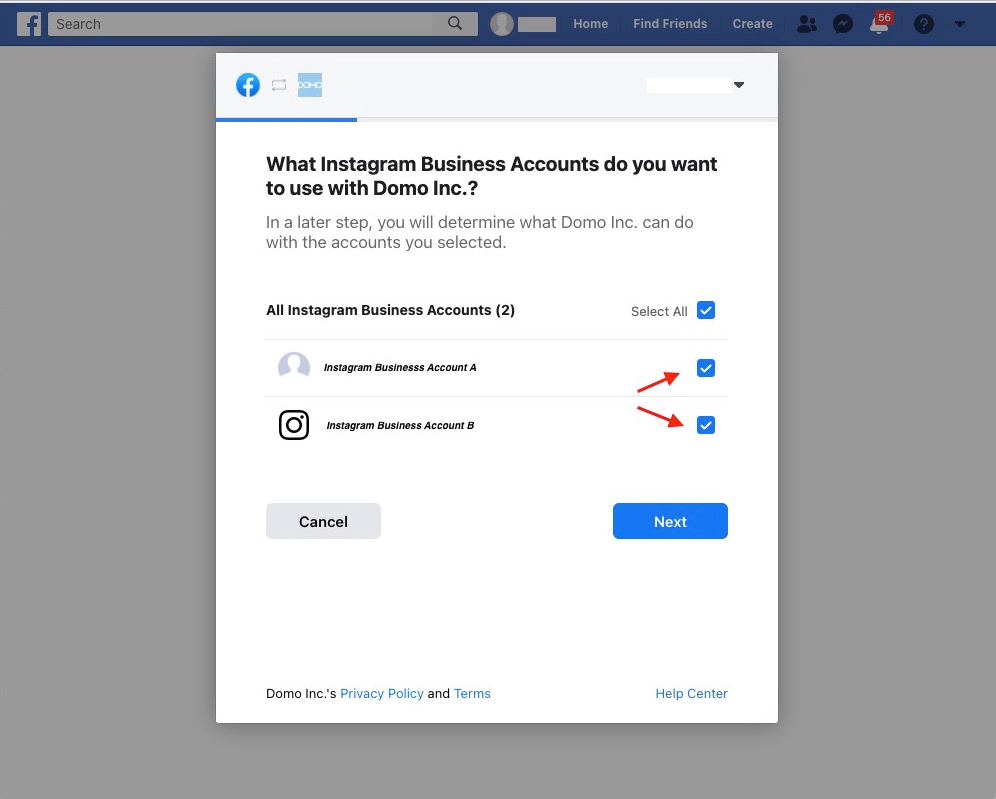
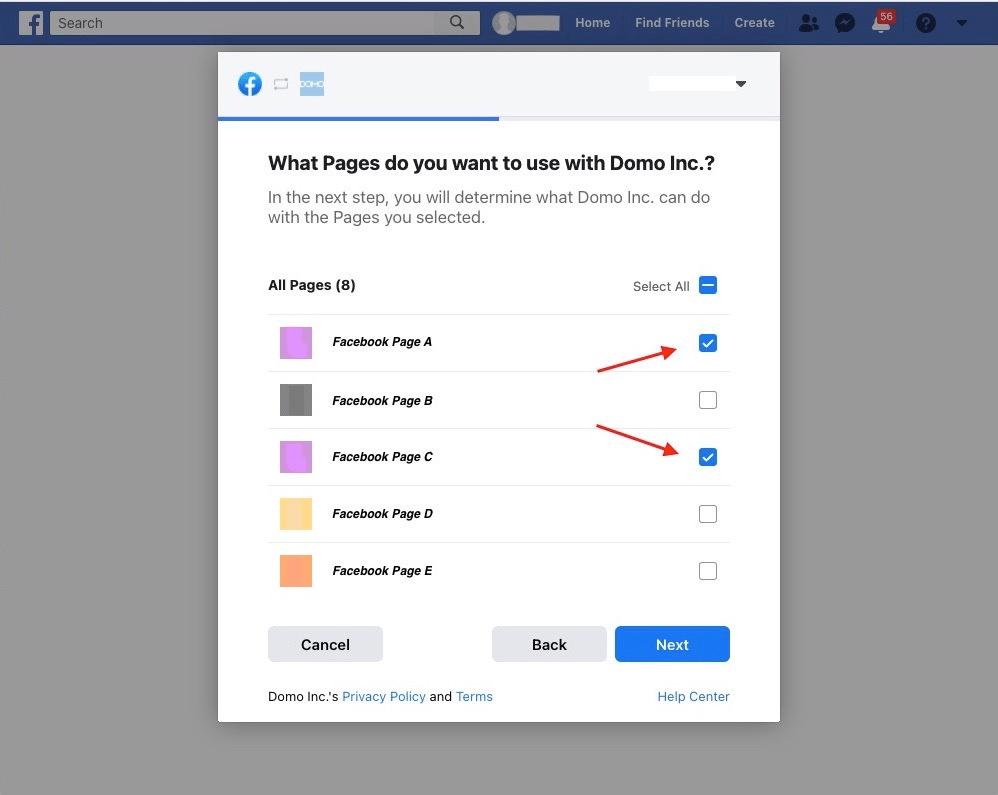
    When connecting your Instagram Business account with Domo, a Facebook OAuth process will happen. It's important to correctly configure the OAuth; otherwise, you may miss some of the data (For example: missing Instagram Business data or missing Facebook Pages in the configuration section).

    Below are the basic steps for correctly configuring the OAuth.

    1. First, choose "Add account", either from the "Create Instagram Business Connector DataSet" page or from the Accounts view of the connector. For more information about adding an account, see

       [Managing User Account for Connectors](https://domo-support.domo.com/s/article/360042926054?language=en_US "Managing User Account for Connectors").

    2. If you've never connected Facebook to Domo before, the first screen in the Facebook OAuth will be one of the two screens below. Enter your Facebook credentials (if needed) and continue.

    <Frame>
      <img alt="Facebook_login.png" src="https://mintcdn.com/domoinc-openapi-sync-dataflows/J3x-O8qWbl7BB1F9/images/kb/ka0Vq000000EZKT-00N5w00000Ri7BU-0EM5w000005vO0h.png?fit=max&auto=format&n=J3x-O8qWbl7BB1F9&q=85&s=7502eca9b68e533bcc3daab8f225b60d" width="459" height="430" data-path="images/kb/ka0Vq000000EZKT-00N5w00000Ri7BU-0EM5w000005vO0h.png" />
    </Frame>

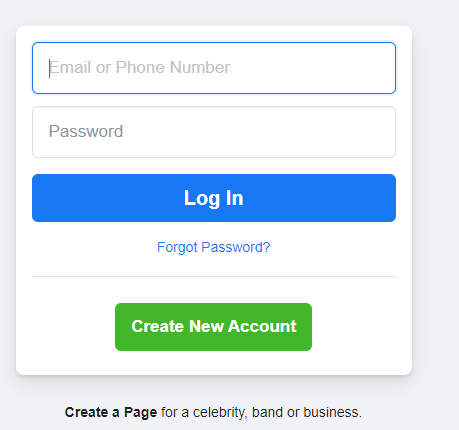
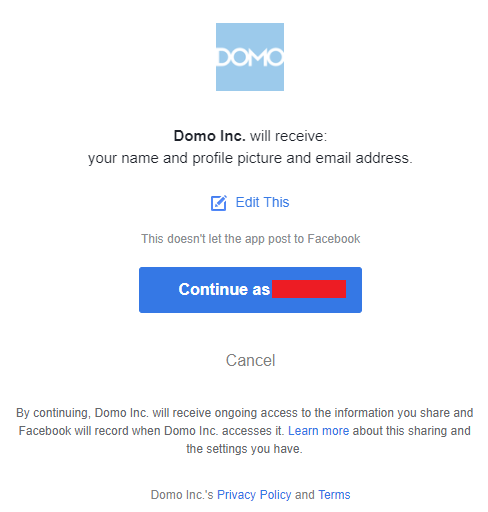
    If you are already logged into your Facebook account, Domo will ask if you wish to use the same account for connection.
    <Frame>
      <img alt="Domo-Facebook_login.png" src="https://mintcdn.com/domoinc-openapi-sync-dataflows/J3x-O8qWbl7BB1F9/images/kb/ka0Vq000000EZKT-00N5w00000Ri7BU-0EM5w000005vO0d.png?fit=max&auto=format&n=J3x-O8qWbl7BB1F9&q=85&s=fe34e9067daecedf049f551cb80205e6" width="488" height="512" data-path="images/kb/ka0Vq000000EZKT-00N5w00000Ri7BU-0EM5w000005vO0d.png" />
    </Frame>

    3. Now, select the Instagram Business Accounts you want to retrieve data for.
    <Frame>
      <img alt="Select_Instagram_Accounts.png" src="https://mintcdn.com/domoinc-openapi-sync-dataflows/J3x-O8qWbl7BB1F9/images/kb/ka0Vq000000EZKT-00N5w00000Ri7BU-0EM5w000005vO0f.png?fit=max&auto=format&n=J3x-O8qWbl7BB1F9&q=85&s=e0308b4cc6acb616a84bd5c68b79e397" width="996" height="799" data-path="images/kb/ka0Vq000000EZKT-00N5w00000Ri7BU-0EM5w000005vO0f.png" />
    </Frame>

    4. Next, select the Facebook Pages that are connected to your Instagram Business accounts.
    <Frame>
      <img alt="Select_Facebook_Pages.png" src="https://mintcdn.com/domoinc-openapi-sync-dataflows/J3x-O8qWbl7BB1F9/images/kb/ka0Vq000000EZKT-00N5w00000Ri7BU-0EM5w000005vO0e.png?fit=max&auto=format&n=J3x-O8qWbl7BB1F9&q=85&s=63b95b9978c681bead33f1195f18f2ed" width="998" height="795" data-path="images/kb/ka0Vq000000EZKT-00N5w00000Ri7BU-0EM5w000005vO0e.png" />
    </Frame>

    <Note>
      **Note:** If you only select the Facebook Pages that aren't connected with an Instagram Business account, the data will be missing. However, there is no harm in selecting extraneous Facebook Pages. This means if you're unsure which Facebook Page is connected with which Instagram Business account, you can choose "Select All."
    </Note>

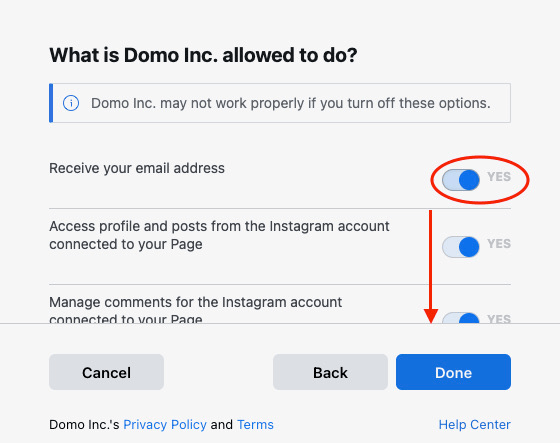
    5. Finally, enable all permissions so Domo has access to retrieve your data.

    <Frame>
      <img alt="Enable_Permissions.png" src="https://mintcdn.com/domoinc-openapi-sync-dataflows/J3x-O8qWbl7BB1F9/images/kb/ka0Vq000000EZKT-00N5w00000Ri7BU-0EM5w000005vO0a.png?fit=max&auto=format&n=J3x-O8qWbl7BB1F9&q=85&s=5880139d2769fa095fa3235cec1a5395" width="560" height="443" data-path="images/kb/ka0Vq000000EZKT-00N5w00000Ri7BU-0EM5w000005vO0a.png" />
    </Frame>
  </Accordion>

  <Accordion title="What version of Facebook/Instagram does this connector use?">
    This connector uses version 15.0 of the Facebook API ([https://developers.facebook.com/docs/graph-api/changelog/version15.0](https://developers.facebook.com/docs/graph-api/changelog/version12.0 "Follow link") ).
  </Accordion>

  <Accordion title="What endpoint does each report call in this connector?">
    <table data-aura-rendered-by="33:201;a">
      <tbody>
        <tr>
          <th colspan="1" rowspan="1"> Report Name </th>
          <th colspan="1" rowspan="1"> Endpoint URL </th>
        </tr>

        <tr>
          <td colspan="1" rowspan="1"> Hashtag Recent Media </td>
          <td colspan="1" rowspan="1"> `{hashtag-id}/recent_media` </td>
        </tr>

        <tr>
          <td colspan="1" rowspan="1"> Hashtag Top Media </td>
          <td colspan="1" rowspan="1"> `/{hashtag-id}/top_media` </td>
        </tr>

        <tr>
          <td colspan="1" rowspan="1"> Media Comments </td>
          <td colspan="1" rowspan="1"> `/{instagram_media_id}/comments` </td>
        </tr>

        <tr>
          <td colspan="1" rowspan="1"> Media Insights </td>
          <td colspan="1" rowspan="1"> `/{instagram_media_id}/insights` </td>
        </tr>

        <tr>
          <td colspan="1" rowspan="1"> Other Users </td>
          <td colspan="1" rowspan="1"> `/{instagram_business_account_id}?fields=business_discovery.username({account_name}){user_fields}` </td>
        </tr>

        <tr>
          <td colspan="1" rowspan="1"> Other Users' Media </td>
          <td colspan="1" rowspan="1"> `/{instagram_business_account_id}?fields=business_discovery.username({account_name}){media{media_fields}}` </td>
        </tr>

        <tr>
          <td colspan="1" rowspan="1"> Recently Searched Hashtags </td>
          <td colspan="1" rowspan="1"> `/{instagram_business_account_id}/recently_searched_hashtags` </td>
        </tr>

        <tr>
          <td colspan="1" rowspan="1"> User </td>
          <td colspan="1" rowspan="1"> `/{instagram_business_account_id}` </td>
        </tr>

        <tr>
          <td colspan="1" rowspan="1"> User Insights </td>
          <td colspan="1" rowspan="1"> `/{instagram_business_account_id}/insights` </td>
        </tr>

        <tr>
          <td colspan="1" rowspan="1"> User Media </td>
          <td colspan="1" rowspan="1"> `/{instagram_business_account_id}/media` </td>
        </tr>

        <tr>
          <td colspan="1" rowspan="1"> User Stories </td>
          <td colspan="1" rowspan="1"> `/{instagram_business_account_id}/stories` </td>
        </tr>
      </tbody>
    </table>
  </Accordion>

  <Accordion title="What do I need to power up this connector?">
    To start with, you need a Facebook page, a Facebook account that has a role on that page, and an Instagram account. You then need to follow the steps to connect your Instagram account and Facebook page and the steps to enable your Facebook user to have access to the Instagram Business connector. For more information, see [Connecting Instagram to Facebook](#h_6c575603-faf1-44af-a5a3-d8e25210473a "#Connecting_Instagram_to_Facebook").
  </Accordion>

  <Accordion title="Do I need any specific kind of Instagram account or Facebook page? Do I need the admin role?">
    You will be connecting the Facebook page to the Instagram account and then converting the account to an Instagram Business account. You don't have to be the admin of the page, but since you'll be connecting it to an Instagram Business Account, the page and account should be related in some way.
  </Accordion>

  <Accordion title="How often can the data be updated?">
    Most information about pages is updated every 24 hours. Selected "insight" metrics are updated roughly every 15 minutes. It is recommended you configure the DataSets to run every 24 hours.
  </Accordion>

  <Accordion title="Are there any API limits that I need to be aware of?">
    Instagram Business connector is limited to 200 calls per user per hour.
  </Accordion>
</AccordionGroup>

## Troubleshooting

I keep seeing this error message: "Domo is ready, but Instagram reported an error: Error validating access token: Sess..."

To resolve this, do the following:

1. Receiving an error, please reconnect your credentials to click
   **Re-Edit** or **Edit Account** in the Accounts tab.
2. If you continue to receive the error message, it implies that your account has already expired with your OAuth access token.

**NOTE: If you have a valid support package. please contact Domo Support.**