> ## Documentation Index
> Fetch the complete documentation index at: https://domoinc-openapi-sync-dataflows.mintlify.site/llms.txt
> Use this file to discover all available pages before exploring further.
# Manage Connector/Adapter Accounts
export const InlineImage = ({src, alt = '', height = '1.6em'}) => {
return  ;
};
### Intro
Accounts is where you manage the details for connector integrations. In the Accounts interface, you can do the following:
* View and manage your own accounts and any accounts shared with you
* Transfer DataSets to others' accounts or change the accounts associated with DataSets
* Share connector accounts with others so they can also create DataSets using that connector
**Important:** If you delete someone from Domo and reassign their DataSets to someone else, the permissions for the DataSet accounts are not passed to the new owner. Ownership of each account must be transferred manually. For more information, see [Remove Users from Domo](/s/article/360042934334 "Removing Users from Domo").
***
### Access Accounts
You can access the **Accounts** interface from inside the Data Center.
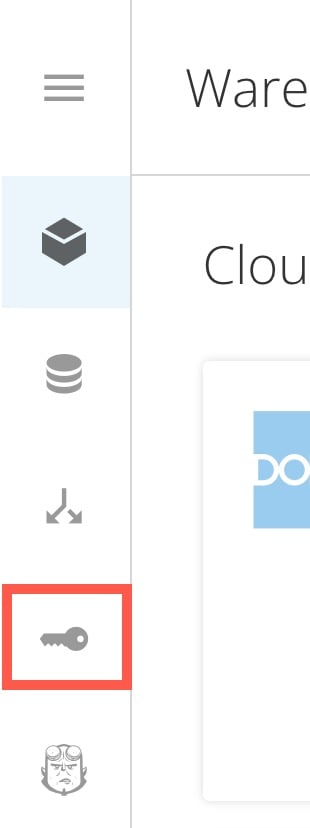
In the Domo navigation, select **Data**. Then select **Accounts** in the left sidebar.
;
};
### Intro
Accounts is where you manage the details for connector integrations. In the Accounts interface, you can do the following:
* View and manage your own accounts and any accounts shared with you
* Transfer DataSets to others' accounts or change the accounts associated with DataSets
* Share connector accounts with others so they can also create DataSets using that connector
**Important:** If you delete someone from Domo and reassign their DataSets to someone else, the permissions for the DataSet accounts are not passed to the new owner. Ownership of each account must be transferred manually. For more information, see [Remove Users from Domo](/s/article/360042934334 "Removing Users from Domo").
***
### Access Accounts
You can access the **Accounts** interface from inside the Data Center.
In the Domo navigation, select **Data**. Then select **Accounts** in the left sidebar.
 ### Accounts Interface
In the **Accounts** interface, a list of your authorized integrations displays.
### Accounts Interface
In the **Accounts** interface, a list of your authorized integrations displays.
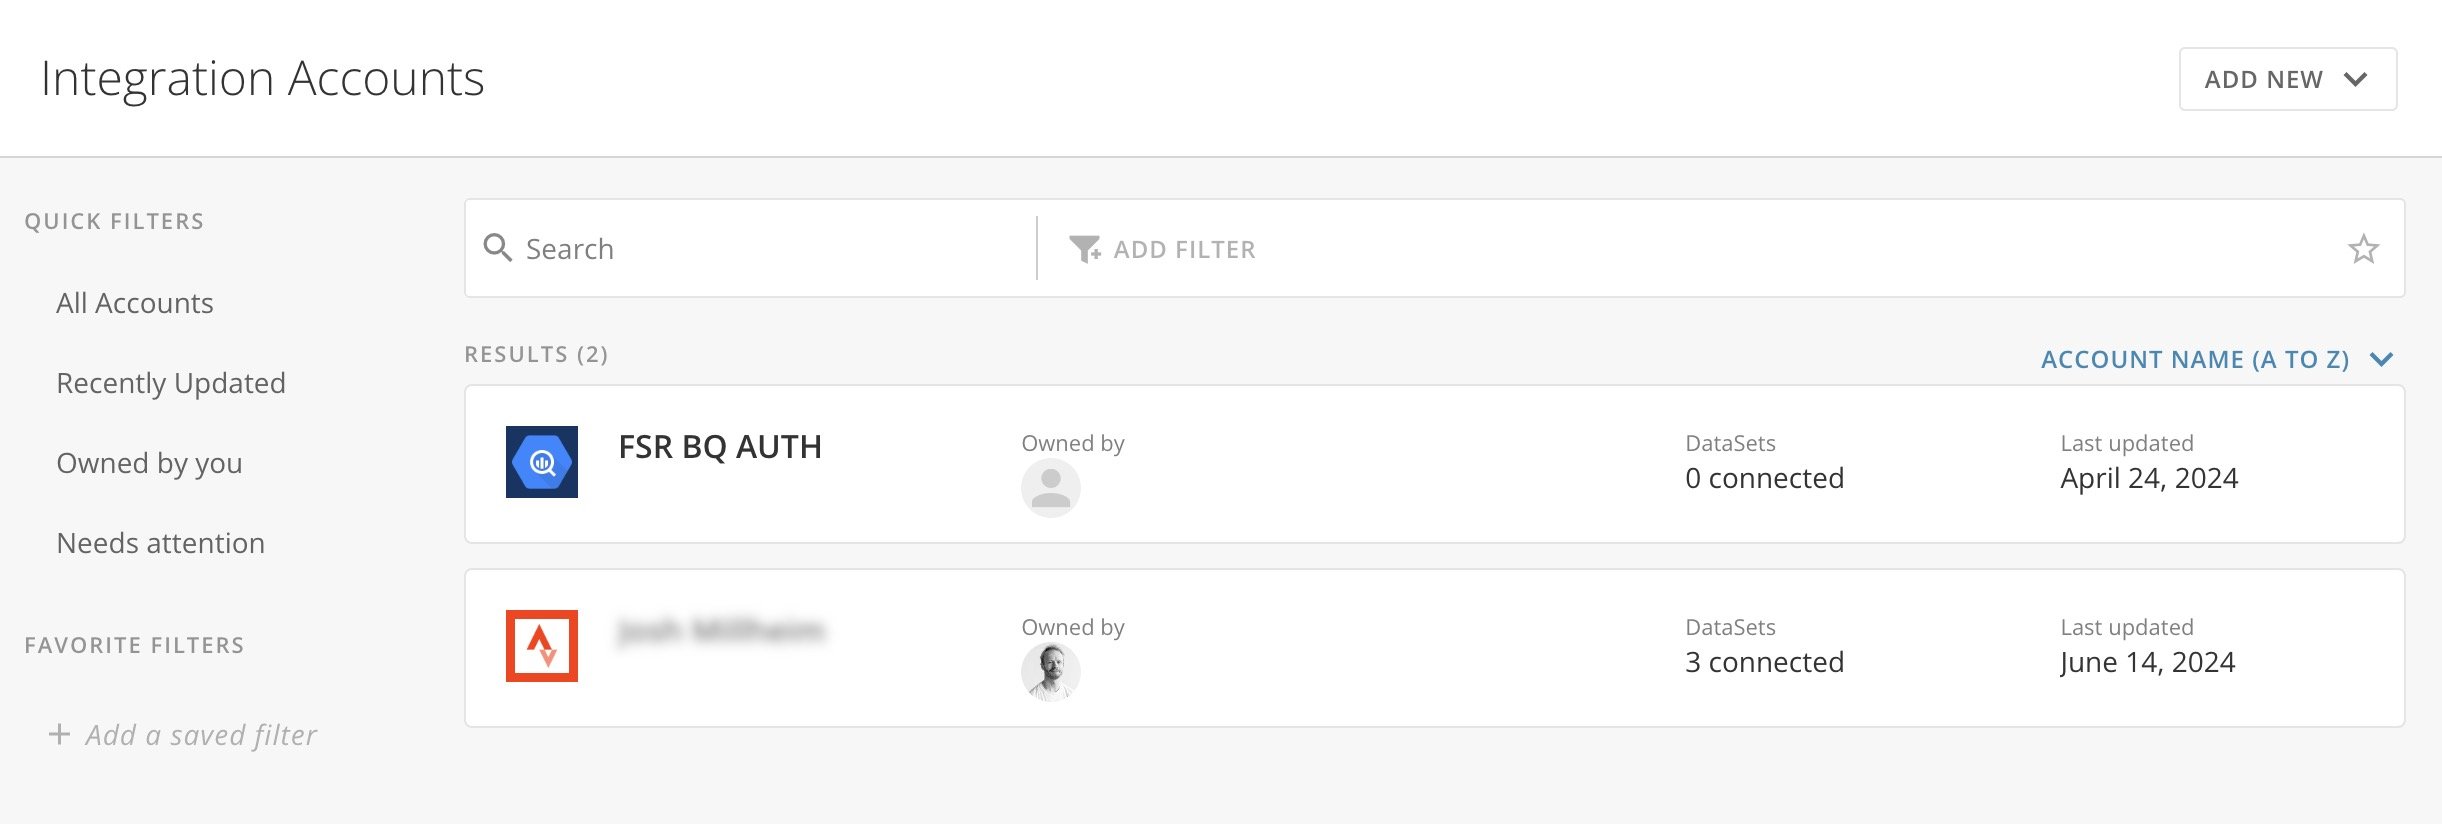 Each row in the accounts list represents a single integration. A row displays the account name, the owner name and profile picture, the number of connected DataSets, and the date when the account was last updated.
##### Search and Filter Accounts List
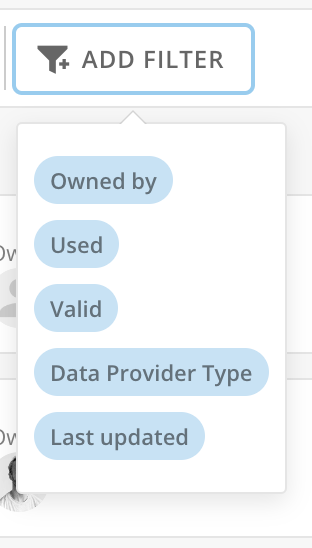
You can search the list and use the following filters:
* Owned by
* Used
* Valid
* Data Provider Type
* Last updated
Each row in the accounts list represents a single integration. A row displays the account name, the owner name and profile picture, the number of connected DataSets, and the date when the account was last updated.
##### Search and Filter Accounts List
You can search the list and use the following filters:
* Owned by
* Used
* Valid
* Data Provider Type
* Last updated
 ##### Sort Accounts List
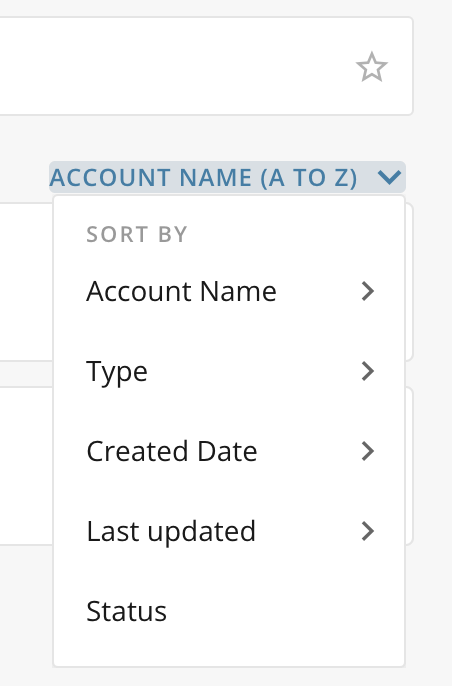
You can sort the list of integrations in the following ways:
* Account name (A to Z or Z to A)
* Type (A to Z or Z to A)
* Created date (Newest to oldest or oldest to newest)
* Last updated (Newest to oldest or oldest to newest)
* Status
##### Sort Accounts List
You can sort the list of integrations in the following ways:
* Account name (A to Z or Z to A)
* Type (A to Z or Z to A)
* Created date (Newest to oldest or oldest to newest)
* Last updated (Newest to oldest or oldest to newest)
* Status
 ### Add an Account
You can add an account to Domo by doing one of the following:
* Add a DataSet to Domo and enter new account information (as opposed to selecting an existing account). After adding an account by this method, the listing displays in the **Accounts** interface. Learn more in [Adding a DataSet Using a Connector](/s/article/360042926274 "Connecting to Data with Connectors").
* Add an account from the **Accounts** interface. Learn how below.
Follow these steps to add an account from the **Accounts** interface:
1. From the **Accounts** interface, select **Add New** > **Account**.
The **Add Account** modal displays.
### Add an Account
You can add an account to Domo by doing one of the following:
* Add a DataSet to Domo and enter new account information (as opposed to selecting an existing account). After adding an account by this method, the listing displays in the **Accounts** interface. Learn more in [Adding a DataSet Using a Connector](/s/article/360042926274 "Connecting to Data with Connectors").
* Add an account from the **Accounts** interface. Learn how below.
Follow these steps to add an account from the **Accounts** interface:
1. From the **Accounts** interface, select **Add New** > **Account**.
The **Add Account** modal displays.
 **Note:** You can use the **Assign Somone** option in the modal to choose someone else in your organization to connect their account.
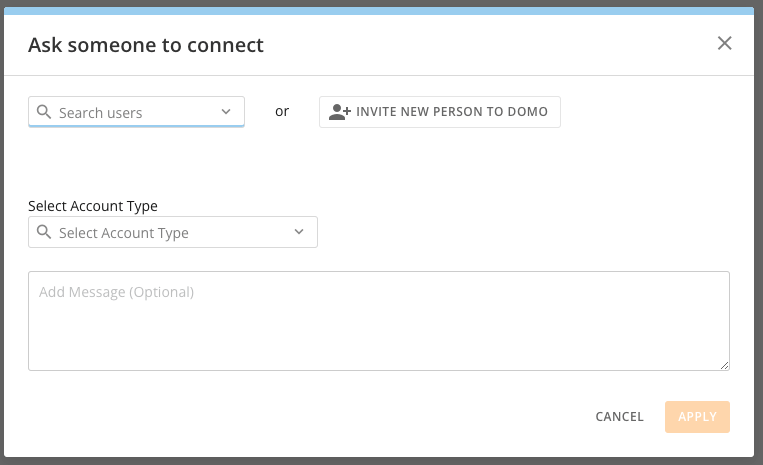 2. From the dropdown, select the connector.
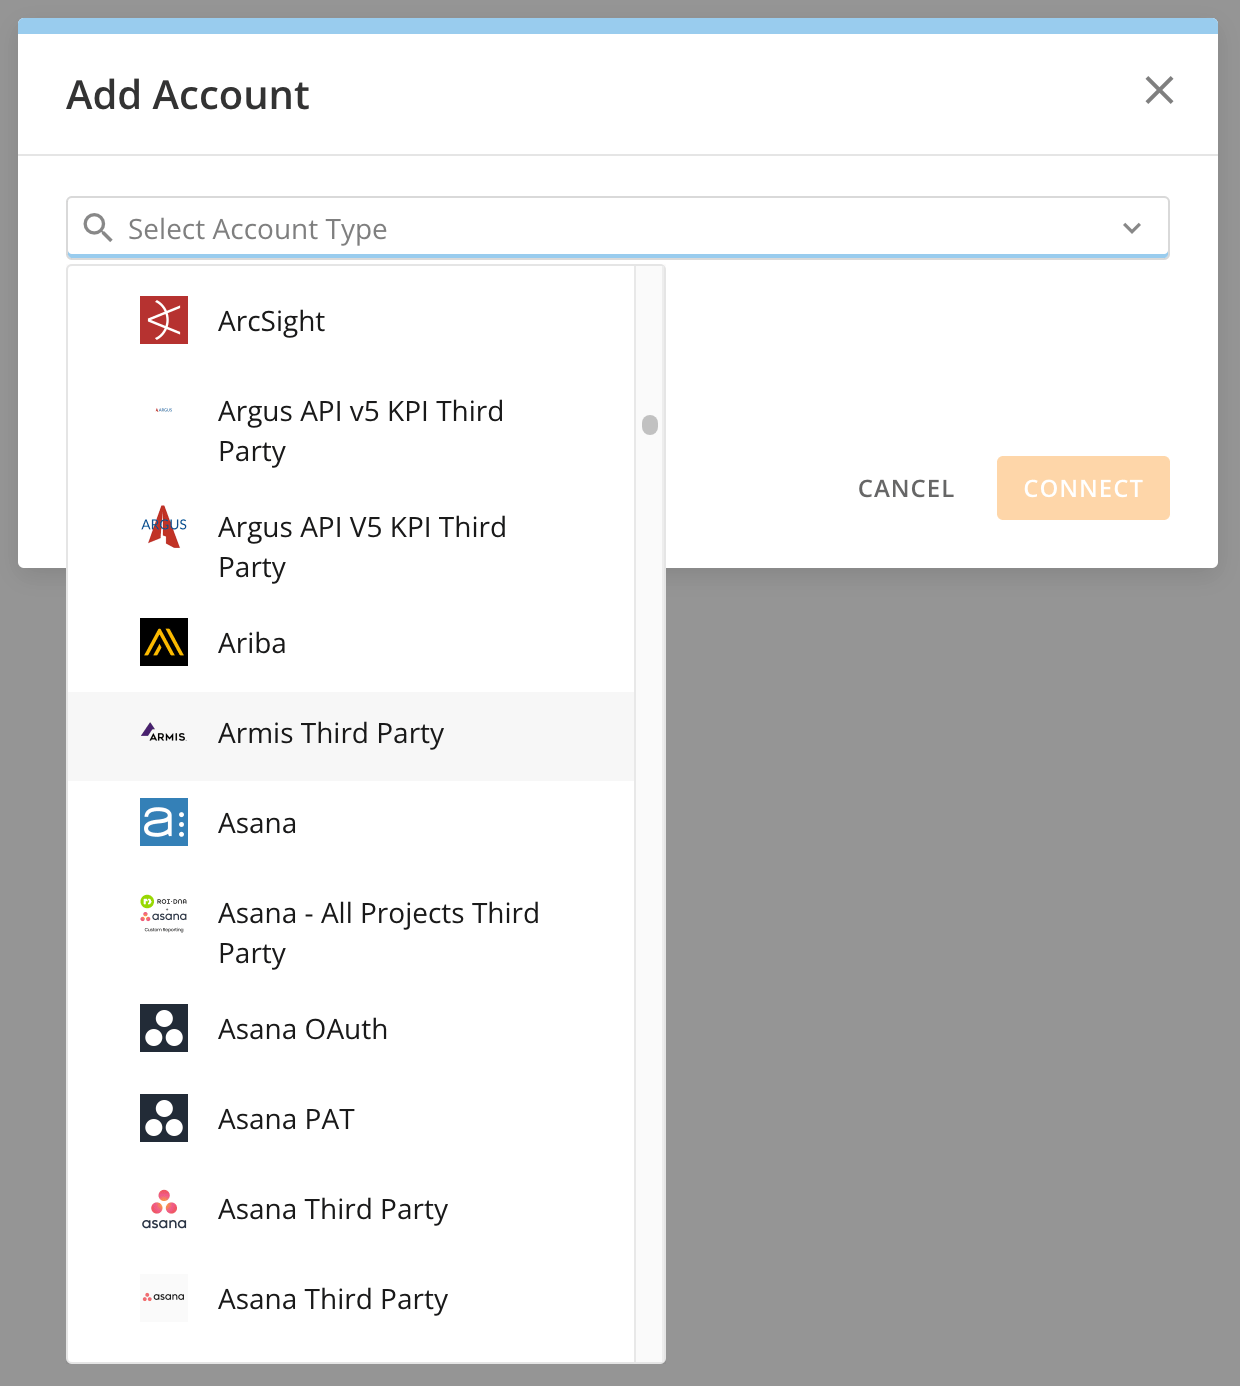 3. Enter the required connection information.
4. Select **Connect**.
5. Select **Done**.
An entry for the new account appears in the **Accounts** interface.
### Delete an Account
You can disconnect (delete) any account listing from the **Accounts** interface. After deletion, any DataSets that use this account are disconnected and stop updating.
Follow these steps to delete an account:
1. In the accounts list, hover over the account row you want to delete.
2. Select
**Account options** > **Delete account**.
3. Enter the required connection information.
4. Select **Connect**.
5. Select **Done**.
An entry for the new account appears in the **Accounts** interface.
### Delete an Account
You can disconnect (delete) any account listing from the **Accounts** interface. After deletion, any DataSets that use this account are disconnected and stop updating.
Follow these steps to delete an account:
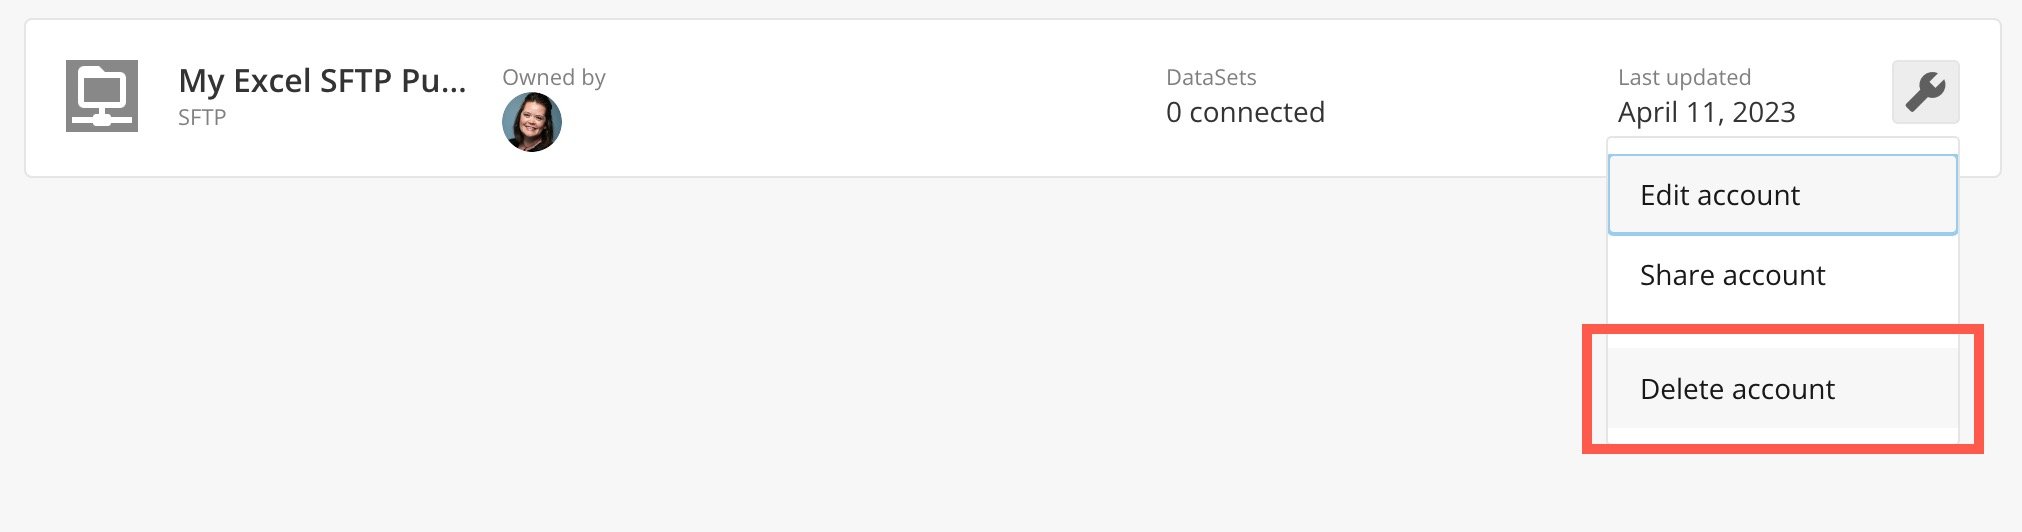
1. In the accounts list, hover over the account row you want to delete.
2. Select
**Account options** > **Delete account**.
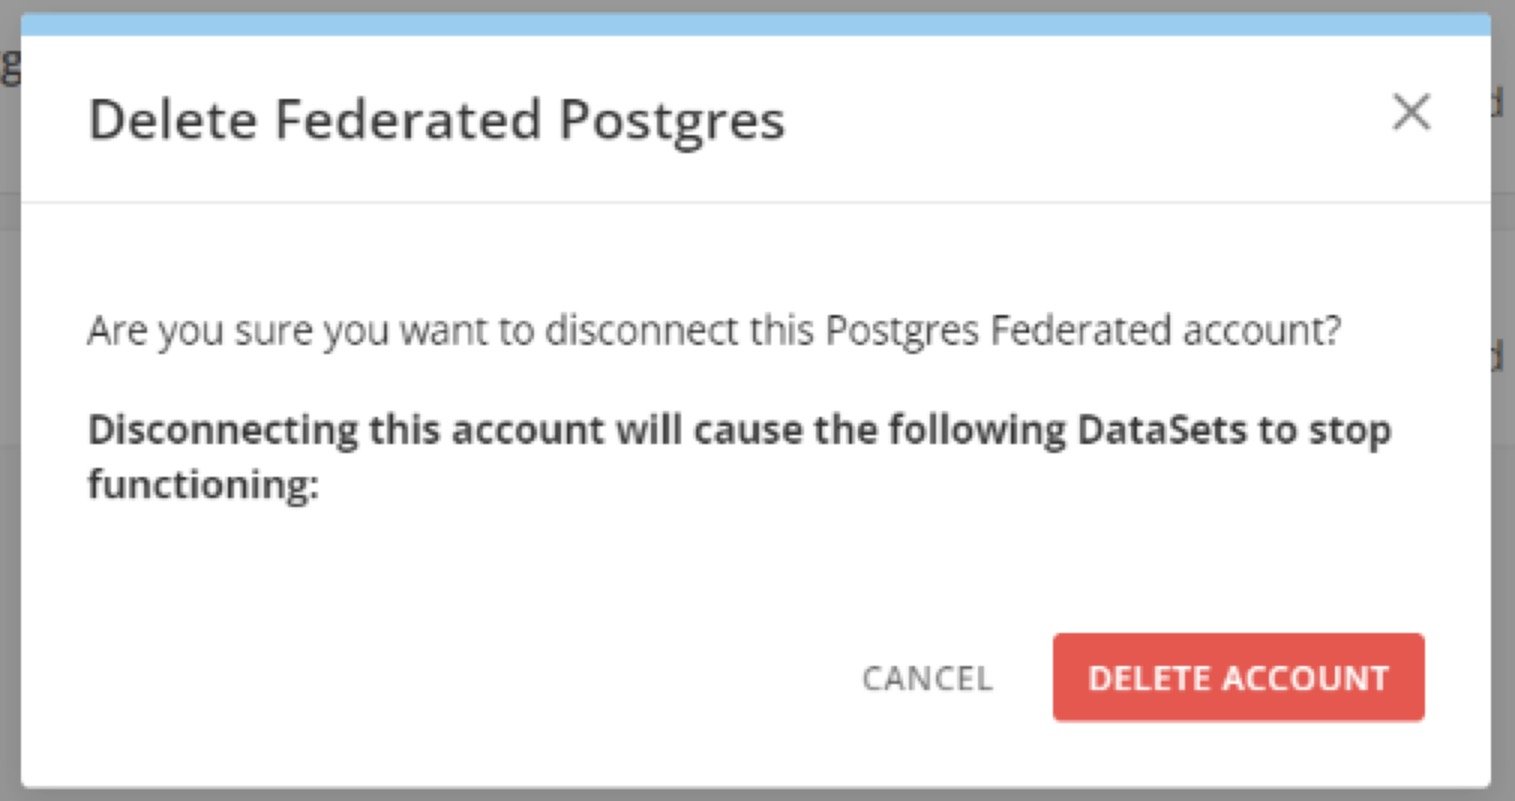
 3. In the confirmation dialog, select **Delete Account** to remove the account OR **Cancel** to close the dialog without deleting.
Confirming deletion causes any connected and listed DataSets to stop functioning.
3. In the confirmation dialog, select **Delete Account** to remove the account OR **Cancel** to close the dialog without deleting.
Confirming deletion causes any connected and listed DataSets to stop functioning.
 ### View DataSets Associated with Accounts
In the **Accounts** interface, you can see a list of DataSets associated with each account. Select any DataSet in the list to view its Details page.
Follow these steps to view DataSets associated with an account:
1. In the accounts list, hover over the **DataSets** column item.
A list of the associated DataSets displays.
2. Select the name of a DataSet to see the Details page for that DataSet.
### View DataSets Associated with Accounts
In the **Accounts** interface, you can see a list of DataSets associated with each account. Select any DataSet in the list to view its Details page.
Follow these steps to view DataSets associated with an account:
1. In the accounts list, hover over the **DataSets** column item.
A list of the associated DataSets displays.
2. Select the name of a DataSet to see the Details page for that DataSet.
 ### Rename an Account
When you create accounts, either by adding them in the Accounts interface or entering credentials for a new DataSet, those accounts are automatically assigned the connector name. For example, if you add an account for Facebook, that account is called "Facebook Account." Other accounts you add for Facebook are also called "Facebook Account." This can make it confusing to differentiate between accounts for the same connector. You can eliminate this confusion by giving unique names to accounts in the **Accounts** tab.
Follow these steps to rename an account:
1. In the accounts list, hover over the account you want to rename.
2. Select
**Account options** > **Edit account**.
3. In the modal, hover over the account name until the edit field displays.
### Rename an Account
When you create accounts, either by adding them in the Accounts interface or entering credentials for a new DataSet, those accounts are automatically assigned the connector name. For example, if you add an account for Facebook, that account is called "Facebook Account." Other accounts you add for Facebook are also called "Facebook Account." This can make it confusing to differentiate between accounts for the same connector. You can eliminate this confusion by giving unique names to accounts in the **Accounts** tab.
Follow these steps to rename an account:
1. In the accounts list, hover over the account you want to rename.
2. Select
**Account options** > **Edit account**.
3. In the modal, hover over the account name until the edit field displays.
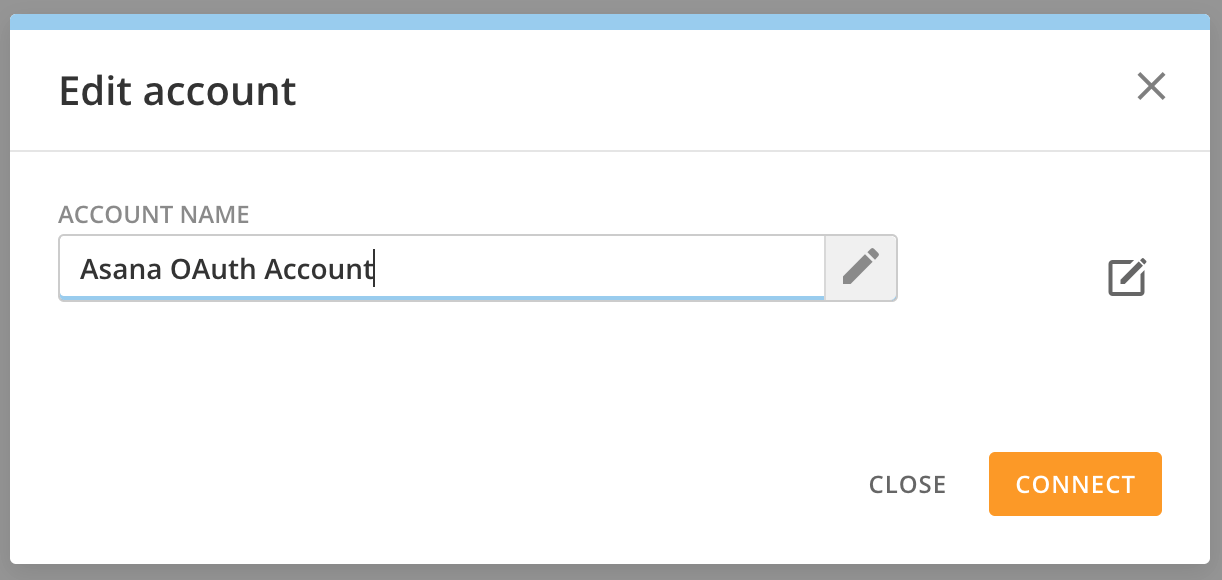 4. Enter the new name and select **Connect** to keep the new name OR **Close** to discard the change.
### Edit Connector Account Credentials
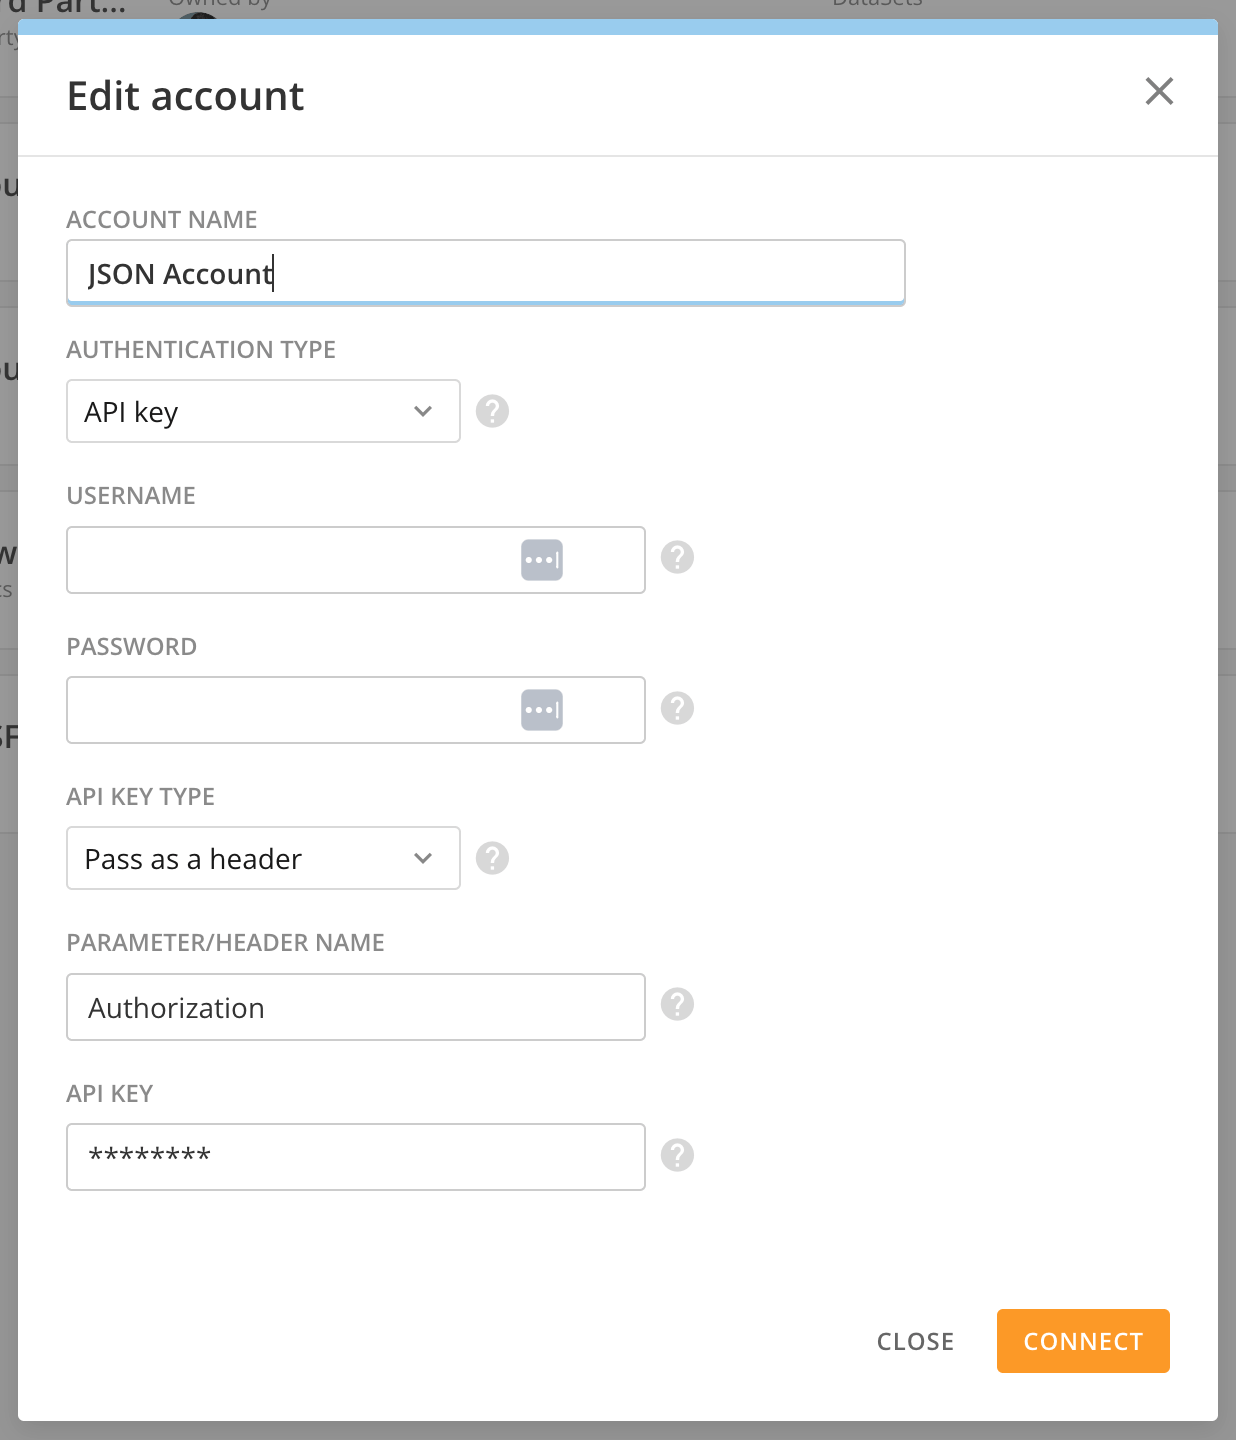
For connectors that require you to enter account credentials manually (versus using OAuth), you can edit the credentials by following these steps:
1. In the accounts list, hover over the account.
2. Select ** Account options** > **Edit account**.
3. Enter the required credentials in the necessary fields.
4. Select **Connect** to keep your changes OR select **Close** to discard them.
4. Enter the new name and select **Connect** to keep the new name OR **Close** to discard the change.
### Edit Connector Account Credentials
For connectors that require you to enter account credentials manually (versus using OAuth), you can edit the credentials by following these steps:
1. In the accounts list, hover over the account.
2. Select ** Account options** > **Edit account**.
3. Enter the required credentials in the necessary fields.
4. Select **Connect** to keep your changes OR select **Close** to discard them.
 ### Reconnect Connectors with OAuth
You can reconnect connectors that use OAuth to authenticate from the **Accounts** interface. If an OAuth token has expired, you may have to re-enter your credentials to reconnect.
Follow these steps to reconnect:
1. In the accounts list, hover over the account you want to reconnect.
2. Select
**Account options** > **Re-connect**.
### Reconnect Connectors with OAuth
You can reconnect connectors that use OAuth to authenticate from the **Accounts** interface. If an OAuth token has expired, you may have to re-enter your credentials to reconnect.
Follow these steps to reconnect:
1. In the accounts list, hover over the account you want to reconnect.
2. Select
**Account options** > **Re-connect**.
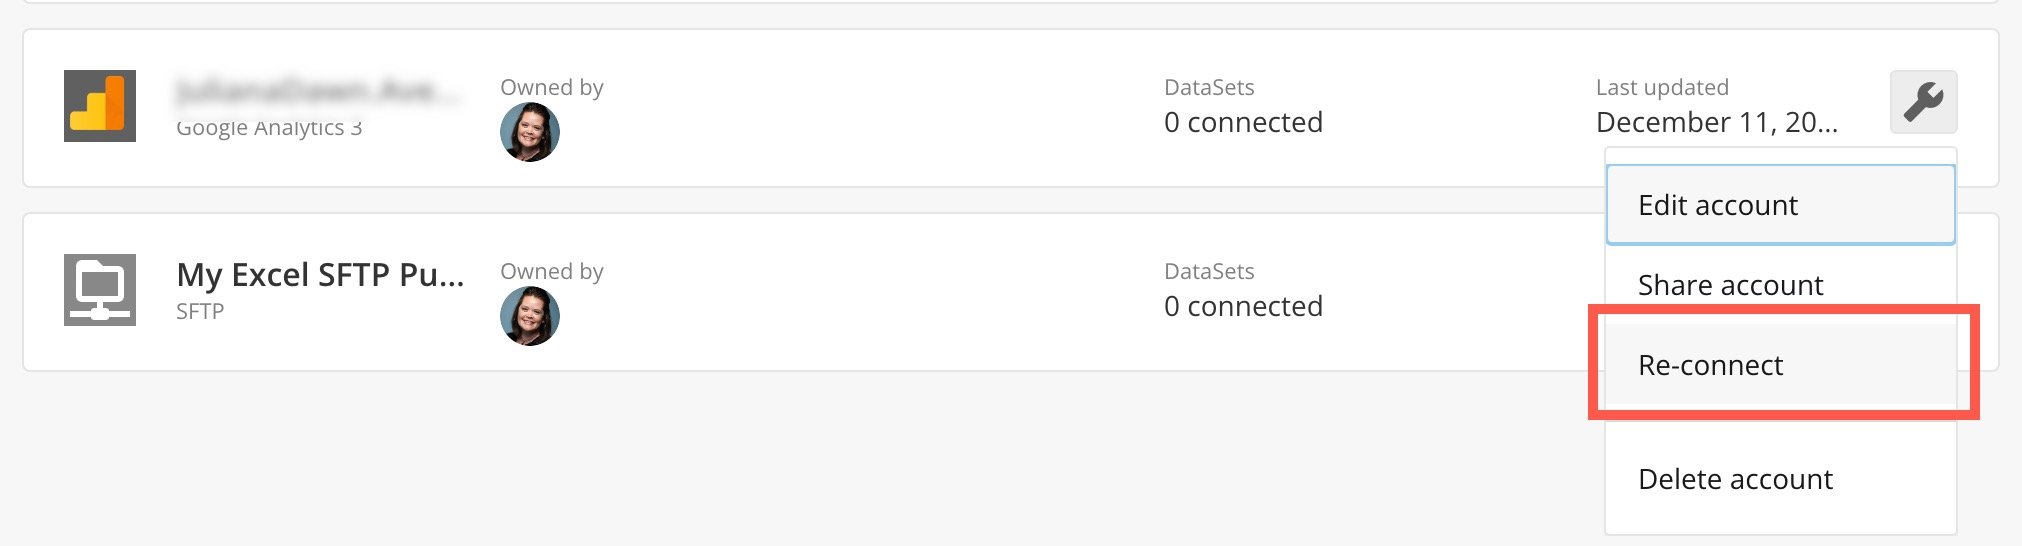 3. (Conditional) Depending on the connector, enter your credentials or grant account access to Domo, if you are prompted to do so.
### Share a Connector Account
You can share connector accounts with others so they can access all available data via this integration and use it to create new DataSets. You can choose the level of access each person/group receives to the integration itself.
This can include giving a person or group Owner-level access to an account.
Accounts shared with you appear in the accounts list, but they are grayed out. You can only use shared accounts to access the system through the connector.
Follow these steps to share an account:
1. In the accounts list, hover over the account you want to share.
2. Select
**Account options** > **Share account** to display the **Manage Account access** modal.
3. In the modal, use the search tool to find people/groups or scroll through instance members to find them.
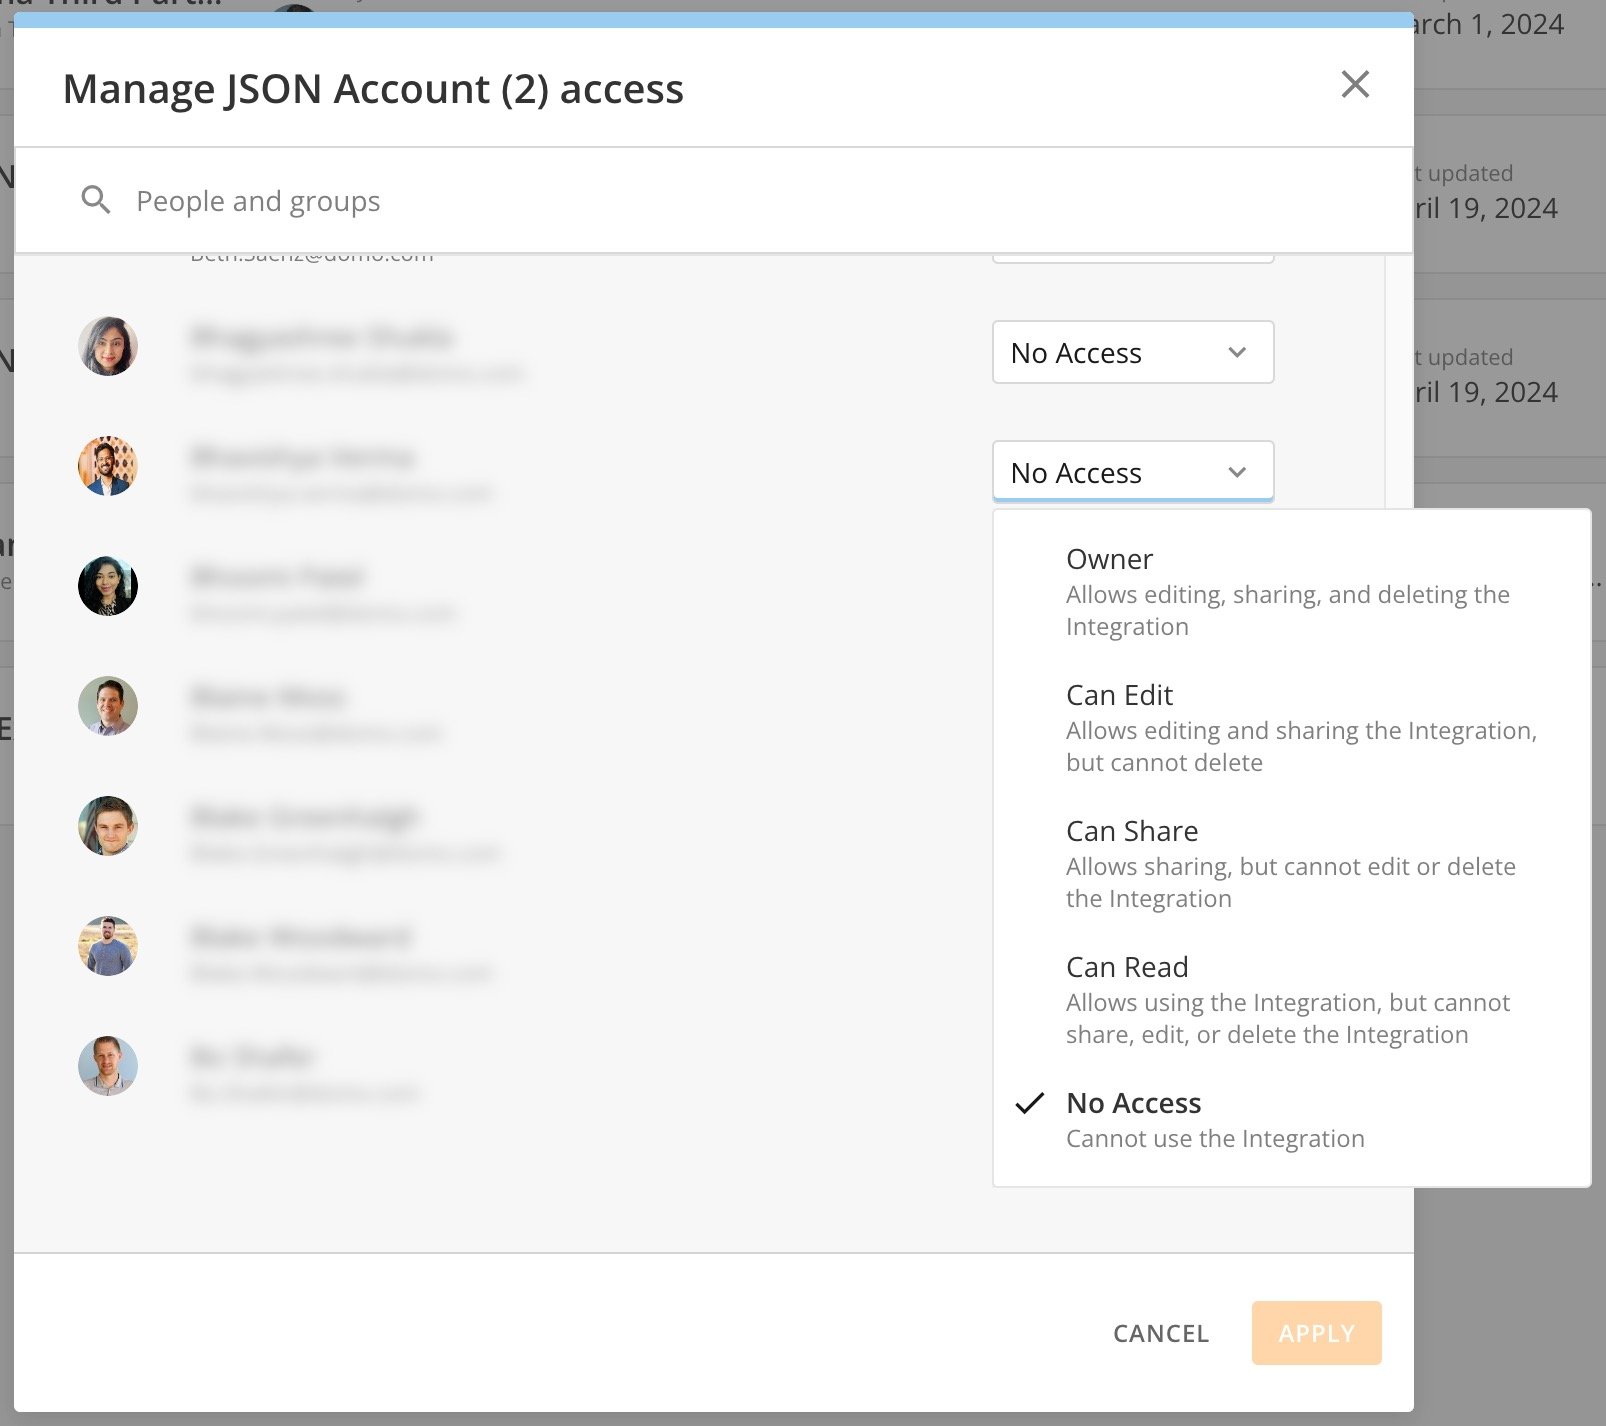
4. Use the access menu beside a person or group name to choose their level of access. The options are as follows:
* **Owner —** Allows editing, sharing, and deletion of the integration. There can be multiple account owners.
* **Can Edit —** Allows editing and sharing the integration, but not deletion.
* **Can Share —** Allows sharing, but not editing or deletion of the integration.
* **Can Read —** Allows integration use, but not sharing, editing, or deletion of the integration.
* **No Access —** Denies access to the integration.
3. (Conditional) Depending on the connector, enter your credentials or grant account access to Domo, if you are prompted to do so.
### Share a Connector Account
You can share connector accounts with others so they can access all available data via this integration and use it to create new DataSets. You can choose the level of access each person/group receives to the integration itself.
This can include giving a person or group Owner-level access to an account.
Accounts shared with you appear in the accounts list, but they are grayed out. You can only use shared accounts to access the system through the connector.
Follow these steps to share an account:
1. In the accounts list, hover over the account you want to share.
2. Select
**Account options** > **Share account** to display the **Manage Account access** modal.
3. In the modal, use the search tool to find people/groups or scroll through instance members to find them.
4. Use the access menu beside a person or group name to choose their level of access. The options are as follows:
* **Owner —** Allows editing, sharing, and deletion of the integration. There can be multiple account owners.
* **Can Edit —** Allows editing and sharing the integration, but not deletion.
* **Can Share —** Allows sharing, but not editing or deletion of the integration.
* **Can Read —** Allows integration use, but not sharing, editing, or deletion of the integration.
* **No Access —** Denies access to the integration.
 After being granted access, the person/group displays in the modal under **People With Access**.
5. (Conditional) Repeat steps 3–4 as many times as needed to give people and groups the proper access.
6. Select **Apply** to display the confirmation dialog. Note the impact of granting access.
7. In the dialog, select **Apply** to save your changes and close the modal OR select **Cancel** to discard your changes.
### Revoke Account Access
You can revoke access to an account for people/groups. When access is revoked, the person/group can no longer access the associated DataSets.
Follow these steps to revoke account access:
1. In the accounts list, hover over the account to which you want to revoke access.
2. Select
**Account options** > **Share account** to display the **Manage Account access** modal.
3. In the **People With Access** section of the modal, locate the person/group for whom you want to revoke access and expand their access dropdown.
4. Choose **No Access**. **Note:** There must be one account owner. If someone is the only owner, you cannot change their access until you add another owner.
After being granted access, the person/group displays in the modal under **People With Access**.
5. (Conditional) Repeat steps 3–4 as many times as needed to give people and groups the proper access.
6. Select **Apply** to display the confirmation dialog. Note the impact of granting access.
7. In the dialog, select **Apply** to save your changes and close the modal OR select **Cancel** to discard your changes.
### Revoke Account Access
You can revoke access to an account for people/groups. When access is revoked, the person/group can no longer access the associated DataSets.
Follow these steps to revoke account access:
1. In the accounts list, hover over the account to which you want to revoke access.
2. Select
**Account options** > **Share account** to display the **Manage Account access** modal.
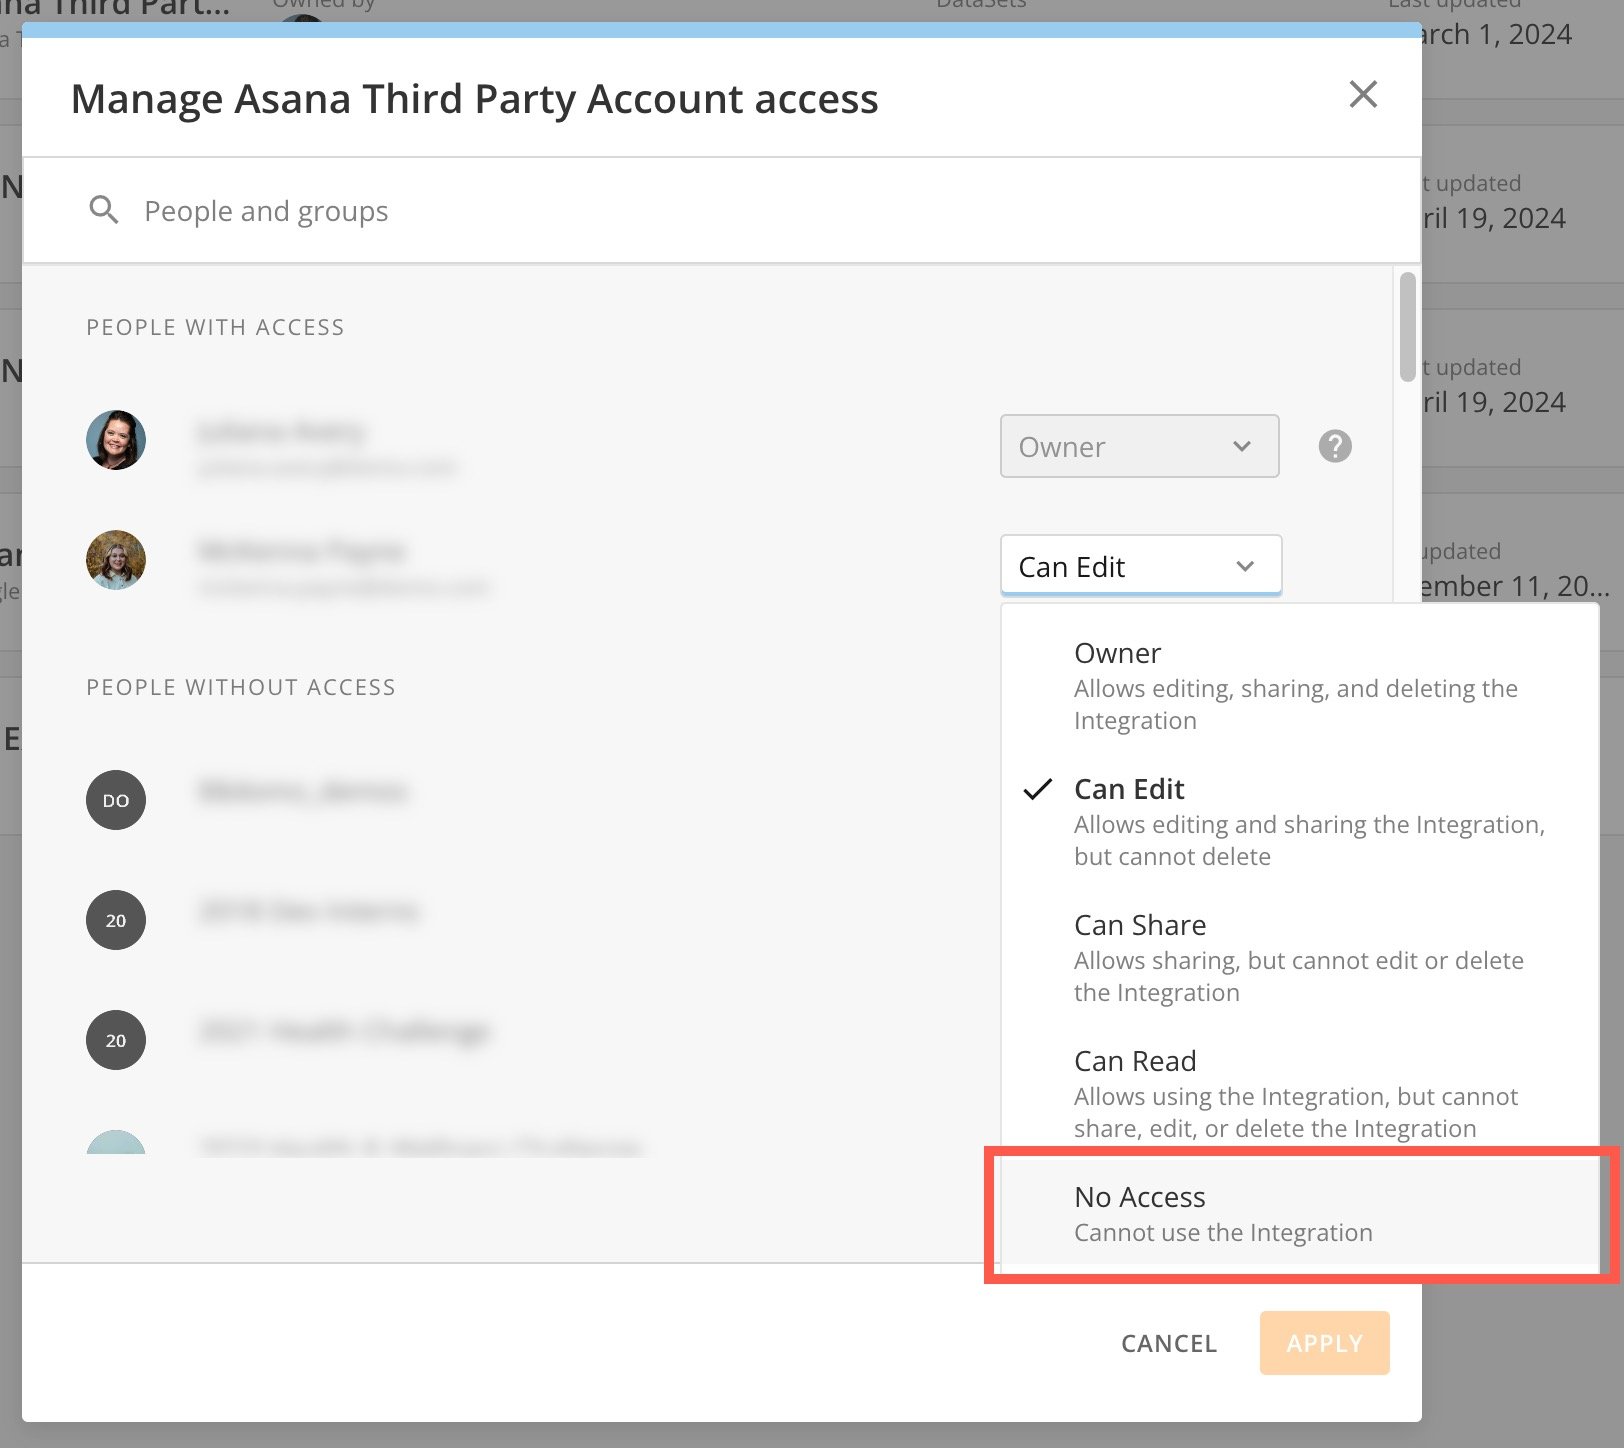
3. In the **People With Access** section of the modal, locate the person/group for whom you want to revoke access and expand their access dropdown.
4. Choose **No Access**. **Note:** There must be one account owner. If someone is the only owner, you cannot change their access until you add another owner.
 5. (Conditional) Repeat steps 3–4 as many times as needed.
6. Select **Apply** to display the confirmation dialog. Note the impact of revoking access.
7. In the dialog, select **Apply** to save your changes and close the modal OR select **Cancel** to discard your changes.
5. (Conditional) Repeat steps 3–4 as many times as needed.
6. Select **Apply** to display the confirmation dialog. Note the impact of revoking access.
7. In the dialog, select **Apply** to save your changes and close the modal OR select **Cancel** to discard your changes.