> ## Documentation Index
> Fetch the complete documentation index at: https://domoinc-openapi-sync-dataflows.mintlify.site/llms.txt
> Use this file to discover all available pages before exploring further.

# Use Buzz

export const InlineImage = ({src, alt = '', height = '1.6em'}) => {
  return <img noZoom src={src} alt={alt} style={{
    display: 'inline',
    verticalAlign: 'start',
    height: height,
    margin: '0'
  }} />;
};

### Intro

<Warning>
  **Important:** Buzz Desktop has been deprecated. It is no longer available for download. The desktop app still functions but is no longer supported.
</Warning>

Buzz is the messaging feature within Domo. You can use Buzz to have a conversation about a card, dashboard, or project or message a person or group directly. You can attach files, reference data elements, and tag other users.

You can also interact with others' messages by adding them to your favorites, reacting to them, quoting them in replies, and more.

***

### Start a Conversation

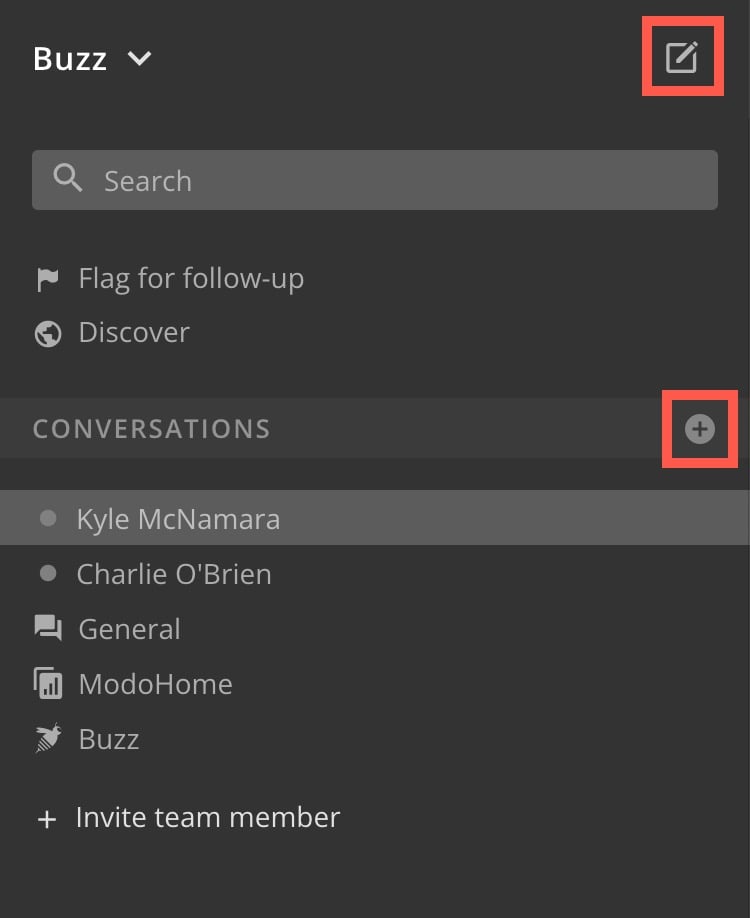
You start a Buzz conversation using the **Add Conversation** option, which is available either by selecting <InlineImage src="/images/kb/ka0Vq000000HVDt-00N5w00000Ri7BU-0EM5w000005vOXD.png" /> **Create a new message** or <InlineImage src="/images/kb/ka0Vq000000HVDt-00N5w00000Ri7BU-0EM5w000005vOXP.png" /> **Start a conversation or find an existing one**.

<Frame>
  <img alt="start new conversation.jpg" src="https://mintcdn.com/domoinc-openapi-sync-dataflows/v5mFCMke9U0SrJSJ/images/kb/ka0Vq000000HVDt-00N5w00000Ri7BU-0EM5w000006ugBe.jpg?fit=max&auto=format&n=v5mFCMke9U0SrJSJ&q=85&s=ce87d5b948badc43ca3a96c86b4e17ec" style={{width: 305, height: 374}} width="750" height="918" data-path="images/kb/ka0Vq000000HVDt-00N5w00000Ri7BU-0EM5w000006ugBe.jpg" />
</Frame>

Selecting either opens a **New Message** modal in which you select the people and/or groups you want to converse with. (You can also open existing conversations from this modal.) After you find the user or group you want to start a conversation with, you indicate whether you want to begin a new topic of conversation or join an existing one. If the topic is new, you are prompted to enter a title for the topic as well as set privacy options. Finally, you can compose your message.

Follow these steps to start a Buzz conversation:

1. (Conditional) If Buzz is not open, open it by clicking
   <InlineImage src="/images/kb/ka0Vq000000HVDt-00N5w00000Ri7BU-0EM5w000005vOXY.png" /> in the toolbar in the top right corner of Domo.
2. Click
   <InlineImage src="/images/kb/ka0Vq000000HVDt-00N5w00000Ri7BU-0EM5w000005vOXD.png" />, which appears in the black bar above Buzz in the top right corner.

   Alternatively, if you are in the navigation pane, you can click <InlineImage src="/images/kb/ka0Vq000000HVDt-00N5w00000Ri7BU-0EM5w000005vOXP.png" /> next to "Conversations."

   The **New Message** dialog opens.
3. In the **People, Groups, or Conversations** field, enter the name of a person or group you want to start a conversation with.

   This adds the name of the person or group to the field.
4. (Optional) Repeat step 3 to add more users and groups to this conversation, if desired.
5. Turn on the **New Topic** toggle.
6. Enter a name for the new topic in the **Conversation Topic** field.
7. (Optional) Specify whether this conversation is to be private or public.

   If it is private, only the users whose names you have added to the filter box will be able to see it. If it is public, anyone in your company will be able to see it.
8. Enter your initial message for the conversation in the **Write a message** field at the bottom of the dialog.

   For more information about writing messages, see [Posting to Buzz](#h_9e5e9ca1-34fa-4add-91dd-82b5c50c6af9 "Chatting in Buzz").
9. Press **Enter** when done.

The conversation appears in the **Conversations** tab in your Buzz inbox so you can access it easily. For more information, see [Posting to Buzz](#h_9e5e9ca1-34fa-4add-91dd-82b5c50c6af9 "Chatting in Buzz").

### Start a Conversation from a User Profile

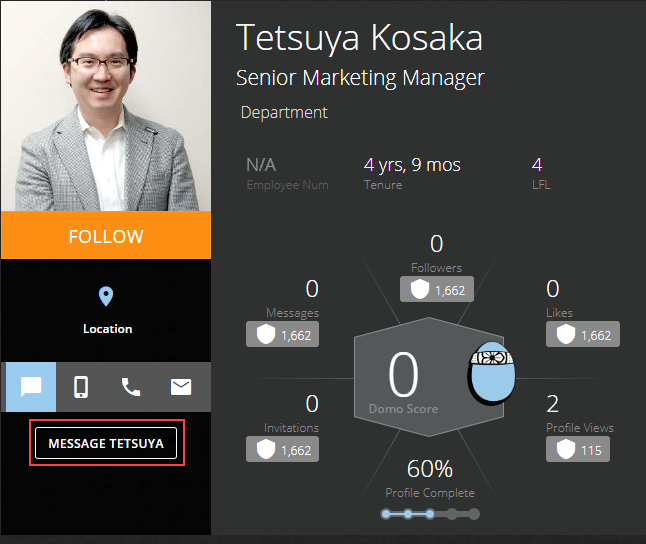
You can also initiate a conversation with a specified user from their Profile page. Follow the steps below.

1. Select
   <InlineImage src="/images/kb/ka0Vq000000HVDt-00N5w00000Ri7BU-0EM5w000005vOXa.png" /> **Message** under the user's photo then click the **Message** **\[ *user name* ]** button under it.

   <Frame>
     <img alt="profile_message_location.png" src="https://mintcdn.com/domoinc-openapi-sync-dataflows/v5mFCMke9U0SrJSJ/images/kb/ka0Vq000000HVDt-00N5w00000Ri7BU-0EM5w000005vOXW.png?fit=max&auto=format&n=v5mFCMke9U0SrJSJ&q=85&s=d3faec46caecd0b411b9685d6bcc7e75" width="646" height="544" data-path="images/kb/ka0Vq000000HVDt-00N5w00000Ri7BU-0EM5w000005vOXW.png" />
   </Frame>
2. Enter your message in the **Write a message** field at the bottom of the dialog.

   For more information about writing messages, see [Posting to Buzz](#h_9e5e9ca1-34fa-4add-91dd-82b5c50c6af9 "Chatting in Buzz").
3. Press Enter when done.

The conversation is added to Domo and appears in the **Conversations** tab in your Buzz inbox so you can access it easily. For more information, see [Posting to Buzz](#h_9e5e9ca1-34fa-4add-91dd-82b5c50c6af9 "Chatting in Buzz").

### Open an Existing Conversation

You can open an existing People conversation in one of several ways. The most straightforward way is to open it from the **Conversations** list in the Buzz navigation pane (or the **Favorites** list, if you have added it as a Favorite). If the conversation does not appear here, you can find it easily by searching in the **Search Buzz** dialog. You can also open it from the **Discover** pane, though it may be harder to find the specific conversation you want. On top of this, you can open a conversation from the **Add Conversation** dialog.

# Open a Conversation from the Conversations or Favorites List

You can open an existing conversation from the **Conversations** or **Favorites** list in the Buzz navigation menu by following these steps.

1. (Conditional) If Buzz is not open, open it by clicking
   <InlineImage src="/images/kb/ka0Vq000000HVDt-00N5w00000Ri7BU-0EM5w000005vOXY.png" /> in the toolbar in the top right corner of Domo.
2. Locate the desired conversation by doing any combination of the following:

   * Navigating through the list of recent conversations in the **Conversations** list.
   * Navigating through conversations you have favorited in the **Favorites** list.
   * Searching for the desired conversation by clicking in the **Search** field to open the **Search Buzz** pane then entering a keyword into the search box. This search returns results for titles, users, and message content.
3. Click the conversation to open it in the conversation pane.

   You can now read it, reply to it, etc.

# Open a Conversation from the New Message Modal

You can open a conversation from the **New Message** modal (the same modal you use when starting a conversation, as explained above). Follow the steps below.

1. (Conditional) If Buzz is not open, open it by clicking
   <InlineImage src="/images/kb/ka0Vq000000HVDt-00N5w00000Ri7BU-0EM5w000005vOXY.png" /> in the toolbar in the top right corner of Domo.
2. Click
   <InlineImage src="/images/kb/ka0Vq000000HVDt-00N5w00000Ri7BU-0EM5w000005vOXD.png" />, which appears in the black bar above Buzz in the top right corner.

   Alternatively, if you are in the navigation pane, you can click <InlineImage src="/images/kb/ka0Vq000000HVDt-00N5w00000Ri7BU-0EM5w000005vOXP.png" /> next to "Conversations."

   The **New Message** dialog opens.
3. In the **People, Groups, or Conversations** field, enter the name of the user, group, Page, Card, or Project that your desired Buzz conversation is centered around.
4. (Conditional) If you want to open an existing one-on-one conversation, select the name of the user in the **People & Groups** list. Otherwise, select the conversation in the **Existing Conversations** list (which opens below **People & Groups**).

   The conversation opens in the pane on the right.
5. Enter your message in the **Write a message** field.

   For more information about writing messages, see [Posting to Buzz](#h_9e5e9ca1-34fa-4add-91dd-82b5c50c6af9 "Chatting in Buzz").

# Open a Conversation from the Discover Pane

You can open conversations from the **Discover** pane; however, if you are searching for a specific conversation, it is recommended you use one of the previously discussed methods. Follow the steps below.

1. (Conditional) If Buzz is not open, open it by clicking
   <InlineImage src="/images/kb/ka0Vq000000HVDt-00N5w00000Ri7BU-0EM5w000005vOXY-3.png" /> in the toolbar in the top right corner of Domo.
2. Click **Discover**.
3. Scroll through the pane until you find the conversation you're looking for.
4. Click the conversation to open it in the conversation pane.

   You can now read it, reply to it, etc.

#### Open a Conversation from the User Profile

You can open an existing one-on-one conversation with a user from his/her Profile page. Follow these steps:

1. Click the
   <InlineImage src="/images/kb/ka0Vq000000HVDt-00N5w00000Ri7BU-0EM5w000005vOXa.png" /> icon found under the user's photo in the top left corner of their Profile, then click the **Message** **\[User Name]** button under it.

   You can now read the conversation, reply to it, etc.

### Post to Buzz

After you've started or opened a conversation, you can post by entering your message in the **Write a message** field at the bottom of the conversation pane.

You can do all of the following when posting to Buzz:

* Enter carriage returns using **Shift** + **Enter**.
* Copy and paste text from other sources, including web pages.
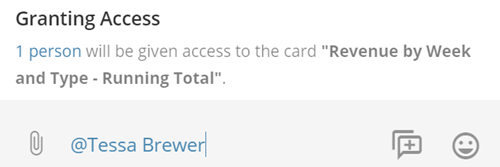
* Reference users, groups, cards, dashboards, and projects by entering the **@** symbol followed by the item you want to reference. Or you can use **@all** to reference all users and groups with access to the conversation. In a conversation centered on a card, dashboard, or project, if you attempt to reference a user or group without access to that card, dashboard, or project, you are given a warning and the option to grant access, as shown here:

  <Frame>
    <img alt="buzz_grant_access_2018.png" src="https://mintcdn.com/domoinc-openapi-sync-dataflows/v5mFCMke9U0SrJSJ/images/kb/ka0Vq000000HVDt-00N5w00000Ri7BU-0EM5w000005vOXl.png?fit=max&auto=format&n=v5mFCMke9U0SrJSJ&q=85&s=4c58bfd1ae487e40477aedce74578e10" width="500" height="167" data-path="images/kb/ka0Vq000000HVDt-00N5w00000Ri7BU-0EM5w000005vOXl.png" />
  </Frame>

  If you click **Grant Access**, the user or group members are given access to the Card, Page, or Project. For more information about access sharing, see [Sharing Access to Cards and Pages](/s/article/360042932994 "Sharing and Removing Access to Content").<br /><br />

  When you reference a Card, you can open a preview of the Card with different options. This is discussed later in this list.
* Enter URLs. These appear as working hyperlinks when posted. You do *not* need to include " http\://"" in a URL for it to be converted into a hyperlink.
* Attach files to your message by clicking the
  <InlineImage src="/images/kb/ka0Vq000000HVDt-00N5w00000Ri7BU-0EM5w000005vOXe.png" /> button, selecting **Upload** **a file**, and browsing to the desired file on your computer.<br /><br />

  In the interest of preventing users from uploading malicious files into Domo accounts, Domo allows a specific set of file types to be uploaded. If you attempt to upload a file not within this list, an error message appears. For more information, see [Previewing a Document](/s/article/360043430213 "Permitted File Types for Attachments"). If you click an attached file with a file type that cannot be previewed, the standard "What would you like to do with this file?" dialog opens.
* Reference cards in your message by clicking the
  <InlineImage src="/images/kb/ka0Vq000000HVDt-00N5w00000Ri7BU-0EM5w000005vOXe.png" /> button, selecting **Add a Card**, and searching for the card using the **Search** box. (You can also reference cards using @, as described previously.) You can only attach cards you have access to. As with attached files, referenced cards appear as thumbnails under the conversation pane and can be removed by clicking the red "x." If you attempt to reference a card in a discussion with a user without access, you are given the option to grant them access.<br /><br />

  If you click a referenced card either before or after sending your message, a preview of the card opens. The preview provides options for jumping to the Details view, adding the card to [Favorites](/s/article/360043428373 "Understanding Pages").
* Add an emoji to your message by clicking
  <InlineImage src="/images/kb/ka0Vq000000HVDt-00N5w00000Ri7BU-0EM5w000005vOXc.png" /> and selecting the desired emoji.
* Use special commands using "/." The following table lists some of these:

<table border="1" cellpadding="1" cellspacing="1" data-aura-rendered-by="33:208;a"><tbody><tr><td colspan="1" rowspan="1"><p> Command </p></td><td colspan="1" rowspan="1"><p> Description </p></td></tr><tr><td colspan="1" rowspan="1"><p><span class="mt-font-courier-new"> /invite \[ <span class="nowiki"><a href="mailto:someone@domain.com"> [someone@domain.com](mailto:someone@domain.com) </a></span> ] </span></p></td><td colspan="1" rowspan="1"><p> Can be used to invite anyone to a Buzz conversation, even if they do not have a Domo account. Domains in invited users' email addresses <em> must </em> be authorized in the <b> Company Settings </b> tab in Admin Settings for this to work. For more information, see <a href="/s/article/360042934534" target="_blank" title="Specifying Authorized Domains for Invited Users"> Specifying Authorized Domains for Invited Users </a>. </p></td></tr><tr><td colspan="1" rowspan="1"><p><span class="mt-font-courier-new"> /giphy \[text] </span></p></td><td colspan="1" rowspan="1"><p> Lets you insert an animated GIF in a message based on text inserted afterward. For example, if you said <span class="mt-font-courier-new"> /giphy sasquatch, </span> a GIF image of a sasquatch would appear in your Buzz <span class="mt-font-arial">. You can select from available GIFs after entering the </span><span class="mt-font-courier-new"> giphy </span> command, or you can insert a random GIF by pressing Enter after entering the command. </p></td></tr><tr><td colspan="1" rowspan="1"><p><span class="mt-font-courier-new"> /roll </span></p></td><td colspan="1" rowspan="1"><p> "Rolls" a random number between 0 and 100. </p></td></tr><tr><td colspan="1" rowspan="1"><p><span class="mt-font-courier-new"> /support </span></p></td><td colspan="1" rowspan="1"><p> Opens a window to the Help Center options. For specific information about creating a Support ticket, see <a href="/s/article/360042922874" target="_blank" title="Getting Help"> Getting Help </a>. </p></td></tr><tr><td colspan="1" rowspan="1"><span class="mt-font-courier-new"> /todo \[text] </span></td><td colspan="1" rowspan="1"> Creates a personal task and adds it to your personal tasks list in Projects & Tasks. For more information, see <a target="_blank" title="Projects and Tasks"> Projects and Tasks </a>. </td></tr></tbody></table>

If you have NLQ Bots enabled, you can also communicate with these Bots using natural language to retrieve information from connectors right in Buzz. For more information, see [Adding a Bot to Buzz](/s/article/360043430273 "Adding a Bot to Buzz").

### Work with Messages

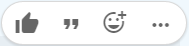
When you mouse over any message in a conversation, a toolbar pops up with a number of options for that message:

<Frame>
  <img alt="buzz_conversation_options_2018.png" src="https://mintcdn.com/domoinc-openapi-sync-dataflows/XhIF2lsSCb8zqkOF/images/kb/ka0Vq000000GnrB-00N5w00000Ri7BU-0EM5w000005vOWt.png?fit=max&auto=format&n=XhIF2lsSCb8zqkOF&q=85&s=3a002eb57c3595b19a188e69382d2f2a" width="189" height="46" data-path="images/kb/ka0Vq000000GnrB-00N5w00000Ri7BU-0EM5w000005vOWt.png" />
</Frame>

The three most commonly used options appear here; you can also click the ellipsis icon (...) to view several more. The following table describes the available options:

<table border="1" cellpadding="1" cellspacing="1" data-aura-rendered-by="33:208;a"><thead><tr><th colspan="1" rowspan="1"><p> Option </p></th><th colspan="1" rowspan="1"><p> Description </p></th></tr></thead><tbody><tr><td colspan="1" rowspan="1"><p> Like icon <InlineImage src="/images/kb/ka0Vq000000HVDt-00N5w00000Ri7BU-0EM5w000005vOXO.png" /></p></td><td colspan="1" rowspan="1"><p> Lets you "like" this message. </p></td></tr><tr><td colspan="1" rowspan="1"><p> Reaction icon <InlineImage src="/images/kb/ka0Vq000000HVDt-00N5w00000Ri7BU-0EM5w000005vOXR.png" /></p></td><td colspan="1" rowspan="1"><p> Lets you include a reaction icon after this message and sets the value to 1. </p></td></tr><tr><td colspan="1" rowspan="1"><p> Quote reply icon <InlineImage src="/images/kb/ka0Vq000000HVDt-00N5w00000Ri7BU-0EM5w000005vOWU.png" /></p></td><td colspan="1" rowspan="1"><p> Lets you reply to this message specifically. When you do this, the message is "quoted" in your reply so users understand the context. </p></td></tr><tr><td colspan="1" rowspan="1"><p> Favorite icon <InlineImage src="/images/kb/ka0Vq000000HVDt-00N5w00000Ri7BU-0EM5w000005vOWT.png" /></p></td><td colspan="1" rowspan="1"><p> Adds this message to your <b> Favorited Messages </b> listing for in the details pane for this conversation. </p></td></tr><tr><td colspan="1" rowspan="1"> Flag for follow-up <InlineImage src="/images/kb/ka0Vq000000HVDt-00N5w00000Ri7BU-0EM5w000005vOXi.png" /></td><td colspan="1" rowspan="1"> Adds this message to your <b> Flag for follow-up </b> pane, allowing you to revisit it later. </td></tr><tr><td colspan="1" rowspan="1"><p> Create thread icon <InlineImage src="/images/kb/ka0Vq000000HVDt-00N5w00000Ri7BU-0EM5w900005vOXK.png" /></p></td><td colspan="1" rowspan="1"><p> Lets you create a new thread using this message as a starting point. </p></td></tr><tr><td colspan="1" rowspan="1"><p> Create task icon <InlineImage src="/images/kb/ka0Vq000000HVDt-00N5w00000Ri7BU-0EM5w000005vOXH.png" /></p></td><td colspan="1" rowspan="1"><p> Lets you create a task based on this message. For more information, see <a href="/s/article/360042925874" target="_blank" title="Creating and Assigning Project Tasks"> Creating and Assigning Project Tasks </a>. </p></td></tr><tr><td colspan="1" rowspan="1"> Edit icon <InlineImage src="/images/kb/ka0Vq000000HVDt-00N5w00000Ri7BU-0EM5m000005vOXL.png" /></td><td colspan="1" rowspan="1"> Lets you edit a message you have already posted. </td></tr><tr><td colspan="1" rowspan="1"><p> Delete icon <InlineImage src="/images/kb/ka0Vq000000HVDt-00N5w00000Ri7BU-0EM5w000005vOXg.png" /></p></td><td colspan="1" rowspan="1"><p> Lets you delete this message from Buzz. Only appears if you wrote the message or you have an "Admin" default security role or a custom role with "Edit Conversations and Messages" enabled. For more information about default security roles, see <a href="/s/article/360043438973" target="_self" title="Default Security Role Reference"> Managing Custom Roles </a>. <a id="favorite_a_message" name="favorite_a_message" /></p></td></tr></tbody></table>

# Favorite a Message

When you "favorite" a message, the message appears with an orange star to indicate the "favorite" status, and it appears in your **Favorited Messages** in the Details pane for this conversation. You can access **Favorited Messages** by opening the Details pane for the conversation and expanding the **Favorited Messages** tab. **Favorited Messages** are specific to users in a conversation; if two users in the same conversation add different messages as favorites, each will see only the specific messages he favorited, *not* those of his coworker.

Follow these steps:

1. Mouse over the message you want to favorite.
2. Click the ellipsis icon (...).
3. Select **Favorite**.

The message is added to your **Favorited Messages**. You can see it anytime by opening the Details pane for this message and expanding the **Favorited Messages** tab.

Follow these steps to "unfavorite" a message you've added as a Favorite:

1. Do one of the following:

   * Click the orange star before the time stamp in the conversation thread.
   * Open the **Favorited Messages** tab in the Details pane for the conversation and click the orange star.

# Like a Message

You can like a message in a conversation by mousing over the message and clicking the <InlineImage src="/images/kb/ka0Vq000000HVDt-00N5w00000Ri7BU-0EM5w000005vOXO-1.png" /> icon. If the message has not yet been liked, a <InlineImage src="/images/kb/ka0Vq000000HVDt-00N5w00000Ri7BU-0EM5w000005vOXF.png" /> icon appears after the message and the value is set to 1. If another user then clicks the toolbar icon or the thumbs up icon, the value is raised by 1.

If a user clicks the toolbar icon or thumbs up icon a second time, his/her "like" is removed and the value decreases by 1.

You can see all of your liked items in Domo in your Profile page.

Follow these steps to like a message in Buzz:

1. Mouse over the message you want to like.
2. Click the like icon
   <InlineImage src="/images/kb/ka0Vq000000HVDt-00N5w00000Ri7BU-0EM5w000005vOXO-1.png" />. (If the message has already been liked by another user, you can also click the <InlineImage src="/images/kb/ka0Vq000000HVDt-00N5w00000Ri7BU-0EM5w000005vOXF.png" /> icon.)

If this is the first time the message has been liked, a <InlineImage src="/images/kb/ka0Vq000000HVDt-00N5w00000Ri7BU-0EM5w000005vOXF.png" /> icon appears and the value is set to 1. Otherwise the value of <InlineImage src="/images/kb/ka0Vq000000HVDt-00N5w00000Ri7BU-0EM5w000005vOXF.png" /> is raised by 1.

Follow these steps to "unlike" a message you have already liked:

1. Click the
   <InlineImage src="/images/kb/ka0Vq000000HVDt-00N5w00000Ri7BU-0EM5w000005vOXF.png" /> icon. (You can also mouse over the message and click the <InlineImage src="/images/kb/ka0Vq000000HVDt-00N5w00000Ri7BU-0EM5w000005vOXO-1.png" /> icon in the toolbar.)

   The value of <InlineImage src="/images/kb/ka0Vq000000HVDt-00N5w00000Ri7BU-0EM5w000005vOXF-5.png" /> decreases by 1. If the value was already set to 1, the <InlineImage src="/images/kb/ka0Vq000000HVDt-00N5w00000Ri7BU-0EM5w000005vOXF.png" /> icon disappears.

# React to a Message

You can select a "reaction icon" to appear after a message. When you do so, the value of the icon is set to 1. If another user then clicks the reaction icon, the value is raised by 1. If a user clicks the reaction icon a second time, his/her reaction is removed and the value decreases by 1. If the icon is clicked a second time when the value is already set to 1, it disappears.

Follow these steps to react to a message:

1. Mouse over the message you want to add a reaction to.
2. Click
   <InlineImage src="/images/kb/ka0Vq000000HVDt-00N5w00000Ri7BU-0EM5w000005vOXR-1.png" />.
3. Select the desired reaction emoji from the library.

The icon you selected is added after the message and the value is set to 1. If you react to a message with the same reaction as someone else, the value of the icon is raised by 1.

Follow these steps to retract your reaction to a message:

1. Click the reaction icon you have already clicked.

The value of the icon decreases by 1. If the value was already set to 1, the icon disappears.

# Create a New Thread Based on a Message

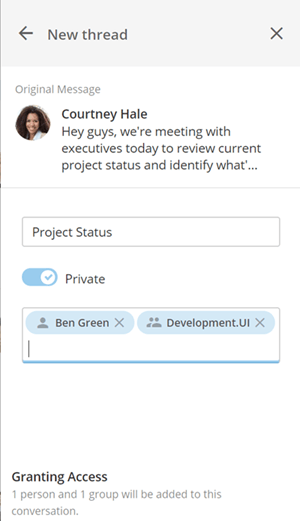
You can create a new thread based on an existing message by mousing over the message, clicking the ellipsis icon, and selecting <InlineImage src="/images/kb/ka0Vq000000HVDt-00N5w00000Ri7BU-0EM5w000005vOXK-1.png" />. This icon appears only for top-level conversations; you *cannot* create threads of threads (subthreads). When you add a thread for a private conversation, you can choose whether to make the thread available to all members of the conversation or those you specifically add to the thread. You do this by toggling the **Private** switch. You can also add new members to the thread, in which case a message appears stating that access will be granted to new individuals and/or groups.

For example, in the following screenshot, access is granted to the original members of the conversation, along with the "Development.UI" group and user "Ben Green," both of which are not part of the original group with access. However, now that they have been added, they are considered members of the thread and will continue to receive notifications.

<Frame>
  <img alt="buzz_new_channel_topic_2018.png" src="https://mintcdn.com/domoinc-openapi-sync-dataflows/v5mFCMke9U0SrJSJ/images/kb/ka0Vq000000HVDt-00N5w00000Ri7BU-0EM5w000005vOXU.png?fit=max&auto=format&n=v5mFCMke9U0SrJSJ&q=85&s=3f9dd31b907e2bf24f9650414e5e5ed2" width="300" height="521" data-path="images/kb/ka0Vq000000HVDt-00N5w00000Ri7BU-0EM5w000005vOXU.png" />
</Frame>

For information about finding a thread in the Buzz menu, see [Buzz Layout](/s/article/360043429973 "Buzz Layout").

# Change the Privacy Status of a Thread

You can switch private threads to public so that everyone included in the conversation has access. You *cannot* switch public threads back to private. Follow the steps below.

1. Select the thread title to open the thread in its own view in the conversation pane.
2. Select the ellipsis (...) to open the details view.
3. Select **Make Public**.

# Delete a Thread

You can delete a thread if you have an "Admin" security profile or a custom role with "Edit Conversations and Messages" enabled or you started the thread. Follow the steps below.

1. Select the thread title to open the thread in its own view in the conversation pane.
2. Select the ellipsis (...) to open the details view.
3. Select **Delete**.
4. Select **Delete** to confirm.

# Quote a Message in a Reply

When replying to a conversation, you can quote a message from earlier in the conversation. When you do this, the message is "quoted" in your reply so users understand the context. Follow the steps below.

1. Mouse over the message you want to quote.
2. Select
   <InlineImage src="/images/kb/ka0Vq000000HVDt-00N5w00000Ri7BU-0EM5w000005vOWU-1.png" /> **Reply**.

   Your cursor appears in the **New Message** field and the quoted message appears under the field to indicate that you are referencing it.

# Create a Task Based on a Message

You can create a task based on a message, specify it as a personal task or part of a Project, assign it to someone, and/or specify a due date and tags. For more information, see [Creating and Assigning Project Tasks](/s/article/360042925874 "Creating and Assigning Project Tasks").

### Delete a Message

When you delete a message from Buzz, it is replaced with the text: **This message has been deleted** so that viewers know a piece of the conversation is missing. You can delete a message only if you wrote it or you have an "Admin" default security profile or a custom role with "Edit Conversations and Messages" enabled. For more information about default security roles, see [Default Security Role Reference](/s/article/360043438953 "Default Security Role Reference"). For more information about custom roles, see Managing Roles.

Follow these steps to delete a message from Buzz:

1. Hover over the message you want to delete.
2. Select
   <InlineImage src="/images/kb/ka0Vq000000HVDt-00N5w00000Ri7BU-0EM5w000005vOXg-1.png" /> **Delete**.

### Unfollow a Buzz Conversation

<Note>
  **Note:** You cannot delete a Buzz conversation, but you can unfollow it.
</Note>

When you are part of a Domo conversation or are manually added as a recipient of such a conversation, you receive notifications for all future posts in the conversation by default. You can unfollow a Buzz conversation to stop receiving notifications.

Follow these steps to unfollow a conversation:

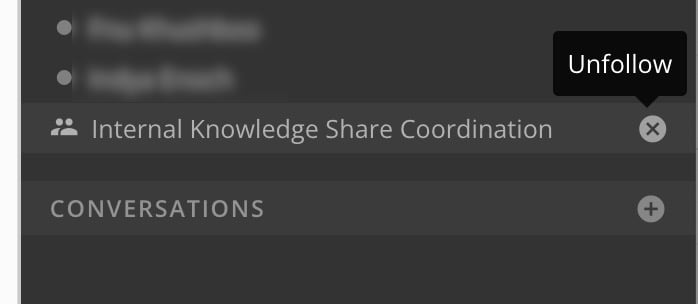
1. In the Buzz panel, hover over the conversation you want to unfollow until the
   <InlineImage src="/images/kb/ka0Vq000000HVDt-00N5w00000Ri7BU-0EMVq000000kT5R.jpg" /> **Unfollow** option displays.

   <Frame>
     <img alt="unfollow.jpg" src="https://mintcdn.com/domoinc-openapi-sync-dataflows/v5mFCMke9U0SrJSJ/images/kb/ka0Vq000000HVDt-00N5w00000Ri7BU-0EMVq000000kT73.jpg?fit=max&auto=format&n=v5mFCMke9U0SrJSJ&q=85&s=35e9f3c51e6ff9a4a1485726c0113dca" style={{width: 351, height: 153}} width="698" height="304" data-path="images/kb/ka0Vq000000HVDt-00N5w00000Ri7BU-0EMVq000000kT73.jpg" />
   </Frame>
2. Select **Unfollow**.

### Add a Bot to a Conversation

NLQ Bots are third-party connector integrations with Buzz. You can add NLQ Bots to any conversation in Buzz. You can then ask these Bots a question in Buzz using natural language and get an immediate response based on your DataSet data.

Many NLQ Bots in Domo use webhooks, meaning you set up an integration with a third-party system. That system then pushes notifications to the Domo conversation where the Bot has been set up.

Because all Bots are set up differently depending on the third-party connector, the instructions provided in this topic are general for all Bots. More specific instructions for each Bot are available when you add a Bot in Domo.

# Add an NLQ Bot

Follow these instructions to add a Bot to a Buzz conversation.

**To add a Bot to Buzz,**

1. Open Buzz and find the conversation where you want the Bot to post.

   For more information about locating and opening conversations, see [Chatting in Buzz](https://domo-support.domo.com/s/article/360042925574 "Chatting in Buzz").
2. Click the details icon (<InlineImage src="/images/kb/ka0Vq000000HVDt-00N5w00000Ri7BU-0EM5w000005vOXZ.png" /> ) next to the conversation name to open the Details pane.
3. Click **Bots** to expand the **Bots** section of the pane.
4. Click the "+" button.

   The **Add a Bot** dialog opens.
5. Locate the desired Bot in the dialog either by scrolling to it or entering the name in the search box.
6. Click the Bot.

   A dialog with options for configuring this Bot appears.
7. Follow the provided instructions for configuring the Bot.

   For more information about configuring NLQ for the Bot, see Understand NLQ.
8. Enter a name for the Bot.

   This is the name that is shown for the Bot in the conversation.
9. Click **Save**.

The Bot is now set up, and you will receive Buzz notifications in this conversation depending on the third-party system and the triggers you have defined.

# Delete a Bot

You can remove a Bot from a Buzz conversation quickly and easily.

**To remove a Bot from a Buzz conversation**,

1. Open Buzz and find the conversation where the Bot has been added.

   For more information about locating and opening conversations, see [Chatting in Buzz](https://domo-support.domo.com/s/article/360042925574 "Chatting in Buzz").
2. Click the details icon (<InlineImage src="/images/kb/ka0Vq000000HVDt-00N5w00000Ri7BU-0EM5w000005vOXZ-1.png" /> ) next to the  conversation name.

   The Details pane opens for the conversation.
3. Click **Bots** to expand the **Bots** section of the pane.
4. Mouse over the Bot you want to delete.
5. Select the trash can icon
   <InlineImage src="/images/kb/ka0Vq000000HVDt-00N5w00000Ri7BU-0EM5w000005vOWS.png" />.
6. Select **Delete** to confirm.

The Bot is now removed, and you will no longer receive notifications for this third-party system in this conversation.

### Understand NLQ

For all Bots, you configure NLQ (Natural Language Query) by entering a command name in the **Command Name** field. For many Bots, this field does not appear until you configure the webhook for the Bot.

You can enter any name in this field that you want, though it is recommended you choose something related to this connector that is short and easy to remember. Once you have configured the Bot and added a command name, you can invoke the Bot in Buzz by entering /\[commandname] then asking your question.

For example, let's say you have Shopify data in Domo and you want to find out how many refunds you gave during the month of March. You would first configure the Bot as explained above, being sure to enter a command in the **Command Name** field. In this example, we'll just use the name "shopify." After successfully connecting to your Shopify store and adding the Bot, you would then write a Buzz message as follows:

`/shopify how many refunds for March`

Buzz would immediately respond with the answer to your question.

Because NLQ Bots understand natural language, there is no required syntax for your questions. You could rephrase the above query using any of the following structures, and because the keywords ("refunds" and "march") are always present, the reply would be the same:

`/shopify how many refunds did I give in March`

`/shopify refunds for March`

`/shopify March refunds`

### Configure Notifications

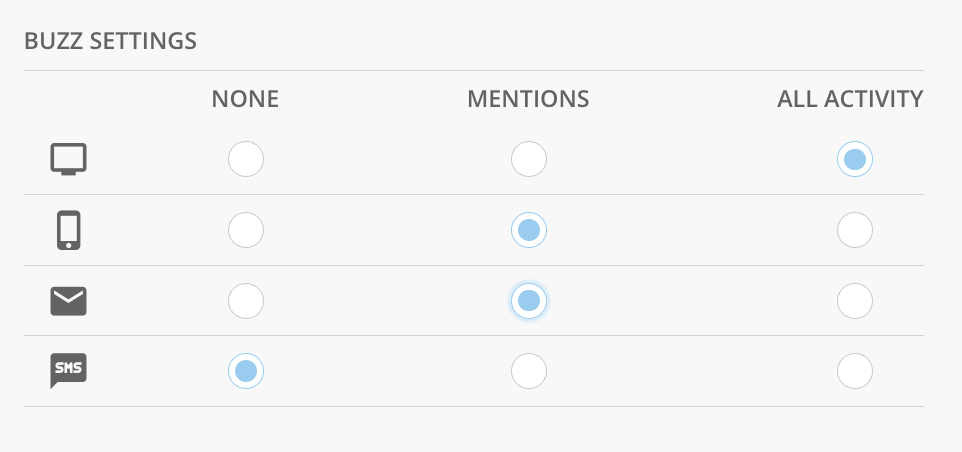
You can configure notifications for a Buzz conversation in the Details pane for that conversation. You can configure notification settings for email, Domo Mobile, SMS, and/or pop-up notifications on your computer. For each of these you indicate whether notifications are sent when you are @ mentioned in the conversation, when any activity occurs in the conversation, or not at all.

In the following example, the user has set computer pop-up notifications <InlineImage src="/images/kb/ka0Vq000000HVDt-00N5w00000Ri7BU-0EM5w000005vOXM.png" /> to **All activity** (meaning they receive pop-up notifications when ANY activity occurs in the conversation); Domo Mobile app <InlineImage src="/images/kb/ka0Vq000000HVDt-00N5w00000Ri7BU-0EM5w000005vOXN.png" /> and email <InlineImage src="/images/kb/ka0Vq000000HVDt-00N5w00000Ri7BU-0EM5m000005vOXE.png" /> to **Mentions** (meaning they receive notifications via Domo Mobile and email when they are @ mentioned in the conversation); and SMS to **None** (meaning they won't receive ANY notifications for this conversation via SMS).

<Frame>
  <img alt="Screenshot 2024-04-16 at 5.38.41 PM.png" src="https://mintcdn.com/domoinc-openapi-sync-dataflows/v5mFCMke9U0SrJSJ/images/kb/ka0Vq000000HVDt-00N5w00000Ri7BU-0EMVq000000lAyP.jpg?fit=max&auto=format&n=v5mFCMke9U0SrJSJ&q=85&s=1c2c2f40f8533d192c6f196592107f5d" style={{width: 500, height: 235}} width="962" height="452" data-path="images/kb/ka0Vq000000HVDt-00N5w00000Ri7BU-0EMVq000000lAyP.jpg" />
</Frame>

Conversation notification settings are inherited from your global notification settings you set in the [Configuring Notifications for a Buzz Conversation](https://domo-support.domo.com/s/article/360042925734) screen. So, for example, if you indicated in that screen you did not want to receive any notifications via SMS, by default that setting would persist for this and all other Buzz conversations. But you could make an exception for a given conversation by changing the SMS setting just for that conversation.

Follow these steps to configure notifications for a Buzz conversation:

1. Locate and open the Buzz conversation you want to configure notifications for.
2. Select the ellipsis icon (...)  in the conversation pane to open the Details pane.
3. Select **Notifications** to expand that tab.
4. Select the radio buttons for the desired notification settings.

### Download Files

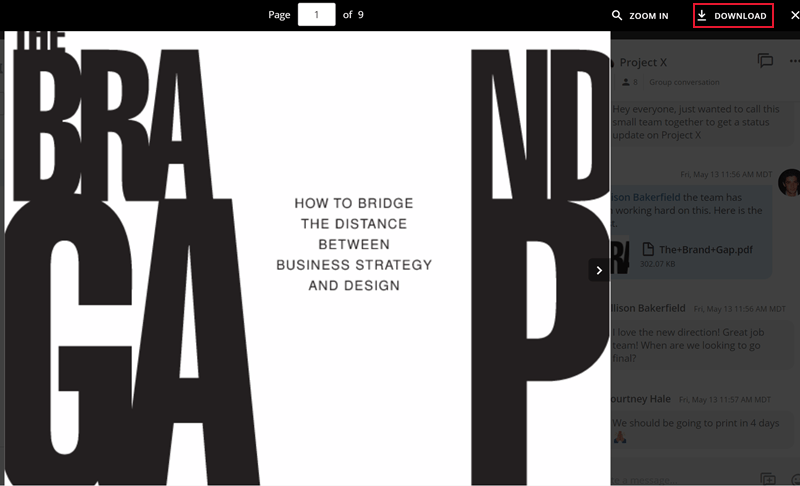
When you open a file thumbnail in a Buzz conversation, the document preview mode opens. This preview mode provides an option **Download**. For more information about the document preview mode, see [Previewing a Document](https://domo-support.domo.com/s/article/360043430213 "Previewing a Document").

<Frame>
  <img alt="preview.png" src="https://mintcdn.com/domoinc-openapi-sync-dataflows/3A4Whxu66v2UwluW/images/kb/ka05w00000123ZE-00N5w00000Ri7BU-0EM5w000005vOXS.png?fit=max&auto=format&n=3A4Whxu66v2UwluW&q=85&s=6cae11932a82e641b580b465ea408c86" style={{width: 673, height: 409}} width="800" height="486" data-path="images/kb/ka05w00000123ZE-00N5w00000Ri7BU-0EM5w000005vOXS.png" />
</Frame>

Follow these steps to preview and download a file in Buzz:

1. Select the link for the file in the conversation.

   The document preview mode opens.
2. In the preview, select **Download**.

   The file is downloaded to your computer.
3. To close the preview, select **X Close** in the top right corner.

   <Note>
     **Note:** To prevent users from uploading malicious files into Domo accounts, only a specific set of file types can be uploaded. If you attempt to upload a file not within this list, you receive an error message. For more information, see [Permitted File Types for Attachments](/s/article/360042925634).
   </Note>

### Import an Email Thread to Buzz

You can import an existing email thread into a Buzz conversation, together with all collaborators and attachments for that thread. By transferring long, slow-moving email threads to Buzz, you can take advantage of the clear context visibility and speed to collaborate that Buzz provides.

You import an email thread into Buzz by following these basic steps:

1. Generate a unique email address within Buzz just by clicking a button.
2. Copy the email address into your email conversation as a recipient.
3. Send the email.

This pulls the conversation into Buzz as a new conversation, along with its context, collaborators, and attachments. All collaborators are notified by email that the conversation has been imported into Buzz; the email also provides a link allowing them to jump directly into the new conversation. Collaborators may also continue to participate in the conversation via email, and their messages will still appear in Buzz.

### FAQ

<AccordionGroup>
  <Accordion title="Can I set retention periods and auto-purge messages and threads in Buzz over a specific time?">
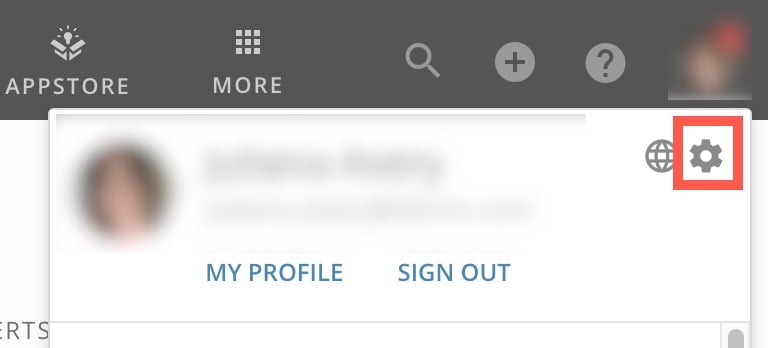
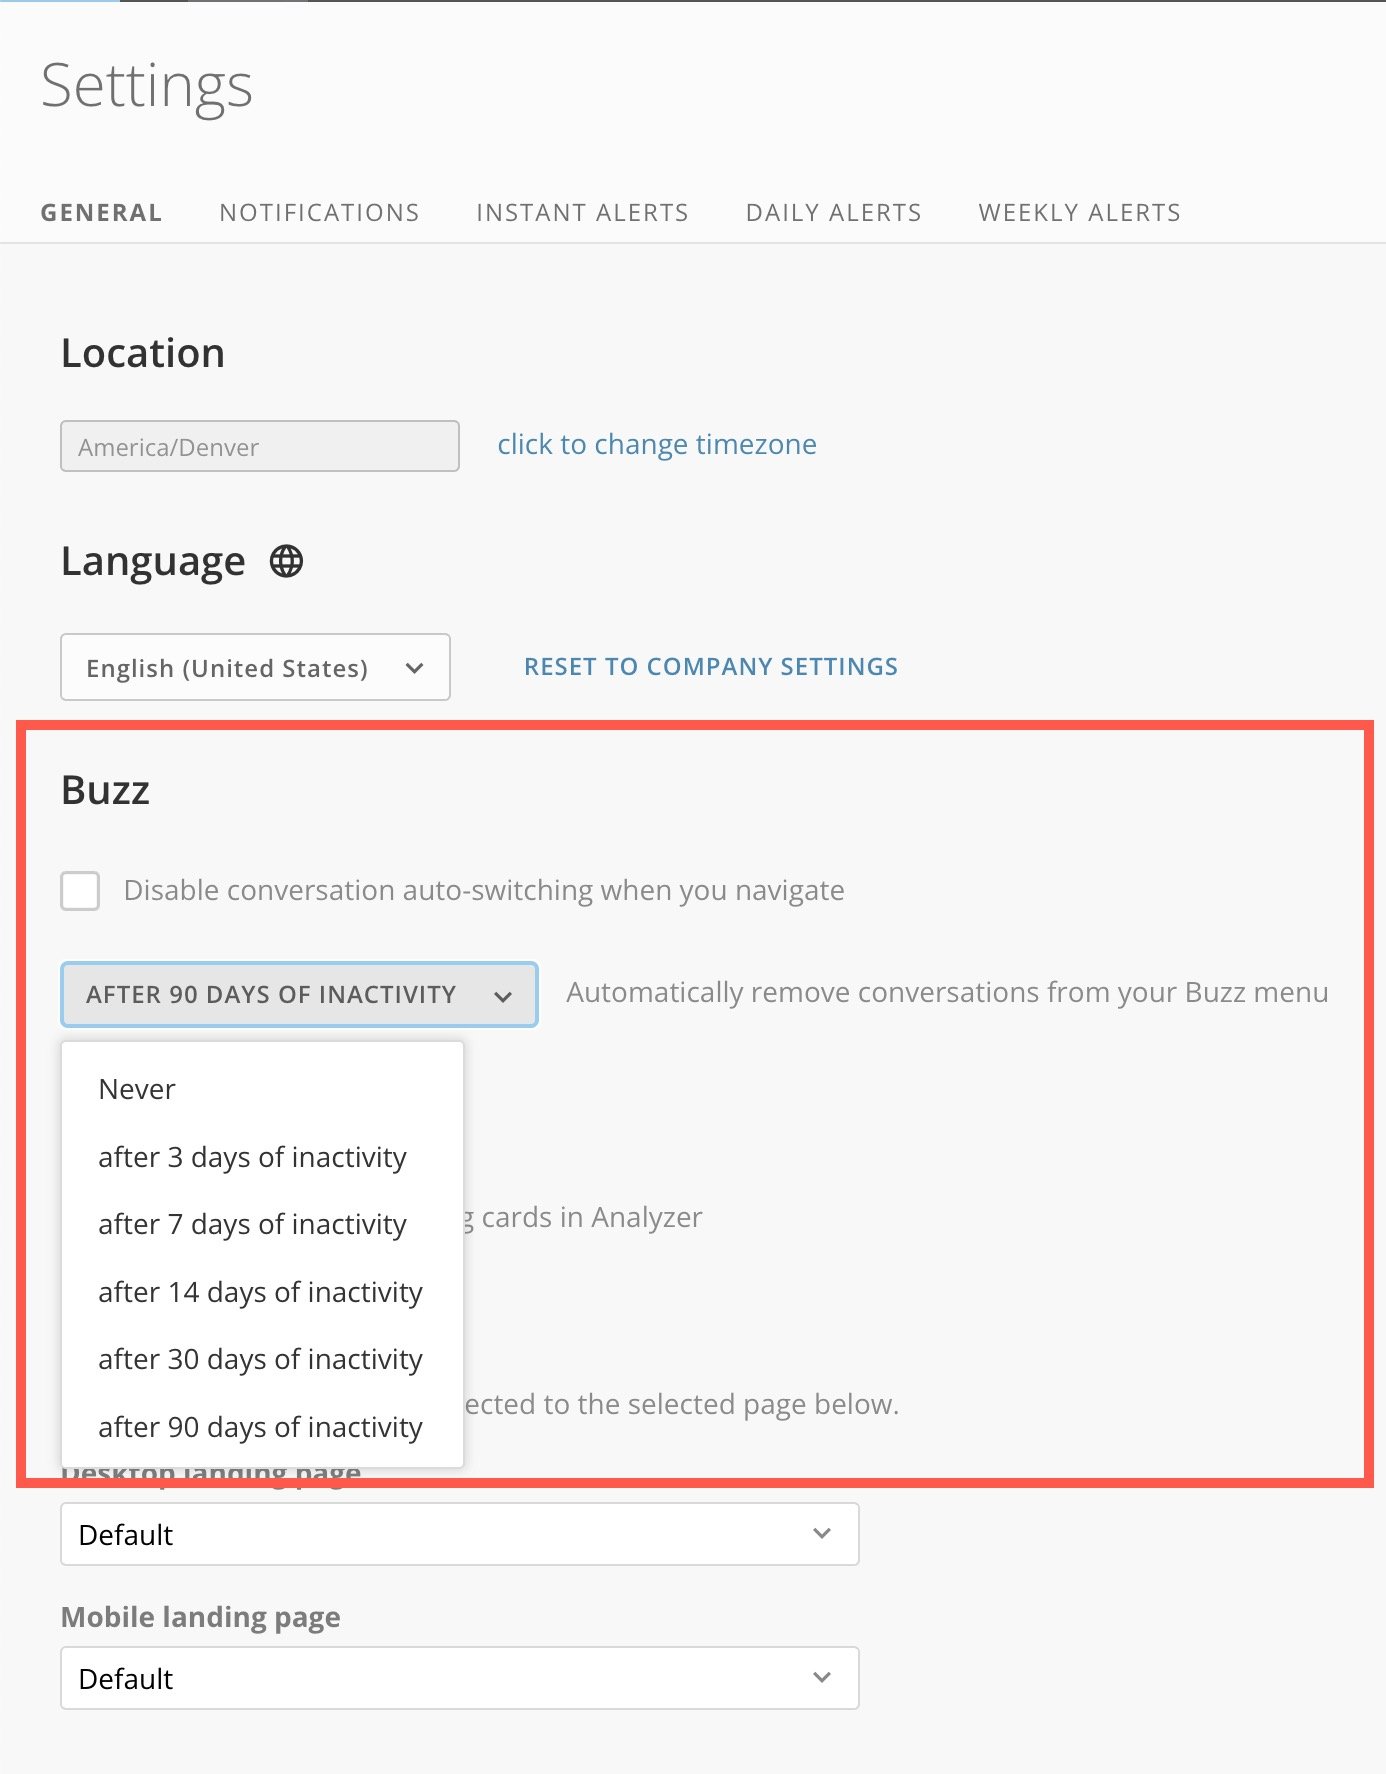
    There isn't a direct functionality in Buzz to set retention periods and auto-purge messages and threads over a specified amount of time. However, you can manage the conversations by making them disappear from your view.

    To adjust the settings, select your profile picture and select <InlineImage src="/images/kb/ka0Vq000000HVDt-00N5w00000Ri7BU-0EM5w000006ugCh.jpg" /> **Settings.**

    <Frame>
      <img alt="select settings.jpg" src="https://mintcdn.com/domoinc-openapi-sync-dataflows/v5mFCMke9U0SrJSJ/images/kb/ka0Vq000000HVDt-00N5w00000Ri7BU-0EM5w000006ugCm.jpg?fit=max&auto=format&n=v5mFCMke9U0SrJSJ&q=85&s=40d8ba5071079f64f61788b8f13f2412" style={{width: 276, height: 125}} width="768" height="348" data-path="images/kb/ka0Vq000000HVDt-00N5w00000Ri7BU-0EM5w000006ugCm.jpg" />
    </Frame>

    In the **General** tab under **Buzz**, select the option for the duration after which conversations should be automatically removed from your Buzz menu.
    <Frame>
      <img alt="buzz in settings.jpg" src="https://mintcdn.com/domoinc-openapi-sync-dataflows/v5mFCMke9U0SrJSJ/images/kb/ka0Vq000000HVDt-00N5w00000Ri7BU-0EM5w000006ugCr.jpg?fit=max&auto=format&n=v5mFCMke9U0SrJSJ&q=85&s=ece3110caf9a212e44a856d7eb85dc09" style={{width: 541, height: 693}} width="1386" height="1774" data-path="images/kb/ka0Vq000000HVDt-00N5w00000Ri7BU-0EM5w000006ugCr.jpg" />
    </Frame>
  </Accordion>

  <Accordion title="Can I disable Buzz auto-opening when first logging into Domo?">
    Yes, you can disable Buzz auto-opening when first logging into Domo. Contact your Domo account team or Domo Support to request that Buzz defaults to be closed.
  </Accordion>

  <Accordion title="Can I disable Buzz for my Domo instance?">
    Yes, you can disable Buzz for your Domo instance. Contact your Domo account team or Domo Support to request that Buzz be disabled.

    ### Buzz Overview (video)

    <iframe allowfullscreen="allowfullscreen" frameborder="1" height="315" src="//www.youtube-nocookie.com/embed/RA3bDajfxns" width="560" />

    ### Share Domo Data with Buzz (video)

    <iframe allowfullscreen="allowfullscreen" frameborder="1" height="315" src="//www.youtube-nocookie.com/embed/yXt3NcSEgCY" width="560" />
  </Accordion>
</AccordionGroup>