> ## Documentation Index
> Fetch the complete documentation index at: https://domoinc-openapi-sync-dataflows.mintlify.site/llms.txt
> Use this file to discover all available pages before exploring further.
# Subset Processing for Magic ETL on Snowflake (Beta)
### Intro
It can be costly to process all of your data every time a Magic ETL DataFlow runs on Snowflake. Subset Processing provides data selection options at the beginning of your flow and additional update methods at the end of your flow so you can choose a smaller subset of your data to transform.
This article describes each of the available options.
**Want to perform a full Replace?** Don't worry, this option is always available. When processing large DataSets, you can try our other update methods—Append, Partition, and Upsert—for more flexibility. Learn about these methods [below](#update_methods).
***
### Required Grants
In Domo, you need to have the following grants enabled to use Subset Processing for Magic ETL on Snowflake:
* **Edit Adrenaline DataFlow —** You must have this grant through your system or custom role. Learn how to [add grants to a custom role](/s/article/360043438973).
* One of the following:
* (Admin-level) **Manage Cloud Accounts —** This grant is considered admin-level because it gives the holder access to instance-wide controls.
OR
* If Integration Sharing is enabled, the **Edit DataFlow** **grant** AND **Can Write permission** to the integration account.
Learn how to [share an integration](https://domo-support.domo.com/s/article/4412849158167?language=en_US#share_integration).
**Important:** To use Subset Processing for Magic ETL on Snowflake, your Snowflake-Cloud Amplifier integration must be configured for WRITE and TRANSFORM. Learn how to [configure your integration](/s/article/4402322966807).
### Access Subset Processing for Magic ETL on Snowflake
If your [Snowflake-Domo integration](/s/article/4402322966807) has been configured, you can choose a Snowflake cloud on which to execute your transform from inside Magic ETL.
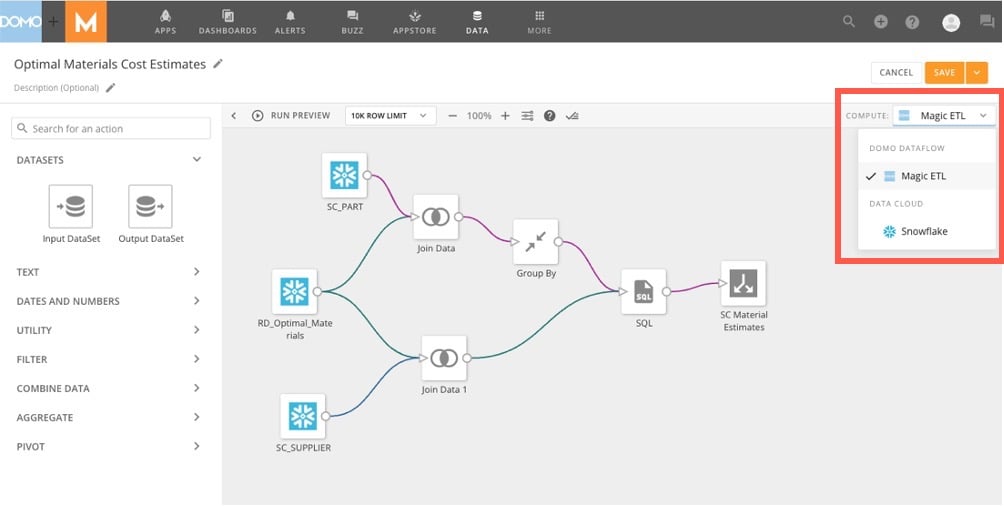 The [data selection options](#new_selection_options) described in this article are available when configuring the Input tile, and the [data update methods](#new_update_methods) are available when configuring the Output tile.
Learn how to [create a Magic ETL DataFlow](/s/article/360055259234).
### Filter Incoming Data with Data Selection Options
Before your data enters the transformation flow, you can filter your input DataSets using the Data Selection options available when configuring the Input DataSet tile in Magic ETL.
Follow these steps to choose a data selection option:
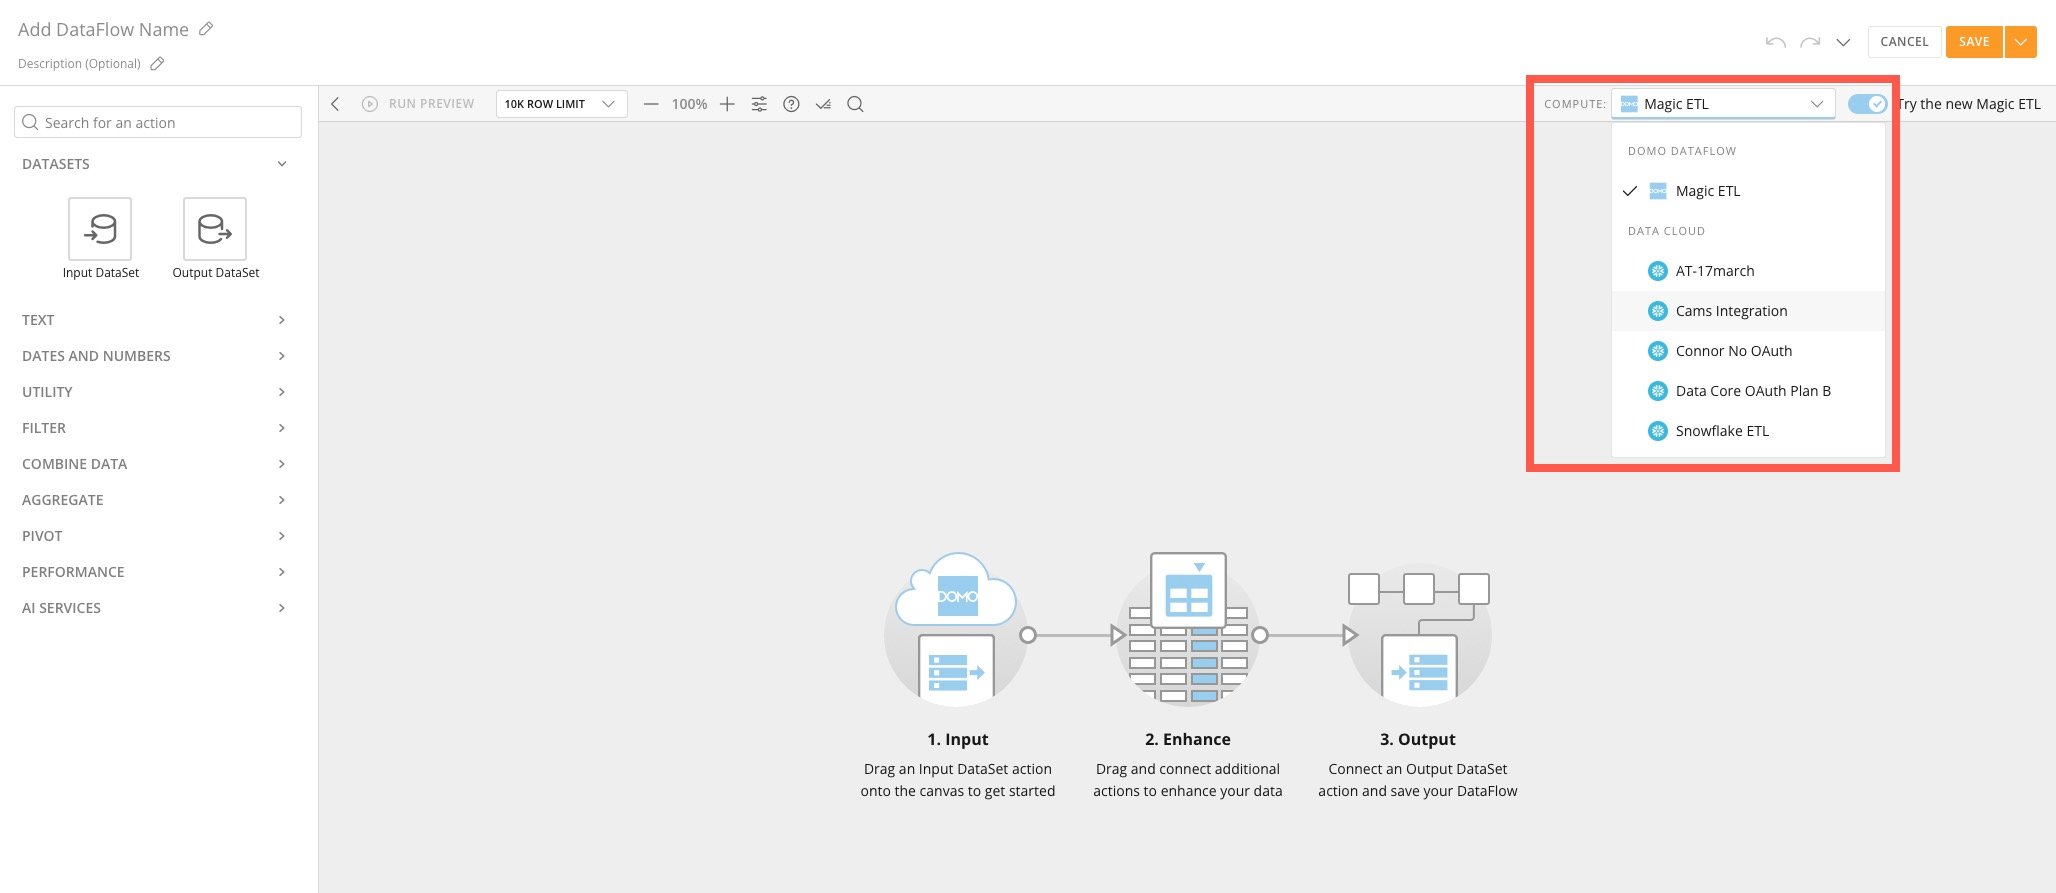
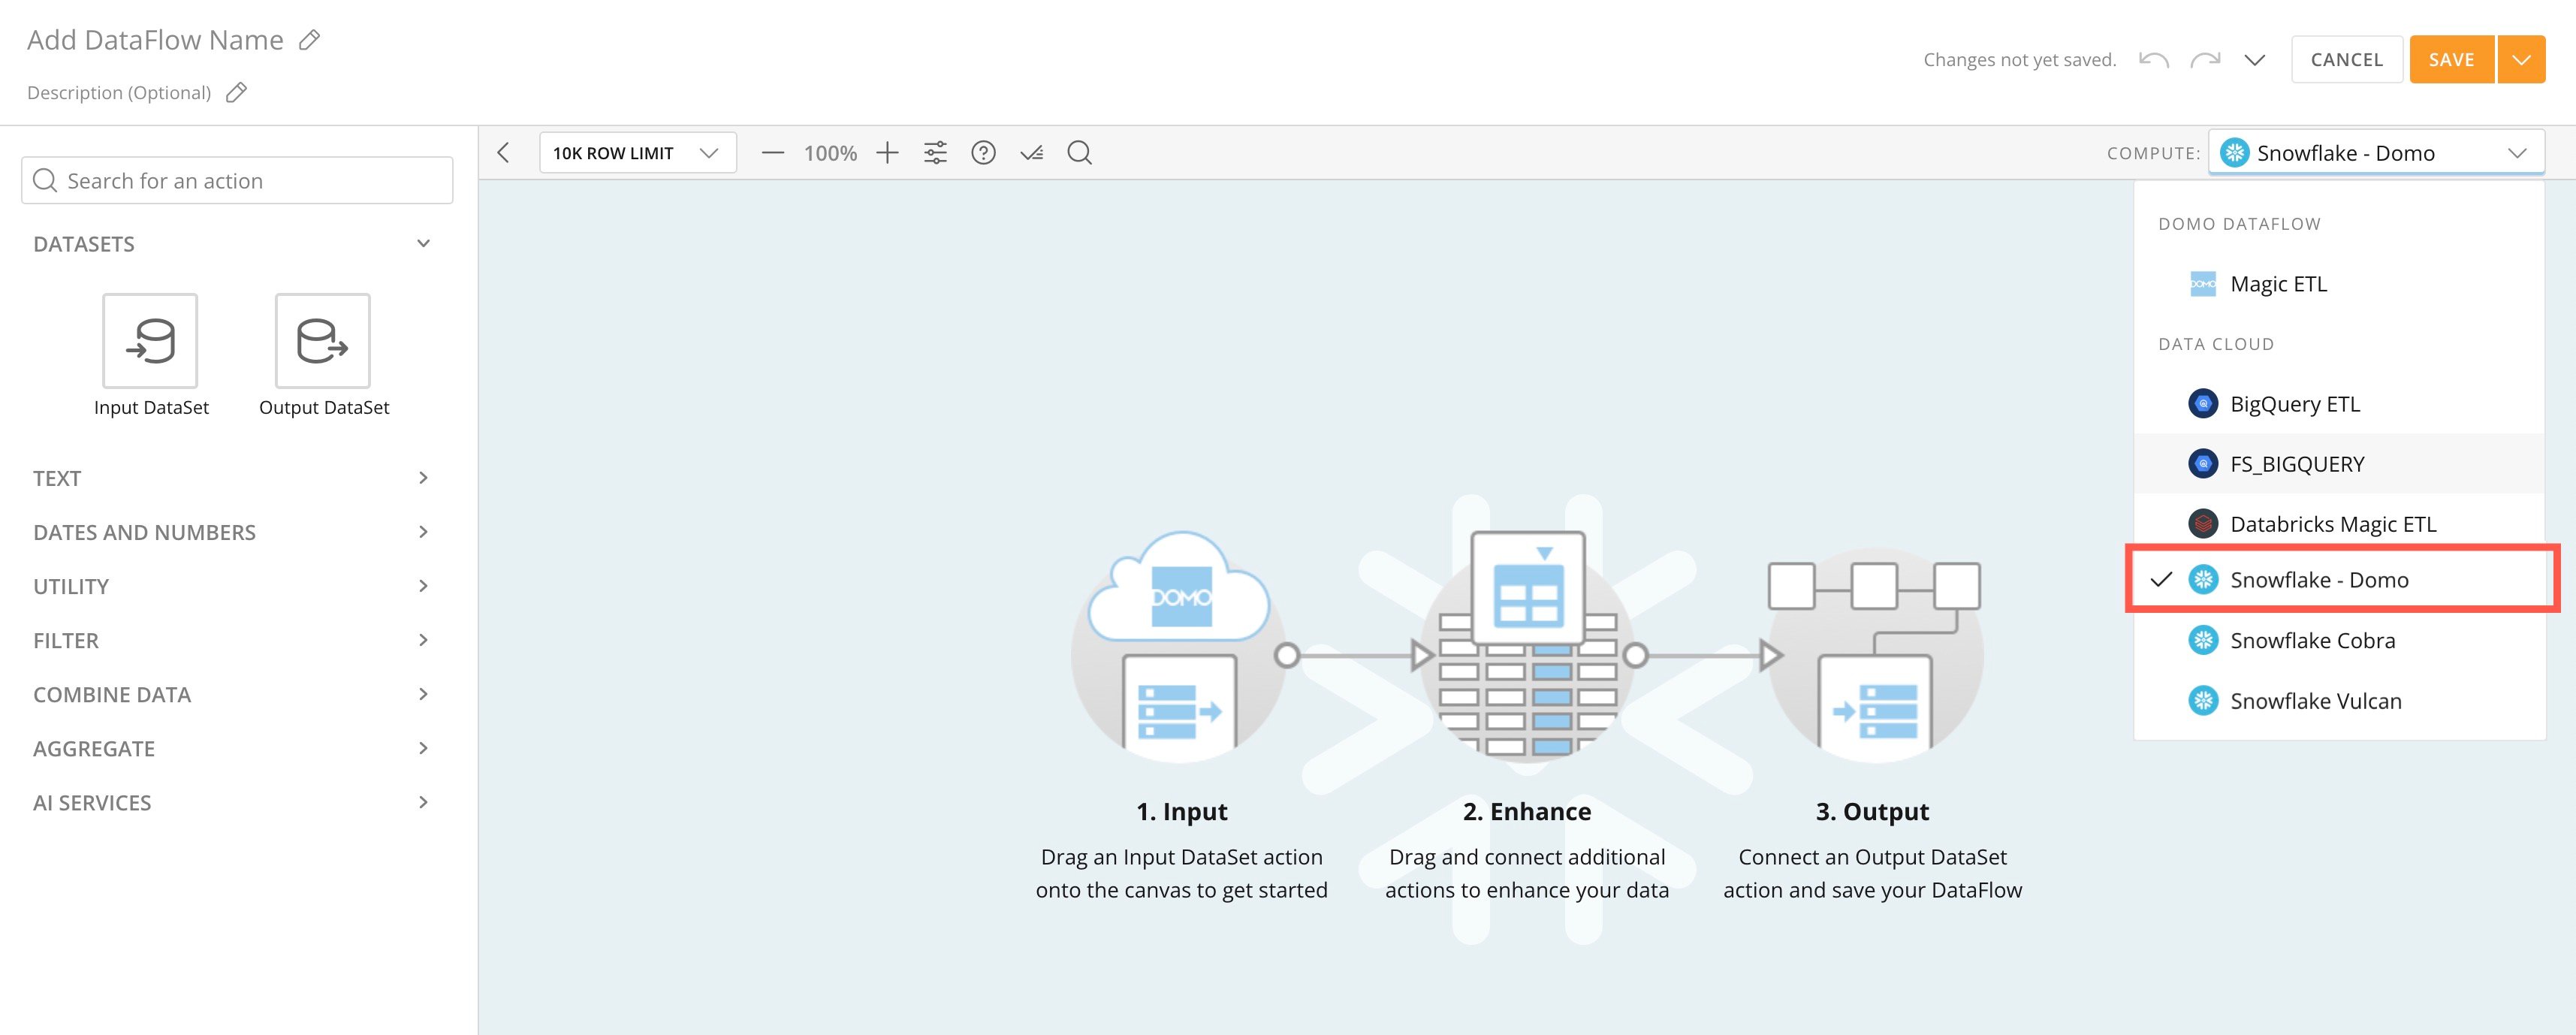
1. Open Magic ETL and choose a Snowflake integration on which to run the DataFlow in the **Compute** dropdown.
If you need to establish a Snowflake-Domo integration, [learn how](/s/article/4402322966807).
The [data selection options](#new_selection_options) described in this article are available when configuring the Input tile, and the [data update methods](#new_update_methods) are available when configuring the Output tile.
Learn how to [create a Magic ETL DataFlow](/s/article/360055259234).
### Filter Incoming Data with Data Selection Options
Before your data enters the transformation flow, you can filter your input DataSets using the Data Selection options available when configuring the Input DataSet tile in Magic ETL.
Follow these steps to choose a data selection option:
1. Open Magic ETL and choose a Snowflake integration on which to run the DataFlow in the **Compute** dropdown.
If you need to establish a Snowflake-Domo integration, [learn how](/s/article/4402322966807).
 2. Drag an Input DataSet tile to the canvas and choose a DataSet.
3. In the configuration panel below the canvas, use the **Data Selection** dropdown to choose one of the filtering options, described below:
2. Drag an Input DataSet tile to the canvas and choose a DataSet.
3. In the configuration panel below the canvas, use the **Data Selection** dropdown to choose one of the filtering options, described below:
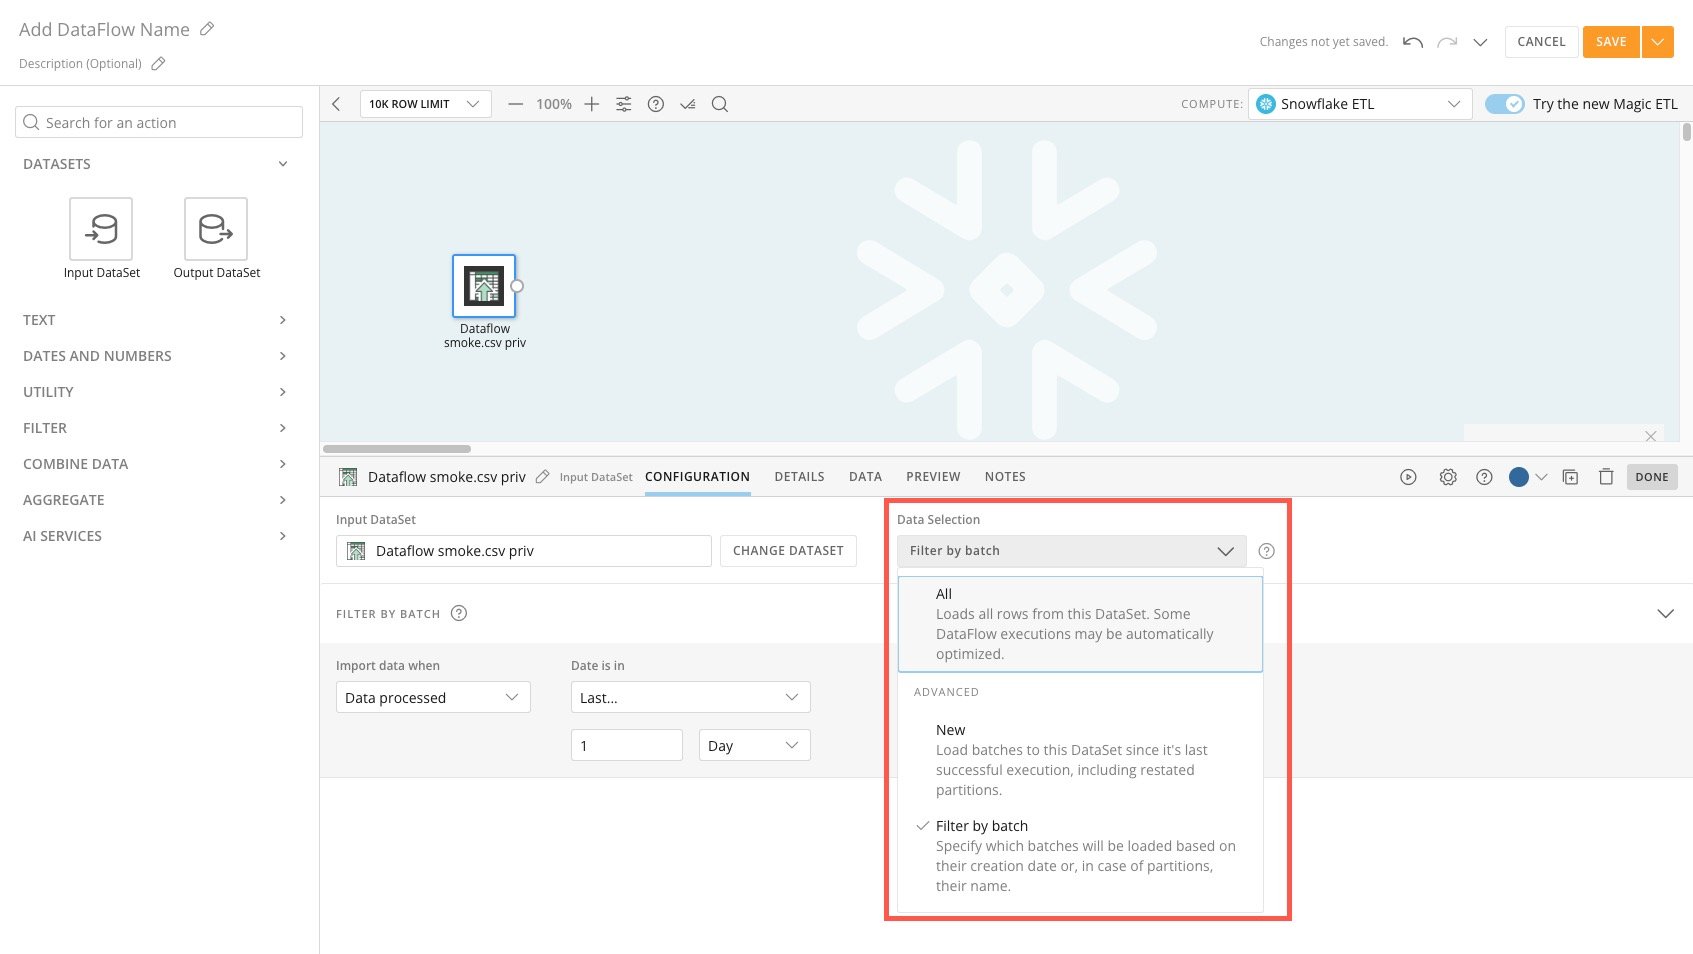 * **All —** This is the default option. This loads all rows in the DataSet.
* **New —** This option only loads batches added to the DataSet since the DataFlow's last successful execution, including re-stated partitions.
* **Filter by batch —** This option lets you specify which batches to load based on their creation date using the **Import data when** and **Date is in** dropdowns.
* **All —** This is the default option. This loads all rows in the DataSet.
* **New —** This option only loads batches added to the DataSet since the DataFlow's last successful execution, including re-stated partitions.
* **Filter by batch —** This option lets you specify which batches to load based on their creation date using the **Import data when** and **Date is in** dropdowns.
 * **Using a custom expression —** After choosing **Filter by batch**, you can identify the batches using a custom expression. To do this, expand the **Filter By Batch** section in the configuration panel and use the **Import data when** dropdown to choose **Custom** **expression**.
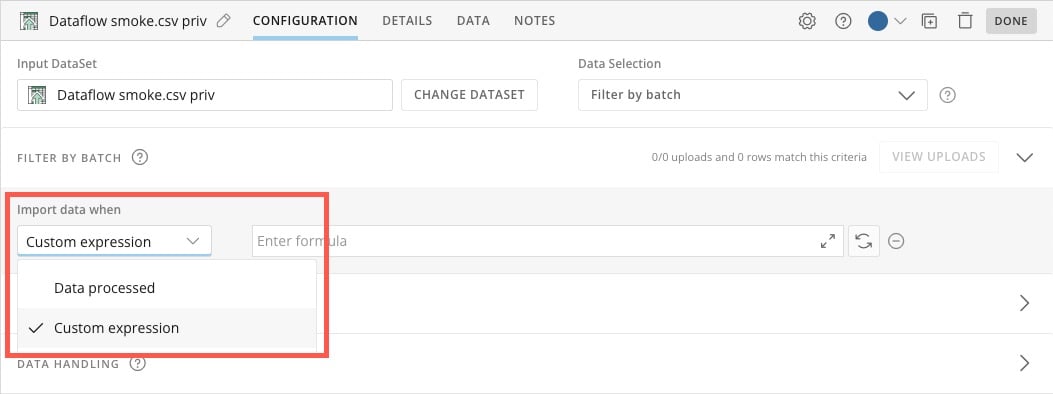 Write your formula in the formula field. Use the arrows icon to open the formula editor.

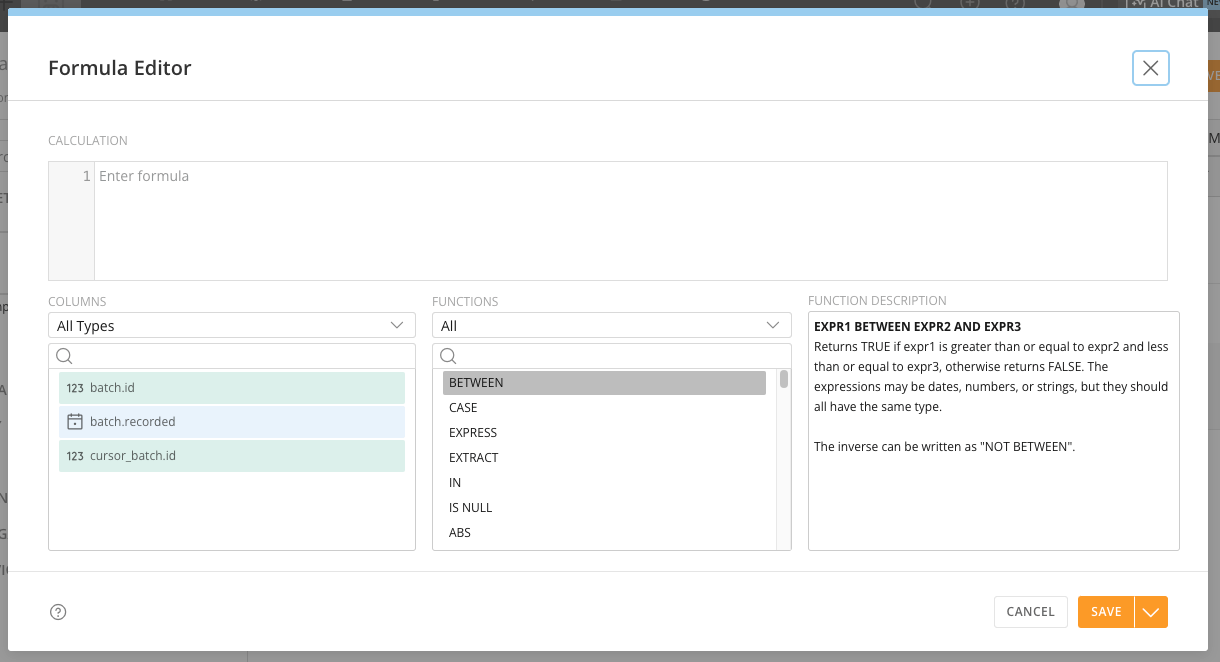 You can reference the batch. id, the date the batch was recorded, or the cursor which is set based on the last successful DataFlow execution.
### Update Methods in the Output Tile
Besides Replace, three additional update methods are available in a Magic ETL on Snowflake DataFlow: Append, Partition, and Upsert. This article doesn't describe each method in detail, but you can learn about them [here](/s/article/000005541).
**Important:** These update methods are not supported for Snowflake's Time Travel feature.
Follow these steps to configure them.
1. Open Magic ETL and choose a Snowflake integration on which to run the DataFlow from the **Compute** dropdown.
You can reference the batch. id, the date the batch was recorded, or the cursor which is set based on the last successful DataFlow execution.
### Update Methods in the Output Tile
Besides Replace, three additional update methods are available in a Magic ETL on Snowflake DataFlow: Append, Partition, and Upsert. This article doesn't describe each method in detail, but you can learn about them [here](/s/article/000005541).
**Important:** These update methods are not supported for Snowflake's Time Travel feature.
Follow these steps to configure them.
1. Open Magic ETL and choose a Snowflake integration on which to run the DataFlow from the **Compute** dropdown.
 2. Build your DataFlow to achieve your desired transformation. Learn how to
[create a Magic ETL DataFlow](/s/article/360055259234).
3. When you add your Output DataSet tile to the canvas, use the configuration panel to choose the update method you want to use.
2. Build your DataFlow to achieve your desired transformation. Learn how to
[create a Magic ETL DataFlow](/s/article/360055259234).
3. When you add your Output DataSet tile to the canvas, use the configuration panel to choose the update method you want to use.
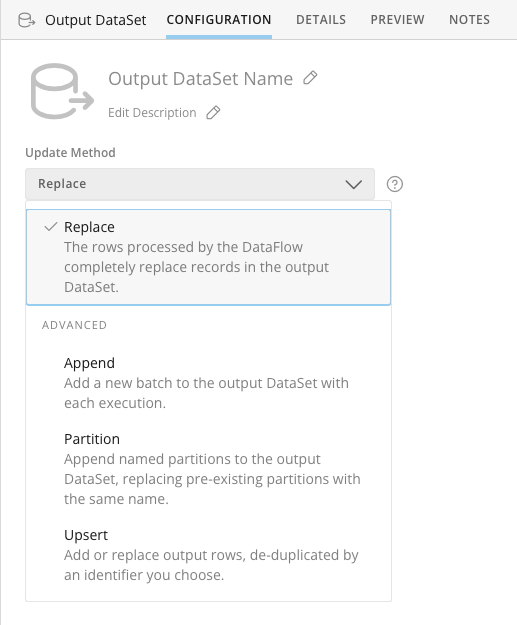 4. (Conditional) Configure the Output DataSet tile as required for your update method, described below:
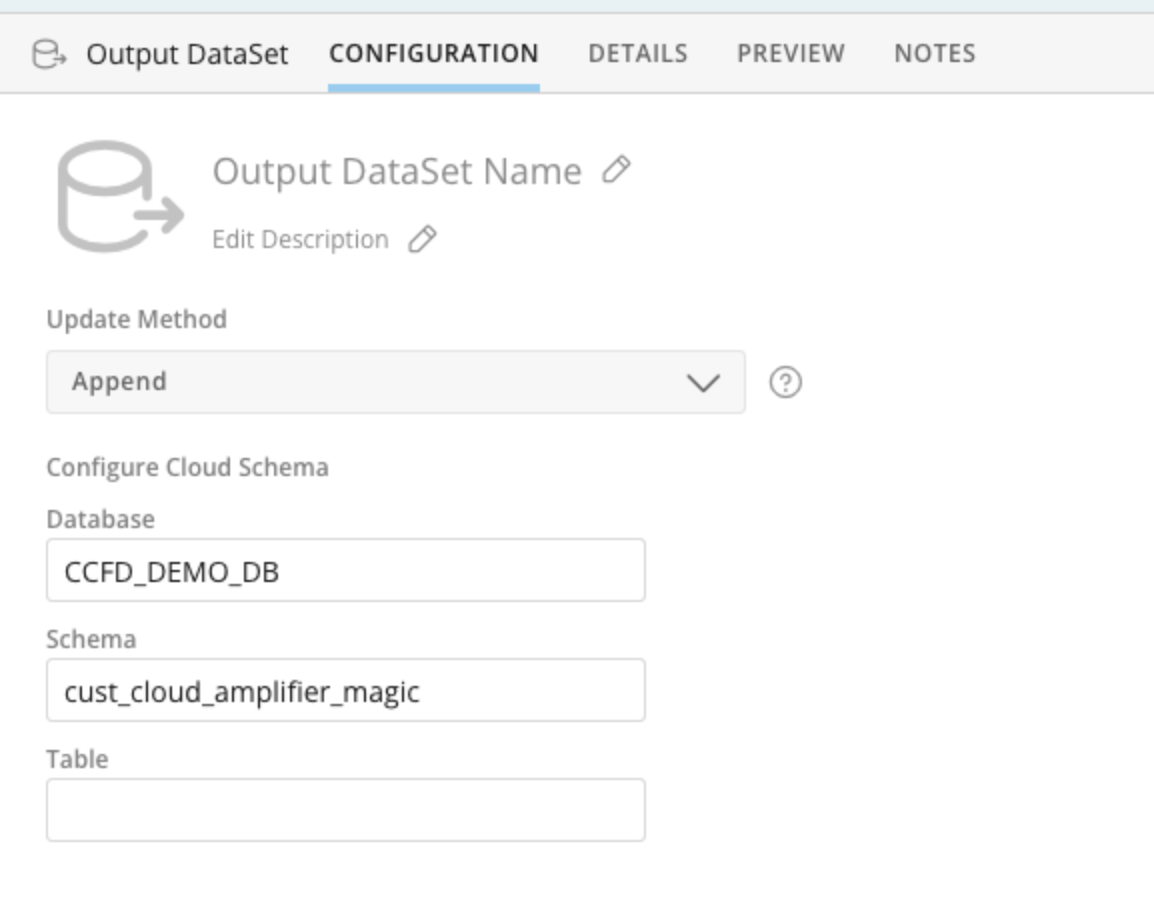
* **Append —** You don't need to select any columns. Append adds a new batch to the Output DataSet with each execution of the DataFlow.
4. (Conditional) Configure the Output DataSet tile as required for your update method, described below:
* **Append —** You don't need to select any columns. Append adds a new batch to the Output DataSet with each execution of the DataFlow.
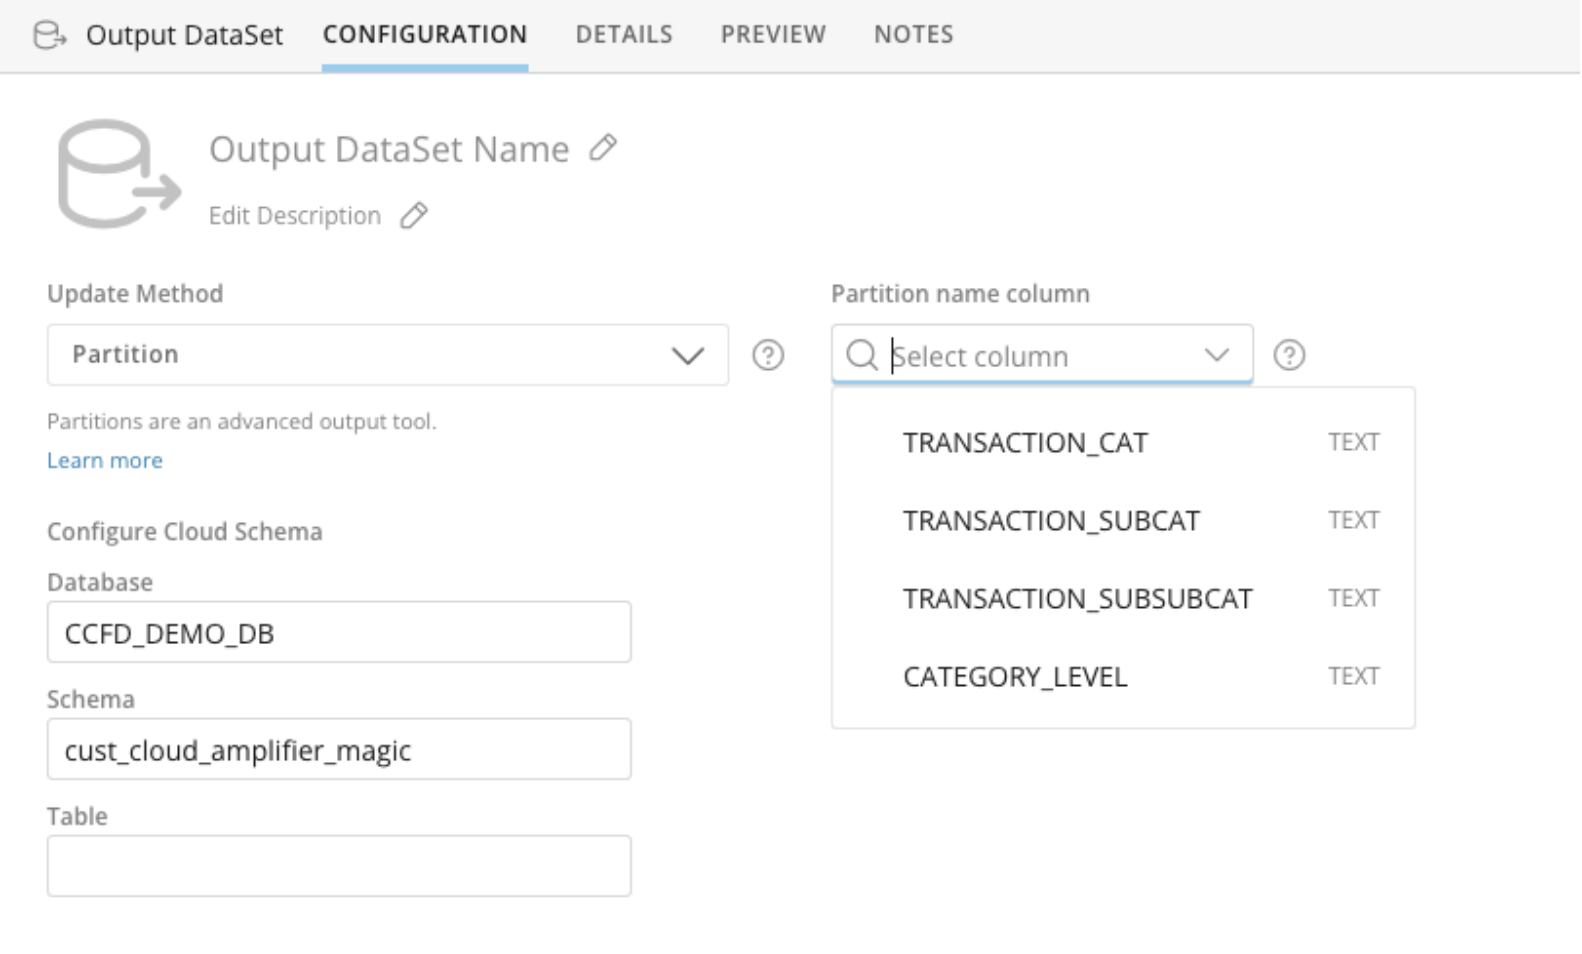
 * **Partition —** Choose the column name that contains the labels to be used for the partitions. This option will append named partitions to the output DataSet, replacing pre-existing partitions with the same name. Learn more about [partitioning](https://domo-support.domo.com/s/article/000005541?language=en_US#partition).
**Important:** You can only use one column for your partition. If your partition needs to be a combination of columns, you must concatenate the constituent columns as part of the DataFlow to create a single column.
* **Partition —** Choose the column name that contains the labels to be used for the partitions. This option will append named partitions to the output DataSet, replacing pre-existing partitions with the same name. Learn more about [partitioning](https://domo-support.domo.com/s/article/000005541?language=en_US#partition).
**Important:** You can only use one column for your partition. If your partition needs to be a combination of columns, you must concatenate the constituent columns as part of the DataFlow to create a single column.
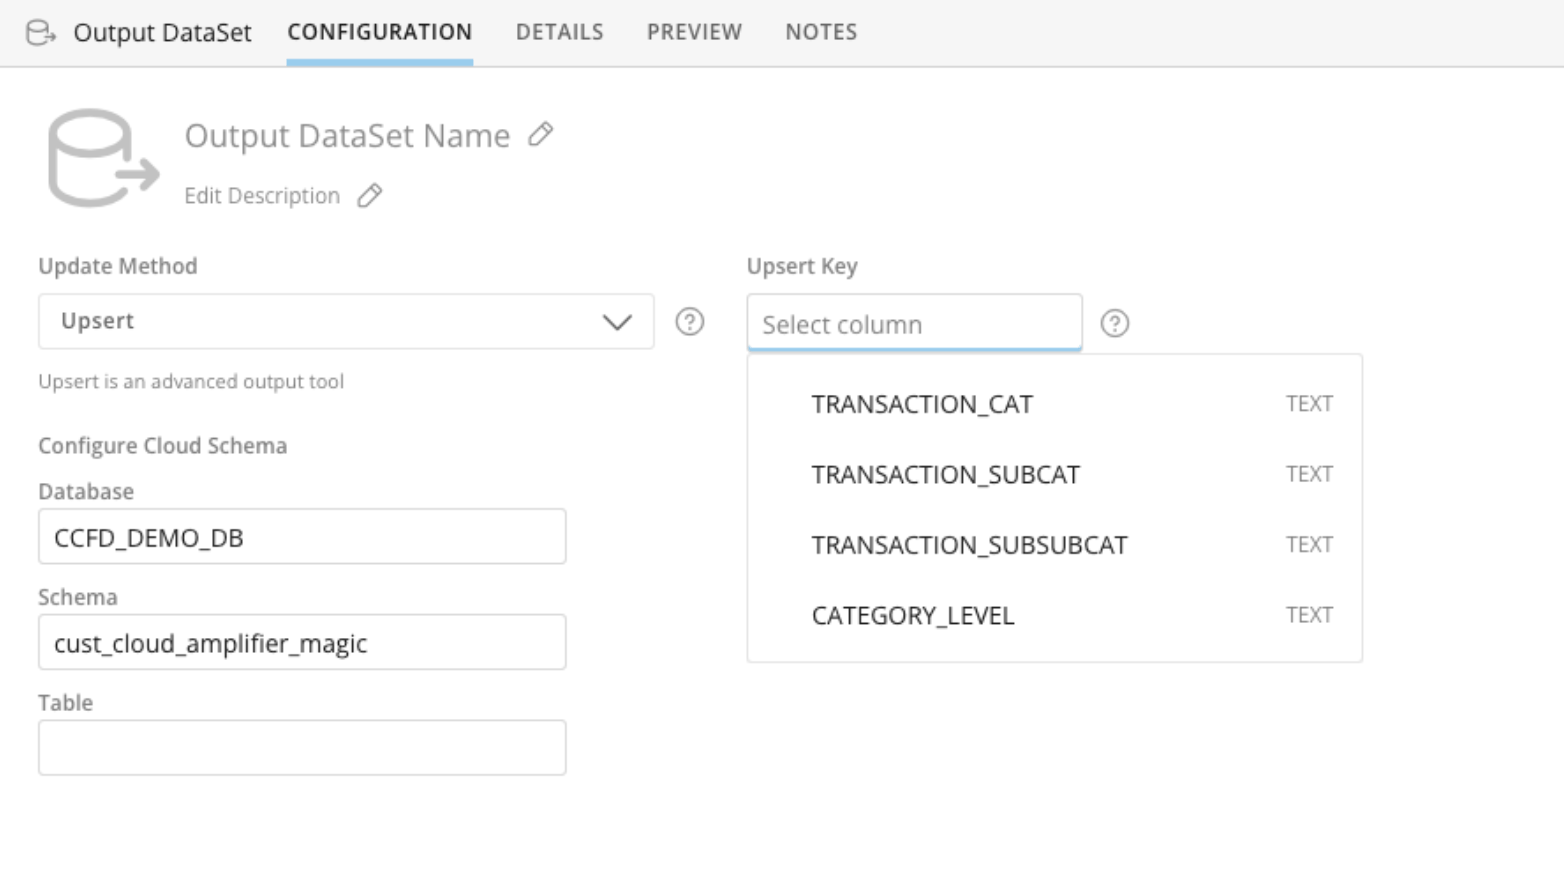
 * **Upsert —** Choose the columns or combination of columns that represent a unique row in your DataSet. This option will add or replace output rows, de-duplicated by an identifier you chose. Learn more about [Upsert](https://domo-support.domo.com/s/article/000005541?language=en_US#upsert).