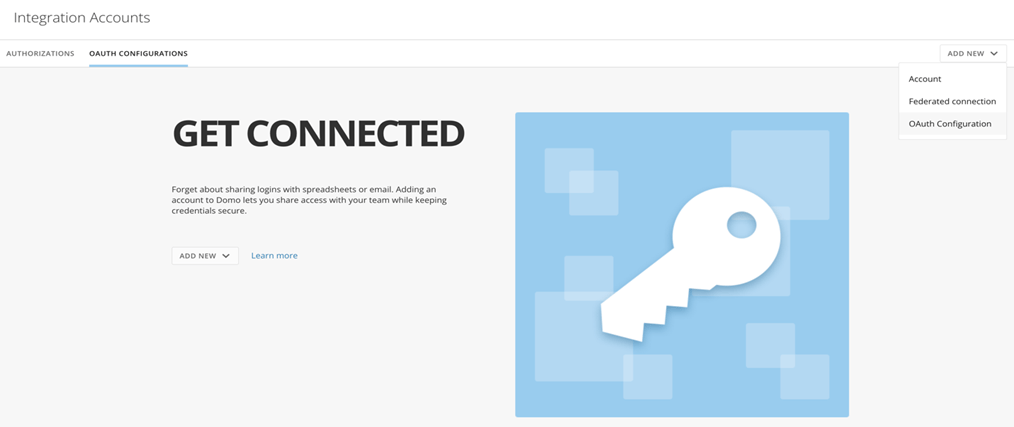
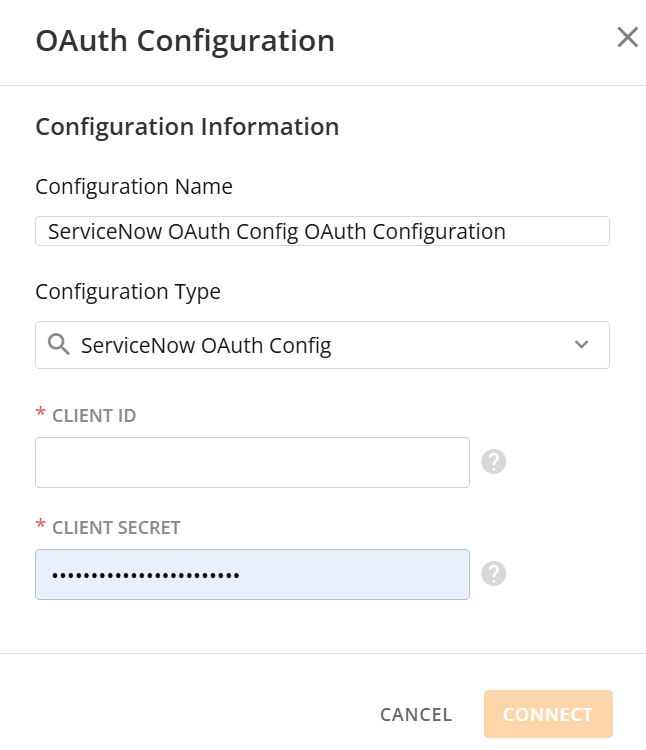
 **Configuring an Incoming Link**
To create an incoming link:
1. Navigate to **Administration** **>** **Applications** **>** **Application links**.
2. Select **Create link**.
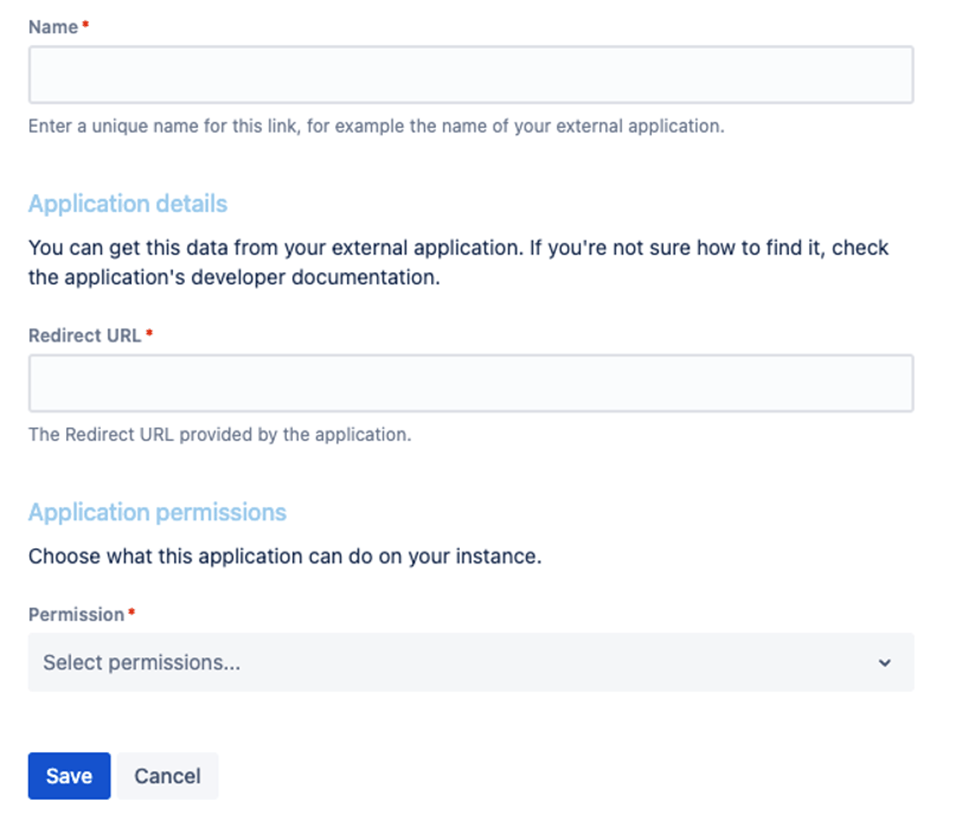
3. Select **External application**, and then select **Incoming** as the direction.
4. Complete the details as described in the below sections.
**Note:** For the **Redirect URL** field, enter this link [https://oauth.domo.com/api/data/v1/oauth/providers/servicenow-enterprise-oauth-configuration/exchange](https://oauth.domo.com/api/data/v1/oauth/providers/servicenow-enterprise-oauth-configuration/exchange "https://oauth.domo.com/api/data/v1/oauth/providers/servicenow-enterprise-oauth-configuration/exchange"),and for the **Permission** field choose ADMIN from the drop-down list.
**Configuring an Incoming Link**
To create an incoming link:
1. Navigate to **Administration** **>** **Applications** **>** **Application links**.
2. Select **Create link**.
3. Select **External application**, and then select **Incoming** as the direction.
4. Complete the details as described in the below sections.
**Note:** For the **Redirect URL** field, enter this link [https://oauth.domo.com/api/data/v1/oauth/providers/servicenow-enterprise-oauth-configuration/exchange](https://oauth.domo.com/api/data/v1/oauth/providers/servicenow-enterprise-oauth-configuration/exchange "https://oauth.domo.com/api/data/v1/oauth/providers/servicenow-enterprise-oauth-configuration/exchange"),and for the **Permission** field choose ADMIN from the drop-down list.

 **View OAuth credentials for an existing link**
If you lose your OAuth credentials, you can use the application link you have created to access at any time.
To view the OAuth credentials:
1. Navigate to
**Administration > Application links**.
2. Find the application link you’re interested, and select
**More actions > View credentials**.
## Connecting to Your ServiceNow Enterprise OAuth Configuration Account
This section enumerates the options in the **Credentials** and **Details** panes on the ServiceNow Enterprise OAuth Configuration Connector page. The components of the other panes on this page, **Scheduling**, and **Name & Describe Your DataSet**, are universal across most connector types and are discussed in great detail in [Adding a DataSet Using a Connector](/s/article/360042926274 "Adding a DataSet Using a Connector").
## Credentials Pane
This pane contains fields for entering credentials to connect to your ServiceNow Enterprise OAuth Configuration account. The following table describes what is needed for each field:
**View OAuth credentials for an existing link**
If you lose your OAuth credentials, you can use the application link you have created to access at any time.
To view the OAuth credentials:
1. Navigate to
**Administration > Application links**.
2. Find the application link you’re interested, and select
**More actions > View credentials**.
## Connecting to Your ServiceNow Enterprise OAuth Configuration Account
This section enumerates the options in the **Credentials** and **Details** panes on the ServiceNow Enterprise OAuth Configuration Connector page. The components of the other panes on this page, **Scheduling**, and **Name & Describe Your DataSet**, are universal across most connector types and are discussed in great detail in [Adding a DataSet Using a Connector](/s/article/360042926274 "Adding a DataSet Using a Connector").
## Credentials Pane
This pane contains fields for entering credentials to connect to your ServiceNow Enterprise OAuth Configuration account. The following table describes what is needed for each field:
Field | Description |
|---|---|
| OAuth Configuration | OAuth Configurations have service credentials stored by your administrator that automatically log you in, so only your personal OAuth login is required. Your administrator may create and edit configurations in the Data Center, in the Accounts tab. |
| Instance Name | Enter the ServiceNow instance name. For example: [https://instance.service-now.com](https://instance.service-now.com). |
Menu | Description | ||||||||||||
|---|---|---|---|---|---|---|---|---|---|---|---|---|---|
Report | Select the ServiceNow Enterprise OAuth Configuration report you want to run. The following reports are available:
| ||||||||||||
| Table |
| ||||||||||||
| Table Name | Enter the name of the table for which you want to retrieve the data for. | ||||||||||||
| Custom Query | Enter a custom query in this field. Include query values directly related to sysparm\_query. The fields sysparm\_limit and sysparm\_offset should not be included. If the field sys\_created\_on is included the value should be in the following format: yyyy-MM-dd HH:mm:ss. Example query: For more Information, refer to here . | ||||||||||||
| Fields | Enter a comma separated list of fields to return with this DataSet. Example field list: | ||||||||||||
| Data Format | Select the format which you expect the ServiceNow API Select report date using relative or specific dates. Relative meaning number of days from today or a specific date using the date selector will return date fields. If you select String, Domo will not process the date, and return the literal string returned from the ServiceNow API. | ||||||||||||
| Duration | Select the duration for the report (a Single Date, or a Date Range). | ||||||||||||
| Report Date | Select report date using relative or specific dates. Relative indicates the number of days from today or a specific date using the date selector. | ||||||||||||
| Select Specific Date | Select the report date using the date selector. | ||||||||||||
| Days back | The number of days back that you would like to get data for. Specify either today or 0, yesterday or 1, or today-7 or 7 to get data for 7 days into the past. | ||||||||||||
| Start Date | Select report start date using relative or specific dates. Relative indicates the number of days from today or a specific date using the date selector. | ||||||||||||
| Select Specific Start Date | Select the report date using the date selector. | ||||||||||||
| Days back to start from | The number of days back that you would like to get data from (start day). Specify either today or 0, yesterday or 1, or today-7 or 7 to get data for 7 days into the past. | ||||||||||||
| End Date | Select report end date using relative or specific dates. Relative indicates the number of days from today or a specific date using the date selector. | ||||||||||||
| Select Specific End Date | Select the report date using the date selector. | ||||||||||||
| Days back to end at | The number of days back that you would like to get data to (end day). Specify either today or 0, yesterday or 1, or today-7 or 7 to get data for 7 days into the past. |