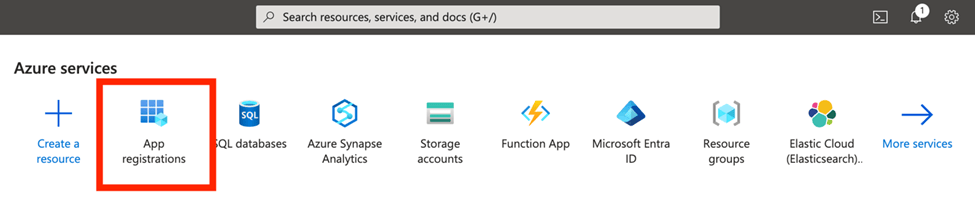
 3. In the App registrations window, click
**+New registration**, and enter the required details.
3. In the App registrations window, click
**+New registration**, and enter the required details.
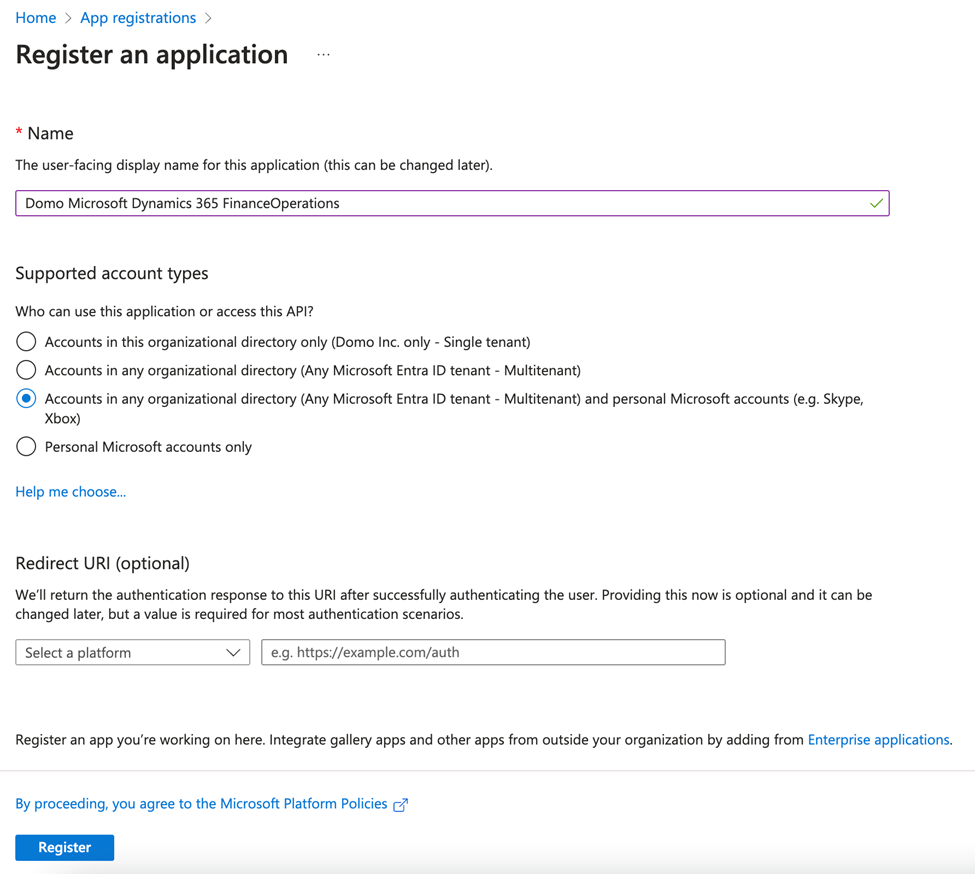
 4. In the Register an application window, under
**Name**, enter the name of your choice, for example, **Domo Microsoft Dynamics 365 Finance Operations**, under **Supported account types**, select **Accounts in any organizational directory (Any Microsoft Entra ID tenant - Multitenant) and personal Microsoft accounts (e.g. Skype, Xbox),** and click **Register**.
4. In the Register an application window, under
**Name**, enter the name of your choice, for example, **Domo Microsoft Dynamics 365 Finance Operations**, under **Supported account types**, select **Accounts in any organizational directory (Any Microsoft Entra ID tenant - Multitenant) and personal Microsoft accounts (e.g. Skype, Xbox),** and click **Register**.
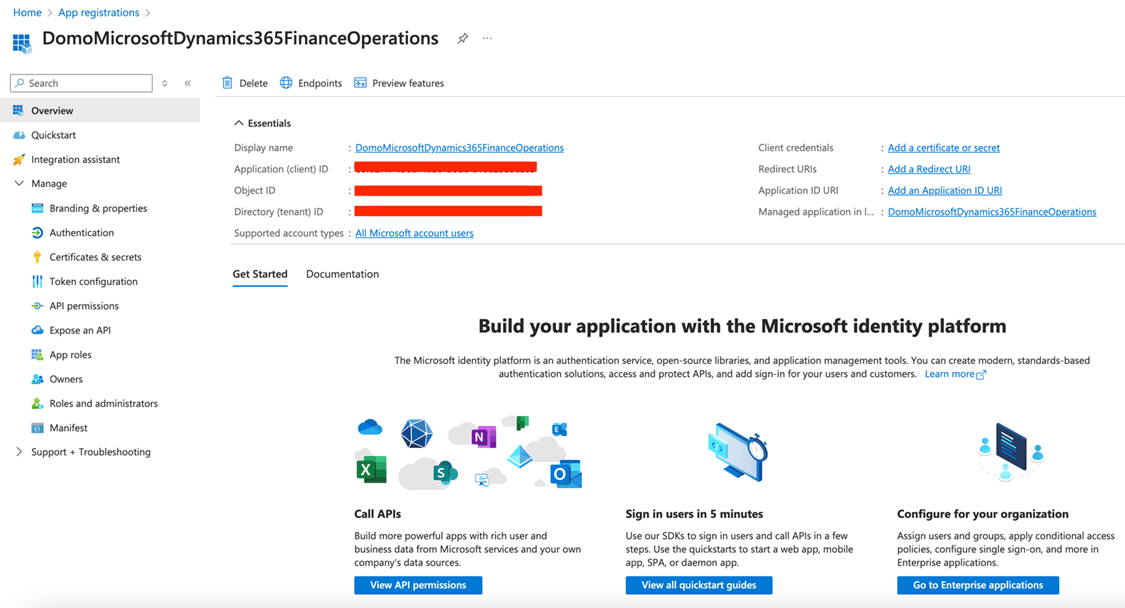
 When you select the **Overview** section on the left pane, the Registered app details appears along with the **Application (client) ID**, and **Directory (tenant) ID**.
 5. On the left pane, select **Manage >** **Certificate and secrets > + New client secret**.
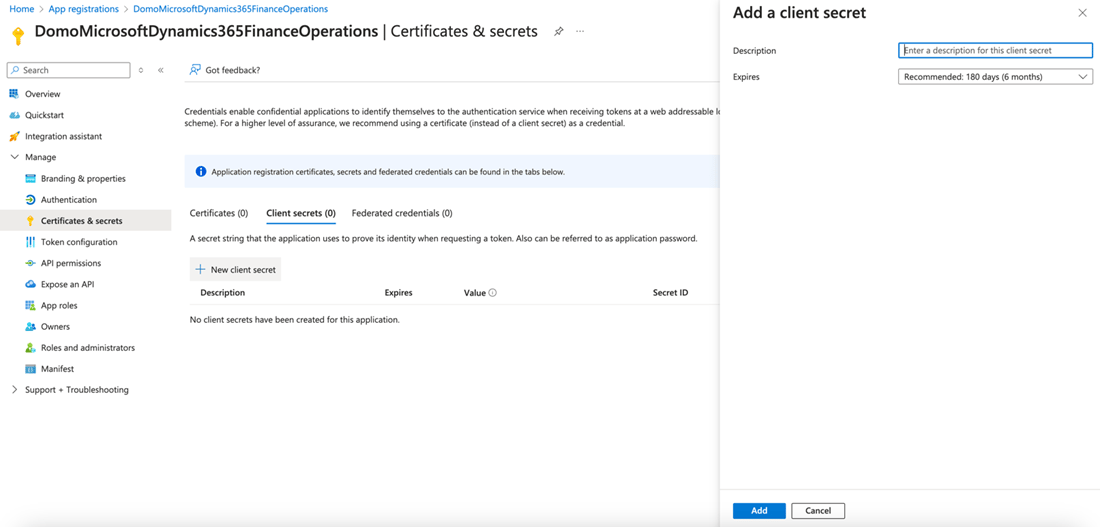 8. A new client secret gets created. Ensure to note down the client secret value which appears under the
**Value** column.
8. A new client secret gets created. Ensure to note down the client secret value which appears under the
**Value** column.
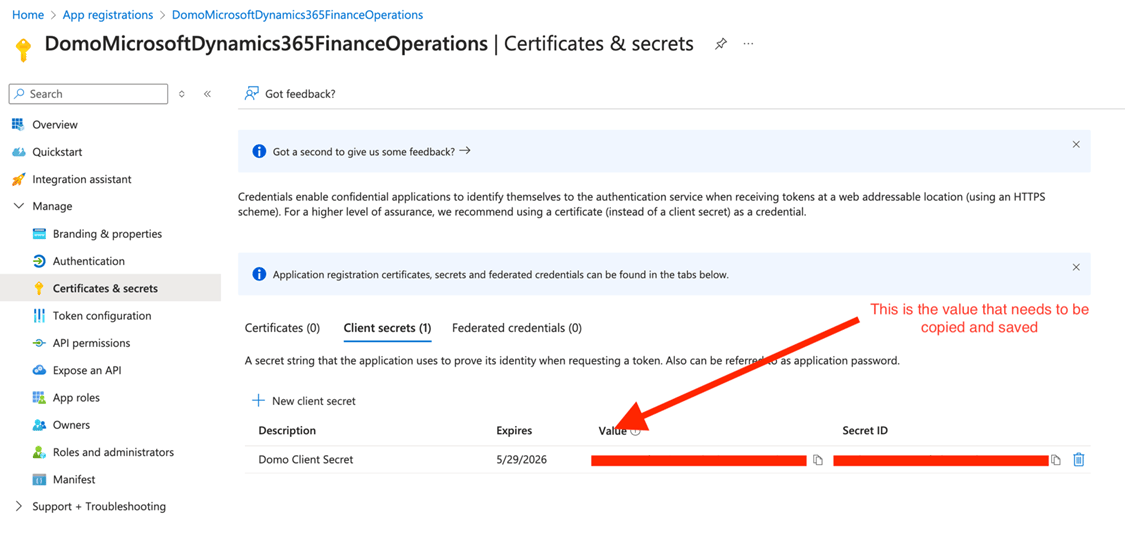 **Note:** Make a note of the Application (client ID), Directory (tenant) ID and Client secret's Value.
9. Login to the customer D365FO, and navigate to, **System administration** > **Setup** > **Microsoft Entra ID applications**.
10. Click
**New** and enter the ClientID obtained from the Azure portal on the Azure Active Directory applications form and click **Save**.
**Note:** Make a note of the Application (client ID), Directory (tenant) ID and Client secret's Value.
9. Login to the customer D365FO, and navigate to, **System administration** > **Setup** > **Microsoft Entra ID applications**.
10. Click
**New** and enter the ClientID obtained from the Azure portal on the Azure Active Directory applications form and click **Save**.
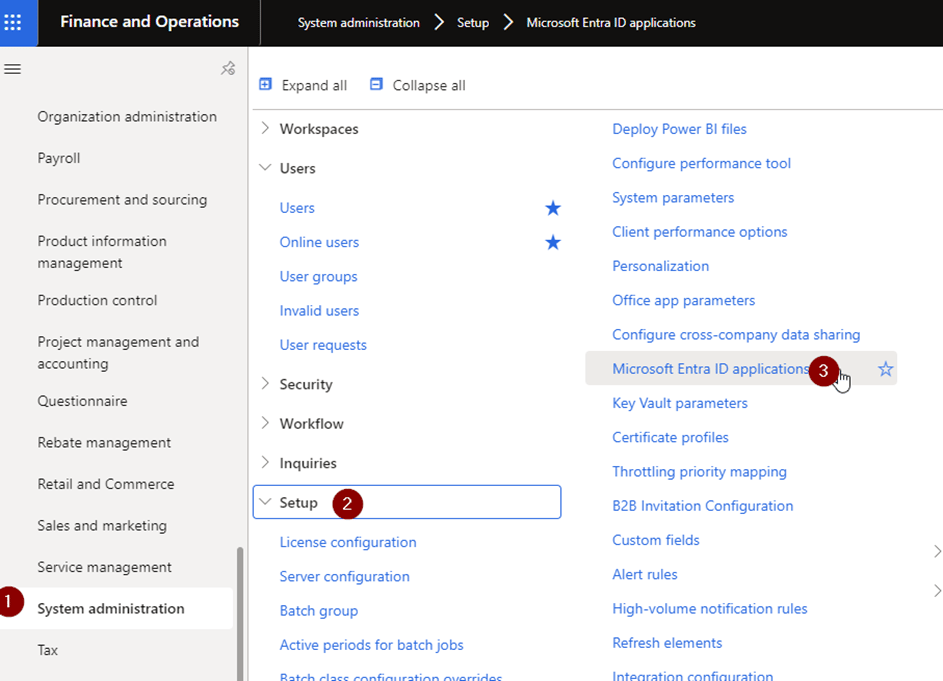 The D365FO registration in the Azure portal is successfully completed.
## Connecting to Your Microsoft Dynamics 365 Finance & Operations Account
This section lists the options in the **Credentials** and **Details** panes in the Microsoft Dynamics 365 Finance & Operations Connector page. The components of the other panes in this page, **Scheduling** and **Name & Describe Your DataSet**, are universal across most connector types and are discussed in great detail in [Adding a DataSet Using a Data Connector](https://domo-support.domo.com/s/article/360042926274?language=en_US "Adding a DataSet Using a Data Connector").
## Credentials Pane
This pane contains fields for entering credentials to connect to your Microsoft Dynamics 365 Finance & Operations account. The following table describes what is needed for each field:
The D365FO registration in the Azure portal is successfully completed.
## Connecting to Your Microsoft Dynamics 365 Finance & Operations Account
This section lists the options in the **Credentials** and **Details** panes in the Microsoft Dynamics 365 Finance & Operations Connector page. The components of the other panes in this page, **Scheduling** and **Name & Describe Your DataSet**, are universal across most connector types and are discussed in great detail in [Adding a DataSet Using a Data Connector](https://domo-support.domo.com/s/article/360042926274?language=en_US "Adding a DataSet Using a Data Connector").
## Credentials Pane
This pane contains fields for entering credentials to connect to your Microsoft Dynamics 365 Finance & Operations account. The following table describes what is needed for each field:
Field | Description |
|---|---|
Client ID | Navigate to portal.azure.com > Azure Active directory > App registrations . Find web app and click the web app. The Application ID from the web app is the client id. |
Client Secret | Navigate to portal.azure.com > Azure Active directory > App registrations . Find the web app and click the web app. Go to settings > Keys and create the client secret. |
Tenant ID | Enter your tenant domain name. |
Resource URL | Enter the Resource Domain URL. |
Menu | Description |
|---|---|
Data Entities | Select the data entity for your report. This list includes every data entity in the Microsoft Dynamics 365 Finance & Operations installation that the authenticated user has access to. |
| Date Column to Filter On | Select the date column to filter the entity data. |
| Duration | The filter duration. Select Single Date or Date Range . |
| Created On Date | Select filter date using relative or specific dates. Relative means the number of days from today or a specific date using the date selector. Specific - The Select Specific Date Field appears. Select the filter date using the date selector. Relative - The Days Back field appears. The number of days back that you would like to get data for. Specify either today or 0, yesterday or 1, or today-7 or 7 to get data for 7 days into the past. |
| Start Date | Select filter start date using relative or specific dates. Relative meaning number of days from today or a specific date using the date selector Specific - The Select Specific Start Date field appears. Select the filter date using the date selector. Relative - The Days Back To Start From field appears. The number of days back that you would like to get data from (start day). Specify either today or 0, yesterday or 1, or today-7 or 7 to get data for 7 days into the past. |
| End Date | Select filter end date using relative or specific dates. Relative meaning number of days from today or a specific date using the date selector Specific - The Select Specific End Date field appears. Select the filter date using the date selector. Relative - The Days Back To End At field appears. The number of days back that you would like to get data to (end day). Specify either today or 0, yesterday or 1, or today-7 or 7 to get data for 7 days into the past. |