> ## Documentation Index
> Fetch the complete documentation index at: https://domoinc-openapi-sync-dataflows.mintlify.site/llms.txt
> Use this file to discover all available pages before exploring further.
# > Domo on Databricks (RECOMMENDED)
export const InlineImage = ({src, alt = '', height = '1.6em'}) => {
return  ;
};
### Intro
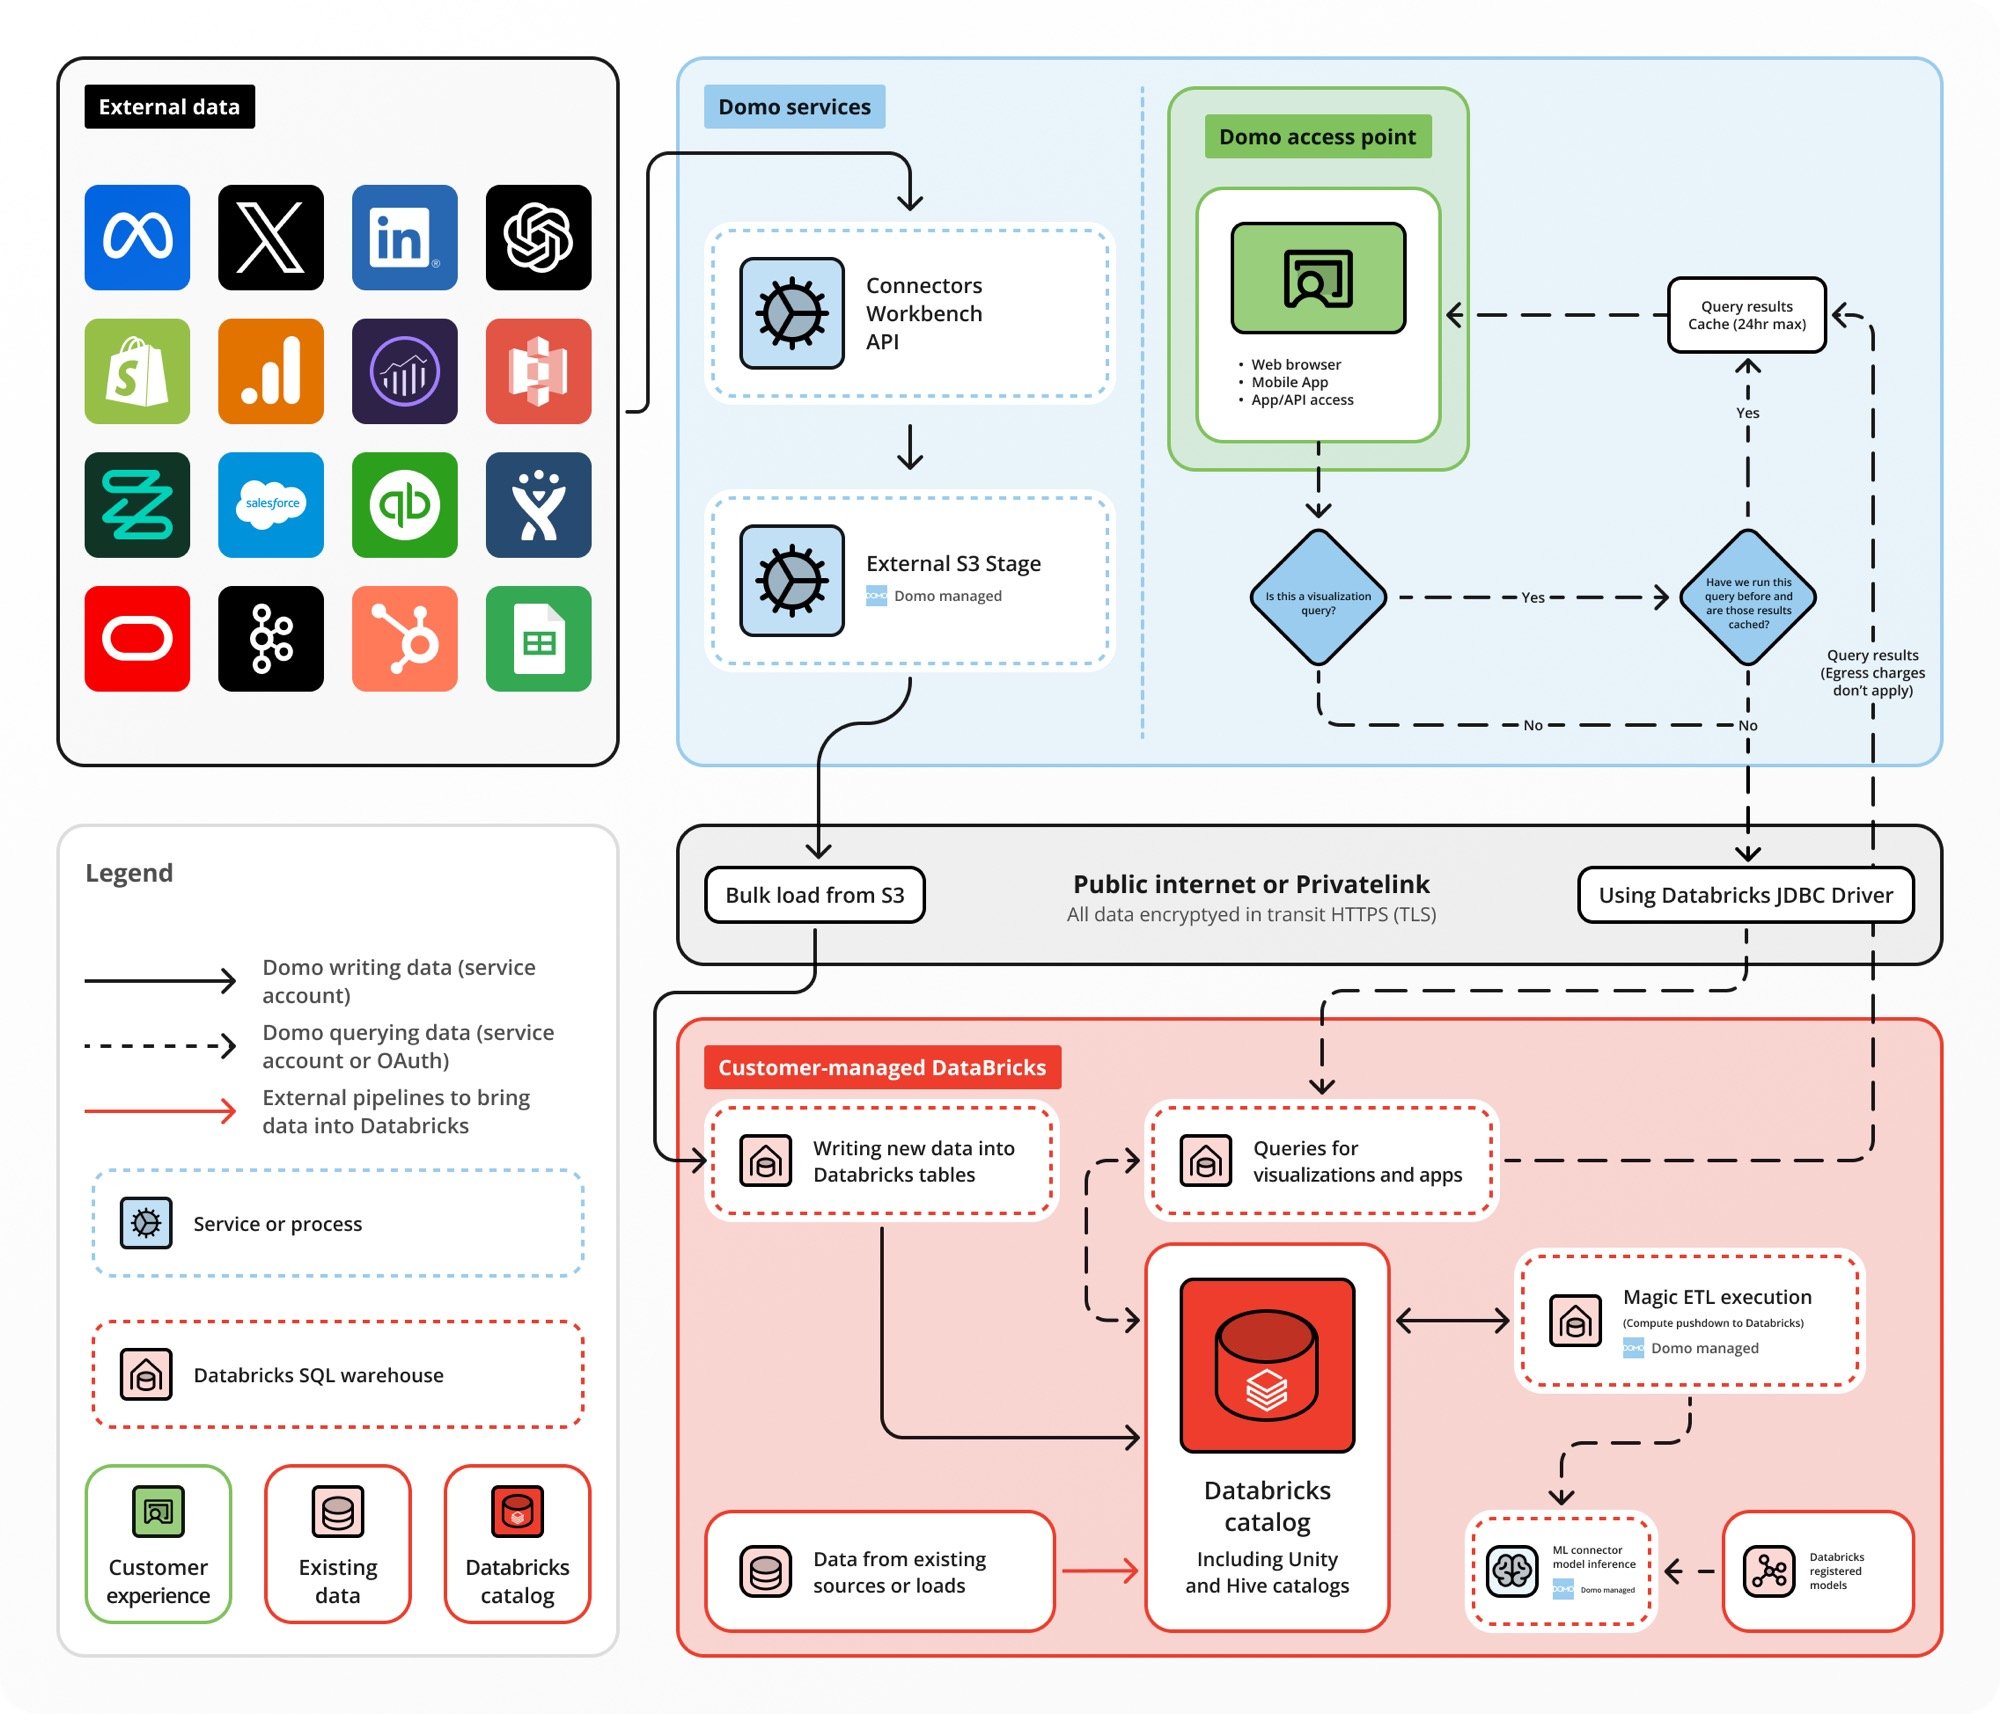
With Cloud Amplifier, you can power your Domo instance using Databricks. This guide is written for users who are familiar with Databricks and describes how to register Databricks with Cloud Amplifier for read-only and read/write integrations.
After completing the setup processes of your choice, you can use virtual tables that read from Databricks to create cards, configure alerts, and serve as inputs in Magic ETL DataFlows.
### Architectural Overview
;
};
### Intro
With Cloud Amplifier, you can power your Domo instance using Databricks. This guide is written for users who are familiar with Databricks and describes how to register Databricks with Cloud Amplifier for read-only and read/write integrations.
After completing the setup processes of your choice, you can use virtual tables that read from Databricks to create cards, configure alerts, and serve as inputs in Magic ETL DataFlows.
### Architectural Overview
 ### Prerequisites
Before configuring the Databricks connection, we strongly recommend that you complete the following:
* **(Recommended) Create a Databricks service account —**
We recommend creating a new Databricks account specifically for this integration. You can use any account with Read access in Databricks, but it is best practice to use a service account. This account must have read access to your default Databricks environment in order to create virtual Databricks tables in Domo.
* **(Recommended) Create a Domo service account —**
We recommend creating a new Domo account specifically for this integration. The custom role for the account must have the Manage Cloud Accounts and Manage DataSet grants enabled. For more information about using OAuth with your Databricks-Cloud Amplifier connection, see [DataBricks using Personal Access Token](https://domo-support.domo.com/s/article/000005522?language=en_US).
For more information about roles and grants, see [Managing Custom Roles](/s/article/360043438973).
### Read-Only Setup
Follow these steps to configure read-only access to Databricks tables from within Domo via Cloud Amplifier.
1. Log in to your Domo service account.
2. Go to the **Data Warehouse**.
3. Select **** **Add New Cloud Account**.
The new integration modal displays.
4. In the modal under
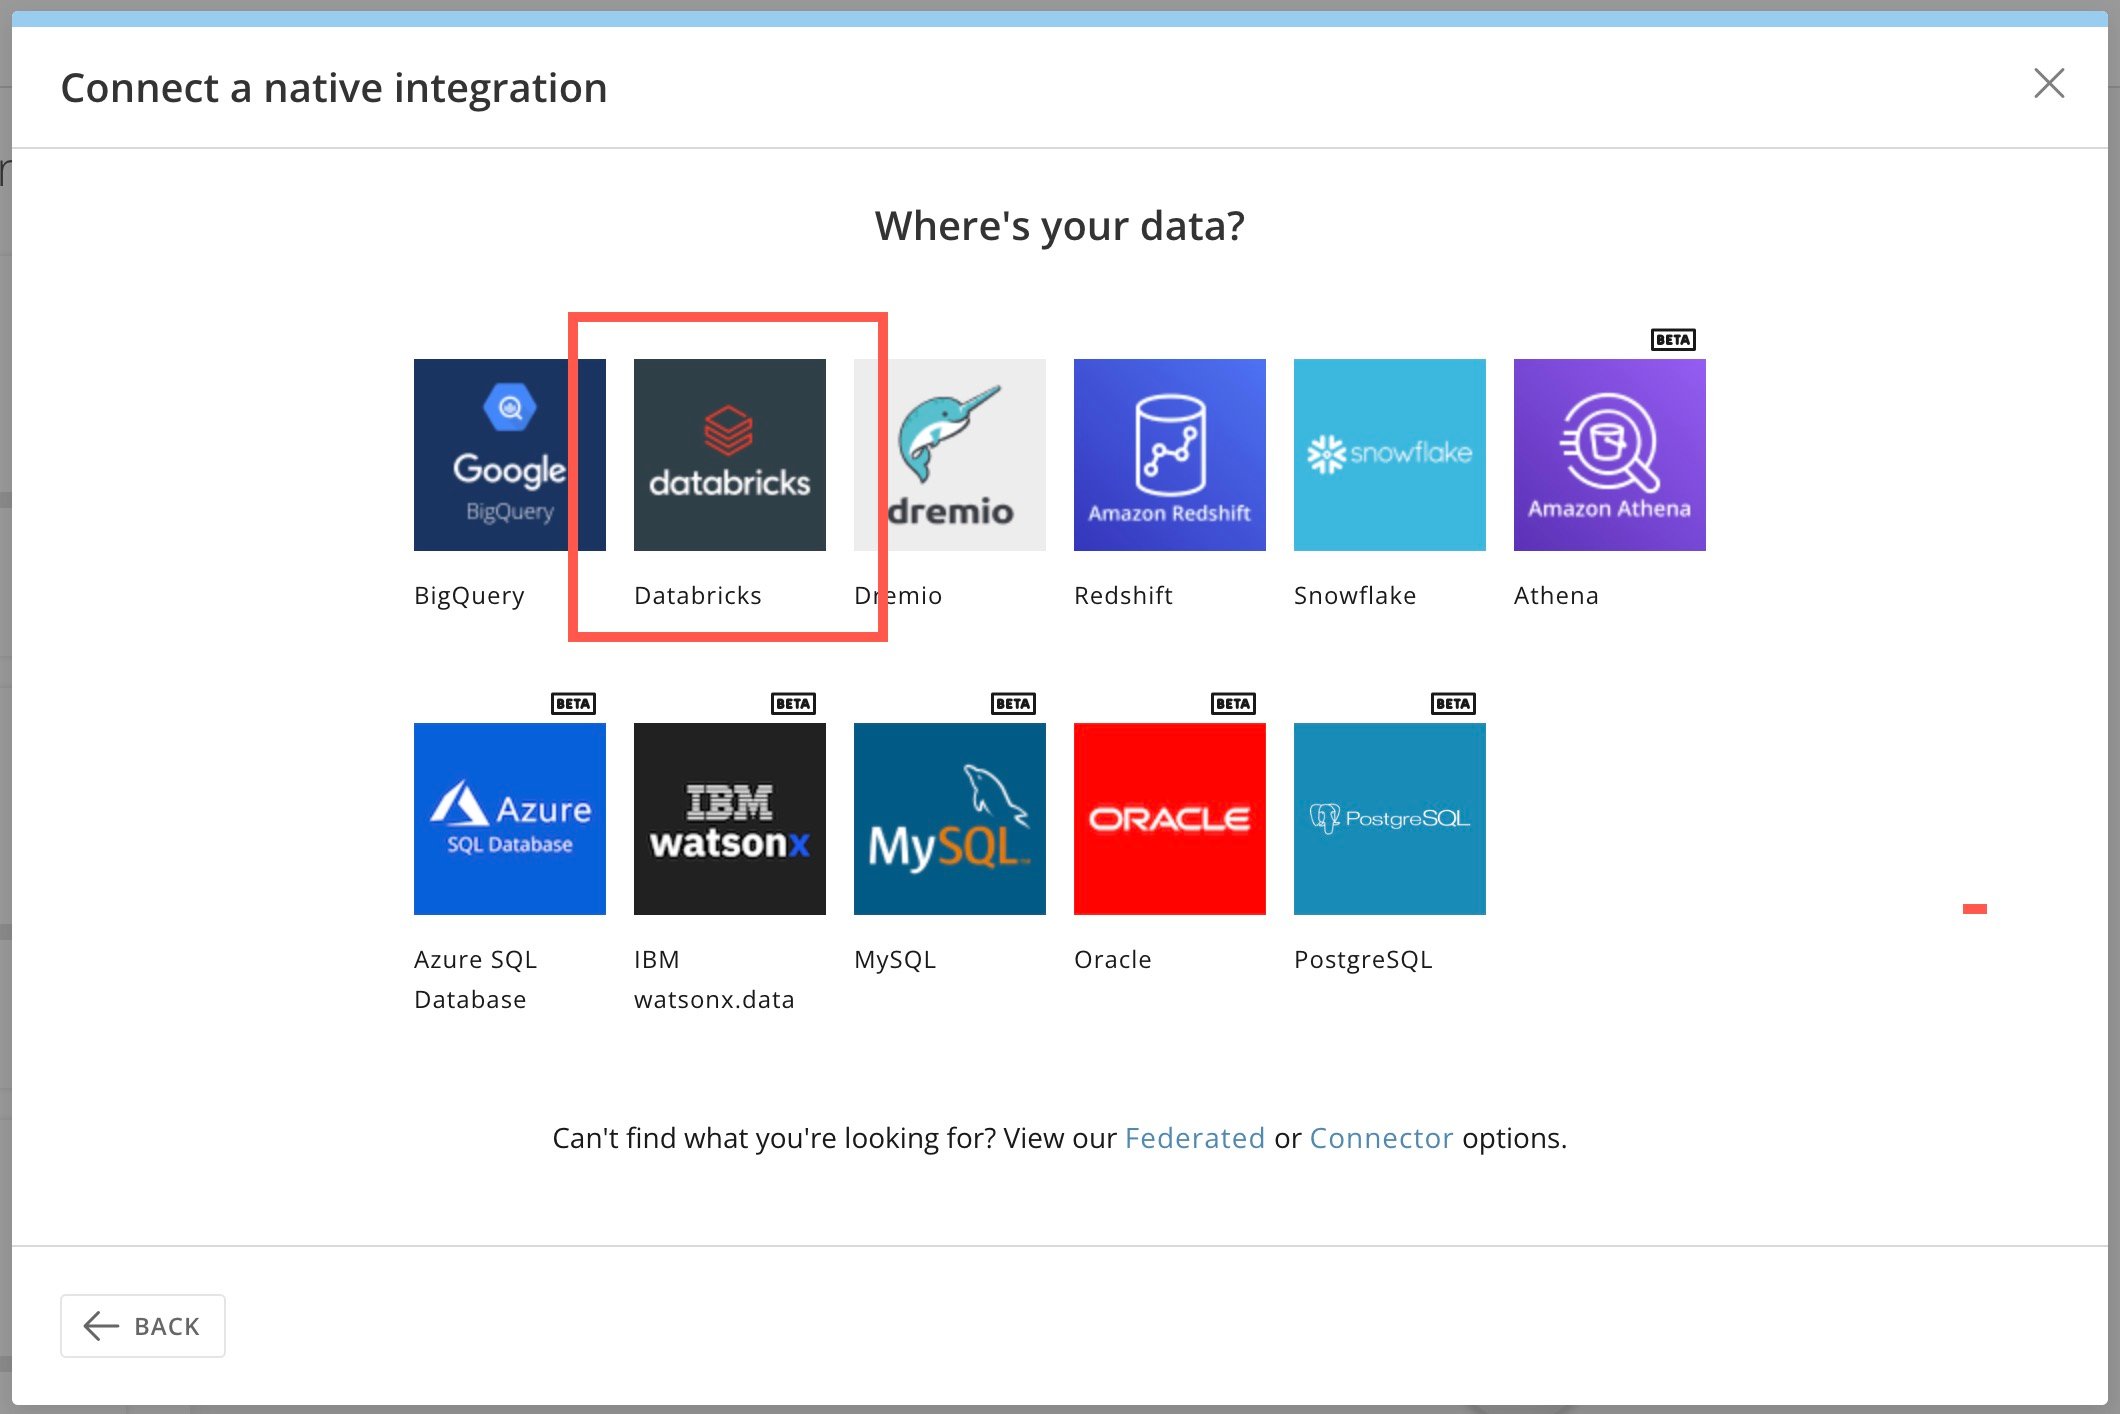
**Native integration**, select **Databricks** (If Databricks doesn't display, select **See More** to see all possible integrations.)
### Prerequisites
Before configuring the Databricks connection, we strongly recommend that you complete the following:
* **(Recommended) Create a Databricks service account —**
We recommend creating a new Databricks account specifically for this integration. You can use any account with Read access in Databricks, but it is best practice to use a service account. This account must have read access to your default Databricks environment in order to create virtual Databricks tables in Domo.
* **(Recommended) Create a Domo service account —**
We recommend creating a new Domo account specifically for this integration. The custom role for the account must have the Manage Cloud Accounts and Manage DataSet grants enabled. For more information about using OAuth with your Databricks-Cloud Amplifier connection, see [DataBricks using Personal Access Token](https://domo-support.domo.com/s/article/000005522?language=en_US).
For more information about roles and grants, see [Managing Custom Roles](/s/article/360043438973).
### Read-Only Setup
Follow these steps to configure read-only access to Databricks tables from within Domo via Cloud Amplifier.
1. Log in to your Domo service account.
2. Go to the **Data Warehouse**.
3. Select **** **Add New Cloud Account**.
The new integration modal displays.
4. In the modal under
**Native integration**, select **Databricks** (If Databricks doesn't display, select **See More** to see all possible integrations.)
 5. Select
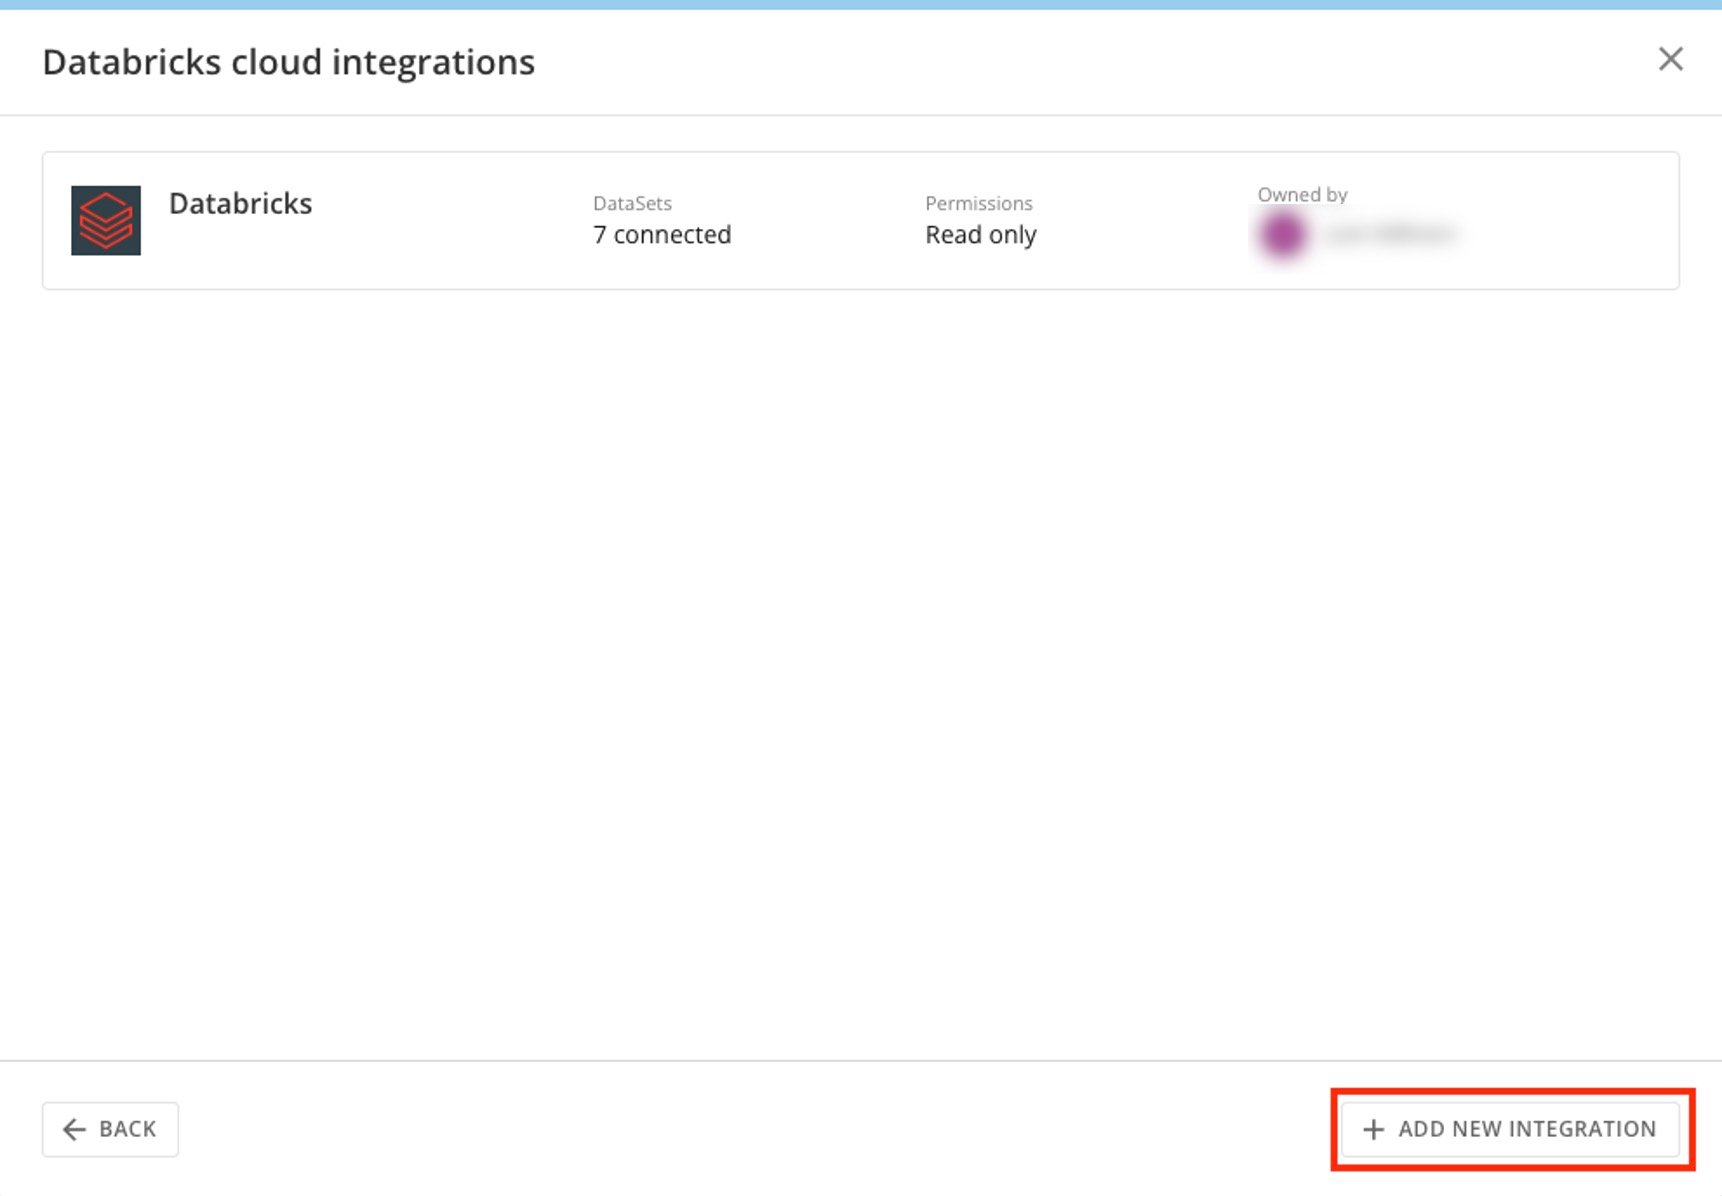
**+ Add New Integration**. If there are other existing integrations, this option displays at the bottom of the list.
5. Select
**+ Add New Integration**. If there are other existing integrations, this option displays at the bottom of the list.
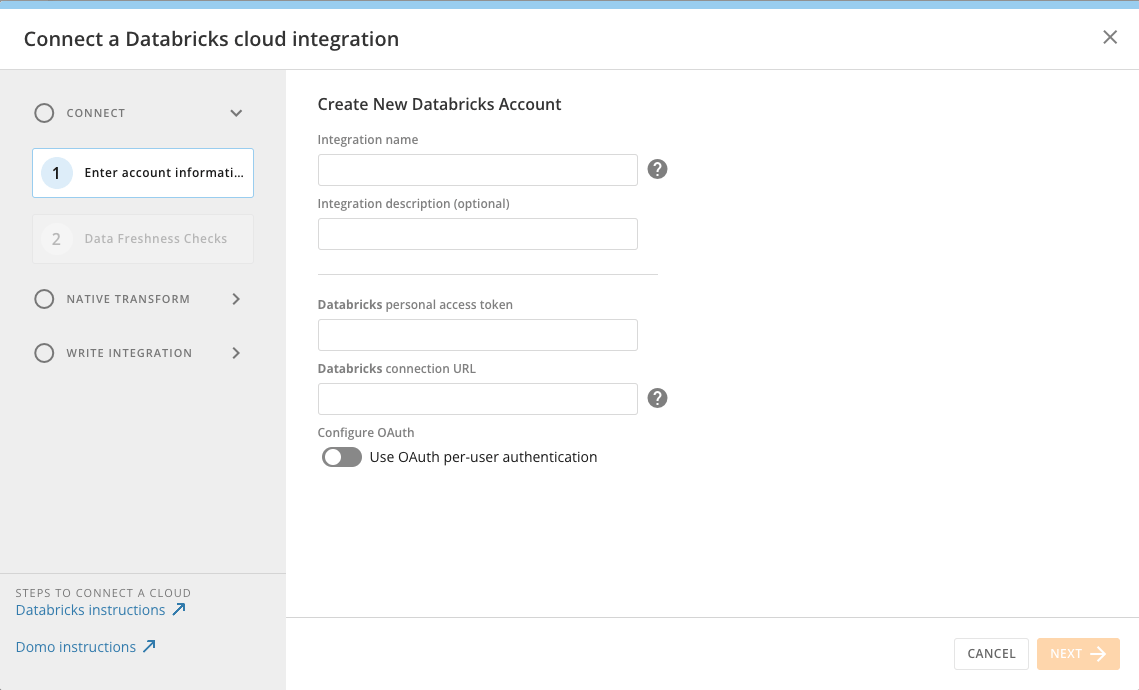
 6. Fill out the fields in the modal. You can move through the modal by selecting **Next** on each screen.
1. Enter a name and optional description in the
**Integration name** and **Integration description** fields.
2. Create a personal access token in your Databricks account.
*Copy the token for your records—you cannot recover it after you leave the page.*
3. Paste the token into the
**Databricks personal access token** field in the integration modal.
4. Locate the Databricks connection URL in Databricks. (Navigate to
**SQL Warehouses** > \{ *warehouse name* } > **Connection details** in Databricks.)
**Note:** Do not include protocol identifiers with the URL. **jdbc:databricks\://** is assumed, **jdbc:spark://** is not supported.
5. Copy the JDBC URL and paste it into the **Databricks connection URL** field in the integration modal.
6. Fill out the fields in the modal. You can move through the modal by selecting **Next** on each screen.
1. Enter a name and optional description in the
**Integration name** and **Integration description** fields.
2. Create a personal access token in your Databricks account.
*Copy the token for your records—you cannot recover it after you leave the page.*
3. Paste the token into the
**Databricks personal access token** field in the integration modal.
4. Locate the Databricks connection URL in Databricks. (Navigate to
**SQL Warehouses** > \{ *warehouse name* } > **Connection details** in Databricks.)
**Note:** Do not include protocol identifiers with the URL. **jdbc:databricks\://** is assumed, **jdbc:spark://** is not supported.
5. Copy the JDBC URL and paste it into the **Databricks connection URL** field in the integration modal.
 7. Configure your data freshness settings. Learn about
[advanced scheduling](https://domo-support.domo.com/s/article/4412849158167?language=en_US#advanced_scheduling) for data freshness.
Your configuration is now complete. You can optionally choose Databricks tables to connect to Domo by following the steps below.
# Add Databricks Tables to Domo
The following process is optional.
1. After setting up your read-only integration, select
**Choose Tables to Connect**.
7. Configure your data freshness settings. Learn about
[advanced scheduling](https://domo-support.domo.com/s/article/4412849158167?language=en_US#advanced_scheduling) for data freshness.
Your configuration is now complete. You can optionally choose Databricks tables to connect to Domo by following the steps below.
# Add Databricks Tables to Domo
The following process is optional.
1. After setting up your read-only integration, select
**Choose Tables to Connect**.
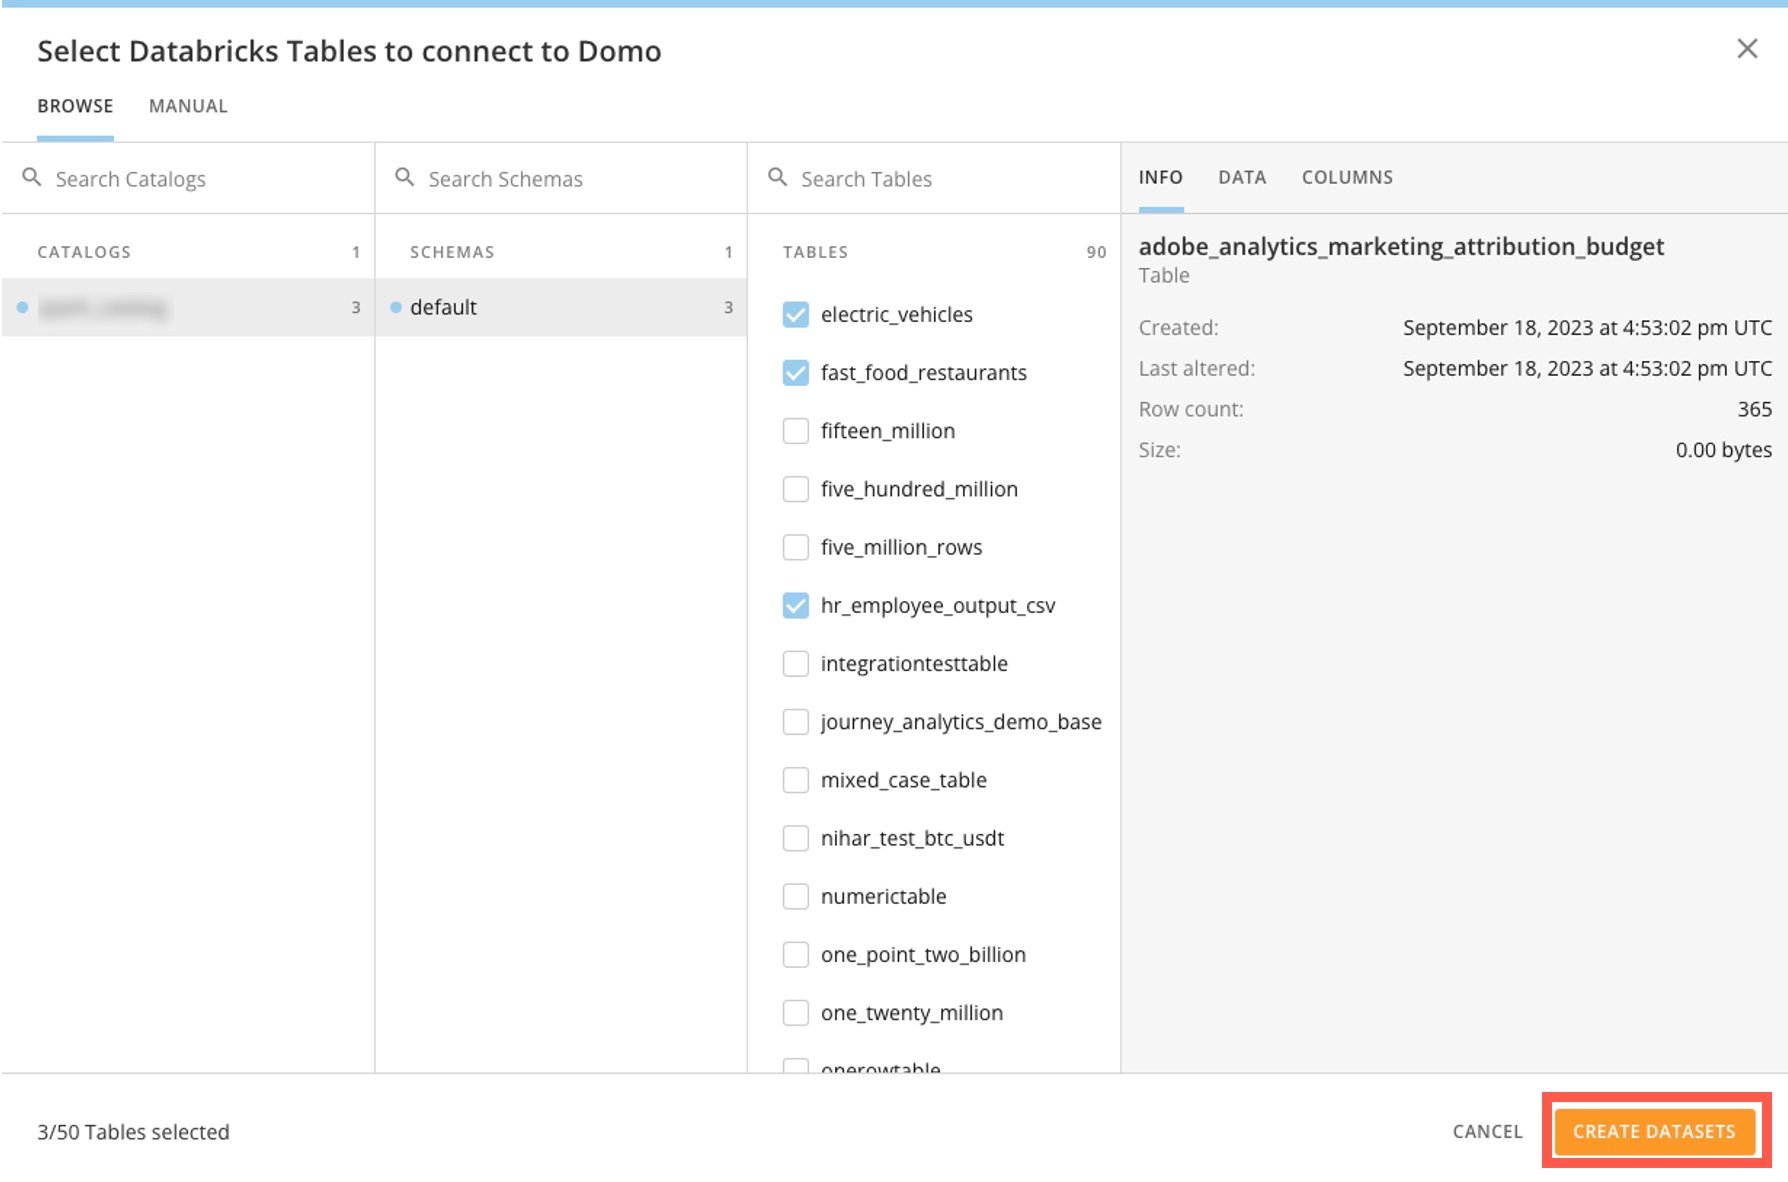
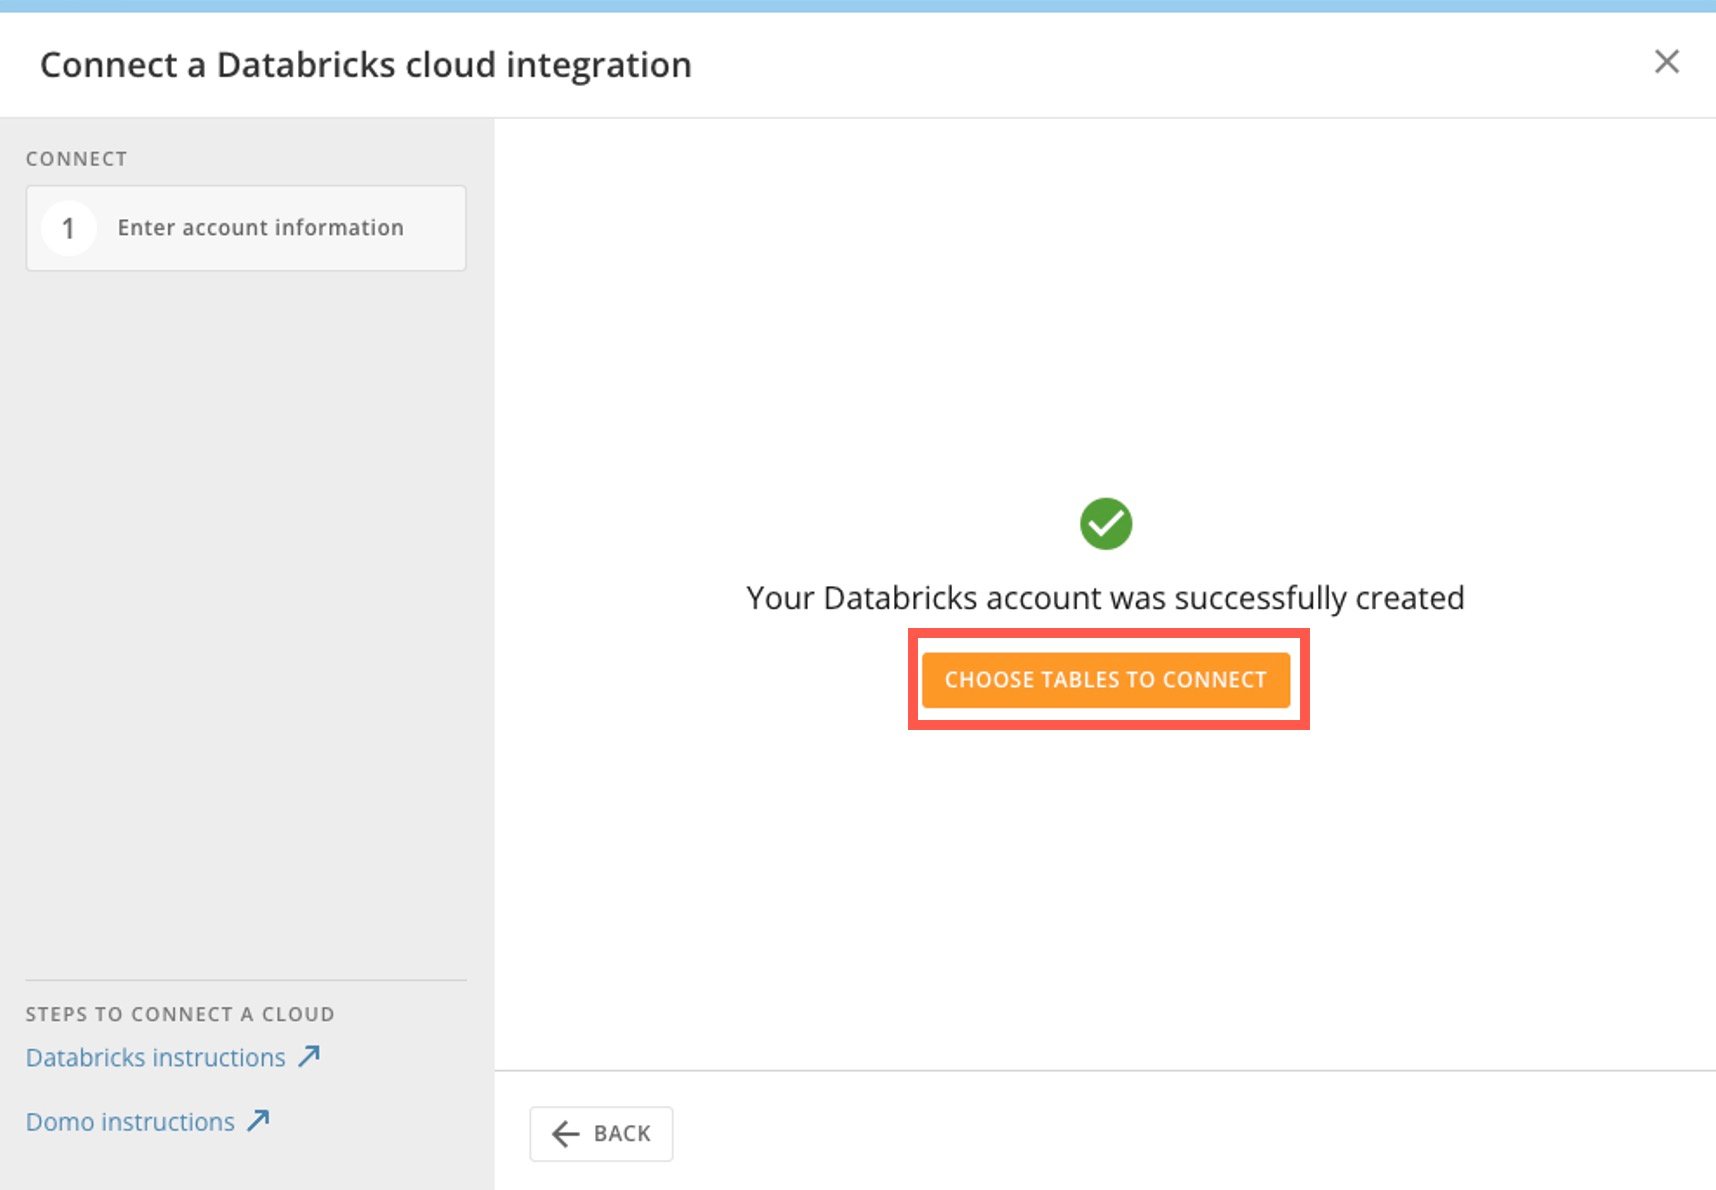 2. Search for and select Databricks schemas and tables you want to use to create DataSets in Domo.
3. Select
**Create DataSets**.
2. Search for and select Databricks schemas and tables you want to use to create DataSets in Domo.
3. Select
**Create DataSets**.
 You have successfully configured your read-only integration from Databricks to Cloud Amplifier.
### Write Setup
Before taking the steps described in this section, complete the following prerequisites.
# Prerequisites
* Enable Unity Catalog on your Databricks instance. Find enablement instructions
[here](https://docs.databricks.com/en/data-governance/unity-catalog/enable-workspaces.html#enable-your-workspace-for-unity-catalog) .
* Obtain the following Databricks permissions for your Databricks user:
* Create storage credential
* Create catalog
* Create external location
# Convert a Read-Only Integration to Read-Write
1. In your Domo instance, go to the
**Data Warehouse** and select **Manage Cloud Connections** to open the integration modal.
You have successfully configured your read-only integration from Databricks to Cloud Amplifier.
### Write Setup
Before taking the steps described in this section, complete the following prerequisites.
# Prerequisites
* Enable Unity Catalog on your Databricks instance. Find enablement instructions
[here](https://docs.databricks.com/en/data-governance/unity-catalog/enable-workspaces.html#enable-your-workspace-for-unity-catalog) .
* Obtain the following Databricks permissions for your Databricks user:
* Create storage credential
* Create catalog
* Create external location
# Convert a Read-Only Integration to Read-Write
1. In your Domo instance, go to the
**Data Warehouse** and select **Manage Cloud Connections** to open the integration modal.
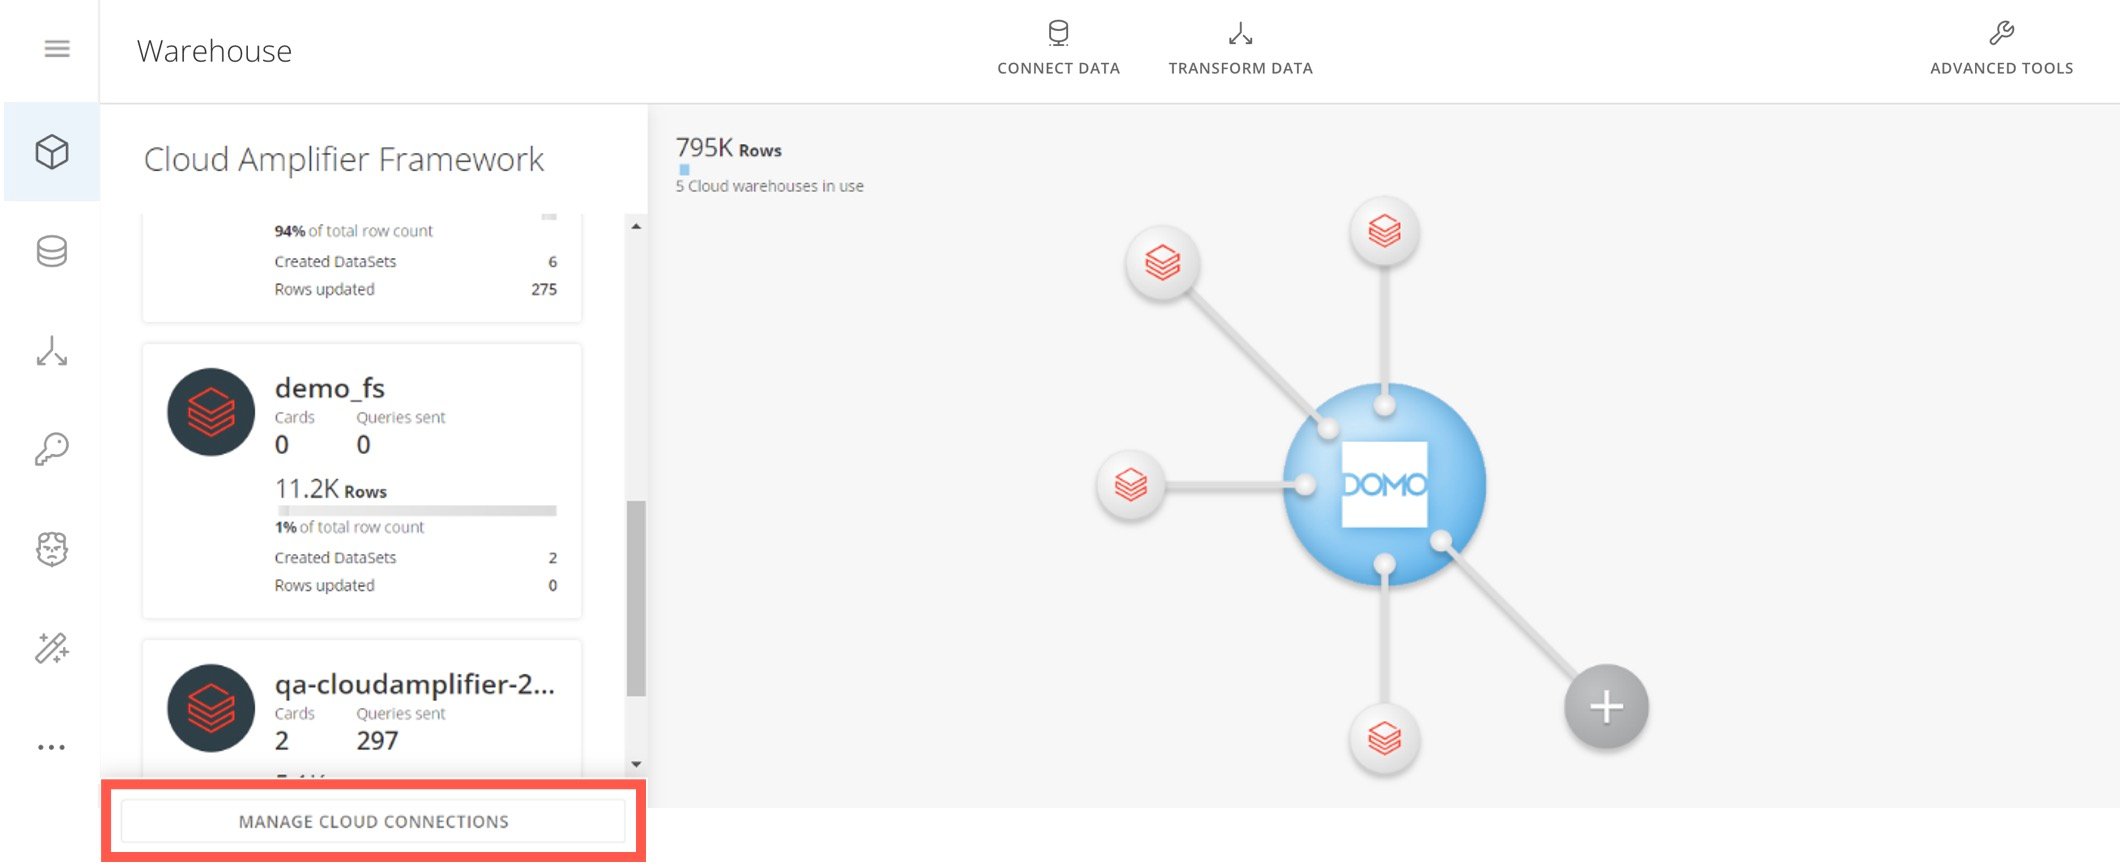 2. In the modal under
**Native** **integration**, select **See more** > **Databricks**.
The list of existing Databricks integrations displays.
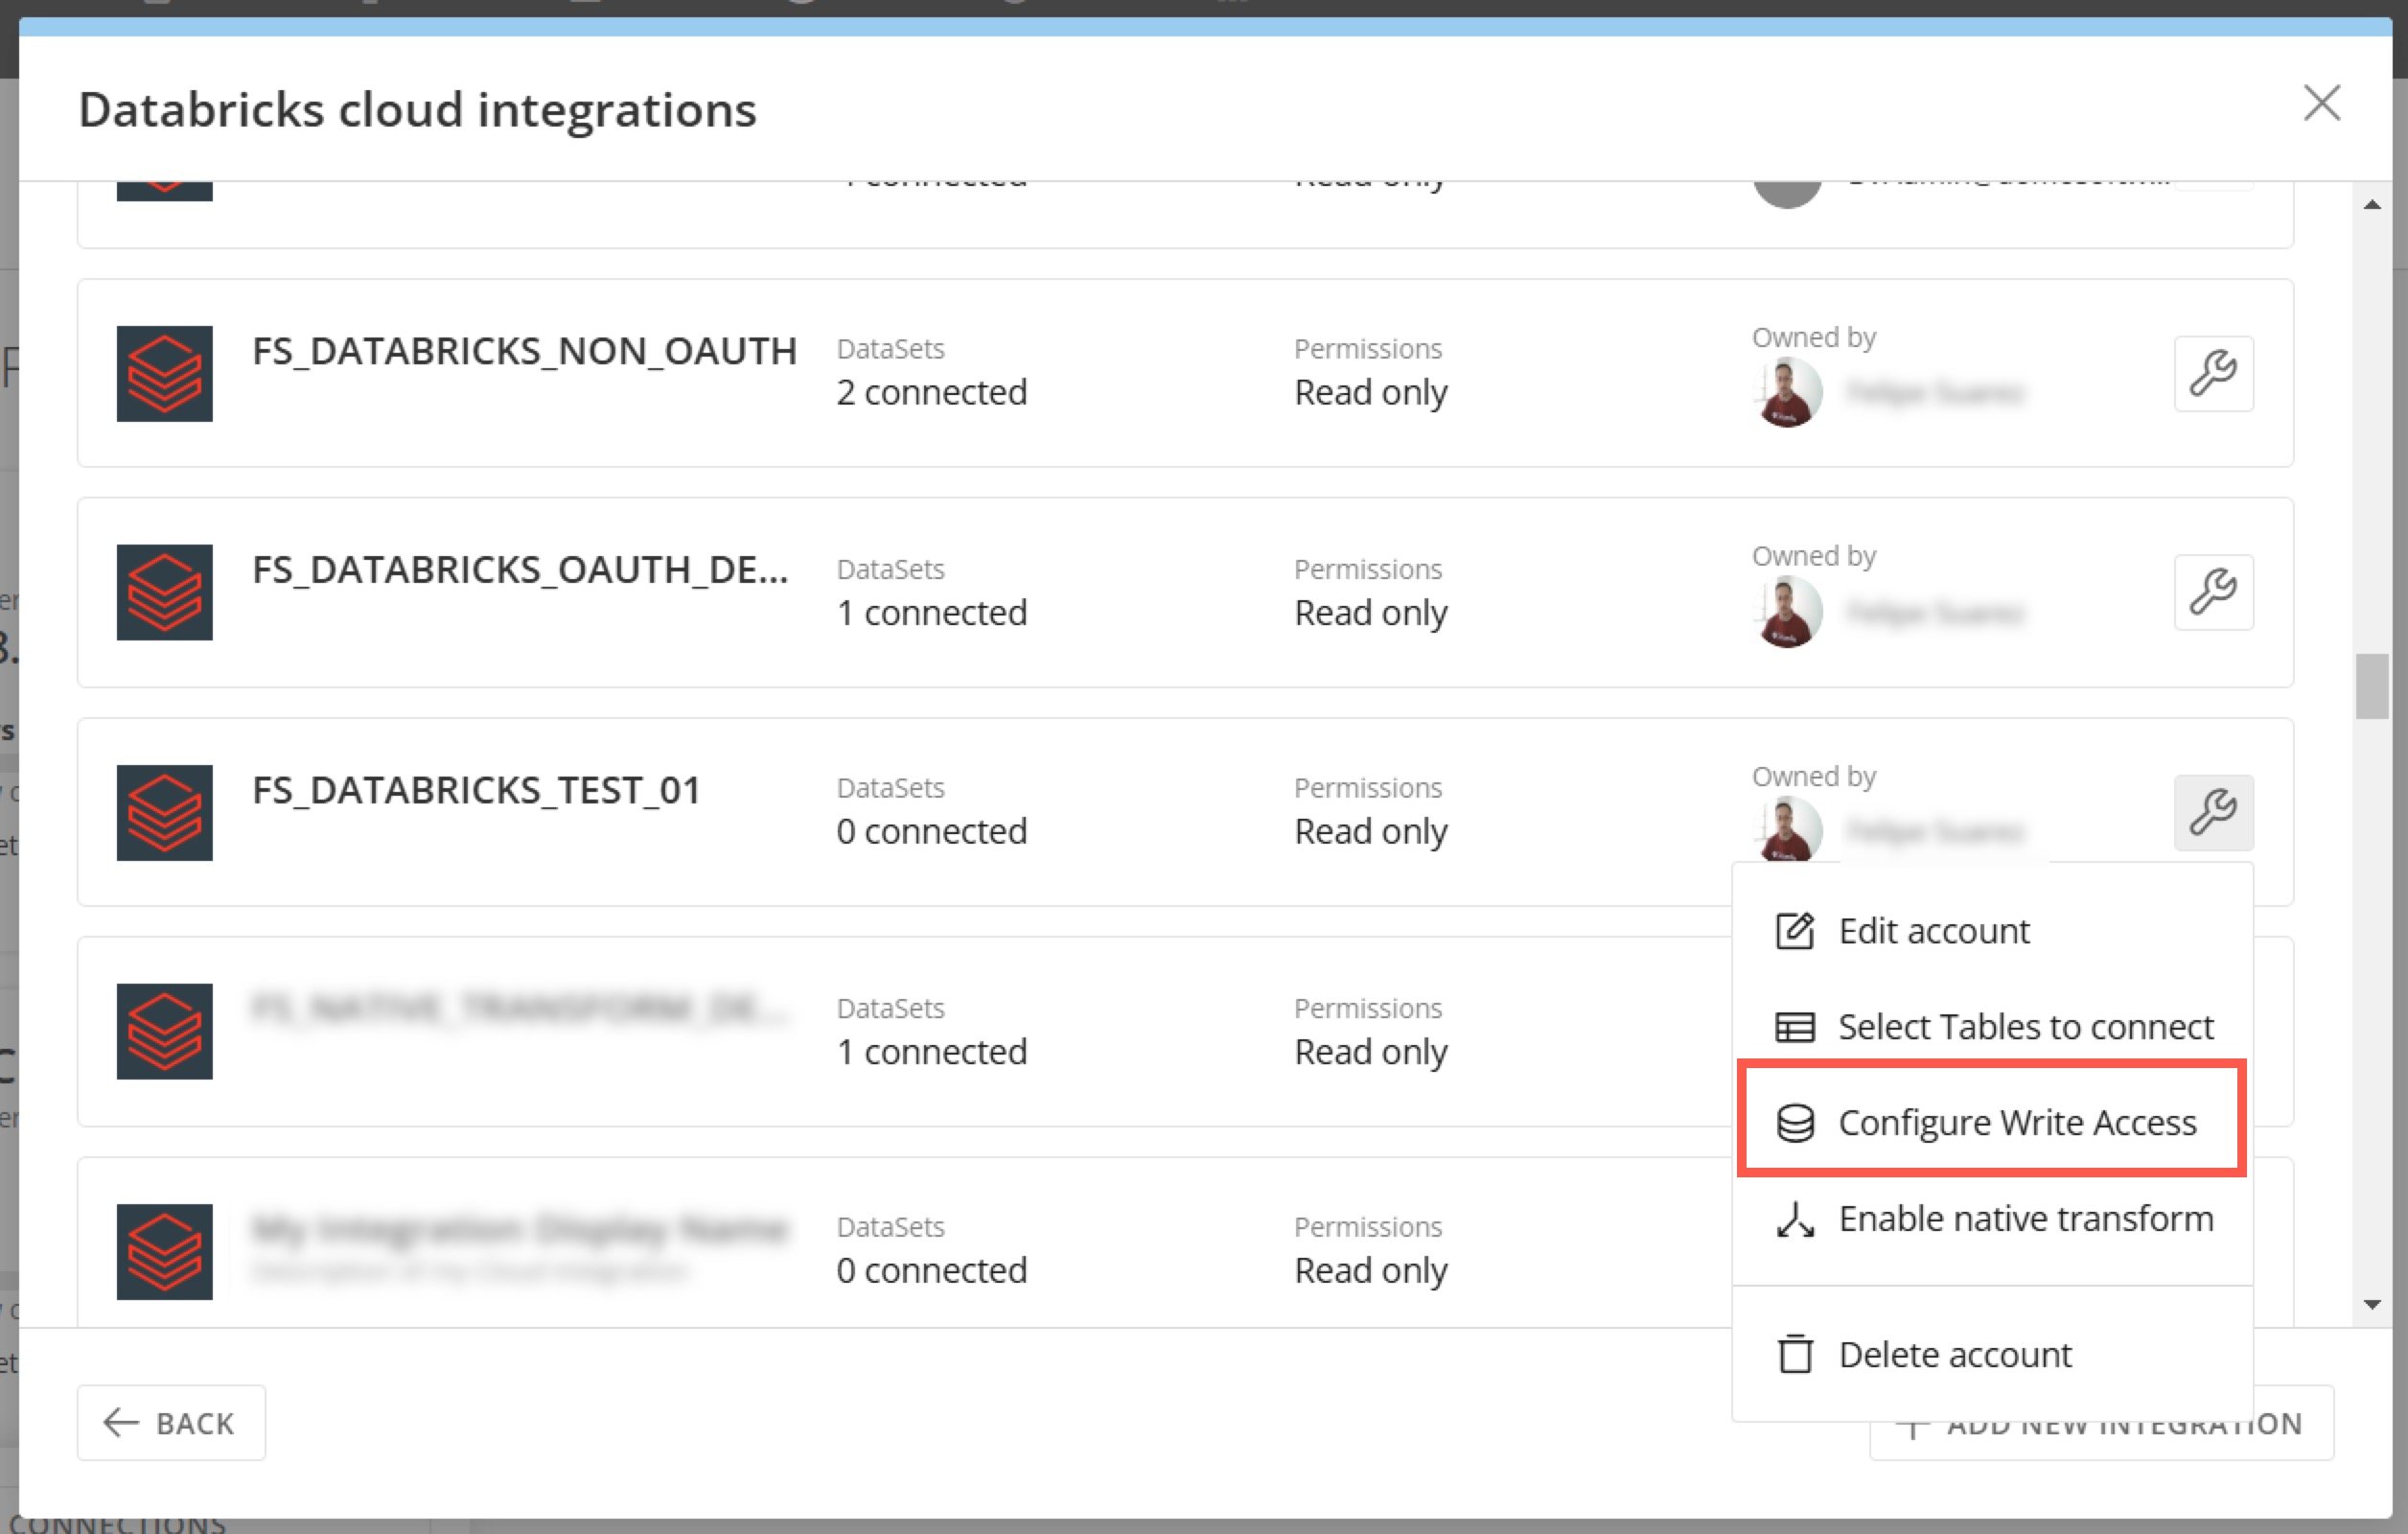
3. Locate the existing read-only integration that you want to upgrade to a read-write integration. Hover over the integration row and select
**Options** (wrench icon) > **Configure Write Access**.
Use **Next** to move through the modal as you complete the steps.
2. In the modal under
**Native** **integration**, select **See more** > **Databricks**.
The list of existing Databricks integrations displays.
3. Locate the existing read-only integration that you want to upgrade to a read-write integration. Hover over the integration row and select
**Options** (wrench icon) > **Configure Write Access**.
Use **Next** to move through the modal as you complete the steps.
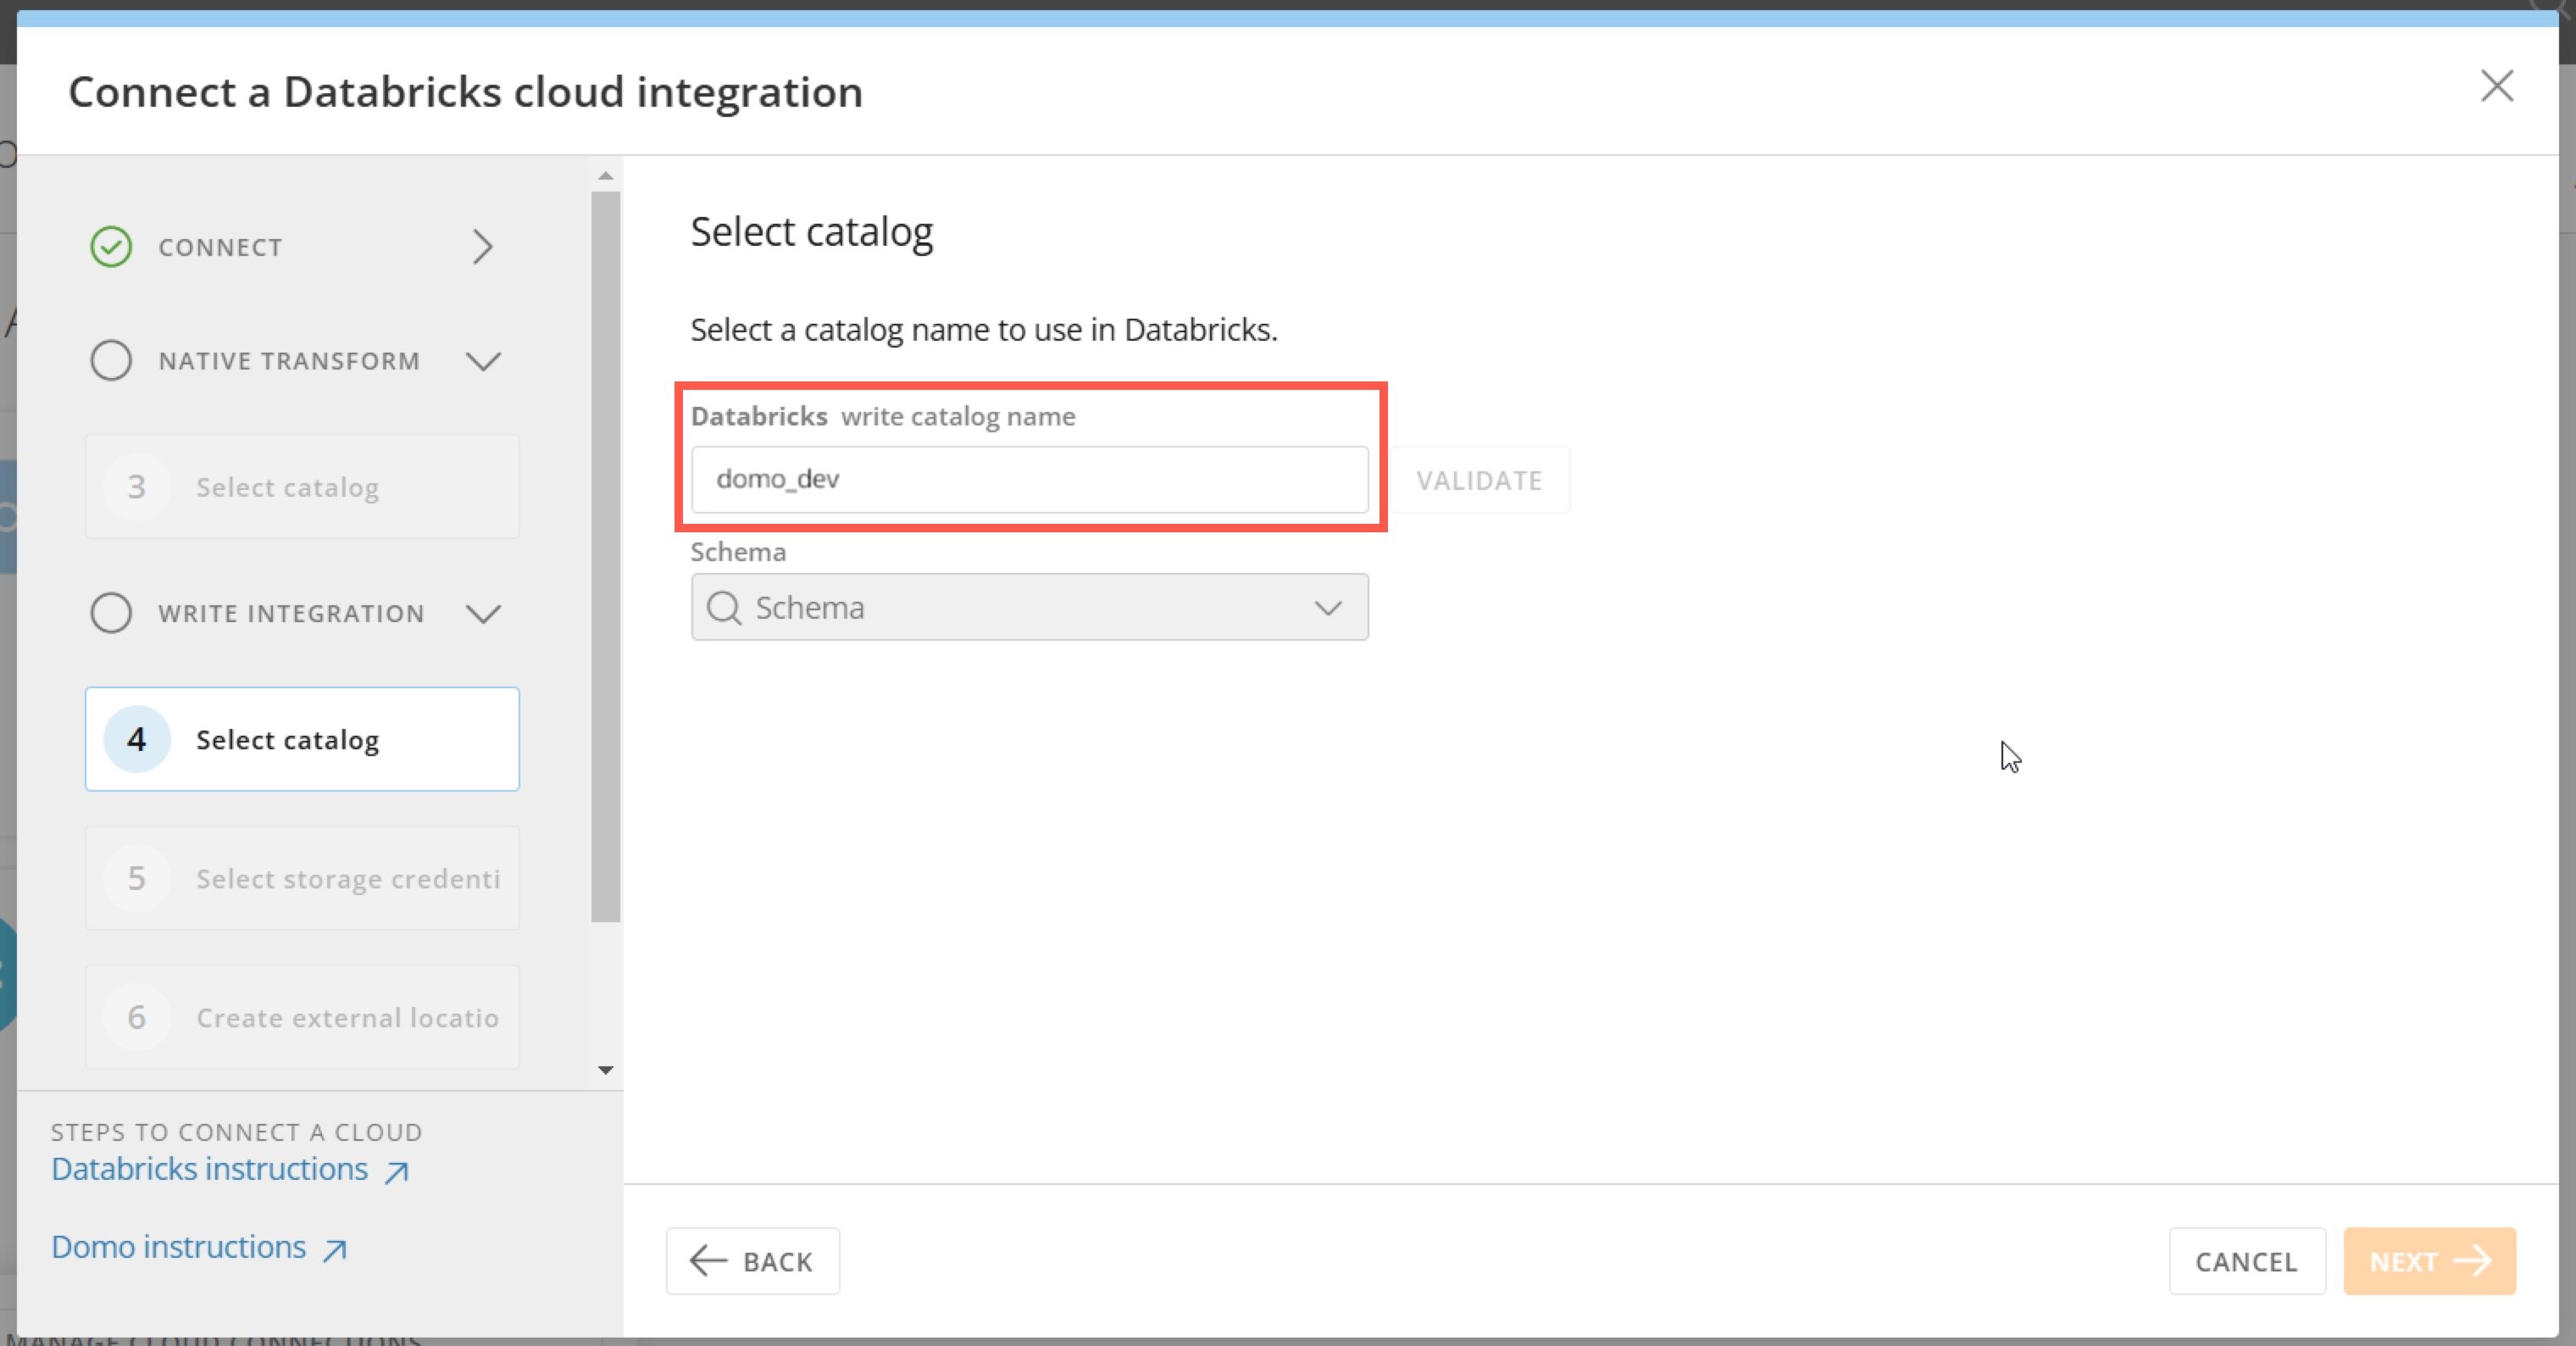
 4. In the modal, enter the Databricks write catalog name in the labeled field.
 5. Select
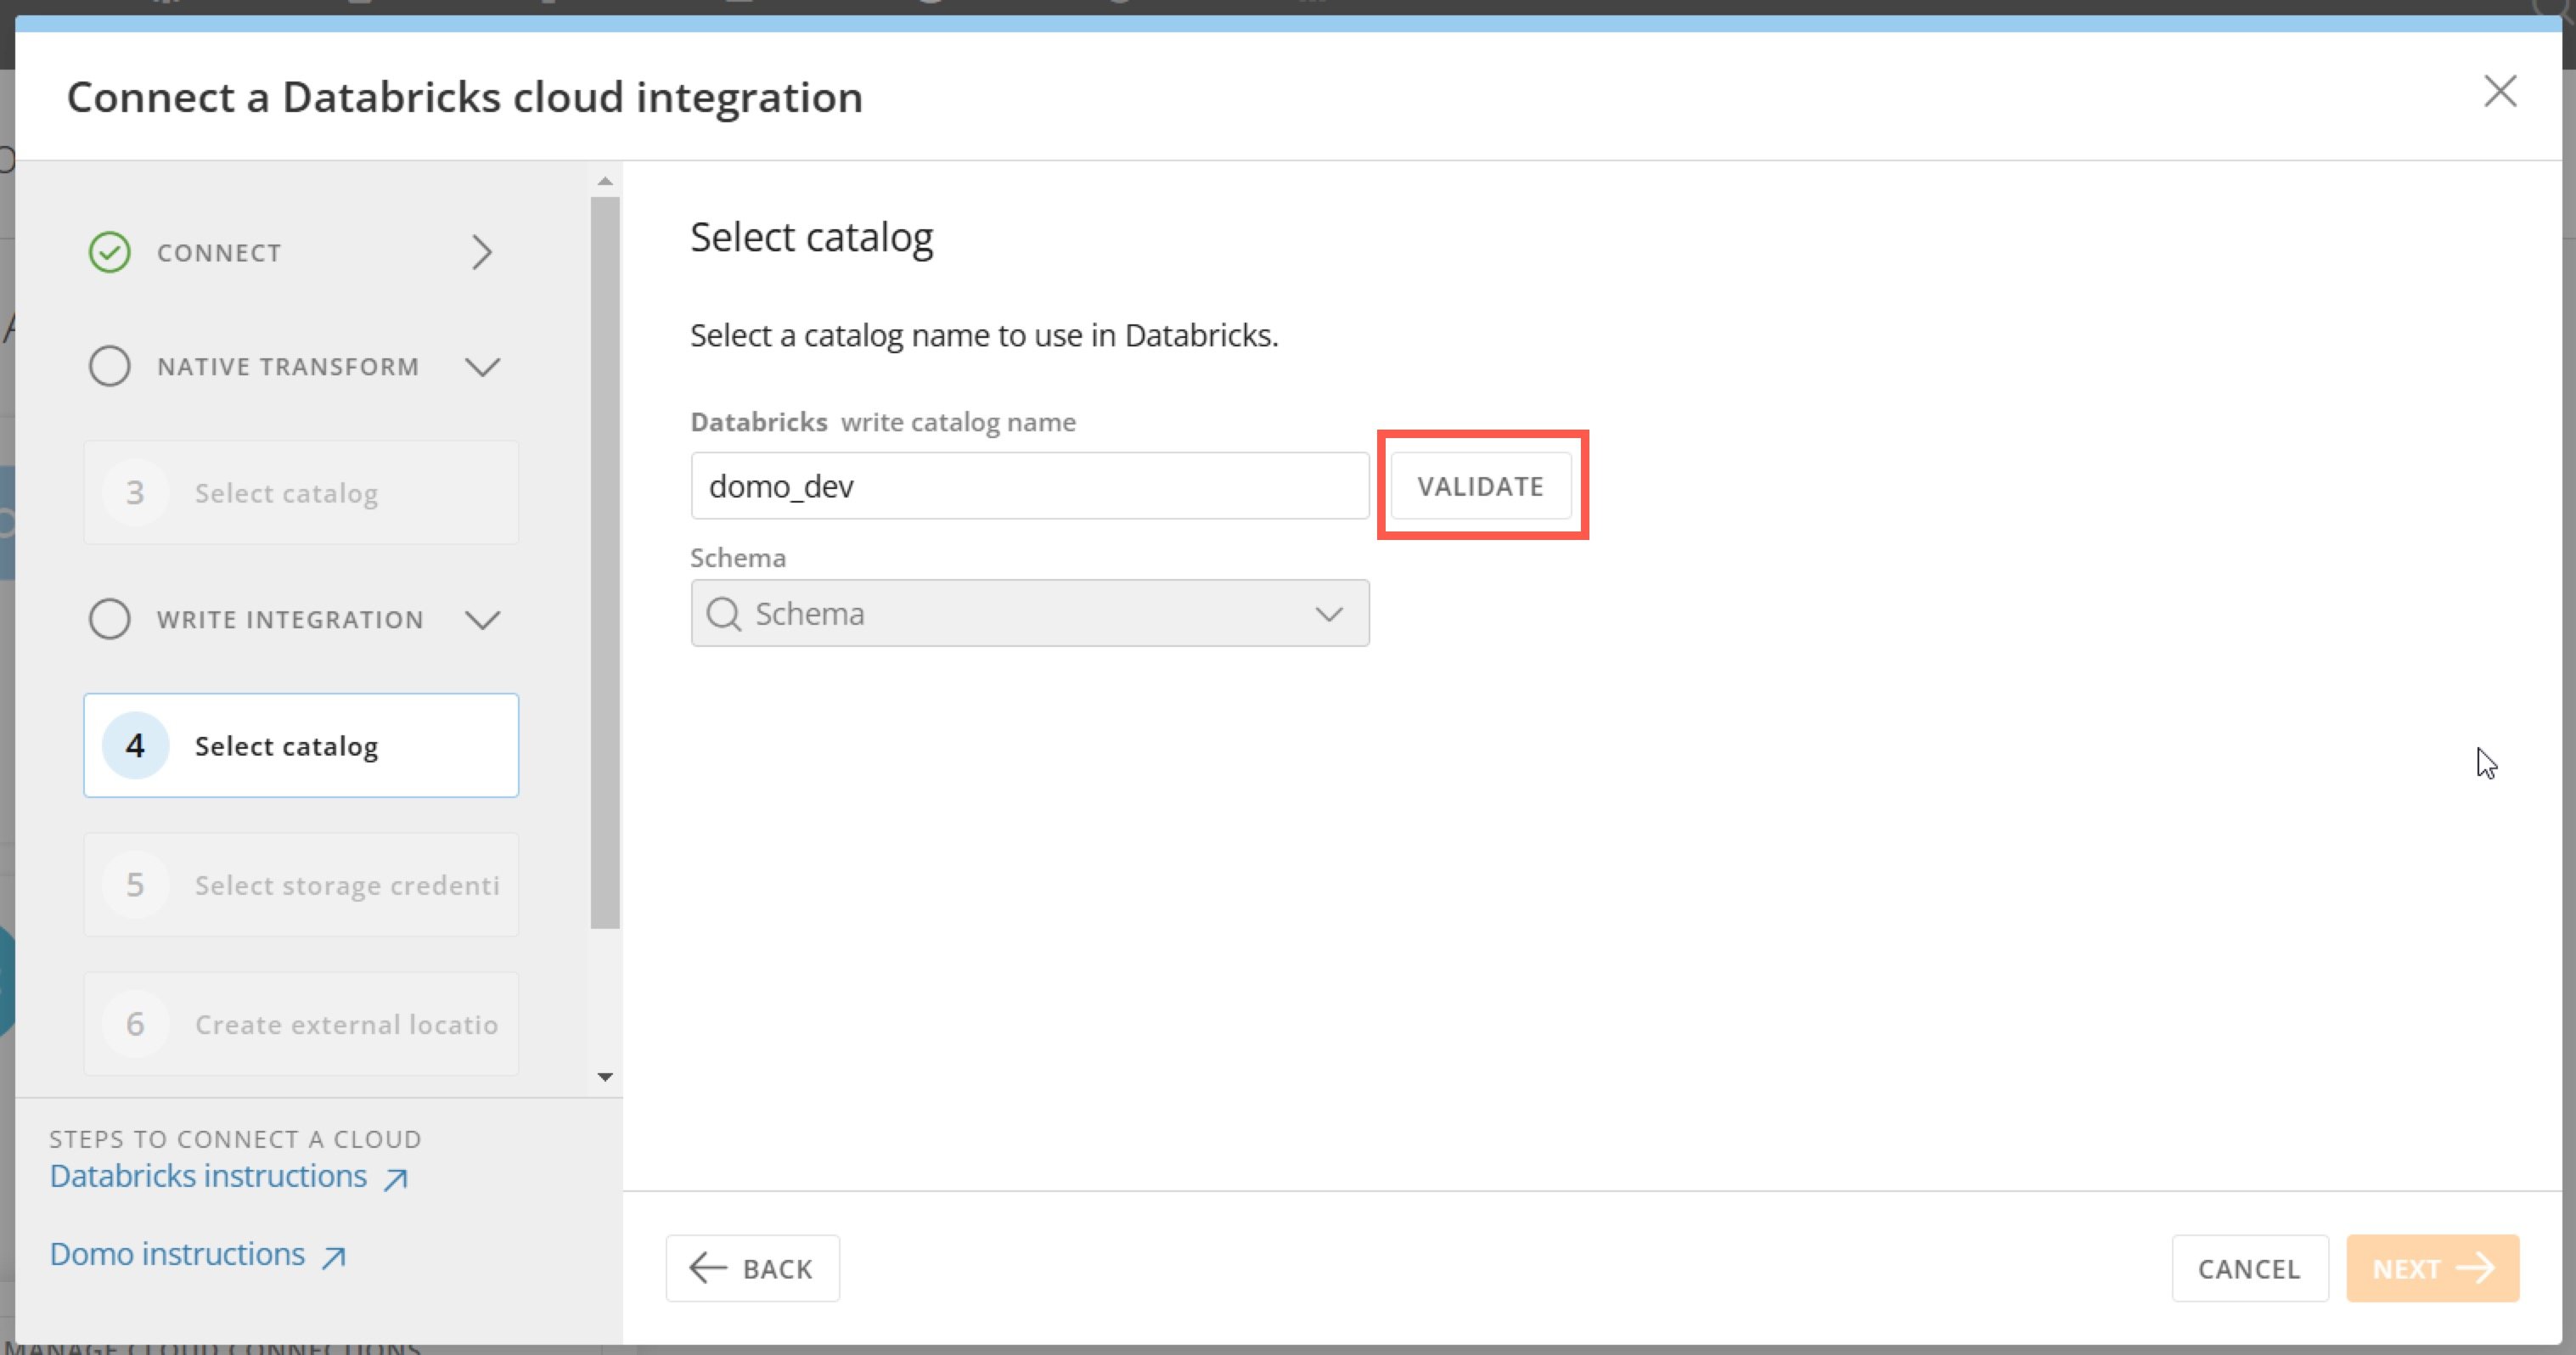
**Validate** to check the name of the catalog and load the list of schemas that belong to that catalog.
5. Select
**Validate** to check the name of the catalog and load the list of schemas that belong to that catalog.
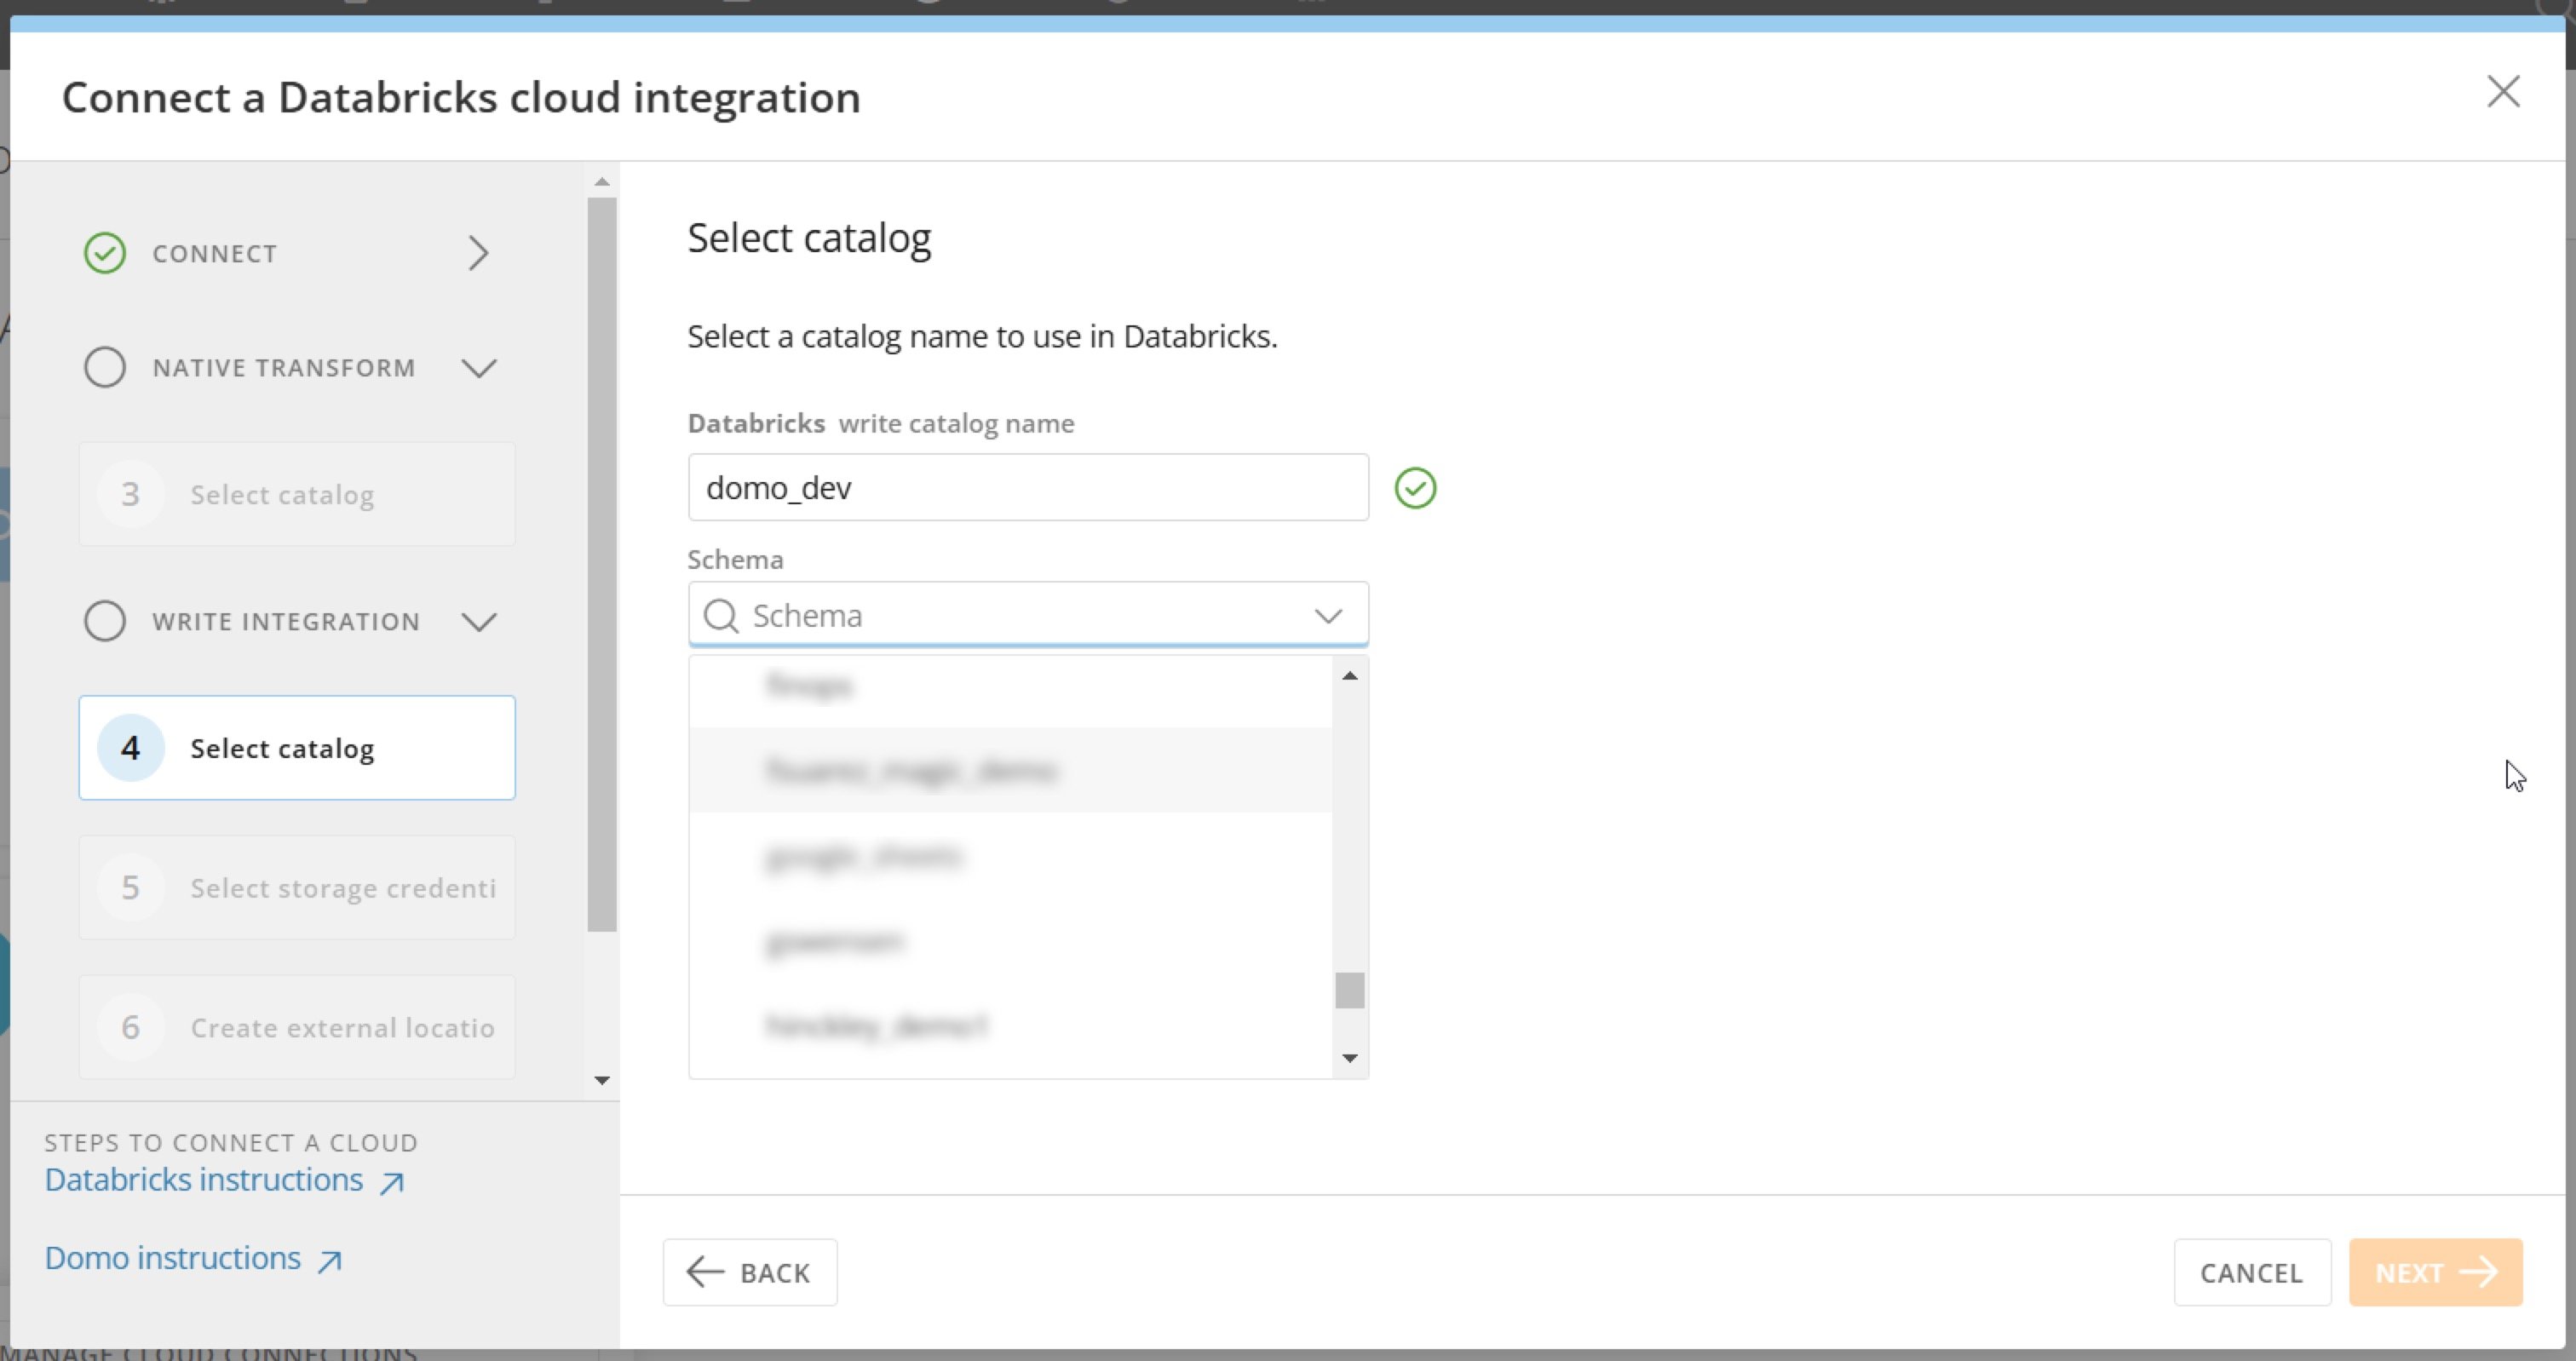
 6. After validating the catalog, choose the schema from the
**Schema** dropdown.
6. After validating the catalog, choose the schema from the
**Schema** dropdown.
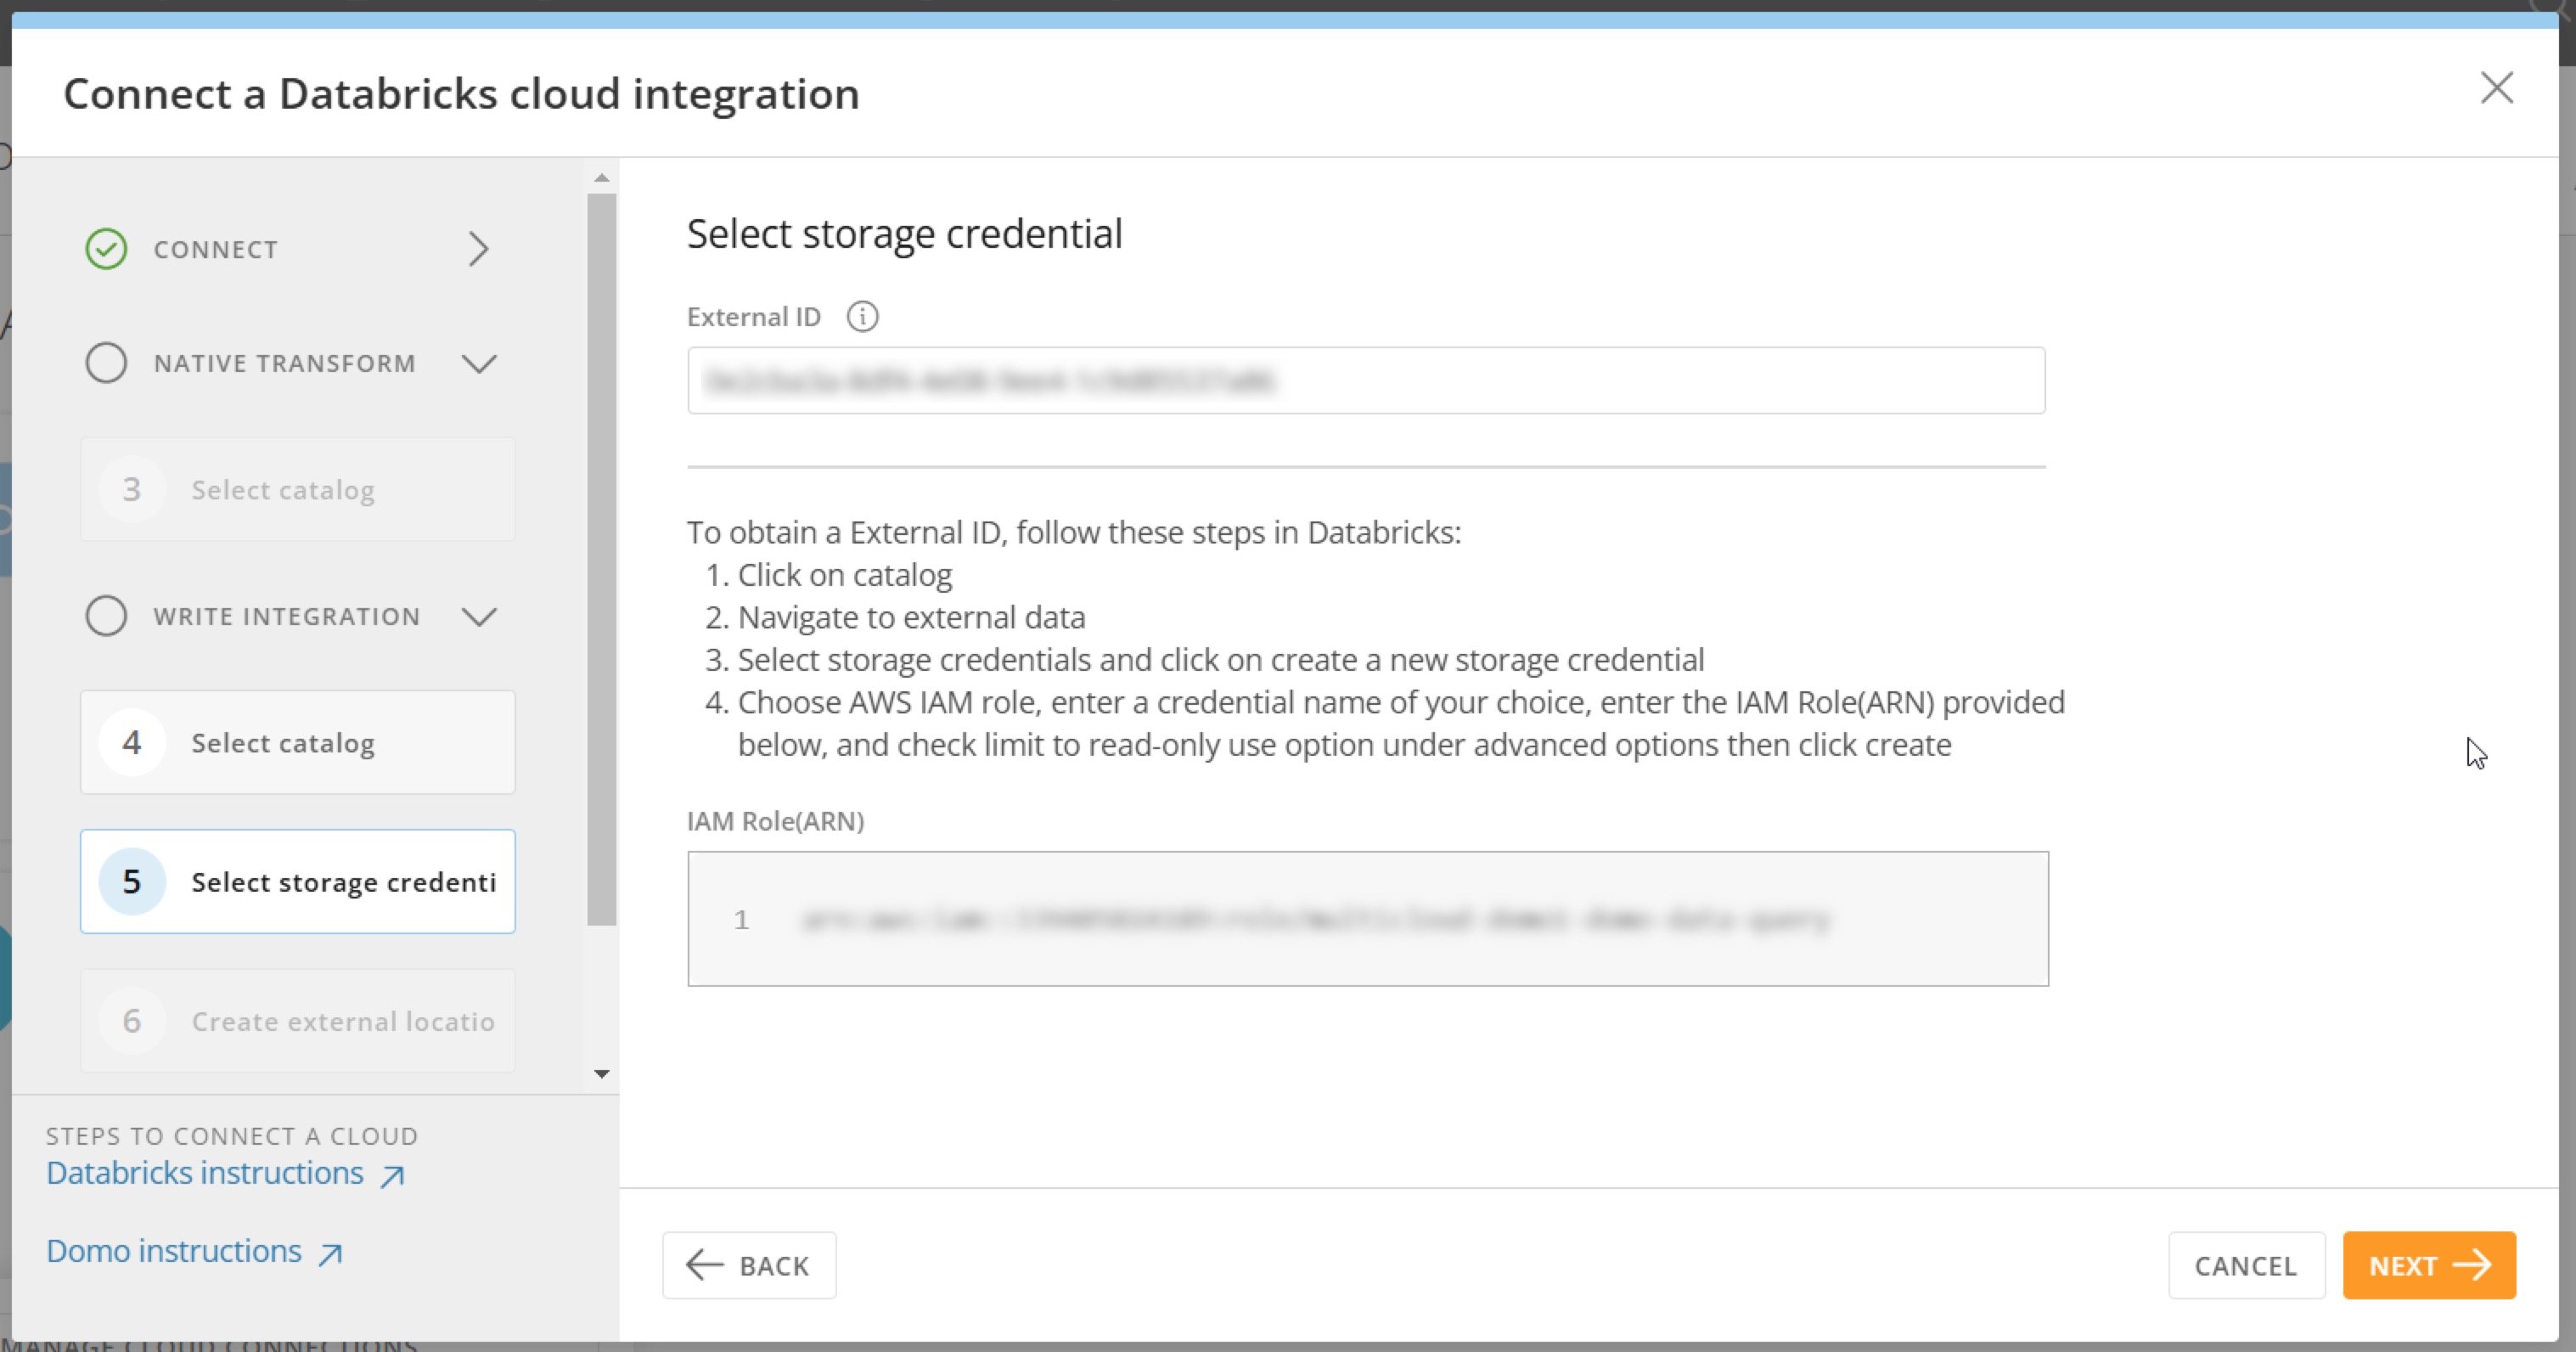
 7. Follow the on-screen instructions to create a storage credential and enter it in the
**STORAGE\_AWS\_EXTERNAL\_ID** field.
7. Follow the on-screen instructions to create a storage credential and enter it in the
**STORAGE\_AWS\_EXTERNAL\_ID** field.
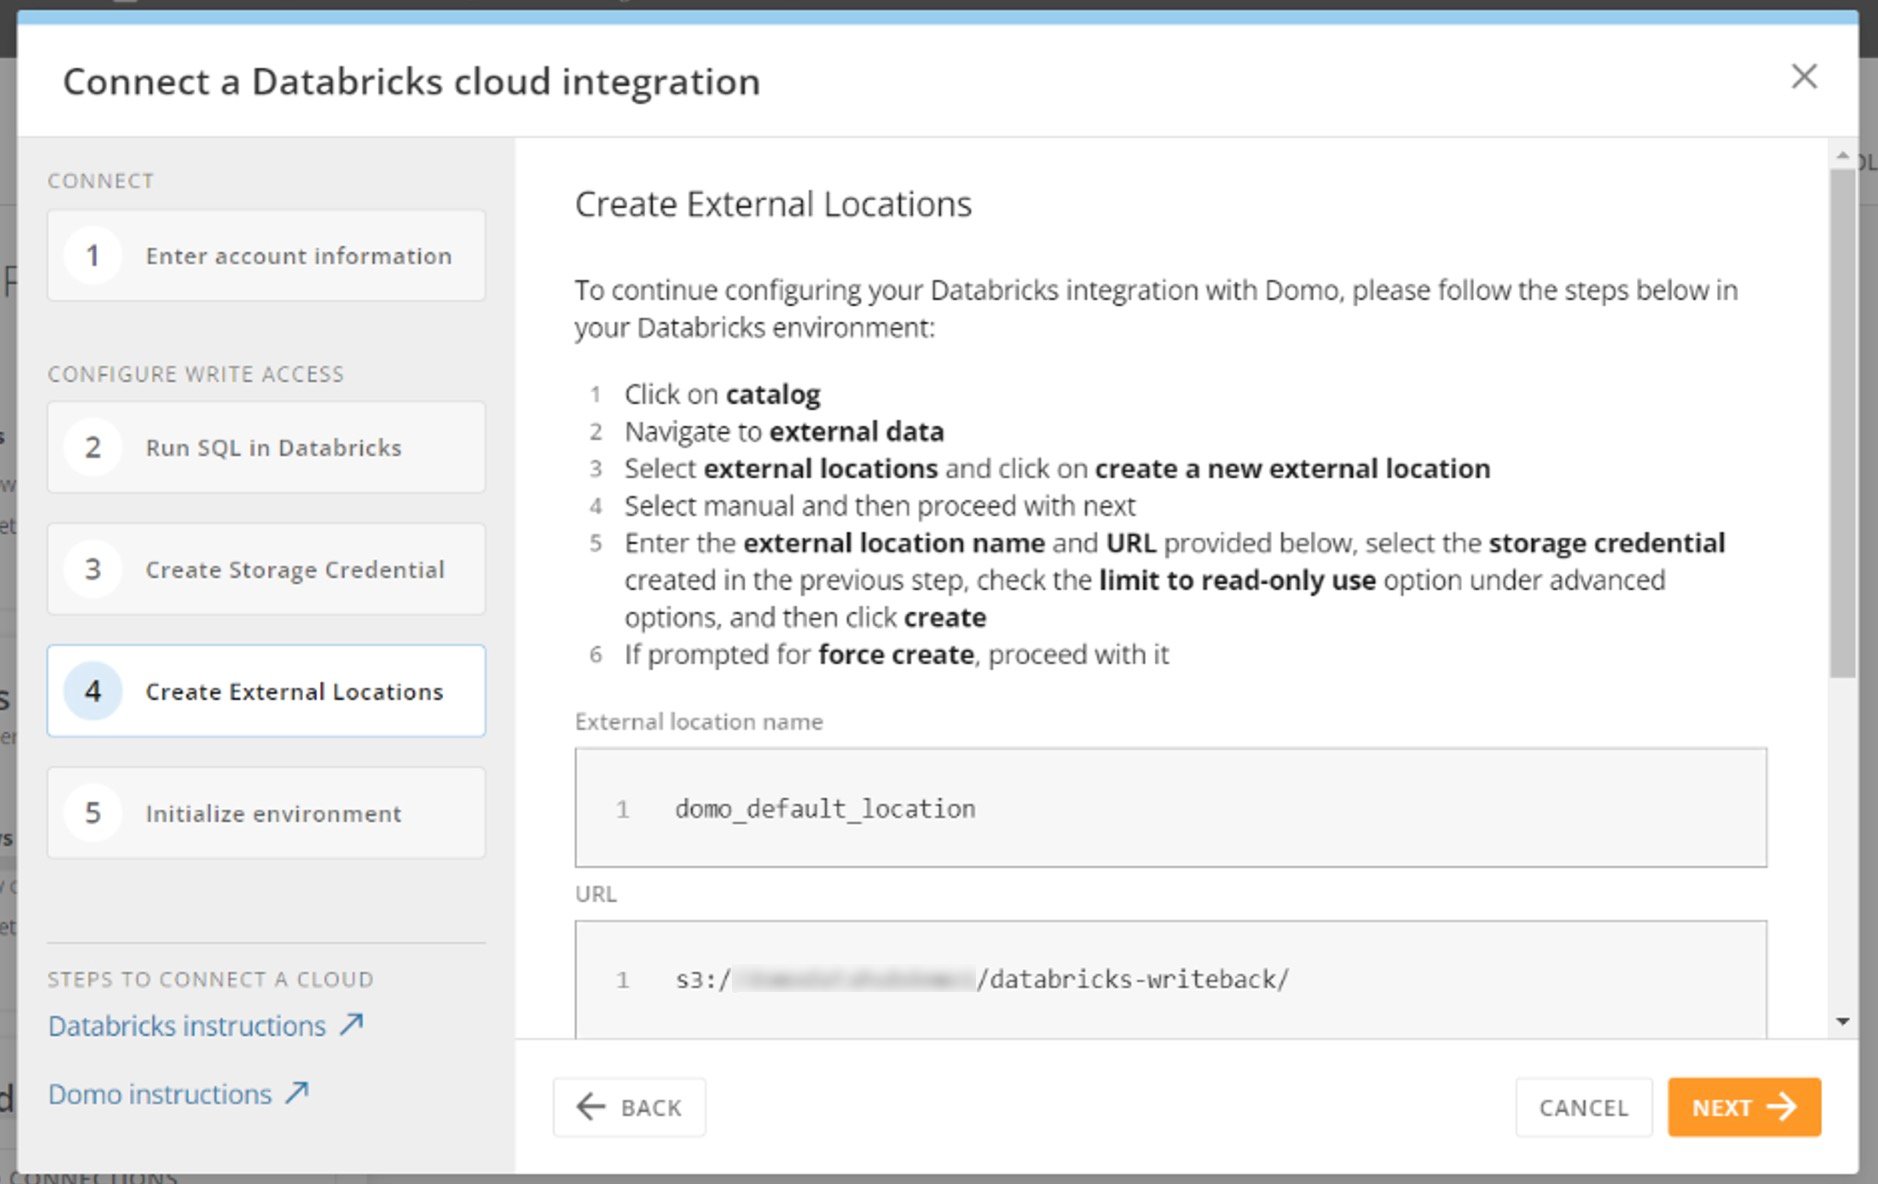
 8. Follow the on-screen instructions to create
**External Locations**.
8. Follow the on-screen instructions to create
**External Locations**.
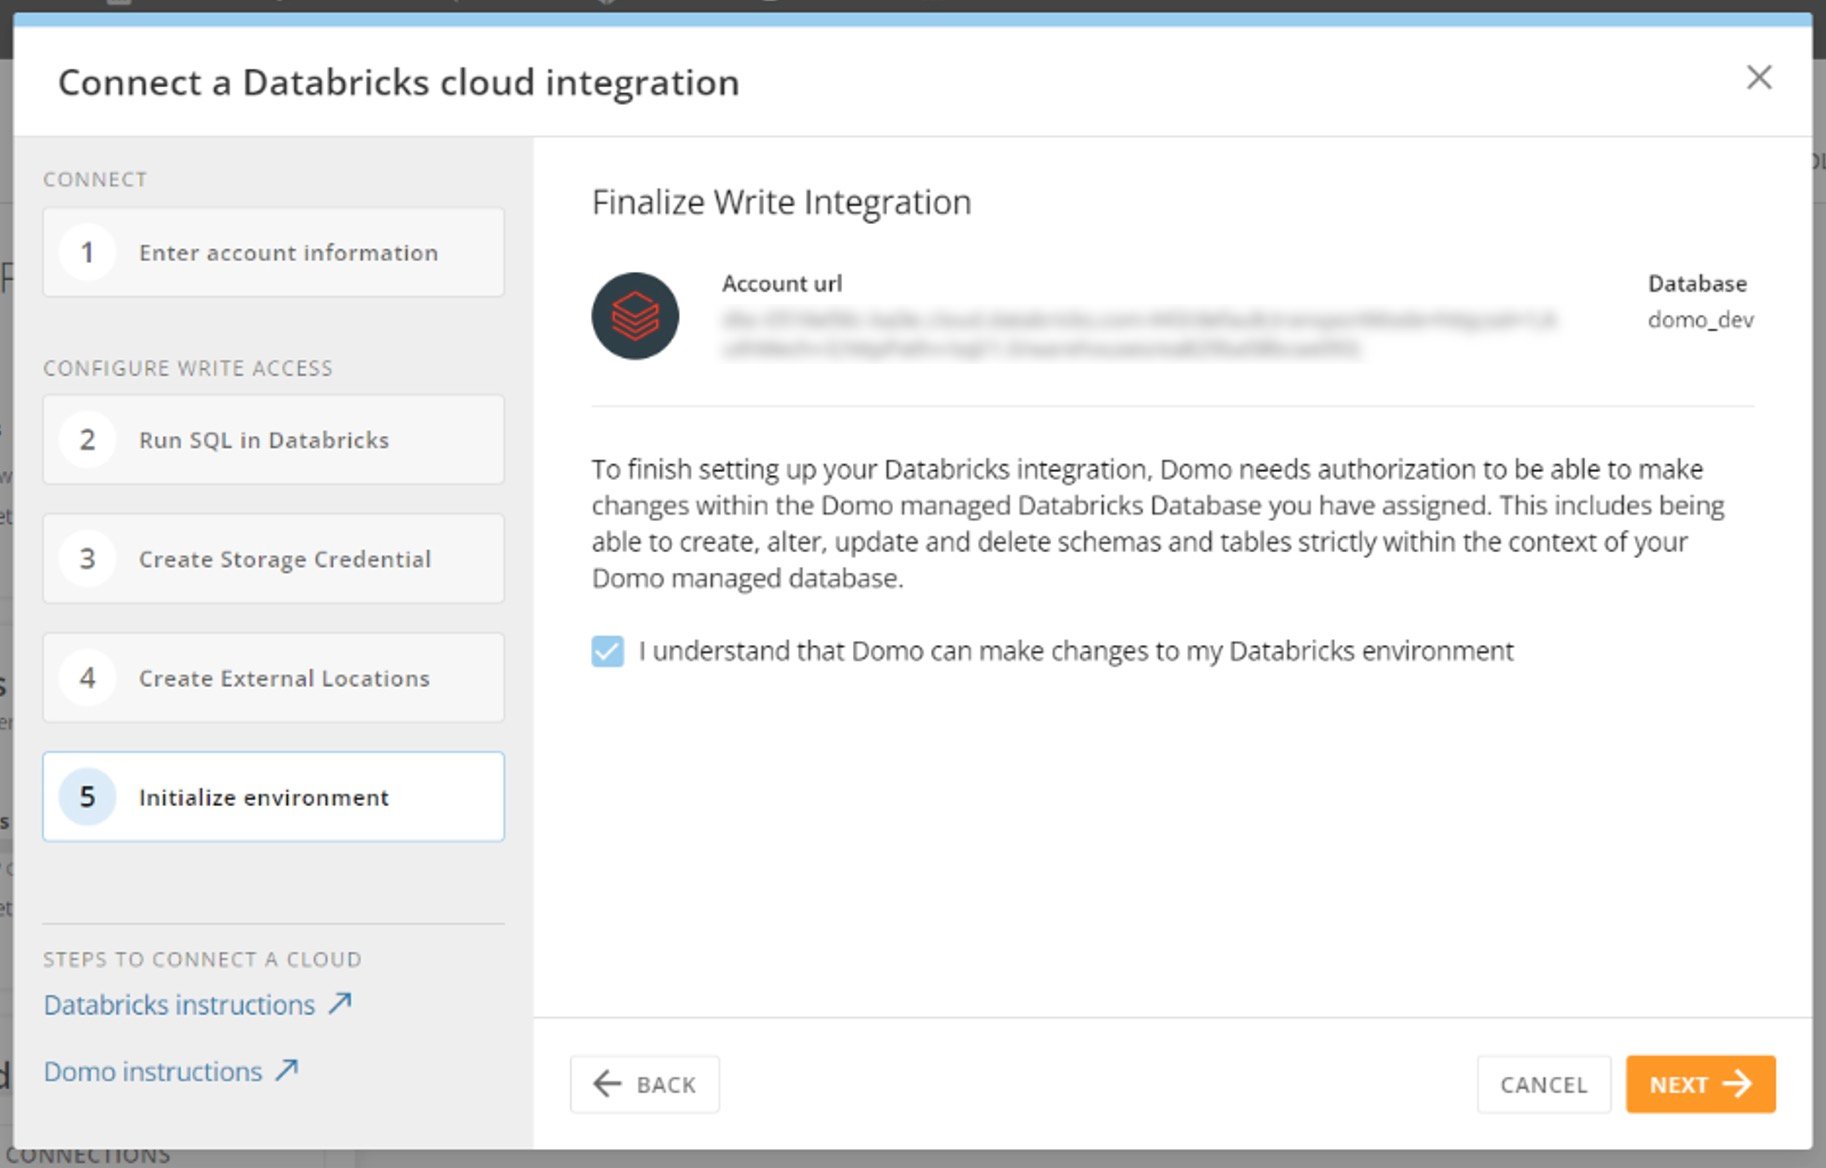
 9. On the
**Finalize Write Integration** screen, confirm that you understand that Domo will be able to make changes to your Databricks environment.
9. On the
**Finalize Write Integration** screen, confirm that you understand that Domo will be able to make changes to your Databricks environment.
 A success message displays.
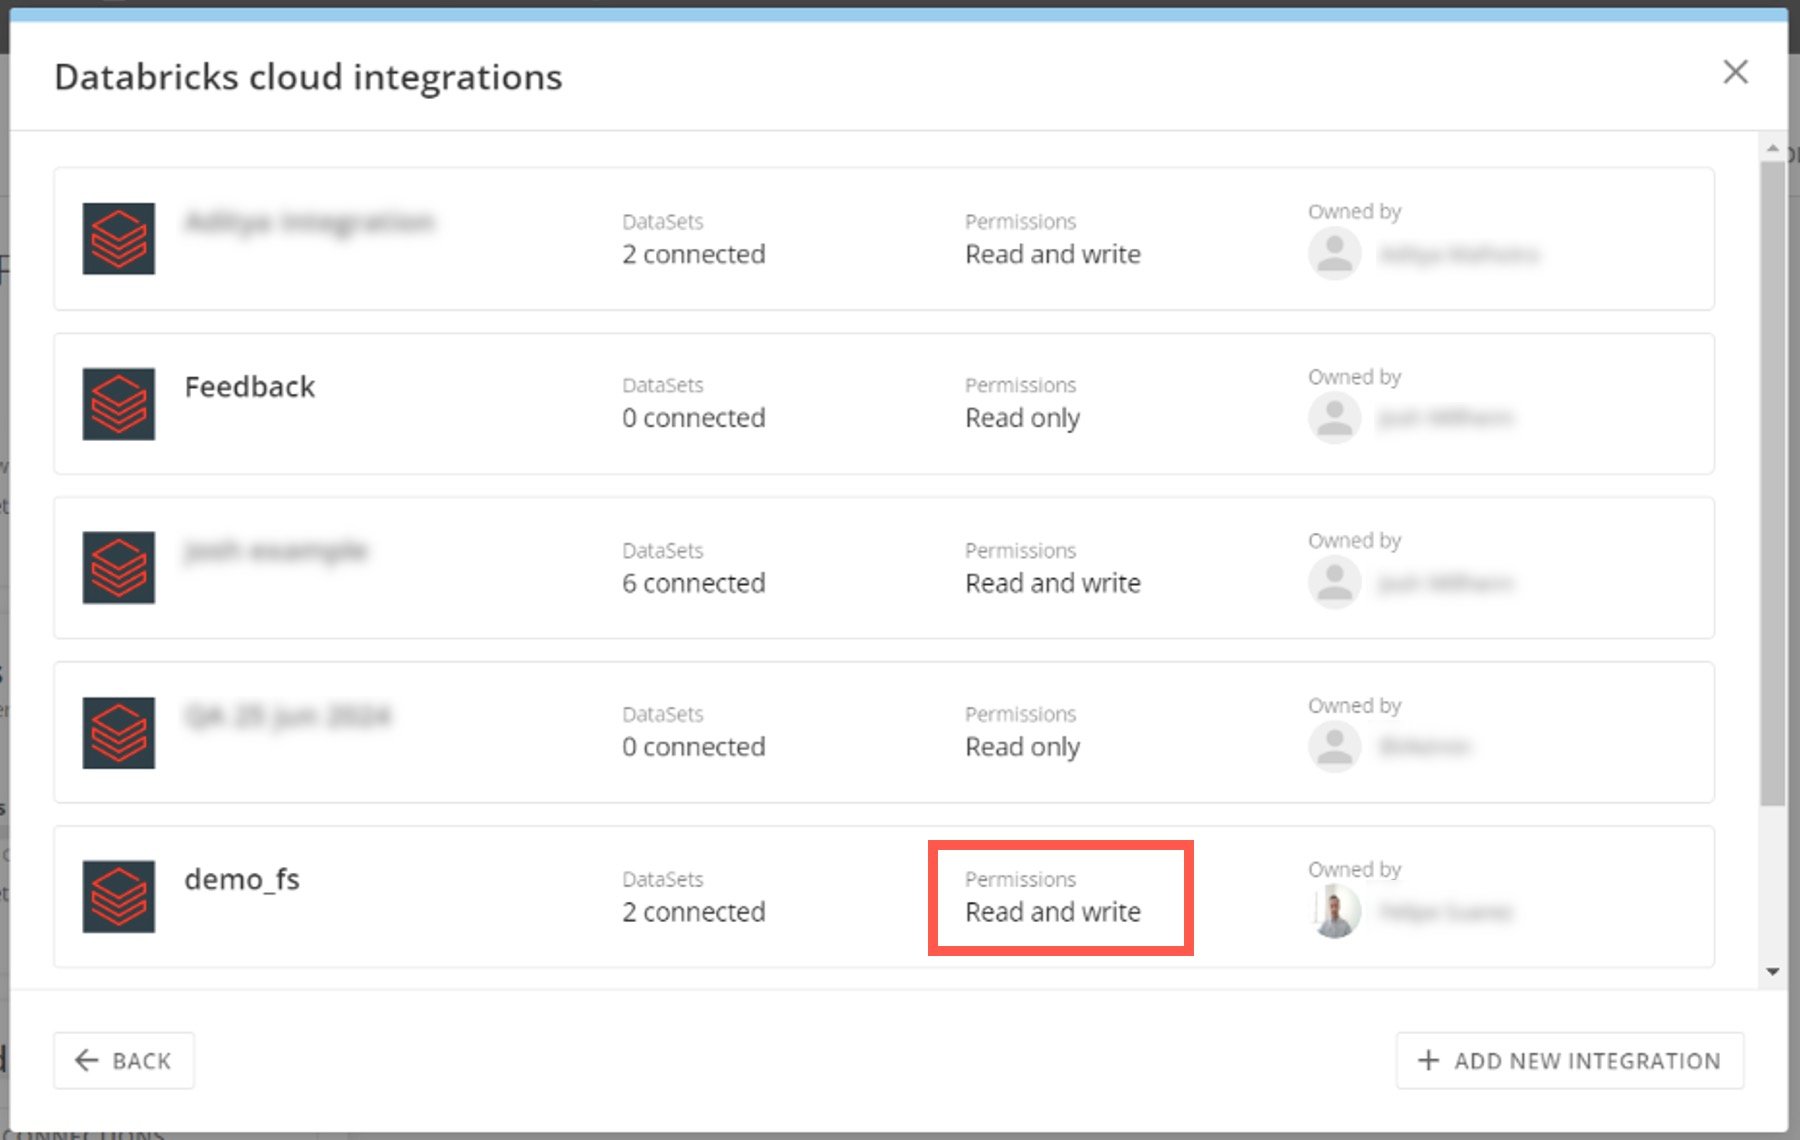
10. Choose
**Return To Account List** to see your integration configured with read and write access.
A success message displays.
10. Choose
**Return To Account List** to see your integration configured with read and write access.
 You can now use your write integration across Domo, including writing the output of a Magic ETL DataFlow back to Databricks.
### Databricks-sourced DataSets
When Databricks-sourced DataSets are used in a DataFlow, the data is queried live from Databricks when the flow initiates. In addition, Databricks-sourced DataSets are checked for updates every 15 minutes based on the table's LAST\_ALTERED DateTime. If a table has been updated since it was last checked, DataFlows that use that table as a trigger initiate.
You can now use your write integration across Domo, including writing the output of a Magic ETL DataFlow back to Databricks.
### Databricks-sourced DataSets
When Databricks-sourced DataSets are used in a DataFlow, the data is queried live from Databricks when the flow initiates. In addition, Databricks-sourced DataSets are checked for updates every 15 minutes based on the table's LAST\_ALTERED DateTime. If a table has been updated since it was last checked, DataFlows that use that table as a trigger initiate.