> ## Documentation Index
> Fetch the complete documentation index at: https://domoinc-openapi-sync-dataflows.mintlify.site/llms.txt
> Use this file to discover all available pages before exploring further.
# > Domo on Google BigQuery (RECOMMENDED)
export const InlineImage = ({src, alt = '', height = '1.6em'}) => {
return  ;
};
### Intro
With Cloud Amplifier, you can power your Domo instance using Google BigQuery. This guide is written for users who are familiar with BigQuery and describes how to register BigQuery with Cloud Amplifier, including setup for Read and Write capability and OAuth configuration.
After completing the setup process, you can begin using virtual tables that read from BigQuery to create cards, configure alerts, and serve as inputs in Magic ETL DataFlows.
**Note:** Magic ETL leverages the BigQuery-Cloud Amplifier integration so you can effortlessly transform your data inside BigQuery. Learn about [Magic ETL on BigQuery](/s/article/000005557).
***
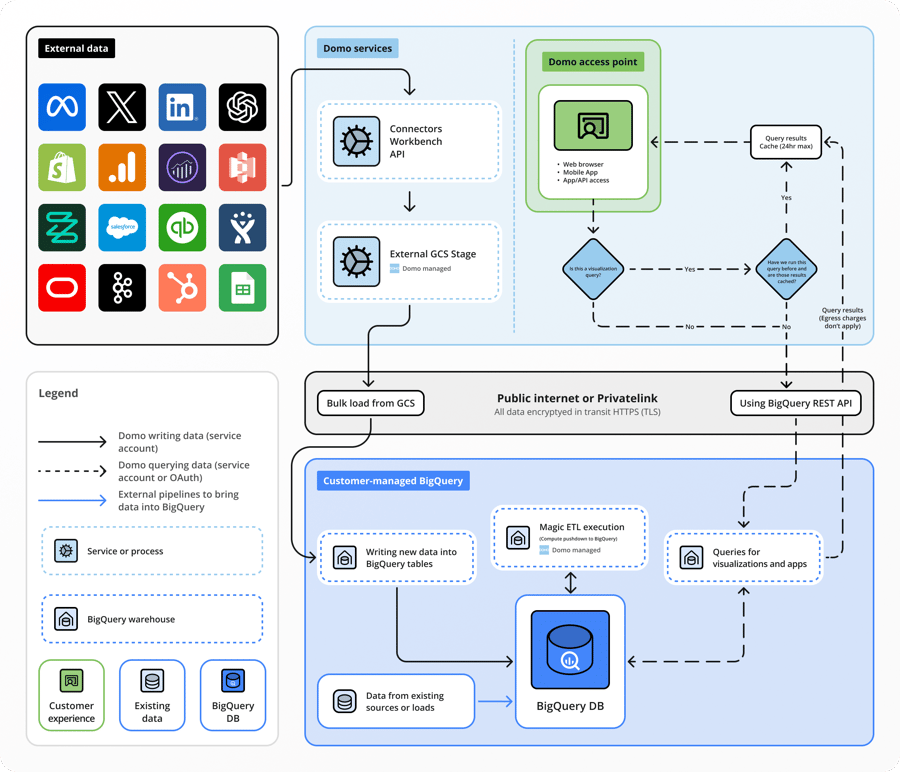
### Architectural Overview
;
};
### Intro
With Cloud Amplifier, you can power your Domo instance using Google BigQuery. This guide is written for users who are familiar with BigQuery and describes how to register BigQuery with Cloud Amplifier, including setup for Read and Write capability and OAuth configuration.
After completing the setup process, you can begin using virtual tables that read from BigQuery to create cards, configure alerts, and serve as inputs in Magic ETL DataFlows.
**Note:** Magic ETL leverages the BigQuery-Cloud Amplifier integration so you can effortlessly transform your data inside BigQuery. Learn about [Magic ETL on BigQuery](/s/article/000005557).
***
### Architectural Overview
 ### Prerequisites
Before configuring the Cloud Amplifier—BigQuery connection, we strongly recommend that you complete the following:
* **(Recommended) Create a BigQuery service account —**
We recommend creating a new BigQuery account specifically for this integration. You can use any account with Read access in BigQuery, but it is best practice to use a service account. This account must have read access to your default BigQuery environment in order to create virtual BigQuery tables in Domo. When you create this account, a BigQuery service account key file is generated that is required for [setup](#setup).
* **(Recommended) Create a Domo service account —**
We recommend creating a new Domo account specifically for this integration. The custom role for the account must have the Manage Cloud Accounts and Manage DataSet grants enabled.
For more information about roles and grants, see [Managing Custom Roles](/s/article/360043438973).
### Read Setup
Follow these steps to configure Read access to BigQuery tables from within Domo using Cloud Amplifier.
1. Log in to your Domo service account.
2. In the navigation header, select
**Data**.
The Data Center displays.
3. If you are not already there, go to the
**Data Warehouse** in the left side rail.
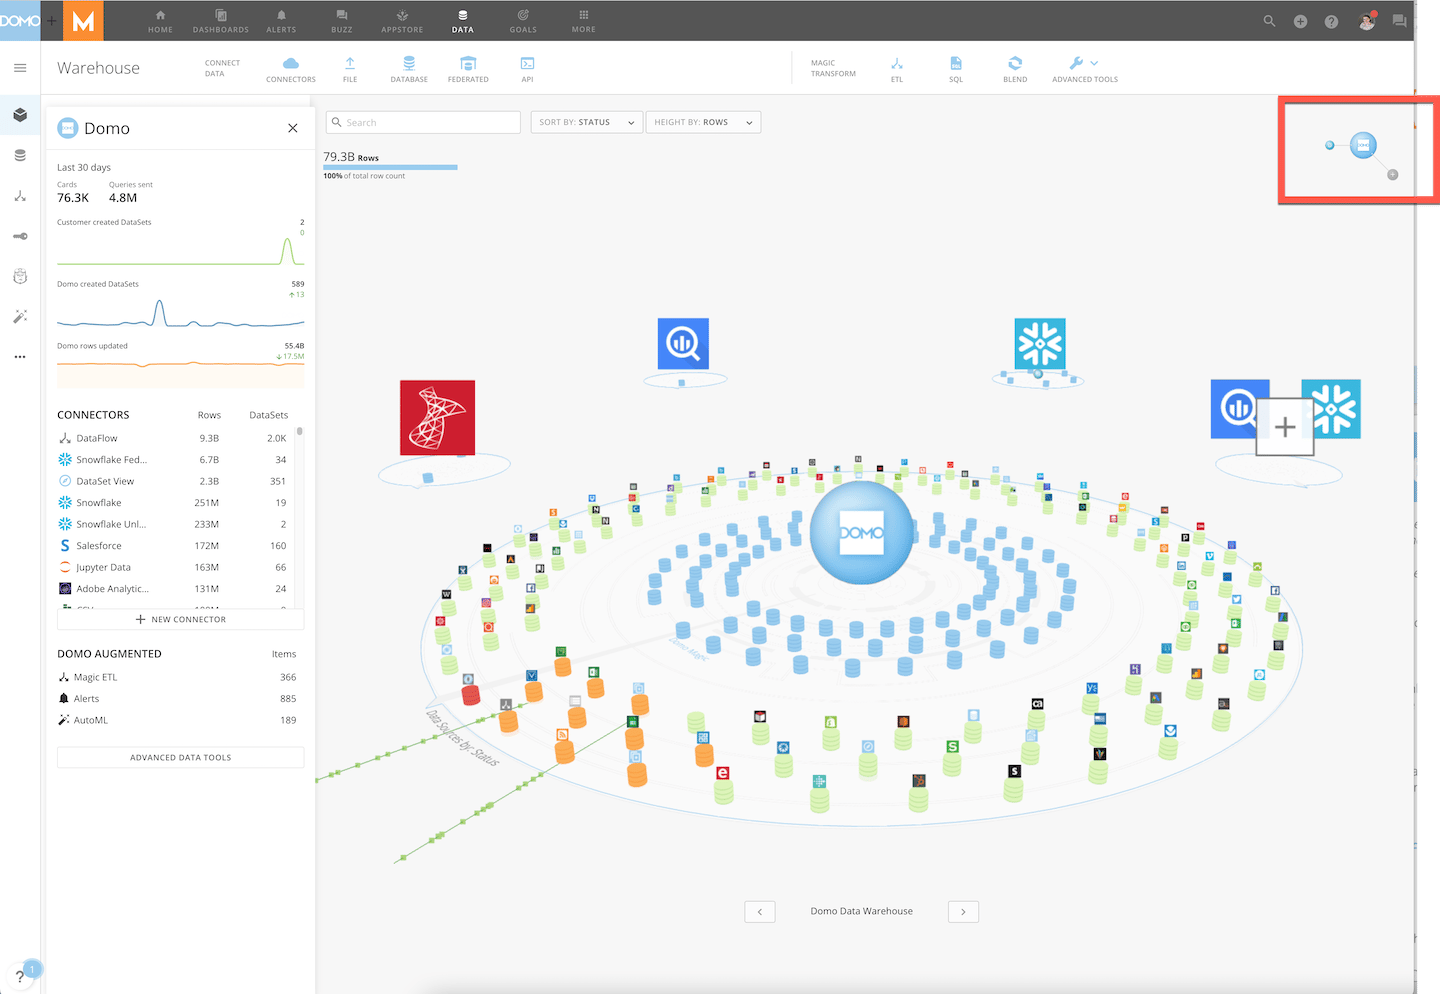
4. In the warehouse area of the screen, select the molecule shown below.
Selecting the molecule brings it into focus.
### Prerequisites
Before configuring the Cloud Amplifier—BigQuery connection, we strongly recommend that you complete the following:
* **(Recommended) Create a BigQuery service account —**
We recommend creating a new BigQuery account specifically for this integration. You can use any account with Read access in BigQuery, but it is best practice to use a service account. This account must have read access to your default BigQuery environment in order to create virtual BigQuery tables in Domo. When you create this account, a BigQuery service account key file is generated that is required for [setup](#setup).
* **(Recommended) Create a Domo service account —**
We recommend creating a new Domo account specifically for this integration. The custom role for the account must have the Manage Cloud Accounts and Manage DataSet grants enabled.
For more information about roles and grants, see [Managing Custom Roles](/s/article/360043438973).
### Read Setup
Follow these steps to configure Read access to BigQuery tables from within Domo using Cloud Amplifier.
1. Log in to your Domo service account.
2. In the navigation header, select
**Data**.
The Data Center displays.
3. If you are not already there, go to the
**Data Warehouse** in the left side rail.
4. In the warehouse area of the screen, select the molecule shown below.
Selecting the molecule brings it into focus.
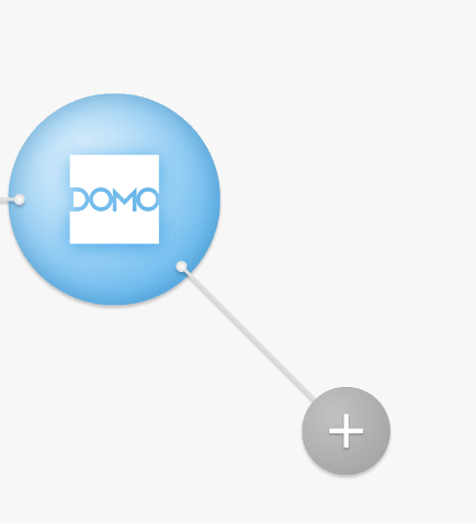 5. Select
**** **Add New Cloud**.
The Add New Integration modal displays.
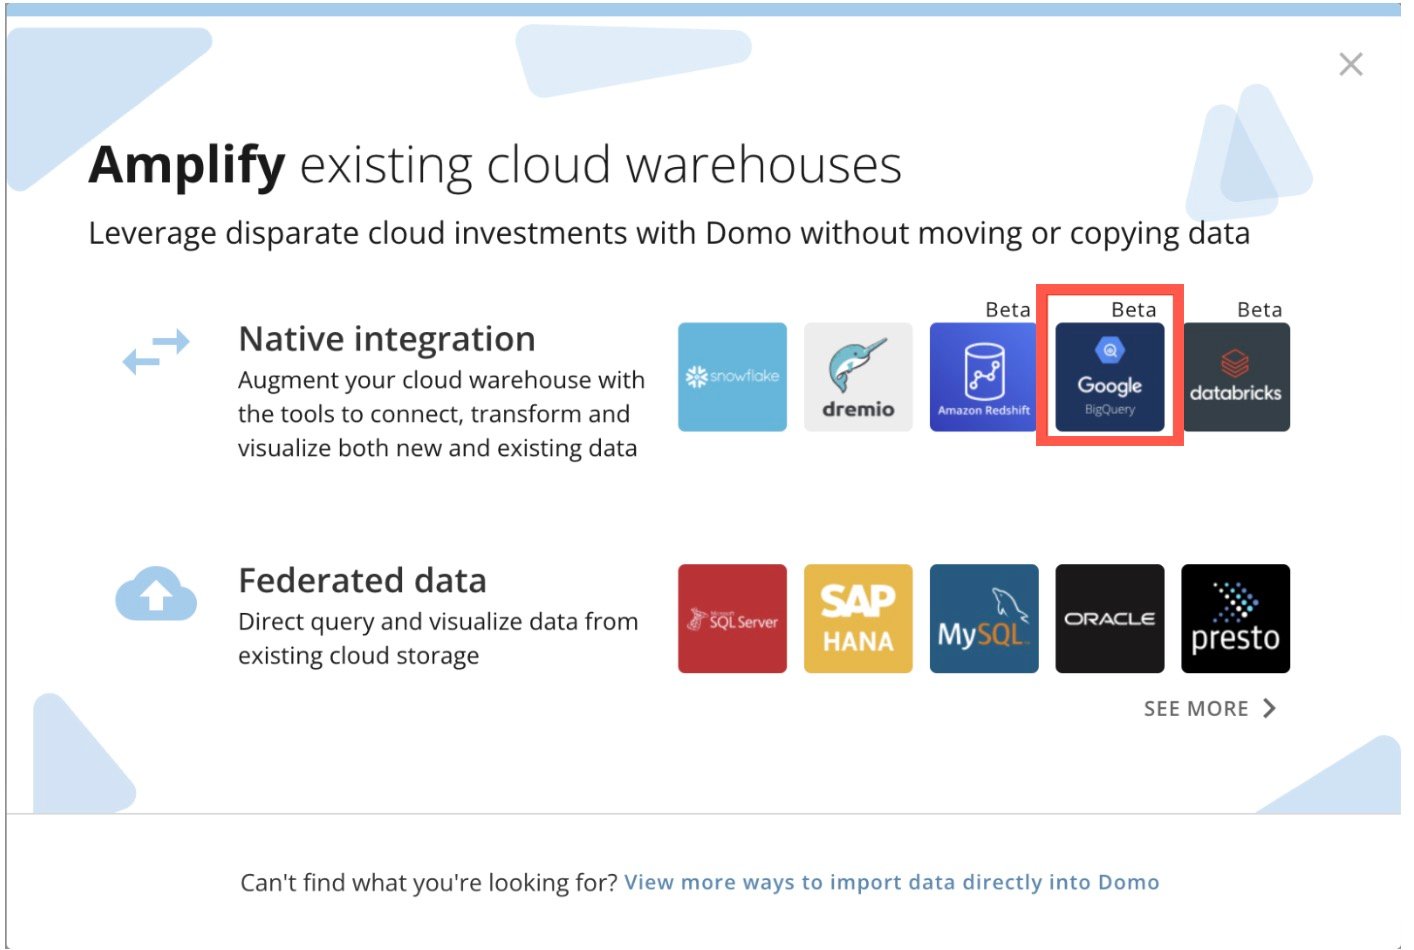
6. In the modal under
**Native integration**, select **BigQuery**.
5. Select
**** **Add New Cloud**.
The Add New Integration modal displays.
6. In the modal under
**Native integration**, select **BigQuery**.
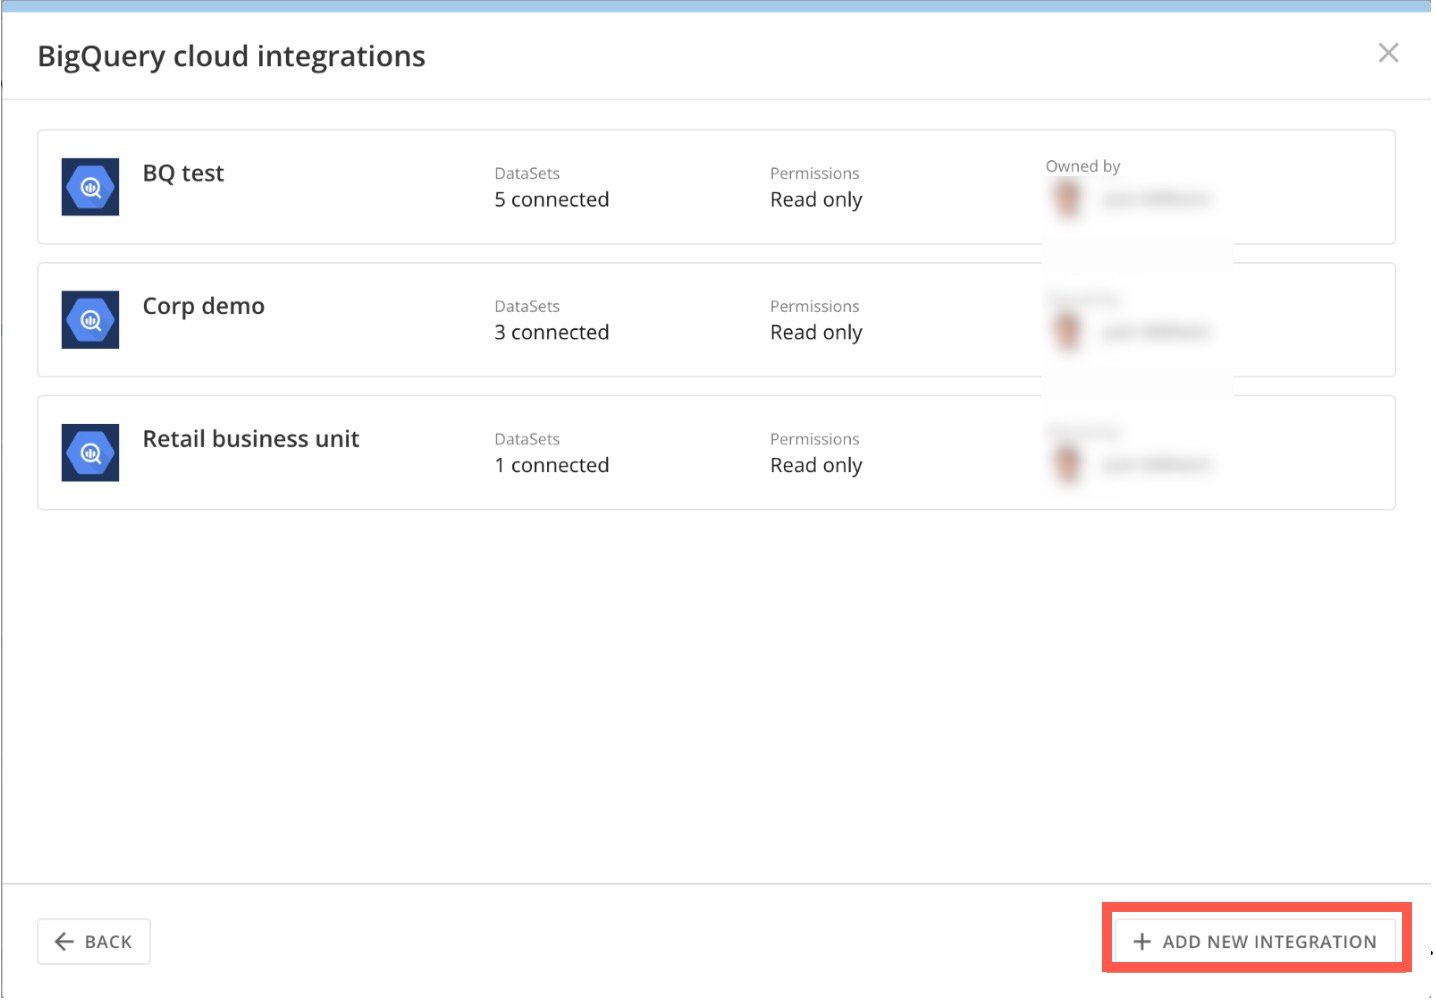
 The **BigQuery cloud integrations** page displays.
7. Select
**+ Add New Integration**.
The **BigQuery cloud integrations** page displays.
7. Select
**+ Add New Integration**.
 8. Enter a name and optional description in the
**Integration name** and **Integration description** fields.
9. Upload the BigQuery service account key file here. This file is generated in Google Console for the service account that you created for the BigQuery integration.
8. Enter a name and optional description in the
**Integration name** and **Integration description** fields.
9. Upload the BigQuery service account key file here. This file is generated in Google Console for the service account that you created for the BigQuery integration.
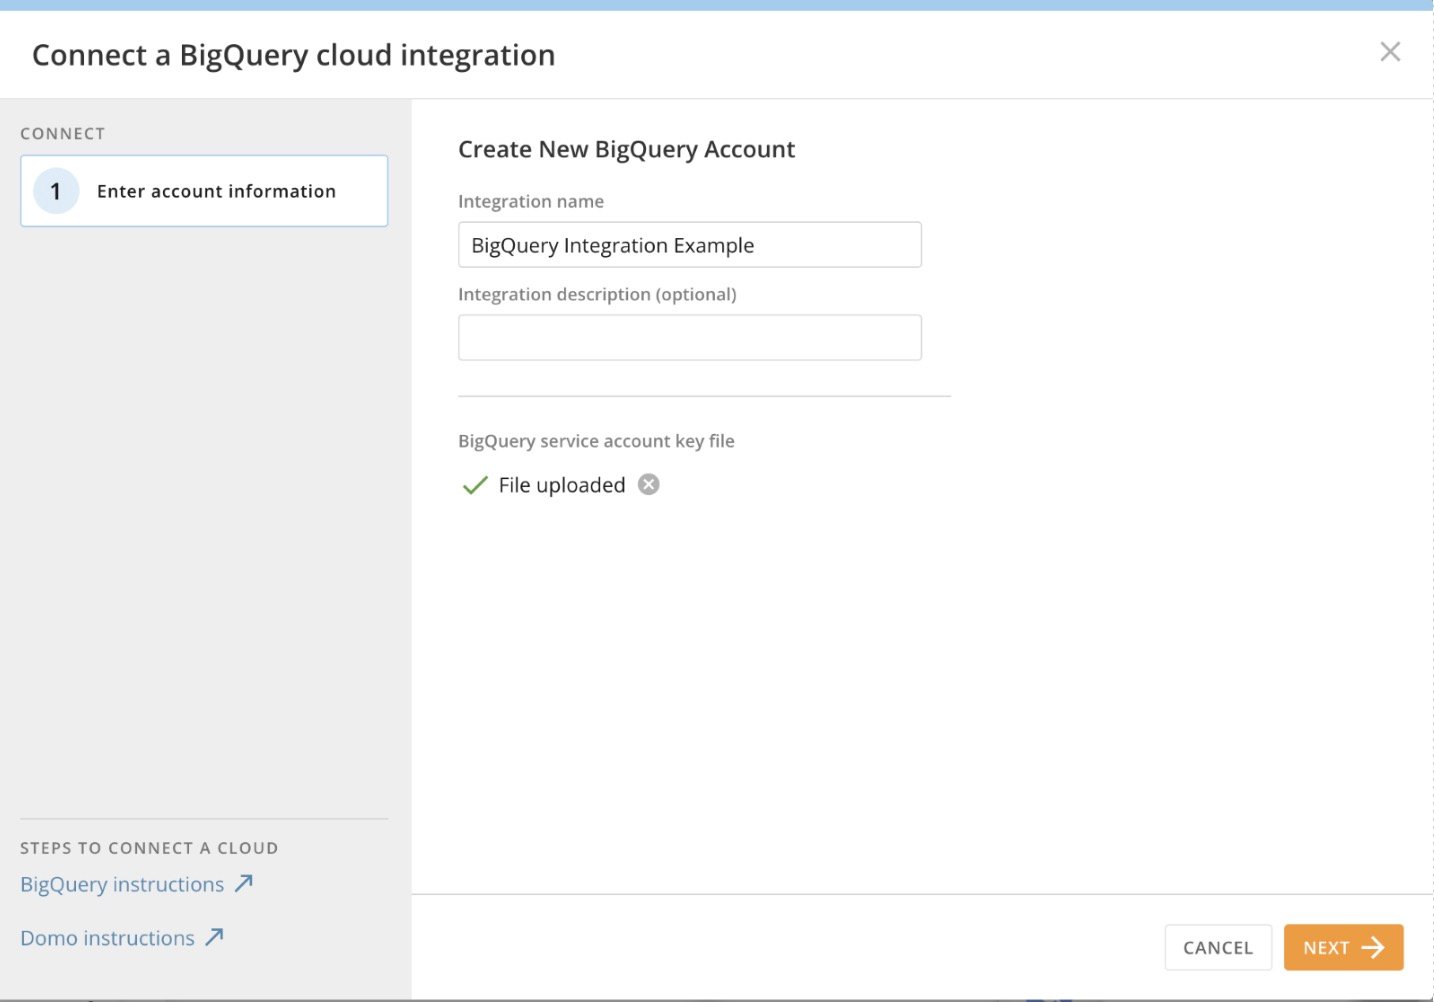 10. Select
**Next**.
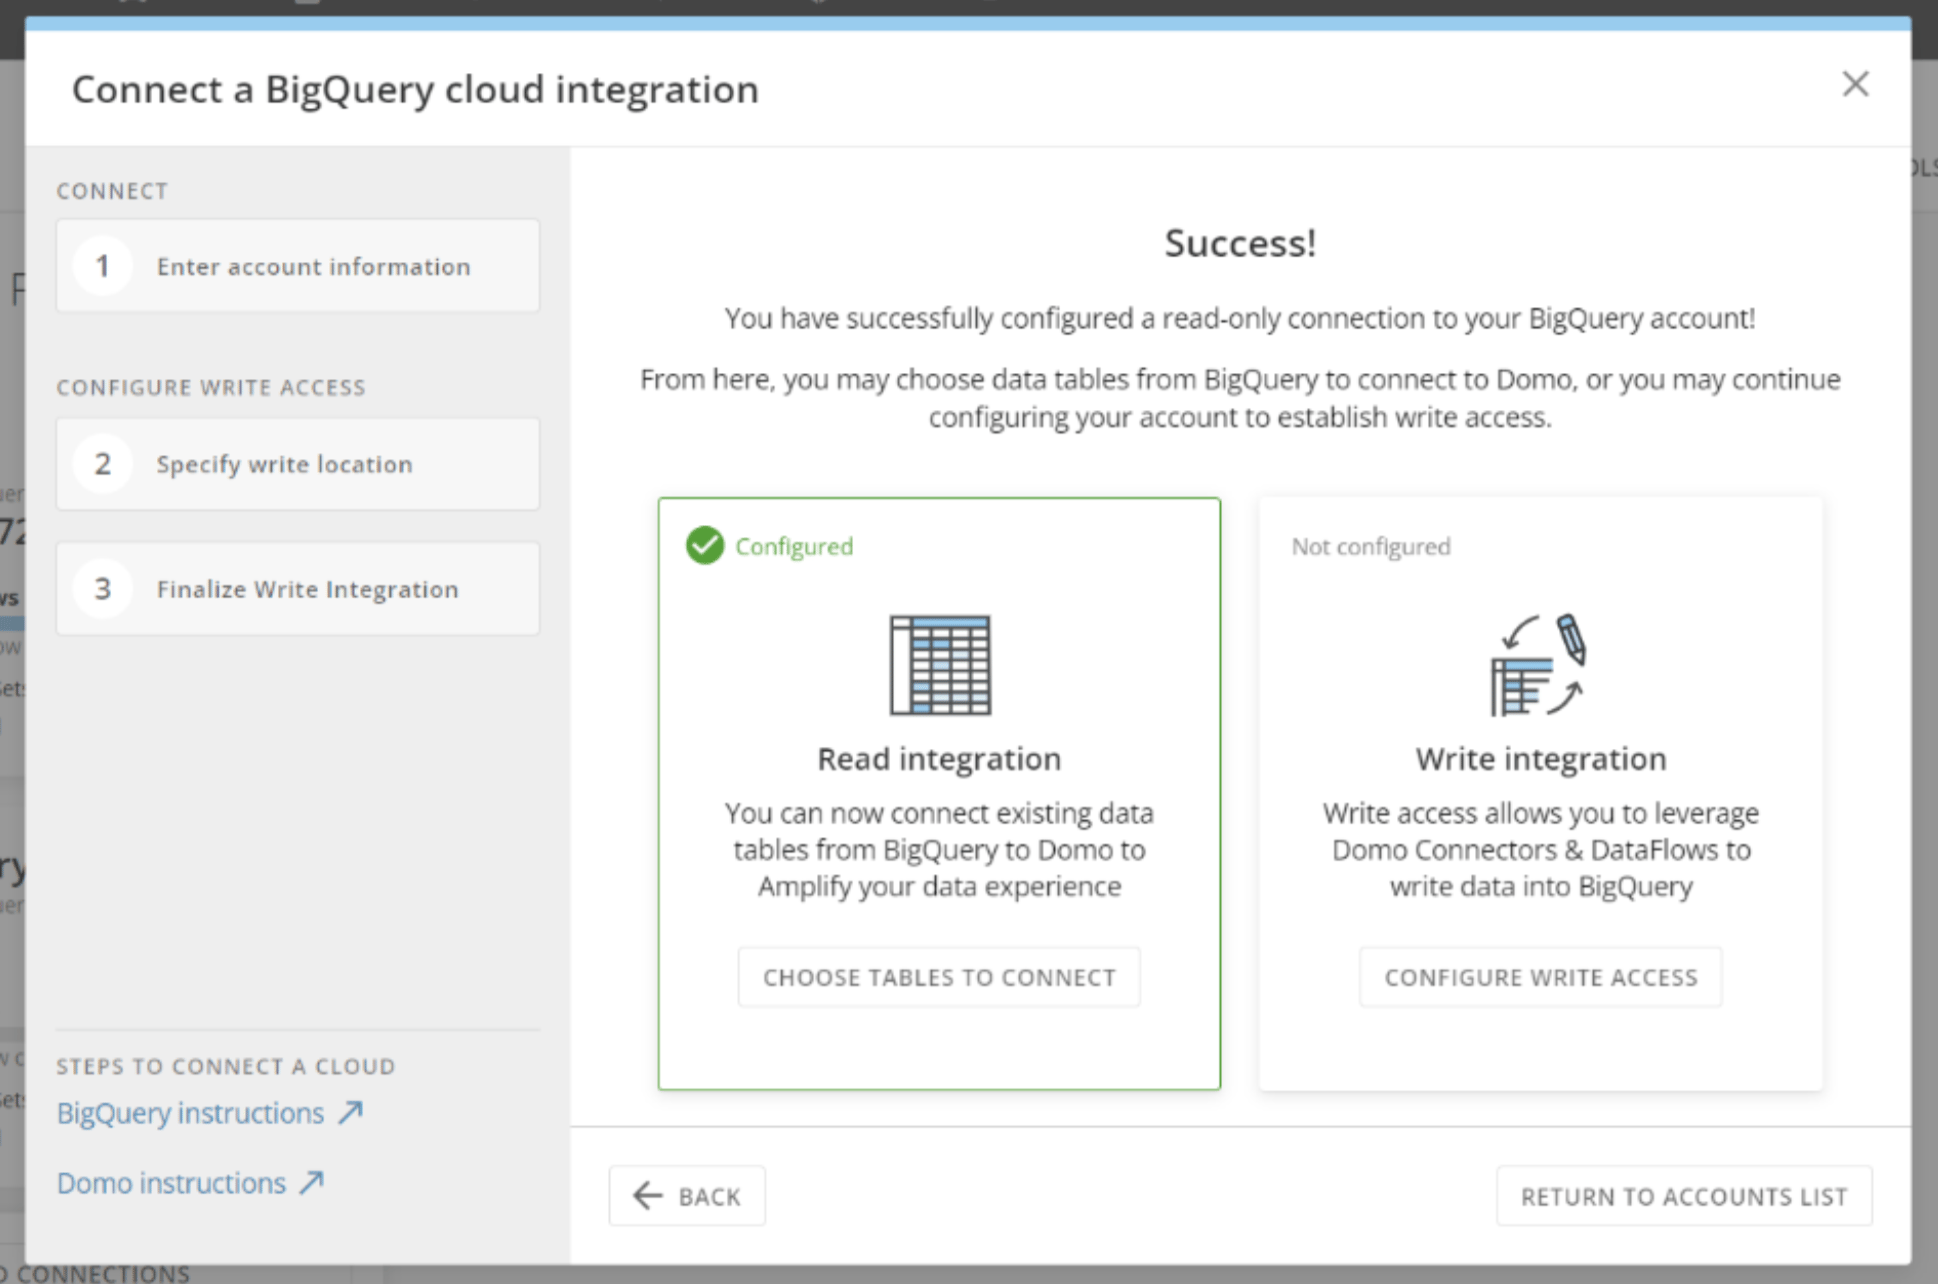
You have successfully configured your Read-only integration from BigQuery to Cloud Amplifier.
### Write Setup
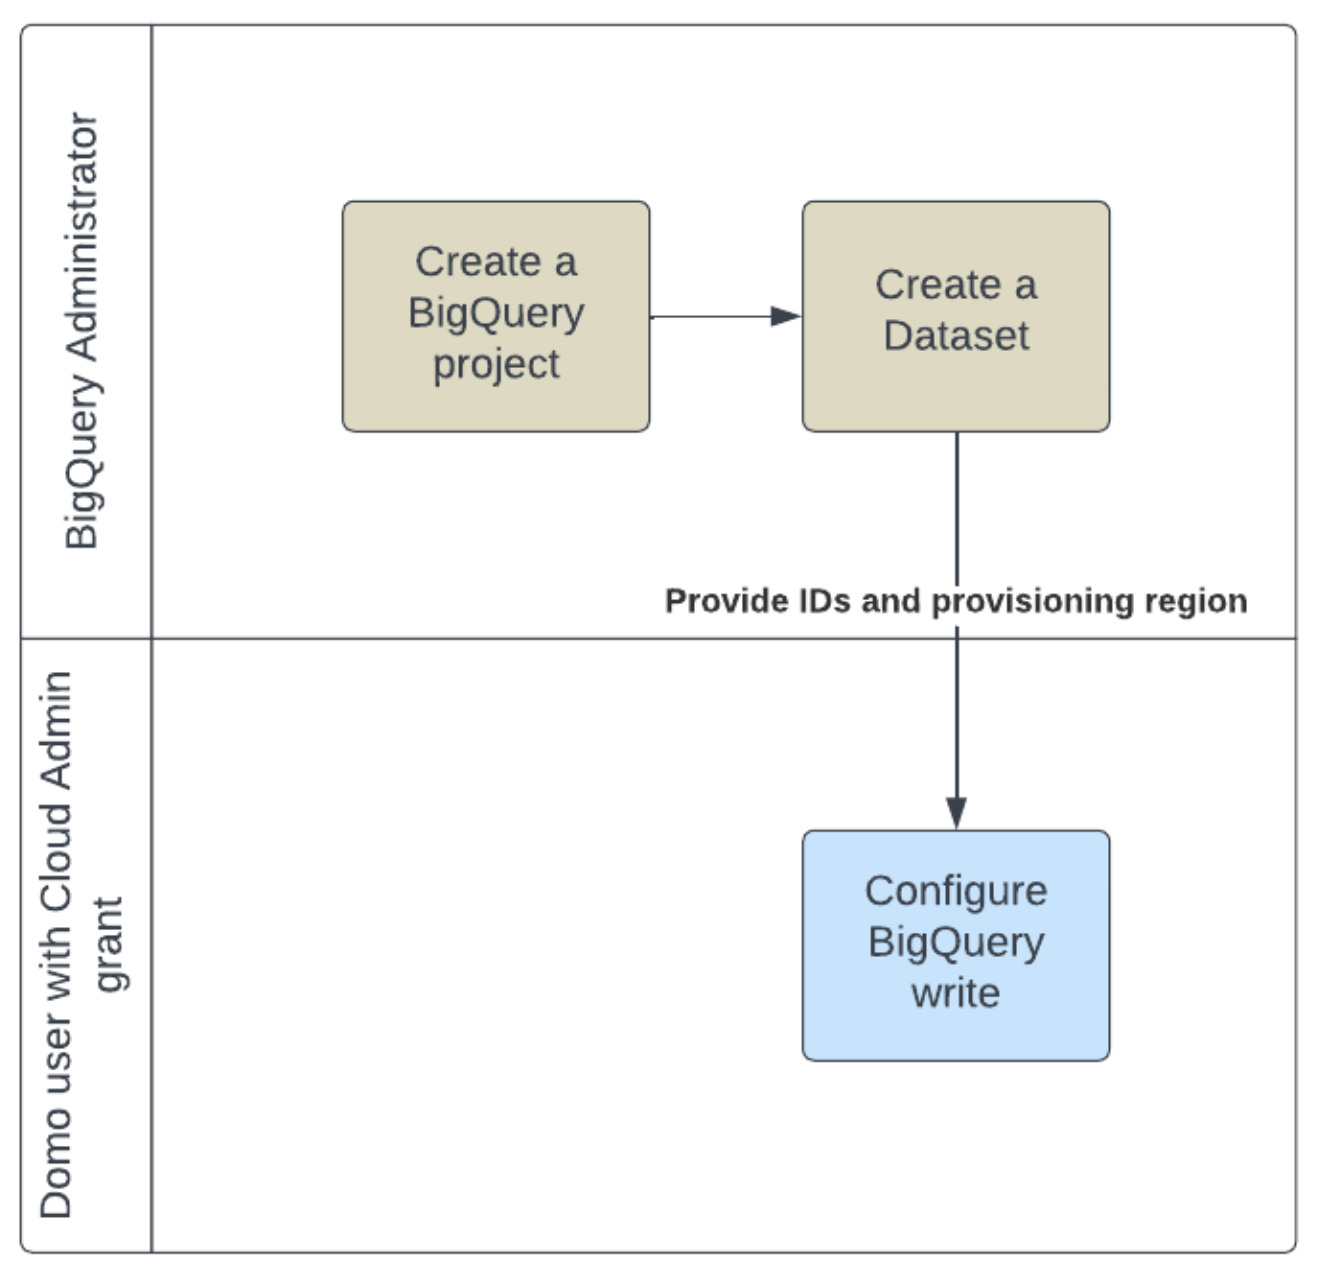
Setting up BigQuery Write requires an existing BigQuery dataset that can be connected to Domo. This graphic displays a general view of the process—a BigQuery admin creates a BigQuery project and dataset and provides the necessary IDs and provisioning region to a Domo user with the [Manage Cloud Accounts](https://domo-support.domo.com/s/article/4412849158167?language=en_US#required_grants) grant. The Domo user then uses the provided information to configure BigQuery Write. The tasks below provide instructions for preparing a dataset in BigQuery and setting up BigQuery Write with Cloud Amplifier.
10. Select
**Next**.
You have successfully configured your Read-only integration from BigQuery to Cloud Amplifier.
### Write Setup
Setting up BigQuery Write requires an existing BigQuery dataset that can be connected to Domo. This graphic displays a general view of the process—a BigQuery admin creates a BigQuery project and dataset and provides the necessary IDs and provisioning region to a Domo user with the [Manage Cloud Accounts](https://domo-support.domo.com/s/article/4412849158167?language=en_US#required_grants) grant. The Domo user then uses the provided information to configure BigQuery Write. The tasks below provide instructions for preparing a dataset in BigQuery and setting up BigQuery Write with Cloud Amplifier.
 # Prepare a Dataset in Google BigQuery
1. In Google BigQuery, select an existing studio project or create a new one. See the
[BigQuery documentation](https://cloud.google.com/bigquery/docs) to learn how to access or create projects.
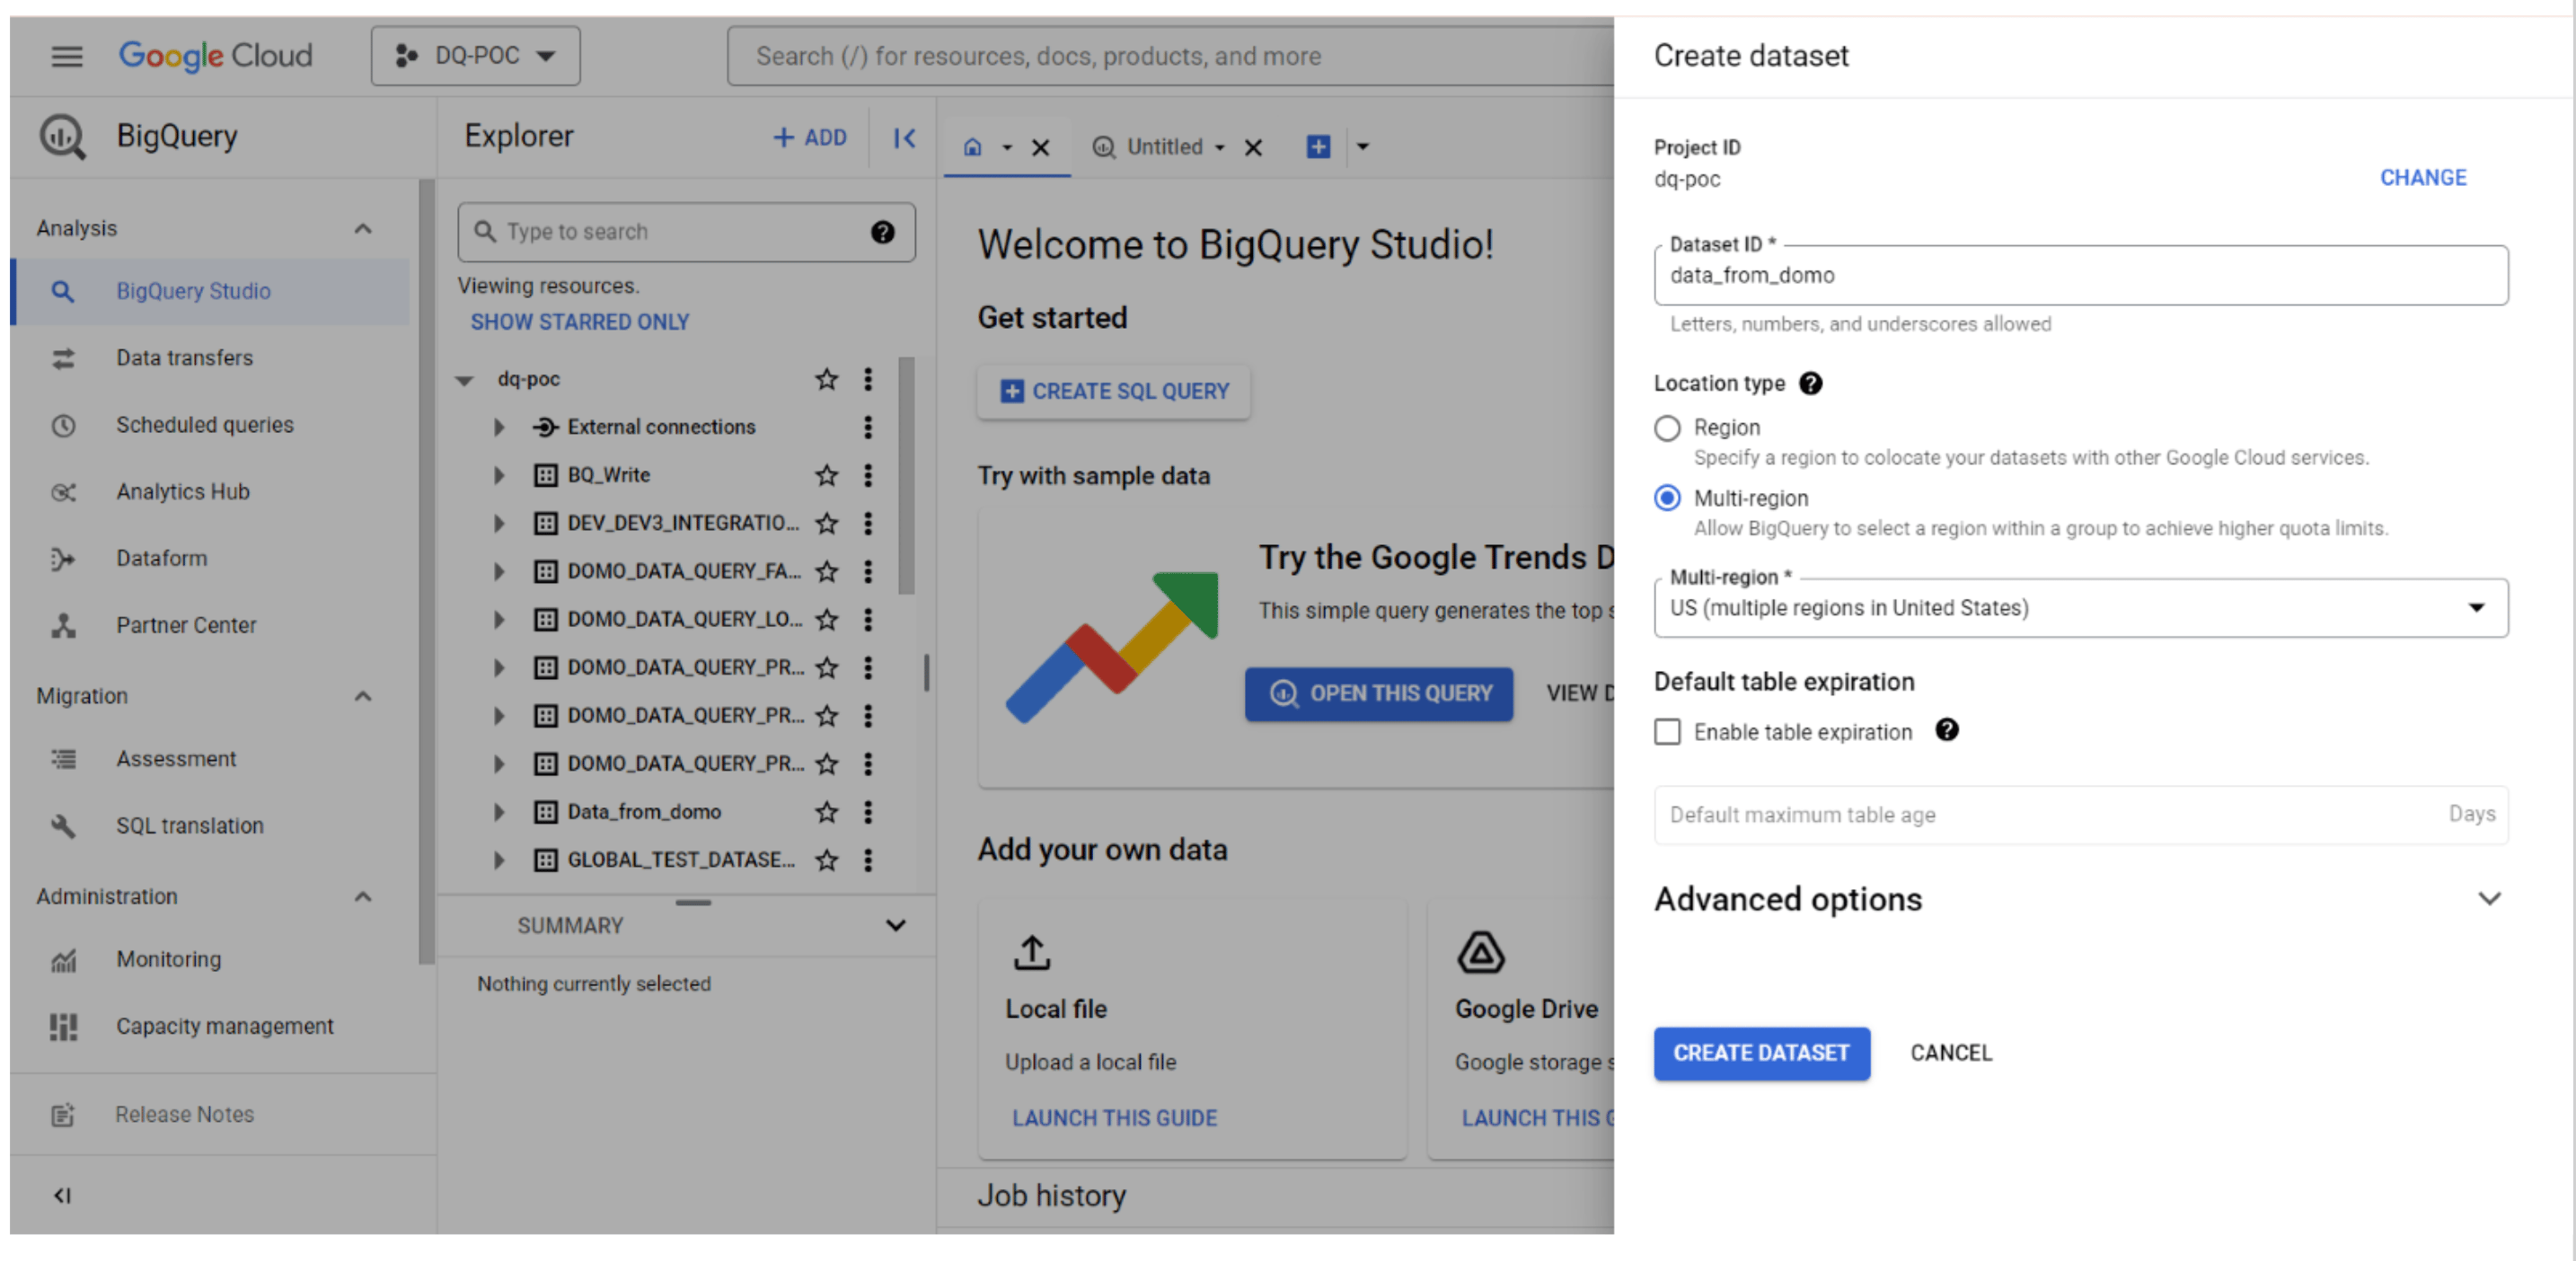
2. In your project, add a new dataset to which you want tables from Domo to be written. In this example, we use `data\_from\_domo` as the Dataset ID in BigQuery.
# Prepare a Dataset in Google BigQuery
1. In Google BigQuery, select an existing studio project or create a new one. See the
[BigQuery documentation](https://cloud.google.com/bigquery/docs) to learn how to access or create projects.
2. In your project, add a new dataset to which you want tables from Domo to be written. In this example, we use `data\_from\_domo` as the Dataset ID in BigQuery.
 3. After creating the dataset in BigQuery, find the data location (provisioning region) for the dataset in the dataset details.
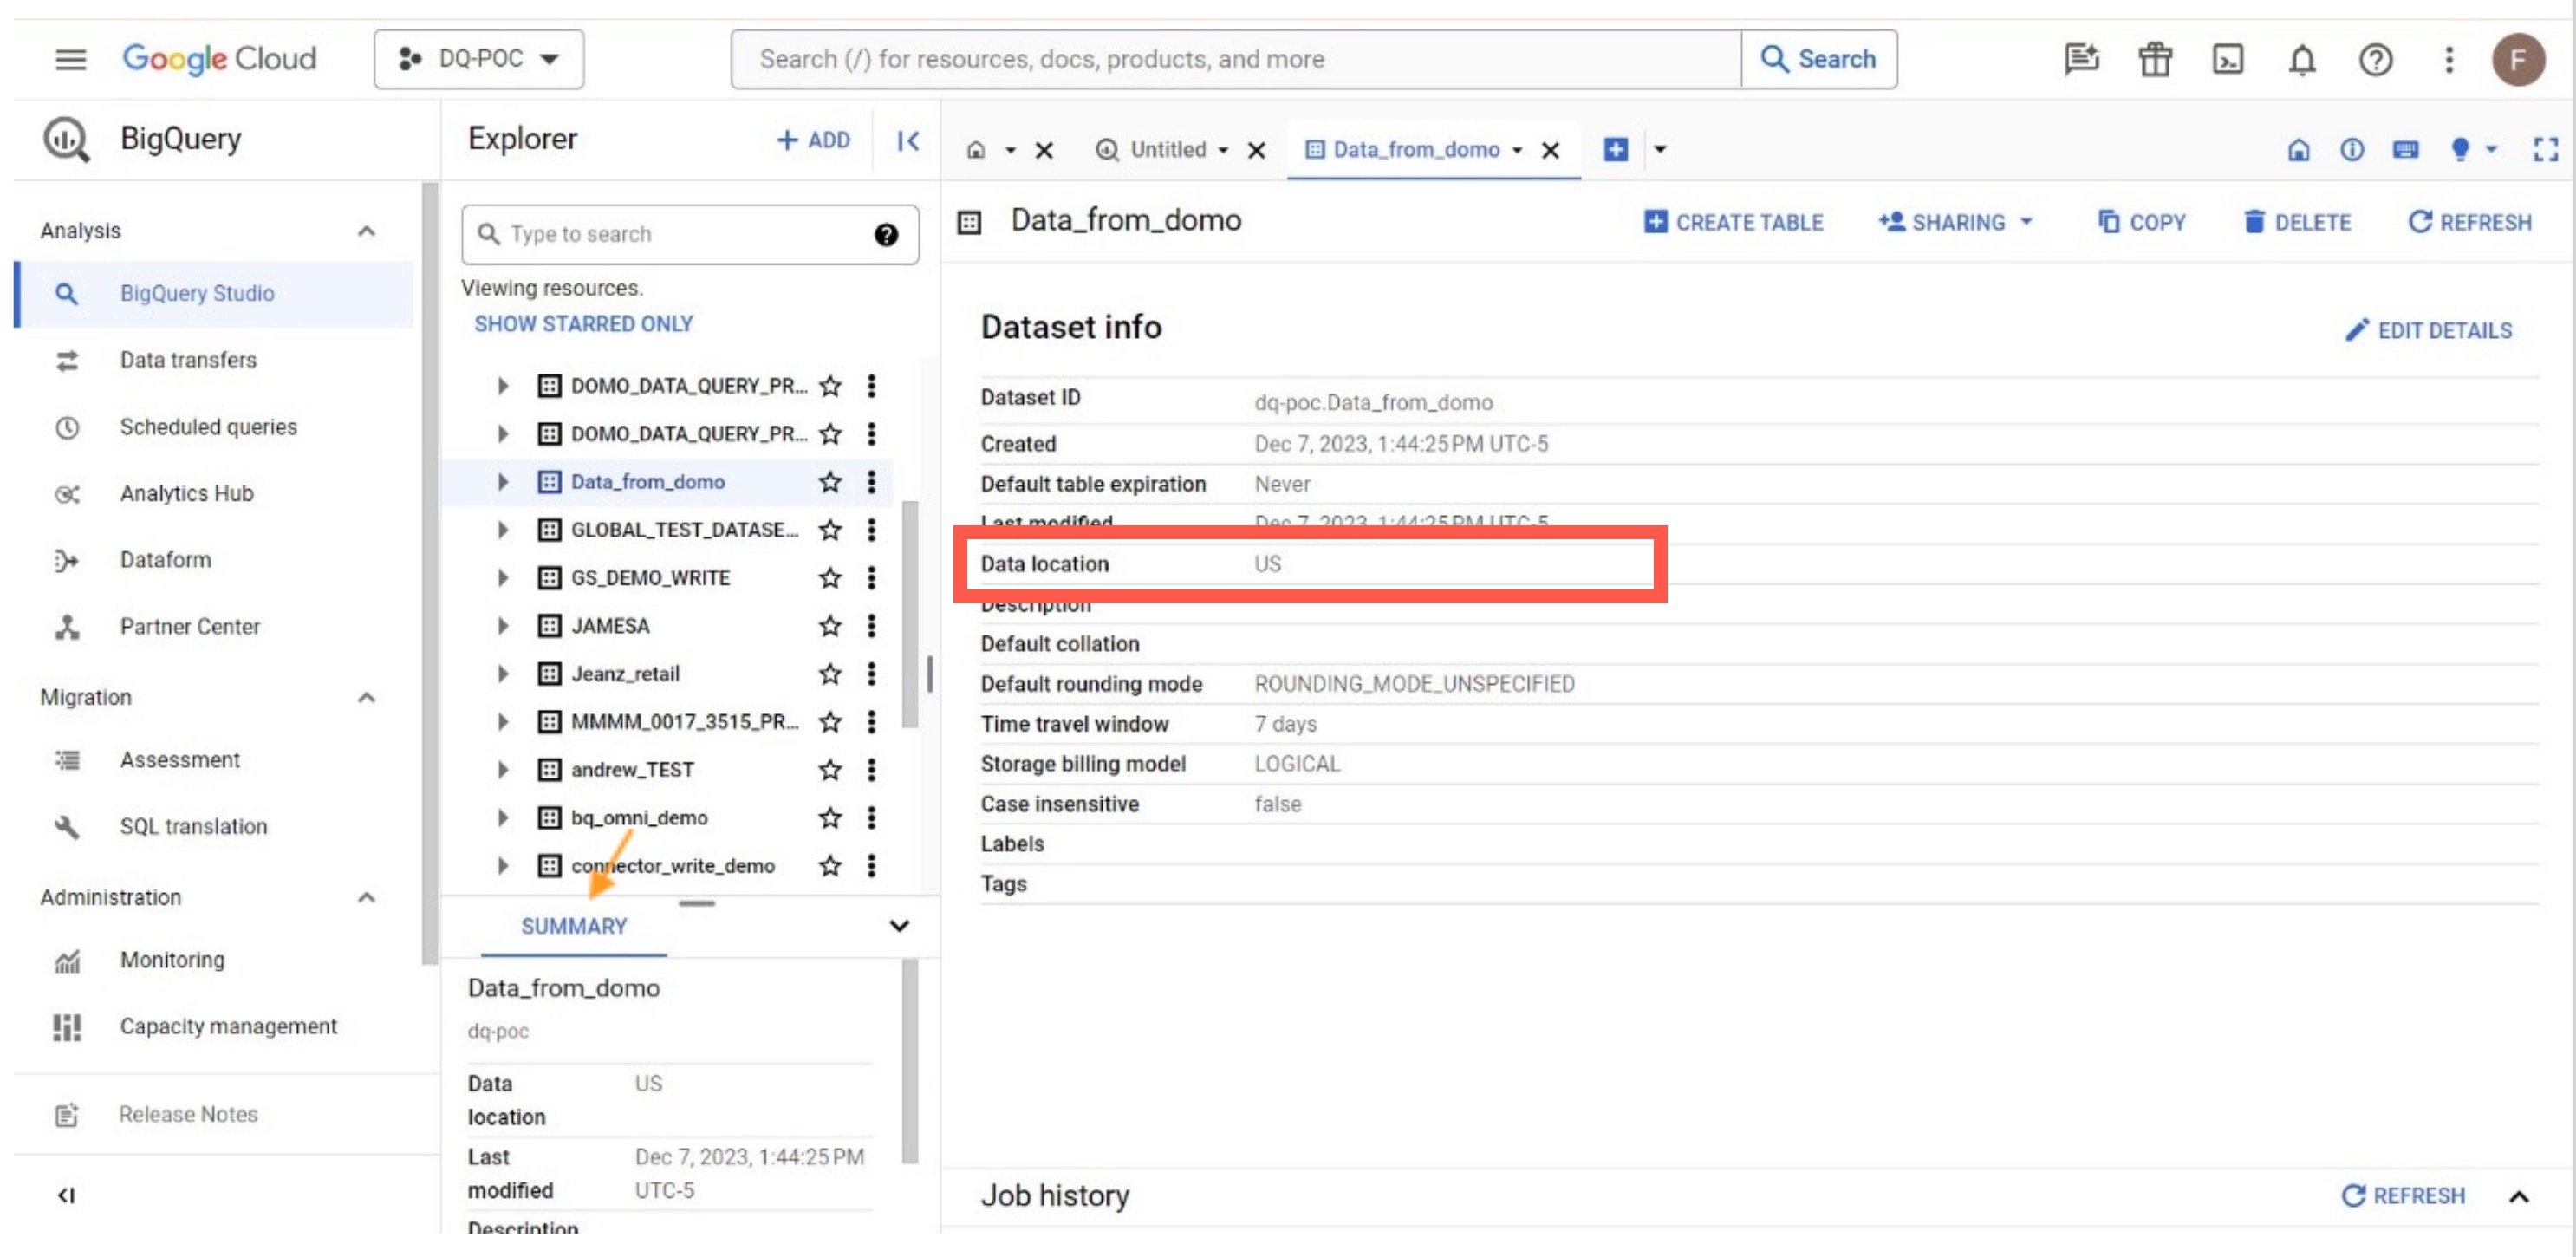 4. Provide the following information from Big Query to a Domo user who has the Cloud Admin grant.
* Project ID
* Dataset ID
* Data location (provisioning region)
# Configure Write Access for BigQuery in Domo
1. In the Domo navigation header, select
**Data** to open the Data Center.
2. If you're not already there, select
**Data Warehouse** in the left rail and open the Data Warehouse.
4. Provide the following information from Big Query to a Domo user who has the Cloud Admin grant.
* Project ID
* Dataset ID
* Data location (provisioning region)
# Configure Write Access for BigQuery in Domo
1. In the Domo navigation header, select
**Data** to open the Data Center.
2. If you're not already there, select
**Data Warehouse** in the left rail and open the Data Warehouse.
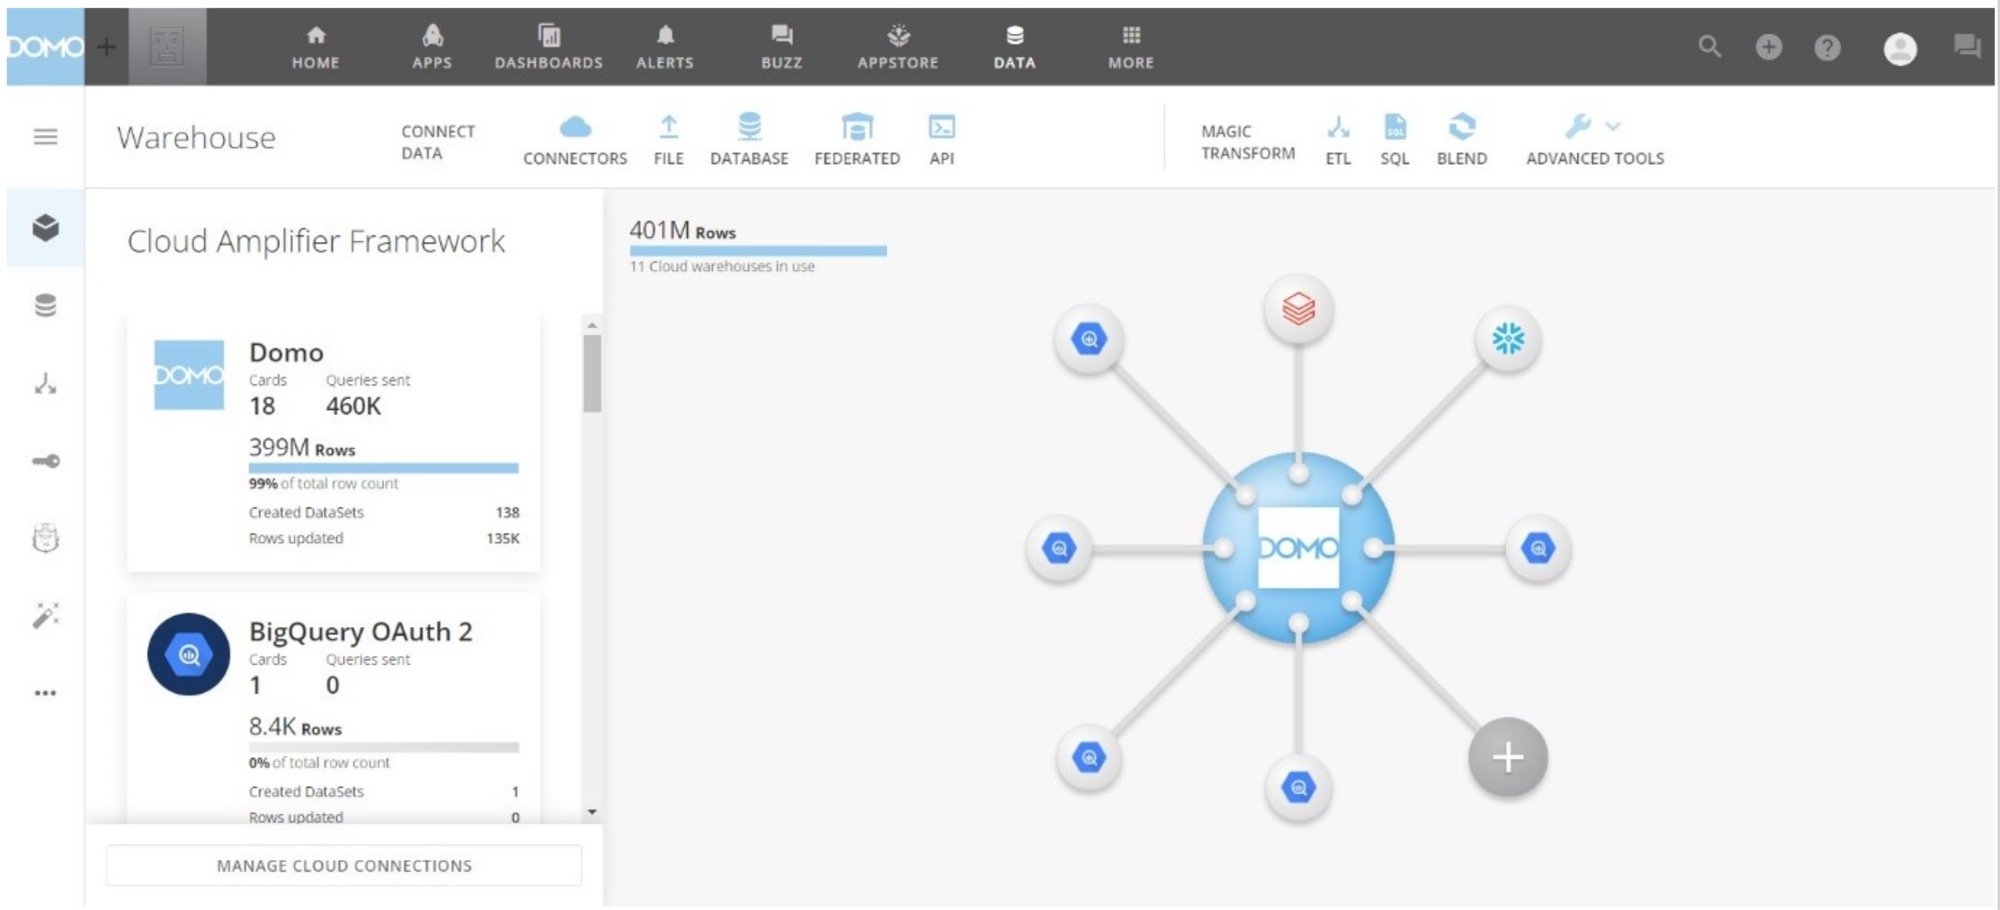 3. Select an existing BigQuery integration.
The **Amplify** modal displays.
3. Select an existing BigQuery integration.
The **Amplify** modal displays.
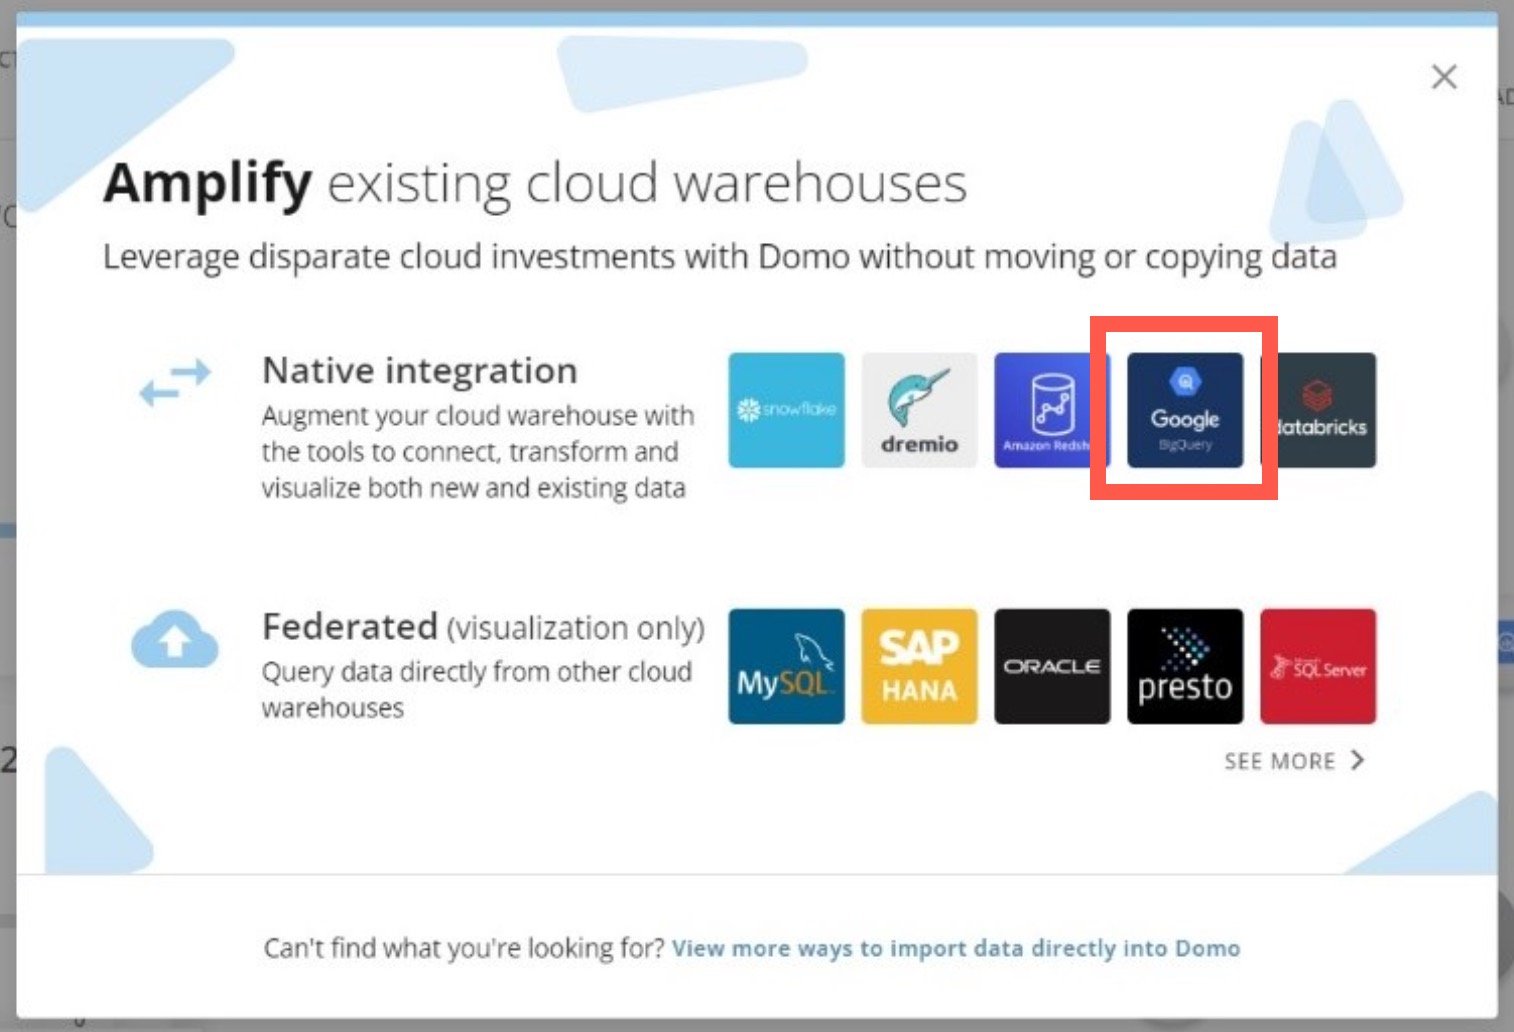
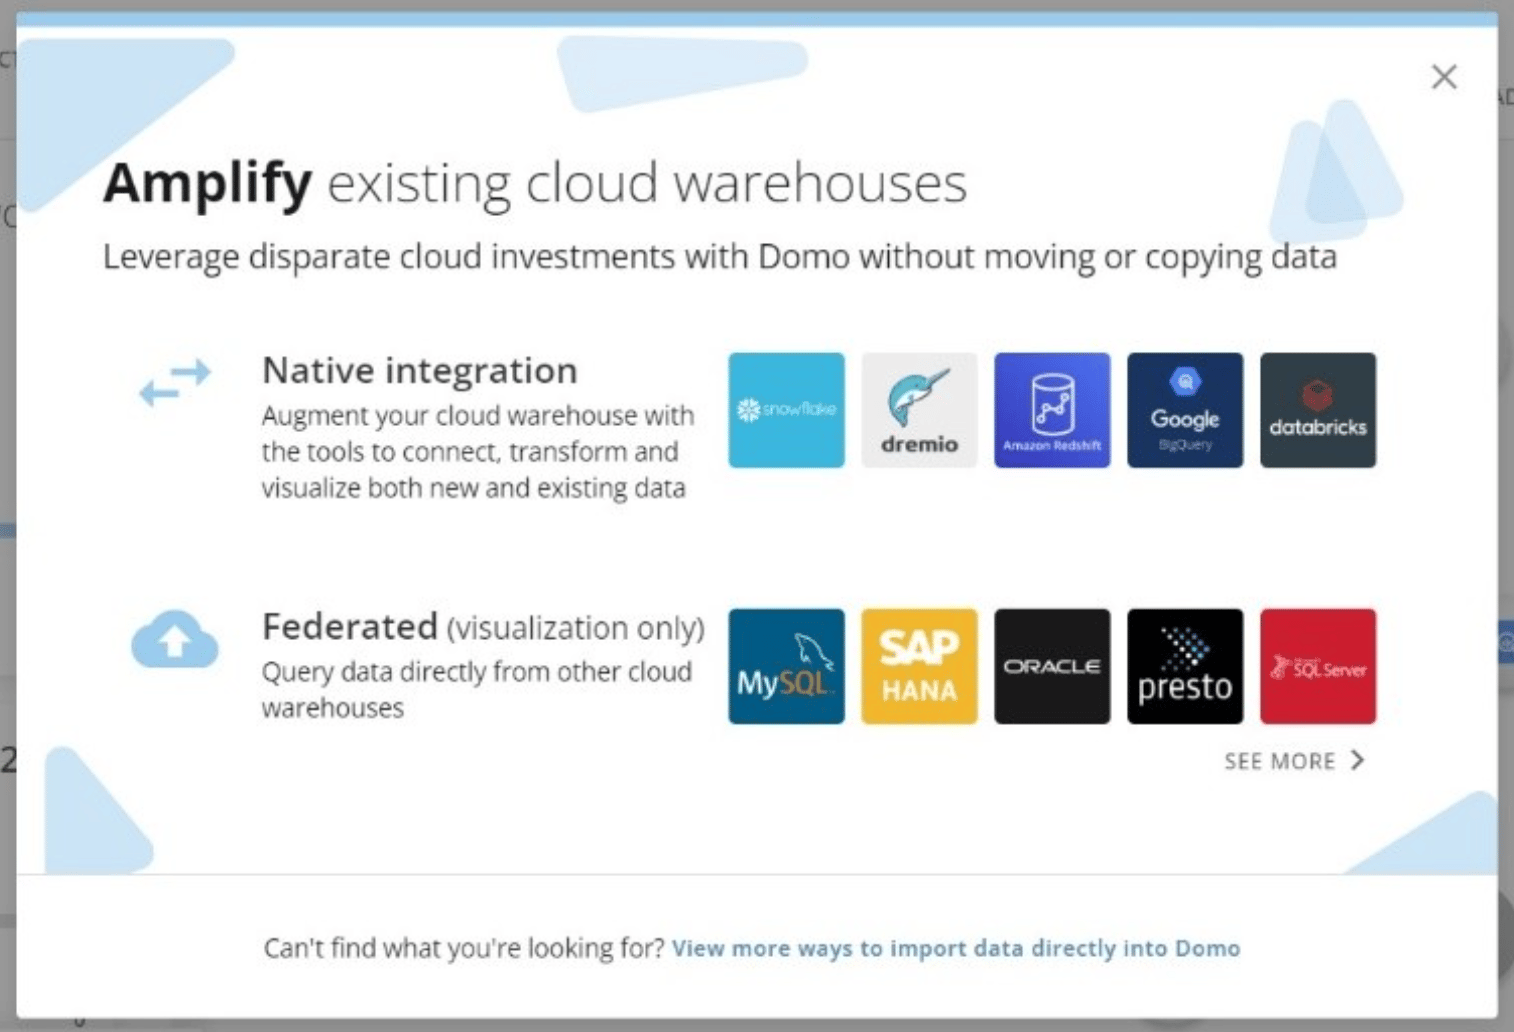 4. In the modal, select
**Google BigQuery** native integration.
4. In the modal, select
**Google BigQuery** native integration.
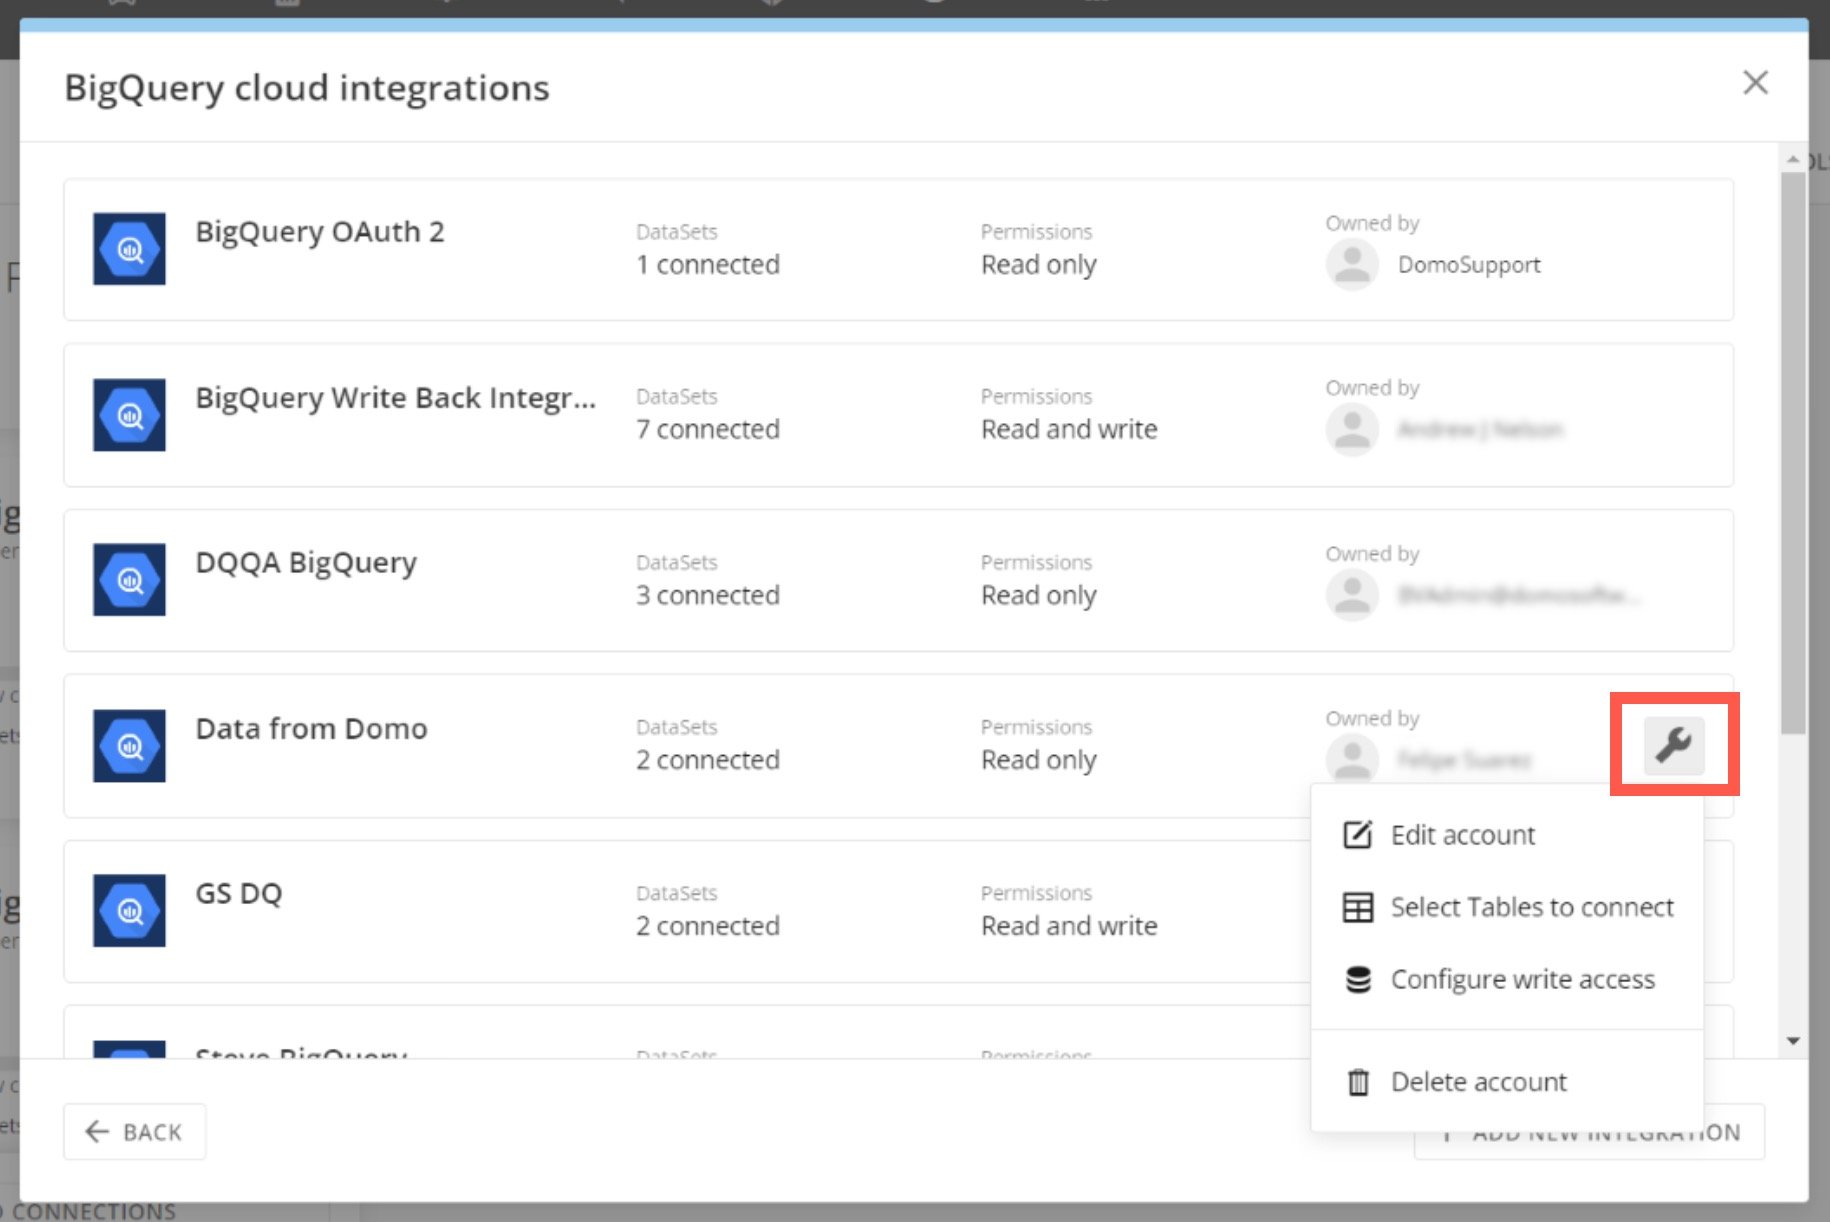
 5. In the list, locate the BigQuery integration to which you want to add Write capability. Hover over the integration and select
**Options** to display the options menu.
5. In the list, locate the BigQuery integration to which you want to add Write capability. Hover over the integration and select
**Options** to display the options menu.
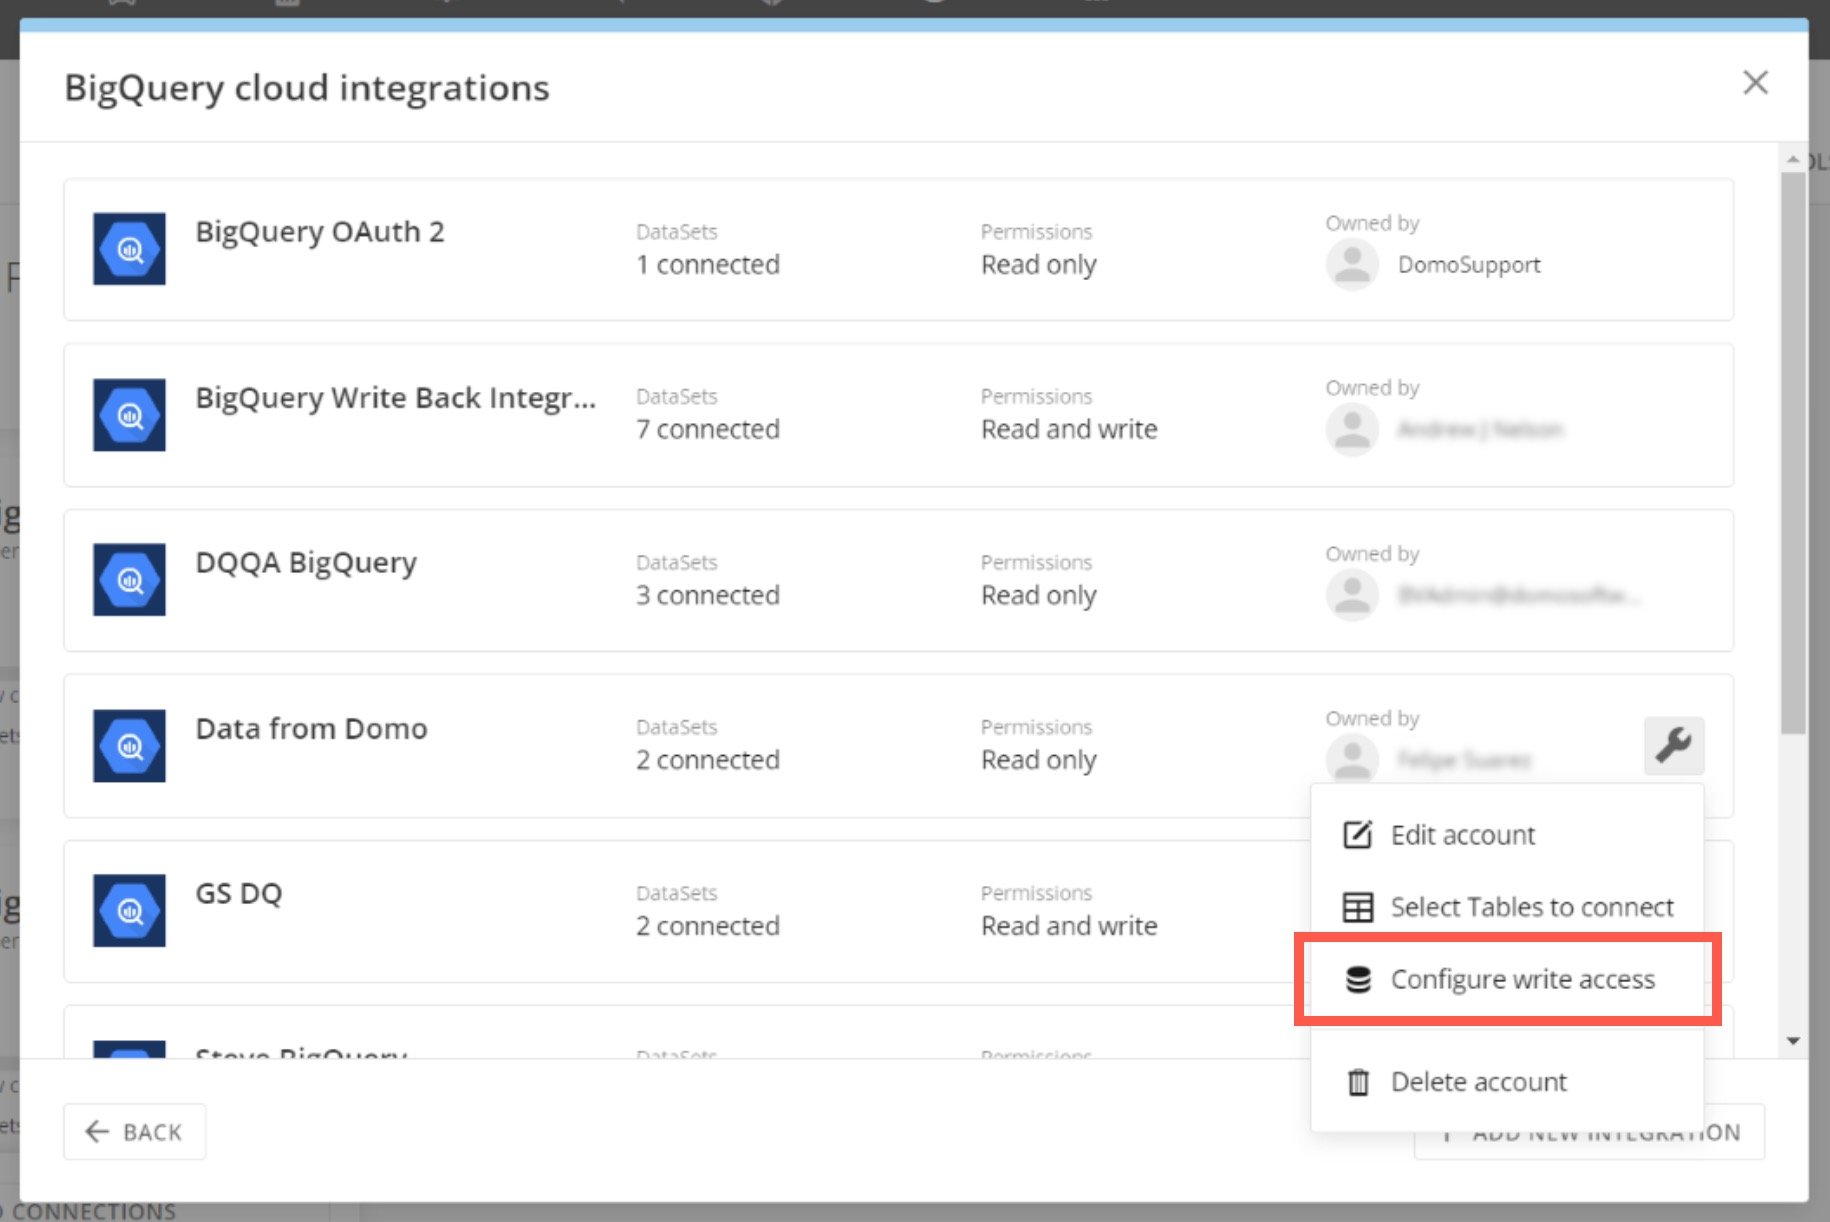
 6. In the menu, select
**Configure write access** to open the **Connect a BigQuery cloud integration** wizard.
6. In the menu, select
**Configure write access** to open the **Connect a BigQuery cloud integration** wizard.
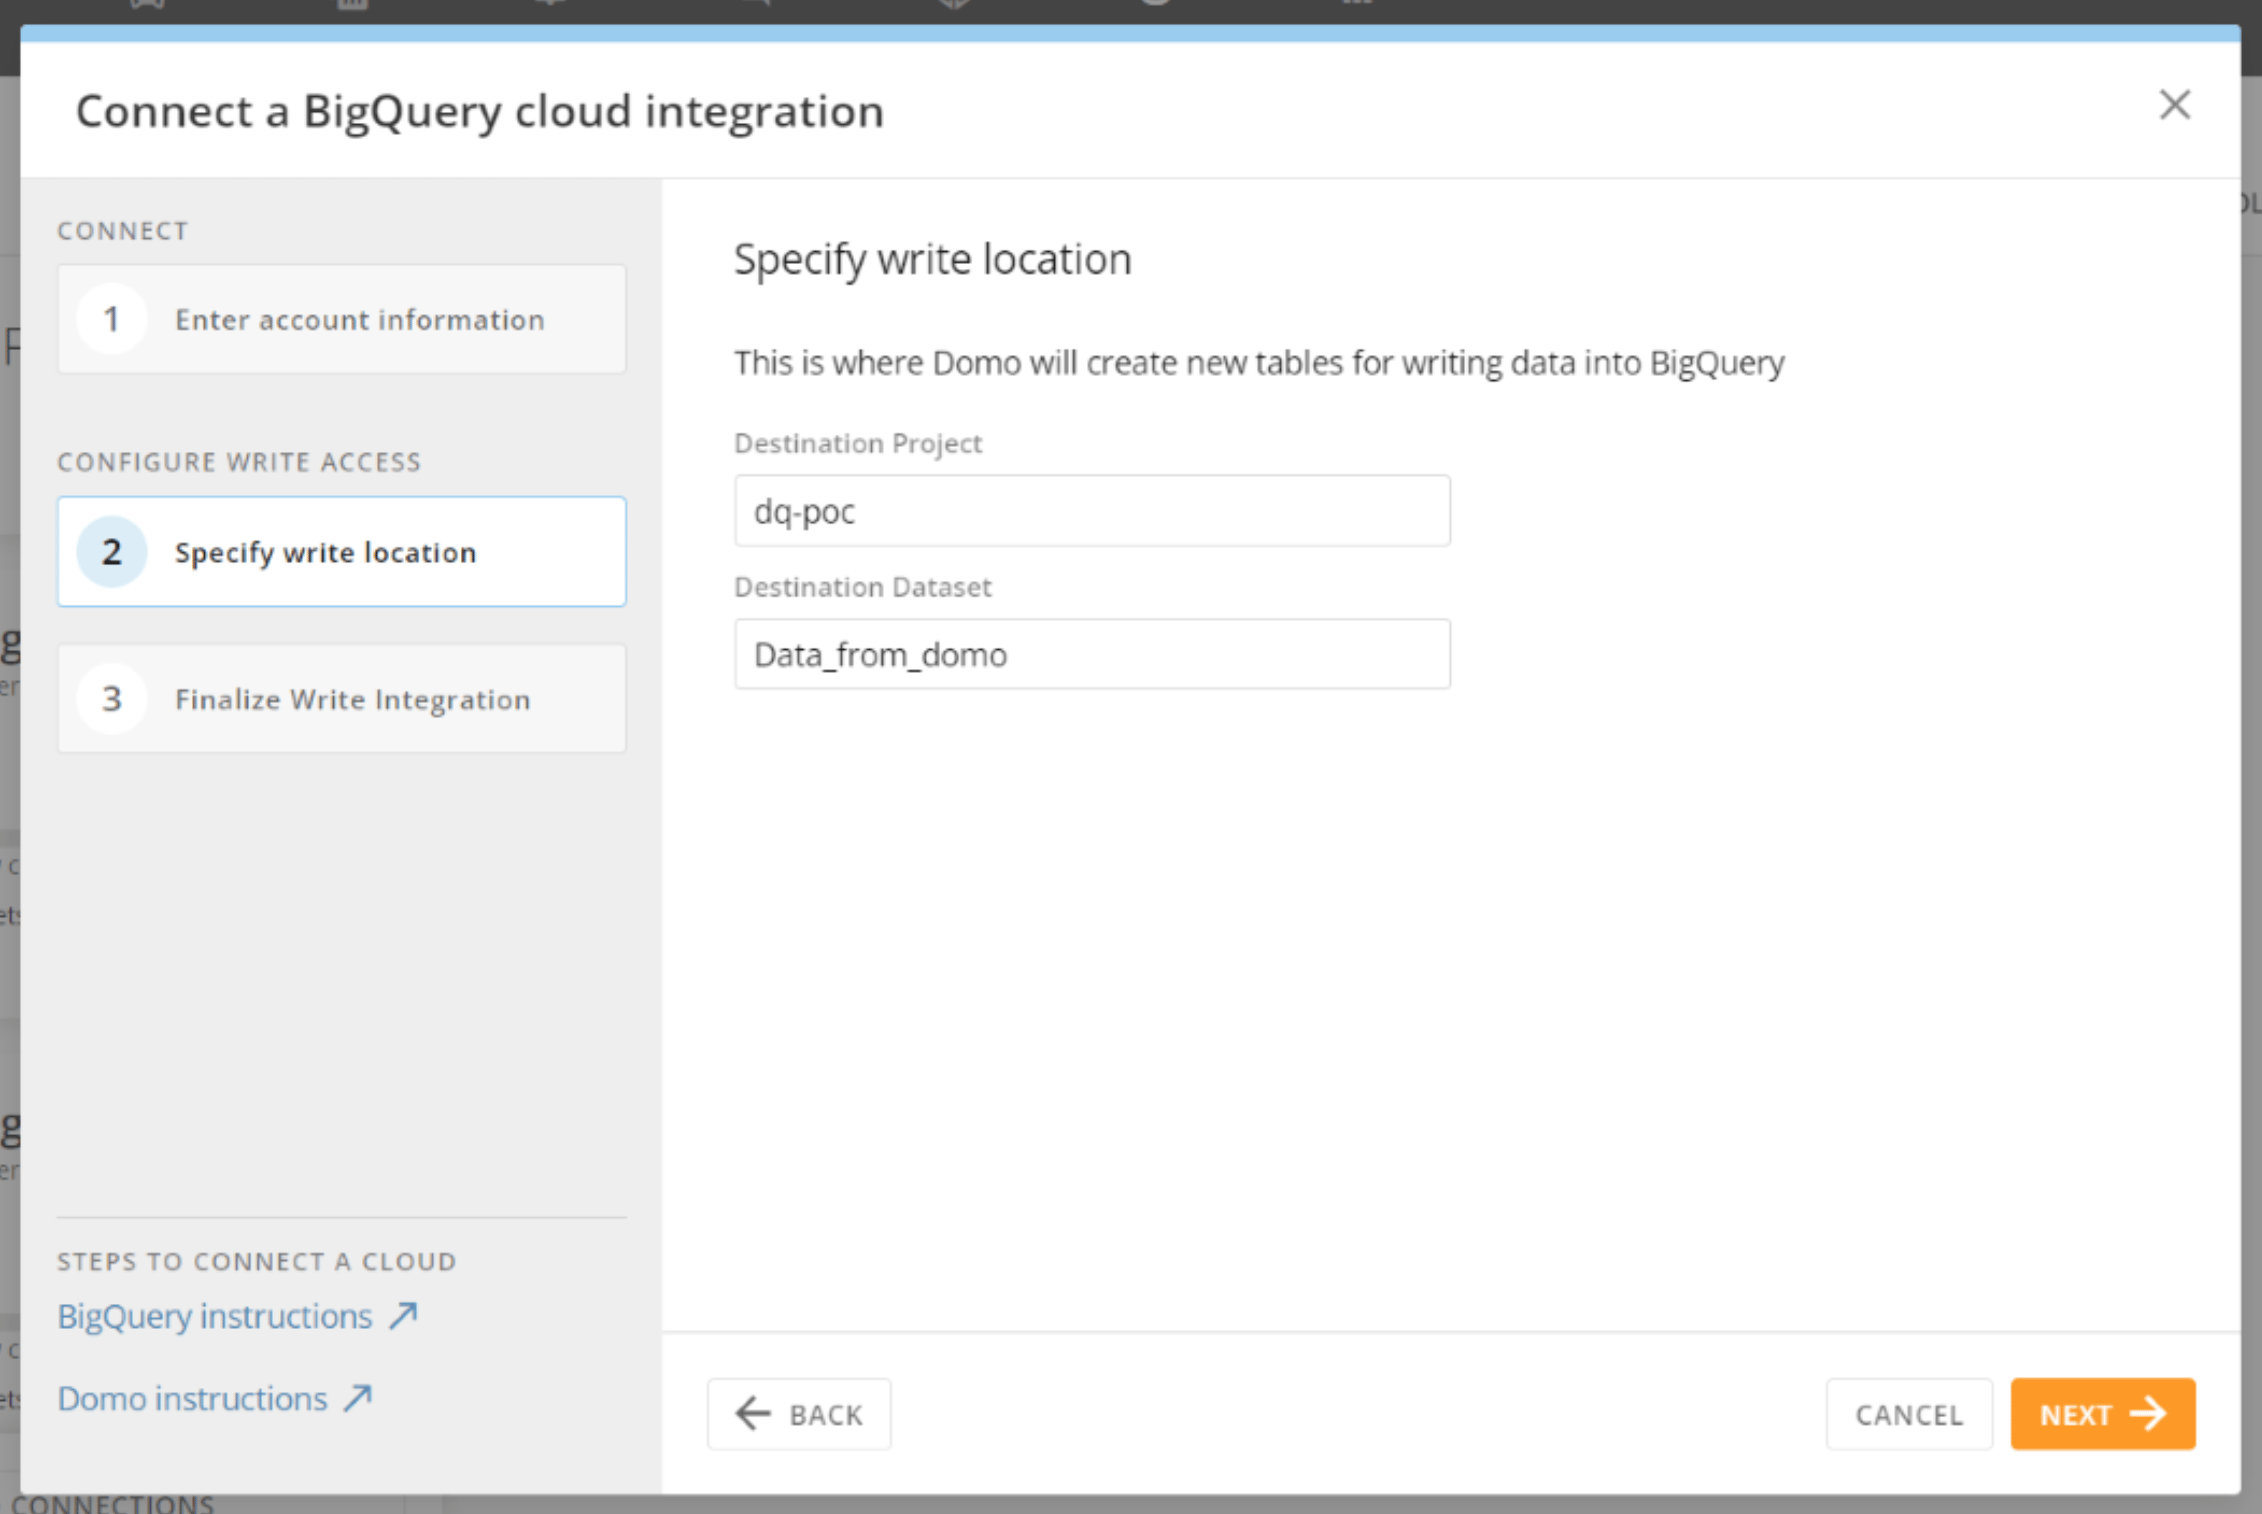
 7. In the
**Destination Project**
field, enter the name of the BigQuery project. In the **Destination Dataset** field, enter the name of the BigQuery dataset. Then select **Next**.
7. In the
**Destination Project**
field, enter the name of the BigQuery project. In the **Destination Dataset** field, enter the name of the BigQuery dataset. Then select **Next**.
 8. Review the displayed information and check the box to acknowledge that Domo will now be able to write to the provided dataset.
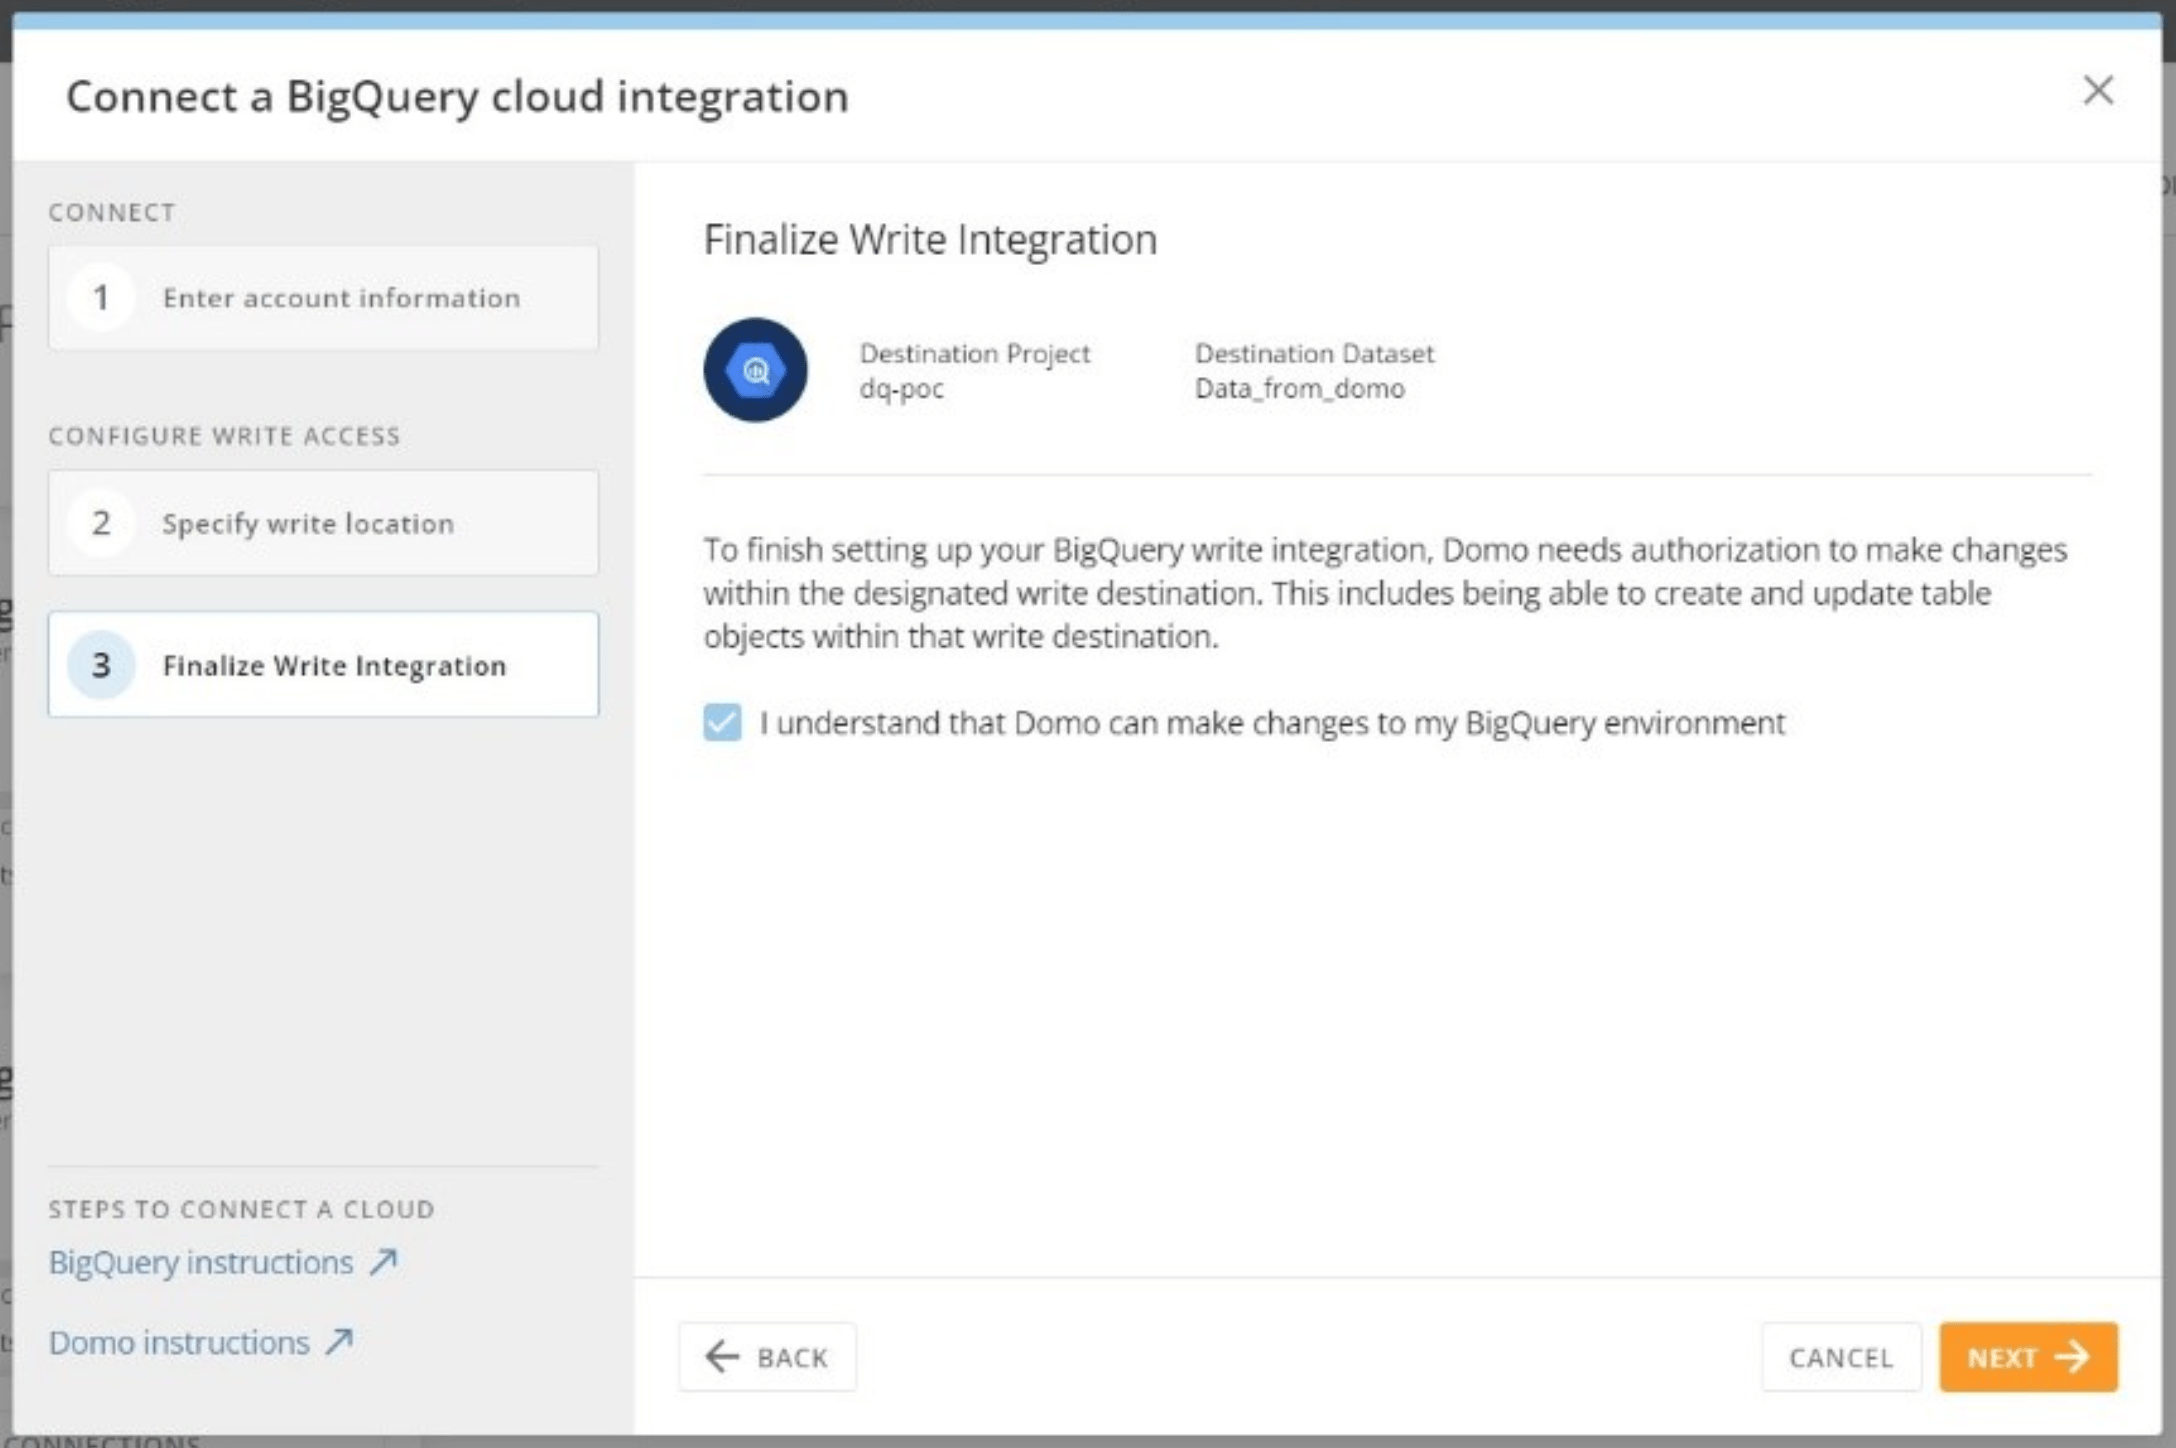 9. Select
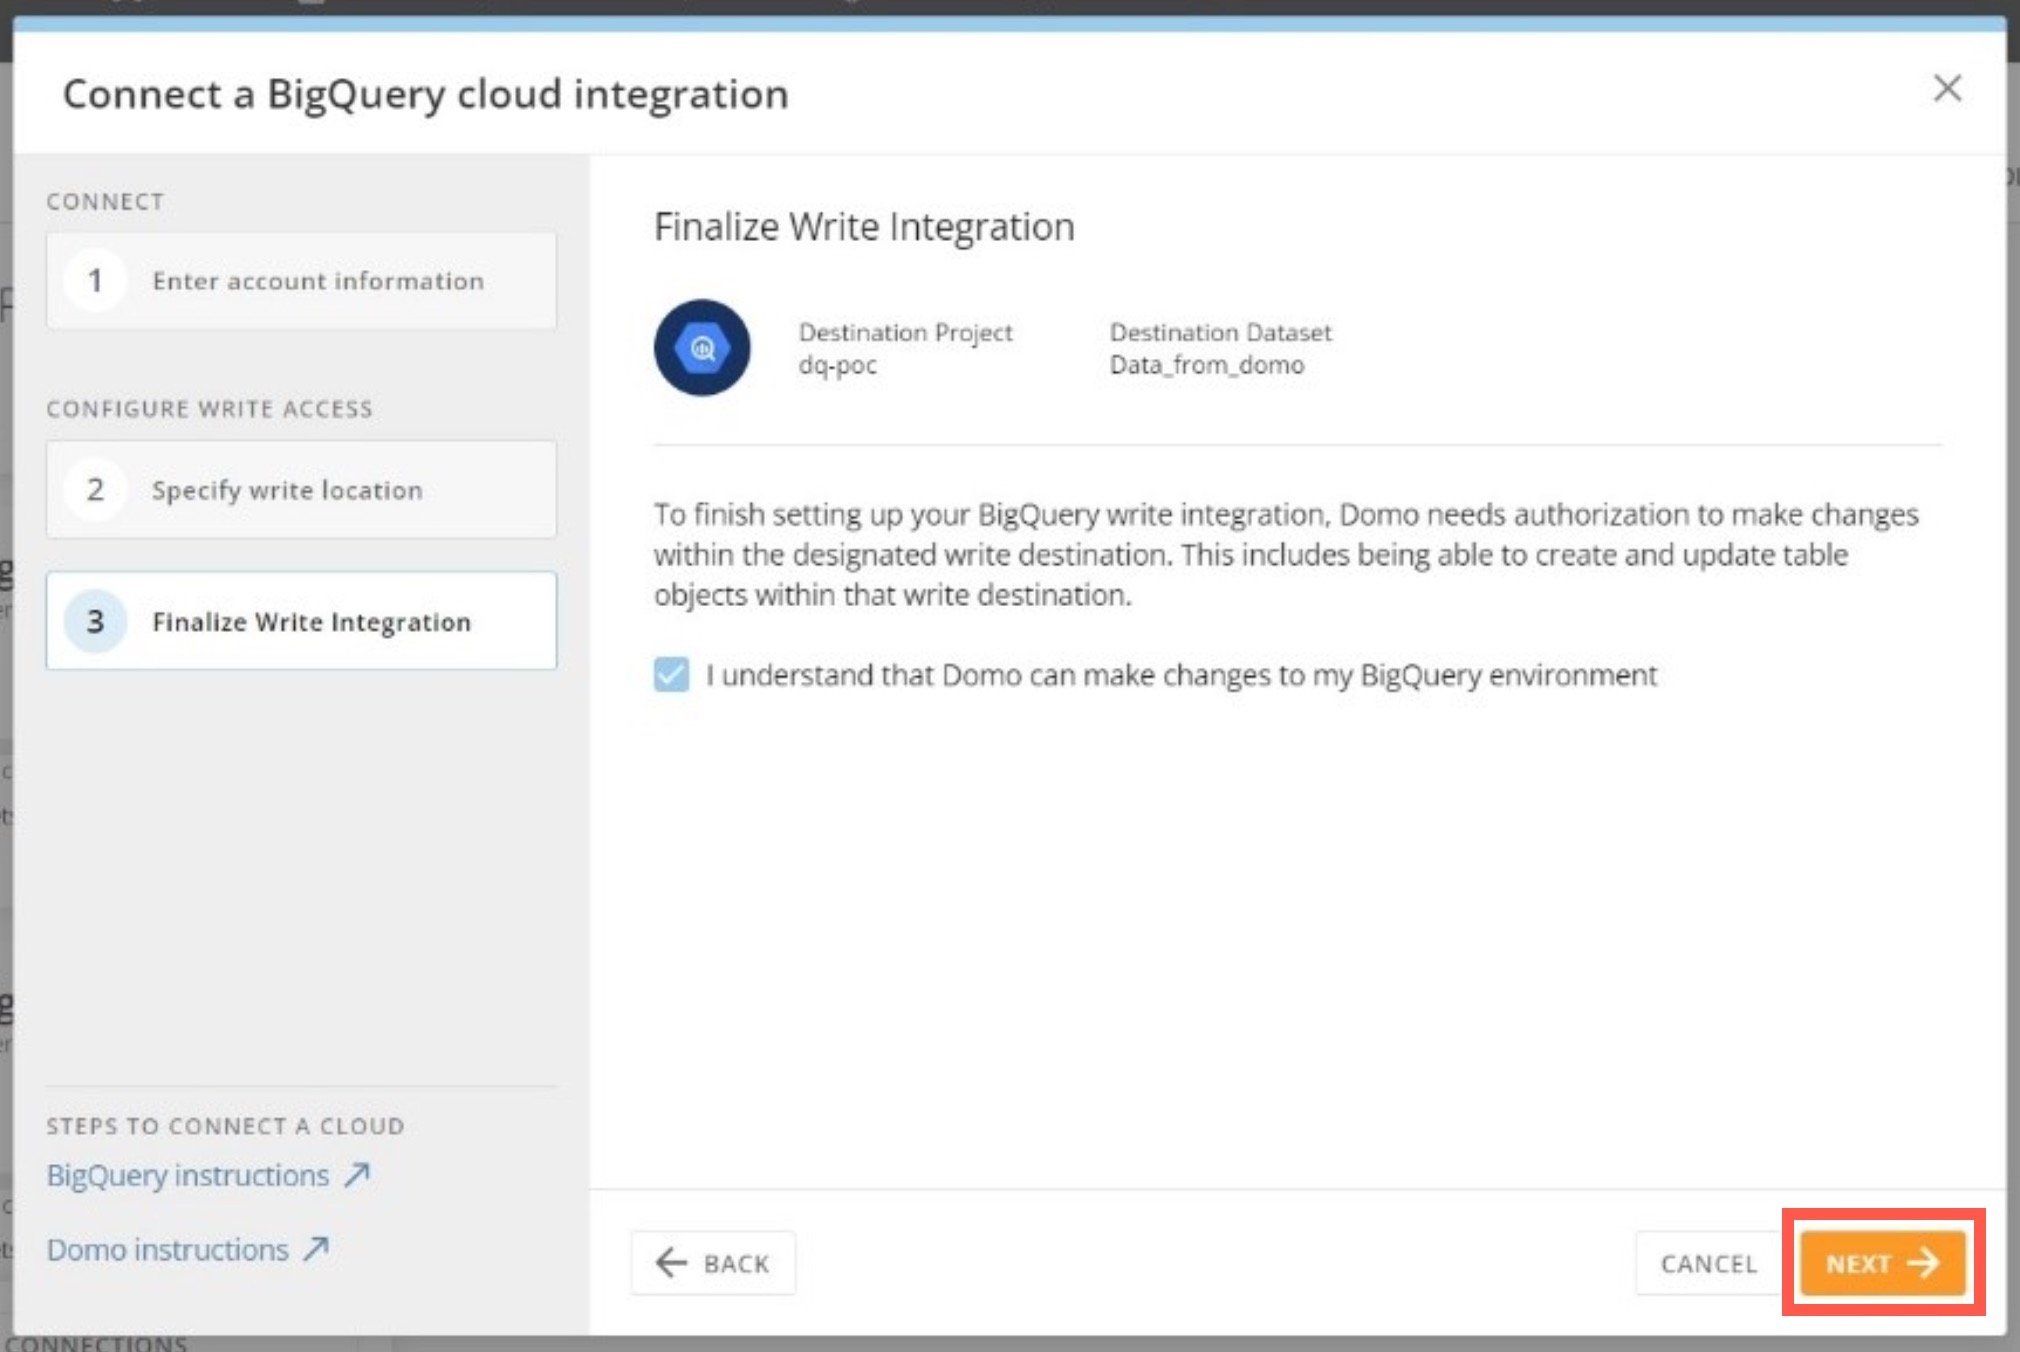
**Next** to confirm that the connection is successfully established.
9. Select
**Next** to confirm that the connection is successfully established.
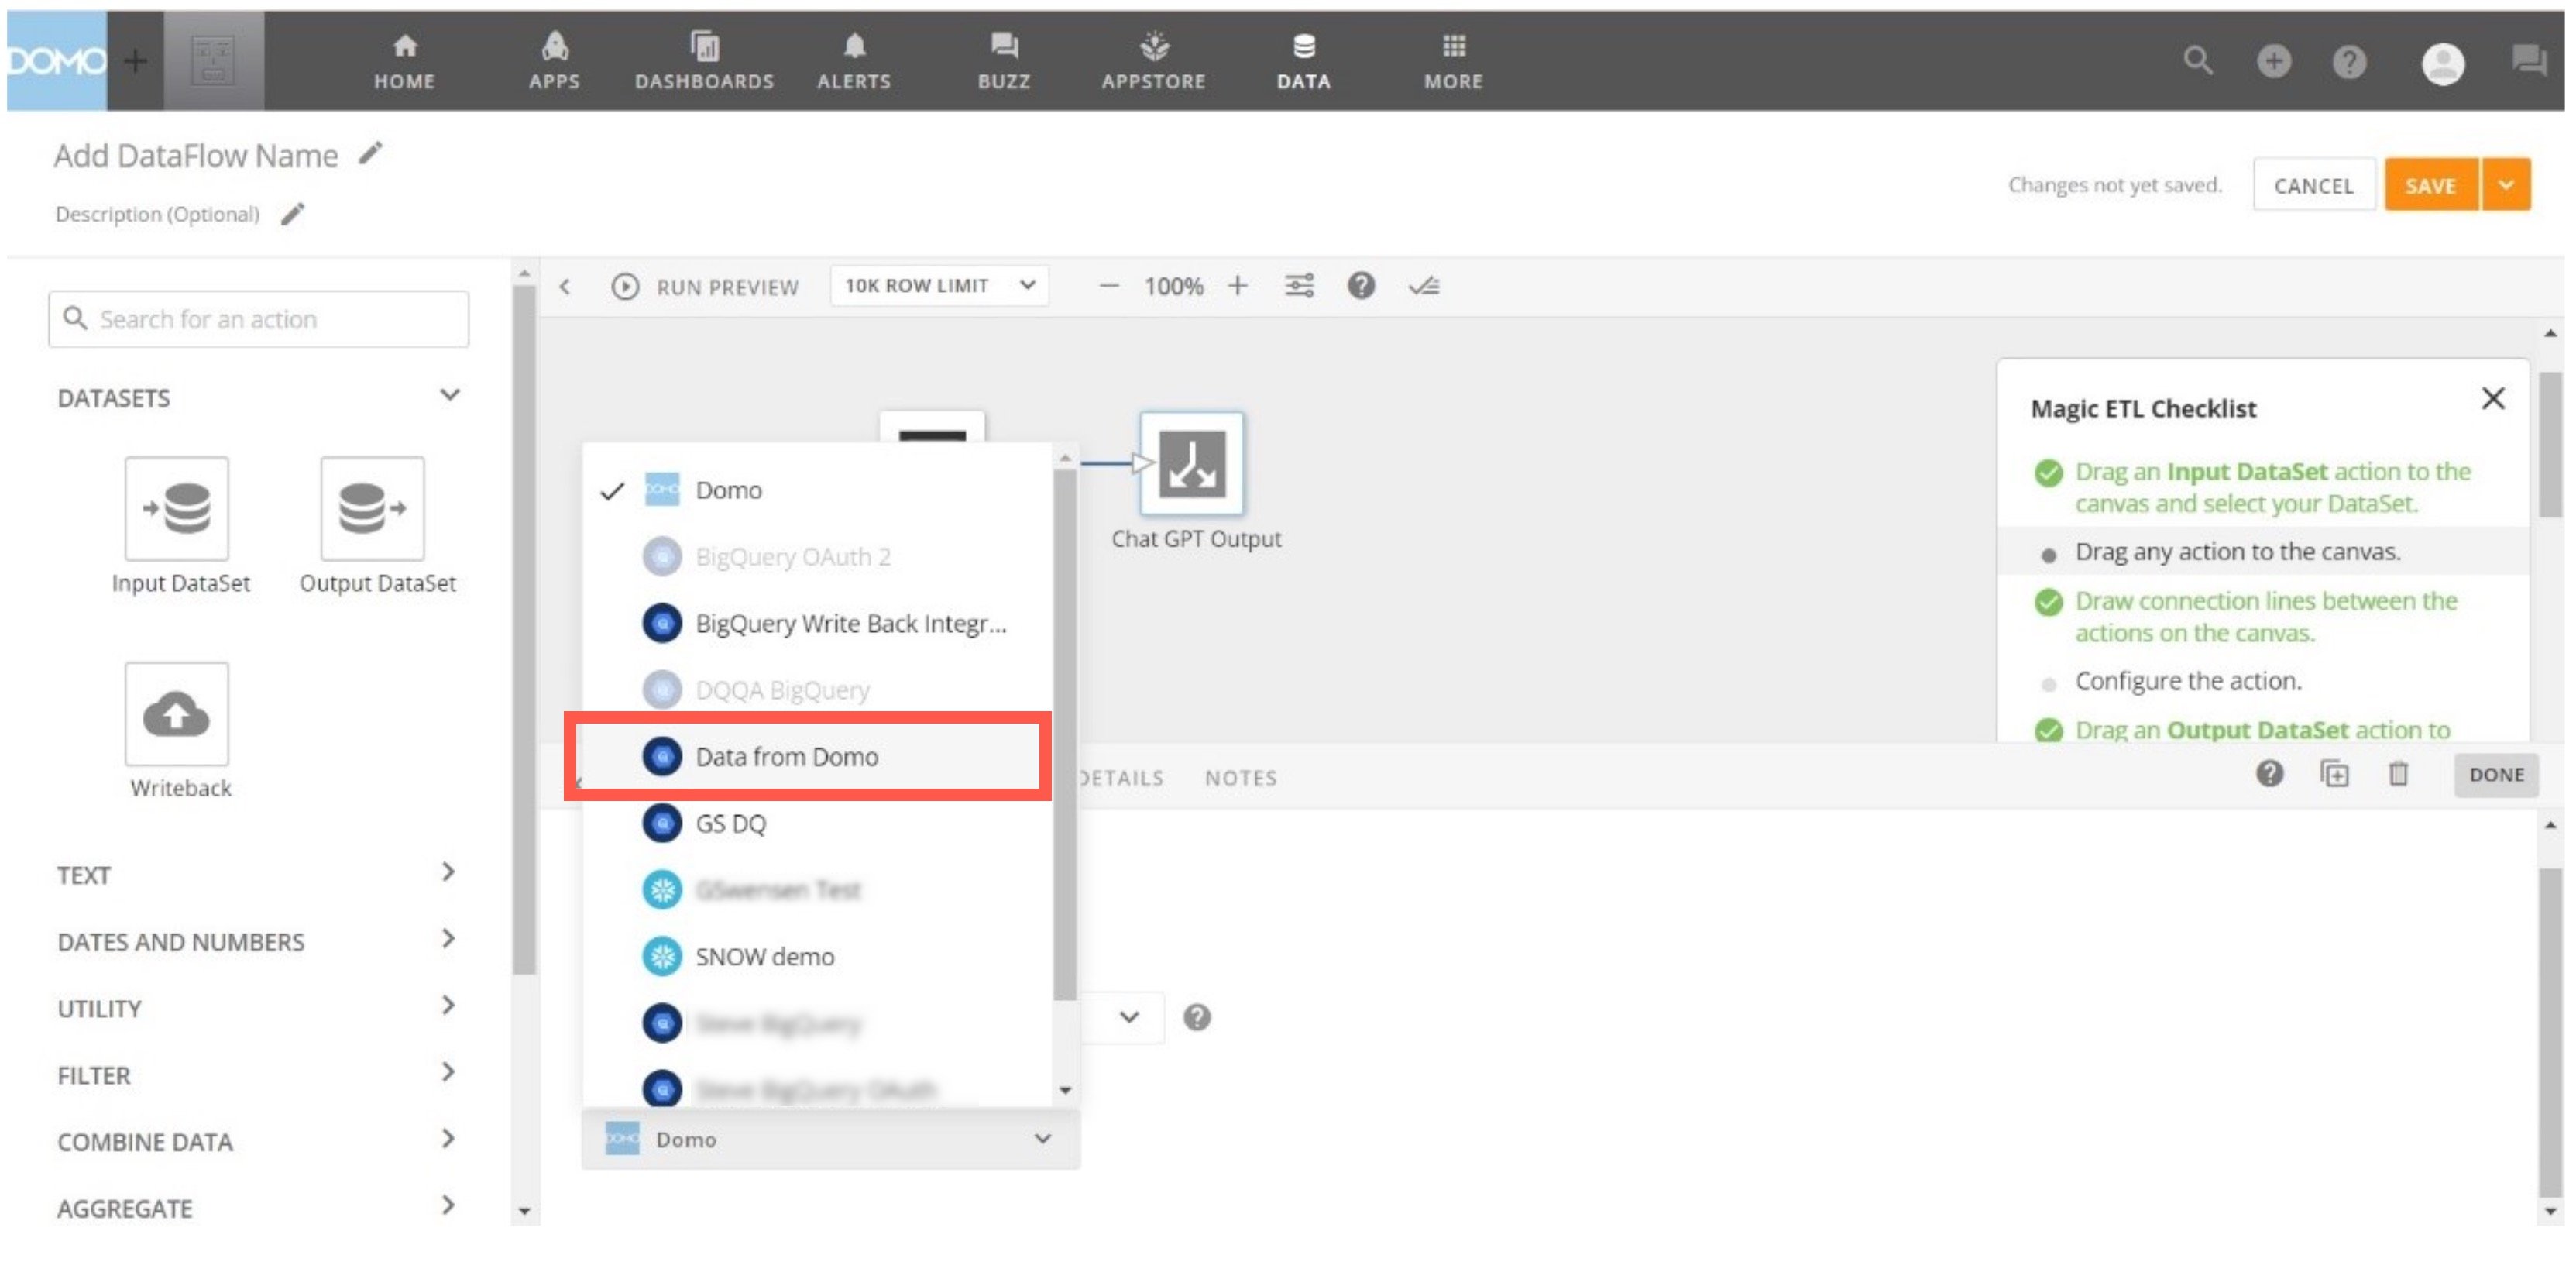
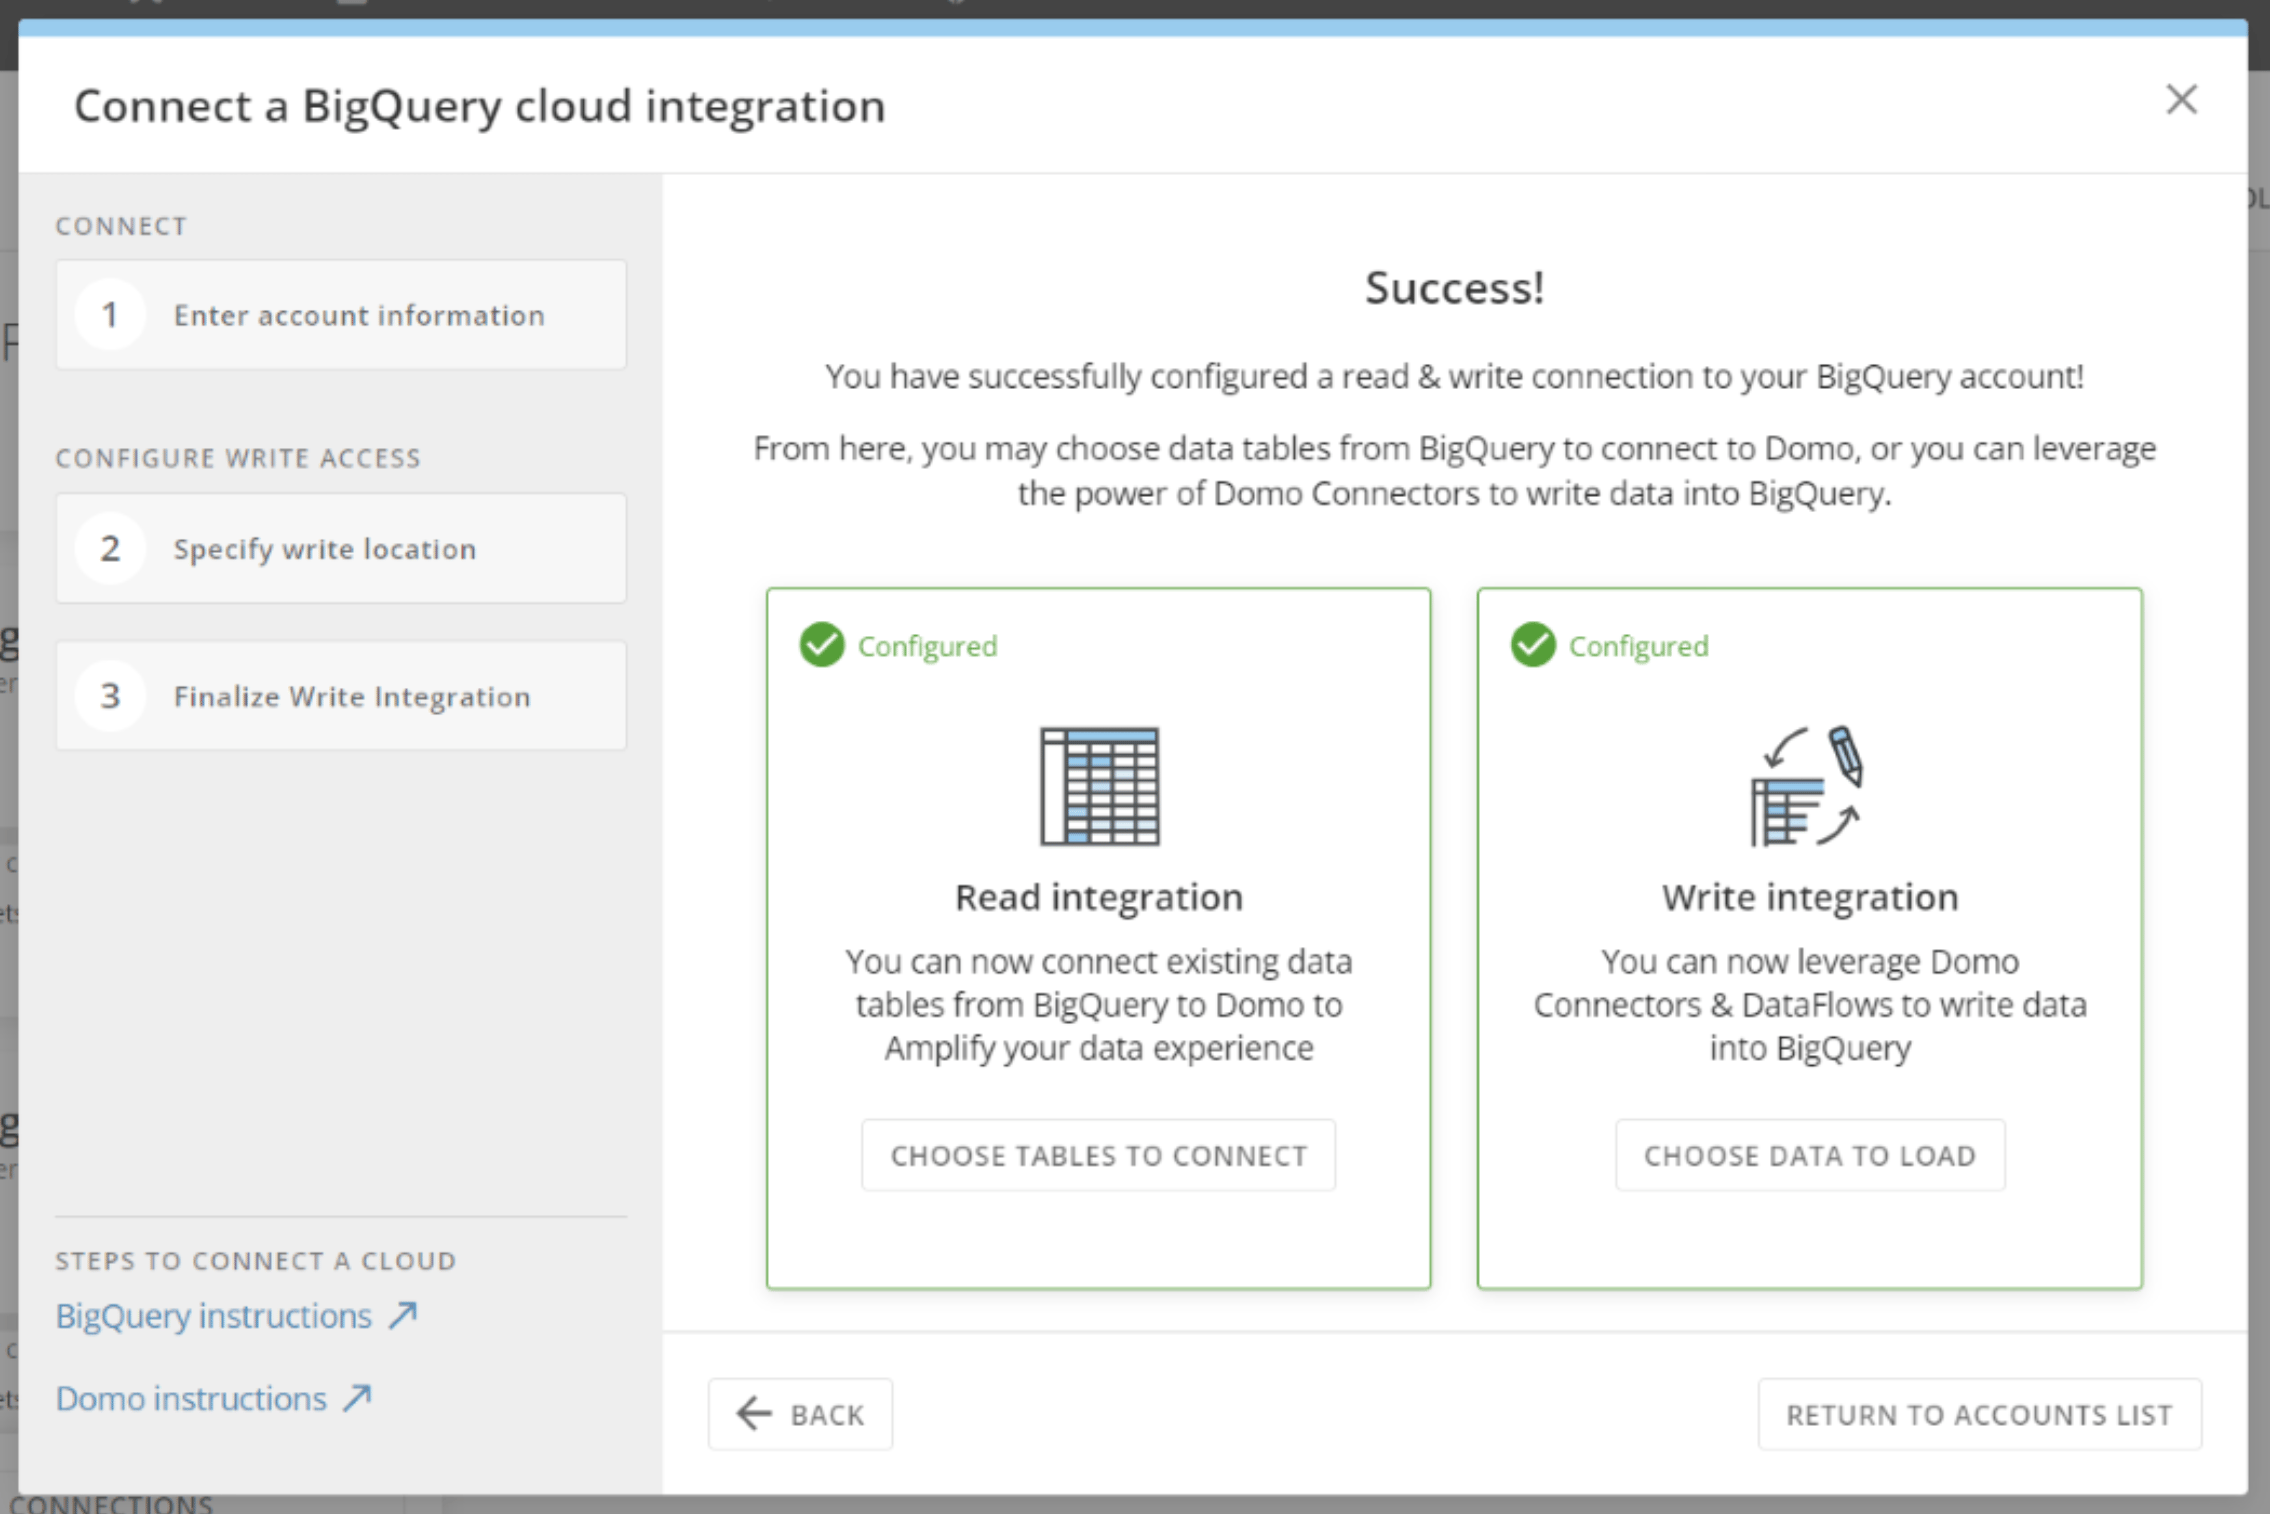 You can now use your BigQuery integration as an output for Domo. In the example below, **Data from Domo** is now an option for a Magic ETL output.
 ### Use BigQuery-sourced Datasets in a DataFlow
When you use BigQuery-sourced datasets in a DataFlow, the data is queried live from BigQuery at the time the flow initiates. In addition, BigQuery-sourced datasets are checked for updates every 15 minutes based on the table's LAST\_ALTERED DateTime. If the LAST\_ALTERED field indicates that data has been updated, any DataFlows that use this table as an input are triggered and will begin to run.
### Configure BigQuery OAuth
The OAuth option for BigQuery-Cloud Amplifier makes it possible to reuse governance and permissions already established in BigQuery. When OAuth is configured for a cloud integration, all DataSets that are then established using that integration now use OAuth.
Any time someone tries to view a card or preview a DataSet built using an OAuth-configured integration, Domo prompts the person to enter their BigQuery credentials. Domo then queries the BigQuery data in the context of the authenticated user.
If a DataSet was set up using a non-OAuth-configured integration, any queries made to BigQuery are made in the context of the service account from the associated BigQuery service account key file.
**Important:** All DataFlows or alerts that use OAuth-configured DataSets use the service account on the associated integration.
# Prerequisites
You must have the following to configure a BigQuery integration with OAuth in Domo:
* A project in your BigQuery account
* A valid BigQuery service account key file
# Configure a BigQuery Integration with Per-User OAuth
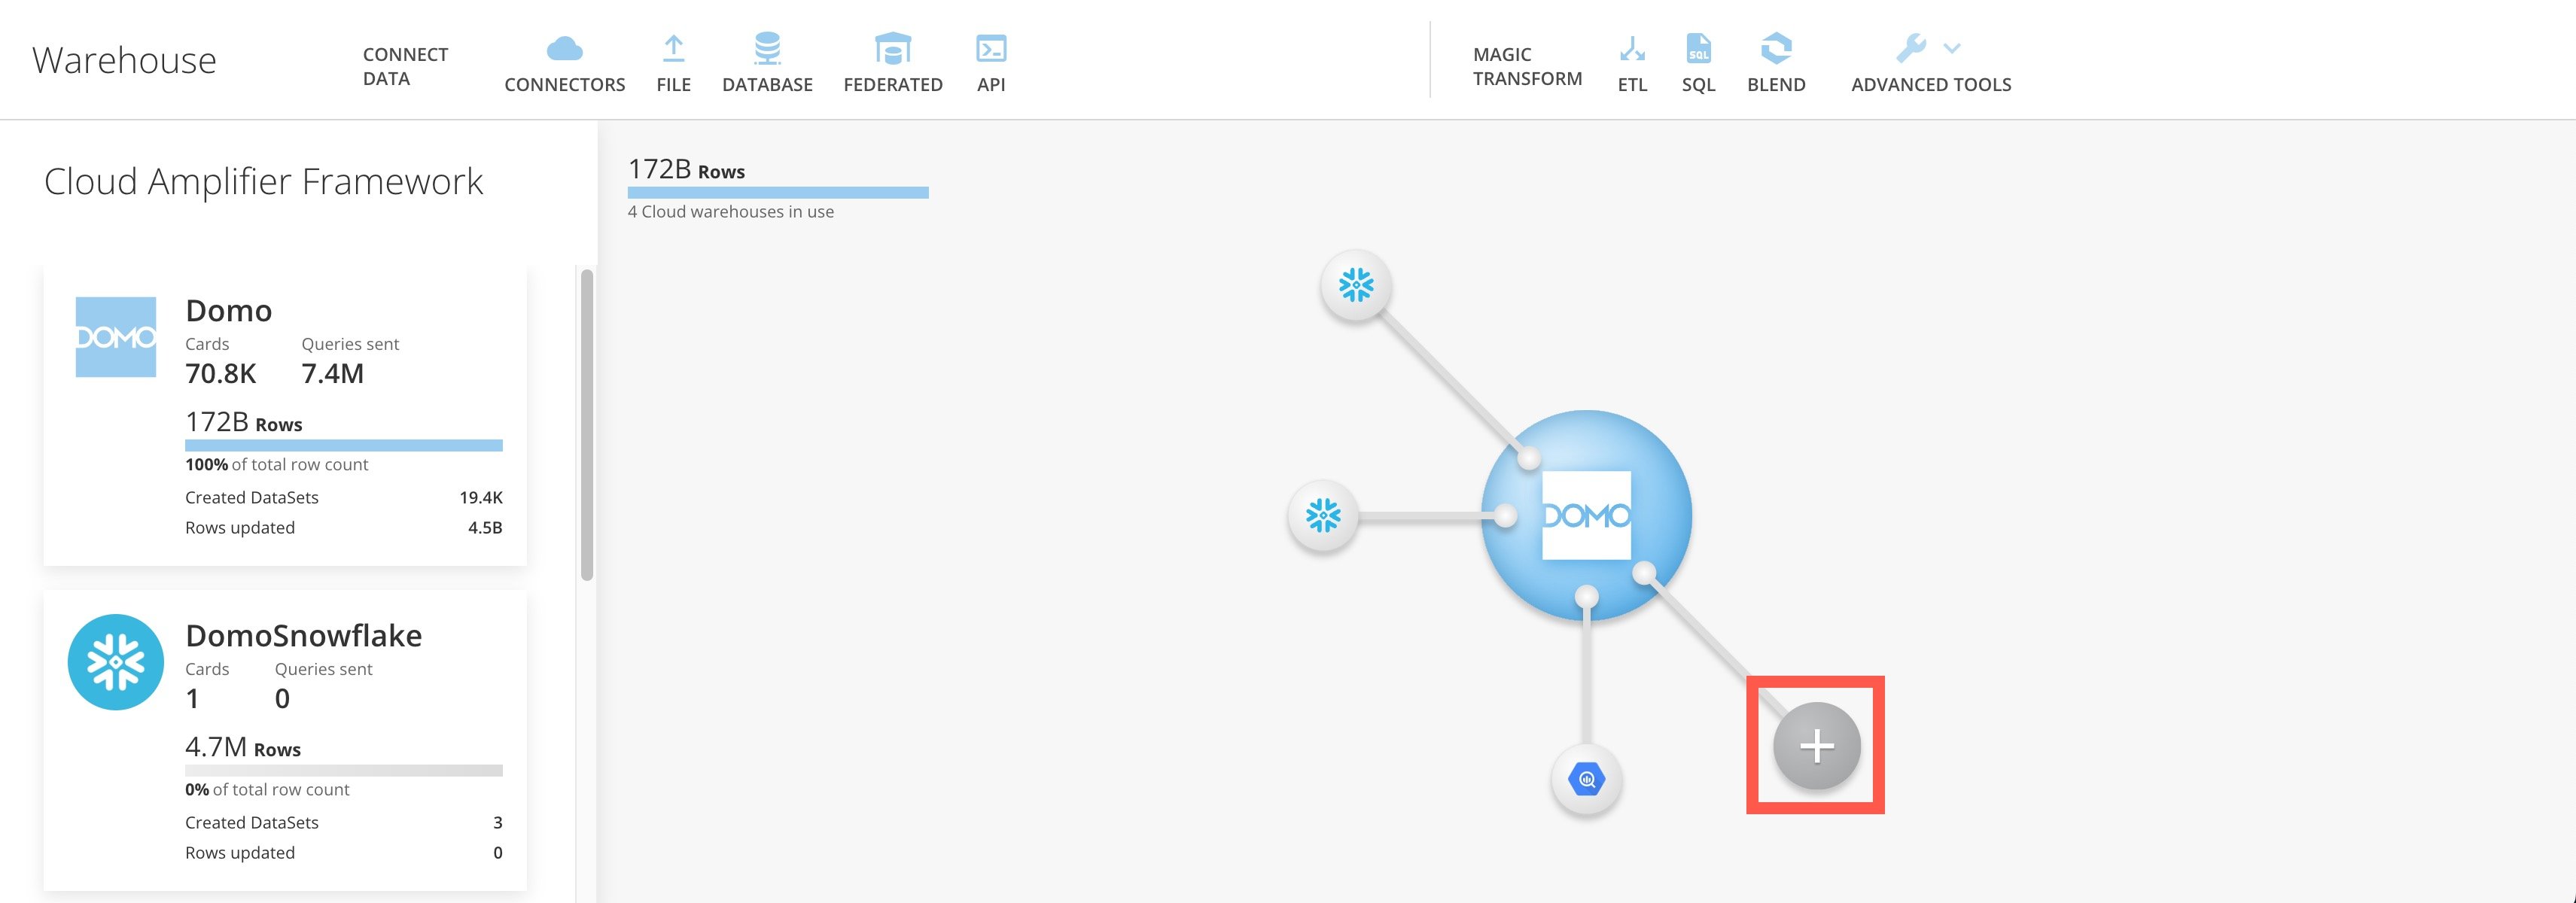
1. Go to the Domo Data Warehouse and select the
**Add** node.
### Use BigQuery-sourced Datasets in a DataFlow
When you use BigQuery-sourced datasets in a DataFlow, the data is queried live from BigQuery at the time the flow initiates. In addition, BigQuery-sourced datasets are checked for updates every 15 minutes based on the table's LAST\_ALTERED DateTime. If the LAST\_ALTERED field indicates that data has been updated, any DataFlows that use this table as an input are triggered and will begin to run.
### Configure BigQuery OAuth
The OAuth option for BigQuery-Cloud Amplifier makes it possible to reuse governance and permissions already established in BigQuery. When OAuth is configured for a cloud integration, all DataSets that are then established using that integration now use OAuth.
Any time someone tries to view a card or preview a DataSet built using an OAuth-configured integration, Domo prompts the person to enter their BigQuery credentials. Domo then queries the BigQuery data in the context of the authenticated user.
If a DataSet was set up using a non-OAuth-configured integration, any queries made to BigQuery are made in the context of the service account from the associated BigQuery service account key file.
**Important:** All DataFlows or alerts that use OAuth-configured DataSets use the service account on the associated integration.
# Prerequisites
You must have the following to configure a BigQuery integration with OAuth in Domo:
* A project in your BigQuery account
* A valid BigQuery service account key file
# Configure a BigQuery Integration with Per-User OAuth
1. Go to the Domo Data Warehouse and select the
**Add** node.
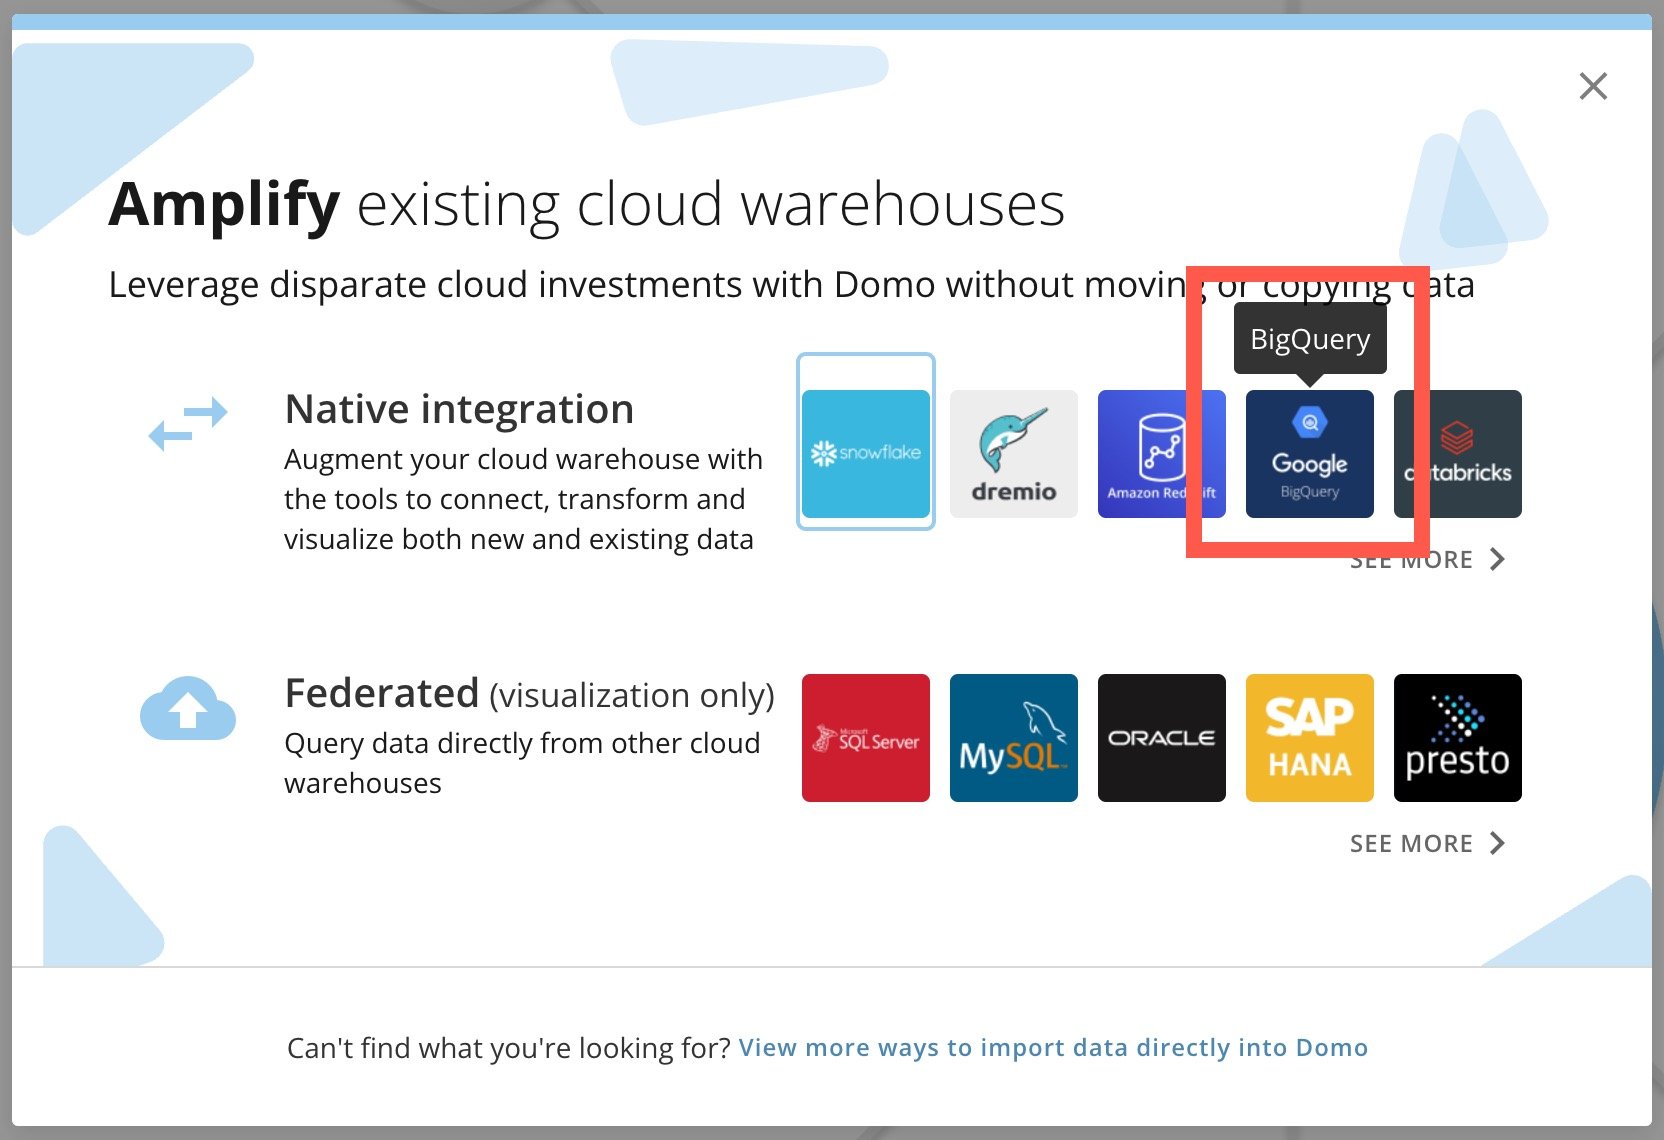
 2. From the native integration options, select **BigQuery**.
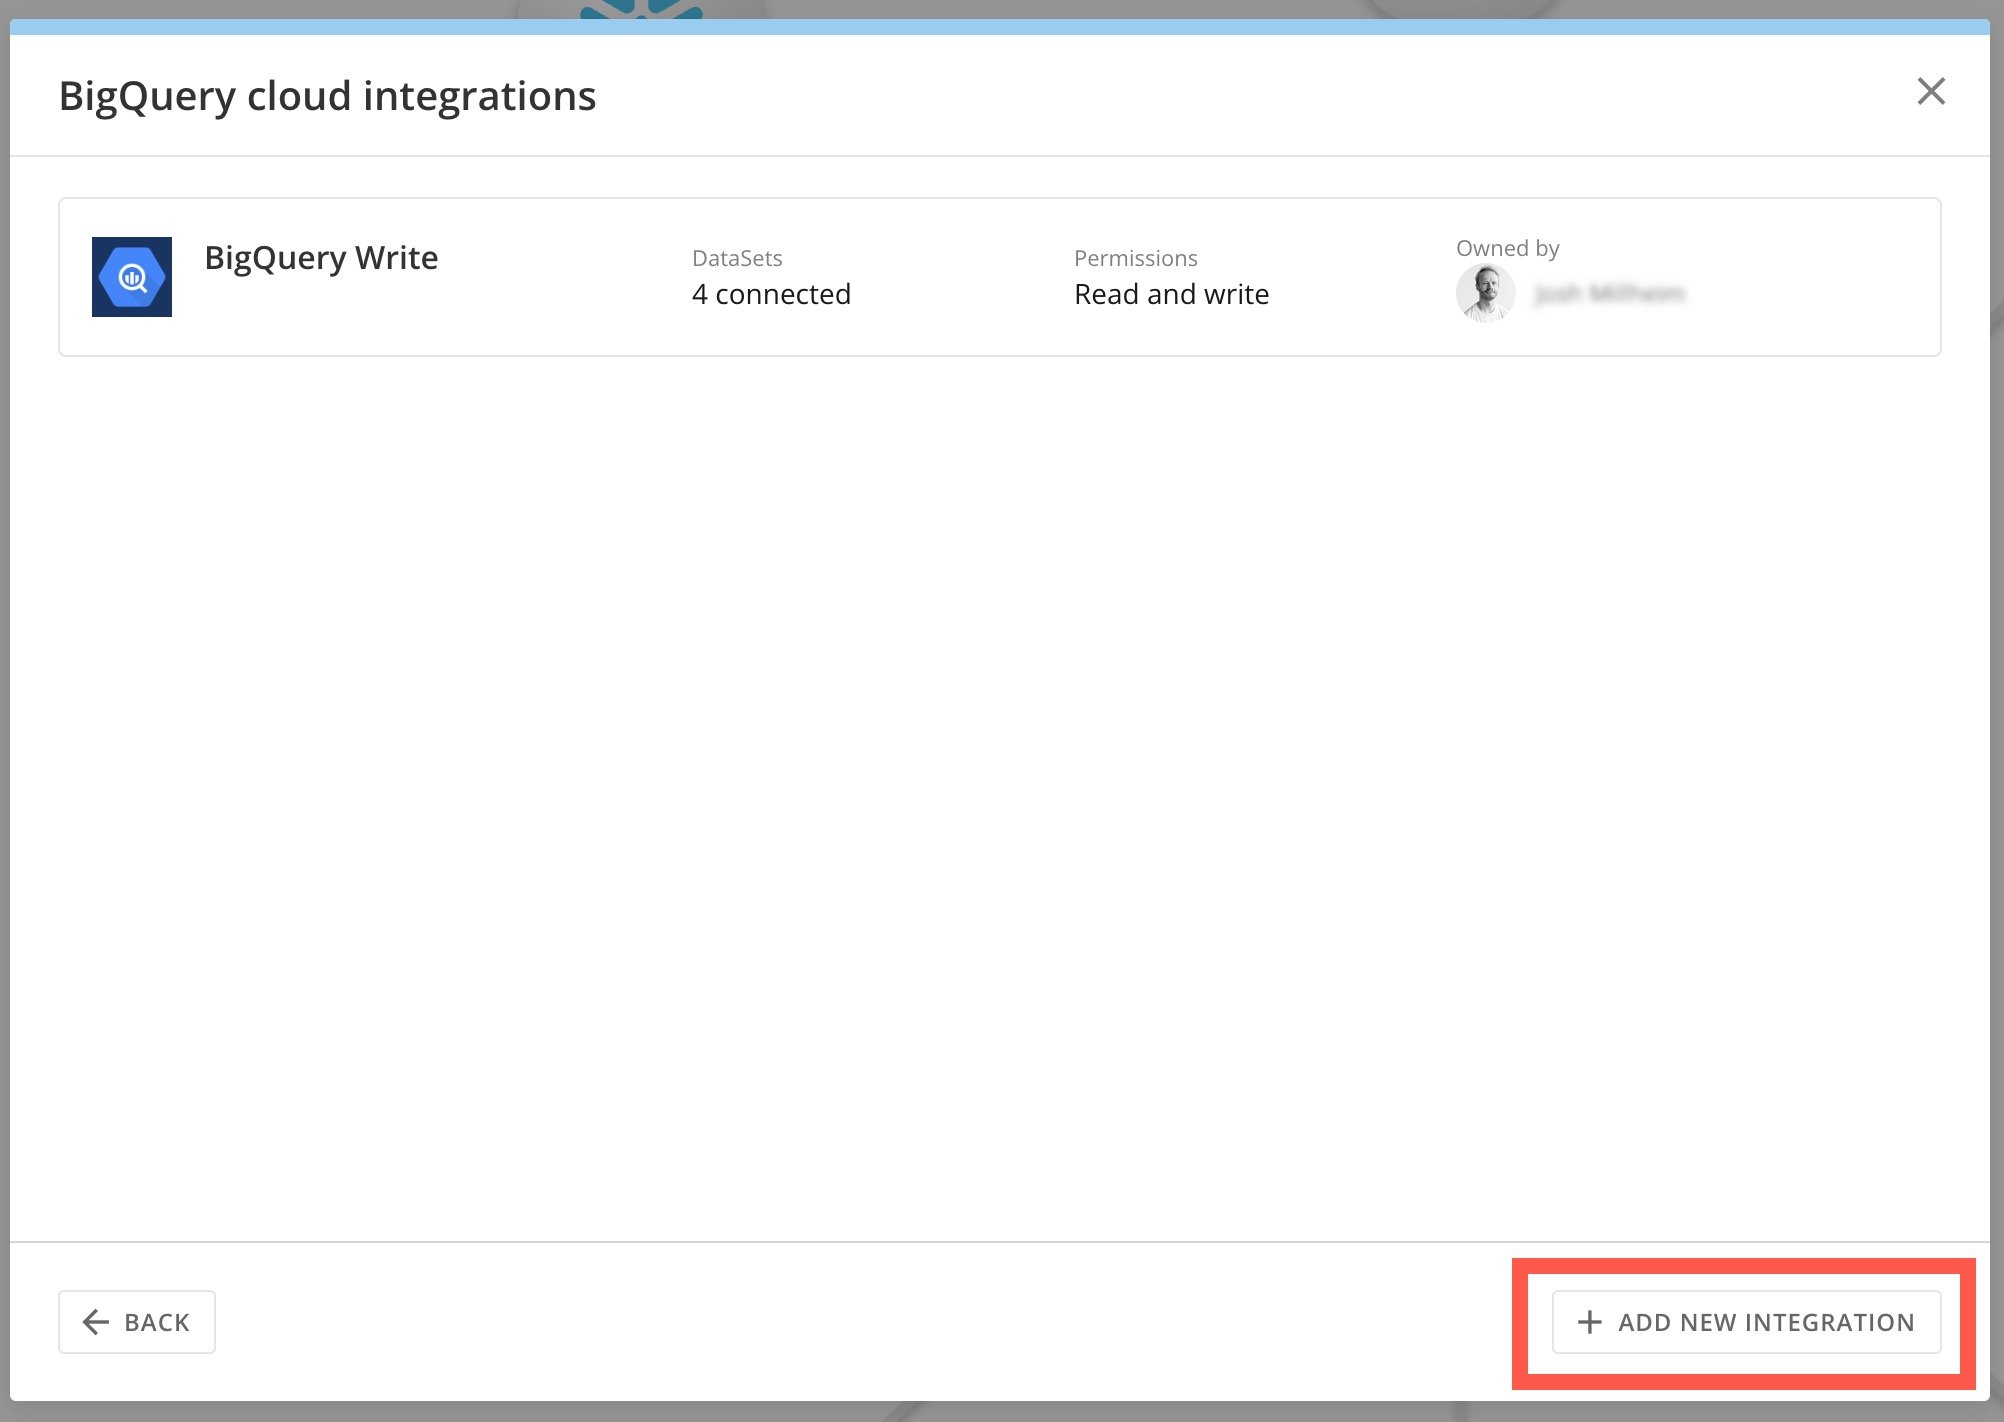
 3. Select
**+** **Add New Integration**.
3. Select
**+** **Add New Integration**.
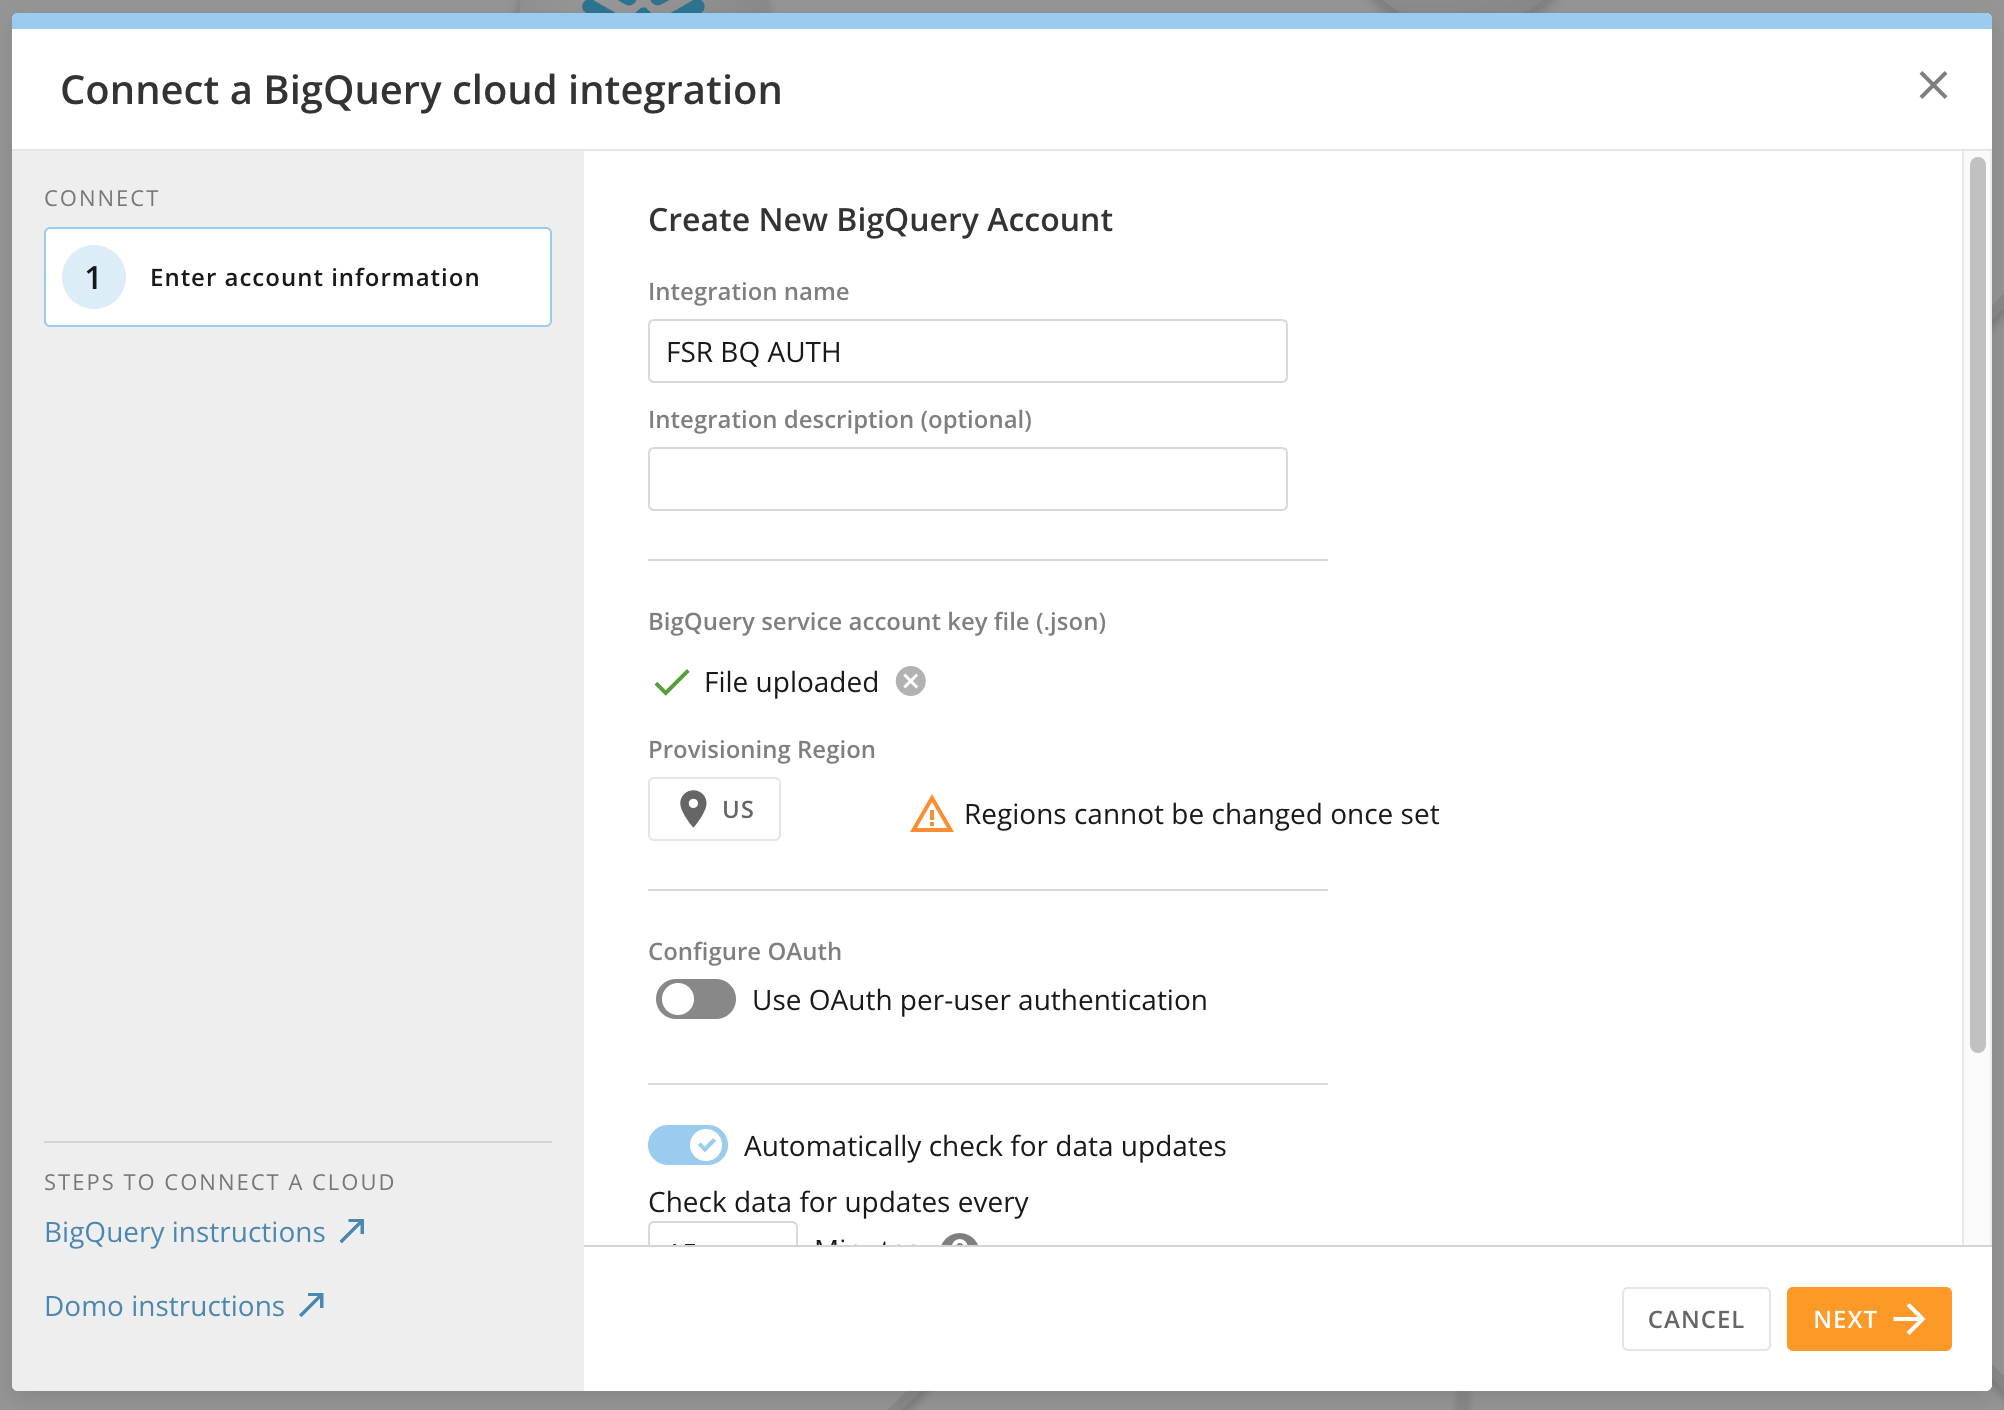
 4. In the provided fields, enter an integration name and optional description, upload your BigQuery service account key file in JSON format, and select the provisioning region that you want to use for this integration. You cannot change the provisioning region after it is set.
 5. Enable the
**Use OAuth per-user integration** switch. Then enter your default billing project ID and select **Authenticate**.
5. Enable the
**Use OAuth per-user integration** switch. Then enter your default billing project ID and select **Authenticate**.
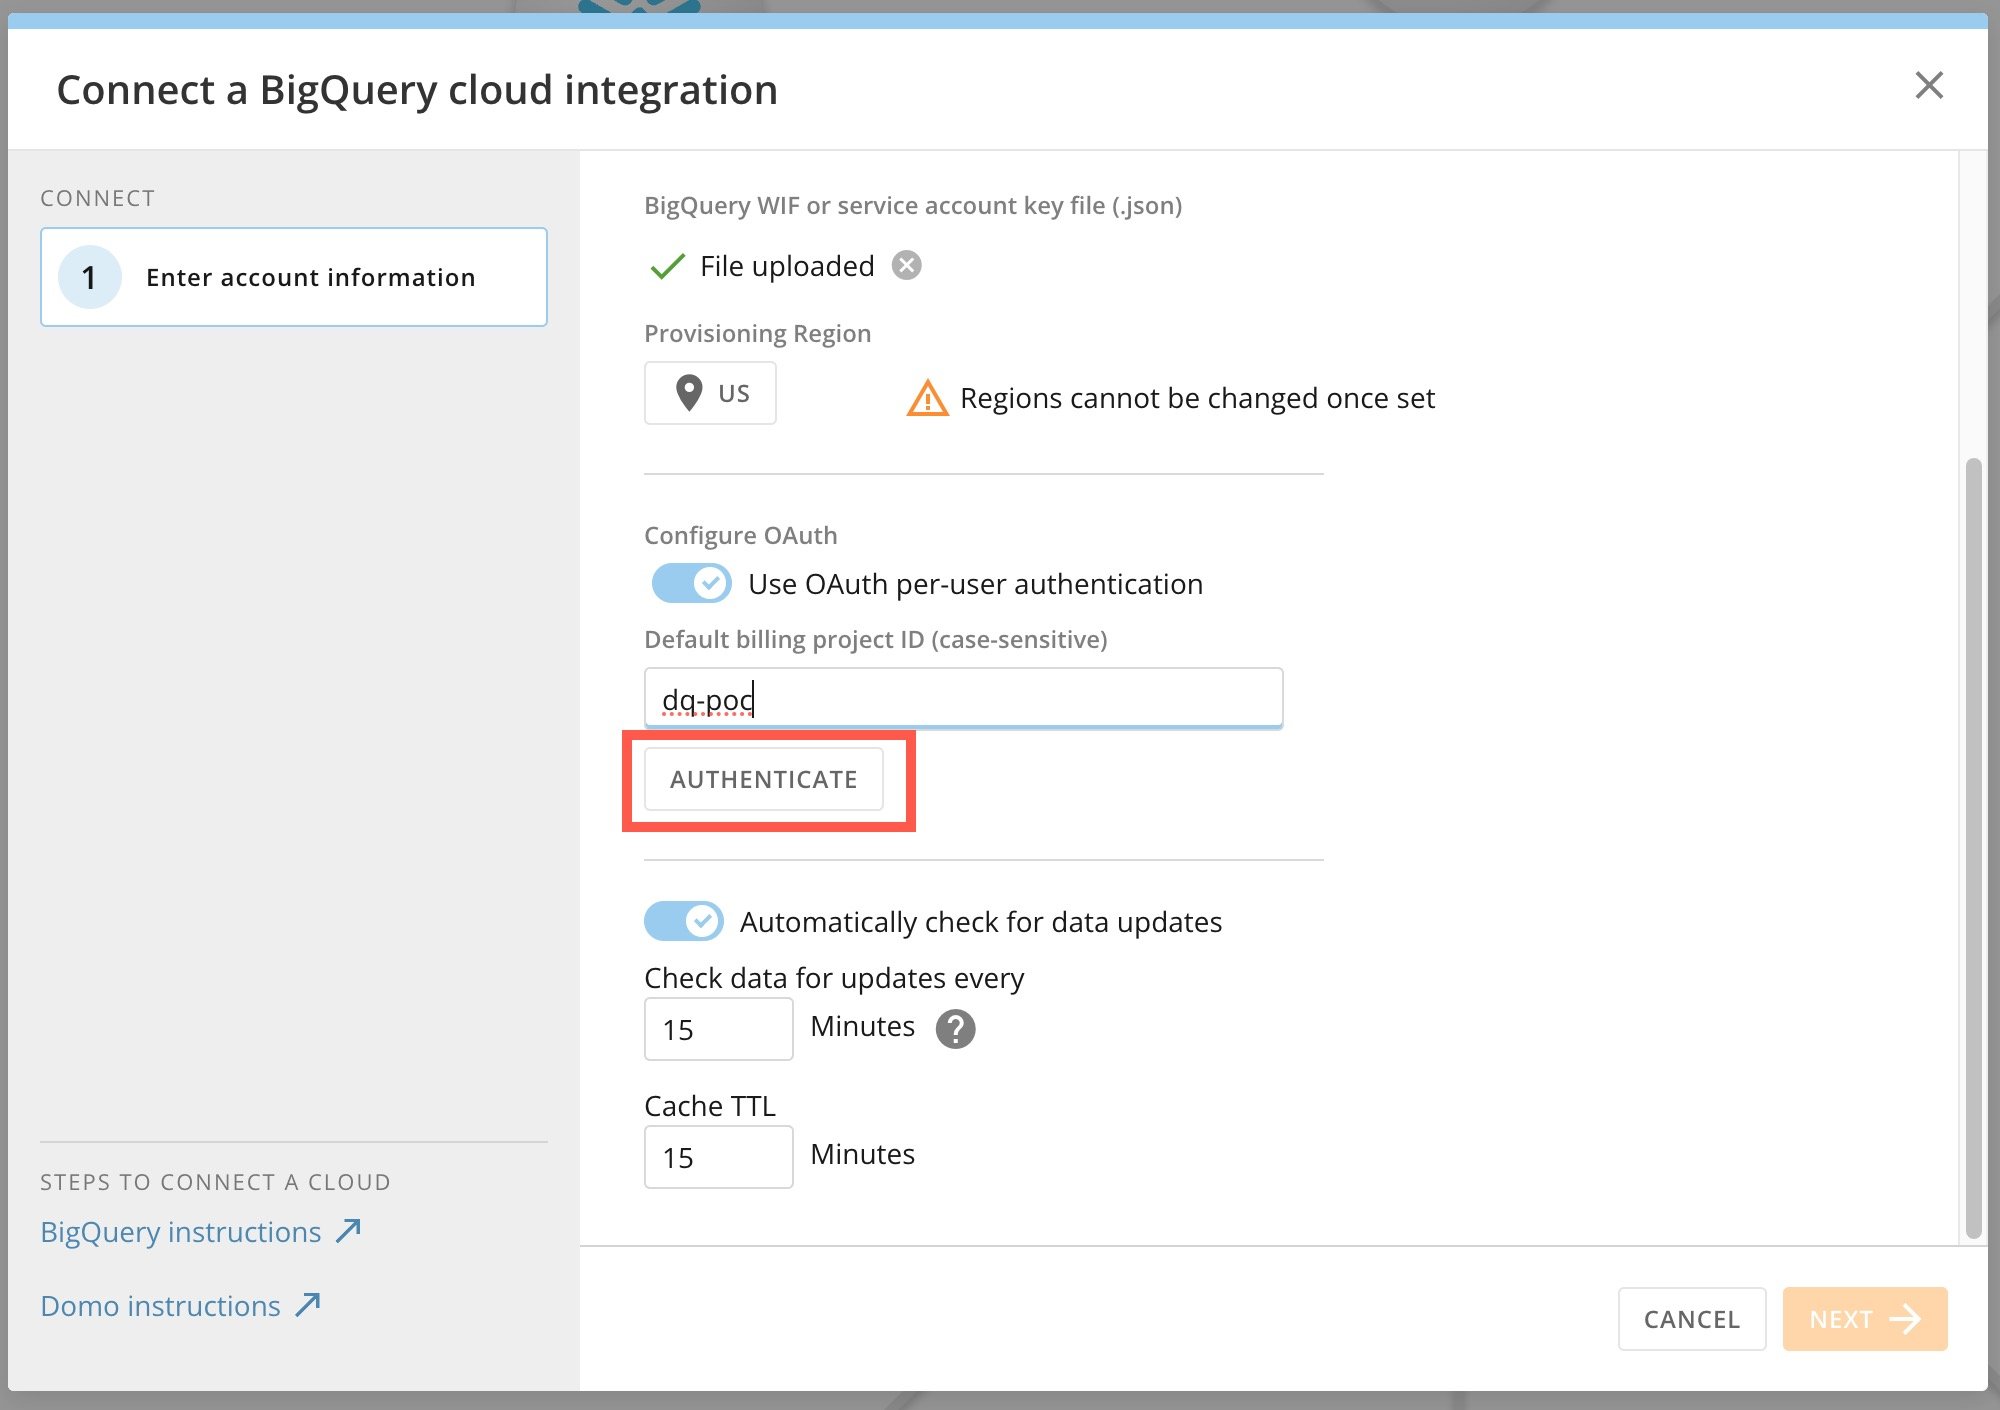 6. Validate your credentials against your IdP. After successful validation, a message displays. In the connect modal, select
**Next**.
You have successfully configured OAuth for BigQuery to Domo. Any card queries or data previews on any DataSets established using this integration now prompt the person to authenticate in BigQuery before query results are returned.
6. Validate your credentials against your IdP. After successful validation, a message displays. In the connect modal, select
**Next**.
You have successfully configured OAuth for BigQuery to Domo. Any card queries or data previews on any DataSets established using this integration now prompt the person to authenticate in BigQuery before query results are returned.