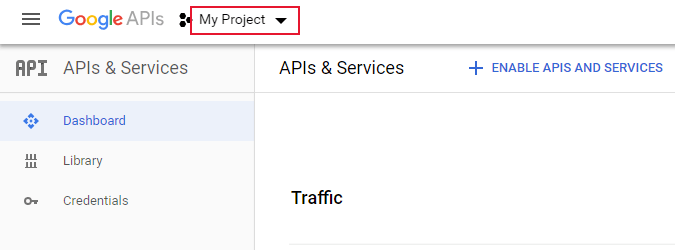
 3. Click
**New Project** and provide a name for the new project and the Parent organization or folder for the new project.
3. Click
**New Project** and provide a name for the new project and the Parent organization or folder for the new project.
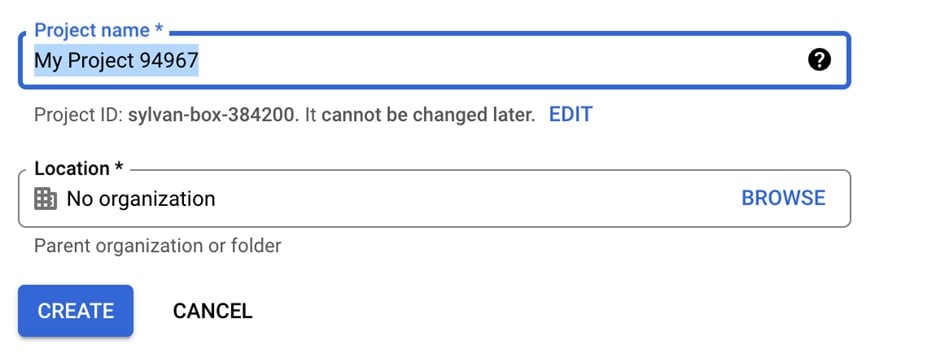 4. Click
**Create**.
### Step 2: Enabling the Google BigQuery API
To enable the Google BigQuery API for your project, do the following:
1. Click the burger menu and select the
**API & Services** menu.
4. Click
**Create**.
### Step 2: Enabling the Google BigQuery API
To enable the Google BigQuery API for your project, do the following:
1. Click the burger menu and select the
**API & Services** menu.
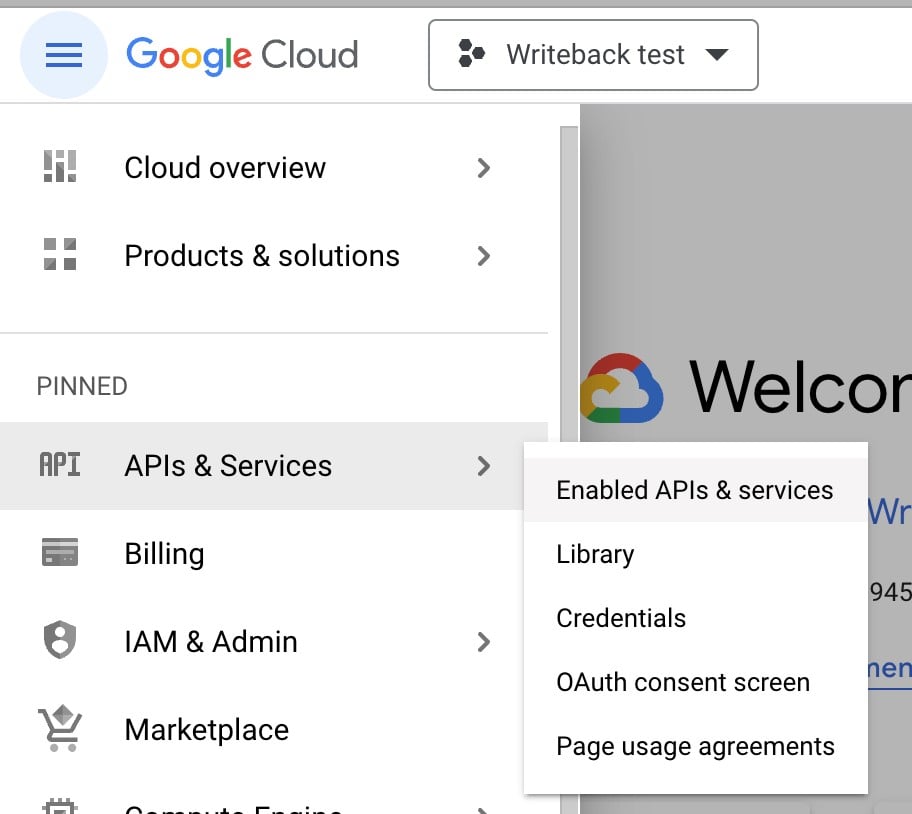 2. Select
**Library** and then search for the Google BigQuery API.
3. Click the Google
**BigQuery API** **Enable**
### Step 3: Creating a Workload Identity Pool and Provider
Follow the steps given below to create a Workload Identity Pool and Provider:
1. Click the burger menu in the console and select
**IAM & Admin**.
2. Select
**Library** and then search for the Google BigQuery API.
3. Click the Google
**BigQuery API** **Enable**
### Step 3: Creating a Workload Identity Pool and Provider
Follow the steps given below to create a Workload Identity Pool and Provider:
1. Click the burger menu in the console and select
**IAM & Admin**.
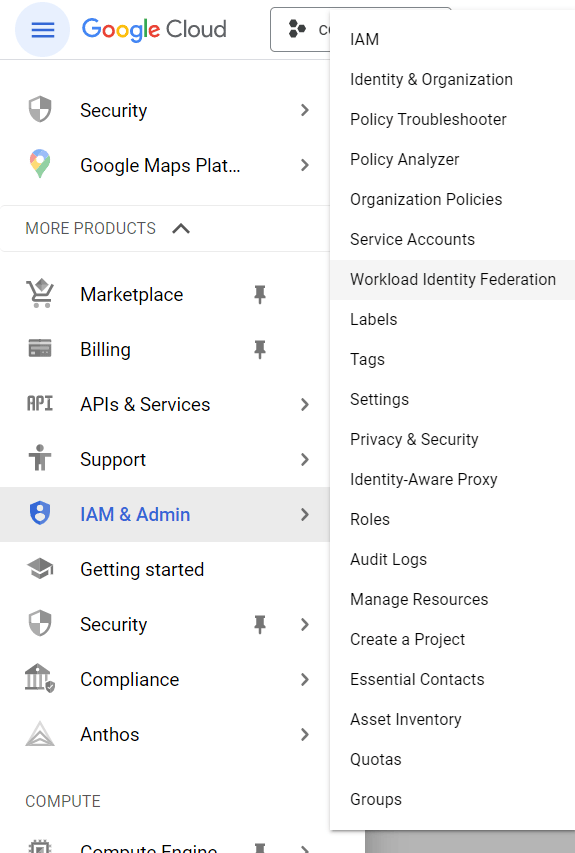 2. Select the
**Workload Identity Federation** option.
3. Click
**create pool**.
2. Select the
**Workload Identity Federation** option.
3. Click
**create pool**.
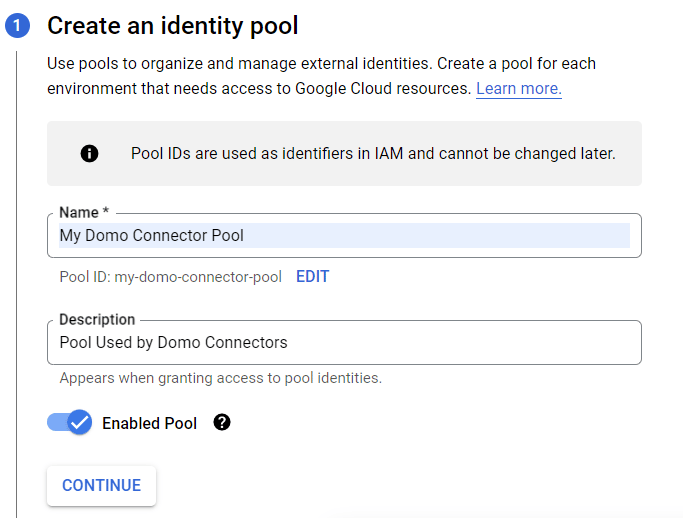
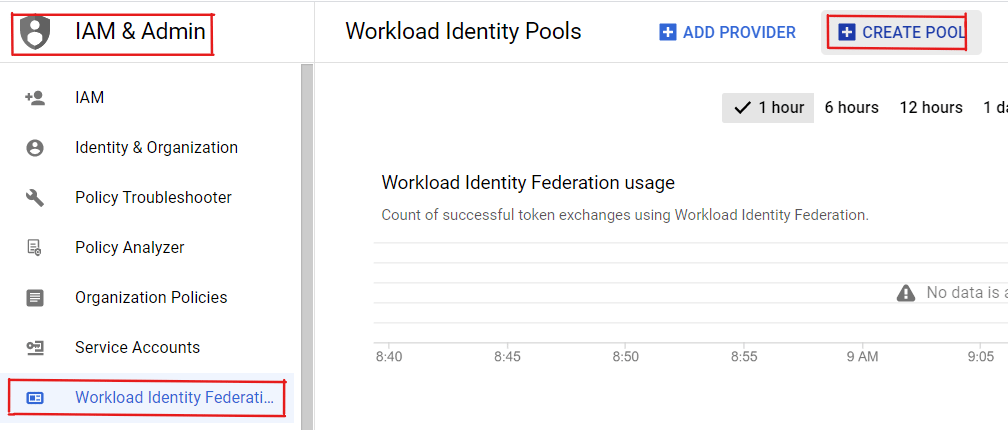 4. Enter a name for the pool in Step-1 and ensure that the
**enable pool** is selected.
4. Enter a name for the pool in Step-1 and ensure that the
**enable pool** is selected.
 5. In step 2, you will be prompted to select a provider. Select
**AWS**.
6. Under the
**provider details** tab, enter the name of the Provider and ID, for example, **Domo AWS**.
5. In step 2, you will be prompted to select a provider. Select
**AWS**.
6. Under the
**provider details** tab, enter the name of the Provider and ID, for example, **Domo AWS**.
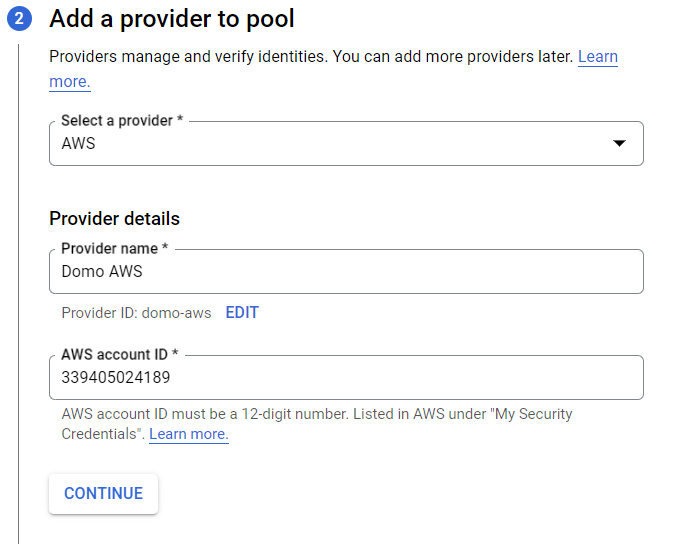 7. You will need to provide Domo’s AWS account id in the
**AWS Account ID box**.
Based on where your Domo instance is located, use one of the account ids listed below:
```
US: 339405024189
AU: 010251424122
EMEA (IE): 687132894031
JP: 622384692065
CA: 710710207408
```
8. Contact Domo Support if you are unsure which id to use.
9. You can optionally configure additional provider attributes in Step-3.
### Step 4: Grant a Service Account access to the Workload Pool
1. On the burger menu, navigate to
**IAM** and select **Workload identity federation** list and then select the recently created pool.
2. Select
**Grant Access** located at the top of the window.
3. On the right-side pane, you will be prompted to select which service account you want to give access to.
4. Select the appropriate service account from the
**Select Service Account** dropdown.
5. Click
**Save**.
6. Under
**Configure your application**, select the provider you created with Domo’s AWS account id.
7. Click the
**Download Config** button to download the JSON configuration file.
This file will be used to power up the connector.
## Configuring the Connection
This section enumerates the options in the **Credentials** and **Details** panes in the Google BigQuery Workload Identity Federation Connector page. The components of the other panes in this page, **Scheduling** and **Name & Describe Your DataSet**, are universal across most connector types and are discussed in great detail in [Adding a DataSet Using a Data Connector](https://domo-support.domo.com/s/article/360042926274?language=en_US "Adding a DataSet Using a Data Connector").
### Credentials Pane
This pane contains fields for entering credentials to connect to your Domo developer account. The following table describes what is needed for each field:
7. You will need to provide Domo’s AWS account id in the
**AWS Account ID box**.
Based on where your Domo instance is located, use one of the account ids listed below:
```
US: 339405024189
AU: 010251424122
EMEA (IE): 687132894031
JP: 622384692065
CA: 710710207408
```
8. Contact Domo Support if you are unsure which id to use.
9. You can optionally configure additional provider attributes in Step-3.
### Step 4: Grant a Service Account access to the Workload Pool
1. On the burger menu, navigate to
**IAM** and select **Workload identity federation** list and then select the recently created pool.
2. Select
**Grant Access** located at the top of the window.
3. On the right-side pane, you will be prompted to select which service account you want to give access to.
4. Select the appropriate service account from the
**Select Service Account** dropdown.
5. Click
**Save**.
6. Under
**Configure your application**, select the provider you created with Domo’s AWS account id.
7. Click the
**Download Config** button to download the JSON configuration file.
This file will be used to power up the connector.
## Configuring the Connection
This section enumerates the options in the **Credentials** and **Details** panes in the Google BigQuery Workload Identity Federation Connector page. The components of the other panes in this page, **Scheduling** and **Name & Describe Your DataSet**, are universal across most connector types and are discussed in great detail in [Adding a DataSet Using a Data Connector](https://domo-support.domo.com/s/article/360042926274?language=en_US "Adding a DataSet Using a Data Connector").
### Credentials Pane
This pane contains fields for entering credentials to connect to your Domo developer account. The following table describes what is needed for each field:
Field | Description |
|---|---|
WORKLOAD IDENTITY FEDERATION CLIENT LIBRARY CONFIG JSON KEY | Configuration of external credentials JSON file containing external authentication metadata. This file is obtained from Step-4 in the instructions above. |
| Project ID | Project id of the project in GCP that has access to Google BigQuery and the workload pool. |
Menu | Description | ||||||
|---|---|---|---|---|---|---|---|
| Report | Run the following reports based on the requirements:
| ||||||
| SQL Dialect | Select SQL Dialect that you want to use. Defaults to Standard SQL. | ||||||
| Query | Enter the query text. | ||||||
| Query Parameters | Enter the query parameter value, it is the initial value for query parameter. The last run date is optional by default it is '02/01/1700' if is not provided. For example: `!{lastvalue:_id}!=1,!{lastrundate:start_date}!=02/01/1944`. | ||||||
| Allow Large Results | If enabled, allows arbitrarily large results to be written to the temporary destination table and delete it when the job is finished. Dataset name is required to create the temporary table. | ||||||
| Dataset\_Names | Select the dataset names from the available list of datasets. | ||||||
| Table Names | Select table names from available list of tables. | ||||||
| Processing Location | Enter a location where your query will run. Queries that run in a specific location may only reference data in that location. | ||||||
| Max Results | Max Results is the number of results returned per page of data. By default, Max Results is 10,000 results per page. If your dataset throws an out of memory error, decrease Max Results. | ||||||
| Use Google BigQuery Schema | Select this checkbox to use the schema received from Google BigQuery.\ This is useful when a column's datatype may be perceived incorrectly to Domo: e.g. your table has '123' in a String column. |