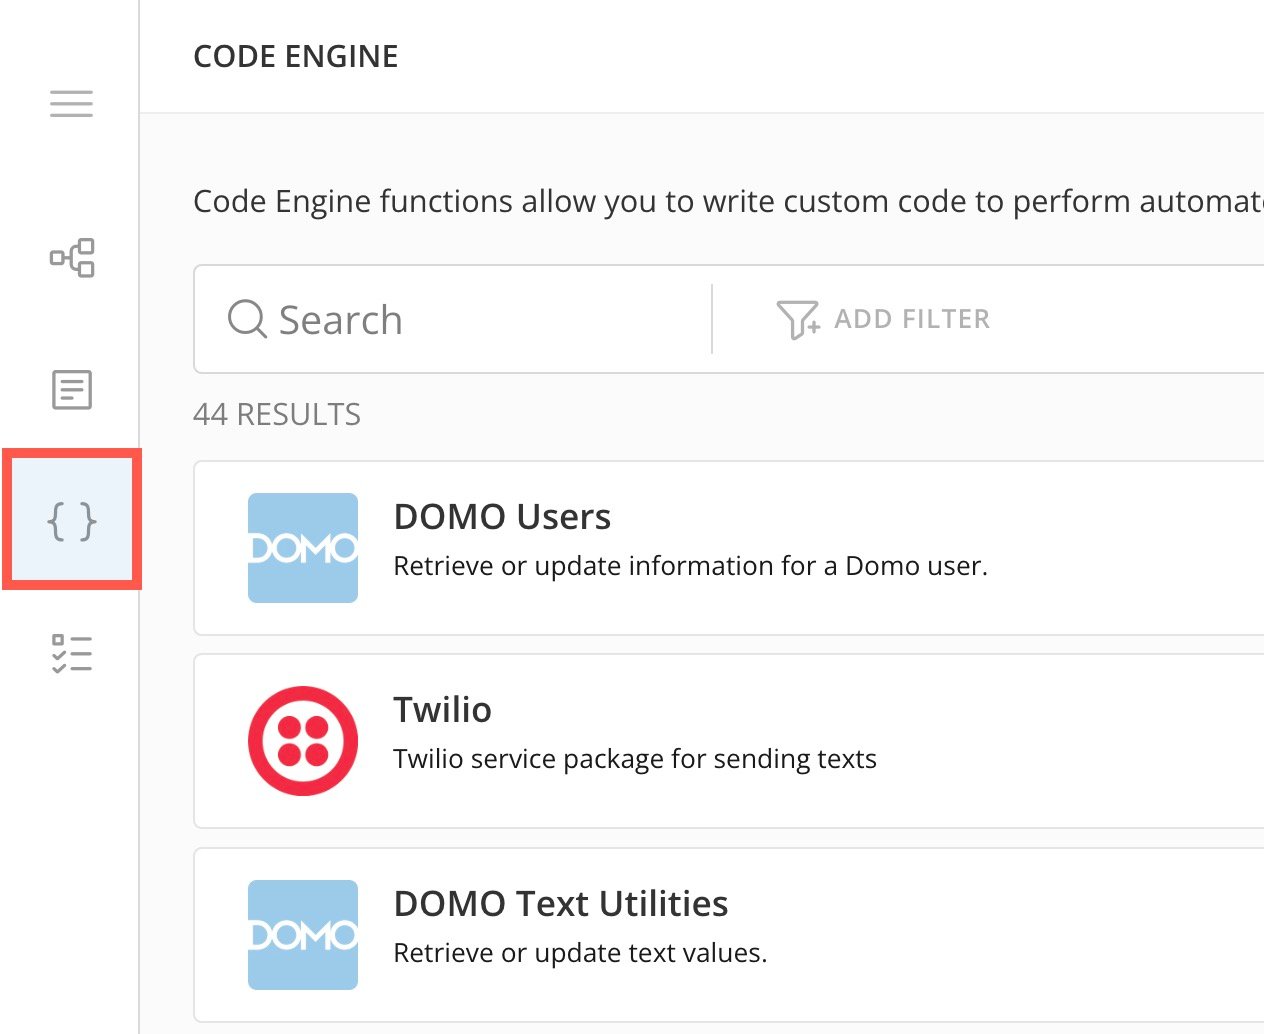
 The Code Engine home page displays.
 ### Home Page
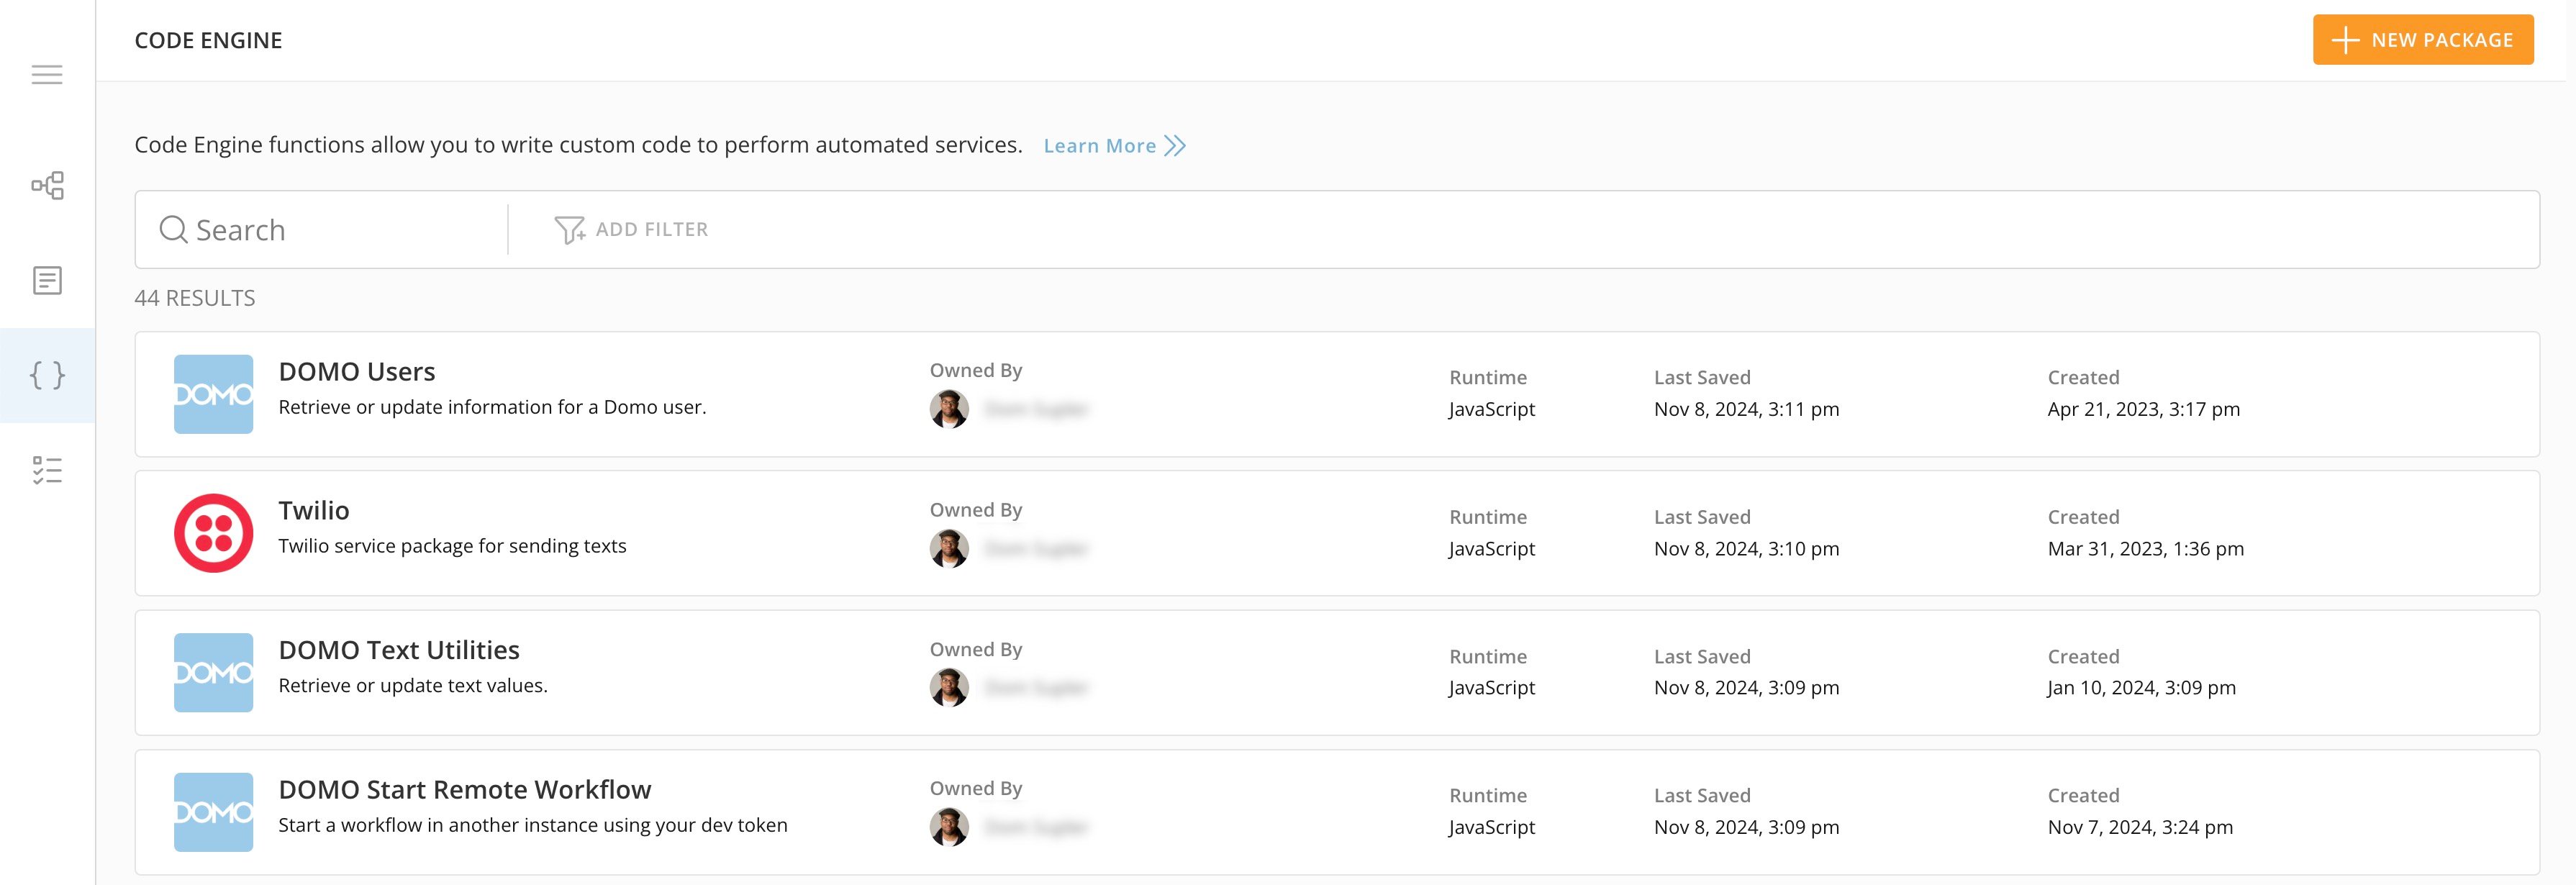
The main feature of the Code Engine home page is a [list](#code_engine_repository_list) of all the Code Engine packages available to you based on your [permissions](#permissions). From here, you can also create new packages and access the code editor to edit existing packages.
From the left navigation, you can access complementary features: [Workflows](/s/article/000005108), [Forms](/s/article/000005171), and [Task Center](/s/article/000005172). If you don't see the options for these features in the left navigation, they are not enabled for your instance. Contact your Domo account team about enablement.
### Home Page
The main feature of the Code Engine home page is a [list](#code_engine_repository_list) of all the Code Engine packages available to you based on your [permissions](#permissions). From here, you can also create new packages and access the code editor to edit existing packages.
From the left navigation, you can access complementary features: [Workflows](/s/article/000005108), [Forms](/s/article/000005171), and [Task Center](/s/article/000005172). If you don't see the options for these features in the left navigation, they are not enabled for your instance. Contact your Domo account team about enablement.
 # Code Engine Repository List
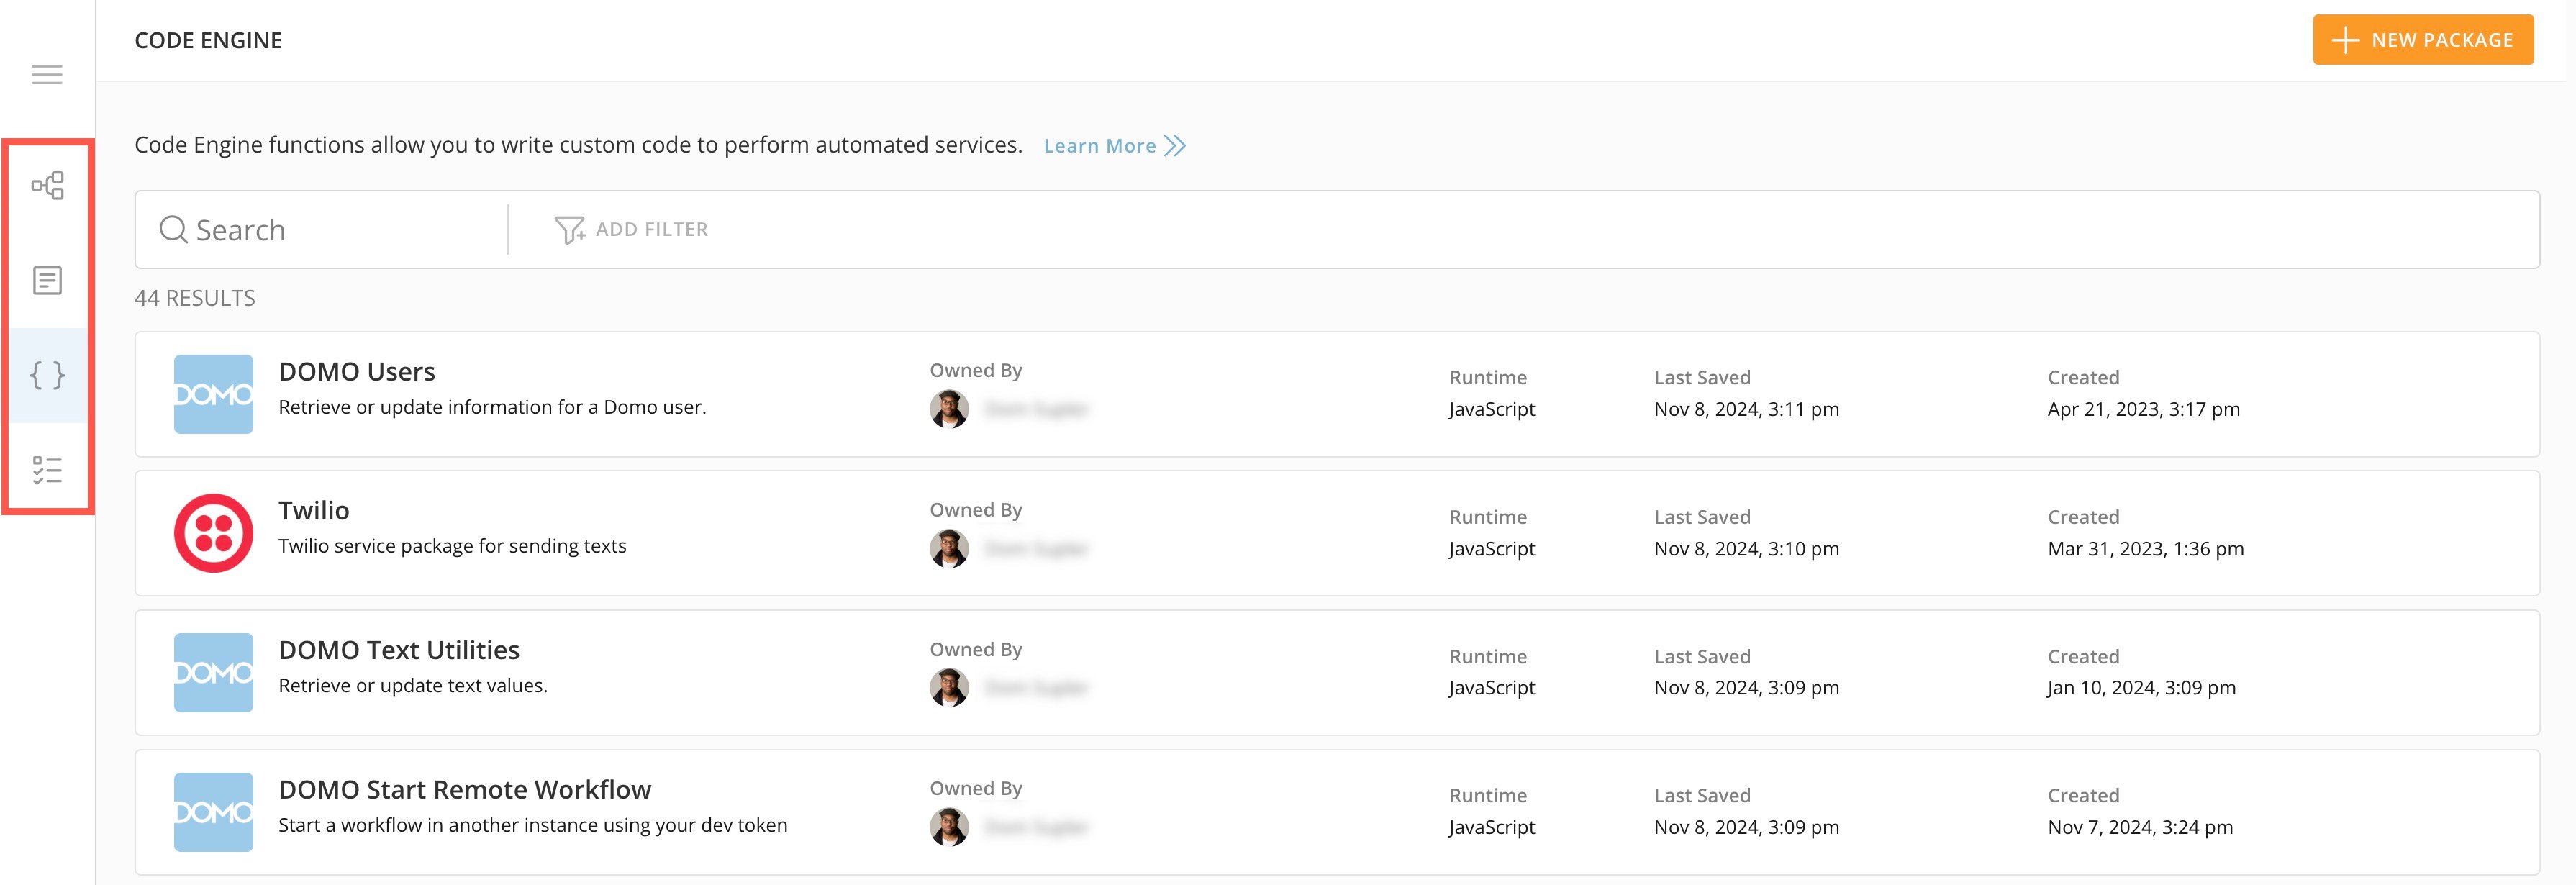
 The Repository List is the main feature of the Code Engine home page. Each row in the list represents an individual package. The columns in the list are described below:
* **Package Name/Description —** Displays the title of the package and a brief description.
* **Owned By —** Displays the package creator/owner's name and avatar.
* **Runtime —** Displays the runtime (or programmatic language) the package is using.
* **Last Saved —** Provides the date when the package was last updated.
* **Created —** Provides the date when the package was created.
Select anywhere in a row to open that package in the [code editor](#code_editor).
### Create a Custom Package
You can create a custom function package from the Code Engine [home page](#home_page) by following the steps below.
1. Select **+ New Package**. If the option is disabled, make sure you have the [required grants](#required_grants). If you do have the grants and still can't create a new package, reach out to your Domo account team or contact [Domo Support](https://domo-support.domo.com/s/)
The Repository List is the main feature of the Code Engine home page. Each row in the list represents an individual package. The columns in the list are described below:
* **Package Name/Description —** Displays the title of the package and a brief description.
* **Owned By —** Displays the package creator/owner's name and avatar.
* **Runtime —** Displays the runtime (or programmatic language) the package is using.
* **Last Saved —** Provides the date when the package was last updated.
* **Created —** Provides the date when the package was created.
Select anywhere in a row to open that package in the [code editor](#code_editor).
### Create a Custom Package
You can create a custom function package from the Code Engine [home page](#home_page) by following the steps below.
1. Select **+ New Package**. If the option is disabled, make sure you have the [required grants](#required_grants). If you do have the grants and still can't create a new package, reach out to your Domo account team or contact [Domo Support](https://domo-support.domo.com/s/) 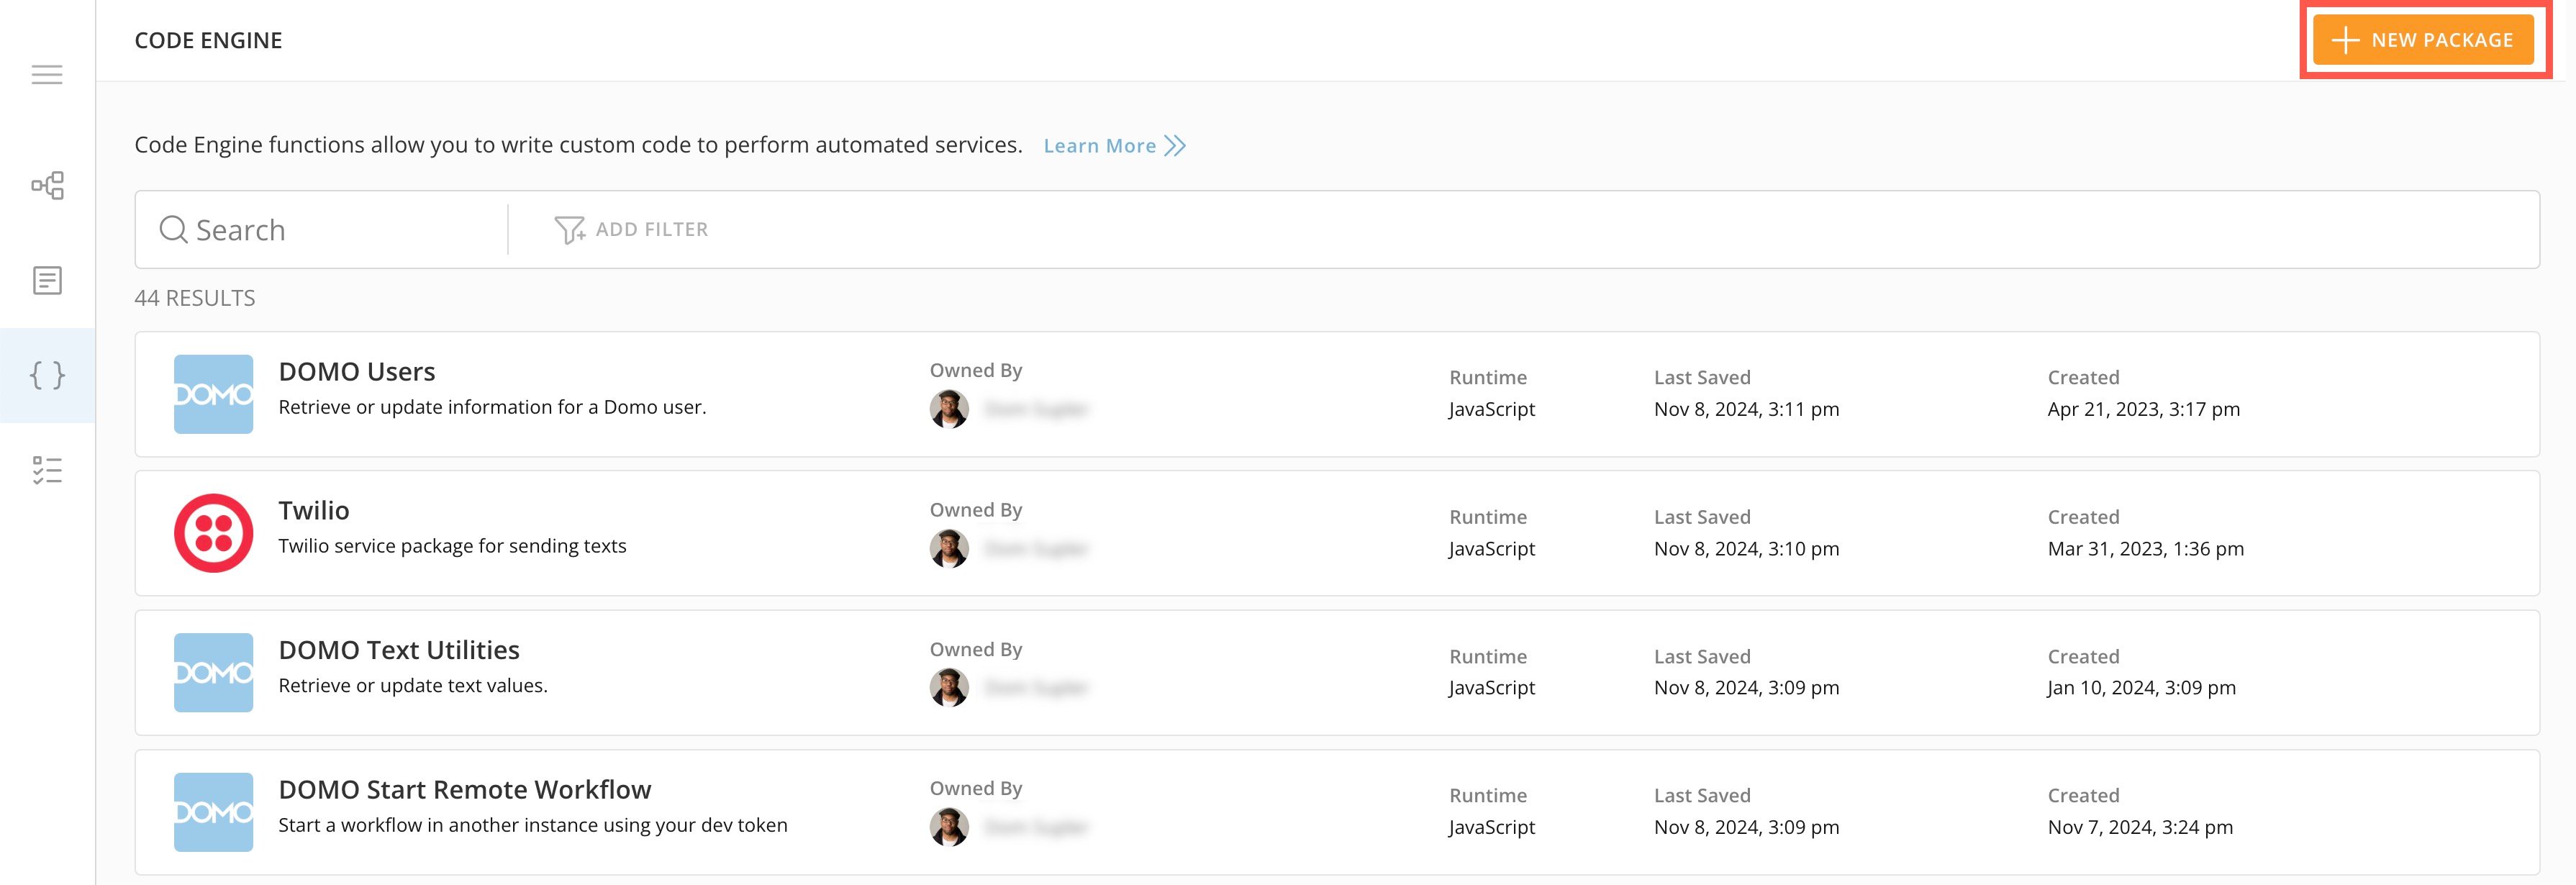 The **Create New Package** modal displays.
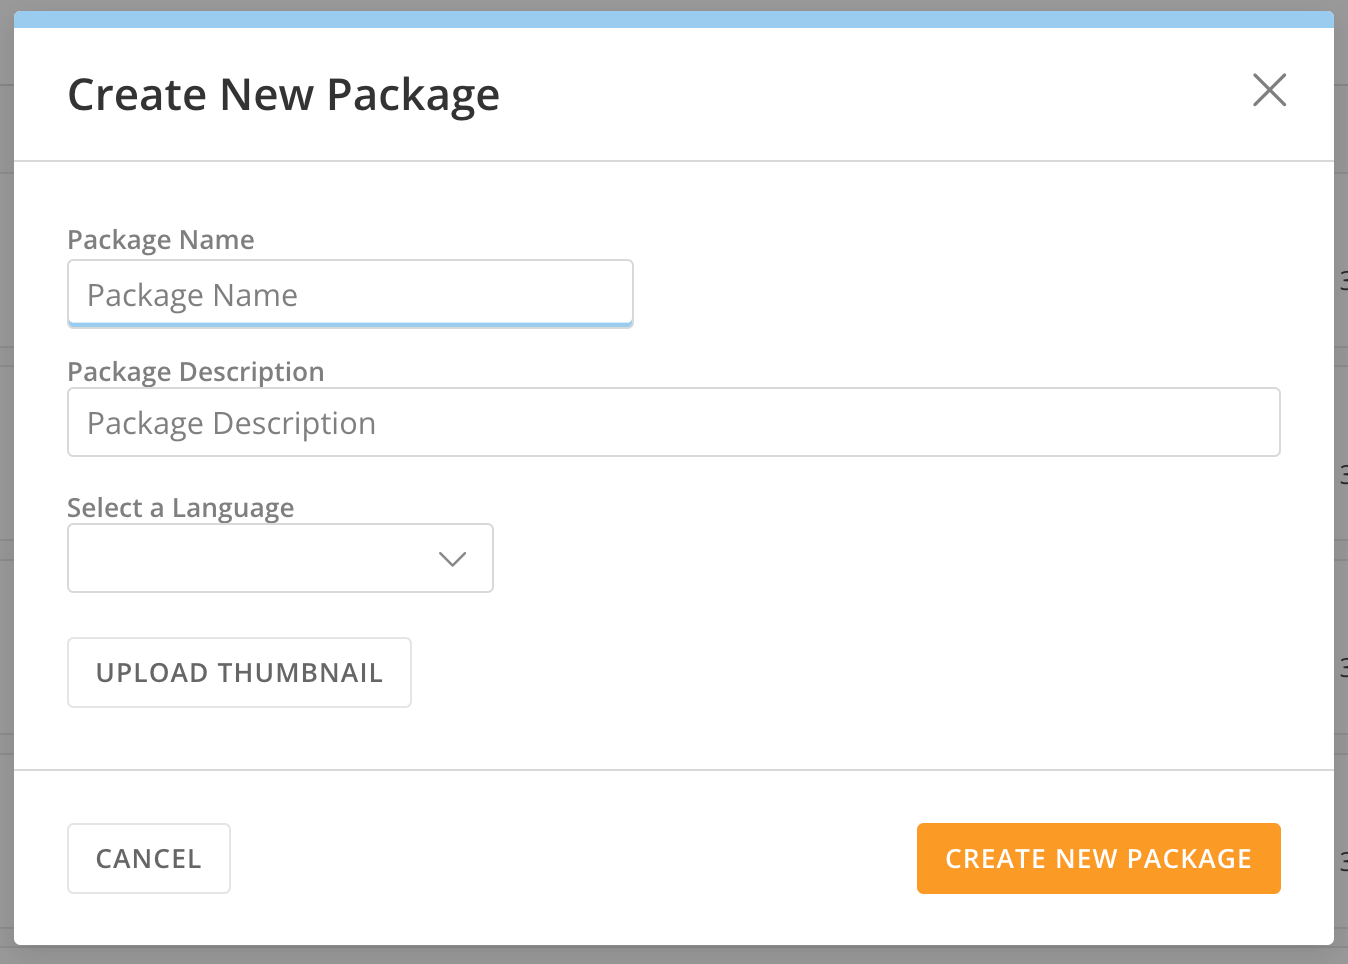 2. (Required) Fill in the **Package Name** and **Package Description** fields.
3. (Required) Choose an option from the **Select a Language** dropdown. The options are JavaScript and Python.
2. (Required) Fill in the **Package Name** and **Package Description** fields.
3. (Required) Choose an option from the **Select a Language** dropdown. The options are JavaScript and Python.
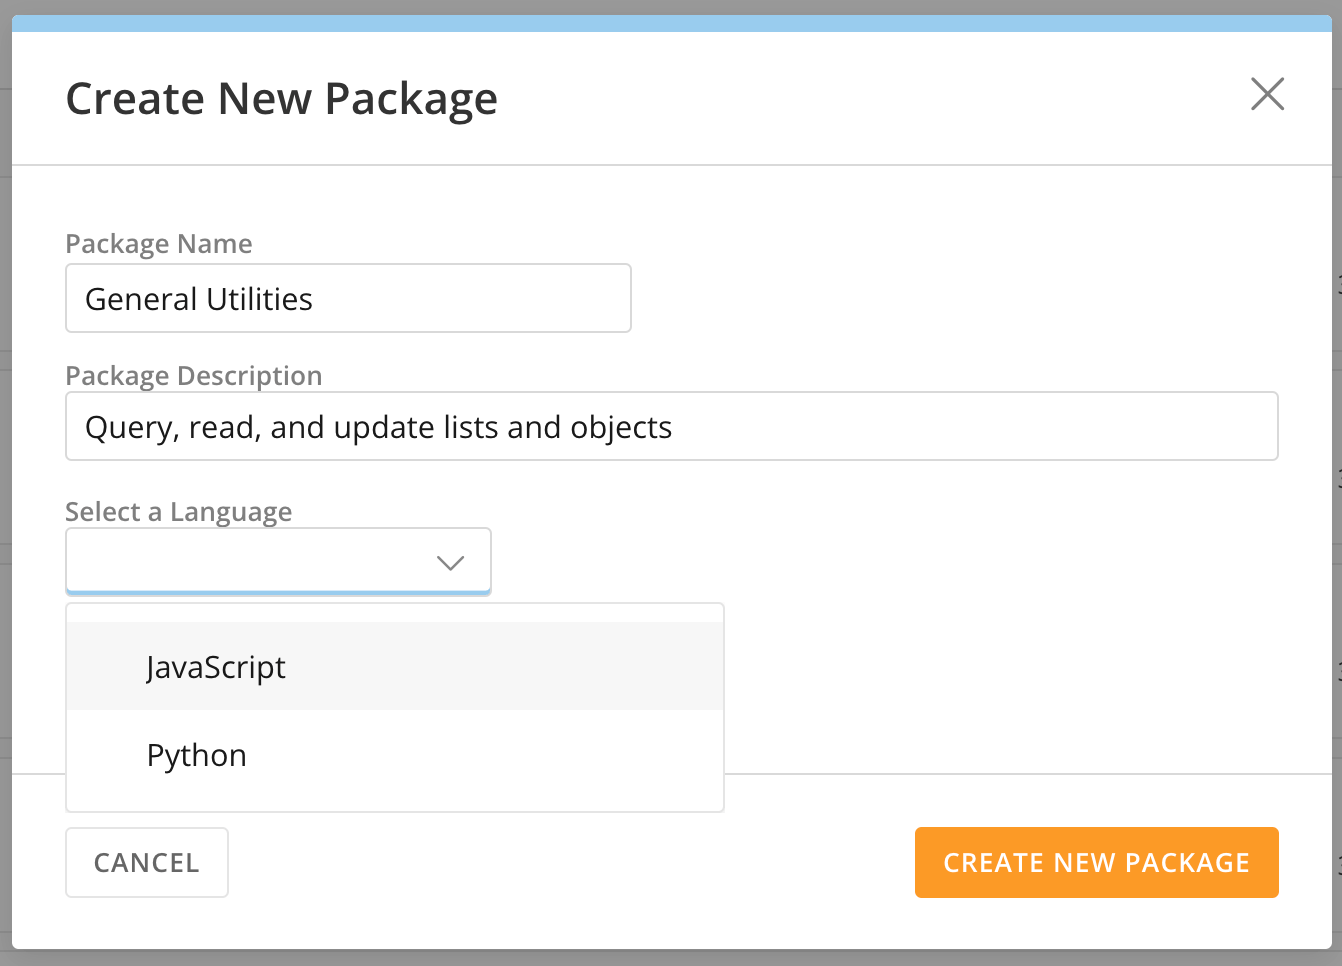 4. (Optional) You can upload a thumbnail for increased package visibility.
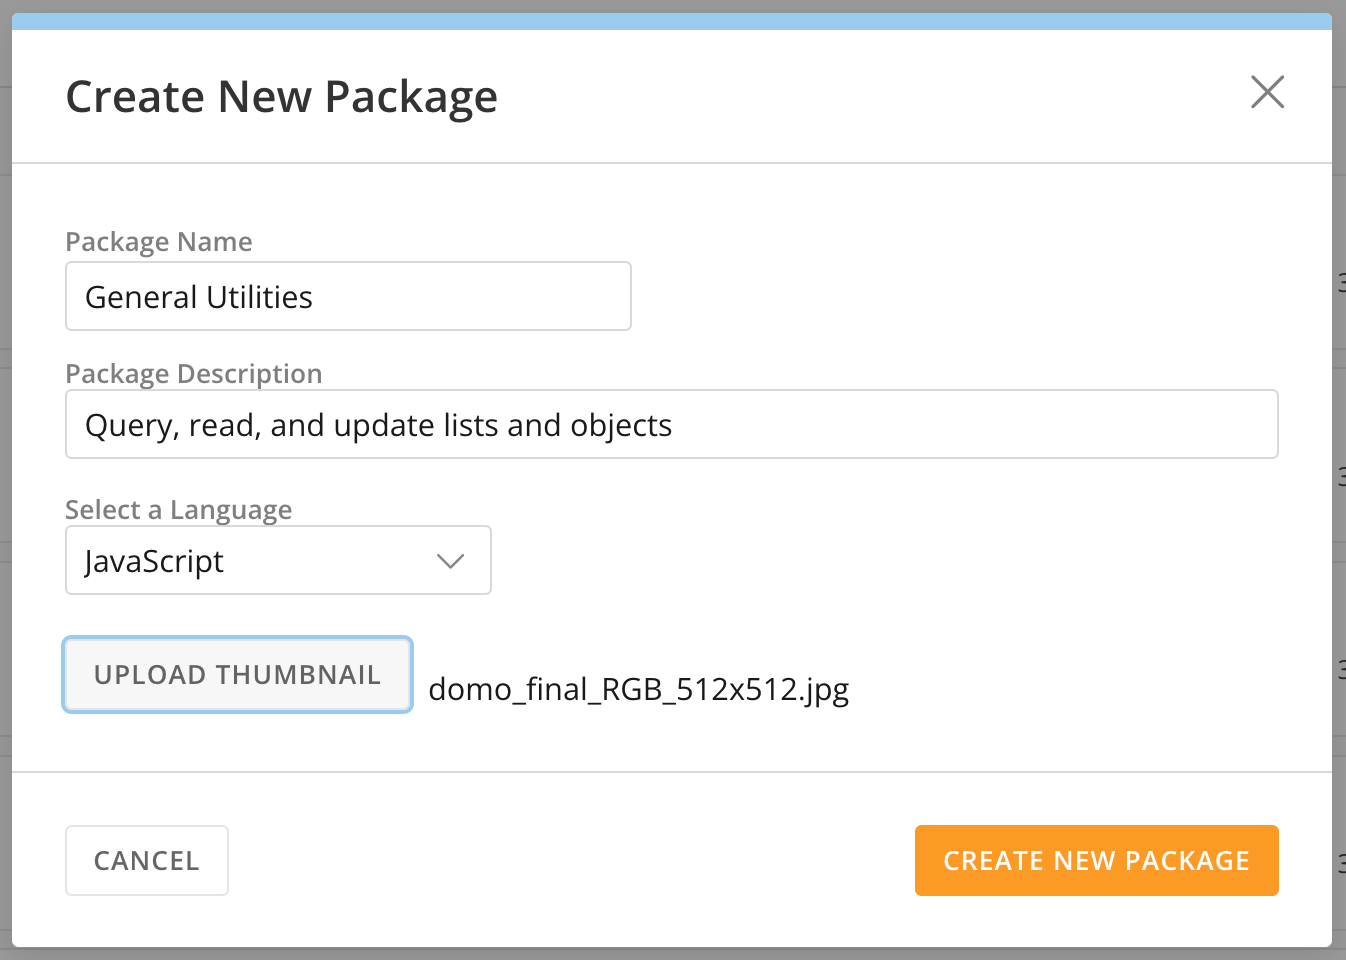 5. Select **Create New Package** to display the package in the [code editor](#code_editor) or **Cancel** to return to the home page.
### Create a New Package Version
When you need to make changes to a package, such as updating a function or adding a new function, you must create a new version of the package to make the updates. When you open a package in Code Engine or access the package modal in Workflows, the latest version of the package is the default, but you can choose an earlier version if needed.
Follow these steps to create a new package version in the [code editor](#code_editor).
1. Open the package in the code editor.
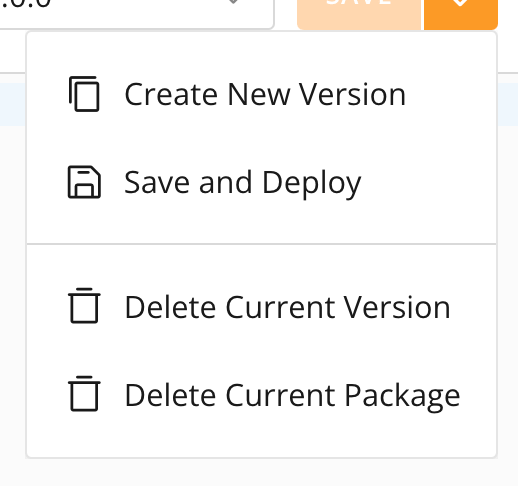
2. Select
5. Select **Create New Package** to display the package in the [code editor](#code_editor) or **Cancel** to return to the home page.
### Create a New Package Version
When you need to make changes to a package, such as updating a function or adding a new function, you must create a new version of the package to make the updates. When you open a package in Code Engine or access the package modal in Workflows, the latest version of the package is the default, but you can choose an earlier version if needed.
Follow these steps to create a new package version in the [code editor](#code_editor).
1. Open the package in the code editor.
2. Select
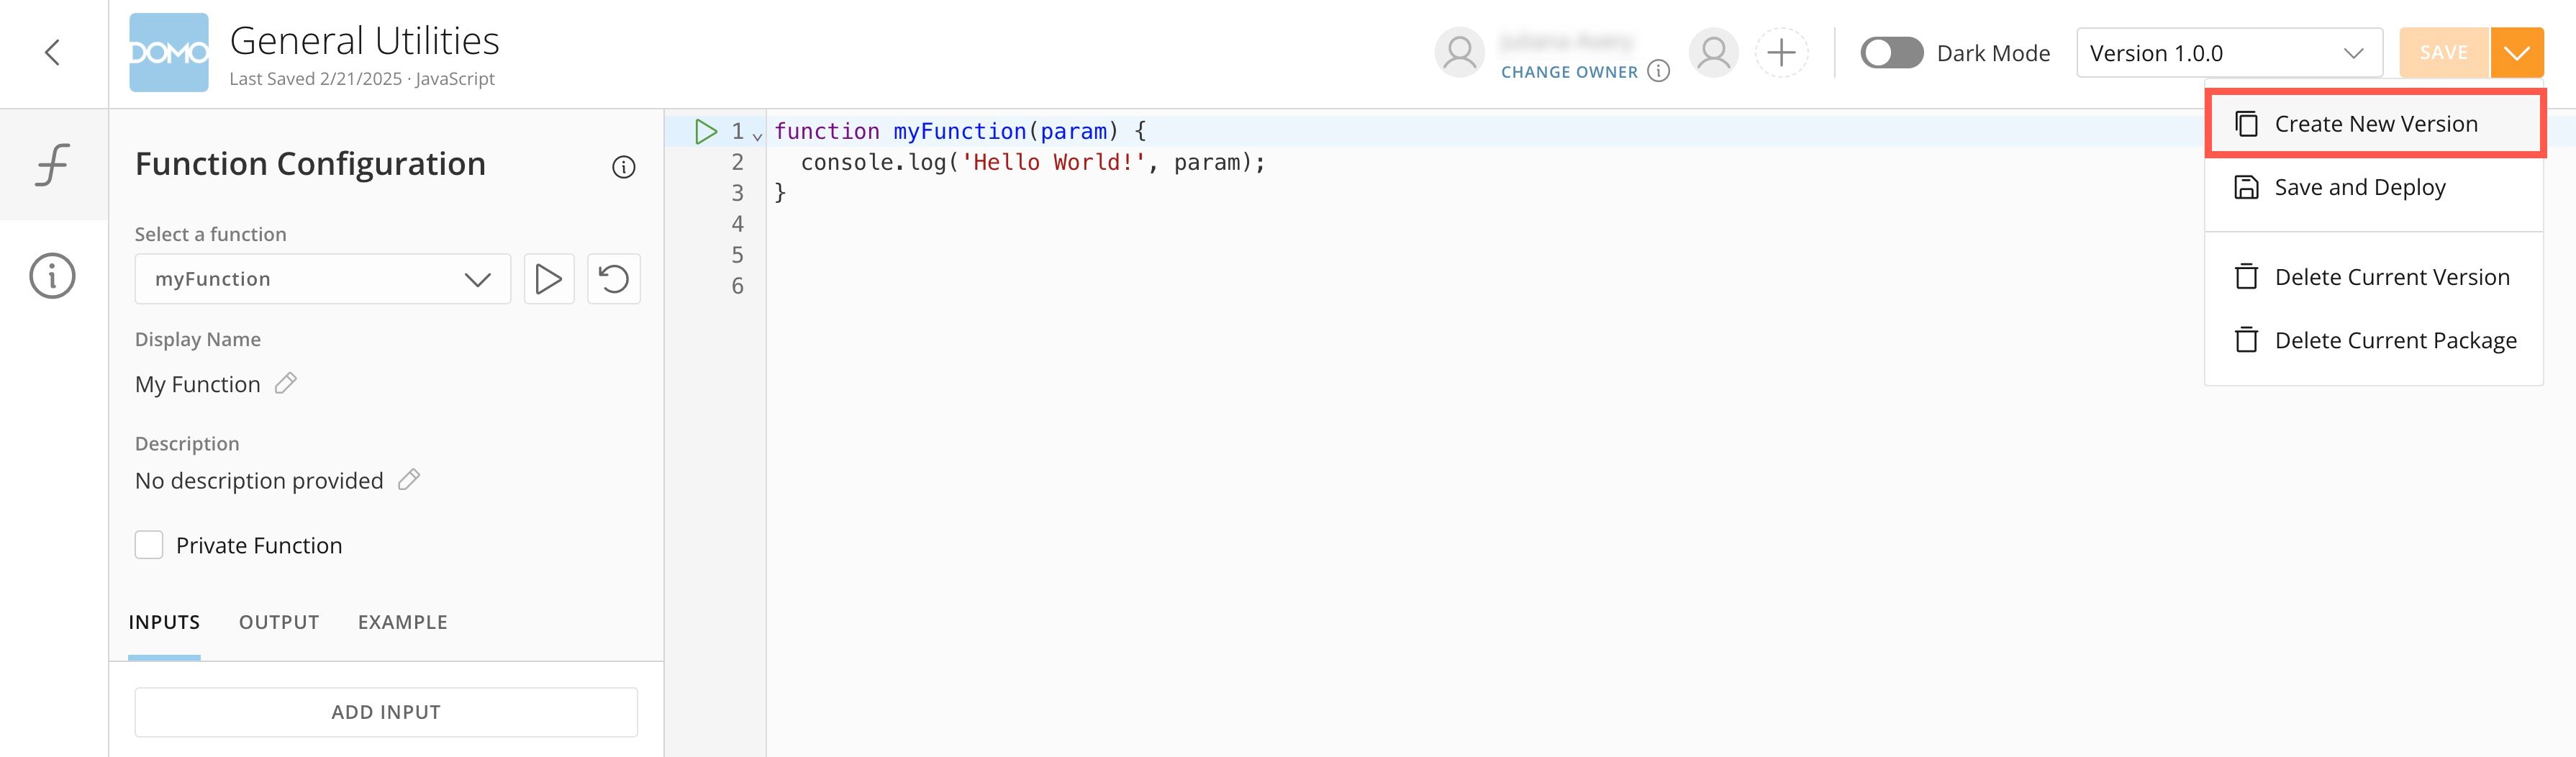
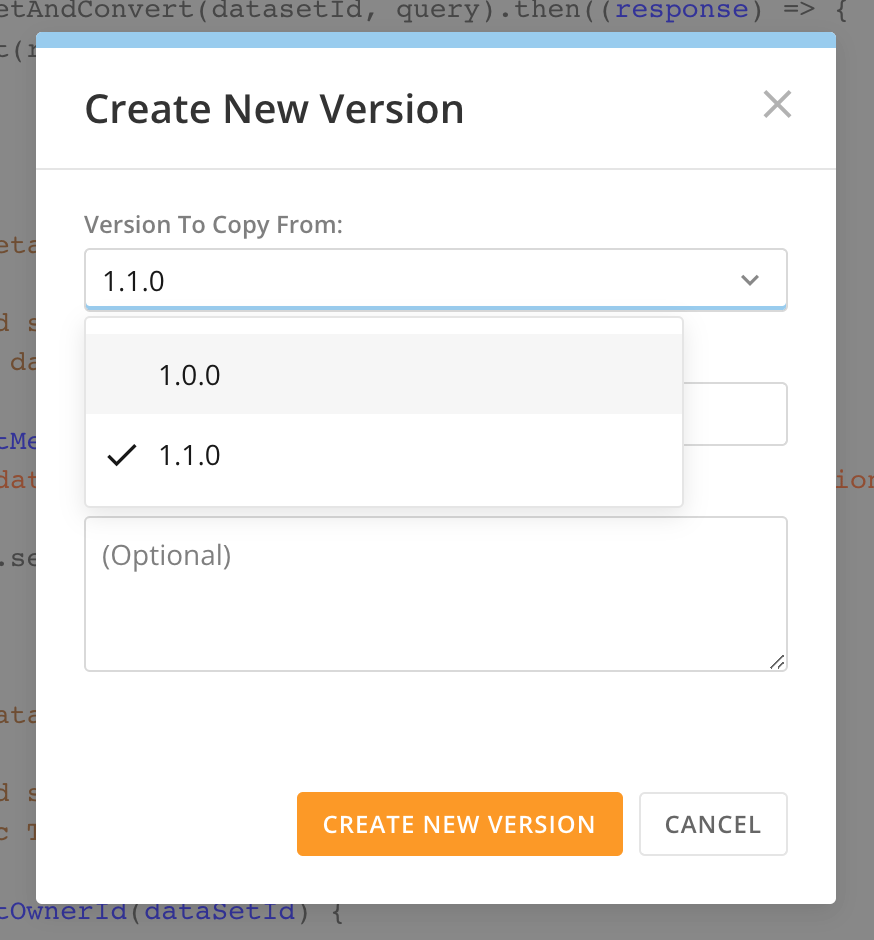
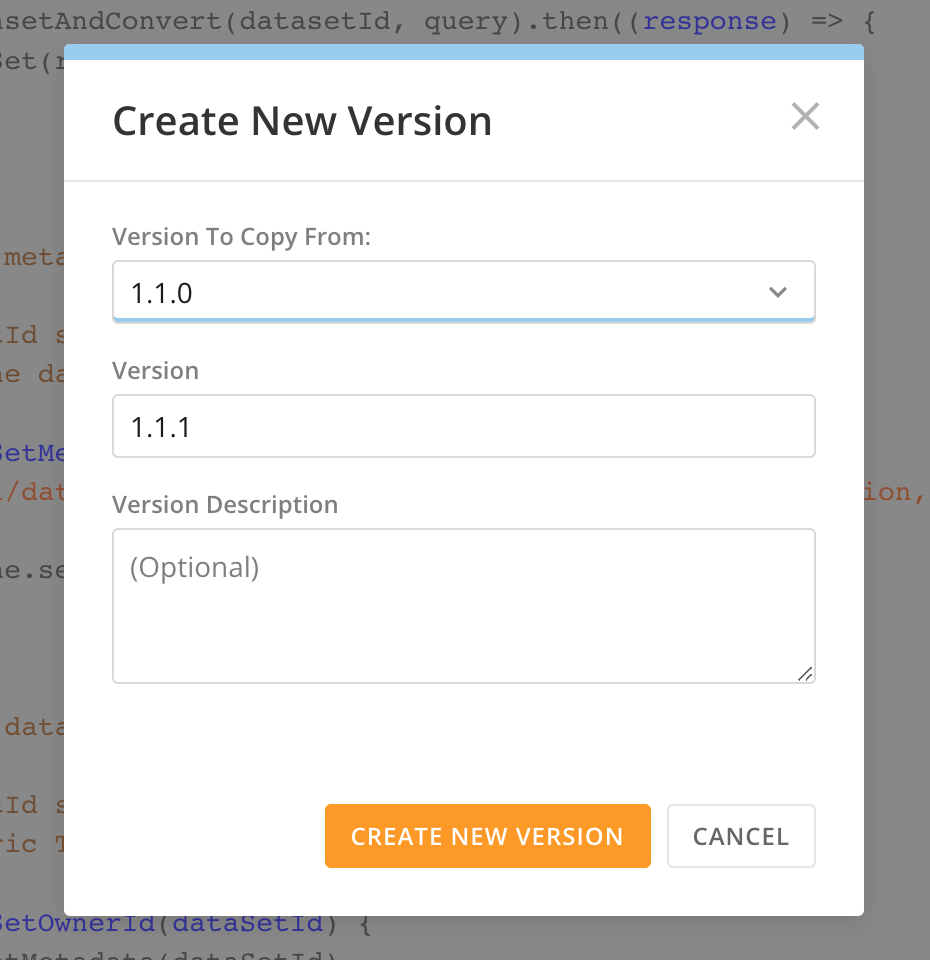 3. In the **Version to Copy From** dropdown, select a target version of the package to copy all of its contents into the new version. This includes syntax, variables, and any metadata.
 4. In the **Version** field, enter the version number you want, according to Semantic Versioning (see the official [spec](https://semver.org/)
 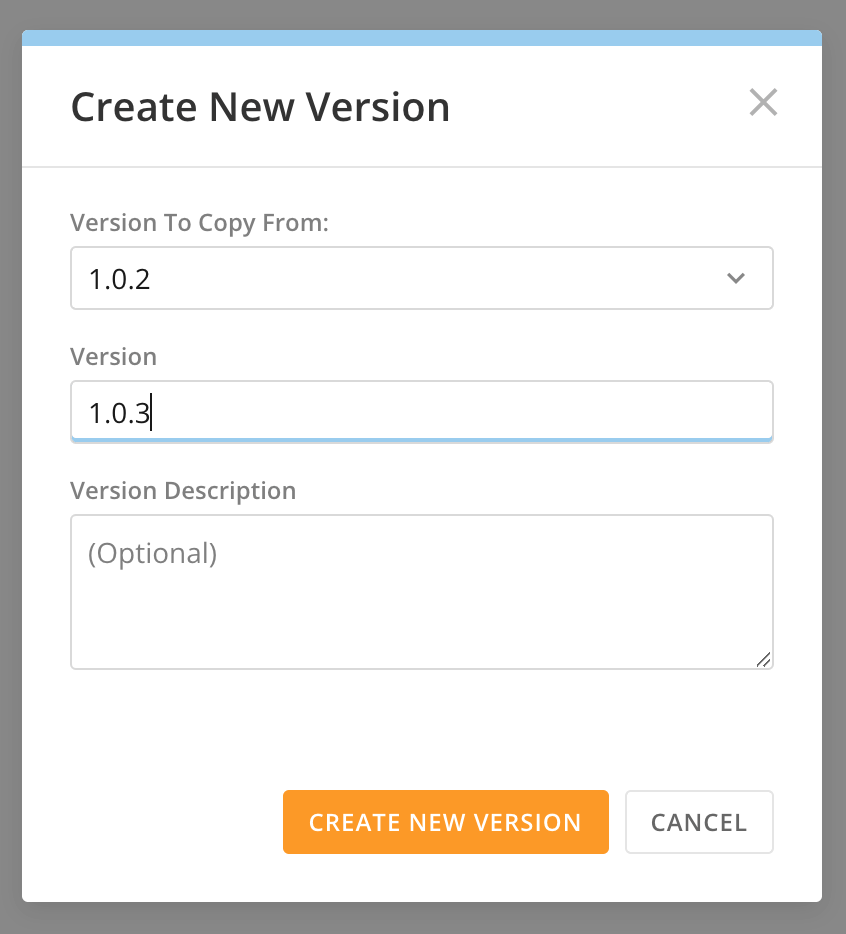 5. (Optional) Enter any details in the **Version Description** field.
6. Select **Create New Version** to save your changes and create a new version of the package.
The new version becomes the package's default version, but if you want to access an earlier version, you can open the package in the code editor and choose another version from the [version list](#version_list).
### Code Editor
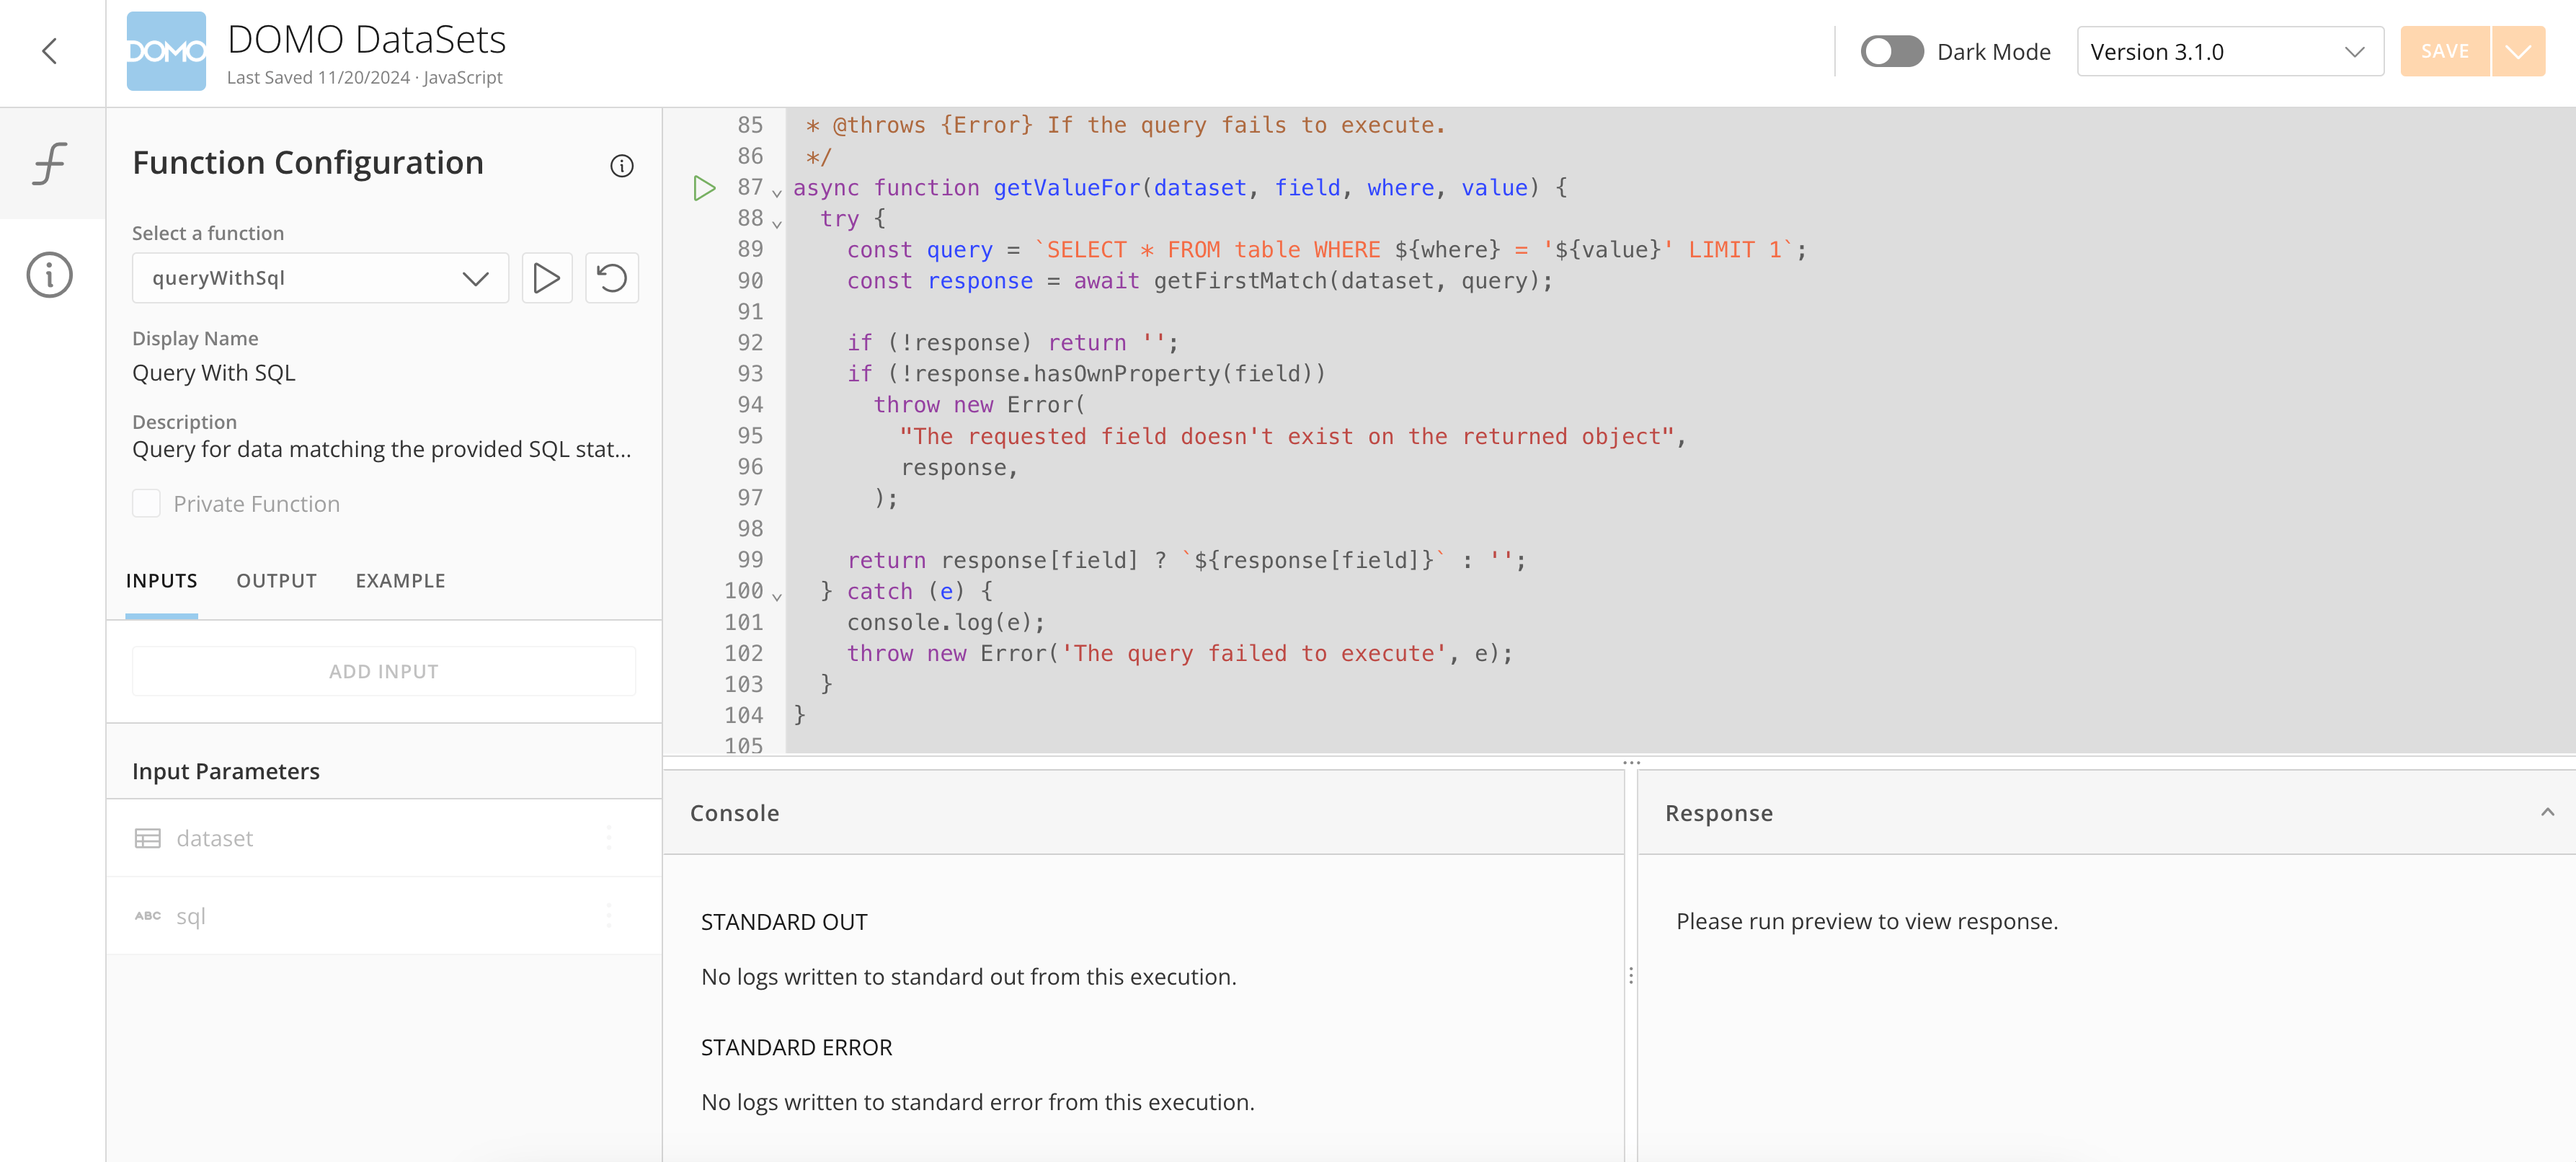
The code editor serves as an integrated development environment (IDE) for writing code, configuring function inputs/outputs, and testing the functions in real time. A package can contain multiple functions. You must code and configure each function in the code editor.
5. (Optional) Enter any details in the **Version Description** field.
6. Select **Create New Version** to save your changes and create a new version of the package.
The new version becomes the package's default version, but if you want to access an earlier version, you can open the package in the code editor and choose another version from the [version list](#version_list).
### Code Editor
The code editor serves as an integrated development environment (IDE) for writing code, configuring function inputs/outputs, and testing the functions in real time. A package can contain multiple functions. You must code and configure each function in the code editor.
 # Package Information/Action Bar
At the top of the code editor is the package information/action bar. The list below describes the elements in this area and their various functions.
# Package Information/Action Bar
At the top of the code editor is the package information/action bar. The list below describes the elements in this area and their various functions.
 # Permissions
Within Code Engine, you can use the permissions modal to give other users or groups permission to perform actions for a specific package. All permissions are granted at the package level.
This list describes the various permissions or levels of access:
* **Admin —** Allows a user to perform any action on the package. This permission is different from the [Manage Code Engine Packages grant](#required_grants), which gives access to all packages in the instance.
* **Delete —** Allows a user to delete a package or a version of a package.
* **Read —** Allows a user view-only access to package metatdata and its versions.
* **Write —** Allows a user to edit a package.
* **Share —** Allows a user to grant another user equal or lesser access to a package.
* **Execute —** Allows a user to run a function in a package.
* **Read Content** **—** Allows a user view-only access to the code content of a package and its versions.
* **Update Content —** Allows a user to edit the code content and metadata of a package and its versions.
To grant permissions, follow the steps below.
1. In the package information/action bar, select
# Permissions
Within Code Engine, you can use the permissions modal to give other users or groups permission to perform actions for a specific package. All permissions are granted at the package level.
This list describes the various permissions or levels of access:
* **Admin —** Allows a user to perform any action on the package. This permission is different from the [Manage Code Engine Packages grant](#required_grants), which gives access to all packages in the instance.
* **Delete —** Allows a user to delete a package or a version of a package.
* **Read —** Allows a user view-only access to package metatdata and its versions.
* **Write —** Allows a user to edit a package.
* **Share —** Allows a user to grant another user equal or lesser access to a package.
* **Execute —** Allows a user to run a function in a package.
* **Read Content** **—** Allows a user view-only access to the code content of a package and its versions.
* **Update Content —** Allows a user to edit the code content and metadata of a package and its versions.
To grant permissions, follow the steps below.
1. In the package information/action bar, select
 The permissions modal contains a search bar, a list of People With Access to the package, and a list of People Without Access to the package. By default, the owner of the package always has Admin permission to the package.
2. In the search bar, enter the name of a person or group for which you want to edit permissions. If the user or group is found in the instance, the name displays at the top of the list of People Without Access. The permissions menu displays next to the user or group name; the default permission is No Access.
3. Select the permission you want to grant the user or group.
4. Select **Save** to save your changes.
# Side Navigation
The code editor's side navigation allows you to view and configure metadata and variables related to either the package itself or the code in the editor.
The permissions modal contains a search bar, a list of People With Access to the package, and a list of People Without Access to the package. By default, the owner of the package always has Admin permission to the package.
2. In the search bar, enter the name of a person or group for which you want to edit permissions. If the user or group is found in the instance, the name displays at the top of the list of People Without Access. The permissions menu displays next to the user or group name; the default permission is No Access.
3. Select the permission you want to grant the user or group.
4. Select **Save** to save your changes.
# Side Navigation
The code editor's side navigation allows you to view and configure metadata and variables related to either the package itself or the code in the editor.
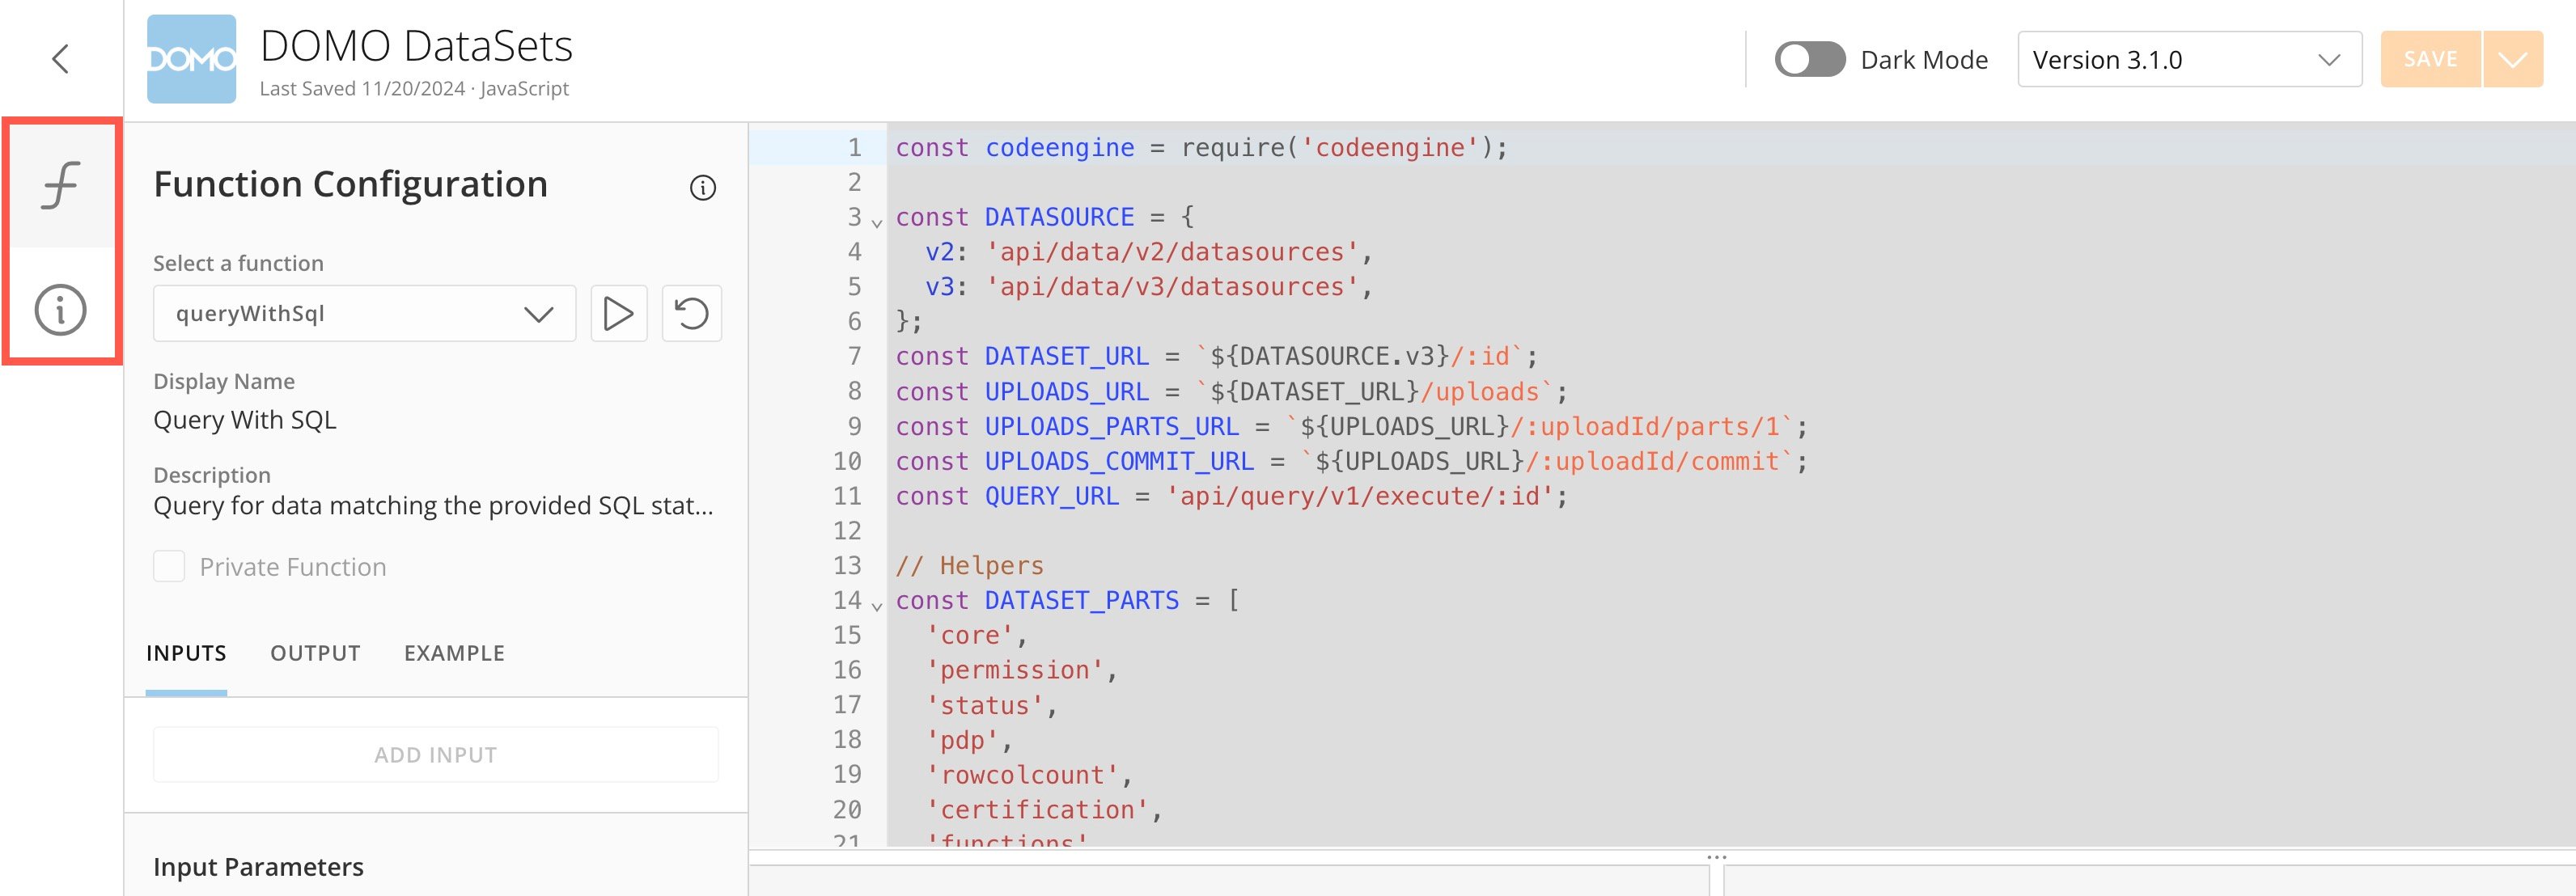 There are two sections in the side navigation. Selecting a section expands the side panel to display options for that section.
*
There are two sections in the side navigation. Selecting a section expands the side panel to display options for that section.
* 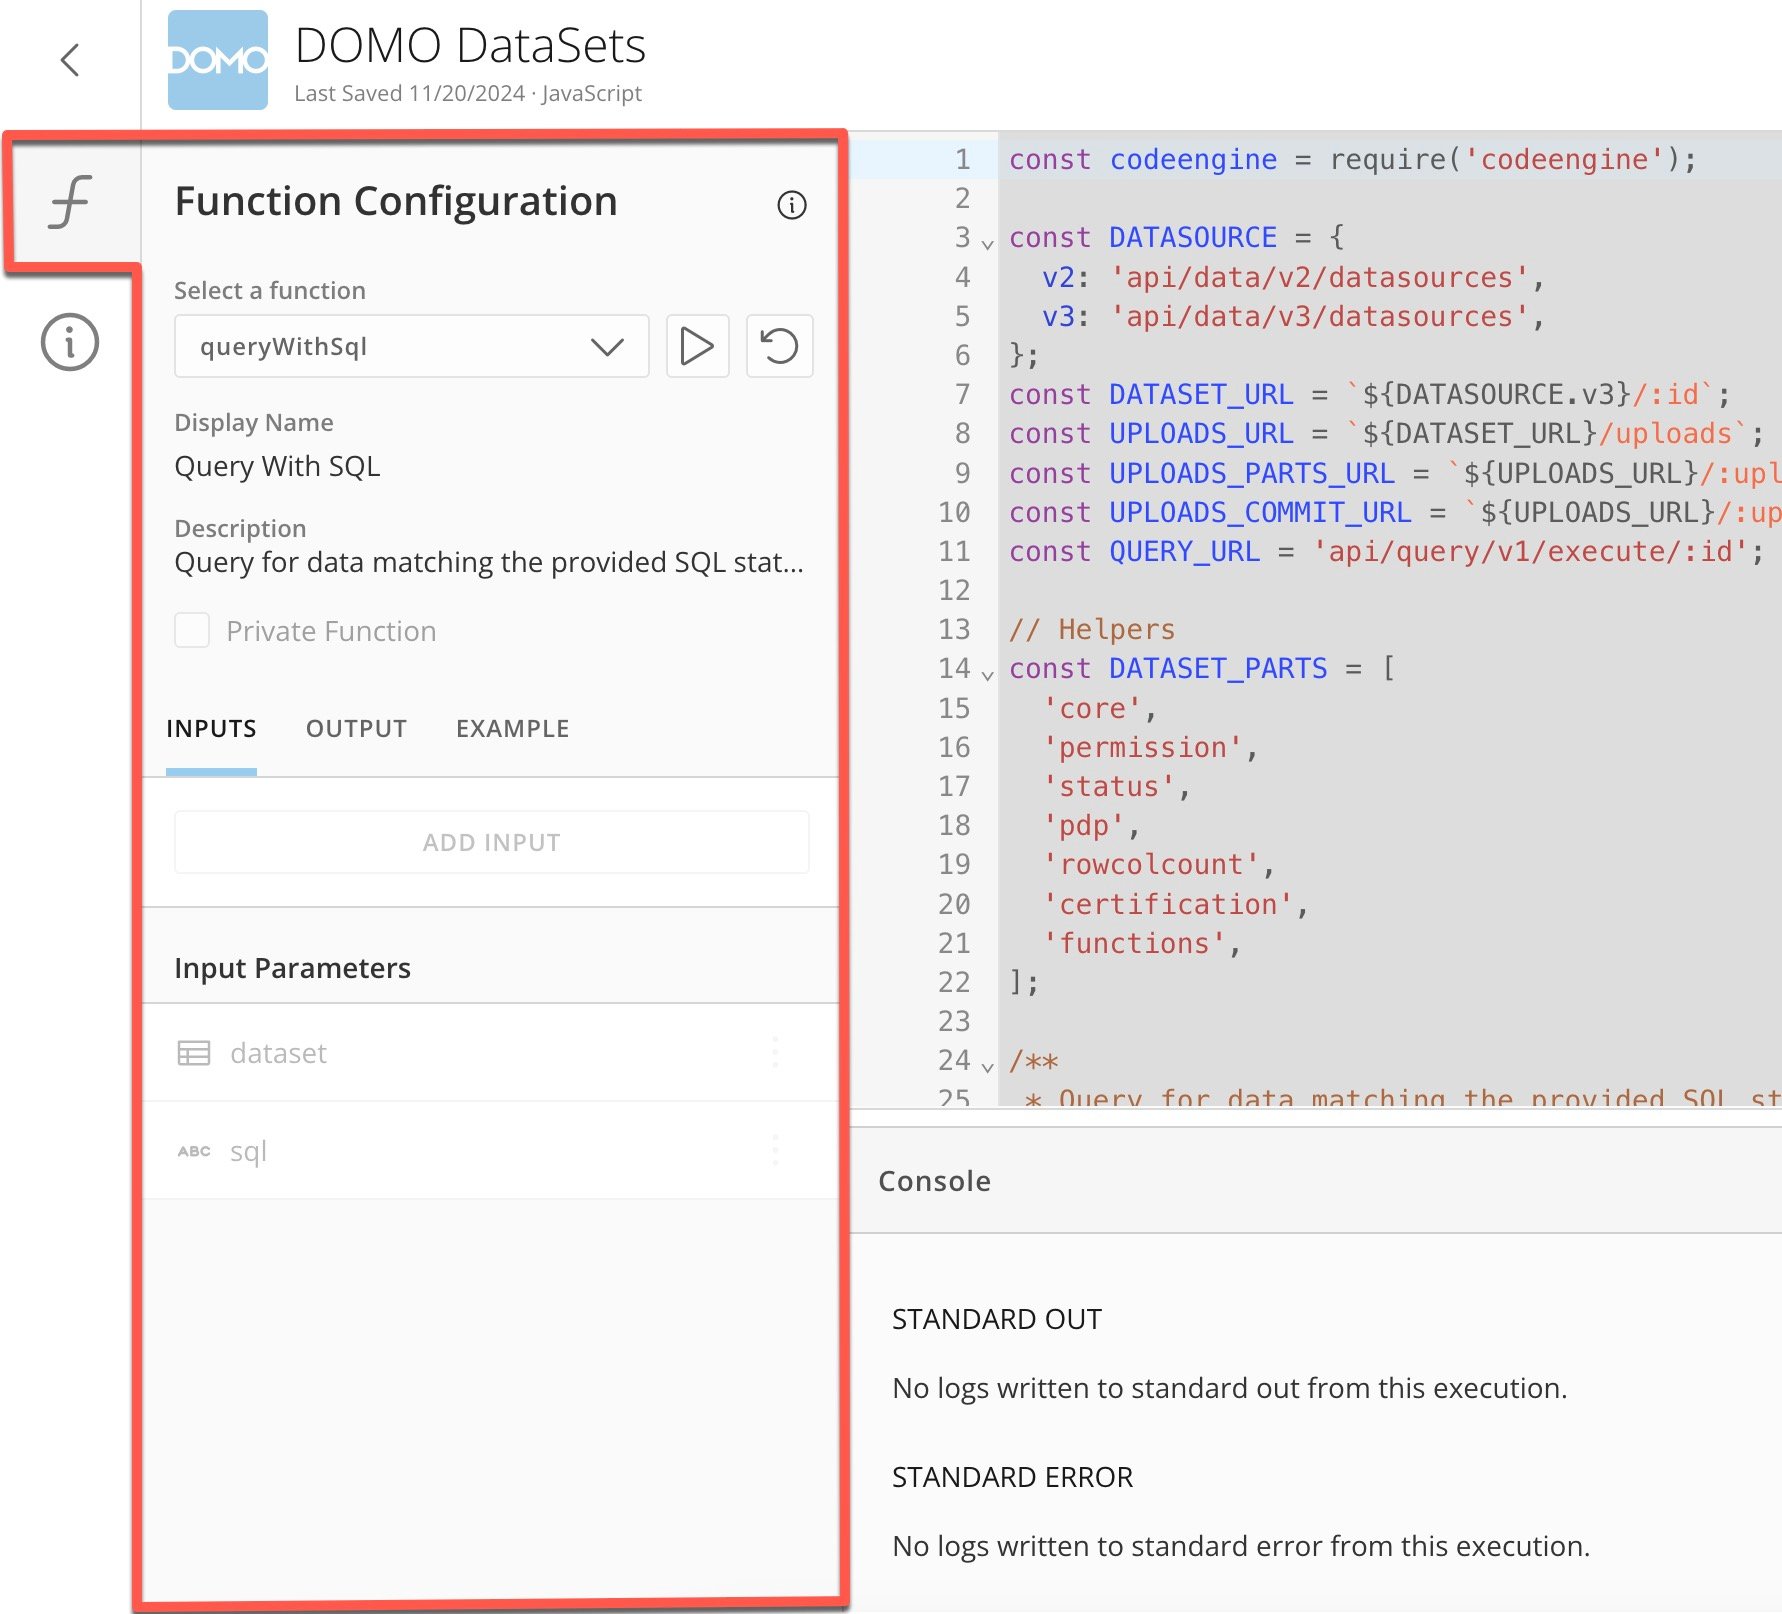 The elements in the **Function Configuration** section are described below.
Element
Description
Select a function dropdown
This list populates with all of the functions that were parsed and found in the code editor. All other fields in the panel are based on the selected function.
If a function you wrote does not appear in the list, select
Function description field
A brief summary of the function's purpose.
Inputs tab
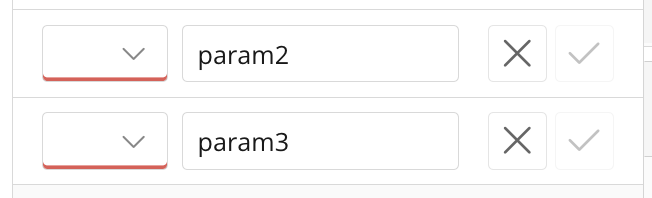
In this tab, you can add input parameters to the function by selecting Add Input . For each input, you must specify a data type and enter a name for it. If there is no data type specified, the field displays with a red border and you cannot save the function configuration.
After selecting a data type and entering a name, select
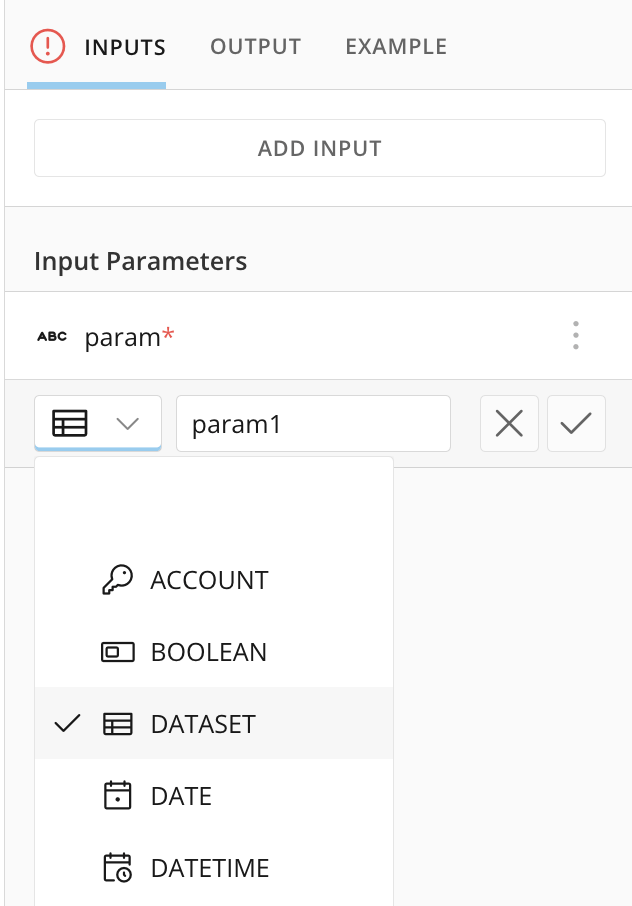
Output tab
In this tab, you can add an output parameter to the function. Select the variable type and enter a name for it. Then select
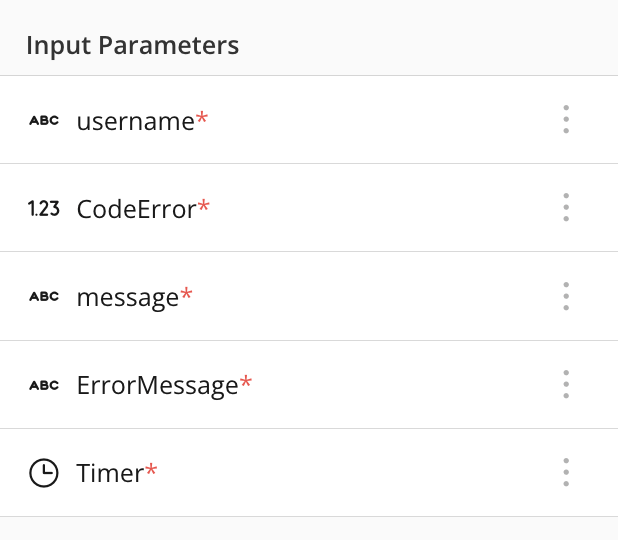
Input Parameters
A list of all input parameters declared in the function.
Output Parameter
The output parameter defined in the function. You can only have one output parameter. An output parameter is not required to build a successful function, but it is best practice to add one so that you can get a return value and know if your function was successful.
Is List?
In the Edit parameter modal, check this box if the output variable is an array of its specified type. 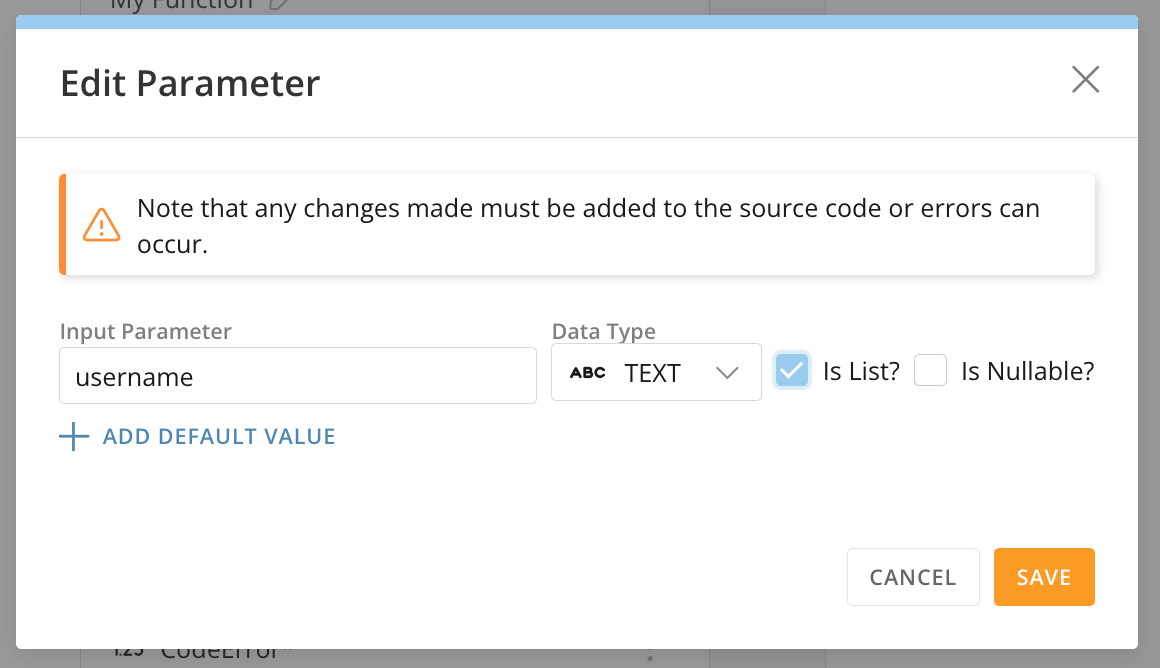
Rescan Functions (
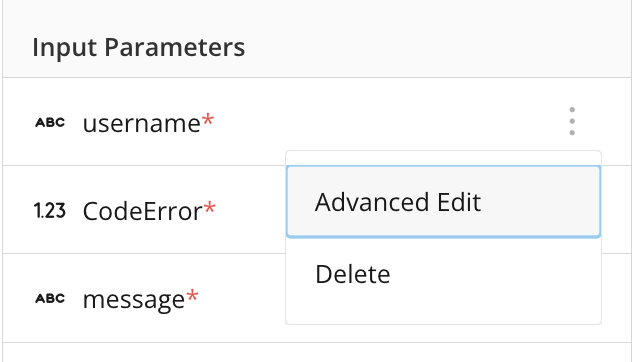 The **Edit Parameter** modal displays.
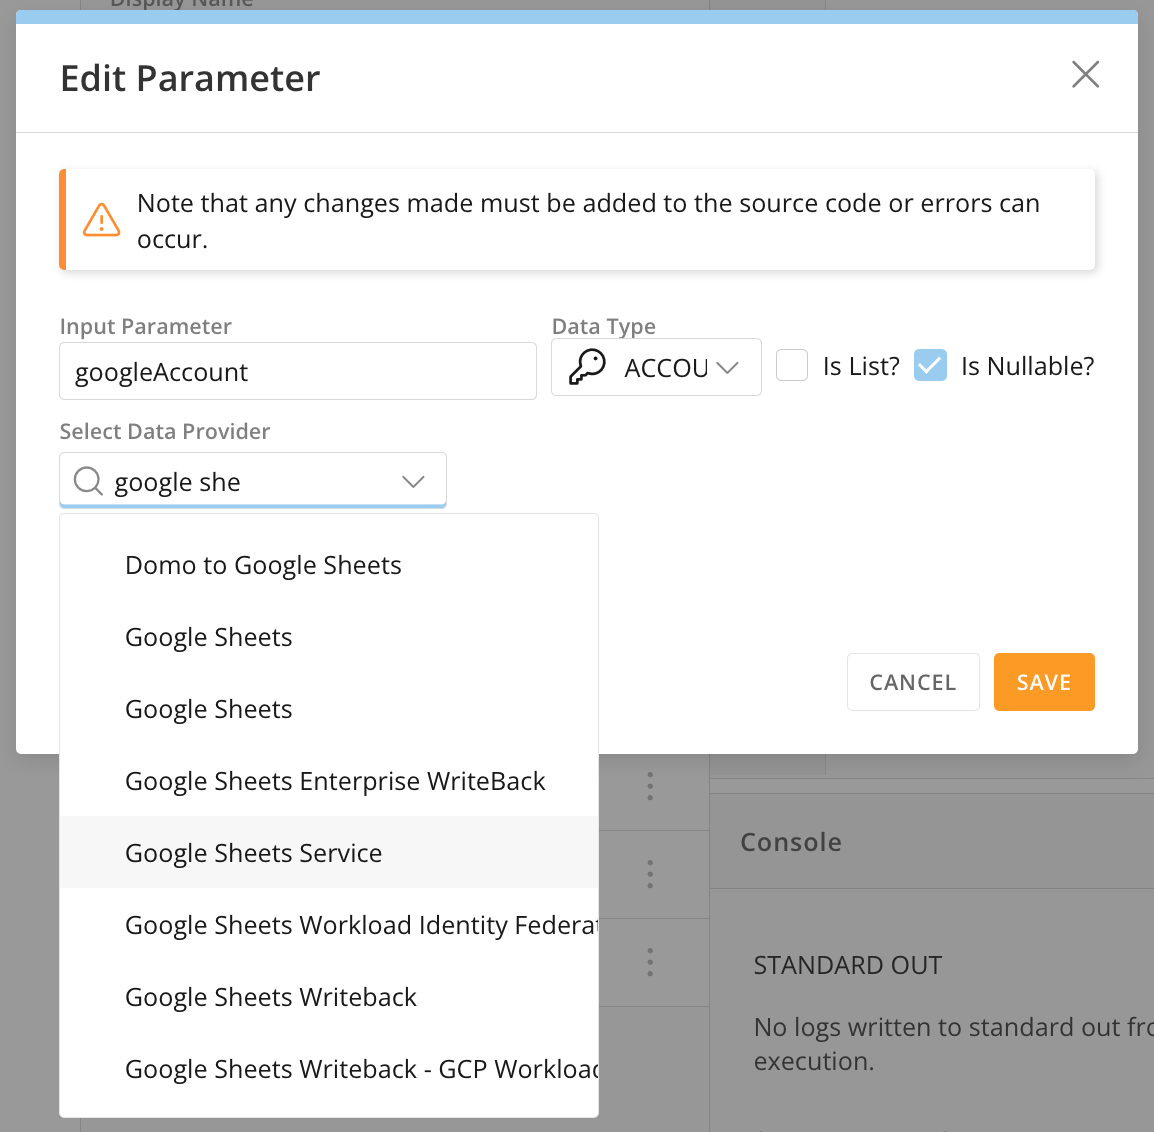 After saving your data provider, go to the function where that parameter appears and select **Start function**.
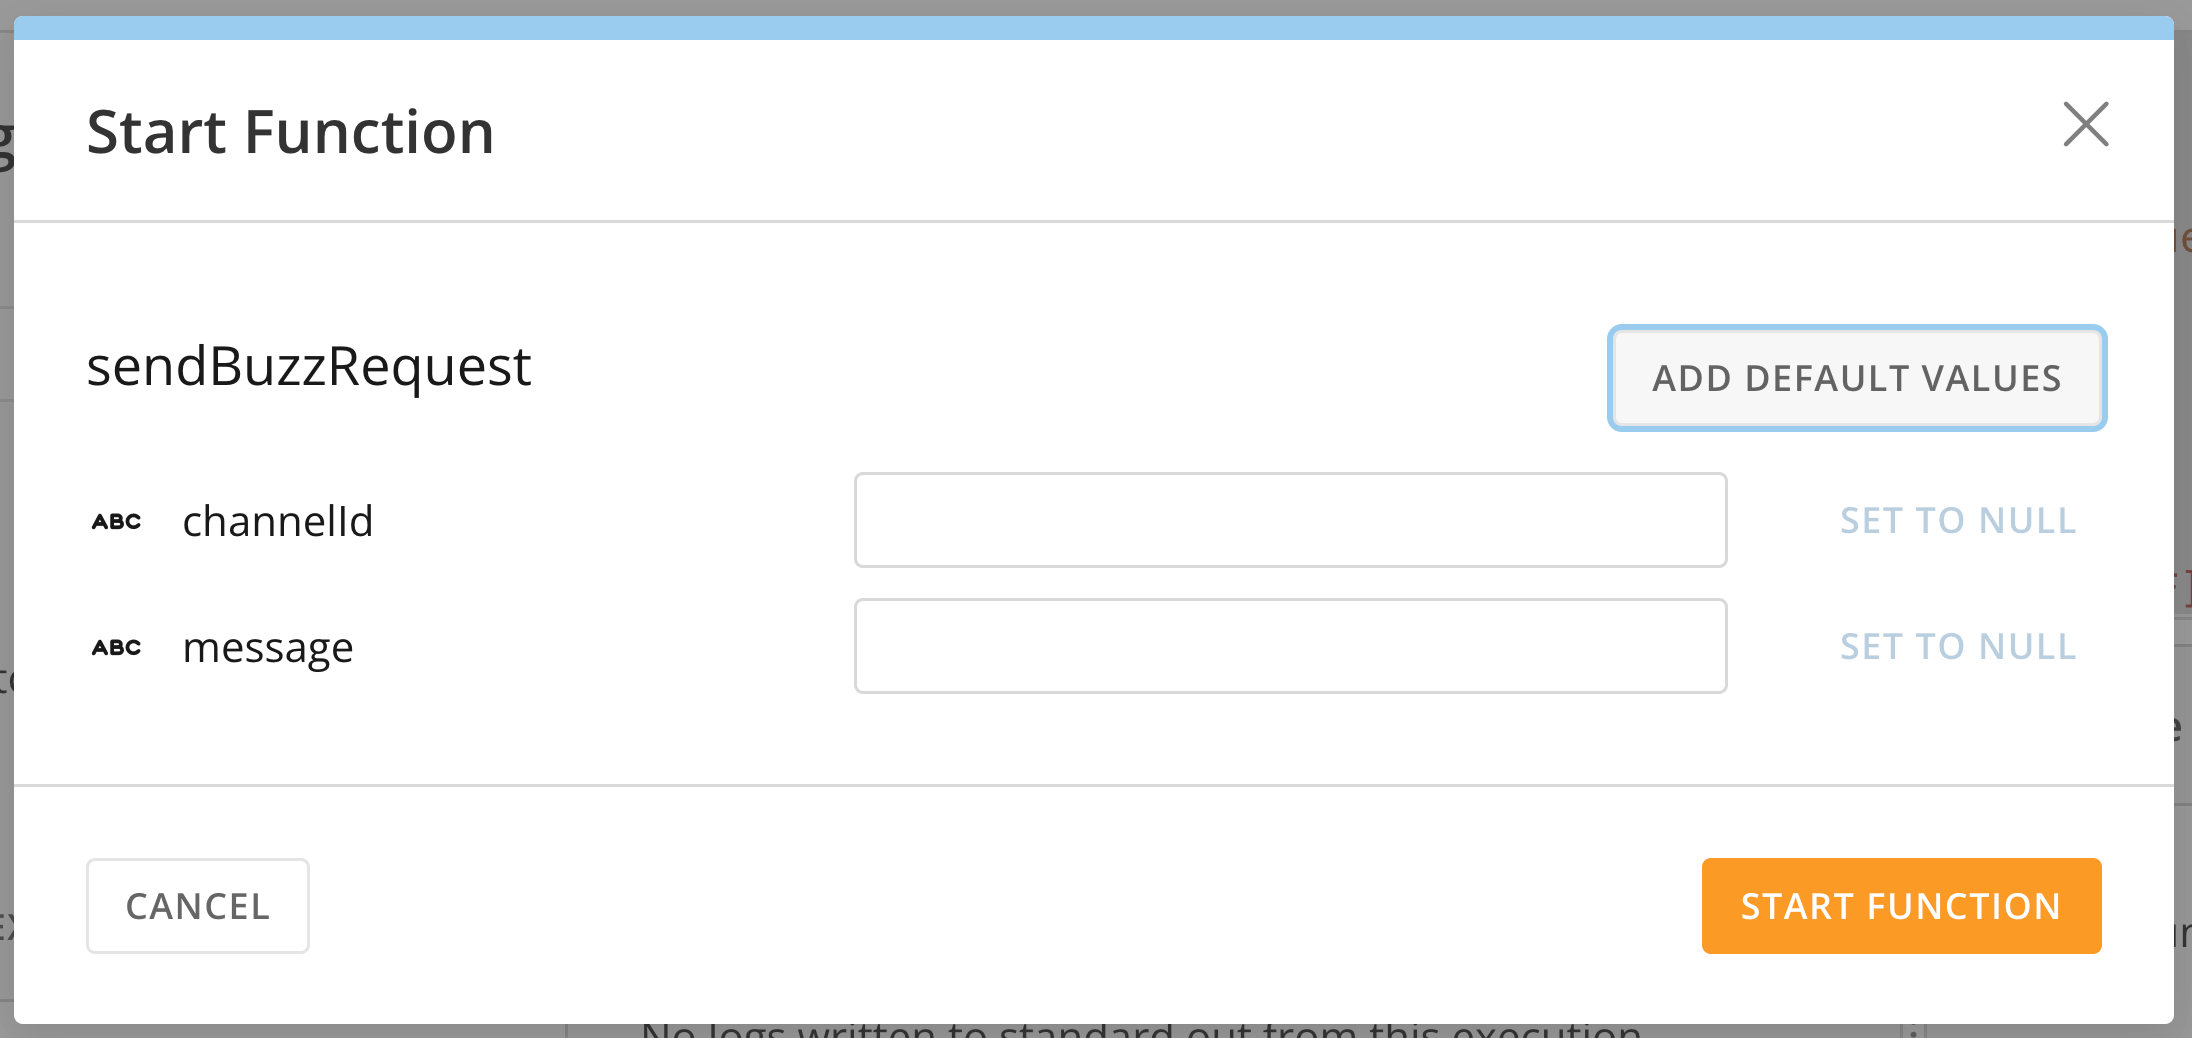
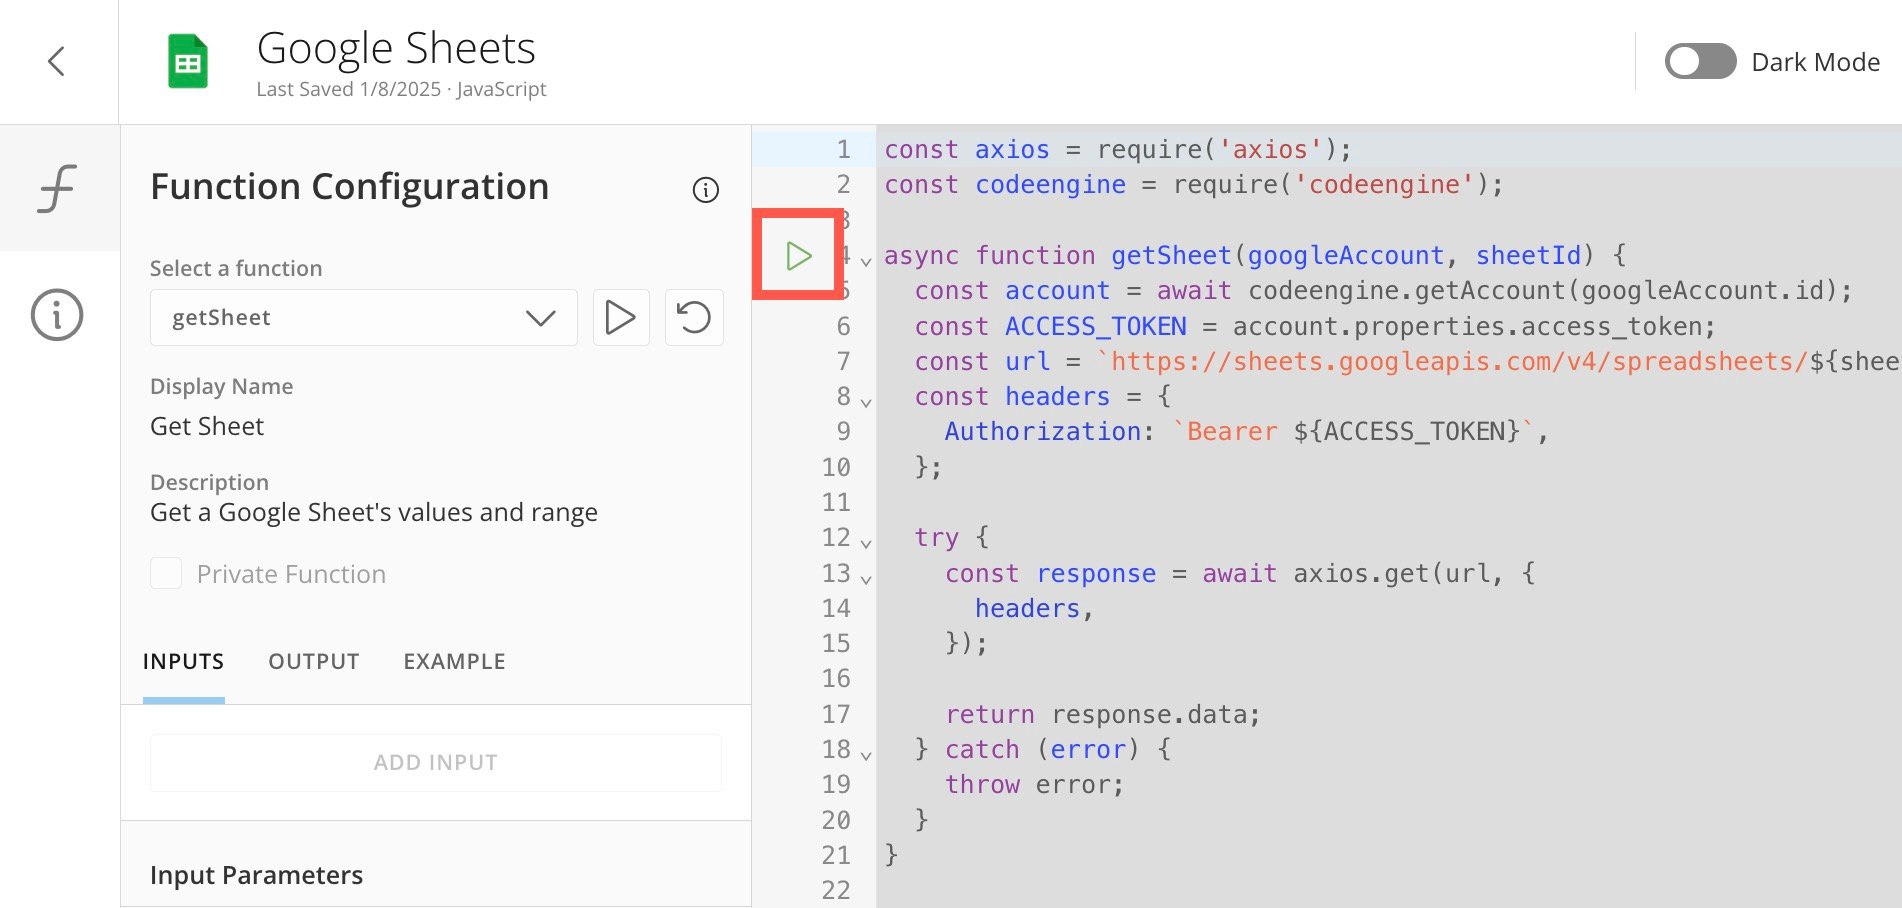 In the **Start Function** modal, enter a value for each required field.
In this example, choose a Google account and add a sheet ID.
In the **Start Function** modal, enter a value for each required field.
In this example, choose a Google account and add a sheet ID.
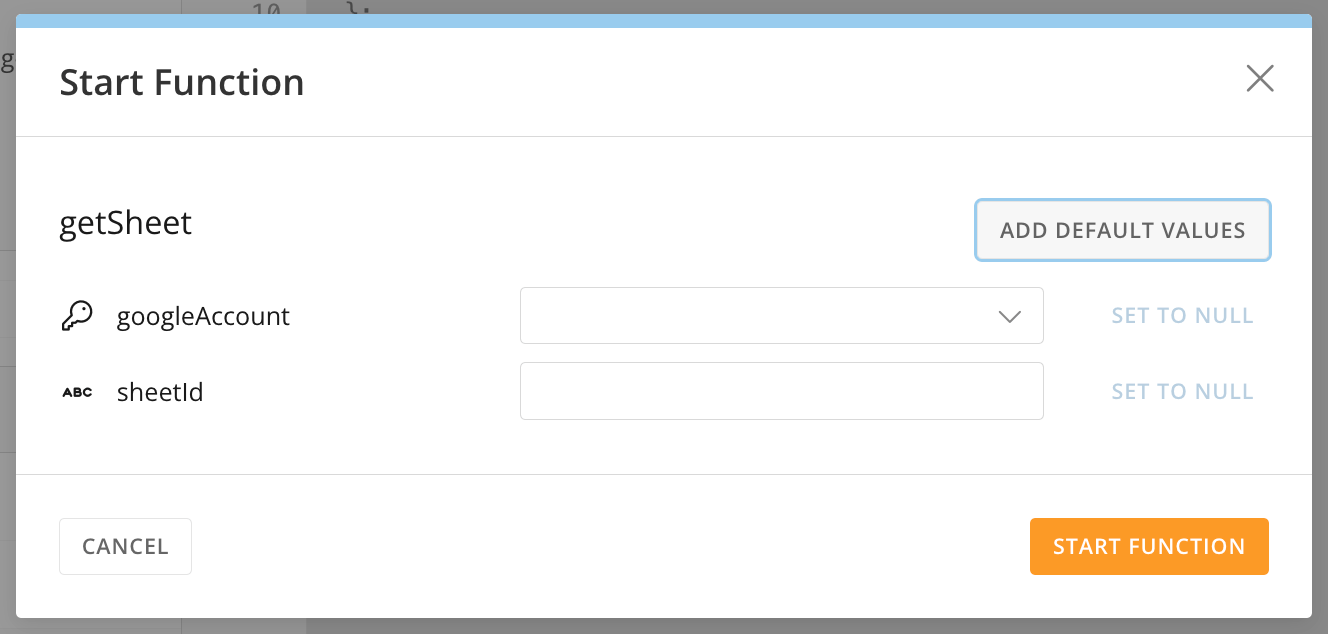 Select **Start Function** to test the values.
If the function is successful, the response displays in the **Response** panel.
###### List Type
Choosing **List** as the data type defines the Input Variable or the Return Type as containing a list. It does not define what is in the list. If you want to define a list of another type, you can select that type and then check the box labeled **Is List?** box. Your parameter will then be defined as a list of variables of that type.
###### Object Type
The **Object** type is useful for storing complex types. An object can be Open or Defined:
* **Open —** You can store any type of data in an Open Object, but what is stored in the object is not explicitly defined. This is useful for operating on APIs that return complex data.
* **Defined Object —** For a Defined Object, you define child properties of the object by selecting **Add Child Property** in the modal.
Select **Start Function** to test the values.
If the function is successful, the response displays in the **Response** panel.
###### List Type
Choosing **List** as the data type defines the Input Variable or the Return Type as containing a list. It does not define what is in the list. If you want to define a list of another type, you can select that type and then check the box labeled **Is List?** box. Your parameter will then be defined as a list of variables of that type.
###### Object Type
The **Object** type is useful for storing complex types. An object can be Open or Defined:
* **Open —** You can store any type of data in an Open Object, but what is stored in the object is not explicitly defined. This is useful for operating on APIs that return complex data.
* **Defined Object —** For a Defined Object, you define child properties of the object by selecting **Add Child Property** in the modal.
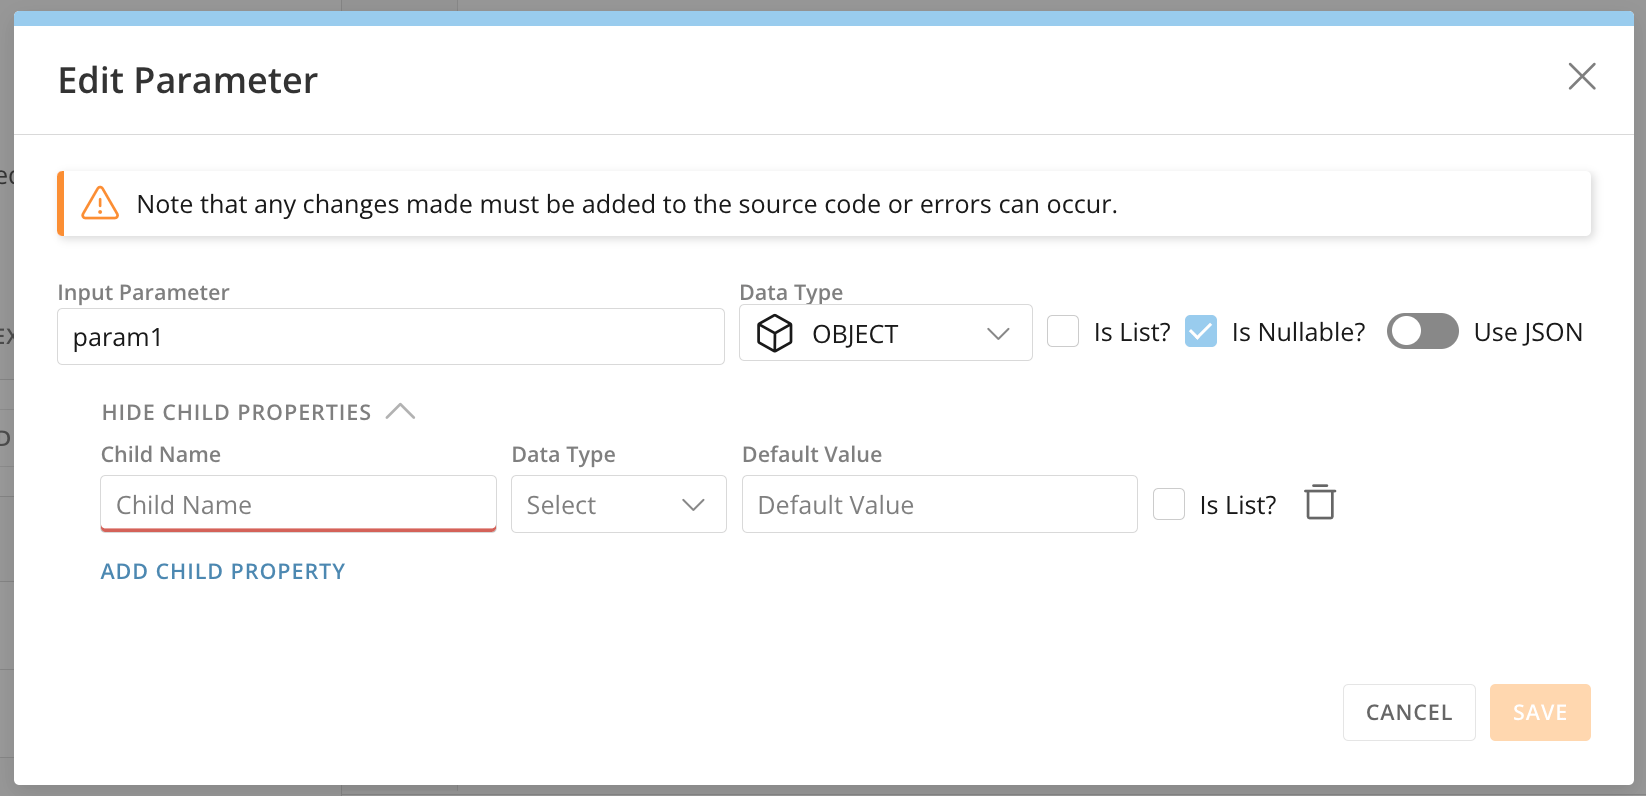 When you add a child property, a row opens for each child property on the Object. Here, you can define the parameter name and data type for each child property of the Object.
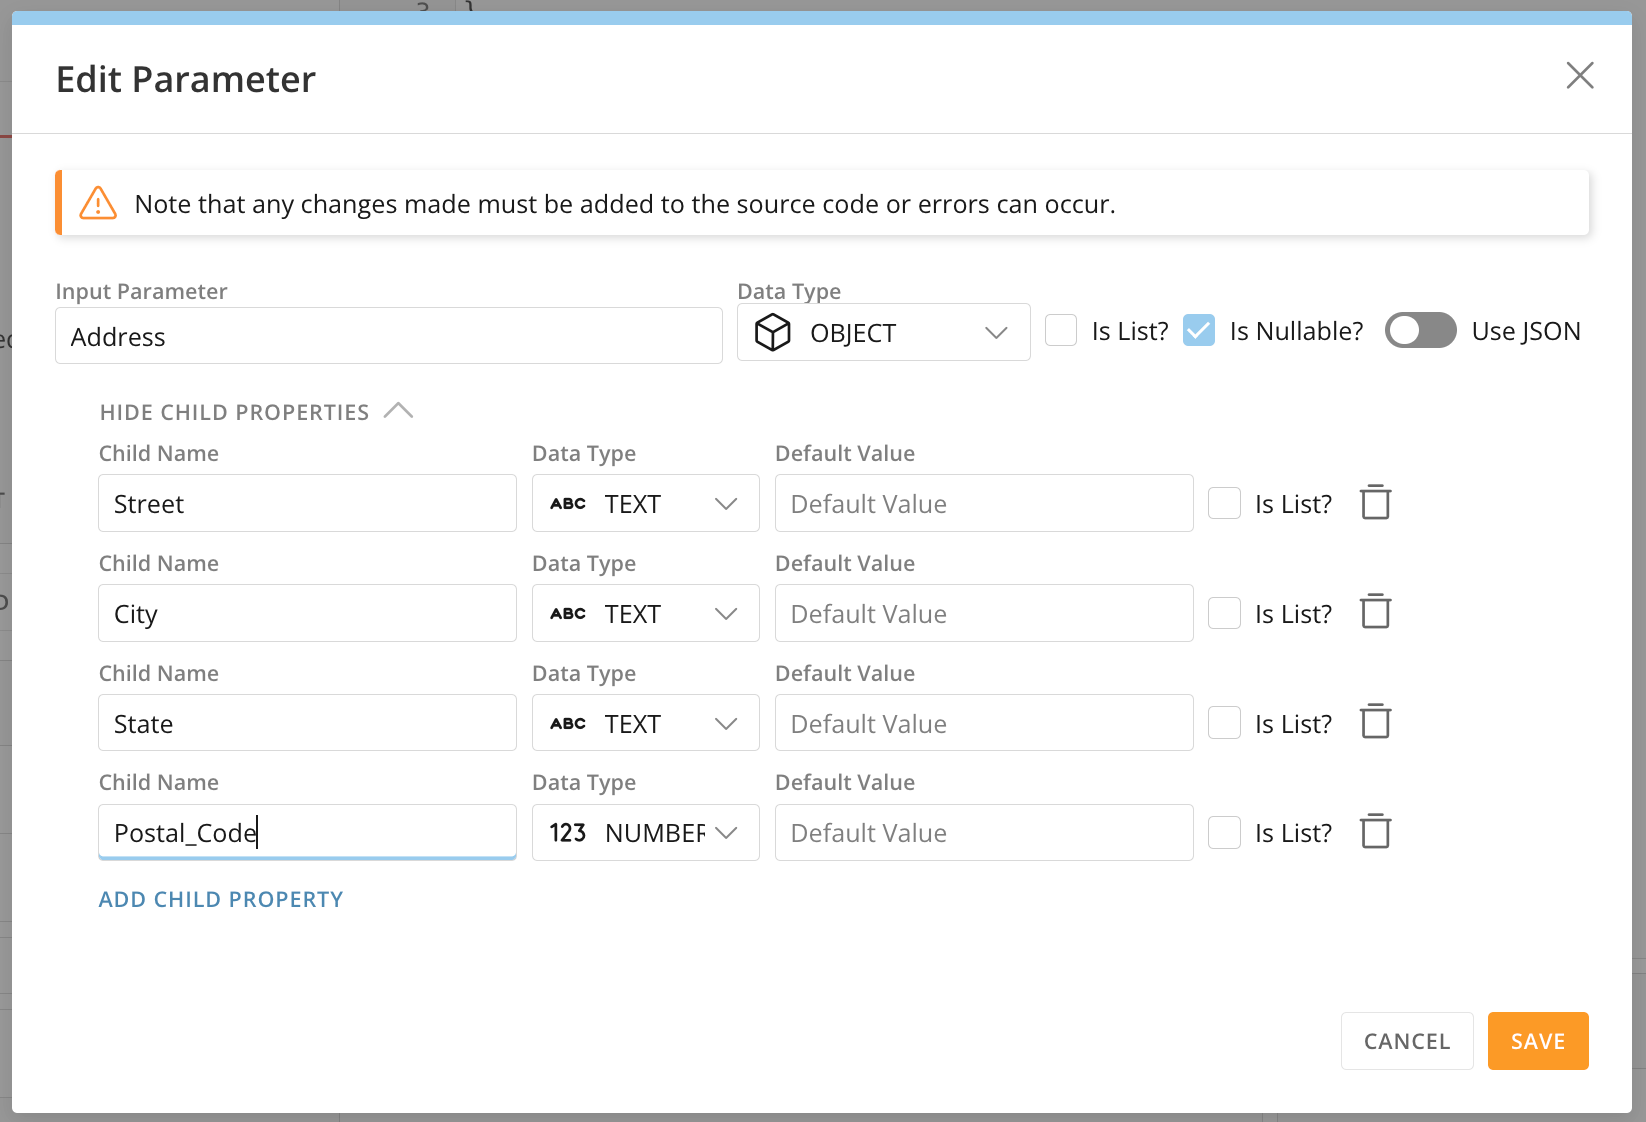
For example, you may have an Address Object that has child properties for the street, city, state (all TEXT type), and postal code (NUMBER type).
When you add a child property, a row opens for each child property on the Object. Here, you can define the parameter name and data type for each child property of the Object.
For example, you may have an Address Object that has child properties for the street, city, state (all TEXT type), and postal code (NUMBER type).
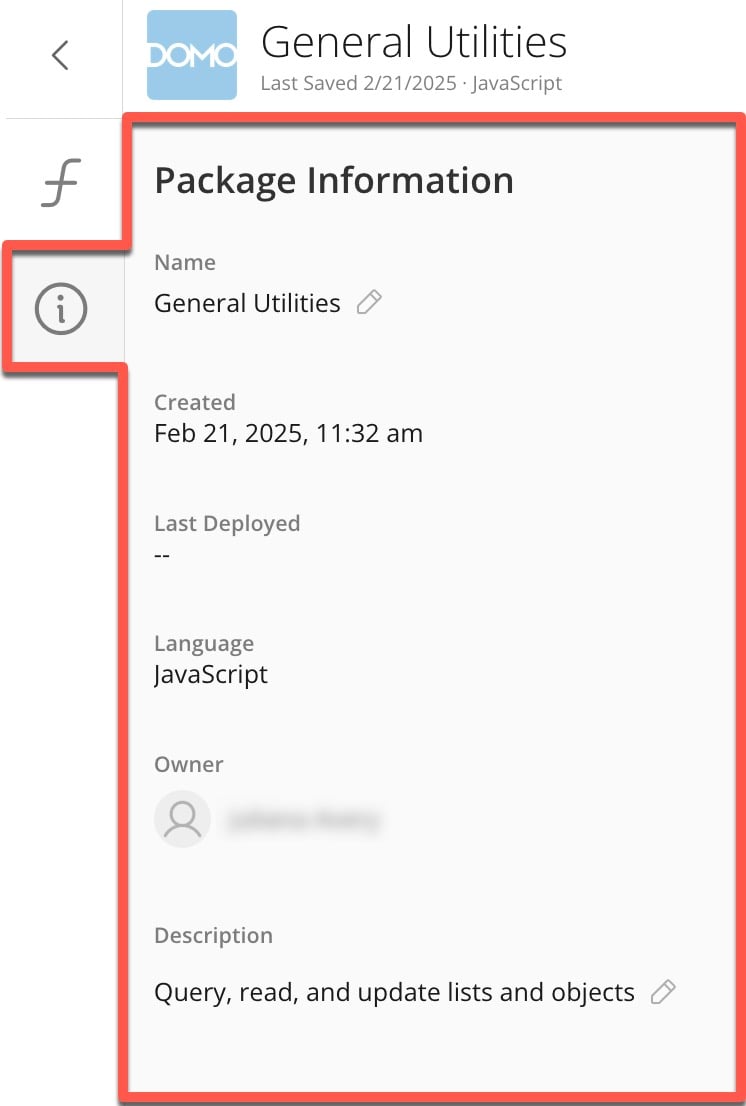
 #### Package Information
The **Package Information** section contains the following metatdata:
* **Name —** The function name.
* **Created —** The date the package version was created.
* **Last Deployed —** The date the package version was deployed.
* **Language —** The programming language the script is written in.
* **Owner —** The name and avatar of the package owner.
* **Description —** A brief description of the package.
#### Package Information
The **Package Information** section contains the following metatdata:
* **Name —** The function name.
* **Created —** The date the package version was created.
* **Last Deployed —** The date the package version was deployed.
* **Language —** The programming language the script is written in.
* **Owner —** The name and avatar of the package owner.
* **Description —** A brief description of the package.
 ### Test a Function
After you enter the code and parameters for a function, you can test the function before deployment.
# Prerequisites
Check for issues with the function syntax and variables. For example, if a parameter displays with a red border, make sure it has a defined type and no outstanding configuration issues.
### Test a Function
After you enter the code and parameters for a function, you can test the function before deployment.
# Prerequisites
Check for issues with the function syntax and variables. For example, if a parameter displays with a red border, make sure it has a defined type and no outstanding configuration issues.
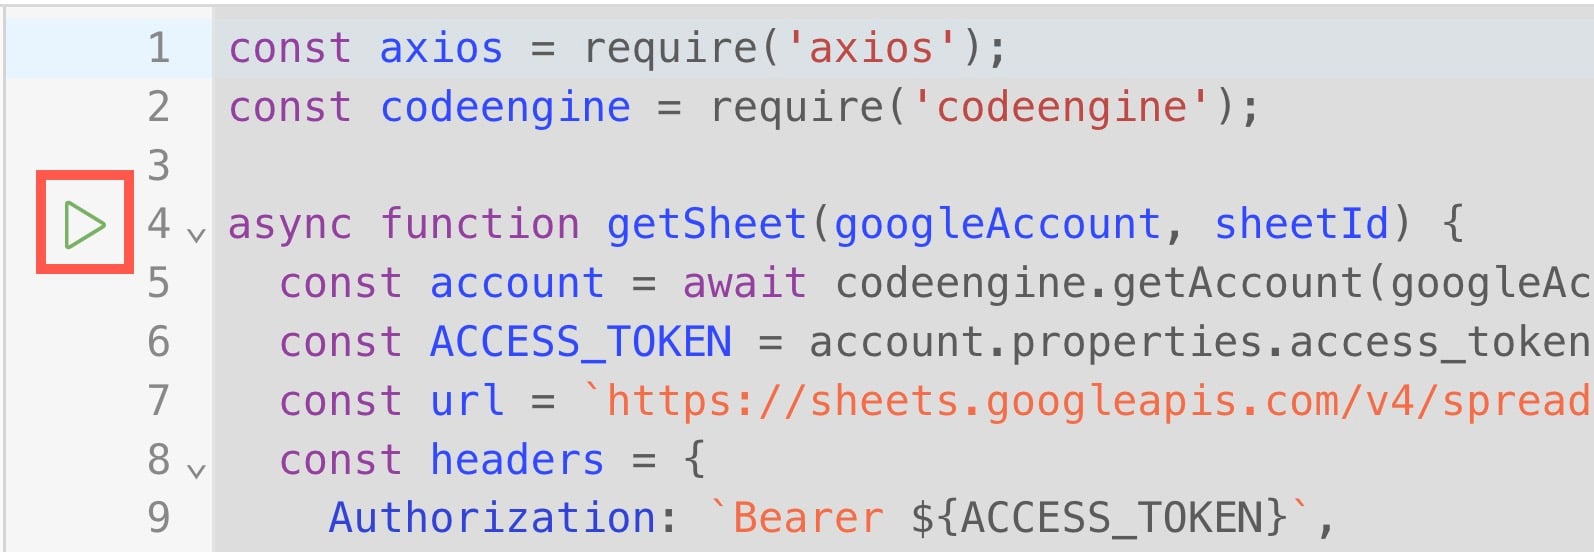
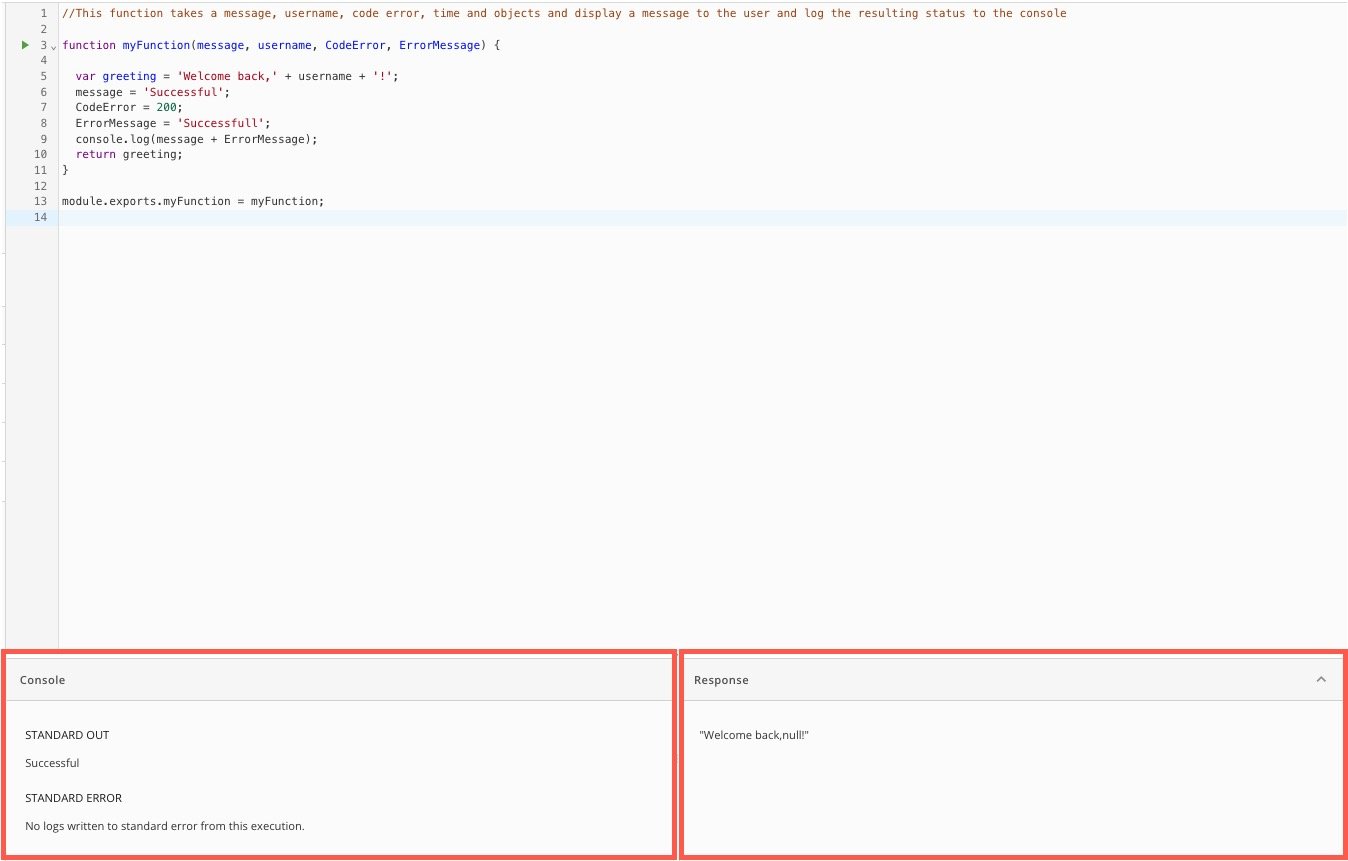
 In the code editor, select
  The modal displays a list of all your configured variables and their default values. You can modify the default values here for the current test run, but the changes do not persist outside of this modal.
 ### Code Engine Library
The Code Engine library contains several useful methods specifically for making internal and external API calls, and is available in the global scope of a code engine package. You can leverage the library by adding a required "codeengine" call to your package. For more specifics about how to leverage the library see [codeengine.sendRequest](#code_engine_send_request), [codeengine.getAccount](#codeengine.getAccount), and [codeengine.axios](#code_engine_axios).
# codeengine.sendRequest
The `codeengine` library contains a method called `sendRequest` that can make calls to internal Domo APIs. `sendRequest` acts like many other http request libraries that make asynchronous calls (typically using request methods such as GET, POST, PUT, and DELETE. You can use the `sendRequest` method to call into various Domo APIs like DataSets, user and groups, and cards and dashboards.
Here is an example function that it built into the Domo DataSets package:
```javascript theme={"dark"}
const codeengine = require("codeengine");
/**
* Retrieves the metadata for the specified dataset.
*
* @param dataSetId string The dataset id
* @returns {} The dataset metadata
*/
function getDataSetMetadata(dataSetId) {
const url = `api/data/v3/datasources/${dataSetId}?part=core,permission,status,pdp,rowcolcount,certification,functions`;
return codeengine.sendRequest("get", url).catch(console.error);
}
```
Notice that we are making the request without any credentials like we have to do when making external calls with the axios library. Every `sendRequest` call is intercepted by the Code Engine service and injected with the credentials of the authenticated user who is making the request.
# codeengine.getAccount
This is an example function that we have built into the Twilio package that leverages the `getAccount` method from `codeengine` library. The key is this code block:
```javascript theme={"dark"}
const codeengine = require("codeengine");
function accountExample(twilioAccount) {
const account = await codeengine.getAccount(twilioAccount.id);
const {accountSID, password} = account.properties;
}
```
Here is how it is used in context of making an external request with the axios library also available from the `codeengine` library import:
```javascript theme={"dark"}
const codeengine = require("codeengine");
async function sendSMS(twilioAccount, to, from, body) {
// get the account by account id
const account = await codeengine.getAccount(twilioAccount.id);
// access the properties of the account. These will vary from account type so it's
// important to check what is returned. In this case it's `accountSID` and `password`
const {accountSID, password} = account.properties;
const url = `https://api.twilio.com/2010-04-
01/Accounts/${accountSID}/Messages.json?To+${to}&From=${from}&Body=${encodeURIC
omponent(body)}`;
const apiBody = {
To: to,
From: from,
Body: body,
};
const requestOptions = {
headers: {
'Content-Type': 'application/x-www-form-urlencoded;charset=utf-8',
Authorization:
'Basic' + Buffer.from(`${accountSID}:${password}`).toString('base64'),
},
};
try {
await axios.post(url, apiBody, requestOptions)';
return true;
} catch (error) {
console.error(error);
throw error;
}
}
```
The input `twilioAccount` in this example represents the account getting passed into the function at runtime. You can configure accounts by adding an input to your function setting the type as `Account`, and choosing your account type.
Select **Add Input**.
### Code Engine Library
The Code Engine library contains several useful methods specifically for making internal and external API calls, and is available in the global scope of a code engine package. You can leverage the library by adding a required "codeengine" call to your package. For more specifics about how to leverage the library see [codeengine.sendRequest](#code_engine_send_request), [codeengine.getAccount](#codeengine.getAccount), and [codeengine.axios](#code_engine_axios).
# codeengine.sendRequest
The `codeengine` library contains a method called `sendRequest` that can make calls to internal Domo APIs. `sendRequest` acts like many other http request libraries that make asynchronous calls (typically using request methods such as GET, POST, PUT, and DELETE. You can use the `sendRequest` method to call into various Domo APIs like DataSets, user and groups, and cards and dashboards.
Here is an example function that it built into the Domo DataSets package:
```javascript theme={"dark"}
const codeengine = require("codeengine");
/**
* Retrieves the metadata for the specified dataset.
*
* @param dataSetId string The dataset id
* @returns {} The dataset metadata
*/
function getDataSetMetadata(dataSetId) {
const url = `api/data/v3/datasources/${dataSetId}?part=core,permission,status,pdp,rowcolcount,certification,functions`;
return codeengine.sendRequest("get", url).catch(console.error);
}
```
Notice that we are making the request without any credentials like we have to do when making external calls with the axios library. Every `sendRequest` call is intercepted by the Code Engine service and injected with the credentials of the authenticated user who is making the request.
# codeengine.getAccount
This is an example function that we have built into the Twilio package that leverages the `getAccount` method from `codeengine` library. The key is this code block:
```javascript theme={"dark"}
const codeengine = require("codeengine");
function accountExample(twilioAccount) {
const account = await codeengine.getAccount(twilioAccount.id);
const {accountSID, password} = account.properties;
}
```
Here is how it is used in context of making an external request with the axios library also available from the `codeengine` library import:
```javascript theme={"dark"}
const codeengine = require("codeengine");
async function sendSMS(twilioAccount, to, from, body) {
// get the account by account id
const account = await codeengine.getAccount(twilioAccount.id);
// access the properties of the account. These will vary from account type so it's
// important to check what is returned. In this case it's `accountSID` and `password`
const {accountSID, password} = account.properties;
const url = `https://api.twilio.com/2010-04-
01/Accounts/${accountSID}/Messages.json?To+${to}&From=${from}&Body=${encodeURIC
omponent(body)}`;
const apiBody = {
To: to,
From: from,
Body: body,
};
const requestOptions = {
headers: {
'Content-Type': 'application/x-www-form-urlencoded;charset=utf-8',
Authorization:
'Basic' + Buffer.from(`${accountSID}:${password}`).toString('base64'),
},
};
try {
await axios.post(url, apiBody, requestOptions)';
return true;
} catch (error) {
console.error(error);
throw error;
}
}
```
The input `twilioAccount` in this example represents the account getting passed into the function at runtime. You can configure accounts by adding an input to your function setting the type as `Account`, and choosing your account type.
Select **Add Input**.
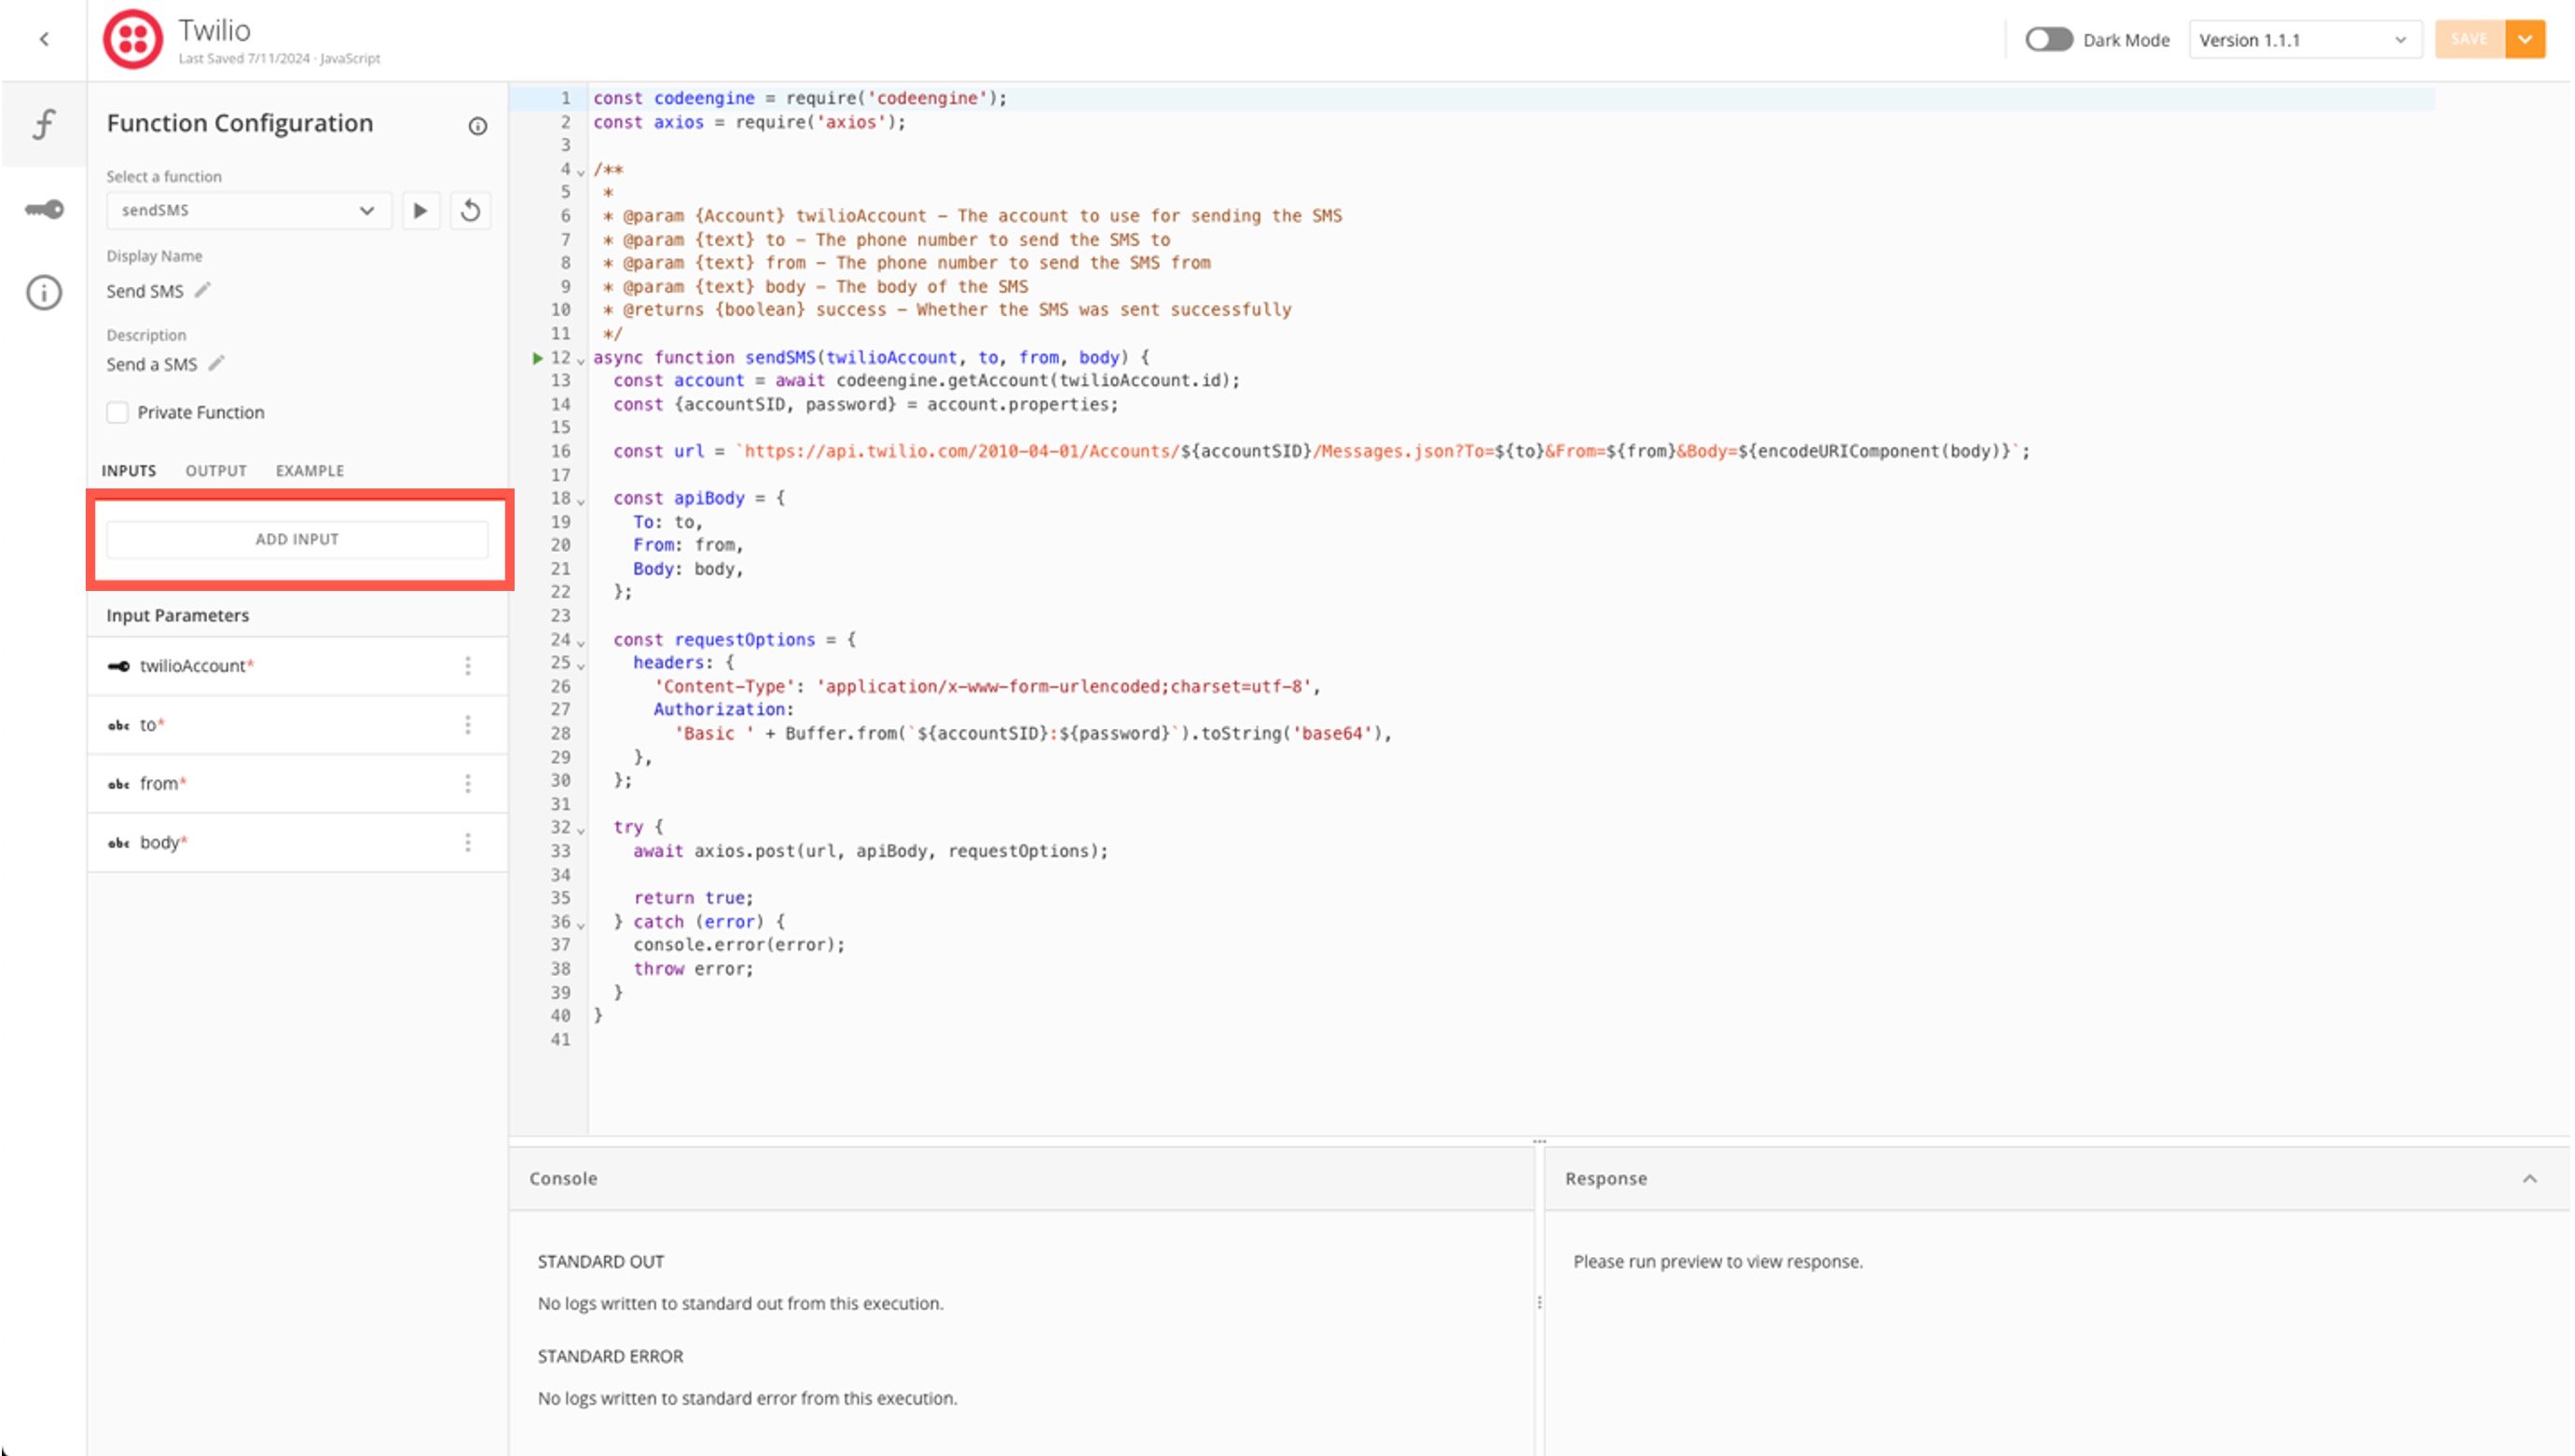 Name your input and choose **Account** as your type.
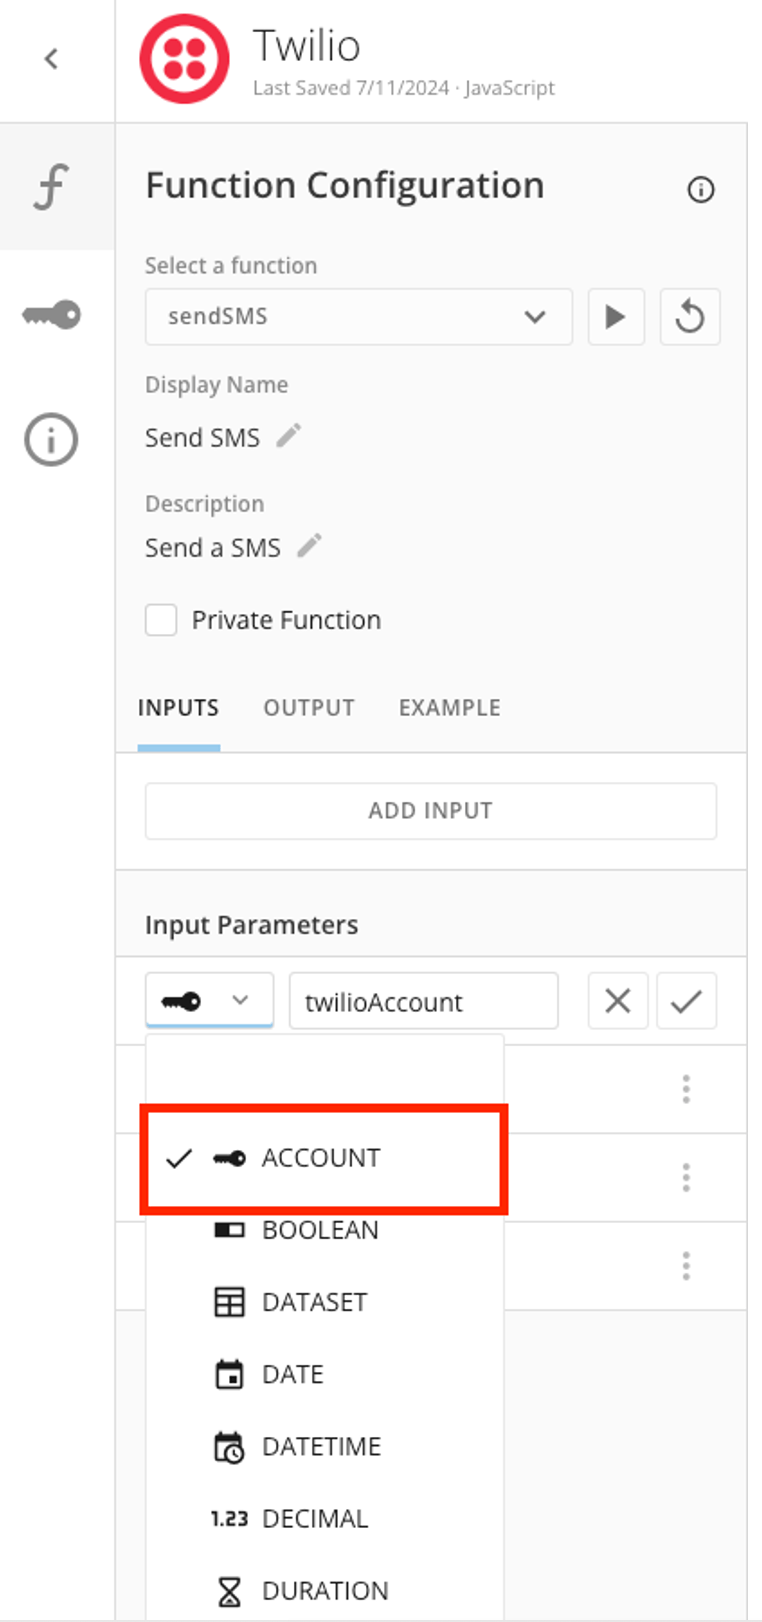 Choosing the `Account` type opens the **Edit Parameter** modal where you can choose your account data provider.
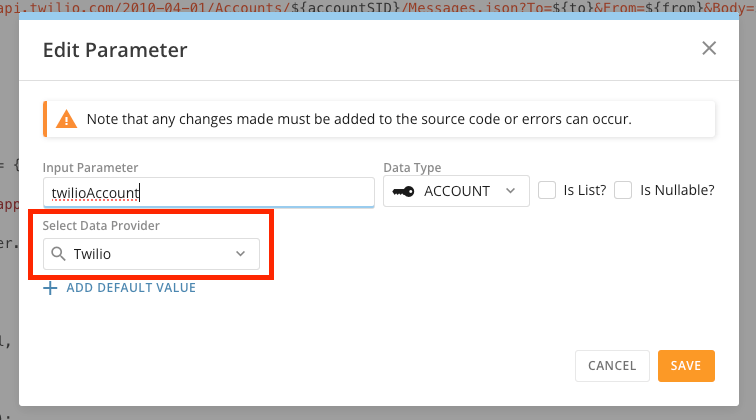 Select **Save**. Your input is now an account strictly using the data provider you chose. When running the function in Code Engine or a workflow, the input must be from the same data provider.
# codeengine.axios
This is an example function built into the Twilio package for sending texts. It uses axios to send a post request to the Twilio API. Domo Accounts are also leveraged. For more information, see codeengine.getAccount.
```javascript theme={"dark"}
const codeengine = require(“codeengine”);
async function sendTwilioSms(to, from, body) {
const account = await codeengine.getAccount(“Twilio”).then(a => {
return a.properties;
});
const url = `https://api.twilio.com/2010-04-01/Accounts/${account.properties.SID}/Messages.json`;
const data = new URLSearchParams();
data.append(‘To’, to);
data.append(‘From’, from);
data.append(‘Body’, body);
const requestOptions = {
method: ‘POST’,
headers: {
‘Content-Type’: ‘application/x-www-form-urlencoded;charset=utf-8’,
‘Authorization’: ‘Basic ‘ + Buffer.from(`${SID}:${TOKEN}`).toString(‘base64’)
},
data
};
try {
const response = await codeengine.axios(url, requestOptions);
const jsonResponse = await response.data;
if (response.ok) {
console.log('SMS sent successfully:', jsonResponse);
return jsonResponse;
} else {
console.error('Error sending SMS:', jsonResponse);
throw new Error(jsonResponse.message);
}
} catch (error) {
console.error('Error:', error);
throw error;
}
return jsonResponse;
}
```
Select **Save**. Your input is now an account strictly using the data provider you chose. When running the function in Code Engine or a workflow, the input must be from the same data provider.
# codeengine.axios
This is an example function built into the Twilio package for sending texts. It uses axios to send a post request to the Twilio API. Domo Accounts are also leveraged. For more information, see codeengine.getAccount.
```javascript theme={"dark"}
const codeengine = require(“codeengine”);
async function sendTwilioSms(to, from, body) {
const account = await codeengine.getAccount(“Twilio”).then(a => {
return a.properties;
});
const url = `https://api.twilio.com/2010-04-01/Accounts/${account.properties.SID}/Messages.json`;
const data = new URLSearchParams();
data.append(‘To’, to);
data.append(‘From’, from);
data.append(‘Body’, body);
const requestOptions = {
method: ‘POST’,
headers: {
‘Content-Type’: ‘application/x-www-form-urlencoded;charset=utf-8’,
‘Authorization’: ‘Basic ‘ + Buffer.from(`${SID}:${TOKEN}`).toString(‘base64’)
},
data
};
try {
const response = await codeengine.axios(url, requestOptions);
const jsonResponse = await response.data;
if (response.ok) {
console.log('SMS sent successfully:', jsonResponse);
return jsonResponse;
} else {
console.error('Error sending SMS:', jsonResponse);
throw new Error(jsonResponse.message);
}
} catch (error) {
console.error('Error:', error);
throw error;
}
return jsonResponse;
}
```