> ## Documentation Index
> Fetch the complete documentation index at: https://domoinc-openapi-sync-dataflows.mintlify.site/llms.txt
> Use this file to discover all available pages before exploring further.
# Programmatic Filtering
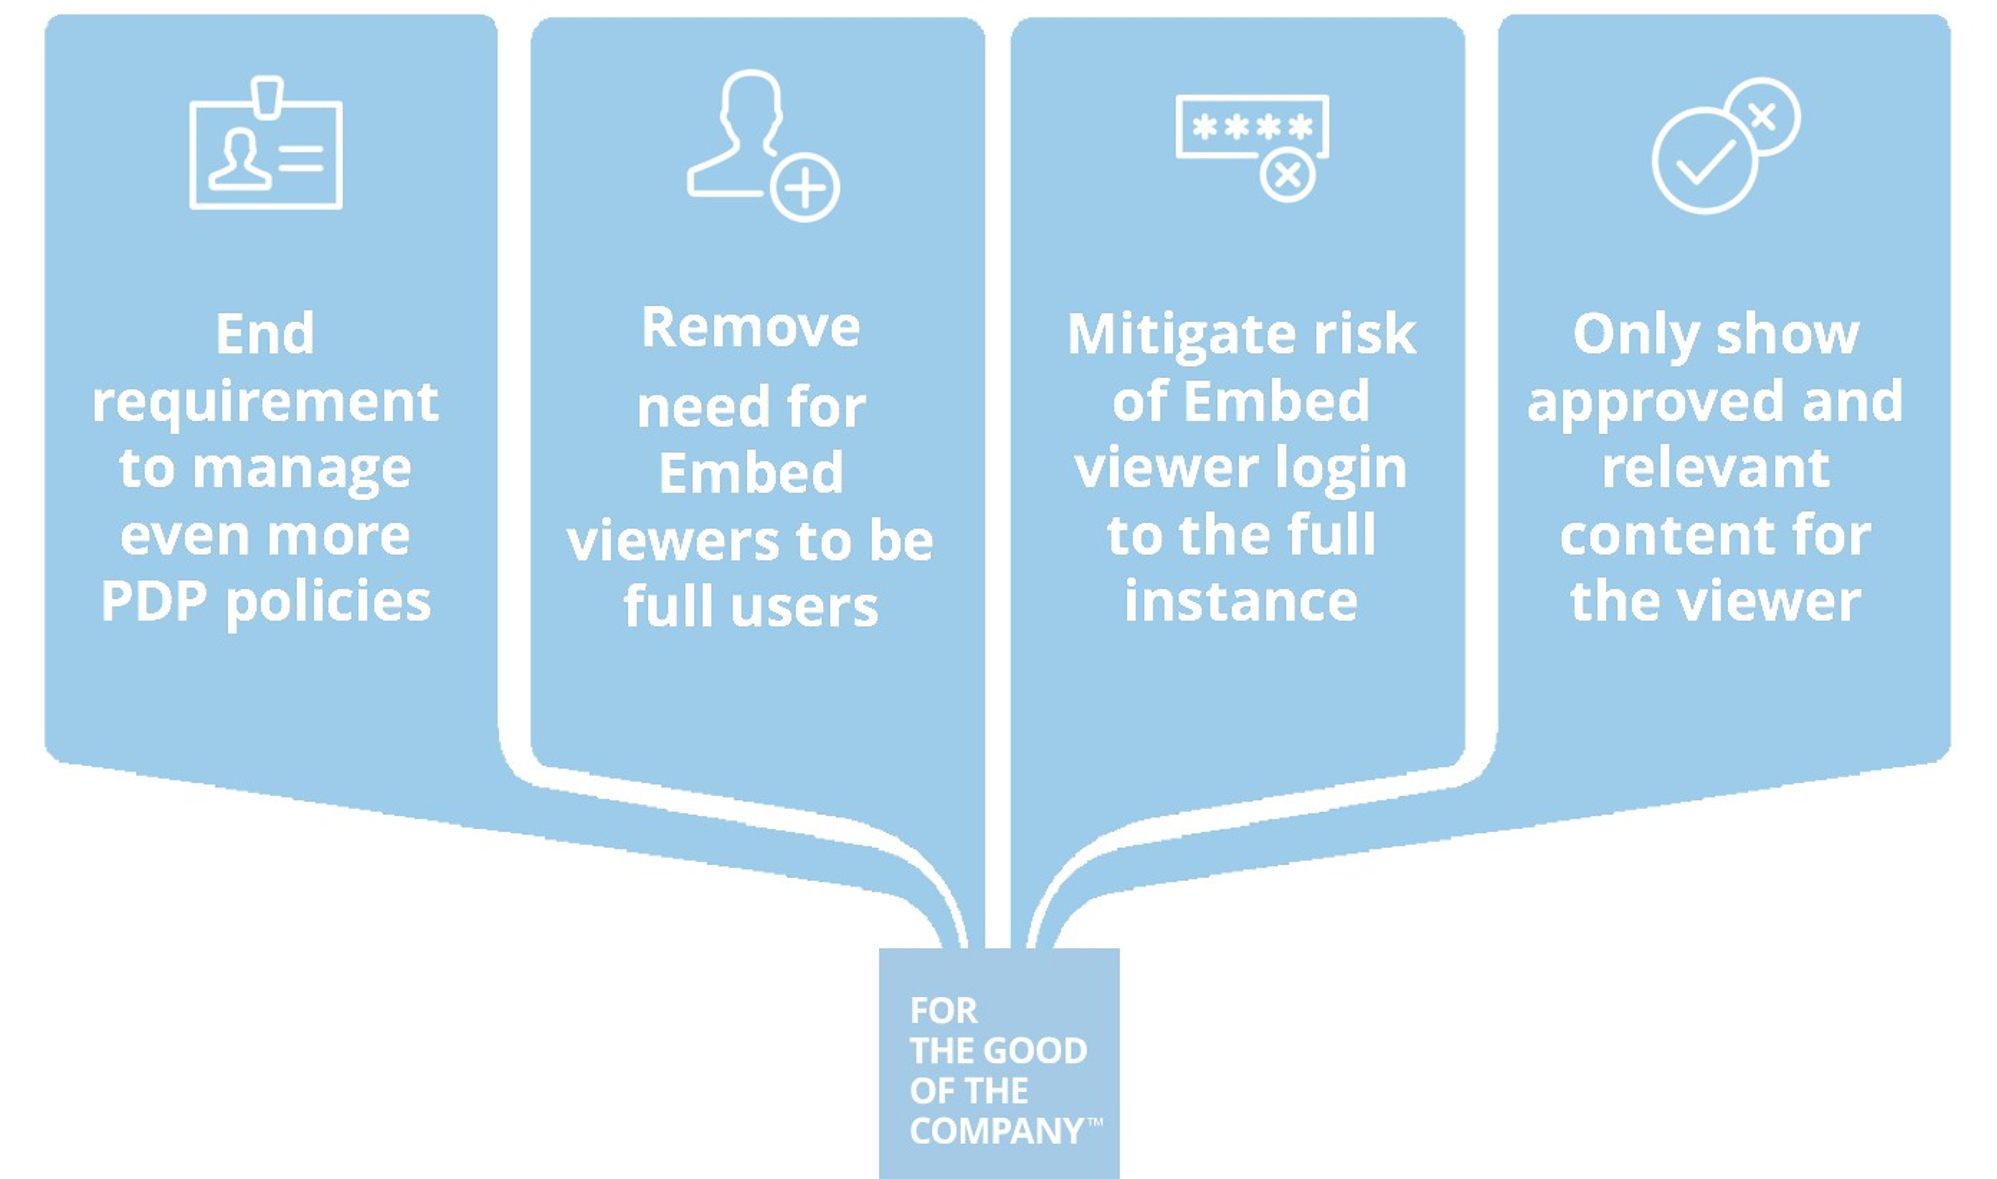
If you prefer not to work through the licensing and provisioning of mirror users both in your systems and Domo, the main alternative is to persist the policies you have already setup in your systems by applying Programmatic Filters in server-side code. This way, you can still personalize embedded content for any number of viewers even if they do not have a Domo account.
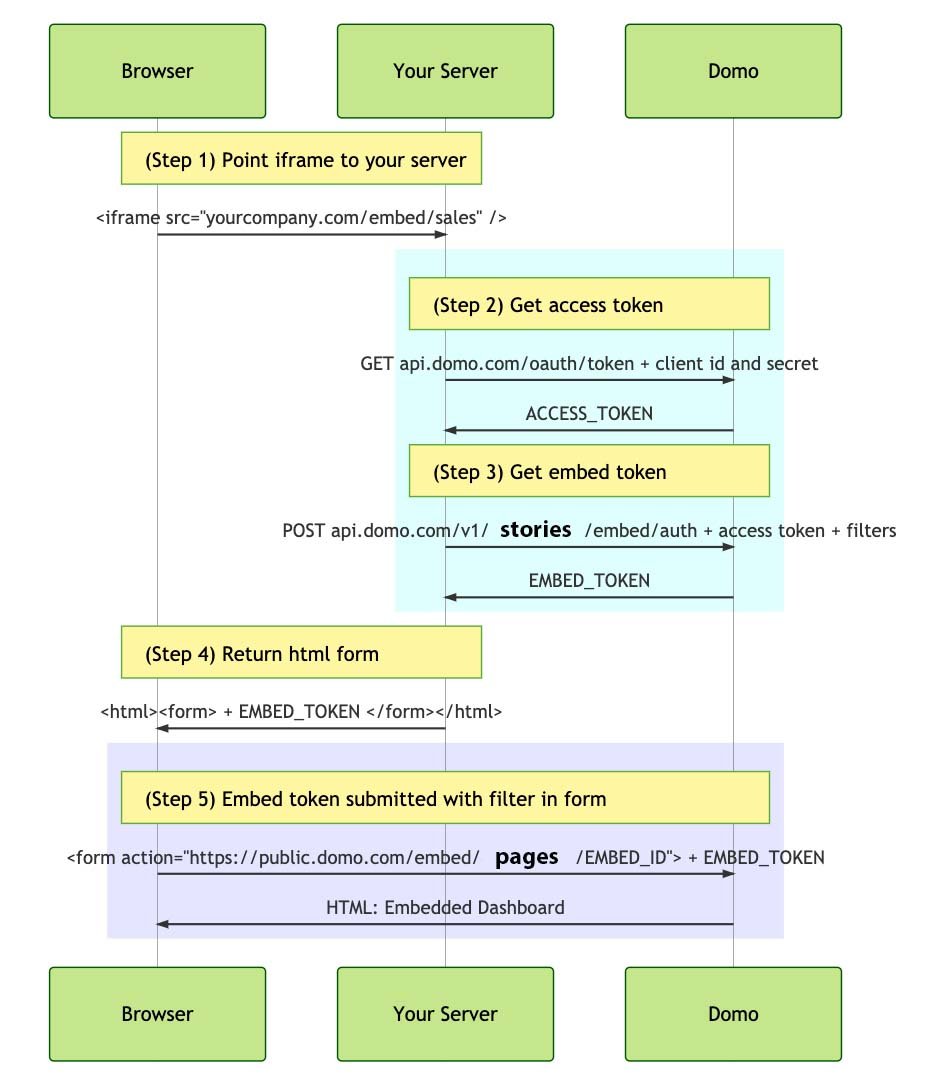
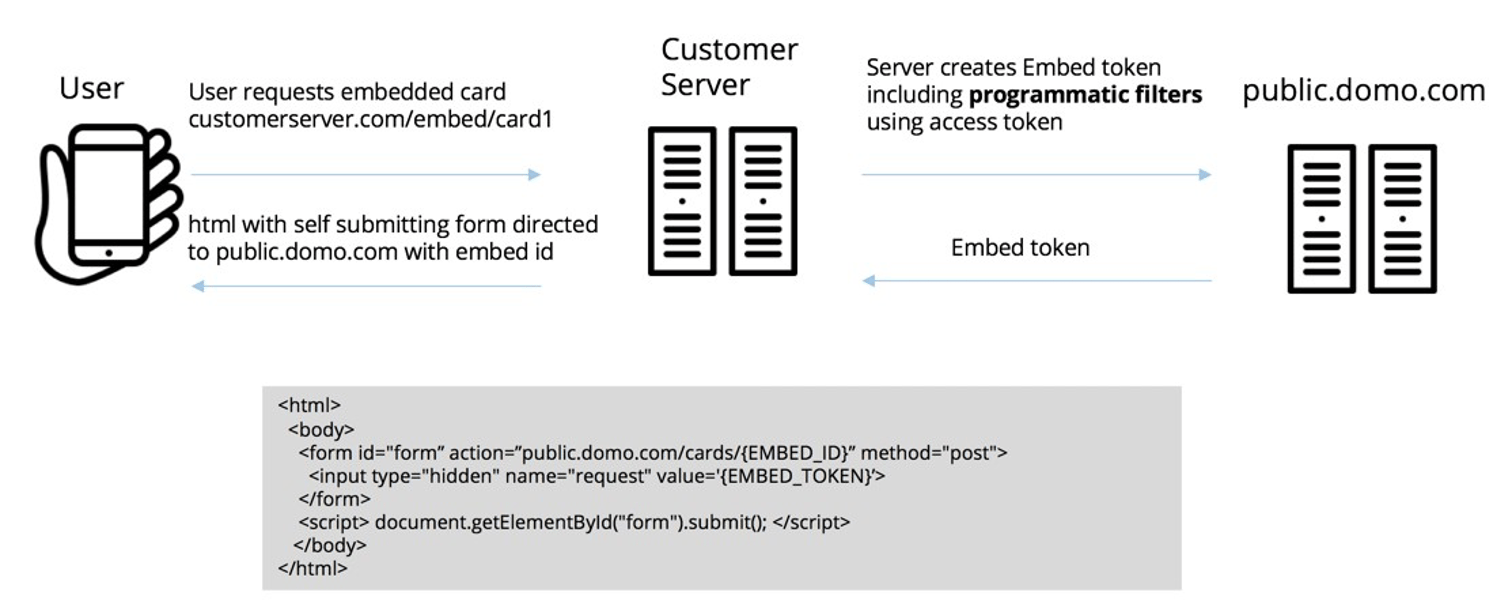
 This diagram summarizes the flow of tokens and data through the service account that acts as proxy for all other viewers. Steps 1-5 highlight the sequence of messages between your servers and the Domo API during Programmatic Filtering.
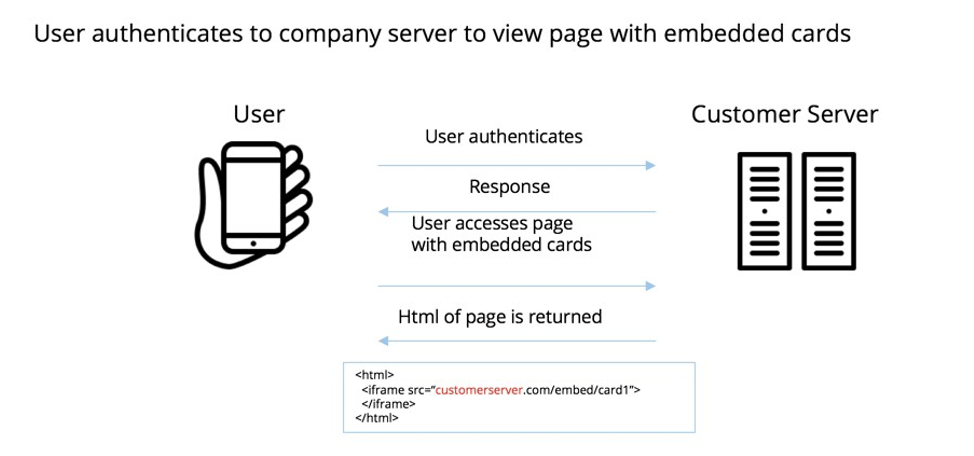
 ### Step 1: Point iframe to your server
***
**A.** Download the sample code from one of the example GitHub repositories to access even more detailed instructions in the readme file or check out example code:
**Warning**
Although other apps can be privately embedded, the Inline Dataset Editor and Form Viewer apps cannot be used with programmatic filters because of their reliance on OAuth.
* The JavaScript version uses a Node.js repository
*
JS sample code
* The ASP version is based on a .NET repository
*
ASP.NET sample code
* Check out example Python code for Programmatic Filtering
* [Python sample code](/portal/embed/embed-in-sites-and-apps/code-examples#python-code-example)
* Check out example PHP code for Programmatic Filtering
* [PHP sample code](/portal/embed/embed-in-sites-and-apps/code-examples#php-code-example)
**B.** Open the "sample.html" file in the example code
**Warning**
Due to Cross-origin resource sharing (CORS), Authentication will not work client side and must be done server side.
* Focus on this line:
```html theme={"dark"}
```
* When you are ready to move from testing to a production environment, replace localhost:3001 with the domain for your server
* This can feel counter-intuitive at first since the default embed code is an iframe that points to the Domo instance
* However, this temporary detour in your domain is how the server side code is processed before the final version of the embedded content is sent by Domo
* Step 4 below will swap your domain with the Domo instance domain in the self-submitting HTML form
### Step 1: Point iframe to your server
***
**A.** Download the sample code from one of the example GitHub repositories to access even more detailed instructions in the readme file or check out example code:
**Warning**
Although other apps can be privately embedded, the Inline Dataset Editor and Form Viewer apps cannot be used with programmatic filters because of their reliance on OAuth.
* The JavaScript version uses a Node.js repository
*
JS sample code
* The ASP version is based on a .NET repository
*
ASP.NET sample code
* Check out example Python code for Programmatic Filtering
* [Python sample code](/portal/embed/embed-in-sites-and-apps/code-examples#python-code-example)
* Check out example PHP code for Programmatic Filtering
* [PHP sample code](/portal/embed/embed-in-sites-and-apps/code-examples#php-code-example)
**B.** Open the "sample.html" file in the example code
**Warning**
Due to Cross-origin resource sharing (CORS), Authentication will not work client side and must be done server side.
* Focus on this line:
```html theme={"dark"}
```
* When you are ready to move from testing to a production environment, replace localhost:3001 with the domain for your server
* This can feel counter-intuitive at first since the default embed code is an iframe that points to the Domo instance
* However, this temporary detour in your domain is how the server side code is processed before the final version of the embedded content is sent by Domo
* Step 4 below will swap your domain with the Domo instance domain in the self-submitting HTML form
 ### Step 2: Get access token
***
**A.** Activate an API client by signing in to developer.domo.com as the user who will serve as proxy for every other viewer:
**Warning**
Ensure this user has the relevant cards and pages shared with them before trying to embed content
### Step 2: Get access token
***
**A.** Activate an API client by signing in to developer.domo.com as the user who will serve as proxy for every other viewer:
**Warning**
Ensure this user has the relevant cards and pages shared with them before trying to embed content
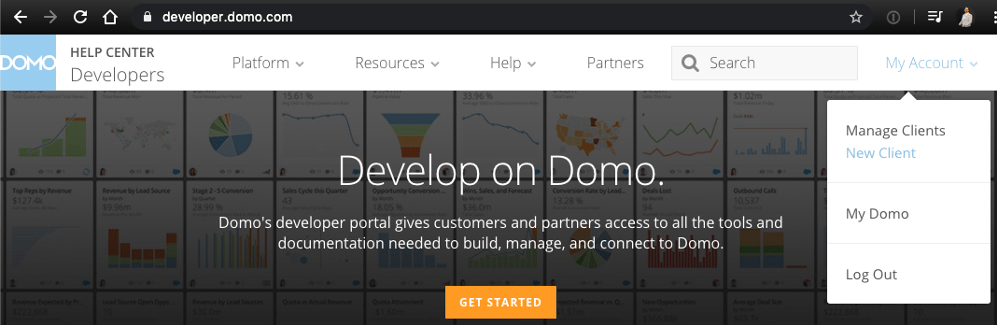 **B.** Create an account by clicking My Account > New Client and filling out the fields as follows:
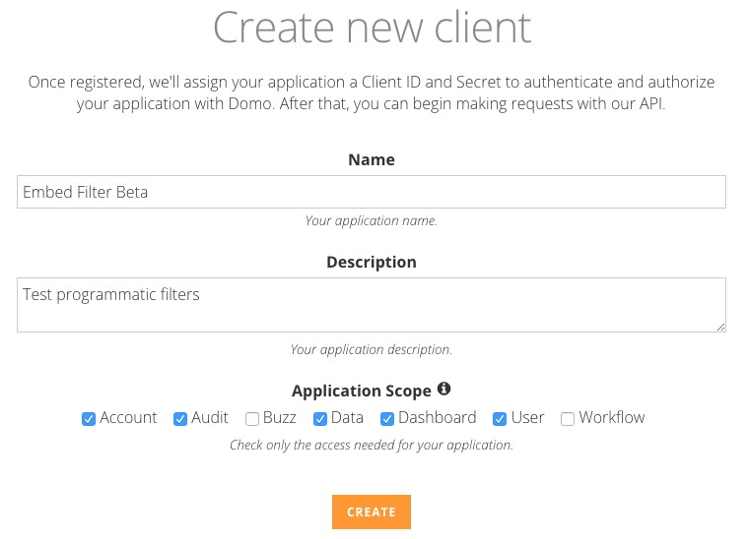 * For more information about creating the CLIENT\_ID and CLIENT\_SECRET review the details in the following link: [API Authentication Overview](/portal/API-Reference/overview)
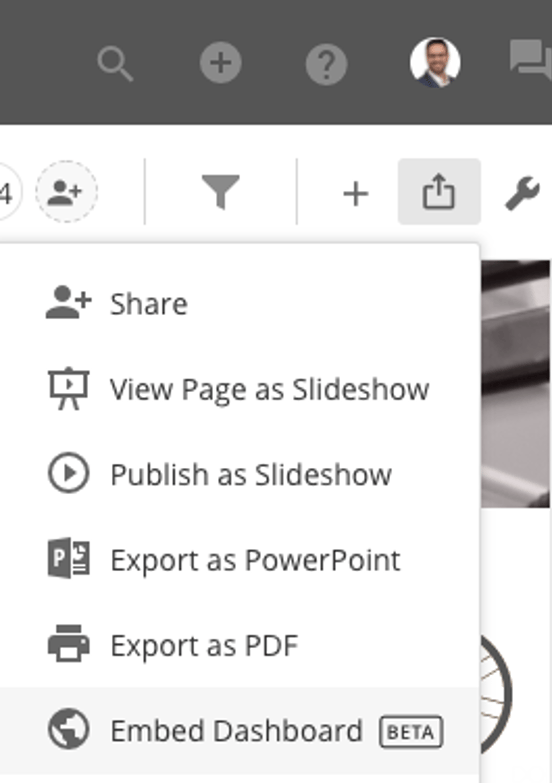
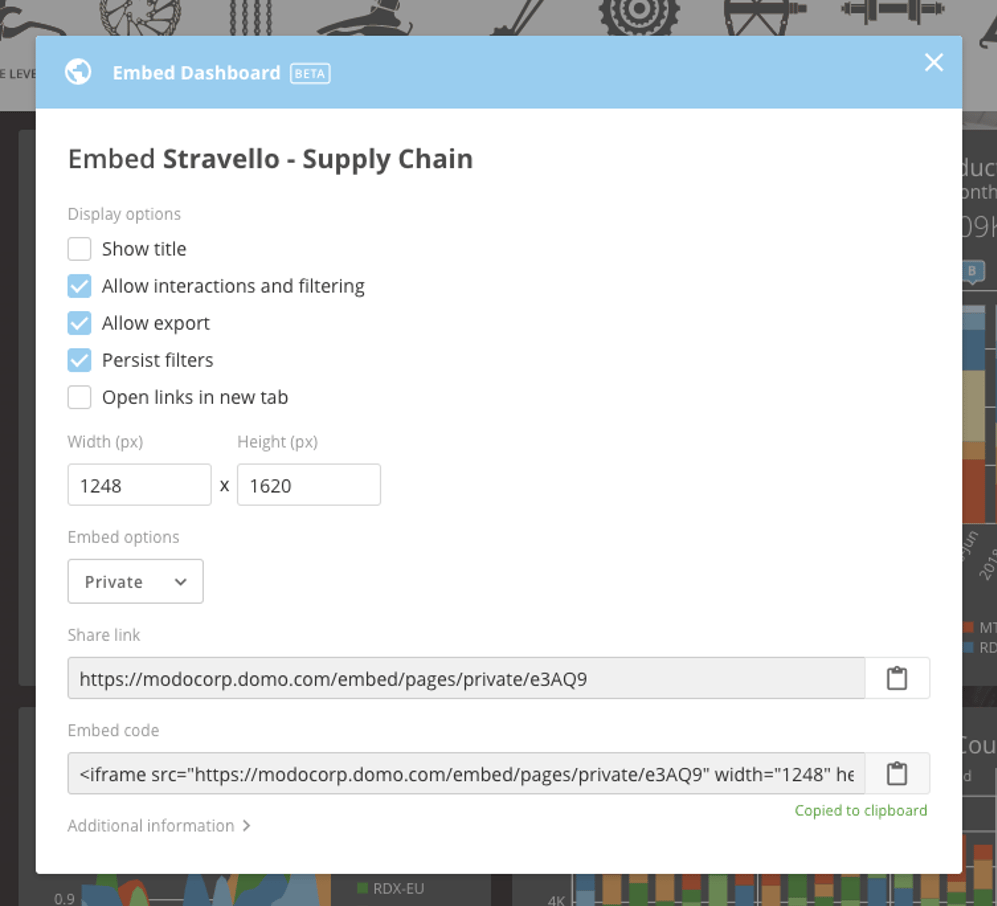
**C.** Copy the IDs for the cards or dashboards from the embed dialog in Domo using the "private" authenticated option:
* For more information about creating the CLIENT\_ID and CLIENT\_SECRET review the details in the following link: [API Authentication Overview](/portal/API-Reference/overview)
**C.** Copy the IDs for the cards or dashboards from the embed dialog in Domo using the "private" authenticated option:
 **D.** Create a file with a blank name and .env extension
* Customize the configuration settings with your own values
**D.** Create a file with a blank name and .env extension
* Customize the configuration settings with your own values
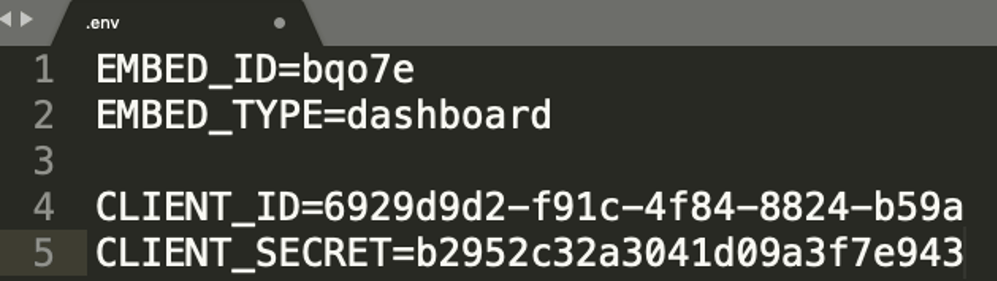 * Include "USE\_XHR=true" only if cookie based authentication won't work for the endpoint on your server.
* The CLIENT\_ID and CLIENT\_SECRET is used to create the access token which will be used to then create an embed token for use with the private embed.
* The EMBED\_ID references the card or the dashboard you are embedding.
**Best Practice**
This ID is NOT the one you can see in the URL of the Domo instance. It is the 5-character embed ID you can only copy from the embed dialog for that card or dashboard.
* The `EMBED_TYPE` must be either the word 'dashboard' or 'card' (without the quotes).
* Save the .env file in the same directory as the sample code
### Step 3: Get embed token
***
**A.** Open the embed.js file
* Notice it covers these functions:
* `getAccessToken`
* `getEmbedToken`
* `returnEmbedInfo`
* `handleRequest`
* `refreshEmbedToken`
* No customization should be required
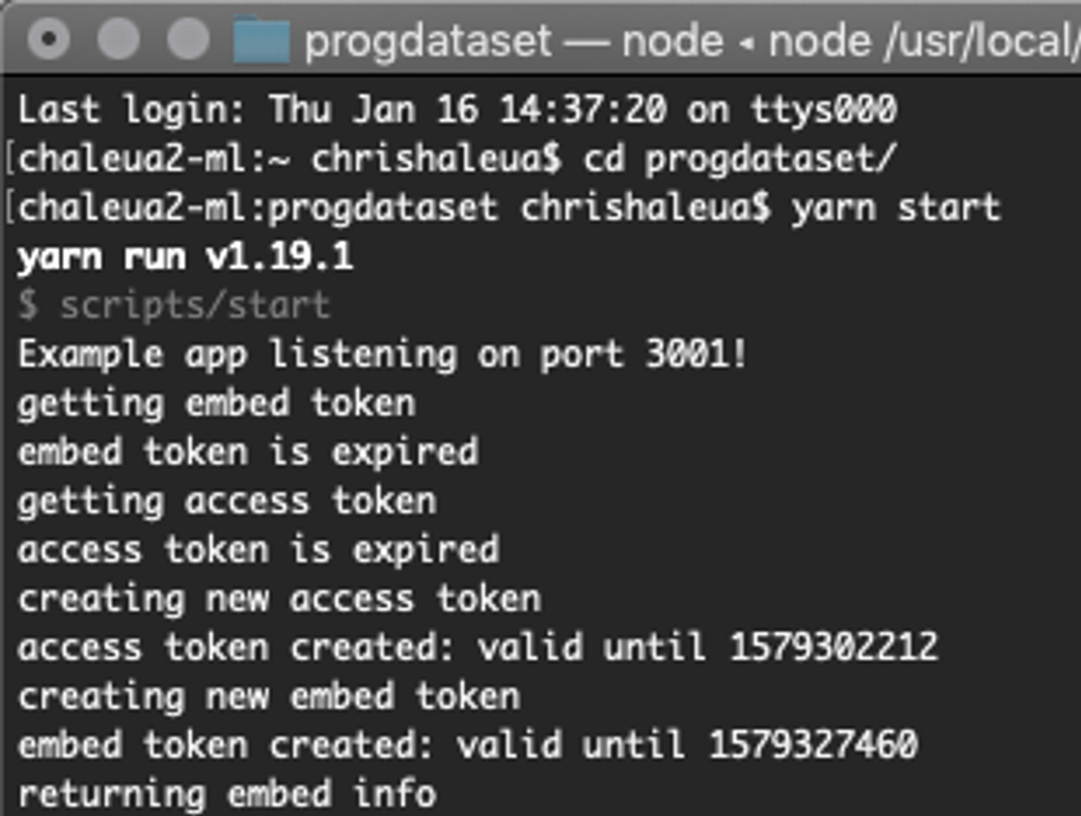
Processing can be viewed from the command line when the testing environment is live (see step 5)
* Include "USE\_XHR=true" only if cookie based authentication won't work for the endpoint on your server.
* The CLIENT\_ID and CLIENT\_SECRET is used to create the access token which will be used to then create an embed token for use with the private embed.
* The EMBED\_ID references the card or the dashboard you are embedding.
**Best Practice**
This ID is NOT the one you can see in the URL of the Domo instance. It is the 5-character embed ID you can only copy from the embed dialog for that card or dashboard.
* The `EMBED_TYPE` must be either the word 'dashboard' or 'card' (without the quotes).
* Save the .env file in the same directory as the sample code
### Step 3: Get embed token
***
**A.** Open the embed.js file
* Notice it covers these functions:
* `getAccessToken`
* `getEmbedToken`
* `returnEmbedInfo`
* `handleRequest`
* `refreshEmbedToken`
* No customization should be required
Processing can be viewed from the command line when the testing environment is live (see step 5)
 Deeper details on the possible requests and responses for the Embed API can be found here: [Embed Token API Reference](/portal/uc9ls4li6ny8s-embed-token-api)
### Step 4: Return html form
***
**A.** Open the file users.js in a text editor and modify the filter settings for each user to customize the filtering that each user will have applied to them.
Currently, each user has an empty filter being applied to them `[]`.
* There are some example filters in the file that are commented out that you can use that give you an idea of the format expected for the filters.
* Once you make filter changes to the users.js file, you will need to save the file, restart the express server, refresh the page, and then log back in.
Deeper details on the possible requests and responses for the Embed API can be found here: [Embed Token API Reference](/portal/uc9ls4li6ny8s-embed-token-api)
### Step 4: Return html form
***
**A.** Open the file users.js in a text editor and modify the filter settings for each user to customize the filtering that each user will have applied to them.
Currently, each user has an empty filter being applied to them `[]`.
* There are some example filters in the file that are commented out that you can use that give you an idea of the format expected for the filters.
* Once you make filter changes to the users.js file, you will need to save the file, restart the express server, refresh the page, and then log back in.
 There are two supported formats for filters: Standard Filters and SQL Filters
#### Standard Filters
Standard filters are passed on the `filters` property. The value of `filters` should be an array of filter objects. A filter object is a JSON object with the following properties:
`column`: (required) The name of the column you are filtering on
`operator`: (required) One of the following values that describes the function of the filter:
* "IN"
* "NOT\_IN"
* "EQUALS"
* "NOT\_EQUALS"
* "GREATER\_THAN"
* "GREAT\_THAN\_EQUALS\_TO"
* "LESS\_THAN"
* "LESS\_THAN\_EQUALS\_TO"
`values`: (required) A list of values
`datasourceId`: (optional) An optional value of a datasource ID to apply this filter on. If this is not supplied, the filter will be applied to all datasets on the page. If the specified column does not exist on a dataset, cards using that dataset will fail to render. Specifying the dataset will ensure that only cards on this dataset will have the filter applied.
e.g. `"filters": [{"column": "Region", "operator": "IN", "values": ["West"], "datasourceId": "xxxxxxxx-xxxx-xxxx-xxxx-xxxxxxxxxxxx"}]`
#### SQL Filters
SQL filters allow you to use a familiar SQL syntax to define powerful and concise filter logic. Because the support "OR" and "AND" operators, they enable you to use more complicated rules to target the exact data you wish users to see. SQL filters are passed on the `sqlFilters` property. The value of `sqlFilters` should be an array of SQL filter objects. A SQL filter object is a JSON object with the following properties:
`sqlFilter`: (required) A SQL string that describes your filter. This should look like a "WHERE" clause in a typical SQL query. You can use "OR" and "AND" to create complex filters. Column names should be wrapped in backticks, and values should be wrapped in single quotes.
`datasourceIds`: (optional) An array of datasource IDs to apply this filter on. If this is not supplied, the filter will be applied to all datasets on the page. If the specified column does not exist on a dataset, cards using that dataset will fail to render. Specifying the dataset will ensure that only cards on this dataset will have the filter applied.
e.g. ``"sqlFilters": [{"sqlFilter": "`Region` IN ('WEST')", "datasourceIds": ["xxxxxxxx-xxxx-xxxx-xxxx-xxxxxxxxxxxx"]}]``
**Best Practice**
* Browsers set a standardized size limit around 8kb on the JSON Web Token (JWT) used to define programmatic filters: [https://auth0.com/docs/security/tokens/json-web-tokens](https://auth0.com/docs/security/tokens/json-web-tokens)
* In a few edge cases (primarily with “IN” operator), filters that try to include extremely long lists of values can hit that size limit.
* To resolve this, transform the data and create a new column of aggregated values that will simplify the server-side filter logic.
There are two supported formats for filters: Standard Filters and SQL Filters
#### Standard Filters
Standard filters are passed on the `filters` property. The value of `filters` should be an array of filter objects. A filter object is a JSON object with the following properties:
`column`: (required) The name of the column you are filtering on
`operator`: (required) One of the following values that describes the function of the filter:
* "IN"
* "NOT\_IN"
* "EQUALS"
* "NOT\_EQUALS"
* "GREATER\_THAN"
* "GREAT\_THAN\_EQUALS\_TO"
* "LESS\_THAN"
* "LESS\_THAN\_EQUALS\_TO"
`values`: (required) A list of values
`datasourceId`: (optional) An optional value of a datasource ID to apply this filter on. If this is not supplied, the filter will be applied to all datasets on the page. If the specified column does not exist on a dataset, cards using that dataset will fail to render. Specifying the dataset will ensure that only cards on this dataset will have the filter applied.
e.g. `"filters": [{"column": "Region", "operator": "IN", "values": ["West"], "datasourceId": "xxxxxxxx-xxxx-xxxx-xxxx-xxxxxxxxxxxx"}]`
#### SQL Filters
SQL filters allow you to use a familiar SQL syntax to define powerful and concise filter logic. Because the support "OR" and "AND" operators, they enable you to use more complicated rules to target the exact data you wish users to see. SQL filters are passed on the `sqlFilters` property. The value of `sqlFilters` should be an array of SQL filter objects. A SQL filter object is a JSON object with the following properties:
`sqlFilter`: (required) A SQL string that describes your filter. This should look like a "WHERE" clause in a typical SQL query. You can use "OR" and "AND" to create complex filters. Column names should be wrapped in backticks, and values should be wrapped in single quotes.
`datasourceIds`: (optional) An array of datasource IDs to apply this filter on. If this is not supplied, the filter will be applied to all datasets on the page. If the specified column does not exist on a dataset, cards using that dataset will fail to render. Specifying the dataset will ensure that only cards on this dataset will have the filter applied.
e.g. ``"sqlFilters": [{"sqlFilter": "`Region` IN ('WEST')", "datasourceIds": ["xxxxxxxx-xxxx-xxxx-xxxx-xxxxxxxxxxxx"]}]``
**Best Practice**
* Browsers set a standardized size limit around 8kb on the JSON Web Token (JWT) used to define programmatic filters: [https://auth0.com/docs/security/tokens/json-web-tokens](https://auth0.com/docs/security/tokens/json-web-tokens)
* In a few edge cases (primarily with “IN” operator), filters that try to include extremely long lists of values can hit that size limit.
* To resolve this, transform the data and create a new column of aggregated values that will simplify the server-side filter logic.
 ### Step 5: Token and filter submitted in form
***
**A.** Navigate to the base folder where the repository was unzipped to install the necessary dependencies
* Install nodejs: Node installer
* Install yarn: Yarn installer
**B.** Start the express server by running the `yarn start` or `node express` command from the base folder of the project in Terminal / Command line.
* Go to the url localhost:3001 in your browser and verify that you are able to see the card or dashboard after you log in.
* The available usernames are listed in the express.js file ("mike", "susan", "tom", and "rachael").
* The password is not verified and so any will work.
### Step 5: Token and filter submitted in form
***
**A.** Navigate to the base folder where the repository was unzipped to install the necessary dependencies
* Install nodejs: Node installer
* Install yarn: Yarn installer
**B.** Start the express server by running the `yarn start` or `node express` command from the base folder of the project in Terminal / Command line.
* Go to the url localhost:3001 in your browser and verify that you are able to see the card or dashboard after you log in.
* The available usernames are listed in the express.js file ("mike", "susan", "tom", and "rachael").
* The password is not verified and so any will work.
 ### Linking across embedded dashboards while persisting programmatic filters
***
Engaging interaction is a major differentiator in Domo Everywhere. The most common interaction is cross-card filtering. Right after that, linking across content is a powerful next step in customizing experiences for external viewers. When linking across embedded content, embedders often make a couple common mistakes.
First, they try pointing the card interaction to link to content within the instance:
{' '}
### Linking across embedded dashboards while persisting programmatic filters
***
Engaging interaction is a major differentiator in Domo Everywhere. The most common interaction is cross-card filtering. Right after that, linking across content is a powerful next step in customizing experiences for external viewers. When linking across embedded content, embedders often make a couple common mistakes.
First, they try pointing the card interaction to link to content within the instance:
{' '}
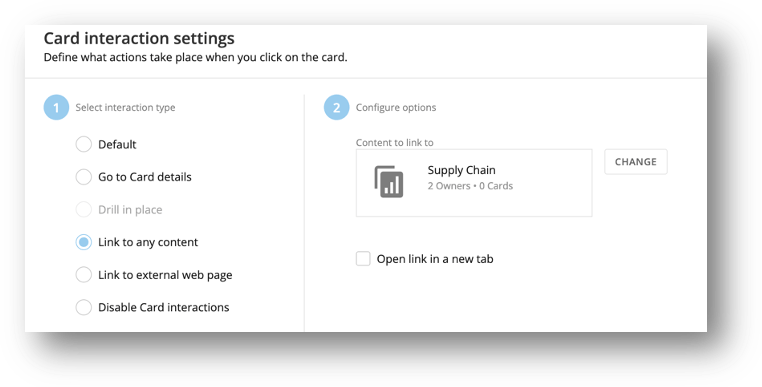 This does not work because the embedded experience started outside of the instance. External viewers only have access to the single card or dashboard that has been embedded unless you choose to upgrade beyond the view experience to the edit experience as documented [here](/portal/embed/embed-in-sites-and-apps/embedded-capabilities)
The next most common mistake is when some embedders try to paste in the embed link as an external web page:
This does not work because the embedded experience started outside of the instance. External viewers only have access to the single card or dashboard that has been embedded unless you choose to upgrade beyond the view experience to the edit experience as documented [here](/portal/embed/embed-in-sites-and-apps/embedded-capabilities)
The next most common mistake is when some embedders try to paste in the embed link as an external web page:
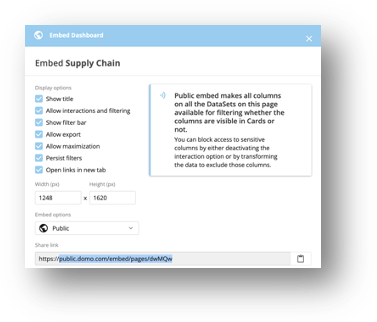
 That actually works for public embed use cases, but does not maintain any programmatic filters for authenticated private embed use cases.
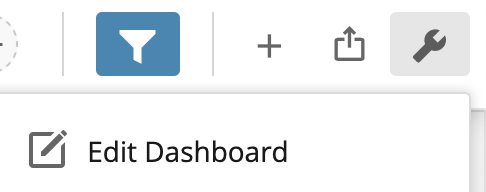
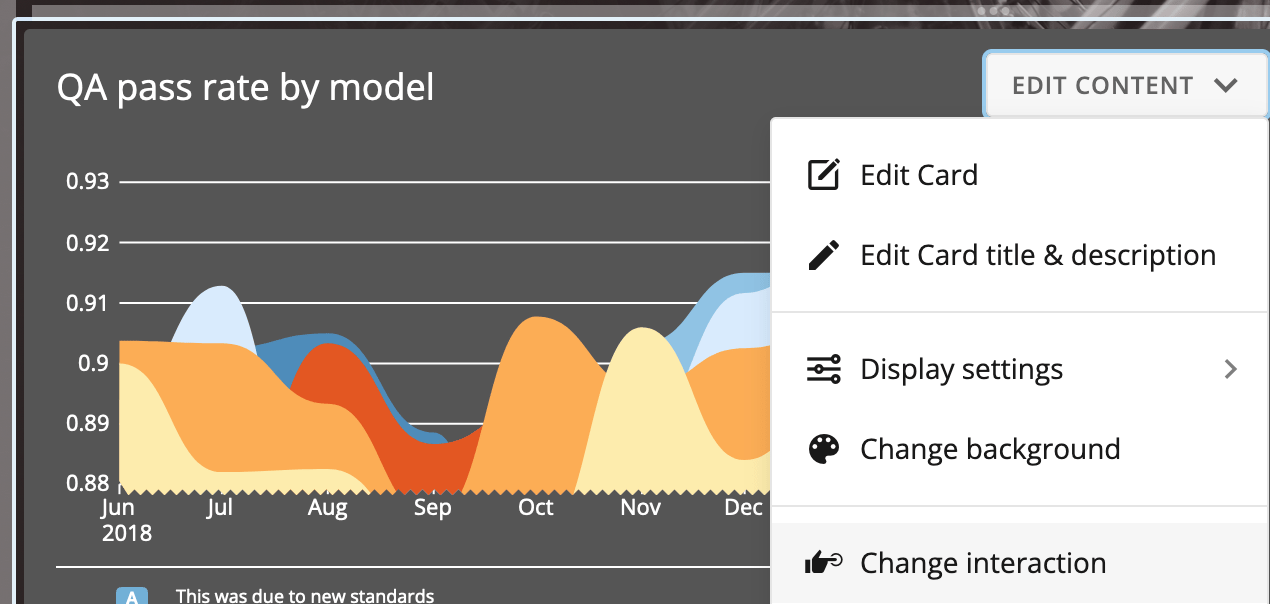
To persist programmatic filters across privately embedded dashboard links, the only secure method is to point the external link interaction for a card directly at the host page where the server-side code of the programmatic filter can be applied to both embedded dashboard. That means the link does not point to any Domo domains at all. The link points at your host site’s domain.
That actually works for public embed use cases, but does not maintain any programmatic filters for authenticated private embed use cases.
To persist programmatic filters across privately embedded dashboard links, the only secure method is to point the external link interaction for a card directly at the host page where the server-side code of the programmatic filter can be applied to both embedded dashboard. That means the link does not point to any Domo domains at all. The link points at your host site’s domain.
 !\[]\(/images/dev/web-assets.domo.com/blog/wp-content/uploads/2022/08/image003.png"
class="alignnone size-full)
In the [JavaScript example code](/portal/embed/embed-in-sites-and-apps/code-examples#javascript-code-example) there are 3 important places where a change needs to be made:
**`.env` file**
*
[https://github.com/domoinc/domo-node-embed-filters/blob/master/.env\{](https://github.com/domoinc/domo-node-embed-filters/blob/master/.env\{)' '}
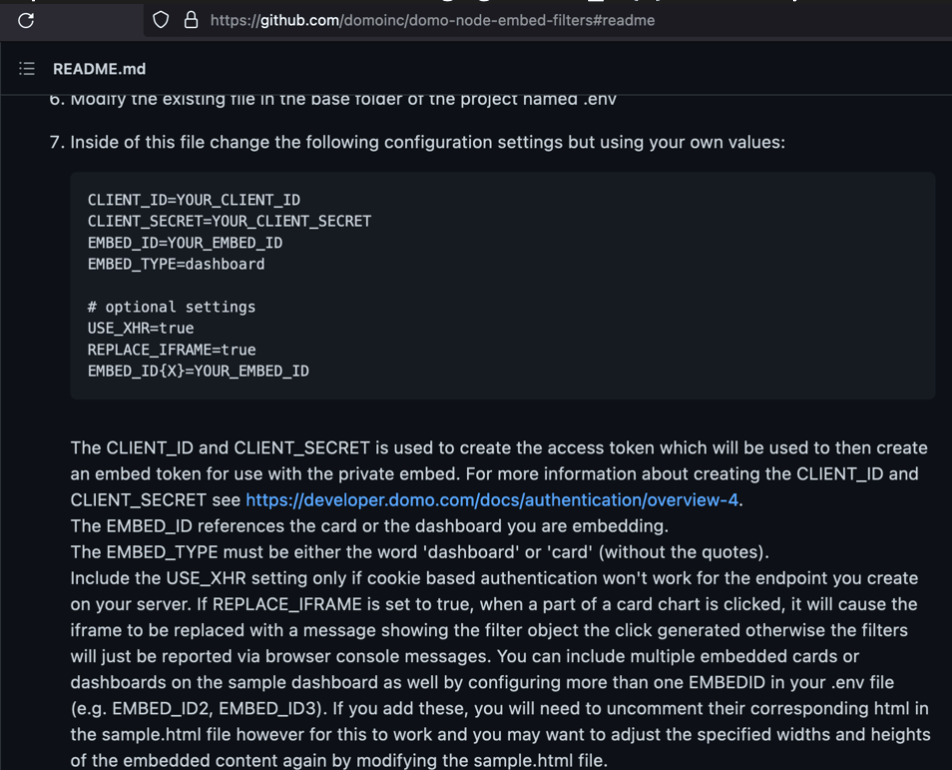
* Step 7 in the readme talks about changing EMBED\_ID{X} to as many dashboards as needed in the experience
{' '}
!\[]\(/images/dev/web-assets.domo.com/blog/wp-content/uploads/2022/08/image003.png"
class="alignnone size-full)
In the [JavaScript example code](/portal/embed/embed-in-sites-and-apps/code-examples#javascript-code-example) there are 3 important places where a change needs to be made:
**`.env` file**
*
[https://github.com/domoinc/domo-node-embed-filters/blob/master/.env\{](https://github.com/domoinc/domo-node-embed-filters/blob/master/.env\{)' '}
* Step 7 in the readme talks about changing EMBED\_ID{X} to as many dashboards as needed in the experience
{' '}
 **host page**
*
[https://github.com/domoinc/domo-node-embed-filters/blob/master/sample.html\{](https://github.com/domoinc/domo-node-embed-filters/blob/master/sample.html\{)' '}
* Line 25 shows the path to the host page. You would swap out localhost:3000 for your domain
**host page**
*
[https://github.com/domoinc/domo-node-embed-filters/blob/master/sample.html\{](https://github.com/domoinc/domo-node-embed-filters/blob/master/sample.html\{)' '}
* Line 25 shows the path to the host page. You would swap out localhost:3000 for your domain
 * The combination of that domain and path is what would be pasted into the external interaction
**users.js filter logic**
*
[https://github.com/domoinc/domo-node-embed-filters/blob/master/users.js\{](https://github.com/domoinc/domo-node-embed-filters/blob/master/users.js\{)' '}
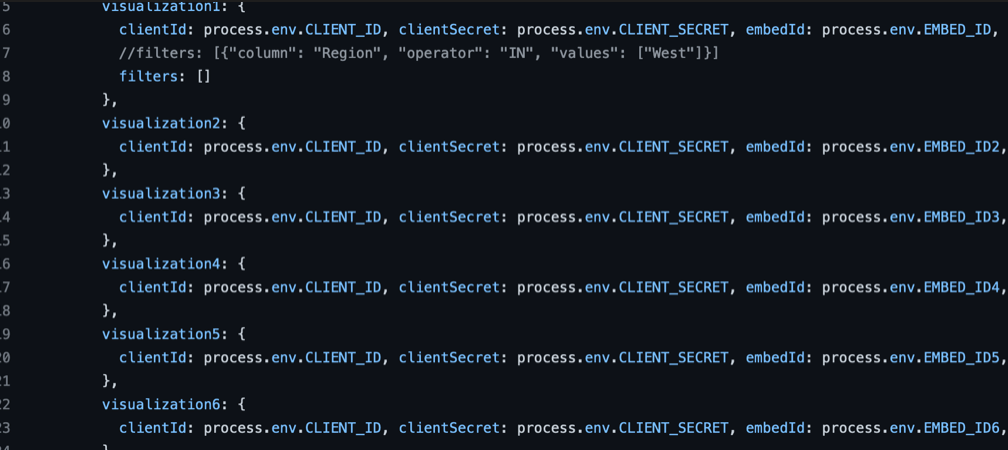
* Uncomment the code in lines 6-23 which already references embed IDs for each dashboard
* The combination of that domain and path is what would be pasted into the external interaction
**users.js filter logic**
*
[https://github.com/domoinc/domo-node-embed-filters/blob/master/users.js\{](https://github.com/domoinc/domo-node-embed-filters/blob/master/users.js\{)' '}
* Uncomment the code in lines 6-23 which already references embed IDs for each dashboard