> ## Documentation Index
> Fetch the complete documentation index at: https://domoinc-openapi-sync-dataflows.mintlify.site/llms.txt
> Use this file to discover all available pages before exploring further.
# Overview
You need to complete four steps when building a custom connector:
Upload connector icon images
Configure user authentication
Configure selectable reports
Define how the data is processed
After you have completed these steps, you can submit the connector for publishing.
Domo developers will review the connector, perform some engineering magic, and notify
you when your connector is available for use.
This section will review the process using the Sample CRM custom connector provided in Connector Dev Studio.
### Upload Icon Images
***
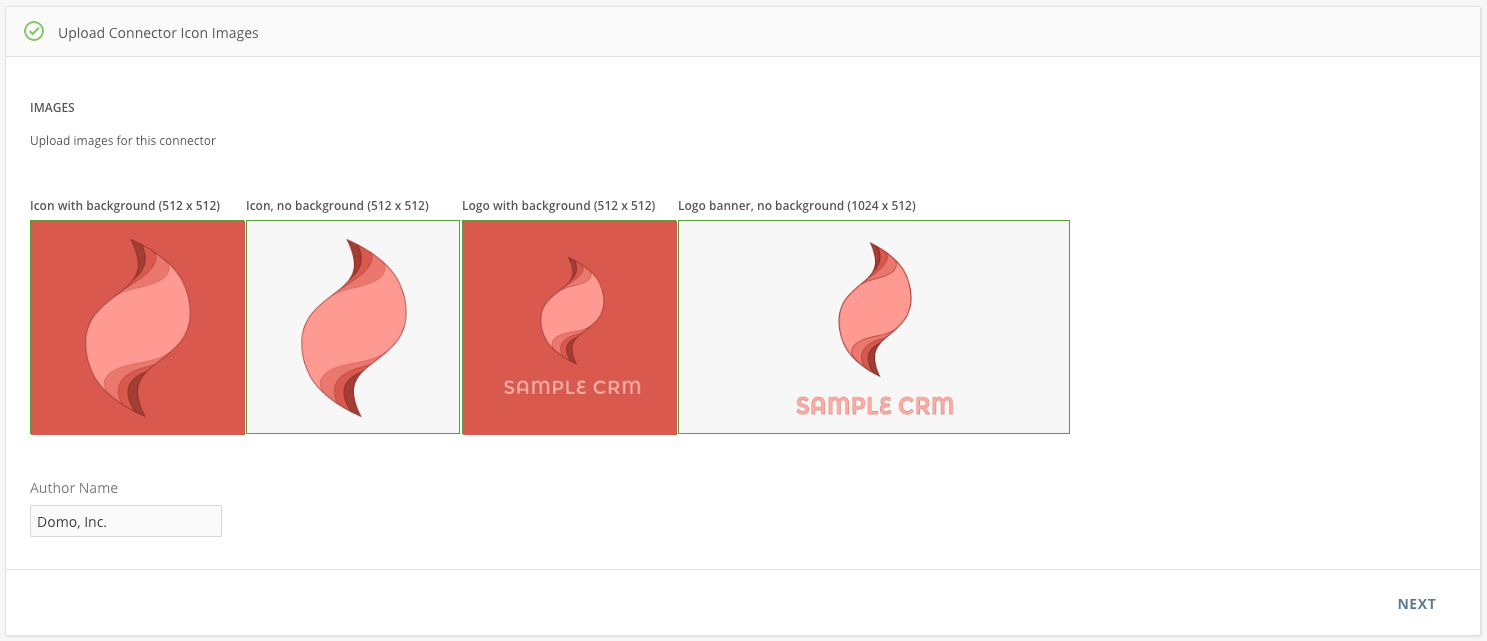
Icons allow users to quickly identify your connector. The four images you need for a connector are:
Icon with background (512 x 512 pixels, png)
Icon, no background (512 x 512 pixels, png)
Logo with background (512 x 512 pixels, png)
Logo banner, no background (1024 x 512 pixels, png)
Note: You can move on to other steps before completing this step,
but icons are required before you submit your connector for publishing.
### Configure User Authentication
***
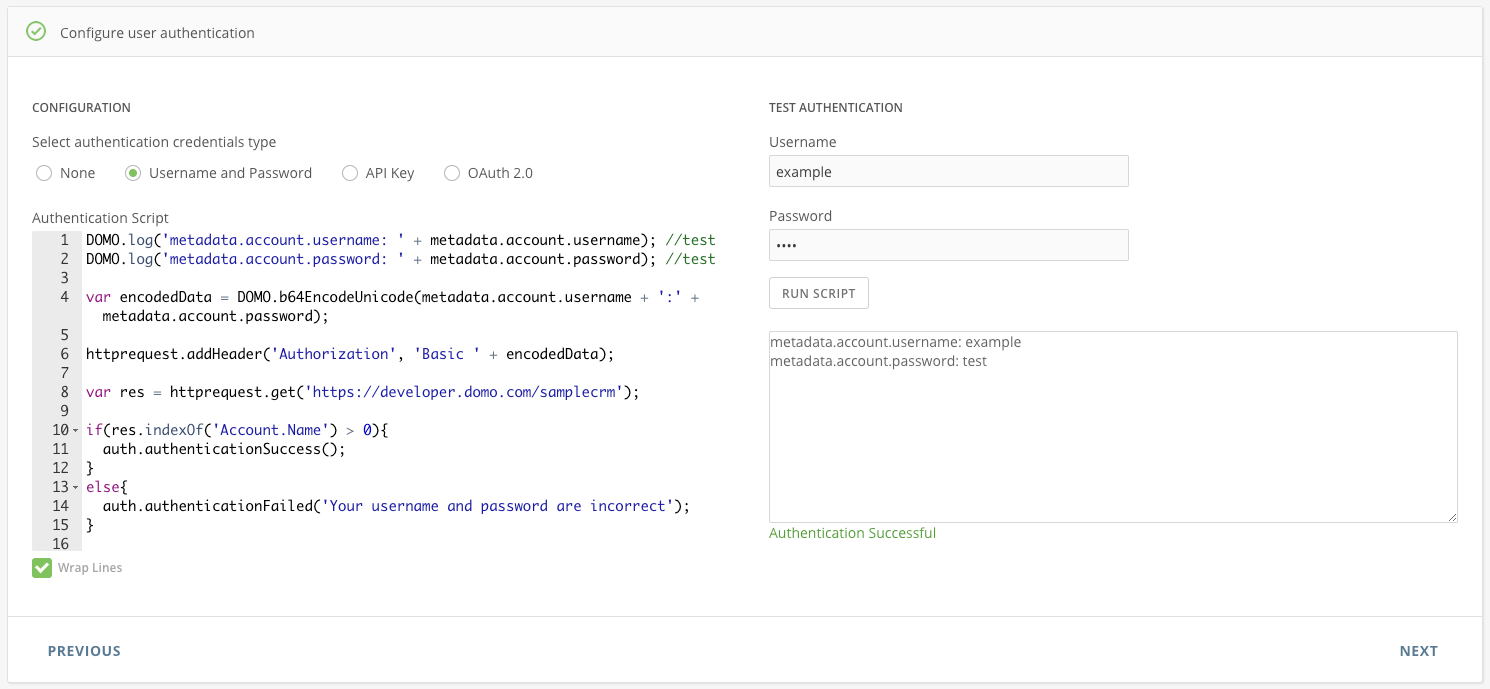
The Connector Builder supports four different authentication methods:
No authentication
Username and password
API Key
OAuth 2.0
Here is an example of writing authentication code for an API that uses username and password. For a detailed description of the different methods, see the [Configure Authentication](/portal/Connectors/Custom-Connectors/configure-authentication) section. For code examples, see [Examples](/portal/Connectors/Custom-Connectors/examples).
Selecting an authentication method determines the metadata available to use in your authentication script. After selecting an authentication method and filling out the authentication fields, write a code block to validate the API's credentials.
**Note**
The code block needs to determine and set the status of the API credential validation code to either `auth.authenticationSuccess()` or `auth.authenticationFailed('Insert your message')`. The messsage provided to the auth.authenticationFailed method will be displayed to users when the connector is run if the authentication fails.
Code:
```js theme={"dark"}
//This logging is here for testing! Remove before publishing your connectors
DOMO.log('metadata.account.username: ' + metadata.account.username);
DOMO.log('metadata.account.password: ' + metadata.account.password);
var encodedData = DOMO.b64EncodeUnicode(
metadata.account.username + ':' + metadata.account.password,
);
httprequest.addHeader('Authorization', 'Basic ' + encodedData);
var res = httprequest.get('https://developer.domo.com/samplecrm');
if (httprequest.getStatusCode() == 200) {
auth.authenticationSuccess();
} else {
auth.authenticationFailed('Your username and password are incorrect.');
}
```
Best Practices:
Ensure the script runs in 'strict mode' to avoid any unexpected behavior.
If you get errors saying "Expected JSON, but found…", put your httprequest
calls in a 'try-catch' block to handle errors gracefully.
### Configure Selectable Reports
***
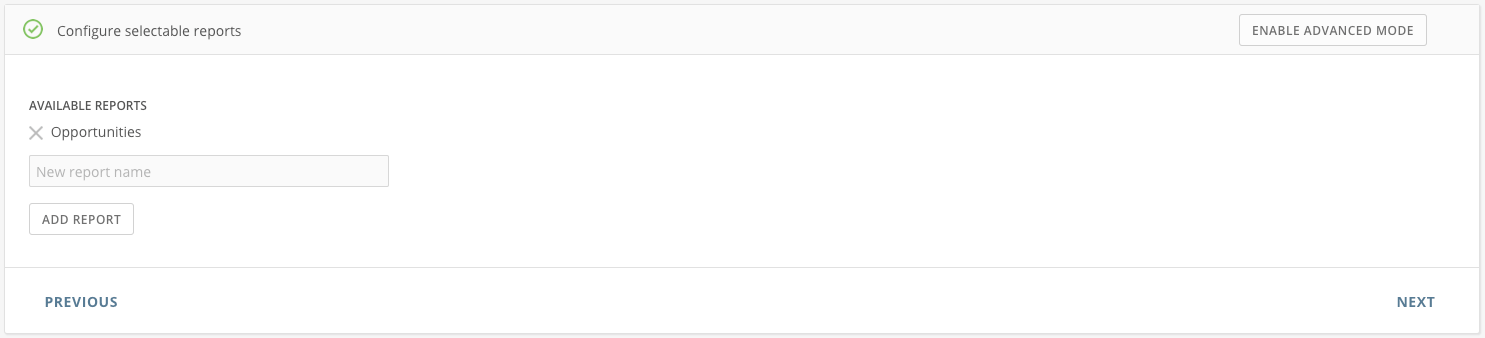
Each connector can contain multiple reports. Reports allow a developer to call different API endpoints or perform different work on the data received. In this step, you will define the reports that a user can select when using this connector in Domo. These reports will appear in the Report dropdown menu after the connector is published.
If you would like the ability for users to provide custom parameters that you can use when making your API calls, click Enable Advanced Mode. See [configure Reports](/portal/Connectors/Custom-Connectors/configure-reports) for instructions on how to use this feature. For code examples, see [Examples](/portal/Connectors/Custom-Connectors/examples).
### Define How the Data Is Processed
***
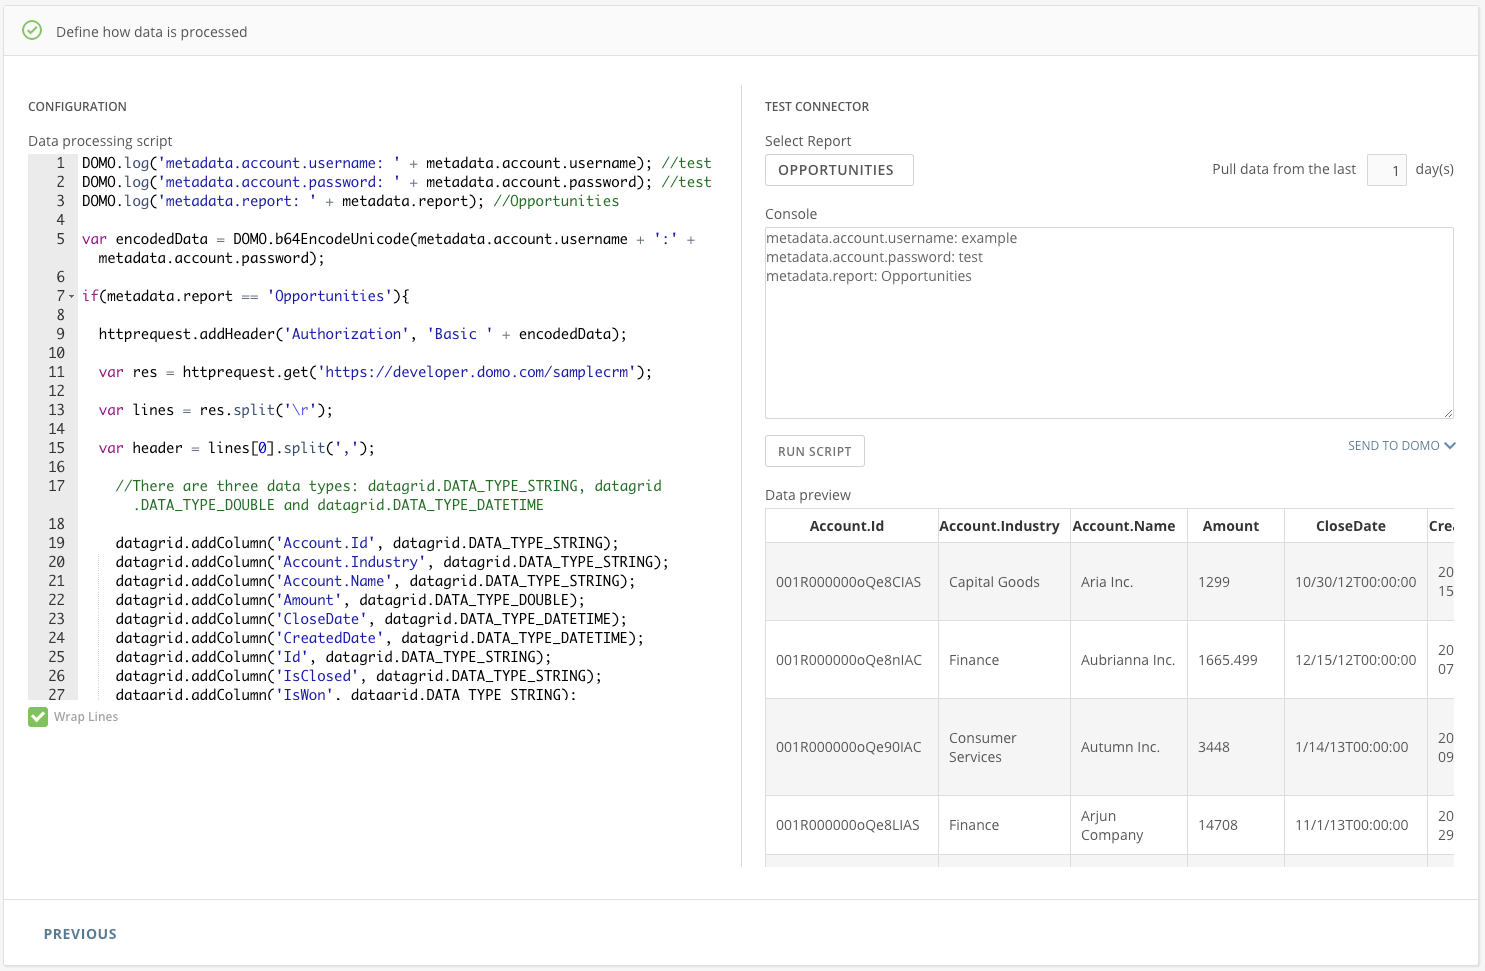
In this step, you will define how to process the data returned from the API endpoint. This is frequently done per report. Your script will need to retrieve the data, parse it, and store it in Domo. To store the data in Domo, first define the columns with a column name and data type, then add the data, one row at a time, one cell at a time.
See [Process Data](/portal/Connectors/Custom-Connectors/process-data) for more detailed instructions. For code examples, see [Examples](/portal/Connectors/Custom-Connectors/examples).
```javascript theme={"dark"}
//This logging is here for testing! Remove before publishing your connectors
DOMO.log('metadata.account.username: ' + metadata.account.username);
DOMO.log('metadata.account.password: ' + metadata.account.password);
DOMO.log('metadata.report: ' + metadata.report); // Opportunities
var encodedData = DOMO.b64EncodeUnicode(
metadata.account.username + ':' + metadata.account.password,
);
// Perform work per report
if (metadata.report == 'Opportunities') {
// Call API Endpoint
httprequest.addHeader('Authorization', 'Basic ' + encodedData);
var res = httprequest.get('https://developer.domo.com/samplecrm');
// Parse Return
var lines = res.split('r');
var header = lines[0].split(',');
// Add Columns. There are three data types:
// datagrid.DATA_TYPE_STRING,
// datagrid.DATA_TYPE_DOUBLE and
// datagrid.DATA_TYPE_DATETIME
datagrid.addColumn('Account.Id', datagrid.DATA_TYPE_STRING);
datagrid.addColumn('Account.Industry', datagrid.DATA_TYPE_STRING);
datagrid.addColumn('Account.Name', datagrid.DATA_TYPE_STRING);
datagrid.addColumn('Amount', datagrid.DATA_TYPE_DOUBLE);
datagrid.addColumn('CloseDate', datagrid.DATA_TYPE_DATETIME);
datagrid.addColumn('CreatedDate', datagrid.DATA_TYPE_DATETIME);
datagrid.addColumn('Id', datagrid.DATA_TYPE_STRING);
datagrid.addColumn('IsClosed', datagrid.DATA_TYPE_STRING);
datagrid.addColumn('IsWon', datagrid.DATA_TYPE_STRING);
datagrid.addColumn('LastActivityDate', datagrid.DATA_TYPE_DATETIME);
datagrid.addColumn('LastModifiedDate', datagrid.DATA_TYPE_DATETIME);
datagrid.addColumn('LeadSource', datagrid.DATA_TYPE_STRING);
datagrid.addColumn('Name', datagrid.DATA_TYPE_STRING);
datagrid.addColumn('NextStep', datagrid.DATA_TYPE_STRING);
datagrid.addColumn('Probability', datagrid.DATA_TYPE_DOUBLE);
datagrid.addColumn('StageName', datagrid.DATA_TYPE_STRING);
datagrid.addColumn('Type', datagrid.DATA_TYPE_STRING);
datagrid.addColumn('ForecastCategoryName', datagrid.DATA_TYPE_STRING);
datagrid.addColumn('Strategic_Account__c', datagrid.DATA_TYPE_STRING);
datagrid.addColumn('Forecasted_ACV__c', datagrid.DATA_TYPE_DOUBLE);
datagrid.addColumn('Competitor__c', datagrid.DATA_TYPE_STRING);
datagrid.addColumn('Owner.CreatedDate', datagrid.DATA_TYPE_DATETIME);
datagrid.addColumn('Owner.Email', datagrid.DATA_TYPE_STRING);
datagrid.addColumn('Owner.FullPhotoUrl', datagrid.DATA_TYPE_STRING);
datagrid.addColumn('Owner.Id', datagrid.DATA_TYPE_STRING);
datagrid.addColumn('Owner.IsActive', datagrid.DATA_TYPE_STRING);
datagrid.addColumn('Owner.Manager', datagrid.DATA_TYPE_STRING);
datagrid.addColumn('Owner.Name', datagrid.DATA_TYPE_STRING);
datagrid.addColumn('Owner.UserRole.Name', datagrid.DATA_TYPE_STRING);
// Add Rows
for (var i = 1; i < lines.length; i++) {
console.log('line: ' + lines[i]);
// For heavy logging, use browser console logging
var rows = lines[i].split(',');
// Add cells
for (var j = 0; j < rows.length; j++) {
// Ensure time string in right format. It needs to be yyyy-MM-dd'T'HH:mm:ss
if (j == 4 || j == 9) {
datagrid.addCell(rows[j] + 'T00:00:00');
} else {
datagrid.addCell(rows[j]);
}
}
// Make sure to end the row!
datagrid.endRow();
}
} else {
// Gracefully handle a report error
DOMO.log(metadata.report + ' is not a supported report.');
datagrid.error(0, metadata.report + ' is not a supported report.');
}
```
Best Practices:
Ensure the script runs in ‘strict mode’ to avoid any unexpected behavior.
Dates inserted into the table need to be formatted{' '}
yyyy-MM-dd'T'HH:mm:ss.
When adding a row, remember to call datagrid.endRow() when then row
is complete.
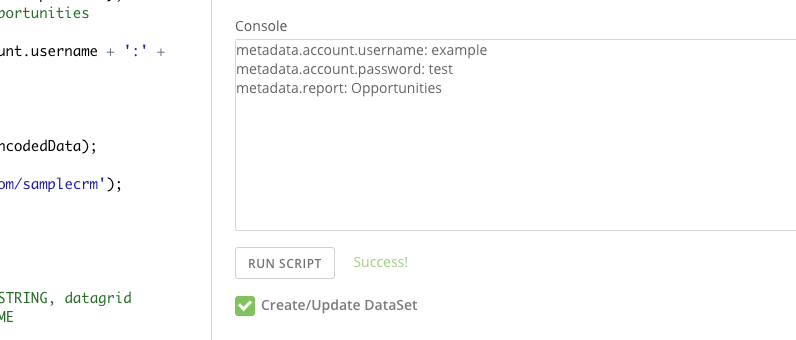
Click Run Script anytime you want to test your code.
### Send Data to Domo
***
After you have completed defining how the data will be processed, you can ensure the data is correctly represented in Domo by sending your generated data to Domo.
1. Click **SEND TO DOMO** to view the
**Create/Update Dataset** check box.
2. Check **Create/Update Dataset**.
3. Click **Run Script**. A success or error message about the process will appear next to the **Run Script** button.
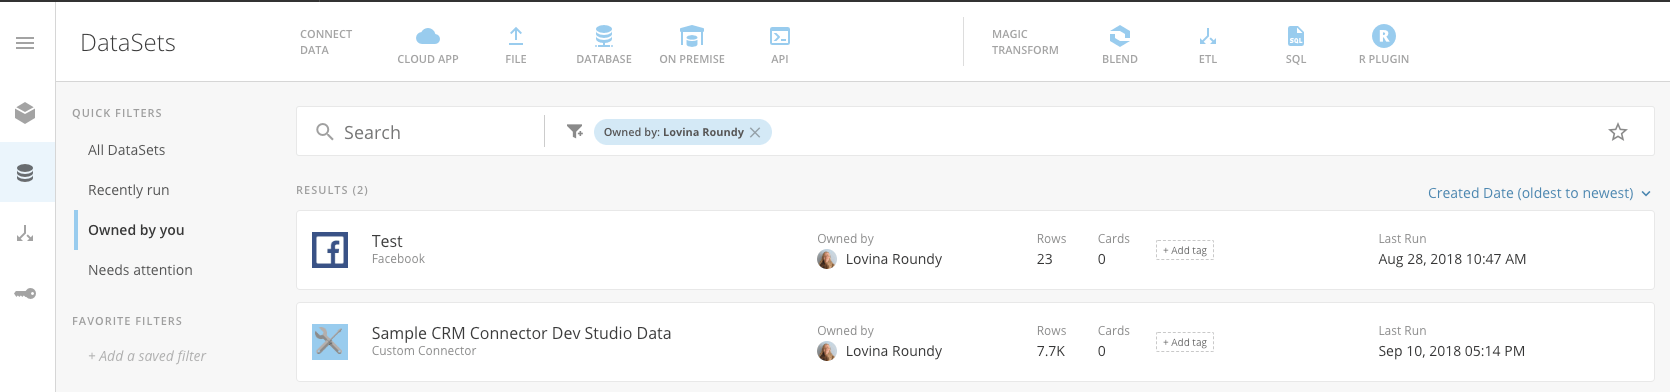
4. If successful, the dataset will be published in your Domo instance. A pop-up window will provide a link directly to the dataset (this may be blocked by a pop-up blocker).
In your Domo instance, you can verify that your datatypes and values are correct.
**Note**
These datasets cannot be scheduled. The connector must be published to schedule dataset updates.
**Note**
These datasets cannot be scheduled. The connector must be published to schedule dataset updates.
### Connector Submission
***
After you have completed all four steps and ensured that the connector is behaving the way you want, click Submit For Publishing.
* The review process for a custom connector may take up to 30 days.
* For status inquiries & questions pertaining to these custom connectors, please contact [3rdpartyconnectorhelp@domo.com](mailto:3rdpartyconnectorhelp@domo.com).
* If you select to self-publish a trial version of the custom connector, it will be available for 30 days for review and refinement.
* The self-publish option is not available for custom connectors that use OAuth 2.o in the authentication process or use discovery parameter types in Configure Reports / Advanced Mode.
See [Publish Connector](/portal/Connectors/Custom-Connectors/publish-connector) for more detailed instructions and information on this process.
 ### Configure User Authentication
***
The Connector Builder supports four different authentication methods:
### Configure User Authentication
***
The Connector Builder supports four different authentication methods:
 Code:
```js theme={"dark"}
//This logging is here for testing! Remove before publishing your connectors
DOMO.log('metadata.account.username: ' + metadata.account.username);
DOMO.log('metadata.account.password: ' + metadata.account.password);
var encodedData = DOMO.b64EncodeUnicode(
metadata.account.username + ':' + metadata.account.password,
);
httprequest.addHeader('Authorization', 'Basic ' + encodedData);
var res = httprequest.get('https://developer.domo.com/samplecrm');
if (httprequest.getStatusCode() == 200) {
auth.authenticationSuccess();
} else {
auth.authenticationFailed('Your username and password are incorrect.');
}
```
Best Practices:
Code:
```js theme={"dark"}
//This logging is here for testing! Remove before publishing your connectors
DOMO.log('metadata.account.username: ' + metadata.account.username);
DOMO.log('metadata.account.password: ' + metadata.account.password);
var encodedData = DOMO.b64EncodeUnicode(
metadata.account.username + ':' + metadata.account.password,
);
httprequest.addHeader('Authorization', 'Basic ' + encodedData);
var res = httprequest.get('https://developer.domo.com/samplecrm');
if (httprequest.getStatusCode() == 200) {
auth.authenticationSuccess();
} else {
auth.authenticationFailed('Your username and password are incorrect.');
}
```
Best Practices:
 ### Define How the Data Is Processed
***
In this step, you will define how to process the data returned from the API endpoint. This is frequently done per report. Your script will need to retrieve the data, parse it, and store it in Domo. To store the data in Domo, first define the columns with a column name and data type, then add the data, one row at a time, one cell at a time.
See [Process Data](/portal/Connectors/Custom-Connectors/process-data) for more detailed instructions. For code examples, see [Examples](/portal/Connectors/Custom-Connectors/examples).
### Define How the Data Is Processed
***
In this step, you will define how to process the data returned from the API endpoint. This is frequently done per report. Your script will need to retrieve the data, parse it, and store it in Domo. To store the data in Domo, first define the columns with a column name and data type, then add the data, one row at a time, one cell at a time.
See [Process Data](/portal/Connectors/Custom-Connectors/process-data) for more detailed instructions. For code examples, see [Examples](/portal/Connectors/Custom-Connectors/examples).
 ```javascript theme={"dark"}
//This logging is here for testing! Remove before publishing your connectors
DOMO.log('metadata.account.username: ' + metadata.account.username);
DOMO.log('metadata.account.password: ' + metadata.account.password);
DOMO.log('metadata.report: ' + metadata.report); // Opportunities
var encodedData = DOMO.b64EncodeUnicode(
metadata.account.username + ':' + metadata.account.password,
);
// Perform work per report
if (metadata.report == 'Opportunities') {
// Call API Endpoint
httprequest.addHeader('Authorization', 'Basic ' + encodedData);
var res = httprequest.get('https://developer.domo.com/samplecrm');
// Parse Return
var lines = res.split('r');
var header = lines[0].split(',');
// Add Columns. There are three data types:
// datagrid.DATA_TYPE_STRING,
// datagrid.DATA_TYPE_DOUBLE and
// datagrid.DATA_TYPE_DATETIME
datagrid.addColumn('Account.Id', datagrid.DATA_TYPE_STRING);
datagrid.addColumn('Account.Industry', datagrid.DATA_TYPE_STRING);
datagrid.addColumn('Account.Name', datagrid.DATA_TYPE_STRING);
datagrid.addColumn('Amount', datagrid.DATA_TYPE_DOUBLE);
datagrid.addColumn('CloseDate', datagrid.DATA_TYPE_DATETIME);
datagrid.addColumn('CreatedDate', datagrid.DATA_TYPE_DATETIME);
datagrid.addColumn('Id', datagrid.DATA_TYPE_STRING);
datagrid.addColumn('IsClosed', datagrid.DATA_TYPE_STRING);
datagrid.addColumn('IsWon', datagrid.DATA_TYPE_STRING);
datagrid.addColumn('LastActivityDate', datagrid.DATA_TYPE_DATETIME);
datagrid.addColumn('LastModifiedDate', datagrid.DATA_TYPE_DATETIME);
datagrid.addColumn('LeadSource', datagrid.DATA_TYPE_STRING);
datagrid.addColumn('Name', datagrid.DATA_TYPE_STRING);
datagrid.addColumn('NextStep', datagrid.DATA_TYPE_STRING);
datagrid.addColumn('Probability', datagrid.DATA_TYPE_DOUBLE);
datagrid.addColumn('StageName', datagrid.DATA_TYPE_STRING);
datagrid.addColumn('Type', datagrid.DATA_TYPE_STRING);
datagrid.addColumn('ForecastCategoryName', datagrid.DATA_TYPE_STRING);
datagrid.addColumn('Strategic_Account__c', datagrid.DATA_TYPE_STRING);
datagrid.addColumn('Forecasted_ACV__c', datagrid.DATA_TYPE_DOUBLE);
datagrid.addColumn('Competitor__c', datagrid.DATA_TYPE_STRING);
datagrid.addColumn('Owner.CreatedDate', datagrid.DATA_TYPE_DATETIME);
datagrid.addColumn('Owner.Email', datagrid.DATA_TYPE_STRING);
datagrid.addColumn('Owner.FullPhotoUrl', datagrid.DATA_TYPE_STRING);
datagrid.addColumn('Owner.Id', datagrid.DATA_TYPE_STRING);
datagrid.addColumn('Owner.IsActive', datagrid.DATA_TYPE_STRING);
datagrid.addColumn('Owner.Manager', datagrid.DATA_TYPE_STRING);
datagrid.addColumn('Owner.Name', datagrid.DATA_TYPE_STRING);
datagrid.addColumn('Owner.UserRole.Name', datagrid.DATA_TYPE_STRING);
// Add Rows
for (var i = 1; i < lines.length; i++) {
console.log('line: ' + lines[i]);
// For heavy logging, use browser console logging
var rows = lines[i].split(',');
// Add cells
for (var j = 0; j < rows.length; j++) {
// Ensure time string in right format. It needs to be yyyy-MM-dd'T'HH:mm:ss
if (j == 4 || j == 9) {
datagrid.addCell(rows[j] + 'T00:00:00');
} else {
datagrid.addCell(rows[j]);
}
}
// Make sure to end the row!
datagrid.endRow();
}
} else {
// Gracefully handle a report error
DOMO.log(metadata.report + ' is not a supported report.');
datagrid.error(0, metadata.report + ' is not a supported report.');
}
```
Best Practices:
```javascript theme={"dark"}
//This logging is here for testing! Remove before publishing your connectors
DOMO.log('metadata.account.username: ' + metadata.account.username);
DOMO.log('metadata.account.password: ' + metadata.account.password);
DOMO.log('metadata.report: ' + metadata.report); // Opportunities
var encodedData = DOMO.b64EncodeUnicode(
metadata.account.username + ':' + metadata.account.password,
);
// Perform work per report
if (metadata.report == 'Opportunities') {
// Call API Endpoint
httprequest.addHeader('Authorization', 'Basic ' + encodedData);
var res = httprequest.get('https://developer.domo.com/samplecrm');
// Parse Return
var lines = res.split('r');
var header = lines[0].split(',');
// Add Columns. There are three data types:
// datagrid.DATA_TYPE_STRING,
// datagrid.DATA_TYPE_DOUBLE and
// datagrid.DATA_TYPE_DATETIME
datagrid.addColumn('Account.Id', datagrid.DATA_TYPE_STRING);
datagrid.addColumn('Account.Industry', datagrid.DATA_TYPE_STRING);
datagrid.addColumn('Account.Name', datagrid.DATA_TYPE_STRING);
datagrid.addColumn('Amount', datagrid.DATA_TYPE_DOUBLE);
datagrid.addColumn('CloseDate', datagrid.DATA_TYPE_DATETIME);
datagrid.addColumn('CreatedDate', datagrid.DATA_TYPE_DATETIME);
datagrid.addColumn('Id', datagrid.DATA_TYPE_STRING);
datagrid.addColumn('IsClosed', datagrid.DATA_TYPE_STRING);
datagrid.addColumn('IsWon', datagrid.DATA_TYPE_STRING);
datagrid.addColumn('LastActivityDate', datagrid.DATA_TYPE_DATETIME);
datagrid.addColumn('LastModifiedDate', datagrid.DATA_TYPE_DATETIME);
datagrid.addColumn('LeadSource', datagrid.DATA_TYPE_STRING);
datagrid.addColumn('Name', datagrid.DATA_TYPE_STRING);
datagrid.addColumn('NextStep', datagrid.DATA_TYPE_STRING);
datagrid.addColumn('Probability', datagrid.DATA_TYPE_DOUBLE);
datagrid.addColumn('StageName', datagrid.DATA_TYPE_STRING);
datagrid.addColumn('Type', datagrid.DATA_TYPE_STRING);
datagrid.addColumn('ForecastCategoryName', datagrid.DATA_TYPE_STRING);
datagrid.addColumn('Strategic_Account__c', datagrid.DATA_TYPE_STRING);
datagrid.addColumn('Forecasted_ACV__c', datagrid.DATA_TYPE_DOUBLE);
datagrid.addColumn('Competitor__c', datagrid.DATA_TYPE_STRING);
datagrid.addColumn('Owner.CreatedDate', datagrid.DATA_TYPE_DATETIME);
datagrid.addColumn('Owner.Email', datagrid.DATA_TYPE_STRING);
datagrid.addColumn('Owner.FullPhotoUrl', datagrid.DATA_TYPE_STRING);
datagrid.addColumn('Owner.Id', datagrid.DATA_TYPE_STRING);
datagrid.addColumn('Owner.IsActive', datagrid.DATA_TYPE_STRING);
datagrid.addColumn('Owner.Manager', datagrid.DATA_TYPE_STRING);
datagrid.addColumn('Owner.Name', datagrid.DATA_TYPE_STRING);
datagrid.addColumn('Owner.UserRole.Name', datagrid.DATA_TYPE_STRING);
// Add Rows
for (var i = 1; i < lines.length; i++) {
console.log('line: ' + lines[i]);
// For heavy logging, use browser console logging
var rows = lines[i].split(',');
// Add cells
for (var j = 0; j < rows.length; j++) {
// Ensure time string in right format. It needs to be yyyy-MM-dd'T'HH:mm:ss
if (j == 4 || j == 9) {
datagrid.addCell(rows[j] + 'T00:00:00');
} else {
datagrid.addCell(rows[j]);
}
}
// Make sure to end the row!
datagrid.endRow();
}
} else {
// Gracefully handle a report error
DOMO.log(metadata.report + ' is not a supported report.');
datagrid.error(0, metadata.report + ' is not a supported report.');
}
```
Best Practices:
 In your Domo instance, you can verify that your datatypes and values are correct.
 ### Connector Submission
***
After you have completed all four steps and ensured that the connector is behaving the way you want, click Submit For Publishing.
### Connector Submission
***
After you have completed all four steps and ensured that the connector is behaving the way you want, click Submit For Publishing.
 * The review process for a custom connector may take up to 30 days.
* For status inquiries & questions pertaining to these custom connectors, please contact [3rdpartyconnectorhelp@domo.com](mailto:3rdpartyconnectorhelp@domo.com).
* If you select to self-publish a trial version of the custom connector, it will be available for 30 days for review and refinement.
* The self-publish option is not available for custom connectors that use OAuth 2.o in the authentication process or use discovery parameter types in Configure Reports / Advanced Mode.
See [Publish Connector](/portal/Connectors/Custom-Connectors/publish-connector) for more detailed instructions and information on this process.
* The review process for a custom connector may take up to 30 days.
* For status inquiries & questions pertaining to these custom connectors, please contact [3rdpartyconnectorhelp@domo.com](mailto:3rdpartyconnectorhelp@domo.com).
* If you select to self-publish a trial version of the custom connector, it will be available for 30 days for review and refinement.
* The self-publish option is not available for custom connectors that use OAuth 2.o in the authentication process or use discovery parameter types in Configure Reports / Advanced Mode.
See [Publish Connector](/portal/Connectors/Custom-Connectors/publish-connector) for more detailed instructions and information on this process.