> ## Documentation Index
> Fetch the complete documentation index at: https://domoinc-openapi-sync-dataflows.mintlify.site/llms.txt
> Use this file to discover all available pages before exploring further.
# Configure Reports
Each connector can contain multiple reports. Reports allow a developer to call different API endpoints or perform different work on the data received.
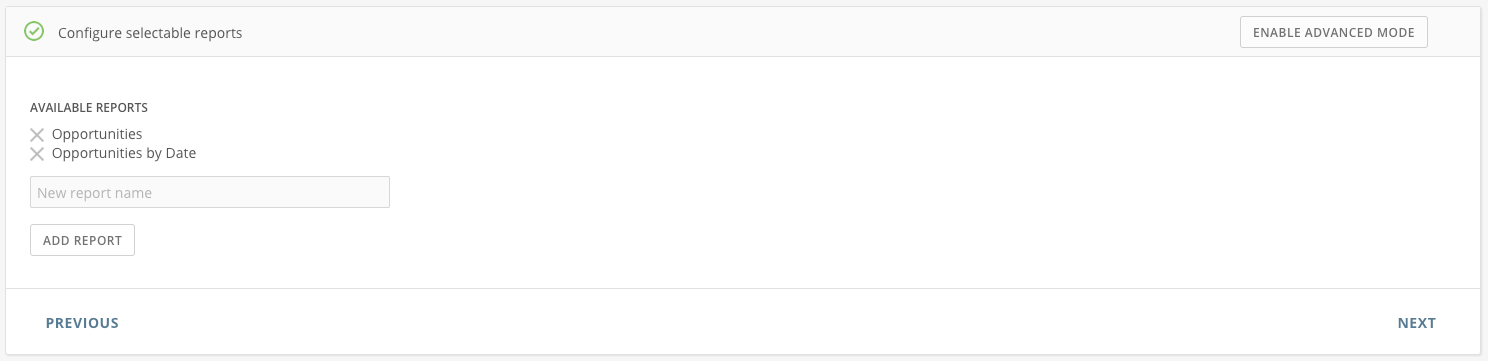
In this step, you will define the reports that a user can select when using this connector in Domo. These reports will appear in the **Report** dropdown menu after the connector is published.
To add a report option:
1. Type a report name in the **New Report Name** field.
2. Click **Add Report** or press enter.
 When your connector is published, the report that the user selects will be stored
in the metadata JavaScript object using the same capitalization and spaces you
use to define it here. You will use the report name in the next step, when you
define how the data is processed.
```javascript theme={"dark"}
if (metadata.report == 'Opportunities') {
//Perform work
} else if (metadata.report == 'Opportunities by Date') {
//Perform work
}
```
If you would like users to provide custom parameters that you can use when making your API calls and deciding how to process the data, click **Enable Advanced Mode**.
Advanced Mode allows you to build and define your own custom parameters for the reports that you are creating. These parameters will also be available when you define how the data is processed. The next sections will walk you through using Advanced Mode.
### Enable Advanced Mode
***
1. Click **Enable Advanced Mode**. You will see a modal window informing you that if you enable Advanced Mode, it will be enabled forever.
2. If you would like your custom connector to have additional parameters beyond the report name, click **Continue**. A Parameters section will appear.
When your connector is published, the report that the user selects will be stored
in the metadata JavaScript object using the same capitalization and spaces you
use to define it here. You will use the report name in the next step, when you
define how the data is processed.
```javascript theme={"dark"}
if (metadata.report == 'Opportunities') {
//Perform work
} else if (metadata.report == 'Opportunities by Date') {
//Perform work
}
```
If you would like users to provide custom parameters that you can use when making your API calls and deciding how to process the data, click **Enable Advanced Mode**.
Advanced Mode allows you to build and define your own custom parameters for the reports that you are creating. These parameters will also be available when you define how the data is processed. The next sections will walk you through using Advanced Mode.
### Enable Advanced Mode
***
1. Click **Enable Advanced Mode**. You will see a modal window informing you that if you enable Advanced Mode, it will be enabled forever.
2. If you would like your custom connector to have additional parameters beyond the report name, click **Continue**. A Parameters section will appear.
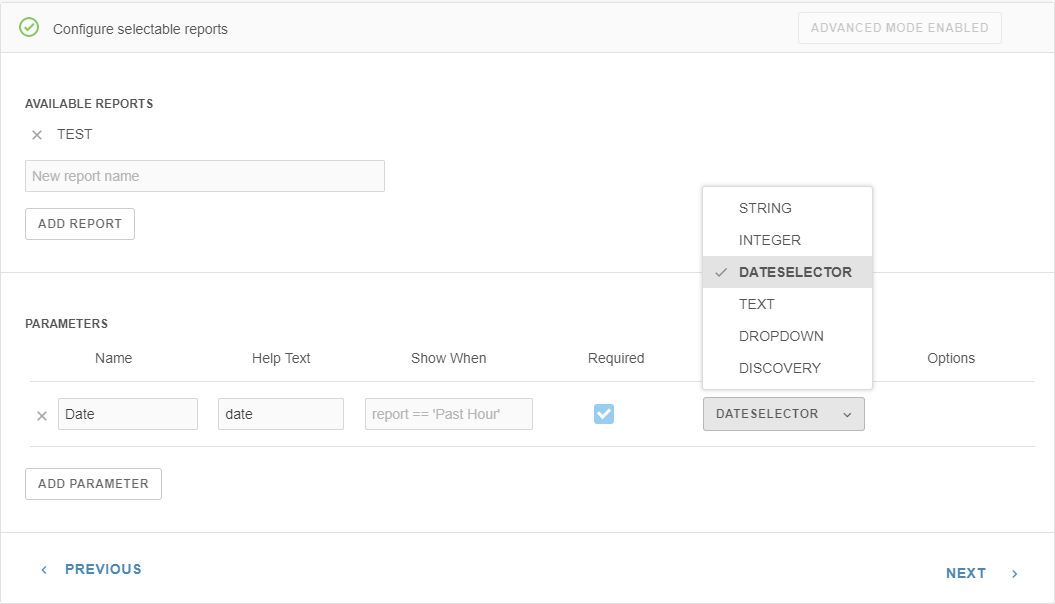 3. Click **Add Parameter**.
4. Enter a **Parameter Name** and **Help Text**. The Parameter Name will be the label for the field. The Help Text description for the new parameter will appear when the user clicks
3. Click **Add Parameter**.
4. Enter a **Parameter Name** and **Help Text**. The Parameter Name will be the label for the field. The Help Text description for the new parameter will appear when the user clicks
 next to the field.
5. If you would like the parameter to be required for the user to run a report, check **Required**.
6. Select a parameter **Type**. Each type will result in a different type of field available to the user on the web form.
* **String**: A text field. The user can enter a freeform text or even an HTML text.
* **Integer**: A number or a decimal field.
* **Dropdown**: A dropdown list.
* Click **Add Option** to add the options you wish to appear in the dropdown list. The user will be able to select one option.
* **Discovery**: If you need to make an API call to discover certain parameters, select this option. Discovery makes an API call to discover the options to present to the user. For example, a Facebook connector might use discovery to get a list of Facebook pages available to the user.
* **Text**: A text field. The user can enter a freeform text.
* **Date selector**: A date selector view that allows selecting specific dates.
7. Click **Configure** to add the JavaScript code necessary to use this option. For detailed information on how to write a discovery parameter, see [Write a Discovery Parameter](#write-a-discovery-parameter).
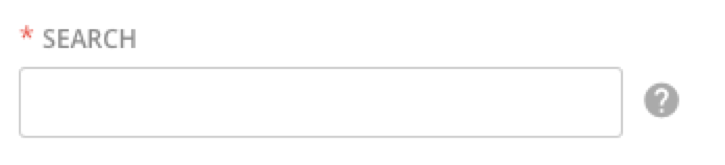
The parameter will appear in the web form provided to the user when they configure the connector. A required string parameter named Search would look like this:
next to the field.
5. If you would like the parameter to be required for the user to run a report, check **Required**.
6. Select a parameter **Type**. Each type will result in a different type of field available to the user on the web form.
* **String**: A text field. The user can enter a freeform text or even an HTML text.
* **Integer**: A number or a decimal field.
* **Dropdown**: A dropdown list.
* Click **Add Option** to add the options you wish to appear in the dropdown list. The user will be able to select one option.
* **Discovery**: If you need to make an API call to discover certain parameters, select this option. Discovery makes an API call to discover the options to present to the user. For example, a Facebook connector might use discovery to get a list of Facebook pages available to the user.
* **Text**: A text field. The user can enter a freeform text.
* **Date selector**: A date selector view that allows selecting specific dates.
7. Click **Configure** to add the JavaScript code necessary to use this option. For detailed information on how to write a discovery parameter, see [Write a Discovery Parameter](#write-a-discovery-parameter).
The parameter will appear in the web form provided to the user when they configure the connector. A required string parameter named Search would look like this:
 In the next step when you define how to process the data, you can access the parameter
data using the following syntax: `metadata.parameters["<<Parameter Name>>"]`
### Date Selector Example
***
Refer to the following date selector example.
* Configure the Data processing script.
In the next step when you define how to process the data, you can access the parameter
data using the following syntax: `metadata.parameters["<<Parameter Name>>"]`
### Date Selector Example
***
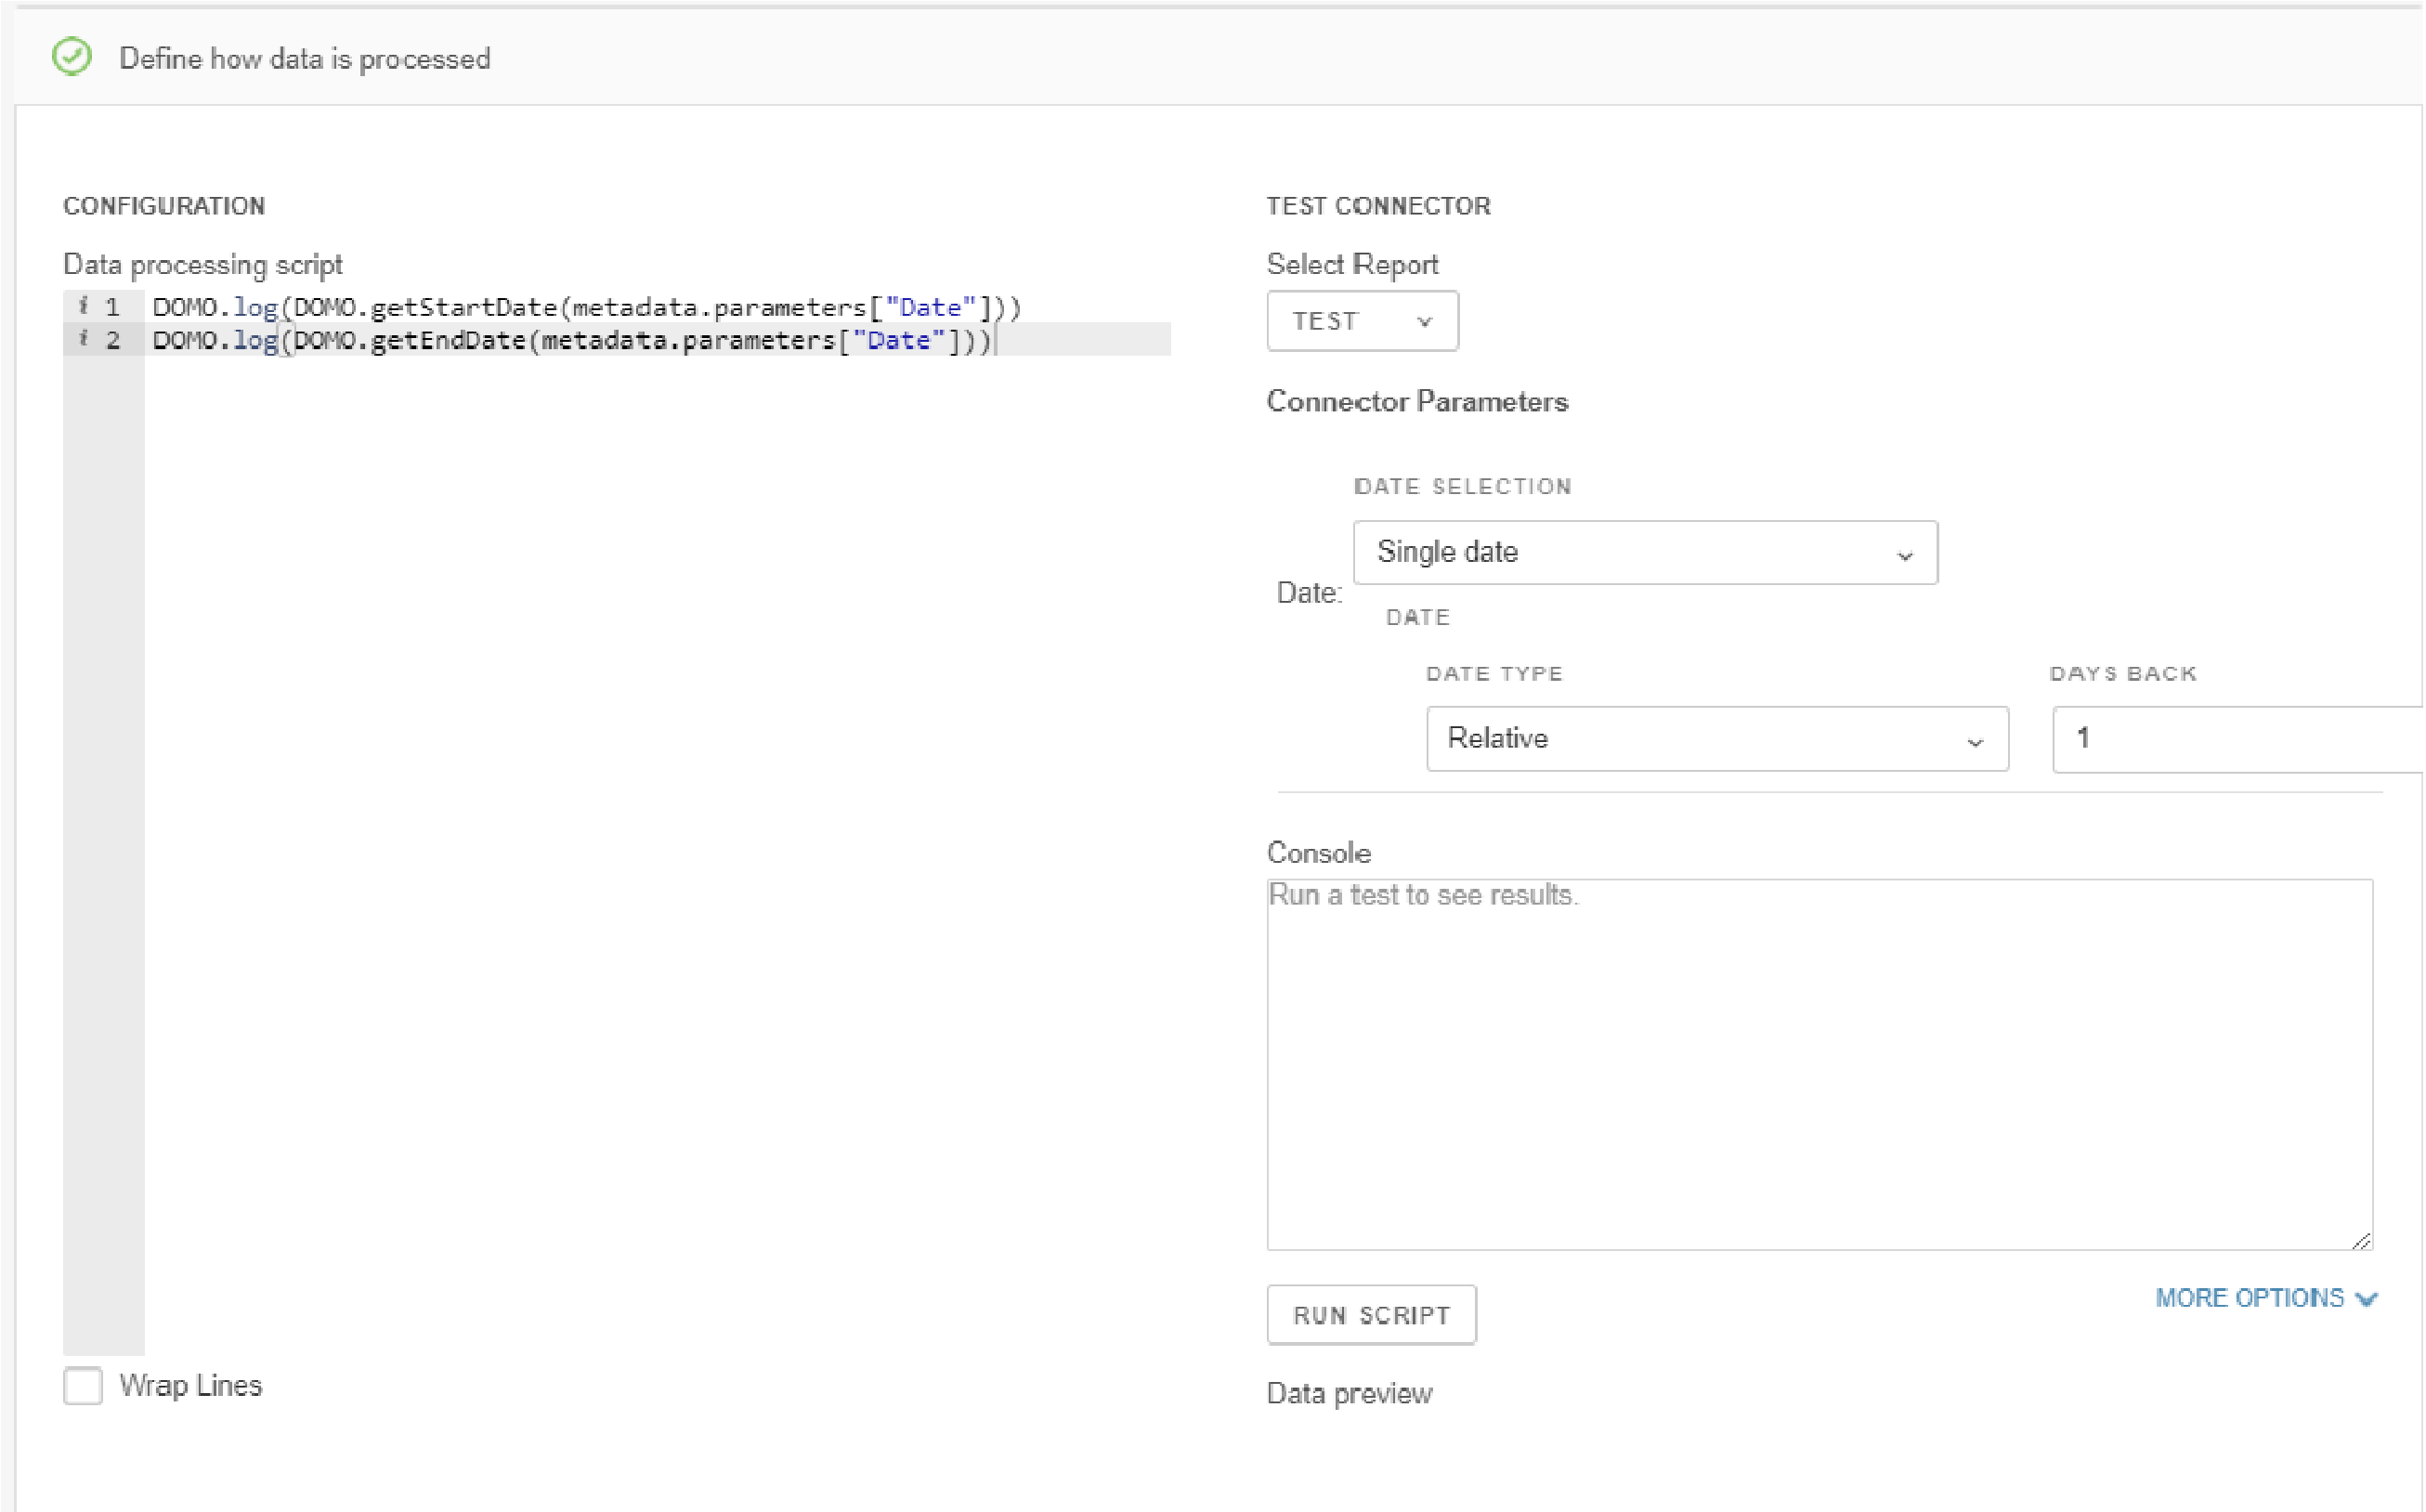
Refer to the following date selector example.
* Configure the Data processing script.
 ```javascript theme={"dark"}
var startDate = DOMO.getStartDate(metadata.parameters['Date']);
var endDate = DOMO.getEndDate(metadata.parameters['Date']);
```
### Write a Discovery Parameter
***
The Discovery option allows you to call an API endpoint to populate either a dropdown menu or a series of checkboxes. You must write the JavaScript code to call the endpoint and populate the appropriate discovery object.
To add a Discovery parameter:
1. Click **Add Parameter**.
2. Fill in the **Parameter Name** and **Help Text**. Check **Required** if the parameter will be required by the connector.
3. Select the **Discovery** type. Click **Configure**. The configure modal will appear.
4. In the configure modal, select a Discovery Type.
* **Dropdown**: Select this option if you would like the user to be able to select *only one* option. To add an option to the dropdown discovery object, use the function `discovery.addOption("Option Value")`. See the [Dropdown Discovery Example](#dropdown-discovery-example).
* **Tree Menu**: Select this option if you would like the user to be able to select *multiple* options. It will appear as a series of checkboxes that can be nested in a tree structure. Use the function `discovery.addNode(<>, <>) `to add a node. Use `discovery.addLeaf(<>, <>) `to add a leaf. Use the function `discovery.publishTree()` when you have completed adding nodes and leaves to the tree. See the [Tree Menu Discovery Examples](#tree-menu-discovery-examples) below.
5. Write the JavaScript code to make the API call and populate the discovery object.
6. Click **Run Script** to see the output of your code.
### Dropdown Discovery Example
***
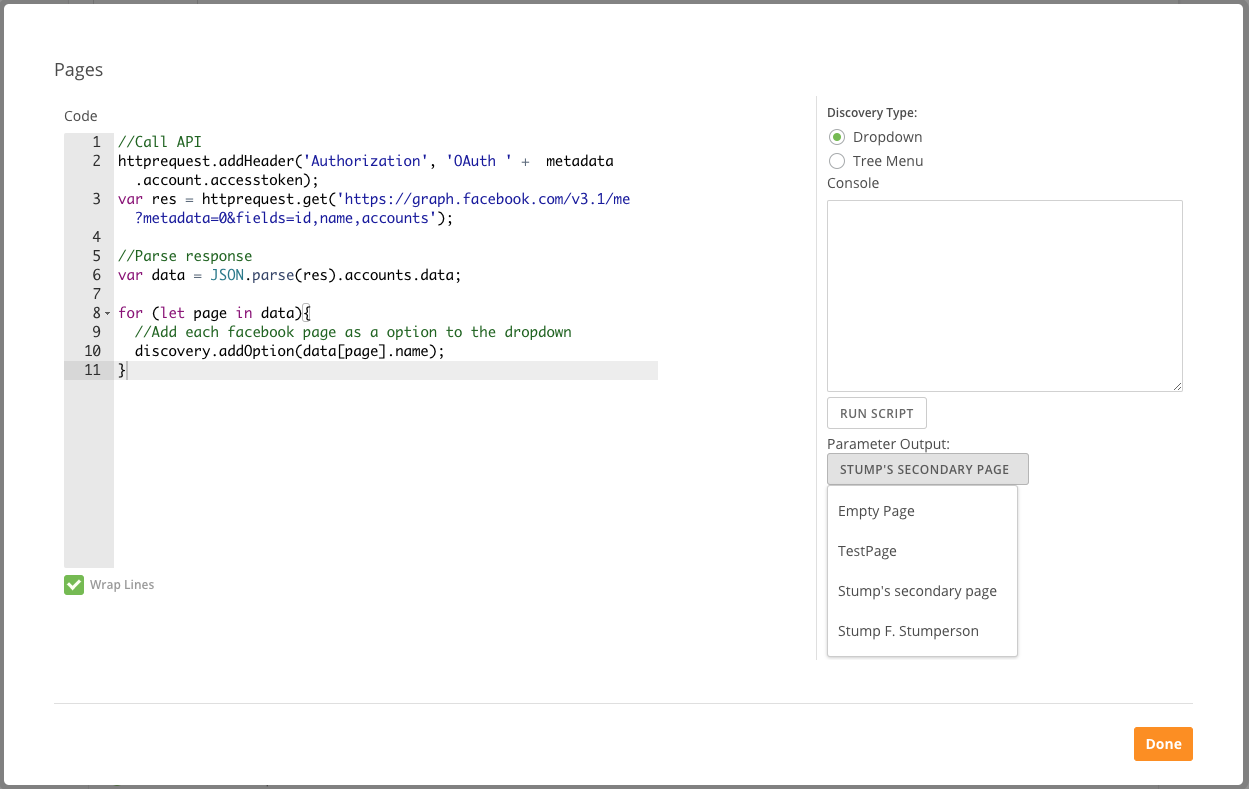
This example makes a call to the Facebook API to get all the pages controlled by this user. It inserts them as options into a discovery dropdown. This will allow a user to select just one Facebook page to run a report on. Click **Run Script** to see Parameter Output.
**Note**
Click on the parameter output to see all options.
```javascript theme={"dark"}
// Call API
httprequest.addHeader('Authorization', 'OAuth ' + metadata.account.accesstoken);
var res = httprequest.get(
'https://graph.facebook.com/v3.1/me?metadata=0&fields=id,name,accounts',
);
// Parse response
var data = JSON.parse(res).accounts.data;
if (data) {
for (let page in data) {
// Add each Facebook page as a option to the dropdown
discovery.addOption(data[page].value, data[page].name);
}
}
```
### Tree Menu Discovery Examples
***
The tree menu discovery option will present the user of your connector with a group of checkboxes, allowing a user to select multiple options.
```javascript theme={"dark"}
var startDate = DOMO.getStartDate(metadata.parameters['Date']);
var endDate = DOMO.getEndDate(metadata.parameters['Date']);
```
### Write a Discovery Parameter
***
The Discovery option allows you to call an API endpoint to populate either a dropdown menu or a series of checkboxes. You must write the JavaScript code to call the endpoint and populate the appropriate discovery object.
To add a Discovery parameter:
1. Click **Add Parameter**.
2. Fill in the **Parameter Name** and **Help Text**. Check **Required** if the parameter will be required by the connector.
3. Select the **Discovery** type. Click **Configure**. The configure modal will appear.
4. In the configure modal, select a Discovery Type.
* **Dropdown**: Select this option if you would like the user to be able to select *only one* option. To add an option to the dropdown discovery object, use the function `discovery.addOption("Option Value")`. See the [Dropdown Discovery Example](#dropdown-discovery-example).
* **Tree Menu**: Select this option if you would like the user to be able to select *multiple* options. It will appear as a series of checkboxes that can be nested in a tree structure. Use the function `discovery.addNode(<>, <>) `to add a node. Use `discovery.addLeaf(<>, <>) `to add a leaf. Use the function `discovery.publishTree()` when you have completed adding nodes and leaves to the tree. See the [Tree Menu Discovery Examples](#tree-menu-discovery-examples) below.
5. Write the JavaScript code to make the API call and populate the discovery object.
6. Click **Run Script** to see the output of your code.
### Dropdown Discovery Example
***
This example makes a call to the Facebook API to get all the pages controlled by this user. It inserts them as options into a discovery dropdown. This will allow a user to select just one Facebook page to run a report on. Click **Run Script** to see Parameter Output.
**Note**
Click on the parameter output to see all options.

```javascript theme={"dark"}
// Call API
httprequest.addHeader('Authorization', 'OAuth ' + metadata.account.accesstoken);
var res = httprequest.get(
'https://graph.facebook.com/v3.1/me?metadata=0&fields=id,name,accounts',
);
// Parse response
var data = JSON.parse(res).accounts.data;
if (data) {
for (let page in data) {
// Add each Facebook page as a option to the dropdown
discovery.addOption(data[page].value, data[page].name);
}
}
```
### Tree Menu Discovery Examples
***
The tree menu discovery option will present the user of your connector with a group of checkboxes, allowing a user to select multiple options.
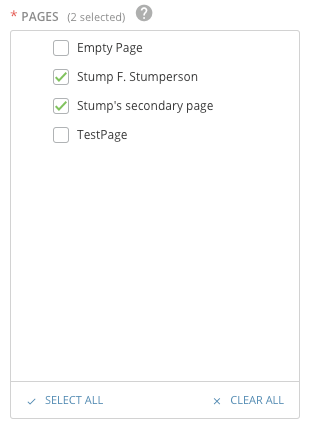 The options selected by the user will be stored in a JavaScript array. You can access
the array the same way you access any other parameter result.
```javascript theme={"dark"}
var treeArray = metadata.parameters['<>'];
for (var element of treeArray) {
// Perform work with element
}
```
There are three functions used while building a discovery tree:
* `discovery.addNode(parentNode, nodeName)`
* `discovery.addLeaf(parentNode, leafName)`
* `discovery.publishTree()`
See [Reference](/portal/Connectors/Custom-Connectors/reference) for more information about these methods.
**Note**
To create a node at the root level, you must use **discovery.tree** as the **node** parameter.
### Basic Discovery Tree Menu
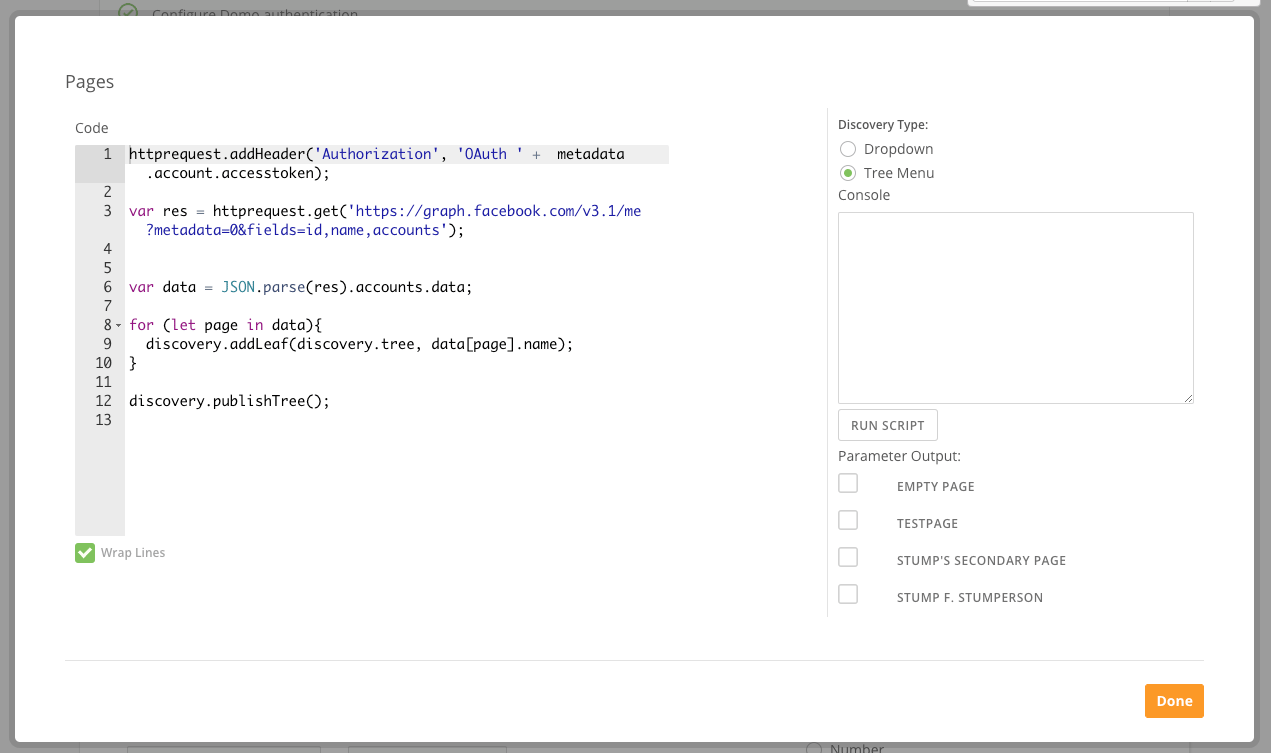
This example makes a call to the Facebook API to get all the pages controlled by this user. To create a series of checkboxes, add each item as a leaf to the root node, `discovery.tree`. This will allow a user to select multiple Facebook pages to run a report on. Click **Run Script** to see Parameter Output.
The options selected by the user will be stored in a JavaScript array. You can access
the array the same way you access any other parameter result.
```javascript theme={"dark"}
var treeArray = metadata.parameters['<>'];
for (var element of treeArray) {
// Perform work with element
}
```
There are three functions used while building a discovery tree:
* `discovery.addNode(parentNode, nodeName)`
* `discovery.addLeaf(parentNode, leafName)`
* `discovery.publishTree()`
See [Reference](/portal/Connectors/Custom-Connectors/reference) for more information about these methods.
**Note**
To create a node at the root level, you must use **discovery.tree** as the **node** parameter.
### Basic Discovery Tree Menu
This example makes a call to the Facebook API to get all the pages controlled by this user. To create a series of checkboxes, add each item as a leaf to the root node, `discovery.tree`. This will allow a user to select multiple Facebook pages to run a report on. Click **Run Script** to see Parameter Output.
 ```javascript theme={"dark"}
// Call API
httprequest.addHeader('Authorization', 'OAuth ' + metadata.account.accesstoken);
var res = httprequest.get(
'https://graph.facebook.com/v3.1/me?metadata=0&fields=id,name,accounts',
);
// Parse response
var data = JSON.parse(res).accounts.data;
for (let page in data) {
// Add each Facebook page as a leaf to the root of the tree
discovery.addLeaf(discovery.tree, data[page].name);
}
// Remember to call publishTree() when you have add all nodes and leaves!
discovery.publishTree();
```
### Nested Discovery Tree Menu
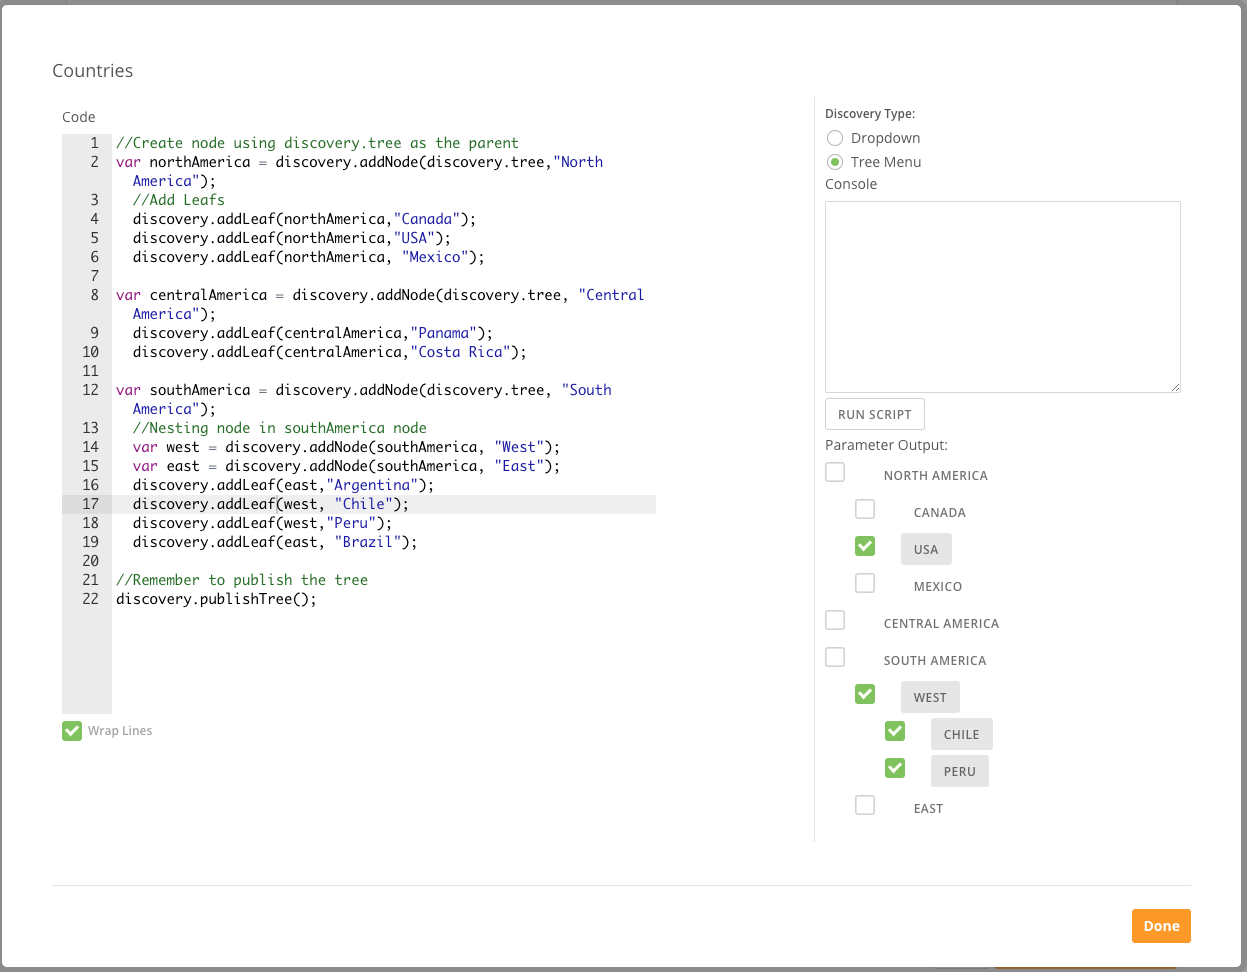
You can nest checkboxes into categories by adding nodes to the `discovery.tree` root. If a user checks a parent checkbox, all the checkboxes nested in it will be selected. This example nests countries in parent nodes that represent regions. To create a series of nested checkboxes, add each item as a parent node to the base node, `discovery.tree`. Add each leaf to their parent node. Click **Run Script** to see Parameter Output.
**Note**: The parameter output only displays top-level nodes and leaves. Click on a node to expand its leaves and nodes.
```javascript theme={"dark"}
// Call API
httprequest.addHeader('Authorization', 'OAuth ' + metadata.account.accesstoken);
var res = httprequest.get(
'https://graph.facebook.com/v3.1/me?metadata=0&fields=id,name,accounts',
);
// Parse response
var data = JSON.parse(res).accounts.data;
for (let page in data) {
// Add each Facebook page as a leaf to the root of the tree
discovery.addLeaf(discovery.tree, data[page].name);
}
// Remember to call publishTree() when you have add all nodes and leaves!
discovery.publishTree();
```
### Nested Discovery Tree Menu
You can nest checkboxes into categories by adding nodes to the `discovery.tree` root. If a user checks a parent checkbox, all the checkboxes nested in it will be selected. This example nests countries in parent nodes that represent regions. To create a series of nested checkboxes, add each item as a parent node to the base node, `discovery.tree`. Add each leaf to their parent node. Click **Run Script** to see Parameter Output.
**Note**: The parameter output only displays top-level nodes and leaves. Click on a node to expand its leaves and nodes.
 ```javascript // Create node using discovery.tree as the parent var northAmerica theme={"dark"}
= discovery.addNode(discovery.tree, 'North America'); // Add Leaves discovery.addLeaf(northAmerica,
'Canada'); discovery.addLeaf(northAmerica, 'USA'); discovery.addLeaf(northAmerica,
'Mexico');
var centralAmerica = discovery.addNode(discovery.tree, 'Central America');
discovery.addLeaf(centralAmerica, 'Panama');
discovery.addLeaf(centralAmerica, 'Costa Rica');
var southAmerica = discovery.addNode(discovery.tree, 'South America');
// Nesting nodes in the southAmerica node
var west = discovery.addNode(southAmerica, 'West');
var east = discovery.addNode(southAmerica, 'East');
discovery.addLeaf(east, 'Argentina');
discovery.addLeaf(west, 'Chile');
discovery.addLeaf(west, 'Peru');
discovery.addLeaf(east, 'Brazil');
// Remember to publish the tree
discovery.publishTree();
```
```
```
```javascript // Create node using discovery.tree as the parent var northAmerica theme={"dark"}
= discovery.addNode(discovery.tree, 'North America'); // Add Leaves discovery.addLeaf(northAmerica,
'Canada'); discovery.addLeaf(northAmerica, 'USA'); discovery.addLeaf(northAmerica,
'Mexico');
var centralAmerica = discovery.addNode(discovery.tree, 'Central America');
discovery.addLeaf(centralAmerica, 'Panama');
discovery.addLeaf(centralAmerica, 'Costa Rica');
var southAmerica = discovery.addNode(discovery.tree, 'South America');
// Nesting nodes in the southAmerica node
var west = discovery.addNode(southAmerica, 'West');
var east = discovery.addNode(southAmerica, 'East');
discovery.addLeaf(east, 'Argentina');
discovery.addLeaf(west, 'Chile');
discovery.addLeaf(west, 'Peru');
discovery.addLeaf(east, 'Brazil');
// Remember to publish the tree
discovery.publishTree();
```
```
```