> ## Documentation Index
> Fetch the complete documentation index at: https://domoinc-openapi-sync-dataflows.mintlify.site/llms.txt
> Use this file to discover all available pages before exploring further.
# Configure Authentication
To build your own connector you will need to know how to authenticate to your target data system. The Connector Dev Studio supports four different authentication schemes:
* No authentication
* Username and password
* API Key
* OAuth 2.0
* Custom Account
You will need to investigate if your API endpoint requires authentication and what kind of authentication it uses.
**What if I need a different type of authentication?**
The Dev Studio does not support any other authentication methods at this time. However, you can use Domo APIs to write your own program. Click here to learn more about building your own program using [Domo APIs](/portal/API-Reference/overview).
### No Authentication
***
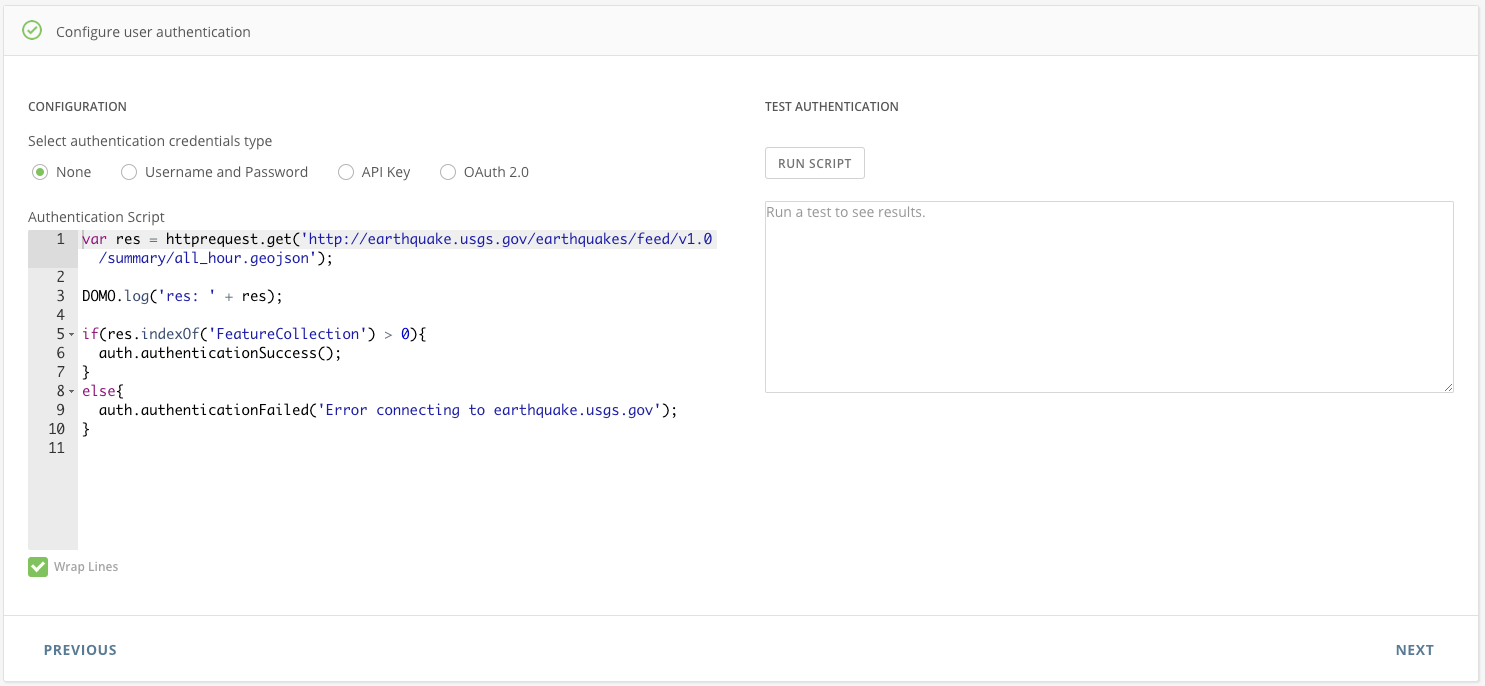
If your REST API endpoint does not require any authentication, select **None**.
 ```text theme={"dark"}
auth.authenticationSuccess();
```
It is not required, but if you would like to check your connection with your API endpoint before you run your report, you can write an authentication script. If you choose to do this, set *auth.authenticationSuccess()* and *auth.authenticationFailed('`<>`')* appropriately.
```javascript theme={"dark"}
var res = httprequest.get(
'http://earthquake.usgs.gov/earthquakes/feed/v1.0/summary/all_hour.geojson',
);
DOMO.log('res: ' + res);
if (httprequest.getStatusCode() == 200) {
auth.authenticationSuccess();
} else {
auth.authenticationFailed('Error connecting to earthquake.usgs.gov');
}
```
### Username and Password
***
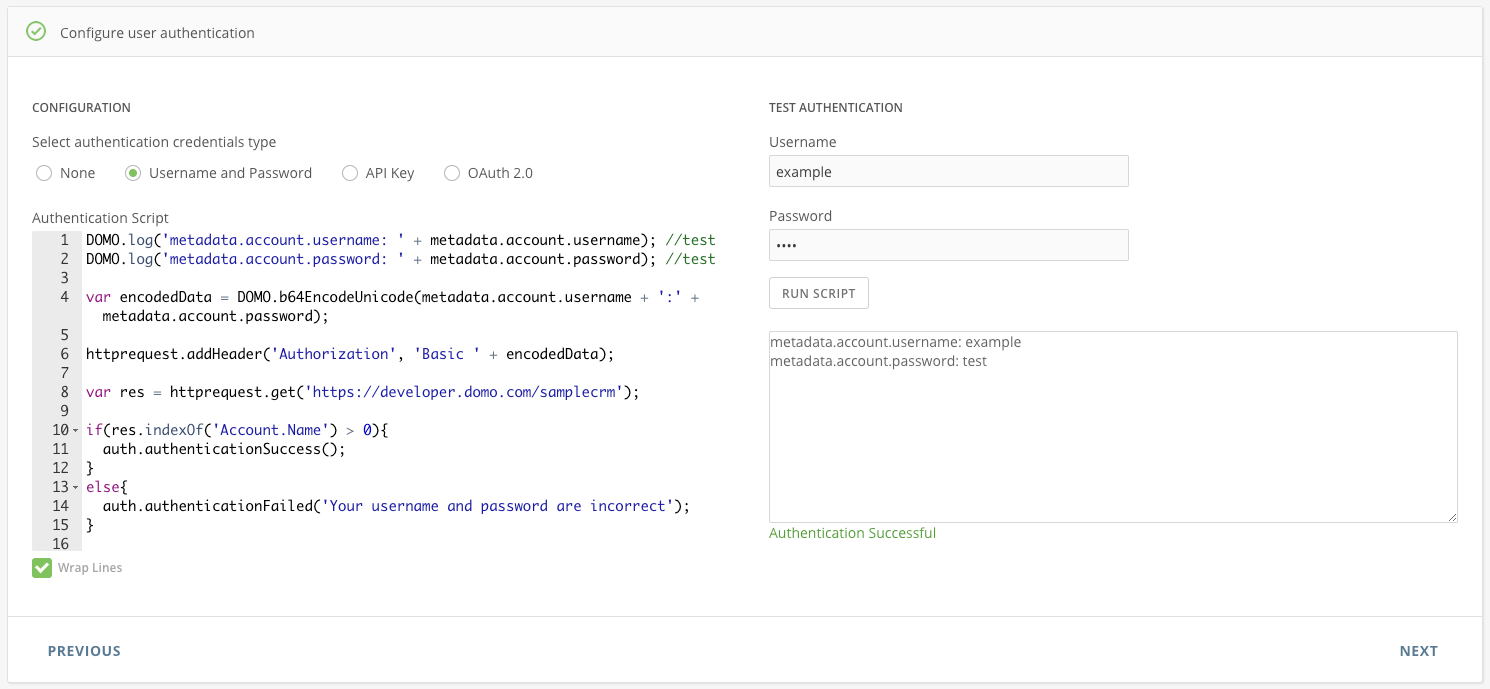
1. Select **Username and Password**.
2. Enter your username and password into the **Username** and **Password** fields. These will be securely stored. You can access them in your authentication script by calling *metadata.account.username* and *metadata.account.password*.
3. Write your authentication script as required by your API endpoint.
4. Click **Run Script** to run your authentication script.
Although you will need to determine how the API endpoint you want to use authenticates, most endpoints that use username and password will use the [Basic Authentication](https://en.wikipedia.org/wiki/Basic_access_authentication) standard. When making an http request, the request header will usually be:
| | |
| ------------- | -------------------------------------------- |
| Key | Value |
| Authorization | `Basic Base64Encoded(:)` |
The Connector Dev Studio provides a built-in function if you need to base-64 encode a string: *DOMO.b64EncodeUnicode(\)*.
**Note**
The code block needs to determine and set the authentication to either *auth.authenticationSuccess()* or *auth.authenticationFailed('`<>`')*.
```text theme={"dark"}
auth.authenticationSuccess();
```
It is not required, but if you would like to check your connection with your API endpoint before you run your report, you can write an authentication script. If you choose to do this, set *auth.authenticationSuccess()* and *auth.authenticationFailed('`<>`')* appropriately.
```javascript theme={"dark"}
var res = httprequest.get(
'http://earthquake.usgs.gov/earthquakes/feed/v1.0/summary/all_hour.geojson',
);
DOMO.log('res: ' + res);
if (httprequest.getStatusCode() == 200) {
auth.authenticationSuccess();
} else {
auth.authenticationFailed('Error connecting to earthquake.usgs.gov');
}
```
### Username and Password
***
1. Select **Username and Password**.
2. Enter your username and password into the **Username** and **Password** fields. These will be securely stored. You can access them in your authentication script by calling *metadata.account.username* and *metadata.account.password*.
3. Write your authentication script as required by your API endpoint.
4. Click **Run Script** to run your authentication script.
Although you will need to determine how the API endpoint you want to use authenticates, most endpoints that use username and password will use the [Basic Authentication](https://en.wikipedia.org/wiki/Basic_access_authentication) standard. When making an http request, the request header will usually be:
| | |
| ------------- | -------------------------------------------- |
| Key | Value |
| Authorization | `Basic Base64Encoded(:)` |
The Connector Dev Studio provides a built-in function if you need to base-64 encode a string: *DOMO.b64EncodeUnicode(\)*.
**Note**
The code block needs to determine and set the authentication to either *auth.authenticationSuccess()* or *auth.authenticationFailed('`<>`')*.
 ```javascript theme={"dark"}
//This logging is here for testing! Remove before publishing your connector
DOMO.log('metadata.account.username: ' + metadata.account.username);
DOMO.log('metadata.account.password: ' + metadata.account.password);
var encodedData = DOMO.b64EncodeUnicode(
metadata.account.username + ':' + metadata.account.password,
);
httprequest.addHeader('Authorization', 'Basic ' + encodedData);
var res = httprequest.get('https://developer.domo.com/samplecrm');
if (httprequest.getStatusCode() == 200) {
auth.authenticationSuccess();
} else {
auth.authenticationFailed('Your username and password are incorrect');
}
```
### API Key
***
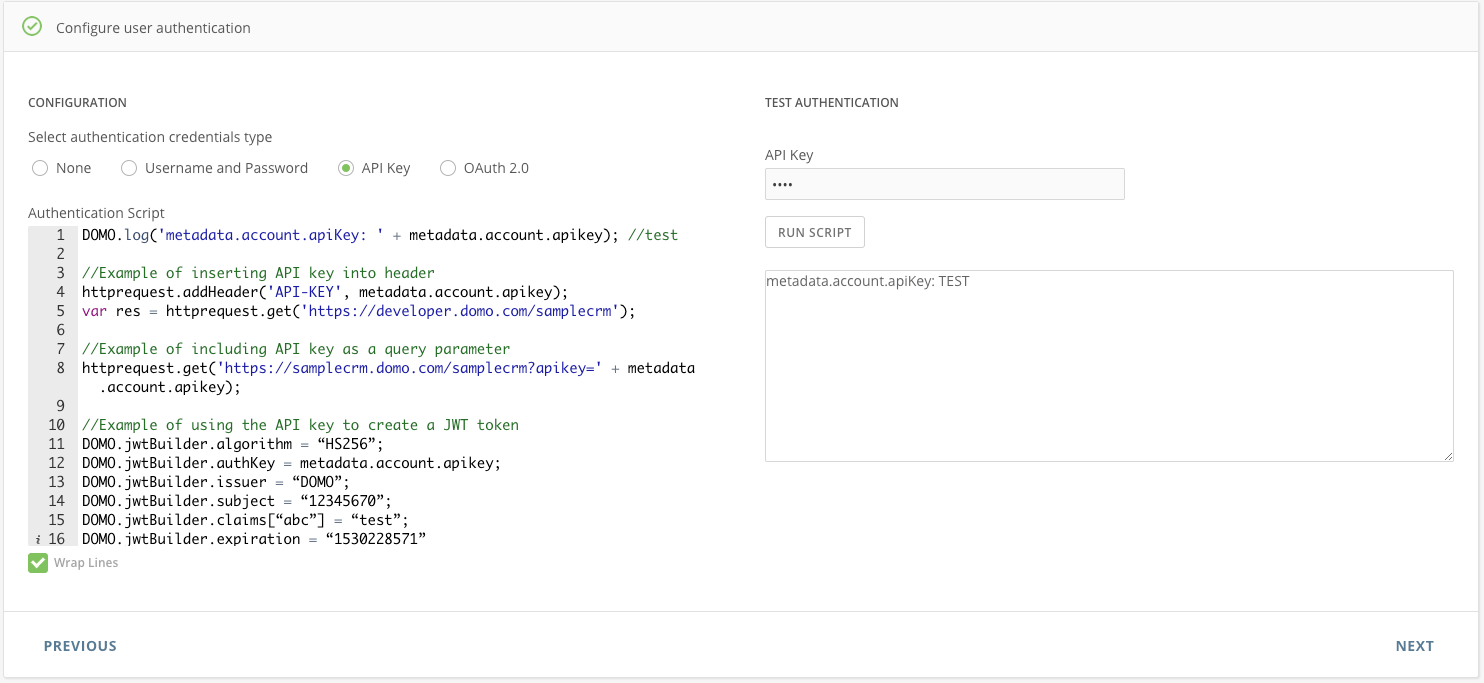
1. Select **API Key**.
2. Enter your API key into the **API Key** field. It will be securely stored. You can access it in your authentication script by calling *metadata.account.apikey*.
3. Write your authentication script as required by your API endpoint.
4. Click **Run Script** to run your authentication script.
An **[API key](https://en.wikipedia.org/wiki/Application_programming_interface_key)** is a token passed in as a header or a query parameter in an http request. It uniquely identifies who is making the call and is often non-expiring. You will need to determine how the REST API you wish to call needs to send the API key.
Use the API key as a query parameter (using the "httprequest.addParameter()" method)
```javascript theme={"dark"}
//This logging is here for testing! Remove before publishing your connector
DOMO.log('metadata.account.username: ' + metadata.account.username);
DOMO.log('metadata.account.password: ' + metadata.account.password);
var encodedData = DOMO.b64EncodeUnicode(
metadata.account.username + ':' + metadata.account.password,
);
httprequest.addHeader('Authorization', 'Basic ' + encodedData);
var res = httprequest.get('https://developer.domo.com/samplecrm');
if (httprequest.getStatusCode() == 200) {
auth.authenticationSuccess();
} else {
auth.authenticationFailed('Your username and password are incorrect');
}
```
### API Key
***
1. Select **API Key**.
2. Enter your API key into the **API Key** field. It will be securely stored. You can access it in your authentication script by calling *metadata.account.apikey*.
3. Write your authentication script as required by your API endpoint.
4. Click **Run Script** to run your authentication script.
An **[API key](https://en.wikipedia.org/wiki/Application_programming_interface_key)** is a token passed in as a header or a query parameter in an http request. It uniquely identifies who is making the call and is often non-expiring. You will need to determine how the REST API you wish to call needs to send the API key.
Use the API key as a query parameter (using the "httprequest.addParameter()" method)
 ```javascript theme={"dark"}
//This logging is here for testing! Remove before publishing your connector
DOMO.log('metadata.account.apiKey: ' + metadata.account.apikey);
// Adding the api key in the query parameter
httprequest.addParameter('apikey', metadata.account.apikey);
// Making the call to the api endpoint
var res = httprequest.get('https://samplecrm.domo.com/samplecrm');
// Make sure to determine and set the authentication status to either success or failure.
if (httprequest.getStatusCode() == 200) {
auth.authenticationSuccess();
} else {
auth.authenticationFailed(
'The api key you entered is invalid. Please try again with a valid key.',
);
}
```
If your API endpoint requires it, the Connector Dev Studio includes functions for building a [JSON Web Token (JWT)](https://en.wikipedia.org/wiki/JSON_Web_Token). You can see an example of this in the code below.
**Note**
The code block needs to determine and set the authentication to either *auth.authenticationSuccess()* or *auth.authenticationFailed('`<>`')*.
```javascript theme={"dark"}
//This logging is here for testing! Remove before publishing your connector
DOMO.log('metadata.account.apiKey: ' + metadata.account.apikey);
// Example of inserting API key into header
httprequest.addHeader('API-KEY', metadata.account.apikey);
var res = httprequest.get('https://developer.domo.com/samplecrm');
// Example of including API key as a query parameter in URL
var res = httprequest.get('https://samplecrm.domo.com/samplecrm?apikey=' + metadata.account.apikey);
// Example of using the API key to create a JWT token
DOMO.jwtBuilder.algorithm = “HS256”;
DOMO.jwtBuilder.authKey = metadata.account.apikey;
DOMO.jwtBuilder.issuer = “DOMO”;
DOMO.jwtBuilder.subject = “12345670”;
DOMO.jwtBuilder.claims[“abc”] = “test”;
DOMO.jwtBuilder.expiration = “1530228571”
var token = DOMO.getJWT()
//This logging is here for testing! Remove before publishing your connector
DOMO.log(token);
httprequest.addHeader(“JWT”, token);
var res = httprequest.get('https://samplecrm.domo.com/samplecrm');
// Make sure to still determine and set the authentication status to either success or failure.
if(httprequest.getStatusCode() == 200){
auth.authenticationSuccess();
} else {
auth.authenticationFailed('The api key you entered is invalid. Please try again with a valid key.');
}
```
### OAuth 2.0
***
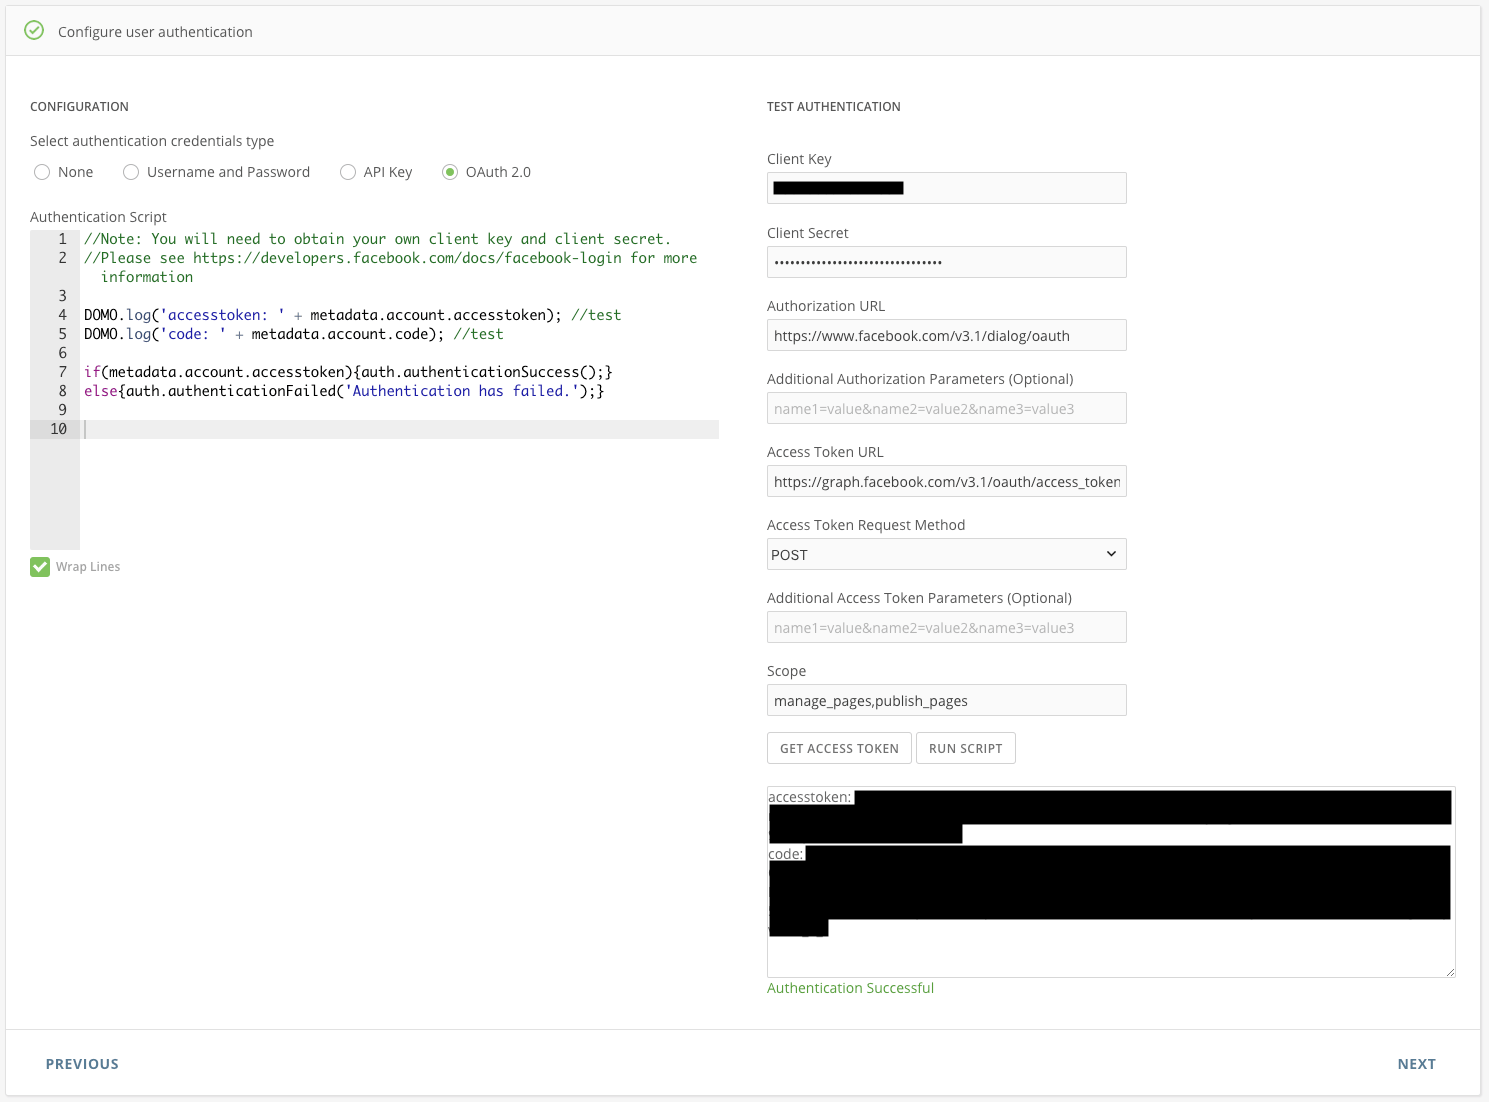
1. Select **OAuth 2.0**.
2. Enter the required data in the Authentication fields. You will need to get the necessary information from the API documentation you wish to use. All data will be securely stored. For your information:
* The redirect URI for the connector IDE is **[https://api.domo.com/builder/oauth.html](https://api.domo.com/builder/oauth.html)**.
* The callback URL response body needs to be JSON.
* The key defining the access token returned by your api needs to be *access\_token*.
3. Click **Get Access Token**. Domo will perform the authentication process and securely store your access token. You can access your token in your authentication script by calling *metadata.account.accesstoken*.
4. Write your authentication script as required by your API endpoint.
5. Click **Run Script** to run your authentication script.
[OAuth 2.0](https://oauth.net/2/) is the industry-standard for secure authentication. If your cloud API endpoint uses OAuth 2.0, you are in luck: Domo has automated the processes of using your stored data to retrieve your access token, below.
**Note**
The code block needs to determine and set the authentication to either *auth.authenticationSuccess()* or *auth.authenticationFailed('`<>`')*.
```javascript theme={"dark"}
//This logging is here for testing! Remove before publishing your connector
DOMO.log('metadata.account.apiKey: ' + metadata.account.apikey);
// Adding the api key in the query parameter
httprequest.addParameter('apikey', metadata.account.apikey);
// Making the call to the api endpoint
var res = httprequest.get('https://samplecrm.domo.com/samplecrm');
// Make sure to determine and set the authentication status to either success or failure.
if (httprequest.getStatusCode() == 200) {
auth.authenticationSuccess();
} else {
auth.authenticationFailed(
'The api key you entered is invalid. Please try again with a valid key.',
);
}
```
If your API endpoint requires it, the Connector Dev Studio includes functions for building a [JSON Web Token (JWT)](https://en.wikipedia.org/wiki/JSON_Web_Token). You can see an example of this in the code below.
**Note**
The code block needs to determine and set the authentication to either *auth.authenticationSuccess()* or *auth.authenticationFailed('`<>`')*.
```javascript theme={"dark"}
//This logging is here for testing! Remove before publishing your connector
DOMO.log('metadata.account.apiKey: ' + metadata.account.apikey);
// Example of inserting API key into header
httprequest.addHeader('API-KEY', metadata.account.apikey);
var res = httprequest.get('https://developer.domo.com/samplecrm');
// Example of including API key as a query parameter in URL
var res = httprequest.get('https://samplecrm.domo.com/samplecrm?apikey=' + metadata.account.apikey);
// Example of using the API key to create a JWT token
DOMO.jwtBuilder.algorithm = “HS256”;
DOMO.jwtBuilder.authKey = metadata.account.apikey;
DOMO.jwtBuilder.issuer = “DOMO”;
DOMO.jwtBuilder.subject = “12345670”;
DOMO.jwtBuilder.claims[“abc”] = “test”;
DOMO.jwtBuilder.expiration = “1530228571”
var token = DOMO.getJWT()
//This logging is here for testing! Remove before publishing your connector
DOMO.log(token);
httprequest.addHeader(“JWT”, token);
var res = httprequest.get('https://samplecrm.domo.com/samplecrm');
// Make sure to still determine and set the authentication status to either success or failure.
if(httprequest.getStatusCode() == 200){
auth.authenticationSuccess();
} else {
auth.authenticationFailed('The api key you entered is invalid. Please try again with a valid key.');
}
```
### OAuth 2.0
***
1. Select **OAuth 2.0**.
2. Enter the required data in the Authentication fields. You will need to get the necessary information from the API documentation you wish to use. All data will be securely stored. For your information:
* The redirect URI for the connector IDE is **[https://api.domo.com/builder/oauth.html](https://api.domo.com/builder/oauth.html)**.
* The callback URL response body needs to be JSON.
* The key defining the access token returned by your api needs to be *access\_token*.
3. Click **Get Access Token**. Domo will perform the authentication process and securely store your access token. You can access your token in your authentication script by calling *metadata.account.accesstoken*.
4. Write your authentication script as required by your API endpoint.
5. Click **Run Script** to run your authentication script.
[OAuth 2.0](https://oauth.net/2/) is the industry-standard for secure authentication. If your cloud API endpoint uses OAuth 2.0, you are in luck: Domo has automated the processes of using your stored data to retrieve your access token, below.
**Note**
The code block needs to determine and set the authentication to either *auth.authenticationSuccess()* or *auth.authenticationFailed('`<>`')*.
 ```text theme={"dark"}
//This logging is here for testing! Remove before publishing your connector
DOMO.log('accesstoken: ' + metadata.account.accesstoken);
DOMO.log('code: ' + metadata.account.code);
if (metadata.account.accesstoken) {
auth.authenticationSuccess();
}
else {
auth.authenticationFailed('Authentication has failed.');
}
```
### Custom Account
***
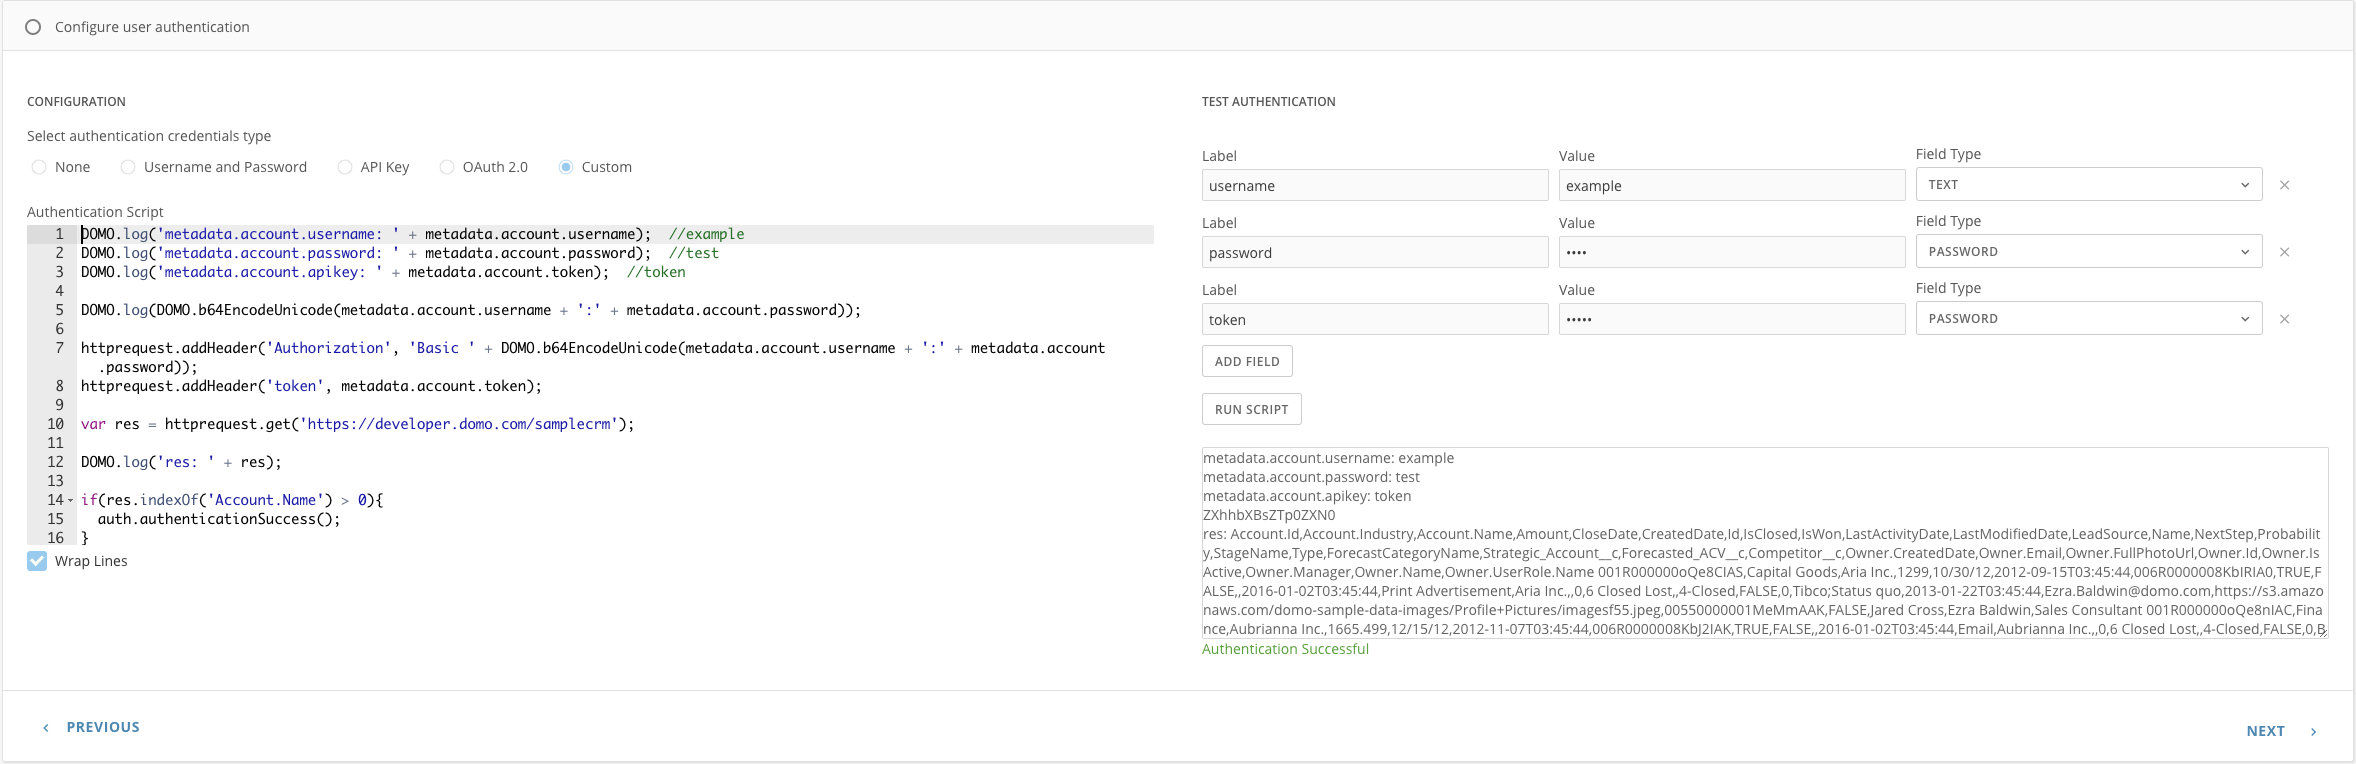
1. Select **Custom**.
2. Enter the label and value in the **Label** and **Value** fields.
3. Select the **Field Type** as Password.
4. Click **ADD FIELD** to add another authentication field.
5. Write your authentication script as required by your API endpoint.
6. Click **Run Script** to run your authentication script.
```text theme={"dark"}
//This logging is here for testing! Remove before publishing your connector
DOMO.log('accesstoken: ' + metadata.account.accesstoken);
DOMO.log('code: ' + metadata.account.code);
if (metadata.account.accesstoken) {
auth.authenticationSuccess();
}
else {
auth.authenticationFailed('Authentication has failed.');
}
```
### Custom Account
***
1. Select **Custom**.
2. Enter the label and value in the **Label** and **Value** fields.
3. Select the **Field Type** as Password.
4. Click **ADD FIELD** to add another authentication field.
5. Write your authentication script as required by your API endpoint.
6. Click **Run Script** to run your authentication script.
 ```javascript theme={"dark"}
//This logging is here for testing! Remove before publishing your connector
DOMO.log('metadata.account.username: ' + metadata.account.username); //example
DOMO.log('metadata.account.password: ' + metadata.account.password); //test
DOMO.log('metadata.account.apikey: ' + metadata.account.token); //token
DOMO.log(
DOMO.b64EncodeUnicode(
metadata.account.username + ':' + metadata.account.password,
),
);
httprequest.addHeader(
'Authorization',
'Basic ' +
DOMO.b64EncodeUnicode(
metadata.account.username + ':' + metadata.account.password,
),
);
httprequest.addHeader('token', metadata.account.token);
var res = httprequest.get('https://developer.domo.com/samplecrm');
DOMO.log('res: ' + res);
if (httprequest.getStatusCode() == 200) {
auth.authenticationSuccess();
} else {
auth.authenticationFailed('Your username and password are incorrect.');
}
```
```javascript theme={"dark"}
//This logging is here for testing! Remove before publishing your connector
DOMO.log('metadata.account.username: ' + metadata.account.username); //example
DOMO.log('metadata.account.password: ' + metadata.account.password); //test
DOMO.log('metadata.account.apikey: ' + metadata.account.token); //token
DOMO.log(
DOMO.b64EncodeUnicode(
metadata.account.username + ':' + metadata.account.password,
),
);
httprequest.addHeader(
'Authorization',
'Basic ' +
DOMO.b64EncodeUnicode(
metadata.account.username + ':' + metadata.account.password,
),
);
httprequest.addHeader('token', metadata.account.token);
var res = httprequest.get('https://developer.domo.com/samplecrm');
DOMO.log('res: ' + res);
if (httprequest.getStatusCode() == 200) {
auth.authenticationSuccess();
} else {
auth.authenticationFailed('Your username and password are incorrect.');
}
```