> ## Documentation Index
> Fetch the complete documentation index at: https://domoinc-openapi-sync-dataflows.mintlify.site/llms.txt
> Use this file to discover all available pages before exploring further.

# Convert Bricks to Pro-Code Apps

<Note>
  **Prerequisites**

  * Access to Domo's Pro-Code Editor: Ensure that Pro-Code Editor is enabled in your Domo instance. After 11/13/2024 this will be automatically enabled.
  * Access to any dataset referenced in the Brick being migrated.
</Note>

You can convert your Brick **semi-automatically** with the “Convert to App” button or **manually** by copying and pasting.

<Tabs>
  <Tab title="Semi-automatically">
    ### 1. Start the conversion

    ***

    1. **Edit** your Brick
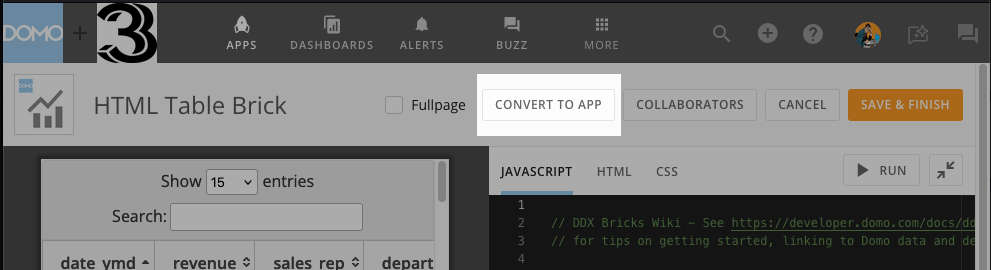
    2. Click the “**Convert to App**” button in the header.

    <Frame>
      <img src="https://mintcdn.com/domoinc-openapi-sync-dataflows/KPD0C7qKtTl5l81-/images/dev/stoplight.io/images/where_to_find_convert_to_app_button.png?fit=max&auto=format&n=KPD0C7qKtTl5l81-&q=85&s=b0f7761f4b23b293d0ca18a3ac7a4357" alt="button" width="991" height="270" data-path="images/dev/stoplight.io/images/where_to_find_convert_to_app_button.png" />
    </Frame>

    <Note>
      **Dataset Configuration Transfer**
      Notice that upon converting, the datasets you had wired previously have **automatically** been **transferred** to your [manifest.json].
    </Note>

    ### 2. Replace `window.datasets`

    ***

    Bricks use the `window.datasets` global property to execute a Configuration-driven design paradigm, while the Pro-Code Editor leverages a [manifest.json] file to implement a Metadata-driven design strategy.

    [manifest.json]: /portal/Apps/App-Framework/Guides/manifest

    To make the switch, you'll need to **replace** any usages of `window.datasets` with the corresponding dataset **aliases** (found in your [manifest.json]).

    #### The Lowest-Touch Approach

    ***

    The simplest approach is to replace all instances of `window.datasets` with an **array of strings** corresponding to your aliases.

    So change

    `var datasets = window.datasets;`

    to something like

    `var datasets = ['sales', 'profit'];`

    As long as you've kept the order the same, that should be sufficient.
  </Tab>

  <Tab title="Manually">
    ### 1. Begin by setting up your Pro-Code Application

    ***

    * In a separate window, navigate to the Asset Library, click the “Pro-Code Editor” button, and choose “Blank Template.”
      * By default, you will already have the app.css, app.js, index.html, and manifest.json files provided.

    ### 2. Copy your code into the Pro-Code Editor

    ***

    * Manual Copy & Paste
      * Copy the HTML from your Brick and paste it into the index.html file in the Pro-Code Editor.
      * Update the `<link>` and `<script>` tags that previously referenced your local resources to now reference “app.css” and “app.js” respectively.
      * Now copy your JavaScript code from the Brick and paste it into the app.js file of the Pro-Code Editor.
      * Finally, copy your CSS from the Brick and paste it into app.css in the Pro-Code Editor.

    ### 3. Next, migrate any required datasets

    ***

    * Review your code and identify all required datasets.
    * Select the “manifest.json” file and use the “+ Add Dataset” button.
    * Click the icon in the dataset ID input field.

          <img src="https://mintcdn.com/domoinc-openapi-sync-dataflows/G5Rc9OFVd1gC1Yb2/images/dev/stoplight.io/images/choosemanifest.png?fit=max&auto=format&n=G5Rc9OFVd1gC1Yb2&q=85&s=a2ef03908f1425f2cefa12e1ec26a32f" alt="choosemanifest.png" width="2018" height="906" data-path="images/dev/stoplight.io/images/choosemanifest.png" />

    ### 4. Select your dataset from the modal:

    ***

    <img src="https://mintcdn.com/domoinc-openapi-sync-dataflows/G5Rc9OFVd1gC1Yb2/images/dev/stoplight.io/images/choosedataset.png?fit=max&auto=format&n=G5Rc9OFVd1gC1Yb2&q=85&s=4a7b30067f8fb92aa11adab267e668b0" alt="choosedataset.png" width="1442" height="1116" data-path="images/dev/stoplight.io/images/choosedataset.png" />

    ### 5. Create an alias for the dataset ID

    ***

    * This will be used to humanize your API calls to the [DataSet endpoint(s)](/portal/API-Reference/app-framework-apis/Data-API).

          <img src="https://mintcdn.com/domoinc-openapi-sync-dataflows/KPD0C7qKtTl5l81-/images/dev/stoplight.io/images/mapping.png?fit=max&auto=format&n=KPD0C7qKtTl5l81-&q=85&s=8087f74eca2b83c6cbba6c1bf7594a19" alt="mapping.png" width="1482" height="266" data-path="images/dev/stoplight.io/images/mapping.png" />

    * In this example, the alias we chose was “mapData” – you will need to update your API calls to use this alias for your dataset.

          <img src="https://mintcdn.com/domoinc-openapi-sync-dataflows/G5Rc9OFVd1gC1Yb2/images/dev/stoplight.io/images/callalias.png?fit=max&auto=format&n=G5Rc9OFVd1gC1Yb2&q=85&s=1da4470da471539cad984590c5eb64ef" alt="callalias.png" width="1056" height="166" data-path="images/dev/stoplight.io/images/callalias.png" />

    ### 6. Create an alias for each Column Name that you will be using.

    ***

    *Note: It is not required to have all columns listed. Additionally, the Pro-Code Editor includes a 'sync' feature that will automatically populate the list of columns and their aliases for you!*

    * Ensure that your new aliases do not have any spaces or special characters in them, as the Pro-Code Editor will not allow it.

          <img src="https://mintcdn.com/domoinc-openapi-sync-dataflows/KPD0C7qKtTl5l81-/images/dev/stoplight.io/images/manifestalias.png?fit=max&auto=format&n=KPD0C7qKtTl5l81-&q=85&s=4d7488ab64684ebe1c2f428ff089c5c6" alt="manifestalias.png" width="2212" height="872" data-path="images/dev/stoplight.io/images/manifestalias.png" />

    ### 7. Update the dataset references

    ***

    * Ensure all API calls now reference the corresponding alias for that dataset.
    * Ensure all references to the data model properties are updated to match the alias of the column names you specified.

    Here is an example from a common Brick Template. In this example the original code is on the top with the updated code on the bottom:

    <img src="https://mintcdn.com/domoinc-openapi-sync-dataflows/KPD0C7qKtTl5l81-/images/dev/stoplight.io/images/codebefore.png?fit=max&auto=format&n=KPD0C7qKtTl5l81-&q=85&s=a2454e52530e3bc29b9500be4ce6b3b9" alt="codebefore.png" width="696" height="152" data-path="images/dev/stoplight.io/images/codebefore.png" />

    <img src="https://mintcdn.com/domoinc-openapi-sync-dataflows/G5Rc9OFVd1gC1Yb2/images/dev/stoplight.io/images/codeafter.png?fit=max&auto=format&n=G5Rc9OFVd1gC1Yb2&q=85&s=26247d0ccdd4d90ea3dac7e91afa86a4" alt="codeafter.png" width="708" height="152" data-path="images/dev/stoplight.io/images/codeafter.png" />

    You won’t need any references to `window.datasets`, so be sure to remove that reference!
  </Tab>
</Tabs>

## Conclusion:

***

After you're done, test your application to ensure normal functionality, and ensure all data is able to be accessed correctly.