> ## Documentation Index
> Fetch the complete documentation index at: https://domoinc-openapi-sync-dataflows.mintlify.site/llms.txt
> Use this file to discover all available pages before exploring further.

# Workbench 4でExcelデータに接続する

## はじめに

Workbench 4ではExcel DataSetジョブを作成できます。データソースタイプにExcelを選択する場合、接続するExcelシートの場所を指定し、使用するデータのセル範囲を設定できます。

**トレーニングビデオ - Workbench 4 を使ってファイルをアップロード**

Workbench 4 で、CSV と Excel ファイルをアップロードする方法を学びましょう。

**パート1（全4パート）**

<iframe allowfullscreen="" frameborder="0" height="315" src="//player.vimeo.com/video/412866033" width="560" />

**パート2（全4パート）**

<iframe allowfullscreen="" frameborder="0" height="315" src="//player.vimeo.com/video/412866261" width="560" />

**パート3（全4パート）**

<iframe allowfullscreen="" frameborder="0" height="315" src="//player.vimeo.com/video/412866767" width="560" />

**パート4（全4パート）**

<iframe allowfullscreen="" frameborder="0" height="315" src="//player.vimeo.com/video/412866962" width="560" />

**Workbench 4 でExcel DataSetジョブを作成するには、**

1. Click
   **Add New** in the **DataSet Jobs** grouping in the Buttons toolbar at the top of the Workbench window.

   This opens the **Workbench DataSet Job Creation Wizard**.

2. （条件付） 要求されたら、Domoサーバーを選択します。 (This screen only appears if you have more than one server set up in Workbench.)

3. In the
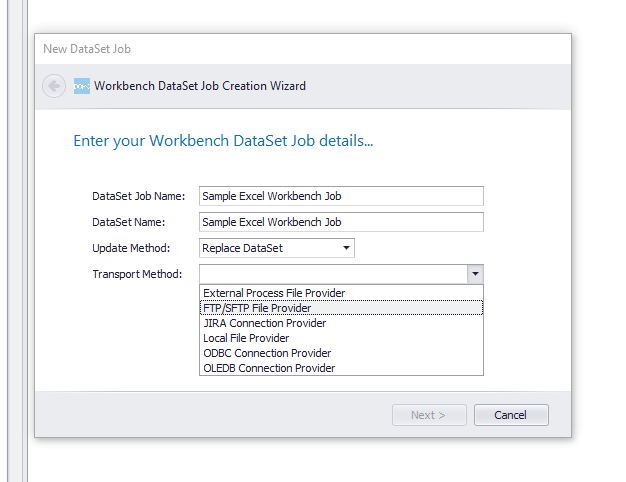
   **DataSet Job Name** field, enter a name for the DataSet Job. This is the name of the job as it appears in Workbench, *not* the name of the uploaded DataSet in Domo.

4. **\[DataSet名]**
   フィールドに、DataSet名を入力します。これは、DomoにアップロードされたDataSet名です。

5. **\[更新方法]**
   メニューで、更新する方法を選択します。

   * 更新時に、DataSetを完全に入れ替えたい場合は、
     **\[DataSetを置換]** を選択します。
   * 更新データを既存のデータに追加したい場合は、
     **\[DataSetに追加]** を選択します。

6. In the
   **Transport Method** menu, select **Local File Provider,** **External Process File Provider**, or **FTP/SFTP File Provider**.

   <Note>
     **Note:**

     JIRA Connection Provider, ODBC Connector Provider, and OLEDB Connection Provider are not valid for Excel jobs.
   </Note>

   Descriptions for these transport methods are as follows:

   <table class="mt-responsive-table"><thead><tr><th colspan="1" rowspan="1"><p> トランスポート方法 </p></th><th colspan="1" rowspan="1"><p> 説明 </p></th></tr></thead><tbody><tr><td colspan="1" rowspan="1"><p> ローカルファイルプロバイダー </p></td><td colspan="1" rowspan="1"><p> Lets you select a file from your machine or a network drive. </p></td></tr><tr><td colspan="1" rowspan="1"><p> 外部プロセスファイルプロバイダー </p></td><td colspan="1" rowspan="1"><p> Lets you use a third-party application to pull data to your local machine for processing. </p></td></tr><tr><td colspan="1" rowspan="1"> FTP/SFTP ファイルプロバイダー </td><td colspan="1" rowspan="1"> ファイルを FTP、SFTP (SSH-FTP) または FTPS (FTP-SSL) 経由で取得します。 </td></tr></tbody></table>

   <Frame>
     <img alt="wbexcel1.png" src="https://mintcdn.com/domoinc-openapi-sync-dataflows/KRKoASQJgRuO8wHw/images/kb/ka05w00000123po-00N5w00000Ri7BU-0EM5w000005vPKT.png?fit=max&auto=format&n=KRKoASQJgRuO8wHw&q=85&s=7a8aafd1179d9db9ce98f065f67b60ac" width="626" height="482" data-path="images/kb/ka05w00000123po-00N5w00000Ri7BU-0EM5w000005vPKT.png" />
   </Frame>

7. **［次へ］**
   をクリックします。

8. In the
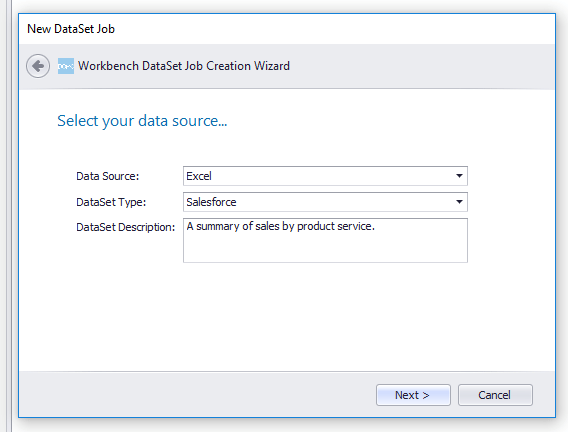
   **Data Source** menu, select **Excel**.

9. In the
   **DataSet Type** field, select the type of DataSet in the dropdown or enter a custom name.

   ここで選択または入力するDataSetのタイプは、ジョブ実行後のDomoのコネクタータイプに反映されます。
   <Tip>
     **Tip:** It is recommended that you select or enter the DataSet type that tells users what data is being represented, *not* the data reader you are using to present the data. 例えば、ツイッターのデータを含んでいるExcelシートに接続するとします。 In this case the best option would be to enter "Twitter" rather than selecting **Excel** because the data you are representing in Domo is from Twitter, not Excel.
   </Tip>

10. (Optional) Enter a description in the
    **DataSet Description** field.

    <Note>
      **Note:** You can change any of the settings you made in the above steps in the **Source** panel for the DataSet Job after you complete all of the steps in the Wizard *except* the transport method.
    </Note>

    <Frame>
      <img alt="wbexcel2.png" src="https://mintcdn.com/domoinc-openapi-sync-dataflows/7Nd5Hb-h9pITriJg/images/kb/ka05w00000123po-00N5w00000Ri7BU-0EM5w000005vPKU.png?fit=max&auto=format&n=7Nd5Hb-h9pITriJg&q=85&s=20bd3aaba5bb01991a28edc975b9d813" width="568" height="432" data-path="images/kb/ka05w00000123po-00N5w00000Ri7BU-0EM5w000005vPKU.png" />
    </Frame>

11. ［
    **次へ** ］をクリックします。

    A new Excel DataSet Job is added to the list of jobs for the currently authenticated server in the **Accounts** pane.

12. Under the Excel DataSet Job that was just added to the jobs list, select
    **Source**.

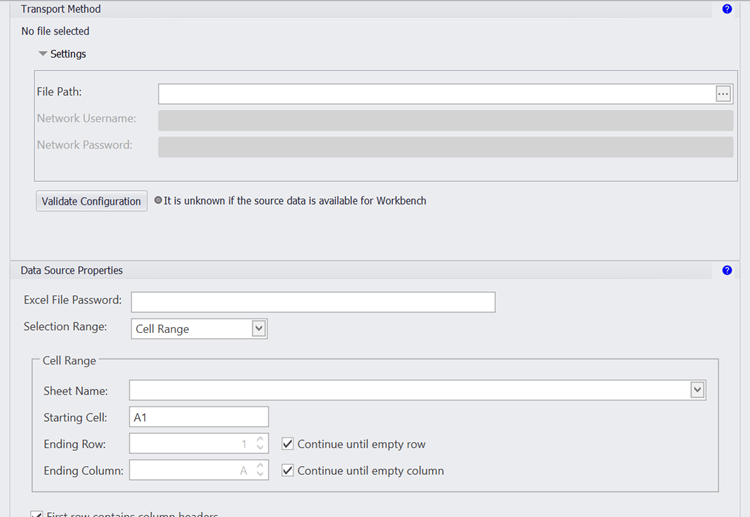
    A panel opens with options for configuring your file transport and setting options for your Excel data source.
    <Frame>
      <img alt="wbexcel3.png" src="https://mintcdn.com/domoinc-openapi-sync-dataflows/7Nd5Hb-h9pITriJg/images/kb/ka05w00000123po-00N5w00000Ri7BU-0EM5w000005vPKa.png?fit=max&auto=format&n=7Nd5Hb-h9pITriJg&q=85&s=6026aa9144a329db8b18144bdcf4e176" width="750" height="517" data-path="images/kb/ka05w00000123po-00N5w00000Ri7BU-0EM5w000005vPKa.png" />
    </Frame>

13. （条件付き）以下のいずれかを行ってください。

    * If you selected
      **Local File Provider** as your Transport Method...

      1. **\[ファイルパス]**
         フィールドで省略記号（...）をクリックします。
      2. 自分のマシンまたはネットワークからExcelファイルを選択します。
      3. (Conditional) If your file is on a password-protected network drive, enter the username and password for the network in the
         **Network Username** and **Network Password** fields.
    * If you selected
      **External Process File Provider** as your Transport Method...

      1. **\[プログラムの実行可能ファイル]**
         フィールドで省略記号（...）をクリックします。
      2. 自分のマシンまたはネットワークから実行可能ファイルを選択します。
      3. （オプション）引数がある場合は
         **\[引数]** フィールドに入力します。
      4. **\[出力ファイルパス]**
         フィールドで省略記号（...）をクリックします。
      5. 自分のマシンまたはネットワークの出力ファイルパスを選択します。

         The file type for the output path *must* be Excel.
    * If you selected
      **FTP/** **SFTP File Provider** as your Transport Method...

      1. **\[サーバー]**
         フィールドにサーバー名を入力します。
      2. **\[ポート]**
         フィールドにポート番号を入力します。
      3. **\[ユーザー名]**
         および **\[パスワード]** にサーバーの認証情報を入力します。
      4. プロトコルを選択します（
         **\[FTP]** 、 **\[SFTP]** 、または **\[FTPS]** ）。
      5. （オプション）SSL証明書がある場合は（\[SFTP] と \[FTPS] のみ）、必要に応じて設定します。

         詳細については、「 [SFTPファイルプロバイダー](/ja/s/article/360047403773 "Workbench 4ユーザーインターフェースについて") 」を参照してください。
      6. **\[リモートファイル]**
         フィールドに、インポートするフィールドのファイル名を入力します。

14. Click
    **Validate Configuration**.

15. (Conditional) In the
    **Data Source Properties** pane, if your Excel file is password-protected, enter the password in the **Excel File Password** field.

16. **\[選択範囲]**
    メニューで、範囲タイプを選択します。

    以下の表に、範囲タイプの詳細を記しています：

    <table border="1" cellpadding="1" cellspacing="1"><thead><tr><th colspan="1" rowspan="1"><p> 範囲タイプ </p></th><th colspan="1" rowspan="1"><p> 説明 </p></th></tr></thead><tbody><tr><td colspan="1" rowspan="1"><p> セル範囲 </p></td><td colspan="1" rowspan="1"><p> 開始セルや終了行、終了列など、データを引き出したいExcelシートを指定します。 </p></td></tr><tr><td colspan="1" rowspan="1"><p> 名前のついた範囲 </p></td><td colspan="1" rowspan="1"><p> リストからは名前のついた範囲を選択することができます。このExcelファイルで名前のついた範囲を作成していない場合は、このメニューにオプションは表示されません。 </p></td></tr><tr><td colspan="1" rowspan="1"><p> 動的範囲 </p></td><td colspan="1" rowspan="1"><p> Excelシートの最後に、指定した行数だけスキップすることができます。 </p></td></tr></tbody></table>

17. 以下のいずれかを行います。

    * 範囲タイプに
      **\[セル範囲]** を選択した場合は...

      1. **\[シート名]**
         メニューで、接続するシートを選択します。
      2. **\[開始セル]**
         で、データを引き出したい範囲の最初のセルを指定します。
      3. （条件付き）Workbenchに、空白行または列が登場するまでデータを引き出したい場合は、
         **\[空白行まで続行する]** または **\[空白列まで続行する]** のボックスにチェックマークを入れたままにします。Approvedそれ以外の場合は、チェックボックスをクリアし、 **\[最終行]** と **\[最終列]** フィールドにそれぞれ最終行と最終列を指定します。
      4. セル範囲の最初の行に列ヘッダーがある場合は、ボックスにチェックを入れたままにします。それ以外は、ボックスをクリアします。
    * 範囲タイプに
      **\[名前のついた範囲]** を選択した場合は...

      1. **\[名前のついた範囲]**
         メニューで範囲を選択します。
      2. （条件付き）Workbenchに、空白行または列が登場するまでデータを引き出したい場合は、
         **\[空白行まで続行する]** のボックスにチェックマークを入れたままにします。
      3. セル範囲の最初の行に列ヘッダーがある場合は、ボックスにチェックを入れたままにします。それ以外は、ボックスをクリアします。列ヘッダーは、その列のデータを参照するために使用されるので、Domoでカードを作成する際、これは重要になります。

         [詳細については、「](/ja/s/article/360043428713 "DataSet列をチャートに適用する")

         DataSet列をチャートに適用する 」を参照してください。
    * 範囲タイプに
      **\[動的範囲]** を選択した場合は...

      1. **\[シート名]**
         メニューで、接続するシートを選択します。
      2. In

         **Starting Cell**, specify the first cell in the range you want to pull data from.
      3. （条件付き）Workbenchでシートの最後の行を無視する場合は、
         **\[終了行を無視する]** で行数を指定します。

これでDomoにExcel DataSetが作成され、DataSetジョブを実行する準備ができました。しかし、Domoに送信する前にDataSetジョブでできる操作はたくさんあります。これには以下のものが含まれます。

* [ジョブの更新スケジュールを設定する](/ja/s/article/360046856934 "Workbench 4でジョブをスケジューリングする")
* [Windowsタスクスケジューラで高度なスケジュールが設定されたジョブグループに、ジョブを追加する](/ja/s/article/360046857074 "Workbench 4 でスケジュールグループを作成する")
* [ジョブの更新が成功または失敗したら通知するよう設定する](/ja/s/article/360047494393 "Workbench 4で通知を設定する")
* [Workbenchデータの暗号化と復号を行う](/ja/s/article/360047501293 "Workbench 4データの暗号化と復号を行う")
* [計算を使用して新しい列を作成する](/ja/s/article/360046861474 "Workbench 4で計算を使用して列を作成する")
* [列にカスタム日付形式を設定する](/ja/s/article/360047504553 "Workbench 4で列にカスタム日付形式を設定する")
* [列の値の置き換える](/ja/s/article/360046864274 "Workbench 4で列の値の置き換える")
* [DataSetを結合する](/ja/s/article/360046861014 "Workbench 4でDataSetを結合する")
* [列にフィルターをかける](/ja/s/article/360046864074 "Workbench 4で列にフィルターをかける")