> ## Documentation Index
> Fetch the complete documentation index at: https://domoinc-openapi-sync-dataflows.mintlify.site/llms.txt
> Use this file to discover all available pages before exploring further.

# Microsoft SharePoint Online RESTコネクター

## はじめに

Microsoft SharePoint Onlineでは、組織のコラボレーション用のカスタムチーム専用サイトやプロジェクト専用サイトを簡単に作成、管理できます。DomoのMicrosoft SharePoint Online RESTコネクターを使用すれば、Domo内のサイトにもとづいた様々な側面に関して、組織全体のイントラネットポータルからデータを取得できます。そのためには、まずMicrosoft AzureでAppを作成する必要があります。Microsoft SharePoint Onlineについての詳細は、ウェブサイト（ [https://products.office.com/ja-jp/sharepoint/sharepoint-online-collaboration-software](https://products.office.com/ja-jp/sharepoint/sharepoint-online-collaboration-software "https://products.office.com/ja-jp/sharepoint/sharepoint-online-collaboration-software") ）を参照してください。

Microsoft SharePoint Onlineへの接続はData Centerで作成します。このトピックでは、Microsoft SharePoint Online RESTコネクターユーザーインターフェースに固有のフィールドとメニューについて説明します。DataSetの追加や更新スケジュールの設定、DataSet情報の編集に関する一般的な情報は、「 [コネクターを使用してDataSetを追加する](/ja/s/article/360042926274 "コネクターを使用してDataSetを追加する") 」を参照してください。

## 必要条件

Microsoft SharePoint Onlineに接続して情報を取得するには、次のものが必要です。

* Microsoft Azure Appのインストール。
* クライアントIDとクライアントシークレット。Appを生成してこれらの認証情報を探す方法については、[Microsoftのドキュメント](https://learn.microsoft.com/ja-jp/entra/identity-platform/quickstart-register-app?tabs=certificate "Microsoftのドキュメント") を参照してください。Appを登録するには、以下の情報が必要になる場合があります。

  * **Azureポータル：** [https://portal.azure.com/](https://portal.azure.com/ "https://portal.azure.com/")
  * **登録するSharePoint App：** SharePoint Online Rest API
  * **DomoリダイレクトURL：** [https://oauth.domo.com/api/data/v1/oauth/providers/microsoft-sharepoint/exchange](https://oauth.domo.com/api/data/v1/oauth/providers/microsoft-sharepoint/exchange "https://oauth.domo.com/api/data/v1/oauth/providers/microsoft-sharepoint/exchange")

### エンタープライズOAuth用Azure Appを作成する

Microsoft Azure Appを作成するには、以下の手順を実行します。

1. [https://portal.azure.com](https://portal.azure.com/ "https://portal.azure.com")
   にログインします。

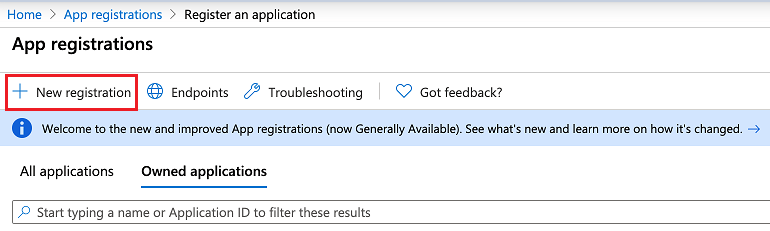
2. **［App registrations］** をクリックします。

   <Frame>
     <img alt="Capture1.PNG" src="https://mintcdn.com/domoinc-openapi-sync-dataflows/blcgkVgnZv6gj_XY/images/kb/ka05w000001236O-00N5w00000Ri7BU-0EM5w000005vNz7.png?fit=max&auto=format&n=blcgkVgnZv6gj_XY&q=85&s=595e884485e262b8a3b708a307dc1fb7" width="770" height="231" data-path="images/kb/ka05w000001236O-00N5w00000Ri7BU-0EM5w000005vNz7.png" />
   </Frame>

3. **［New registration］** をクリックします。

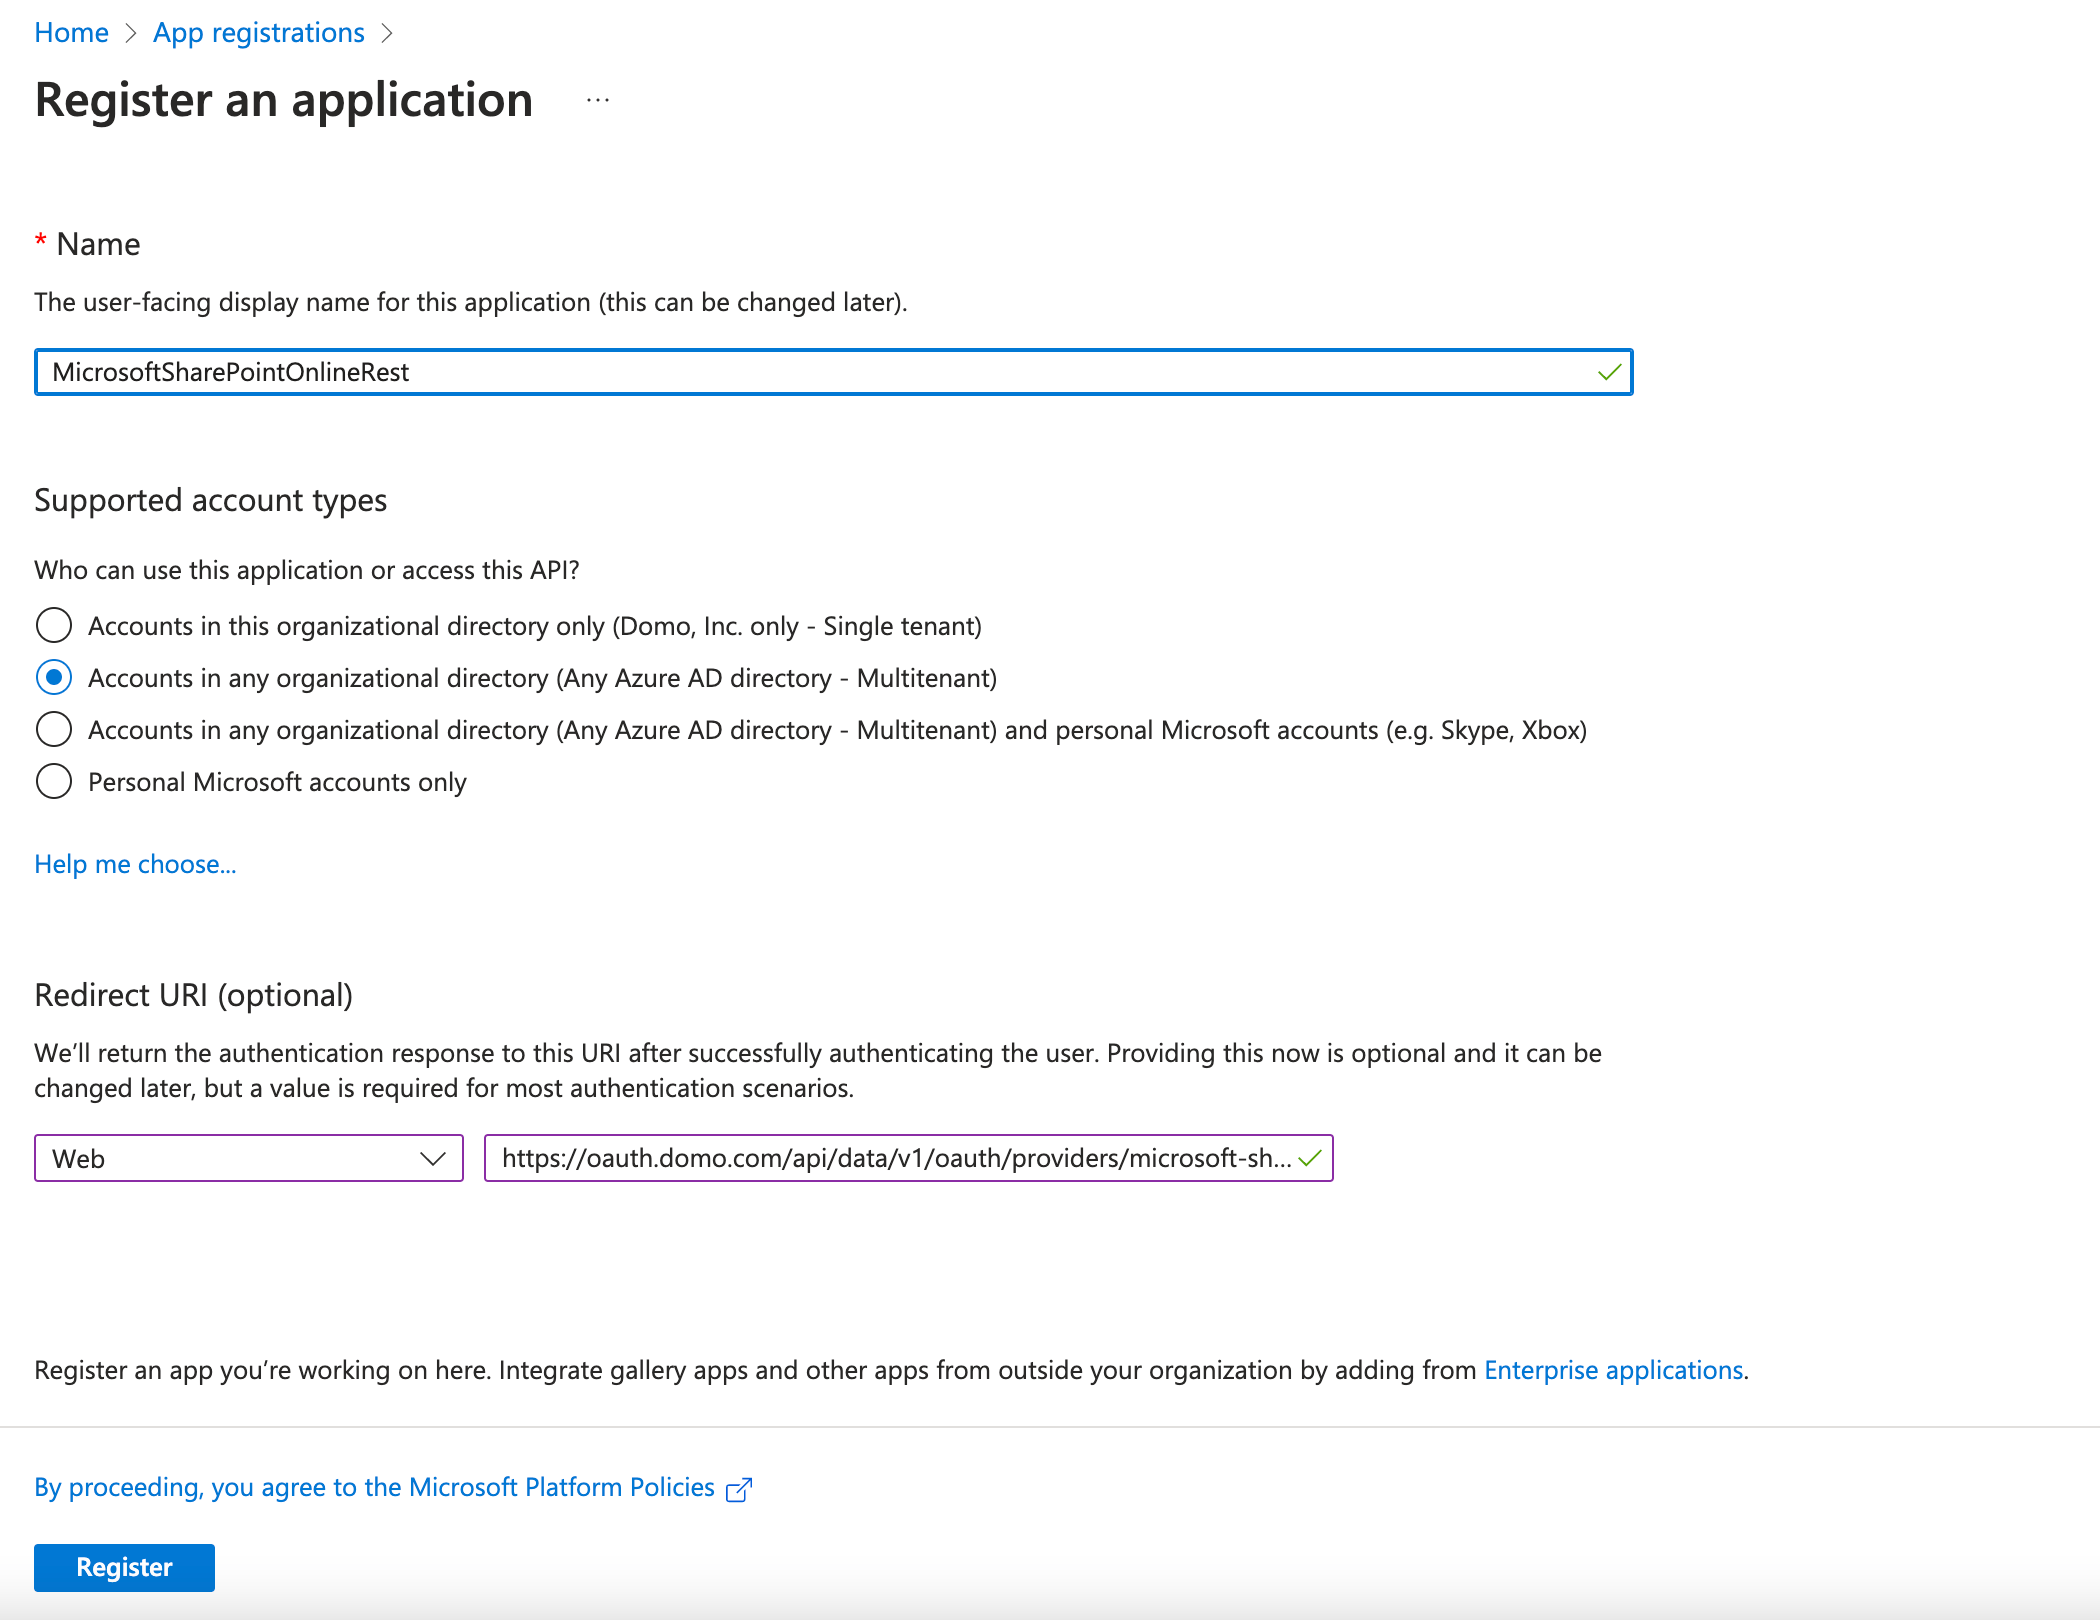
4. アプリケーション名を入力し、サポートされているアカウントのタイプを選択します。WebのリダイレクトURIを次のように入力します。
   [https://oauth.domo.com/api/data/v1/oauth/providers/microsoft-sharepoint/exchange](https://oauth.domo.com/api/data/v1/oauth/providers/microsoft-sharepoint/exchange "https://oauth.domo.com/api/data/v1/oauth/providers/microsoft-sharepoint/exchange")

5. デフォルトのテナント選択をシングルテナントからマルチテナントに変更します。これはコネクターの必要条件です。
   <Frame>
     <img alt="REgister.png" src="https://mintcdn.com/domoinc-openapi-sync-dataflows/AxiXLKkg9sLcFgsR/images/kb/ka0Vq0000006d0H-00N5w00000Ri7BU-0EM5w000006vIDX.jpg?fit=max&auto=format&n=AxiXLKkg9sLcFgsR&q=85&s=b2a1d20758c876a3eec74aac755eb99b" style={{width: 678, height: 523}} width="2100" height="1620" data-path="images/kb/ka0Vq0000006d0H-00N5w00000Ri7BU-0EM5w000006vIDX.jpg" />
   </Frame>

6. **［Register］** をクリックします。

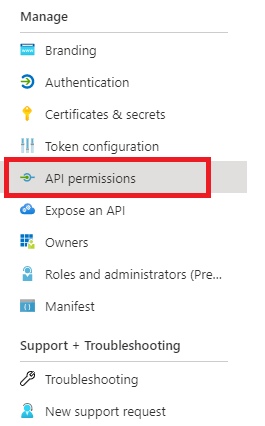
7. ここで、**［API Permissions］** をクリックします。

   <Frame>
     <img alt="API_permission.png" src="https://mintcdn.com/domoinc-openapi-sync-dataflows/AxiXLKkg9sLcFgsR/images/kb/ka0Vq0000006d0H-00N5w00000Ri7BU-0EM5w000005vO6o.png?fit=max&auto=format&n=AxiXLKkg9sLcFgsR&q=85&s=7469db78ea4d37281c3c825c3e34dac2" width="265" height="426" data-path="images/kb/ka0Vq0000006d0H-00N5w00000Ri7BU-0EM5w000005vO6o.png" />
   </Frame>

8. **［+Add Permissions］** ボタンをクリックします。

   <Frame>
     <img alt="Capture8.PNG" src="https://mintcdn.com/domoinc-openapi-sync-dataflows/blcgkVgnZv6gj_XY/images/kb/ka05w00000123LH-00N5w00000Ri7BU-0EM5w000005vO61.png?fit=max&auto=format&n=blcgkVgnZv6gj_XY&q=85&s=d361854fb29fa710f256f60117e2dab9" width="369" height="62" data-path="images/kb/ka05w00000123LH-00N5w00000Ri7BU-0EM5w000005vO61.png" />
   </Frame>

9. **［Microsoft Graph］>［Delegated Permissions］** を選択します。

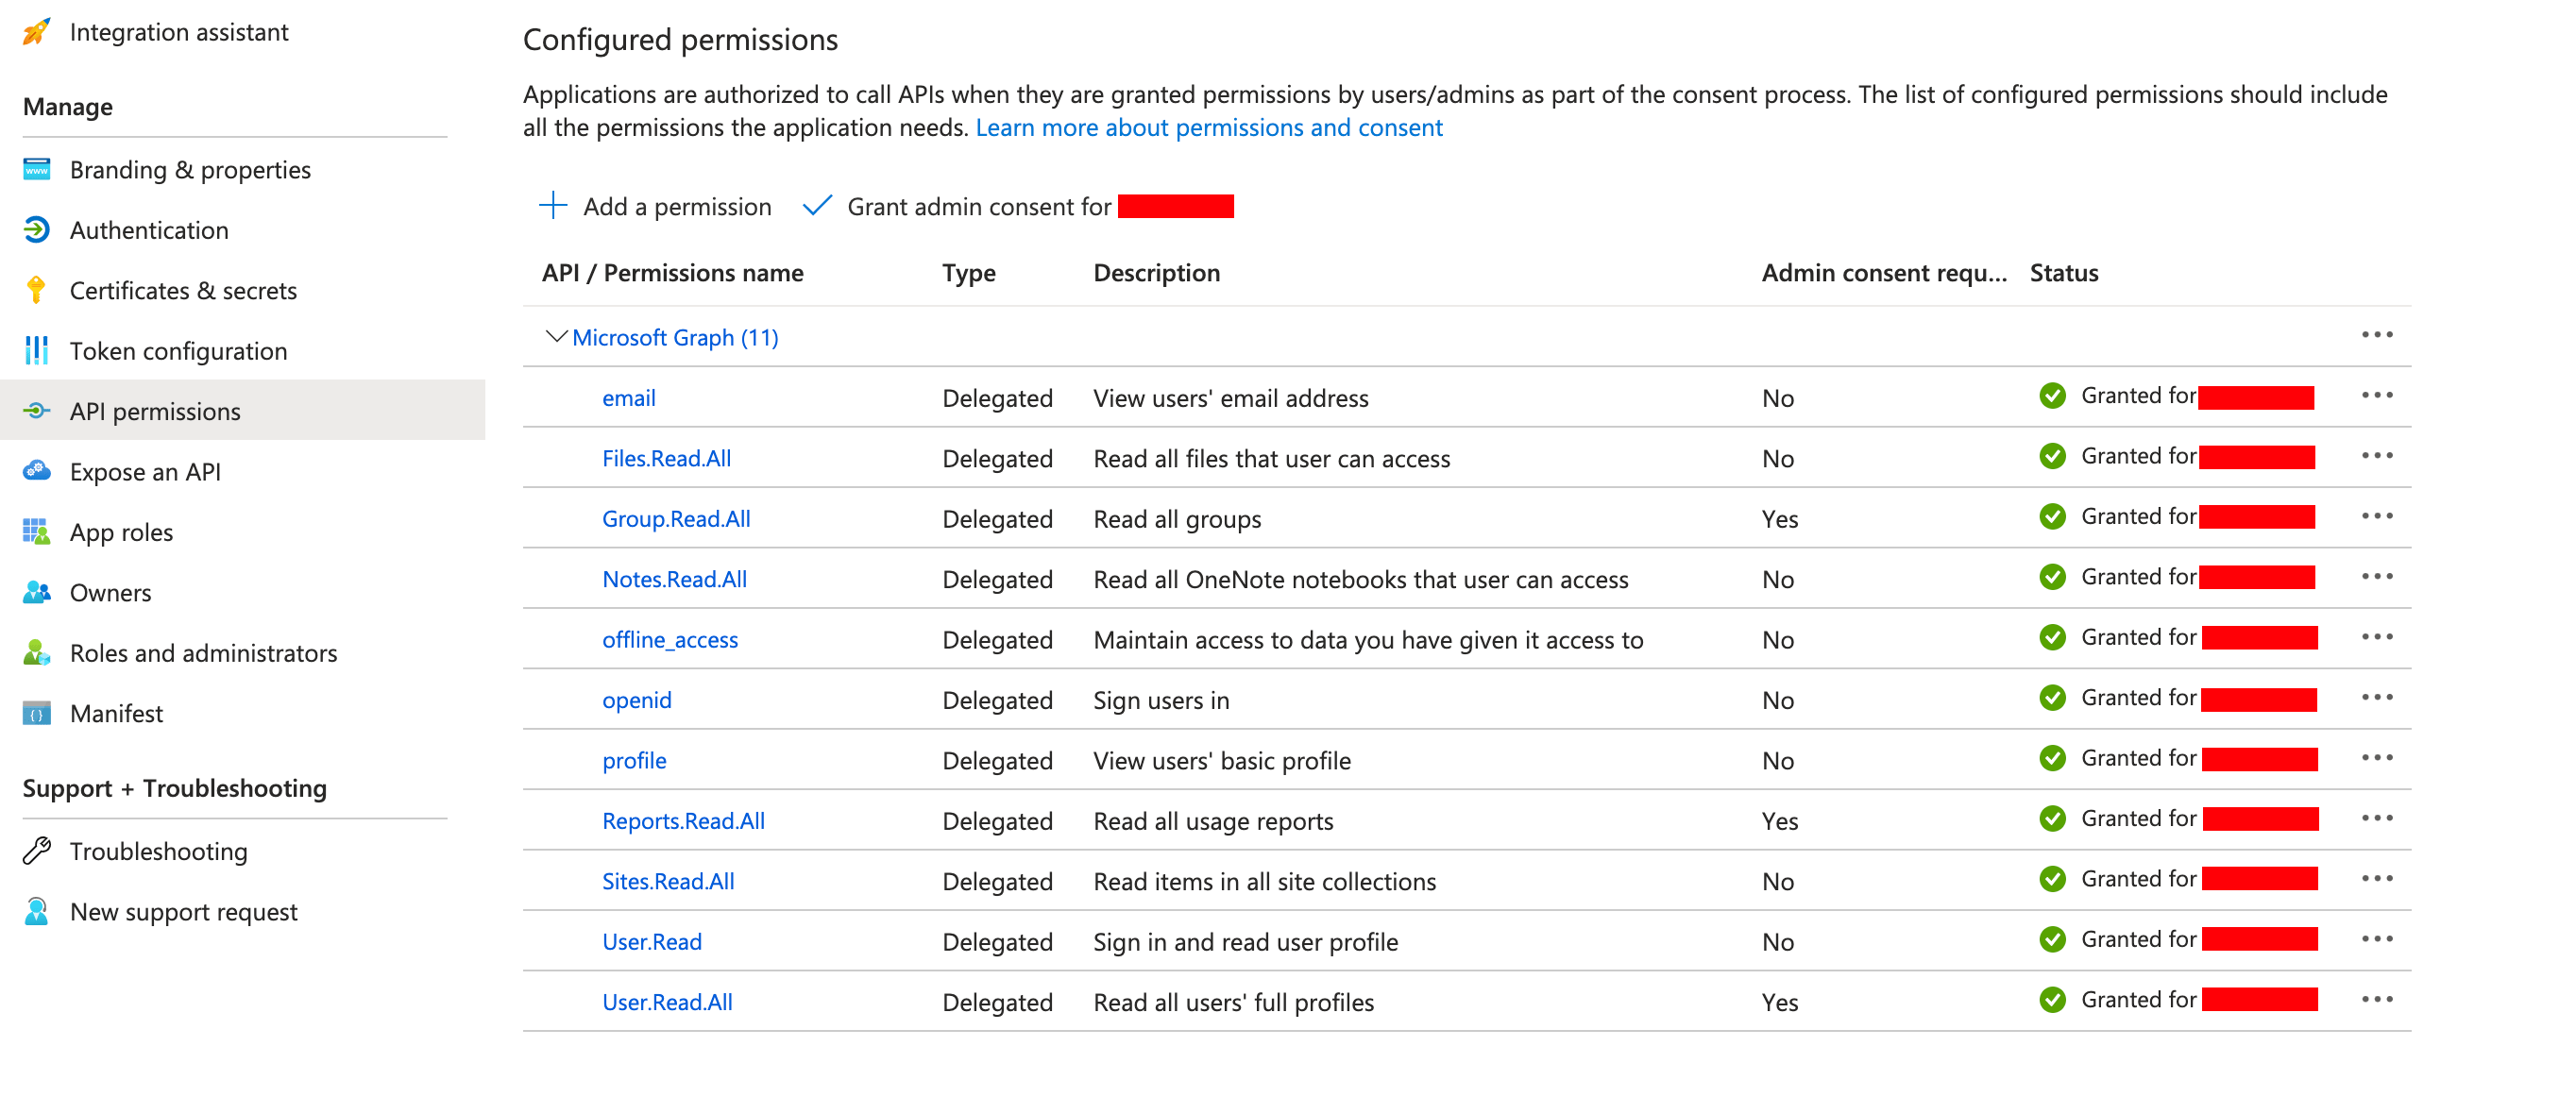
10. 必要に応じて権限を選択してください。

11. 権限を追加した後、すべての設定済みの権限が以下のように一覧表示されます。
    <Frame>
      <img alt="Configure.png" src="https://mintcdn.com/domoinc-openapi-sync-dataflows/AxiXLKkg9sLcFgsR/images/kb/ka0Vq0000006d0H-00N5w00000Ri7BU-0EM5w000006vIDc.jpg?fit=max&auto=format&n=AxiXLKkg9sLcFgsR&q=85&s=b1215814bf51f1932939a18d13f0fc9e" style={{width: 899, height: 383}} width="2728" height="1162" data-path="images/kb/ka0Vq0000006d0H-00N5w00000Ri7BU-0EM5w000006vIDc.jpg" />
    </Frame>

### SharePointクライアントIDを取得するには：

1. [https://portal.azure.com](https://portal.azure.com/ "https://portal.azure.com")
   に移動します。
2. **［Microsoft Entra ID］>［App registrations］** を選択します。
3. 前の手順で作成されたWeb App名をクリックします。
4. 「application ID」がクライアントIDです。

### SharePointクライアントシークレットを取得するには：

1. [https://portal.azure.com](https://portal.azure.com/ "https://portal.azure.com")
   に移動します。
2. **［Microsoft Entra ID］>［App registrations］** を選択します。
3. 前の手順で作成されたWeb App名をクリックします。
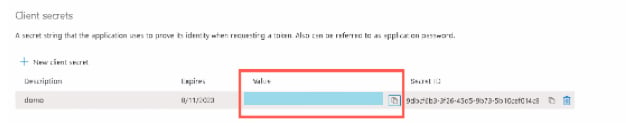
4. **［Certificates and secrets］** を開きます。
5. **［+New Value］** をクリックします。
6. 値の説明とシークレットの有効期限を入力します。**［Add］** をクリックします。
7. 新しい値が表示されます。［Value］フィールドをコピーして、Domoコネクターの［Value］フィールドに貼り付けます。

   <Frame>
     <img alt="Secret.png" src="https://mintcdn.com/domoinc-openapi-sync-dataflows/XLeSvlwfBHPJHbmY/images/kb/ka0Vq000000A67N-00N5w00000Ri7BU-0EM5w000005vO71.png?fit=max&auto=format&n=XLeSvlwfBHPJHbmY&q=85&s=fb4fbadf207106e9814c8fcf5e5d1b31" width="626" height="126" data-path="images/kb/ka0Vq000000A67N-00N5w00000Ri7BU-0EM5w000005vO71.png" />
   </Frame>

## Microsoft SharePoint Onlineに接続する

このセクションでは、Microsoft SharePoint Online RESTコネクターページの **［認証情報］** および **［詳細］** ペインのオプションについて説明します。このページのほかのペインの項目である **［スケジュール設定］** や **［DataSetに名前を付け、説明を入力］** に関しては、ほとんどのタイプのコネクターで共通しています。詳細については、「 [コネクターを使用してDataSetを追加する](/ja/s/article/360042926274 "コネクターを使用してDataSetを追加する") 」を参照してください。

**注記：** [admin.microsoft.com](http://admin.microsoft.com) でクラウドアプリケーション管理者権限を持つMicrosoftアカウントを使用してください。

## ［認証情報］ペイン

このペインには、Azure経由でMicrosoft Dynamics CRMインストールに接続するための認証情報の入力フィールドがあります。下表では、各フィールドに必要な内容を説明しています。

<table border="1" cellpadding="1" cellspacing="1" data-aura-rendered-by="33:195;a"><thead><tr><th colspan="1" rowspan="1"><p><span class="s1"> フィールド </span></p></th><th colspan="1" rowspan="1"><p><span class="s1"> 説明 </span></p></th></tr></thead><tbody><tr><td colspan="1" rowspan="1"><p> CLIENT ID </p></td><td colspan="1" rowspan="1"><p><b><a href="http://portal.azure.com" rel="noopener" target="_blank"> portal.azure.com </a> >［Azure Active Directory］>［App registrations］ </b> の順に進みます。Web Appを検索して選択します。Web AppのアプリケーションIDがクライアントIDです。 </p></td></tr><tr><td colspan="1" rowspan="1"><p> CLIENT SECRET </p></td><td colspan="1" rowspan="1"><p><b><a href="http://portal.azure.com" rel="noopener" target="_blank"> portal.azure.com </a> >［Azure Active Directory］>［App registrations］ </b> の順に進みます。Web Appを検索して選択します。 <b> ［settings］>［Keys］ </b> の順に進み、クライアントシークレットを作成します。 </p></td></tr></tbody></table>

有効な認証情報を一度入力しておくと、随時同じアカウントを使用して新しいMicrosoft SharePoint Online REST DataSetを作成できます。コネクターアカウントは、Data Centerの **［アカウント］** タブで管理できます。このタブの詳細については、「 [コネクター/アダプターアカウントを管理する](/ja/s/article/360042926054 "コネクター/アダプターアカウントを管理する") 」を参照してください。

## ［詳細］ペイン

このパネルには、SharePointレポートを選択したり、様々なオプションを設定したりするためのメニューがあります。

<table border="1" cellpadding="1" cellspacing="1" data-aura-rendered-by="33:195;a"><thead><tr><th colspan="1" rowspan="1"><p> メニュー </p></th><th colspan="1" rowspan="1"><p> 説明 </p></th></tr></thead><tbody><tr><td colspan="1" rowspan="1"><p> Report </p></td><td colspan="1" rowspan="1"><p> 必要なSharePoint Onlineレポートを選択します。 </p><table border="1"><tbody><tr><td colspan="1" rowspan="1"><b> レポート名 </b></td><td colspan="1" rowspan="1"><b> 説明 </b></td></tr><tr><td colspan="1" rowspan="1"><p> All Sites </p></td><td colspan="1" rowspan="1"><p> すべてのサイト、サブサイト、グループサイトのリストを取得します。 </p></td></tr><tr><td class="mt-noheading" colspan="1" rowspan="1"><p> Download Item Contents </p></td><td class="mt-noheading" colspan="1" rowspan="1"><p> リクエストしたファイルのコンテンツを取得します。 </p></td></tr><tr><td class="mt-noheading" colspan="1" rowspan="1"><p> Files </p></td><td class="mt-noheading" colspan="1" rowspan="1"><p> ファイルのリストを取得します。 </p></td></tr><tr><td colspan="1" rowspan="1"><p> File Download </p></td><td colspan="1" rowspan="1"><p> リクエストしたファイルをダウンロードして解析します。 </p></td></tr><tr><td colspan="1" rowspan="1"><p> File Permissions </p></td><td colspan="1" rowspan="1"><p> 選択したドライブ内のすべてのファイルの権限のリストを取得します。 </p></td></tr><tr><td class="mt-noheading" colspan="1" rowspan="1"><p> Get Items </p></td><td class="mt-noheading" colspan="1" rowspan="1"><p> 選択したサイトのルートドライブにあるアイテムを取得します。 </p></td></tr><tr><td class="mt-noheading" colspan="1" rowspan="1"><p> Groups </p></td><td class="mt-noheading" colspan="1" rowspan="1"><p> グループのリストを取得します。 </p></td></tr><tr><td colspan="1" rowspan="1"><p> Group Members </p></td><td colspan="1" rowspan="1"><p> すべてのグループのすべてのメンバーのリストを取得します。 </p></td></tr><tr><td colspan="1" rowspan="1"><p> Group Members V2 (Group Filter Search) </p></td><td colspan="1" rowspan="1"><p> フィルタリングされたグループにもとづいて、すべてのメンバーのリストを返します。 </p></td></tr><tr><td class="mt-noheading" colspan="1" rowspan="1"><p> Group Sites </p></td><td class="mt-noheading" colspan="1" rowspan="1"><p> 選択したグループのサイトのリストを取得します。 </p></td></tr><tr><td class="mt-noheading" colspan="1" rowspan="1"><p> List </p></td><td class="mt-noheading" colspan="1" rowspan="1"><p> 指定したリストの詳細を取得します。 </p></td></tr><tr><td class="mt-noheading" colspan="1" rowspan="1"><p> List Item Column Values </p></td><td class="mt-noheading" colspan="1" rowspan="1"><p> 選択したリストアイテムの詳細を取得します。 </p></td></tr><tr><td class="mt-noheading" colspan="1" rowspan="1"><p> List Item Detailed </p></td><td class="mt-noheading" colspan="1" rowspan="1"><p> 選択したリストアイテムの詳細を取得します。 </p></td></tr><tr><td class="mt-noheading" colspan="1" rowspan="1"><p> List Items </p></td><td class="mt-noheading" colspan="1" rowspan="1"><p> 選択したリストのリストアイテムを取得します。 </p></td></tr><tr><td colspan="1" rowspan="1"><p> List Notebooks </p></td><td colspan="1" rowspan="1"><p> ノートブックオブジェクトのリストを取得します。 </p></td></tr><tr><td colspan="1" rowspan="1"><p> List Onenote sections </p></td><td colspan="1" rowspan="1"><p> 指定したノートブックからOneNoteセクションオブジェクトのリストを取得します。 </p></td></tr><tr><td class="mt-noheading" colspan="1" rowspan="1"><p> Root Sites </p></td><td class="mt-noheading" colspan="1" rowspan="1"><p> ルートにあるサイトのリストを取得します。 </p></td></tr><tr><td colspan="1" rowspan="1"><p> SharePoint Activity User Detail </p></td><td colspan="1" rowspan="1"><p> ユーザーによるSharePointアクティビティの詳細を取得します。 </p></td></tr><tr><td colspan="1" rowspan="1"><p> SharePoint Activity File Counts </p></td><td colspan="1" rowspan="1"><p> SharePointサイトに保存されているファイルを操作した、一意のライセンスユーザー数を取得します。 </p></td></tr><tr><td colspan="1" rowspan="1"><p> SharePoint Activity User Counts </p></td><td colspan="1" rowspan="1"><p> アクティブなユーザー数のトレンドを取得します。 </p></td></tr><tr><td colspan="1" rowspan="1"><p> SharePoint Site Usage Detail </p></td><td colspan="1" rowspan="1"><p> SharePointサイトの利用状況の詳細を取得します。 </p></td></tr><tr><td colspan="1" rowspan="1"><p> SharePoint Site Usage File Counts </p></td><td colspan="1" rowspan="1"><p> すべてのサイトのファイルの合計数とアクティブなファイルの数を取得します。 </p></td></tr><tr><td colspan="1" rowspan="1"><p> SharePoint Site Usage Site Counts </p></td><td colspan="1" rowspan="1"><p> すべてのサイトのファイルの合計数とアクティブなファイルの数を取得します。 </p></td></tr><tr><td colspan="1" rowspan="1"><p> SharePoint Site Usage Storage </p></td><td colspan="1" rowspan="1"><p> レポート期間中に割り当てられ、利用されたストレージに関するトレンドを取得します。 </p></td></tr><tr><td class="mt-noheading" colspan="1" rowspan="1"><p> Site Lists </p></td><td class="mt-noheading" colspan="1" rowspan="1"><p> 選択したサイトのすべてのリストを取得します。 </p></td></tr><tr><td colspan="1" rowspan="1"><p> Sites Search </p></td><td colspan="1" rowspan="1"><p> 検索クエリに一致するすべてのサイトのリストを取得します。 </p></td></tr><tr><td class="mt-noheading" colspan="1" rowspan="1"><p> Site Subsites </p></td><td class="mt-noheading" colspan="1" rowspan="1"><p> 選択したサイトのサブサイトのリストを取得します。 </p></td></tr><tr><td colspan="1" rowspan="1"><p> Users </p></td><td colspan="1" rowspan="1"><p> ユーザーオブジェクトのリストを取得します。 </p></td></tr><tr><td colspan="1" rowspan="1"><p> Users Drive </p></td><td colspan="1" rowspan="1"><p> ドライブリソースのプロパティと関係を取得します。 </p></td></tr></tbody></table></td></tr><tr><td colspan="1" rowspan="1"><p> Group ID </p></td><td colspan="1" rowspan="1"><p> 使用するグループを選択します。 </p></td></tr><tr><td colspan="1" rowspan="1"><p> Site or Subsite? </p></td><td colspan="1" rowspan="1"><p> 最上位サイトかサブサイトのどちらからデータを取得するかを選択します。 </p></td></tr><tr><td colspan="1" rowspan="1"><p> Site ID </p></td><td colspan="1" rowspan="1"><p> データの取得元になるサイトを選択します。 </p></td></tr><tr><td colspan="1" rowspan="1"><p> Subsite ID </p></td><td colspan="1" rowspan="1"><p> データの取得元になるサブサイトを選択します。 </p></td></tr><tr><td colspan="1" rowspan="1"><p> List ID </p></td><td colspan="1" rowspan="1"><p> データの取得元になるリストを選択します。 </p></td></tr><tr><td colspan="1" rowspan="1"><p> List Item ID </p></td><td colspan="1" rowspan="1"><p> 情報を取得するリストアイテムのIDを入力します。 </p></td></tr><tr><td colspan="1" rowspan="1"><p> Drive ID </p></td><td colspan="1" rowspan="1"><p> データの取得元になるドライブを選択します。 </p></td></tr><tr><td colspan="1" rowspan="1"><p> File ID </p></td><td colspan="1" rowspan="1"><p> 情報を取得するファイルのIDを入力します。「Files」レポートを実行することにより、ファイルのリストを生成できます。 </p></td></tr><tr><td colspan="1" rowspan="1"><p> Relative Path </p></td><td colspan="1" rowspan="1"><p> 選択したドライブからフォルダの相対パスを入力します（例： <span class="mt-font-courier-new"> /MyFolder/MySubfolder </span> ）。 </p></td></tr><tr><td colspan="1" rowspan="1"><p> Expand Fields </p></td><td colspan="1" rowspan="1"><p> 展開するすべてのフィールドを選択します。 </p></td></tr><tr><td colspan="1" rowspan="1"><p> File Type </p></td><td colspan="1" rowspan="1"><p> 取得するデータファイルのファイルタイプを選択します。ファイルのコンテンツをバイナリー列として表示するには、 <b> ［Other］ </b> を選択します。 </p></td></tr><tr><td colspan="1" rowspan="1"><p> Sheet Name（オプション） </p></td><td colspan="1" rowspan="1"><p> 指定したExcelスプレッドシートから取得するシートの名前を入力します。シート名に誤ってスペースが入力されていないか確認してください。 </p></td></tr><tr><td colspan="1" rowspan="1"><p> Add Phonetic Words（チェックボックス） </p></td><td colspan="1" rowspan="1"><p> データに発音文字を追加する場合は、このチェックボックスをオンにします。 </p></td></tr><tr><td colspan="1" rowspan="1"><p> Data Tag（オプション） </p></td><td colspan="1" rowspan="1"><p> XMLテキスト内のデータのある場所を示すタグを入力します。 </p></td></tr><tr><td colspan="1" rowspan="1"><p> Do you require attributes in data? </p></td><td colspan="1" rowspan="1"><p> データの一部として属性値を必要としている場合は、 <b> ［Yes］ </b> を選択します。 </p></td></tr><tr><td colspan="1" rowspan="1"><p> Enter fields to exclude （オプション） </p></td><td colspan="1" rowspan="1"><p> XMLデータから除外するフィールドを、カンマで区切ったリストとして指定します。 </p></td></tr><tr><td colspan="1" rowspan="1"><p> Enter Xpath expression </p></td><td colspan="1" rowspan="1"><p> ワールドワイド・ウェブ・コンソーシアムにより定義された標準XPath構文を使って、XPathクエリを入力します（ <a href="https://www.w3.org/TR/2017/REC-xpath-31-20170321/" target="_blank" title="https://www.w3.org/TR/2017/REC-xpath-31-20170321/"> [https://www.w3.org/TR/2017/REC-xpath-31-20170321/](https://www.w3.org/TR/2017/REC-xpath-31-20170321/) </a> ）。 </p></td></tr><tr><td colspan="1" rowspan="1"><p> Header Start Row（オプション） </p></td><td colspan="1" rowspan="1"><p> ヘッダー行番号を入力します。番号を入力しない場合、最初の行がヘッダー行とみなされます。 </p></td></tr><tr><td colspan="1" rowspan="1"><p> Data Start Row（オプション） </p></td><td colspan="1" rowspan="1"><p> 開始データ行番号を入力します。番号を入力しない場合、ヘッダー行に続く最初の行が開始行とみなされます。 </p></td></tr><tr><td colspan="1" rowspan="1"><p> Footer Rows to Skip（オプション） </p></td><td colspan="1" rowspan="1"><p> インポートから除外する行がファイルの終わりに1つまたは複数ある場合は、スキップする行数を入力します。 </p></td></tr><tr><td colspan="1" rowspan="1"><p> Does Your JSON Text Require a Line Reader? </p></td><td colspan="1" rowspan="1"><p> 読み込む行がJSONテキストに複数ある場合は、 <b><b> ［Yes］ </b></b> を選択します。 </p></td></tr><tr><td colspan="1" rowspan="1"><p> Header Tag （オプション） </p></td><td colspan="1" rowspan="1"><p> JSONテキストのヘッダーのタグを入力します。 </p></td></tr><tr><td colspan="1" rowspan="1"><p> Data Tag（オプション） </p></td><td colspan="1" rowspan="1"><p> JSONテキストのデータのタグを入力します。 </p></td></tr><tr><td colspan="1" rowspan="1"><p> Fields to Exclude（オプション） </p></td><td colspan="1" rowspan="1"><p> JSONインポートから除外するフィールドを、カンマ区切りのリストとして指定します。 </p></td></tr><tr><td colspan="1" rowspan="1"><p> Date Format </p></td><td colspan="1" rowspan="1"><p> 日付列を変換するために使用する日付の形式を選択します。Excelファイルの場合、セルの日付の形式が優先されます。 </p></td></tr><tr><td colspan="1" rowspan="1"><p> Use Provided File Encoding </p></td><td colspan="1" rowspan="1"><p> オンにした場合は、その下にある正確なファイルエンコーディングを選択します。オンにしない場合、コネクターはファイルエンコーディングを自動検出します。 </p></td></tr><tr><td colspan="1" rowspan="1"><p> File Encoding </p></td><td colspan="1" rowspan="1"><p> ファイルエンコーディングを選択します。デフォルトはUTF-8です。 </p></td></tr><tr><td colspan="1" rowspan="1"><p> Delimiter </p></td><td colspan="1" rowspan="1"><p> CSVファイルを解析するために使用する区切り文字を選択します。 </p></td></tr><tr><td colspan="1" rowspan="1"><p> Custom Delimiter </p></td><td colspan="1" rowspan="1"><p> 希望するカスタム区切り文字を入力します。タブには <span class="mt-font-courier-new"> \t </span> か、 <span class="mt-font-courier-new"> \uxxxx </span> 形式のUnicode文字を入力します。 </p></td></tr><tr><td colspan="1" rowspan="1"><p> Quote Character </p></td><td colspan="1" rowspan="1"><p> CSVファイルを解析するために使用する引用文字を選択します。 </p></td></tr><tr><td colspan="1" rowspan="1"><p> Custom Quote Character </p></td><td colspan="1" rowspan="1"><p> 希望するカスタム引用文字を入力します。タブには <span class="mt-font-courier-new"> \t </span> か、 <span class="mt-font-courier-new"> \uxxxx </span> 形式のUnicode文字を入力します。 </p></td></tr><tr><td colspan="1" rowspan="1"><p> Escape Character </p></td><td colspan="1" rowspan="1"><p> CSVファイルを解析するために使用するエスケープ文字を選択します。 </p></td></tr><tr><td colspan="1" rowspan="1"><p> Custom Escape Character </p></td><td colspan="1" rowspan="1"><p> 希望するカスタムエスケープ文字を入力します。タブには <span class="mt-font-courier-new"> \t </span> か、 <span class="mt-font-courier-new"> \uxxxx </span> 形式のUnicode文字を入力します。 </p></td></tr></tbody></table>

## その他のペイン

スケジュール設定、再試行、更新オプションなど、その他のコネクターインターフェースのセクションの詳細については、「 [コネクターを使用してDataSetを追加する](/ja/s/article/360042926274 "コネクターを使用してDataSetを追加する") 」を参照してください。

## よくある質問

<AccordionGroup>
  <Accordion title="フィールド名に発音文字が追加されるのはなぜですか？">
    このチェックボックスを無効にすると、データ内の発音文字を削除できます（デフォルトではtrue）。
  </Accordion>

  <Accordion title="このコネクターではどのバージョンのMicrosoft APIを使用しますか？">
    このコネクターはMicrosoft APIのバージョン1.0（
    [https://graph.microsoft.com/v1.0](https://graph.microsoft.com/v1.0)
    ）
    を使用します。
  </Accordion>

  <Accordion title="各レポートコールによってこのコネクターで呼び出されるのはどのエンドポイントですか？">
    <table border="1" data-aura-rendered-by="33:195;a"><tbody><tr><td class="wysiwyg-text-align-center" colspan="1" rowspan="1"><b> レポート名 </b></td><td class="wysiwyg-text-align-center" colspan="1" rowspan="1"><b> エンドポイントURL（1つまたは複数） </b></td></tr><tr><td colspan="1" rowspan="1"><p> All Sites </p></td><td colspan="1" rowspan="1"><span> /sites/root/sites/%s/sites/groups/%s/sites/root </span></td></tr><tr><td class="wysiwyg-text-align-center" colspan="1" rowspan="1"><span> Download Item Contents </span></td><td class="wysiwyg-text-align-center" colspan="1" rowspan="1"><span> /sites/{siteId}/drive/items/{fileId}/content </span></td></tr><tr><td class="wysiwyg-text-align-center" colspan="1" rowspan="1"><span> Files </span></td><td class="wysiwyg-text-align-center" colspan="1" rowspan="1"><span> /sites/{siteId}/drives/{driveId}/{path}/children </span></td></tr><tr><td colspan="1" rowspan="1"><span> File Download </span></td><td colspan="1" rowspan="1"><span> /sites/%s/drives/%s/%s/content </span></td></tr><tr><td colspan="1" rowspan="1"><span> File Permissions </span></td><td colspan="1" rowspan="1"><span> /sites/%s/drives/%s/%s/permissions </span></td></tr><tr><td class="wysiwyg-text-align-center" colspan="1" rowspan="1"><span> Get Items </span></td><td class="wysiwyg-text-align-center" colspan="1" rowspan="1"> /sites/{siteId}/drive/root/children </td></tr><tr><td class="wysiwyg-text-align-center" colspan="1" rowspan="1"><span> Groups </span></td><td class="wysiwyg-text-align-center" colspan="1" rowspan="1"><span> /groups </span></td></tr><tr><td colspan="1" rowspan="1"><span> Group Members </span></td><td colspan="1" rowspan="1"><span> /groups/%s/%s </span></td></tr><tr><td colspan="1" rowspan="1"><span> Group Members V2 (Group Filter Search) </span></td><td colspan="1" rowspan="1"><p> /groups/{id}/transitiveMembers </p><p><b> （または） </b> /groups/{id}/members </p></td></tr><tr><td class="wysiwyg-text-align-center" colspan="1" rowspan="1"><span> Group Sites </span></td><td class="wysiwyg-text-align-center" colspan="1" rowspan="1"> /groups/{groupId}/sites/root </td></tr><tr><td class="wysiwyg-text-align-center" colspan="1" rowspan="1"><span> List </span></td><td class="wysiwyg-text-align-center" colspan="1" rowspan="1"> /sites/{siteId}/lists/listId?expand=columns,items(expand=fields) </td></tr><tr><td class="wysiwyg-text-align-center" colspan="1" rowspan="1"><span> List Item Column Values </span></td><td class="wysiwyg-text-align-center" colspan="1" rowspan="1"> /sites/{siteId}/lists/{listId}/items/itemId?expand=fields </td></tr><tr><td class="wysiwyg-text-align-center" colspan="1" rowspan="1"><span> List Item Detailed </span></td><td class="wysiwyg-text-align-center" colspan="1" rowspan="1"> /sites/{siteId}/lists/{listId}/items/{itemId} </td></tr><tr><td class="wysiwyg-text-align-center" colspan="1" rowspan="1"><span> List Items </span></td><td class="wysiwyg-text-align-center" colspan="1" rowspan="1"> /sites/{siteId}/lists/{listId}/items?expand=fields </td></tr><tr><td class="wysiwyg-text-align-center" colspan="1" rowspan="1"><span> List Notebooks </span></td><td class="wysiwyg-text-align-center" colspan="1" rowspan="1"> /users/{userId}/onenote/notebooks </td></tr><tr><td class="wysiwyg-text-align-center" colspan="1" rowspan="1"><span> List Onenote Sections </span></td><td class="wysiwyg-text-align-center" colspan="1" rowspan="1"> /users/{userId}/onenote/sections </td></tr><tr><td class="wysiwyg-text-align-center" colspan="1" rowspan="1"><span> Root Sites </span></td><td class="wysiwyg-text-align-center" colspan="1" rowspan="1"><span> /sites/root </span></td></tr><tr><td class="wysiwyg-text-align-center" colspan="1" rowspan="1"><span> Sharepoint Activity User Detail </span></td><td class="wysiwyg-text-align-center" colspan="1" rowspan="1"><span> /reports/getSharePointActivityUserDetail(period='period\_value') </span></td></tr><tr><td class="wysiwyg-text-align-center" colspan="1" rowspan="1"><span> Sharepoint Activity File Counts </span></td><td class="wysiwyg-text-align-center" colspan="1" rowspan="1"><span> /reports/getSharePointActivityFileCounts(period='period\_value') </span></td></tr><tr><td class="wysiwyg-text-align-center" colspan="1" rowspan="1"><span> Sharepoint Activity User Counts </span></td><td class="wysiwyg-text-align-center" colspan="1" rowspan="1"><span> /reports/getSharePointActivityUserCounts(period='period\_value') </span></td></tr><tr><td class="wysiwyg-text-align-center" colspan="1" rowspan="1"><span> Sharepoint Site Usage Detail </span></td><td class="wysiwyg-text-align-center" colspan="1" rowspan="1"> /reports/getSharePointSiteUsageDetail(period='period\_value') </td></tr><tr><td class="wysiwyg-text-align-center" colspan="1" rowspan="1"><span> Sharepoint Site Usage File Counts </span></td><td class="wysiwyg-text-align-center" colspan="1" rowspan="1"><span> /reports/getSharePointSiteUsageFileCounts(period='period\_value') </span></td></tr><tr><td class="wysiwyg-text-align-center" colspan="1" rowspan="1"><span> Sharepoint Site Usage Site Counts </span></td><td class="wysiwyg-text-align-center" colspan="1" rowspan="1"><span> /reports/getSharePointSiteUsageSiteCounts(period='period\_value') </span></td></tr><tr><td class="wysiwyg-text-align-center" colspan="1" rowspan="1"><span> Sharepoint Site Usage Storage </span></td><td class="wysiwyg-text-align-center" colspan="1" rowspan="1"><span> /reports/getSharePointSiteUsageStorage(period='period\_value') </span></td></tr><tr><td class="wysiwyg-text-align-center" colspan="1" rowspan="1"><span> Sites Lists </span></td><td class="wysiwyg-text-align-center" colspan="1" rowspan="1"> /sites/{siteId}/lists </td></tr><tr><td colspan="1" rowspan="1"><p> Sites Search </p></td><td colspan="1" rowspan="1"> /sites </td></tr><tr><td class="wysiwyg-text-align-center" colspan="1" rowspan="1"><span> Sites Subsites </span></td><td class="wysiwyg-text-align-center" colspan="1" rowspan="1"> /sites/{siteId}/sites </td></tr><tr><td class="wysiwyg-text-align-center" colspan="1" rowspan="1"><span> Users </span></td><td class="wysiwyg-text-align-center" colspan="1" rowspan="1"> /users </td></tr><tr><td class="wysiwyg-text-align-center" colspan="1" rowspan="1"><span> Users Drive </span></td><td class="wysiwyg-text-align-center" colspan="1" rowspan="1"> /users/{userId}/drive </td></tr></tbody></table>
  </Accordion>

  <Accordion title="このコネクターを使用するにはどのような認証情報が必要ですか？">
    Microsoftアカウントに関連付けられているクライアントIDとクライアントシークレットが必要です。
  </Accordion>

  <Accordion title="クライアントIDとクライアントシークレットはどこにありますか？">
    クライアントIDとクライアントシークレットを取得するには、Microsoft Azure Appがインストールされている必要があります。

    クライアントIDを取得するには：

    1. [Microsoft Azure Portal](https://portal.azure.com/ "Microsoft Azure Portal") にアクセスし、Microsoft認証情報を使用してサインインします。
    2. **［Azure Active Directory］>［App registrations］** を選択します。
    3. お使いのAppを探し、クリックします。
    4. ウェブAppの「Application ID」を確認します。Application IDがクライアントIDです。

    クライアントのシークレットを取得するには：

    クライアントシークレットはAzure Appを作成する際に生成されます。新しいクライアントシークレットを生成するには：

    1. [Microsoft Azure Portal](https://portal.azure.com/ "Microsoft Azure Portal") にアクセスし、Microsoft認証情報を使用してサインインします。
    2. **［Azure Active Directory］>［App registrations］** を選択します。
    3. お使いのAppを探し、クリックします。
    4. **［Settings］>［Keys］** の順に開きます。
    5. クライアントのシークレットを作成します。
  </Accordion>

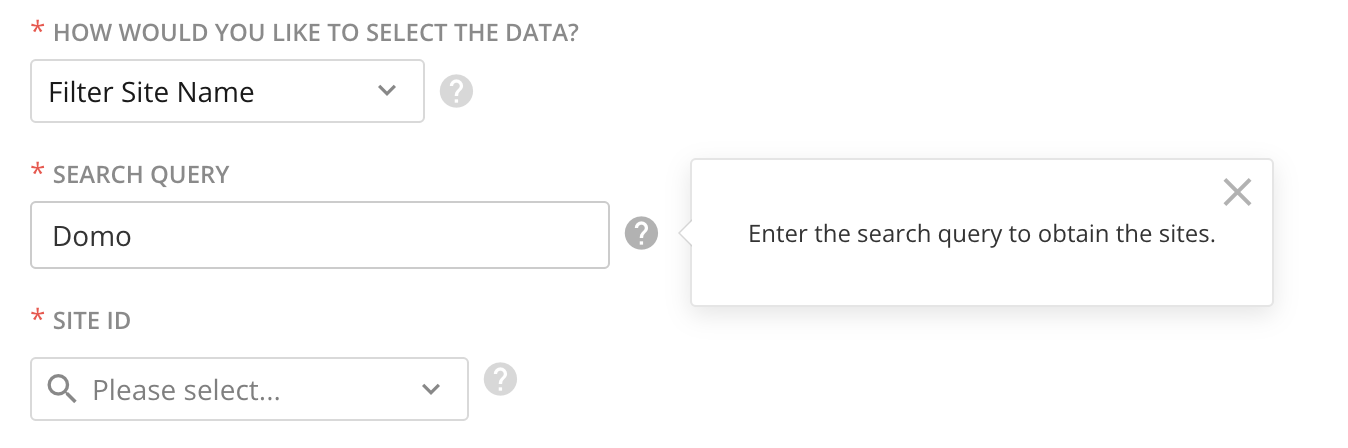
  <Accordion title="サイトのディスカバリー機能でタイムアウトエラーが発生した場合はどうなりますか。">
    ディスカバリー機能でタイムアウトエラーが発生した場合は、 **［filter site name］** オプションを使用して、すべてのサイトを取得する代わりに、サイトを検索します。

    <Frame>
      <img alt="Error resolution.png" src="https://mintcdn.com/domoinc-openapi-sync-dataflows/J3x-O8qWbl7BB1F9/images/kb/ka0Vq000000E953-00N5w00000Ri7BU-0EM5w000006vLor.jpg?fit=max&auto=format&n=J3x-O8qWbl7BB1F9&q=85&s=bacb350843b6b82778c61003aaacc302" style={{width: 759, height: 252}} width="1348" height="448" data-path="images/kb/ka0Vq000000E953-00N5w00000Ri7BU-0EM5w000006vLor.jpg" />
    </Frame>
  </Accordion>

  <Accordion title="データはどのくらいの頻度で更新できますか？">
    必要に応じて何回でも更新できます。
  </Accordion>

  <Accordion title="注意すべきAPI制限はありますか？">
    いいえ
  </Accordion>

  <Accordion title="カードまたはダッシュボードをSharePointにプライベートエンベッドすることはできますか？">
    はい。 [featureswitch@domo.com](mailto:featureswitch@domo.com) 宛てに電子メールを送信して、許可ドメインのプライベートエンベッドをオンにすることで、この機能を有効化することができます。管理者設定のセキュリティセクションにある **［許可ドメインをエンベッド］** ページで、SharePointをホワイトリストに追加する必要があります。

    ## トラブルシューティング

    * 認証が有効であることを確認してください。
    * 設定を見直し、すべての必須項目が選択されていることを確認してください。
    * コネクターの履歴にエラーメッセージが記録されていないか確認してください。
    * まれに、リクエストした情報が多すぎた結果、API制限またはタイムアウトに達する場合があります。記録されている場合は、コネクターの履歴でエラーメッセージと実行時間を確認することができます。また、取得するアカウント数やレポートのメトリクス数を減らしたり、取得するタイムフレームを短縮したりすることができます。
  </Accordion>
</AccordionGroup>