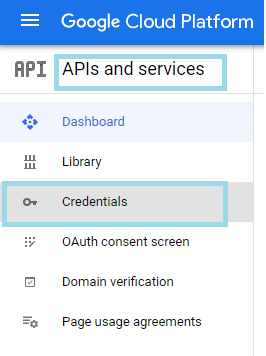
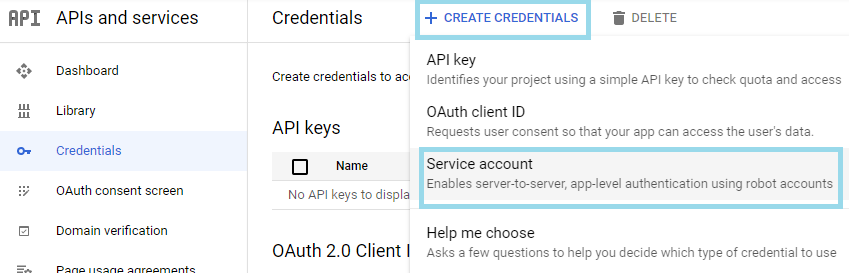
 3. **[Create Credentials]>[Service account]** をクリックします。
 4. [Create service account]ペインで、サービスアカウントの名前と説明を入力し、
**[Create and continue]** をクリックします。
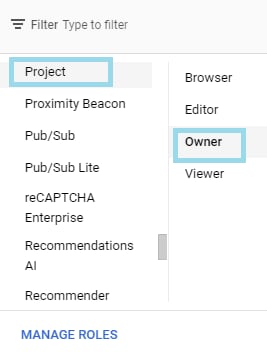
5. **このサービスアカウントのプロジェクトへのアクセスを許可するには** 、 **[Select a role]** ドロップダウン から **[Project]>[Owner]** の順に選択します。
4. [Create service account]ペインで、サービスアカウントの名前と説明を入力し、
**[Create and continue]** をクリックします。
5. **このサービスアカウントのプロジェクトへのアクセスを許可するには** 、 **[Select a role]** ドロップダウン から **[Project]>[Owner]** の順に選択します。
 6. **[Done]** をクリックします。
7. 新しいJSONキーを作成するには、
**[Service accounts]ペイン** で3つ並んだ点(展開メニュー)をクリックし、 **[Manage keys]** を選択します
6. **[Done]** をクリックします。
7. 新しいJSONキーを作成するには、
**[Service accounts]ペイン** で3つ並んだ点(展開メニュー)をクリックし、 **[Manage keys]** を選択します
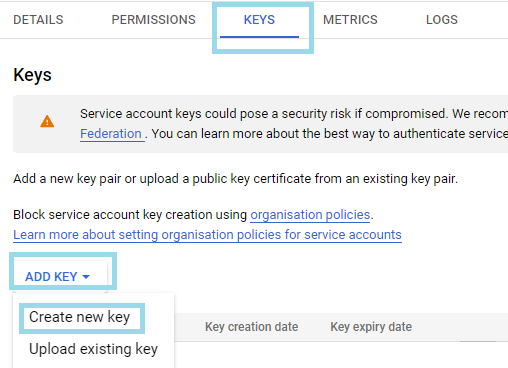 9. キーのタイプに
**[JSON]** を選択し、 **[Create]** をクリックします。
9. キーのタイプに
**[JSON]** を選択し、 **[Create]** をクリックします。
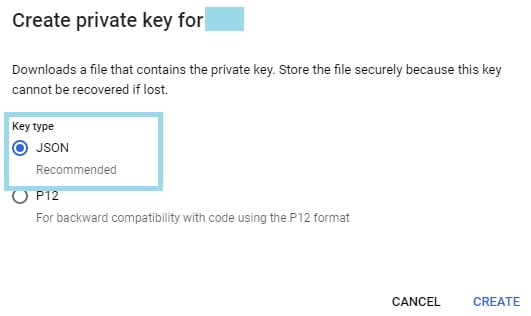 10. **[Create]** をクリックします。
シークレットキーがコンピューターに保存されます。
#### サービスキーへのドメイン全体の委任を有効にするには:
1. 新規に作成されたサービスアカウントを表から探します。
**[Actions]** の下で 3つの点(展開メニュー)をクリックし、 **[Manage Details]** をクリックします。
2. サービスアカウントの詳細で、
**[Show domain-wide delegation]** をクリックして 展開し、
**[Enable Google Workspace Domain-wide Delegation]**
チェックボックスが選択されていることを確認します。
10. **[Create]** をクリックします。
シークレットキーがコンピューターに保存されます。
#### サービスキーへのドメイン全体の委任を有効にするには:
1. 新規に作成されたサービスアカウントを表から探します。
**[Actions]** の下で 3つの点(展開メニュー)をクリックし、 **[Manage Details]** をクリックします。
2. サービスアカウントの詳細で、
**[Show domain-wide delegation]** をクリックして 展開し、
**[Enable Google Workspace Domain-wide Delegation]**
チェックボックスが選択されていることを確認します。
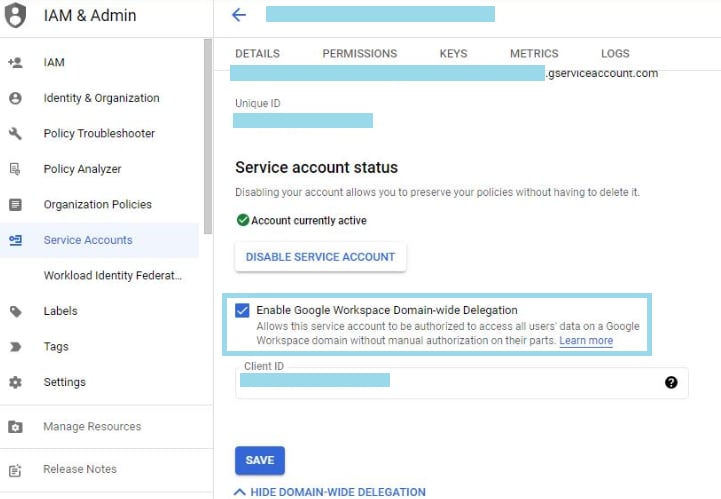 3.
**[Save]**
をクリックしてサービスアカウントを更新し、サービスアカウントの表に戻ります。新しい列
**[Domain-wide delegation]** が表示されます。
4.
**[View Client ID]** をクリックしてクライアントIDを取得し、そのクライアントIDを記録しておきます。
#### ドメイン全体の権限をサービスアカウントに委任するには:
Google Workspaceドメインでユーザーデータにアクセスするには、作成したサービスアカウントにそのドメインのスーパー管理者がアクセス権を付与する必要があります。ドメイン全体の委任に関する詳細は、「 [APIアクセスをドメイン全体の委任で制御する](https://support.google.com/a/answer/162106?hl=en "ドメイン全体の委任を使用してGoogle Workspace APIアクセスを制御します") 」を参照してください。
1. Google Workspaceドメインの
[Adminコンソール](https://accounts.google.com/ServiceLogin/webreauth?continue=https%3A%2F%2Fadmin.google.com%2F\&authuser=0\&passive=3600\&osid=1\&flowName=GlifWebSignIn\&flowEntry=ServiceLogin "Adminコンソール") から、 **メインメニュー >[Security]>[API controls]** の順に進みます。
2. **[Domain wide delegation]** ペインで、 **[Manage Domain Wide Delegation]** を選択します。
3. **[Add new]** をクリックします。
3.
**[Save]**
をクリックしてサービスアカウントを更新し、サービスアカウントの表に戻ります。新しい列
**[Domain-wide delegation]** が表示されます。
4.
**[View Client ID]** をクリックしてクライアントIDを取得し、そのクライアントIDを記録しておきます。
#### ドメイン全体の権限をサービスアカウントに委任するには:
Google Workspaceドメインでユーザーデータにアクセスするには、作成したサービスアカウントにそのドメインのスーパー管理者がアクセス権を付与する必要があります。ドメイン全体の委任に関する詳細は、「 [APIアクセスをドメイン全体の委任で制御する](https://support.google.com/a/answer/162106?hl=en "ドメイン全体の委任を使用してGoogle Workspace APIアクセスを制御します") 」を参照してください。
1. Google Workspaceドメインの
[Adminコンソール](https://accounts.google.com/ServiceLogin/webreauth?continue=https%3A%2F%2Fadmin.google.com%2F\&authuser=0\&passive=3600\&osid=1\&flowName=GlifWebSignIn\&flowEntry=ServiceLogin "Adminコンソール") から、 **メインメニュー >[Security]>[API controls]** の順に進みます。
2. **[Domain wide delegation]** ペインで、 **[Manage Domain Wide Delegation]** を選択します。
3. **[Add new]** をクリックします。
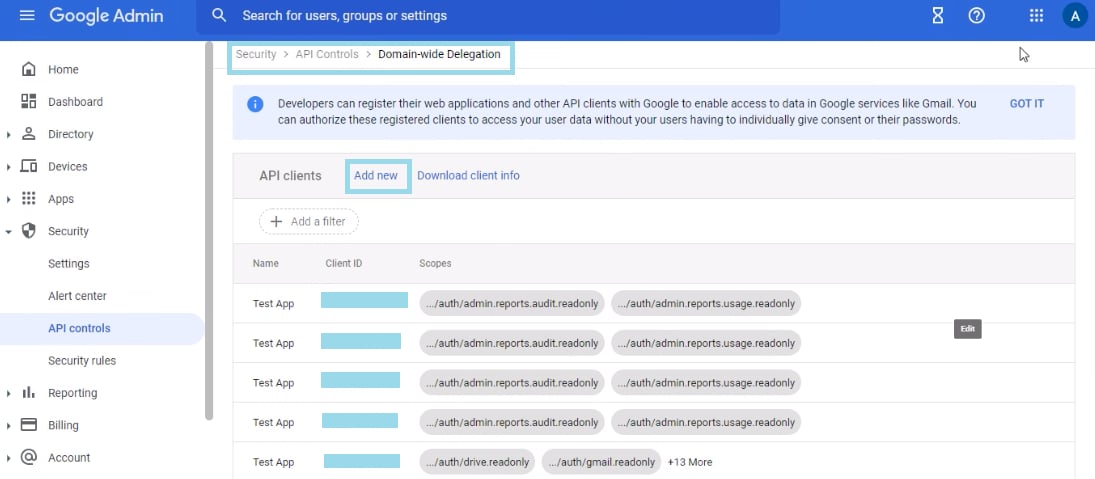 4. **[Client ID]** フィールドには、上記のサービスアカウント作成ステップで取得したクライアントIDを入力します。
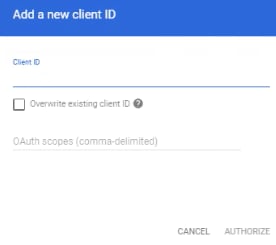 5. **[OAuth Scopes]** フィールドに、アプリケーションに必要なスコープのカンマ区切りのリストを入力します(使用可能なスコープのリストは、「認証要求」を参照してください)。
例えば、アクティビティレポートにドメイン全体でアクセスする必要がある場合は、「 [https://www.googleapis.com/auth/admin.reports.audit.readonly](https://www.googleapis.com/auth/admin.reports.audit.readonly) 」と入力してください。
[https://www.googleapis.com/auth/admin.reports.usage.readonly](https://www.googleapis.com/auth/admin.reports.usage.readonly) **[Authorize]** をクリックします。
## Google Admin SDK Reportsアカウントに接続する
このセクションでは、Google Admin SDK Reportsコネクターページの **[認証情報]** および **[詳細]** ペインのオプションについて説明します。このページのほかのペインの項目である **[スケジュール設定]** や **[DataSetに名前を付け、説明を入力]** に関しては、ほとんどのタイプのコネクターで共通しています。詳細については「 [コネクターを使用してDataSetを追加する](/ja/s/article/360042926274?language=en_US "コネクターを使用してDataSetを追加する") 」を参照してください。
### [認証情報]ペイン
このペインには、Googleサービスアカウントにアクセスするための認証情報を入力するフィールドがあります。下表は、各フィールドに必要な内容を説明しています。
5. **[OAuth Scopes]** フィールドに、アプリケーションに必要なスコープのカンマ区切りのリストを入力します(使用可能なスコープのリストは、「認証要求」を参照してください)。
例えば、アクティビティレポートにドメイン全体でアクセスする必要がある場合は、「 [https://www.googleapis.com/auth/admin.reports.audit.readonly](https://www.googleapis.com/auth/admin.reports.audit.readonly) 」と入力してください。
[https://www.googleapis.com/auth/admin.reports.usage.readonly](https://www.googleapis.com/auth/admin.reports.usage.readonly) **[Authorize]** をクリックします。
## Google Admin SDK Reportsアカウントに接続する
このセクションでは、Google Admin SDK Reportsコネクターページの **[認証情報]** および **[詳細]** ペインのオプションについて説明します。このページのほかのペインの項目である **[スケジュール設定]** や **[DataSetに名前を付け、説明を入力]** に関しては、ほとんどのタイプのコネクターで共通しています。詳細については「 [コネクターを使用してDataSetを追加する](/ja/s/article/360042926274?language=en_US "コネクターを使用してDataSetを追加する") 」を参照してください。
### [認証情報]ペイン
このペインには、Googleサービスアカウントにアクセスするための認証情報を入力するフィールドがあります。下表は、各フィールドに必要な内容を説明しています。
フィールド | 説明 |
|---|---|
Service Account Key JSON | GoogleサービスアカウントキーのJSONをコピーして貼り付けます。キーを作成する方法については、上述の「必要条件」を参照してください。 |
Service Account User | サービスアカウントユーザー名を入力します。例: [es@xyz.com](mailto:es@xyz.com) |
メニュー | 説明 | ||||||||
|---|---|---|---|---|---|---|---|---|---|
Report | 実行するGoogle Admin SDK Reportsレポートを選択します。以下のレポートが利用できます。
| ||||||||
Duration | データを特定の日付について取得するか、日付範囲について取得するかを選択します。 | ||||||||
Report Date | 特定の日付のレポートデータを取得するのか、今日から指定した日数を遡った日までのレポートデータを取得するのかを選択します。 | ||||||||
Select Specific Date | レポートの日付を選択します。 | ||||||||
Days Back | レポートに表示する過去日数を入力します。 | ||||||||
Start Date | 日付範囲の最初の日付が特定の日付なのか、相対的な日付なのかを指定します。範囲の最後の日付は、 [End Date] で選択します。 | ||||||||
End Date | 日付範囲の2番目の日付が特定の日付なのか、相対的な日付なのかを指定します。日付範囲の最初の日付は [Start Date] で選択します。 | ||||||||
Select Specific Start Date | 日付範囲の最初の日付を選択します。 | ||||||||
Select Specific End Date | 日付範囲の2番目の日付を選択します。 | ||||||||
Days Back to Start From | レポートで表示する過去の日のうち、現在から最も遠い日までの日数を入力します。 [Days Back to End At] と組み合わせることによって、表示日数の範囲を指定できます。 例えば、 [Days Back to Start From] に「 10 」、 [Days Back to End At] に「 5 」を入力した場合、レポートには、今日から数えて10日前から5日前のデータが含まれます。 | ||||||||
Days Back to End At | レポートで表示する過去の日のうち、現在から最も近い日までの日数を入力します。 [Days Back to Start From] と組み合わせることによって、表示日数の範囲を指定できます。 例えば、 [Days Back to Start From] に「 10 」、 [Days Back to End At] に「 5 」を入力した場合、レポートには、今日から数えて10日前から5日前のデータが含まれます。 |