> ## Documentation Index
> Fetch the complete documentation index at: https://domoinc-openapi-sync-dataflows.mintlify.site/llms.txt
> Use this file to discover all available pages before exploring further.

# Google Drive Serviceコネクター

<Warning>
  ********重要******** ********：******** Googleの仕様変更によって、DomoコネクターでのOAuth認証の使用が許可されるようになったため、新しいデータ接続を作成する際に、すべてのユーザーがサービスアカウントキー認証を使用しなければならなくなりました。Google Drive DataSetを作成するには、このコネクターを使用します。すべての既存のGoogle Drive DataSetも引き続き、正常に実行できます。
</Warning>

## はじめに

Google Driveは、Googleが開発したファイル保存および同期サービスです。Google Driveを使用するとユーザーはファイルをクラウドに保存したり、デバイス間でファイルを同期したり、ファイルを共有したりできます。DomoのGoogle Drive Serviceコネクターを使用して、Google DriveアカウントからExcelファイルやCSVファイルを取得し、Domo DataSetとして出力します。Google Drive APIについての詳細は、ウェブサイト（ [https://developers.google.com/drive/](https://developers.google.com/drive/ "https://developers.google.com/drive/") ）を参照してください。

Googleアカウントには、Data Centerから接続します。このトピックでは、Google Driveコネクターユーザーインターフェースに固有のフィールドとメニューについて説明します。DataSetの追加、更新スケジュールの設定、DataSet情報の編集に関する一般的な情報については、「 [コネクターを使用してDataSetを追加する](/ja/s/article/360042926274) 」を参照してください。

## 必要条件

Googleサービスアカウントに接続するには、GoogleサービスアカウントのJSONキーが必要です。

GoogleサービスアカウントのJSONキーを作成する前に、まず Google Cloud PlatformのCloud ConsoleでプロジェクトのGoogle Drive API を有効化する必要があります。

#### Google Drive APIを有効化する

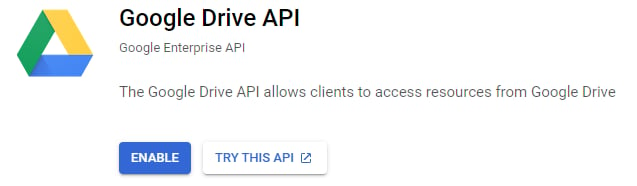
Google Drive APIをプロジェクトで有効にするには、次の手順を実行します。

1. [GCP Console](https://console.cloud.google.com/apis/dashboard) に移動します。

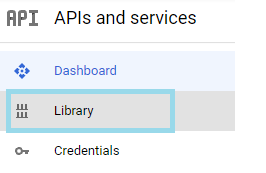
2. 左ペインの
   **［APIs and services］** の下にある **［Library］** をクリックします。

<Frame>
  <img alt="Library.png" src="https://mintcdn.com/domoinc-openapi-sync-dataflows/Gw_GOG2-ZFDgkOCF/images/kb/ka0Vq000000HncD-00N5w00000Ri7BU-0EM5w000005vO7b.png?fit=max&auto=format&n=Gw_GOG2-ZFDgkOCF&q=85&s=573dde19aed8e338d9cd476b74f46f40" width="266" height="173" data-path="images/kb/ka0Vq000000HncD-00N5w00000Ri7BU-0EM5w000005vO7b.png" />
</Frame>

3. **Google Drive API** を検索してクリックします。

4. 画面上部に
   **［ENABLE］** ボタンが表示されます。

<Frame>
  <img alt="Google_Drive_API.png" src="https://mintcdn.com/domoinc-openapi-sync-dataflows/Gw_GOG2-ZFDgkOCF/images/kb/ka0Vq000000HncD-00N5w00000Ri7BU-0EM5w000005vO7W.png?fit=max&auto=format&n=Gw_GOG2-ZFDgkOCF&q=85&s=2f925f226e0a302fdd4af81b6f39a930" width="637" height="186" data-path="images/kb/ka0Vq000000HncD-00N5w00000Ri7BU-0EM5w000005vO7W.png" />
</Frame>

5. **［Enable］** をクリックします。

#### GoogleサービスアカウントのJSONキーを生成するには、次の手順を実行します。

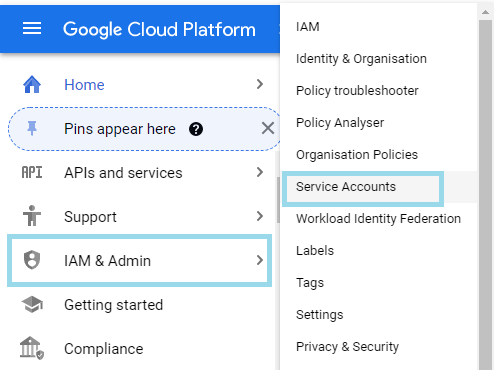
1. [GCP Console](https://console.cloud.google.com/apis/dashboard) で、 ****［IAM & Admin］**** ページを開きます。

2. 左側のナビゲーションペインで
   ********［Service accounts］******** をクリックします。

<Frame>
  <img alt="GCP_screen.png" src="https://mintcdn.com/domoinc-openapi-sync-dataflows/Gw_GOG2-ZFDgkOCF/images/kb/ka0Vq000000HncD-00N5w00000Ri7BU-0EM5w000005vO7T.png?fit=max&auto=format&n=Gw_GOG2-ZFDgkOCF&q=85&s=771662d81d5e0cdf96a106777ced15c1" width="494" height="370" data-path="images/kb/ka0Vq000000HncD-00N5w00000Ri7BU-0EM5w000005vO7T.png" />
</Frame>

3. ********［Create Service Account］******** をクリックします。

4. **［Service account details］** セクションで、サービスアカウントの名前と説明を入力します。

5. **［Create and Continue］** をクリックします。

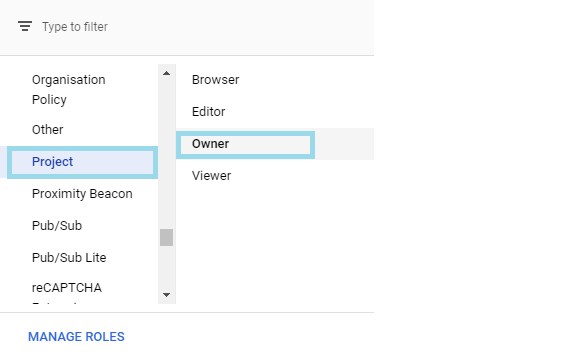
6. **［Grant this service account access to the project］** セクションで、 **［Select a role］** ドロップダウンをクリックします。

7. **［Project］>［Owner］** の順に選択します。

<Frame>
  <img alt="Project-Owner.png" src="https://mintcdn.com/domoinc-openapi-sync-dataflows/Gw_GOG2-ZFDgkOCF/images/kb/ka0Vq000000HncD-00N5w00000Ri7BU-0EM5w000005vO7Y.png?fit=max&auto=format&n=Gw_GOG2-ZFDgkOCF&q=85&s=a5d7899ec3ab2da93391d2e41aaab43f" width="562" height="361" data-path="images/kb/ka0Vq000000HncD-00N5w00000Ri7BU-0EM5w000005vO7Y.png" />
</Frame>

8. **［Continue］** をクリックします。

9. **［Done］** をクリックします。サービスアカウントの概要が表示されます。

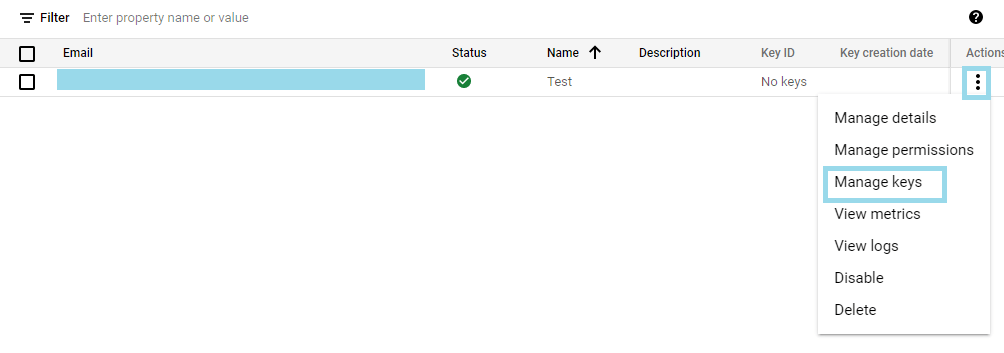
10. **［Actions］** 列で、3つの点が並んだメニューをクリックして展開します。**［Manage Keys］** をクリックします。

<Frame>
  <img alt="Actions-Manage_Keys.png" src="https://mintcdn.com/domoinc-openapi-sync-dataflows/Gw_GOG2-ZFDgkOCF/images/kb/ka0Vq000000HncD-00N5w00000Ri7BU-0EM5w000005vO7U.png?fit=max&auto=format&n=Gw_GOG2-ZFDgkOCF&q=85&s=a11951e58d3a4ce4594784ae5c9b7df3" width="1004" height="353" data-path="images/kb/ka0Vq000000HncD-00N5w00000Ri7BU-0EM5w000005vO7U.png" />
</Frame>

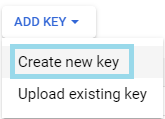
11. **［Add Key］** をクリックします。 **［Create new key］** を選択します。

<Frame>
  <img alt="Add_Key-Create_new_key.png" src="https://mintcdn.com/domoinc-openapi-sync-dataflows/Gw_GOG2-ZFDgkOCF/images/kb/ka0Vq000000HncD-00N5w00000Ri7BU-0EM5w000005vO7V.png?fit=max&auto=format&n=Gw_GOG2-ZFDgkOCF&q=85&s=bc0938d9255b21578d7694a8f0ad71b5" width="165" height="119" data-path="images/kb/ka0Vq000000HncD-00N5w00000Ri7BU-0EM5w000005vO7V.png" />
</Frame>

12. **［Create private key］** ウィンドウが表示されます。プライベートキーのタイプに **［JSON］** を選択し、**［Create］** をクリックします。

13. プライベートキーがコンピューターに保存されます。

## Googleサービスアカウントに接続する

このセクションでは、Google Drive Serviceコネクターページの **［認証情報］** および **［詳細］** ペインのオプションについて説明します。このページのほかのペインの項目にある **［スケジュール設定］** や **［DataSetに名前を付け、説明を入力］** に関しては、ほとんどのタイプのコネクターで共通しています。詳細については、「 [コネクターを使用してDataSetを追加する](/ja/s/article/360042926274) 」を参照してください。

### ［認証情報］ペイン

このペインには、Googleサービスアカウントにアクセスするための認証情報を入力するフィールドがあります。下表は、各フィールドに必要な内容を説明しています。

<table border="1" cellpadding="1" cellspacing="1" data-aura-rendered-by="33:195;a"><thead><tr><th colspan="1" rowspan="1"><p> フィールド </p></th><th colspan="1" rowspan="1"><p> 説明 </p></th></tr></thead><tbody><tr><td colspan="1" rowspan="1"><p> Service Account Key JSON </p></td><td colspan="1" rowspan="1"><p> GoogleサービスアカウントキーのJSONをコピーして貼り付けます。キーを作成する方法については、上述の「必要条件」を参照してください。 </p></td></tr></tbody></table>

有効なキーを一度入力しておくと、随時同じアカウントを使用して新しいGoogle Drive Service DataSetを作成できます。コネクターのアカウントはData Centerの ********［アカウント］******** タブで管理できます。このタブの詳細については、「 [コネクターのユーザーアカウントを管理する](/ja/s/article/360042926054 "コネクターのユーザーアカウントを管理する") 」を参照してください。

### ［詳細］ペイン

このペインでは、Google Driveアカウントのファイルのリストをインポートしたり、DomoにインポートするGoogle Driveファイルを指定して、データの表示方法のオプションを設定したりできます。

<table border="1" cellpadding="1" cellspacing="1" data-aura-rendered-by="33:195;a">
  <thead>
    <tr><th colspan="1" rowspan="1"><p> メニュー </p></th><th colspan="1" rowspan="1"><p> 説明 </p></th></tr>
  </thead>

  <tbody>
    <tr>
      <td colspan="1" rowspan="1"><p> Report </p></td><td colspan="1" rowspan="1"><p> ファイルのリストをインポートするか（「Files」）、特定のファイルをダウンロードするか（「FileDownload」）を選択します。 </p><table border="1"><tbody><tr><td colspan="1" rowspan="1"> Files </td><td colspan="1" rowspan="1"><span> ファイルのリストを返します。 </span></td></tr><tr><td colspan="1" rowspan="1"> File Download </td><td colspan="1" rowspan="1"><span> GoogleドライブのファイルをDomoにインポートします。 </span></td></tr></tbody></table></td>
    </tr>

    <tr>
      <td colspan="1" rowspan="1"><p> How Would You Like to Choose Your File? </p></td><td colspan="1" rowspan="1"><p> Domoにインポートするファイルの選択方法を選びます。ファイル名やIDを自分で入力するには、 <b><b> ［Enter File Name］ </b></b> または <b> ［Enter File ID］ </b> を選択します。ファイルのリストからファイルを選択する場合は、 <b><b> ［Files Discovery］ </b></b> を選択します。 </p></td>
    </tr>

    <tr>
      <td colspan="1" rowspan="1"><p> File ID </p></td><td colspan="1" rowspan="1"><p> インポートするファイルのIDを入力します。アカウント内のすべてのファイルのIDを表示するには、「Files」レポートを実行します。 </p></td>
    </tr>

    <tr>
      <td colspan="1" rowspan="1"><p> File Name </p></td><td colspan="1" rowspan="1"><p> Google Driveからインポートするファイルの名前を入力します。 </p></td>
    </tr>

    <tr>
      <td colspan="1" rowspan="1">
        <p> Files Discovery </p>
      </td>

      <td colspan="1" rowspan="1">
        <p> Domoにインポートするファイルを選択します。 </p>

        <Note>
          <div class="info-box-wrapper"><div class="info-box-icon-container"><span class="info-box-icon" /></div><div class="info-box-content-container"><div class="info-box-content"><b> 注記： </b> ［Files Discovery］オプションは、Google Driveアカウント内のファイル数が100以下の場合のみ利用できます。 </div></div></div>
        </Note>
      </td>
    </tr>

    <tr><td colspan="1" rowspan="1"><p> MIME Type </p></td><td colspan="1" rowspan="1"><p> DomoにインポートするファイルのMIMEタイプを選択します。 </p></td></tr><tr><td colspan="1" rowspan="1"><p> What File Type Would You Like to Import? </p></td><td colspan="1" rowspan="1"><p><span> Domoにインポートして解析したいファイルのタイプを選択します。 </span></p></td></tr><tr><td colspan="1" rowspan="1"><p><span> Select the delimiting character </span></p></td><td colspan="1" rowspan="1"><p><span> ファイルで使用する区切り文字を選択します。区切り文字がリストにない場合は、［Other］を選択します。 </span></p></td></tr><tr><td colspan="1" rowspan="1"><p><span> Specify your delimiter </span></p></td><td colspan="1" rowspan="1"><p><span> CSVテキストを区切る文字を入力します。 </span></p></td></tr><tr><td colspan="1" rowspan="1"><p><span> Quote Character </span></p></td><td colspan="1" rowspan="1"><p><span> CSVファイルを解析するのに使用する引用文字を選択します。（CSVの標準のデフォルトの引用符は二重引用符です） </span></p></td></tr><tr><td colspan="1" rowspan="1"><p> Custom Quote Character </p></td><td colspan="1" rowspan="1"><p> CSVファイルを解析するときに使うカスタム引用文字を入力します。 </p></td></tr><tr><td colspan="1" rowspan="1"><p> Escape Character </p></td><td colspan="1" rowspan="1"><p> CSVファイルを解析するときに使うエスケープ文字を選択します。カスタムエスケープ文字を選択するには、 <b><b> ［Other］ </b></b> を選択し、 <b><b> ［Custom Escape Character］ </b></b> フィールドに区切り文字を入力します。 </p></td></tr><tr><td colspan="1" rowspan="1"><p> Custom Escape Character </p></td><td colspan="1" rowspan="1"><p> CSVファイルを解析するときに使うカスタム引用文字を入力します。 </p></td></tr><tr><td colspan="1" rowspan="1"><p><span> Date Format </span></p></td><td colspan="1" rowspan="1"><p><span> 送信ファイルに使用される日付形式を選択します。 </span></p></td></tr><tr><td colspan="1" rowspan="1"><p> Header Start Row </p></td><td colspan="1" rowspan="1"><p> Excelファイルのヘッダー開始行を入力します。 </p></td></tr><tr><td colspan="1" rowspan="1"><p> Data Start Row </p></td><td colspan="1" rowspan="1"><p> Excelファイルのデータ開始行を入力します。 </p></td></tr><tr><td colspan="1" rowspan="1"><p> Footer Rows to Skip </p></td><td colspan="1" rowspan="1"><p> Excelファイルの最後でスキップする行がある場合は、その数を入力します。 </p></td></tr><tr><td colspan="1" rowspan="1"><p><span> How would you like to match the sheet name? </span></p></td><td colspan="1" rowspan="1"><p><span> 提供された名前を含むシートと一致させるか、提供された名前とまったく同じ名前のシートと一致させるかを選択します。 </span></p></td></tr><tr><td colspan="1" rowspan="1"><p><span> File Password </span></p></td><td colspan="1" rowspan="1"><p><span> ファイルがパスワードで保護されている場合は、そのパスワードを入力します。 </span></p></td></tr><tr><td colspan="1" rowspan="1"><p><span> Sheet Name </span></p></td><td colspan="1" rowspan="1"><p><span> 指定されたスプレッドシートから取得したいシート名を入力します。シート名に誤ってスペースが入力されていないか確認してください。このフィールドが空の場合は、ワークブック内の最初のシートが使用されます。 </span></p></td></tr>
  </tbody>
</table>

### その他のペイン

スケジュール設定、再試行、オプションの更新など、コネクターインターフェースのその他のペインに表示されるオプションについては、「 [コネクターを使用してDataSetを追加する](/ja/s/article/360042926274) 」を参照してください。

## よくある質問

<AccordionGroup>
  <Accordion title="Google Driveのファイルが「Files」レポートに表示されない場合はどうすればよいですか？">
    ドライブファイルが見つからない場合は、サービスアカウントメール（JSONキーにあるclient\_email）を使ってファイルまたはディレクトリをお知らせください。メールはサービスアカウントにあります。
  </Accordion>

  <Accordion title="DataSetが「403 Forbidden」エラーを返します。なぜでしょうか？">
    GoogleサービスアカウントのJSONキーを作成する前に、まず Google Cloud PlatformのCloud ConsoleでプロジェクトのGoogle Drive API を有効化する必要があります。詳細は、前述の「必要条件」にある「Google Drive APIを有効化する」セクションを参照してください。
  </Accordion>

  <Accordion title="データはどれくらいの頻度で更新できますか？">
    必要に応じて何回でも更新できます。
  </Accordion>

  <Accordion title="注意すべきAPI制限はありますか？">
    ありません。
  </Accordion>
</AccordionGroup>