> ## Documentation Index
> Fetch the complete documentation index at: https://domoinc-openapi-sync-dataflows.mintlify.site/llms.txt
> Use this file to discover all available pages before exploring further.

# Instagram Businessコネクター

## はじめに

Instagram Businessアカウントにアクセス可能なInstagram Businessコネクターは、コメントやメタデータの表示、そしてそれらに関するインサイトやメトリクスを得るために利用できます。Instagram APIの詳細については、ウェブサイト（ [https://developers.facebook.com/docs/instagram-api](https://developers.facebook.com/docs/instagram-api "https://developers.facebook.com/docs/instagram-api") ）を参照してください。

Instagram Businessアカウントには、Data Centerから接続します。Instagram Businessへの接続は必ず、まずお使いのInstagramアカウントをFacebookページに接続した上で、Facebookユーザーにコネクターへのアクセスを許可します。この手順は以降で説明します。

このトピックでは、Instagram Businessコネクターのユーザーインターフェースに固有のフィールドとメニューについて説明します。DataSetの追加や更新スケジュールの設定、DataSet情報の編集に関する一般的な情報は、「 [コネクターを使用してDataSetを追加する](/ja/s/article/360042926274) 」を参照してください。

## 必要条件

Instagram Businessコネクターの利用には以下が必要です。

* Instagram Businessアカウント。標準のInstagramアカウントを使用できます。セットアップの過程で、Instagram Businessのアカウントに変換されます。
* InstagramアカウントにリンクされるFacebookページのURL。各Facebookページから接続可能なInstagram Businessアカウントは1つに限られます。
* InstagramにリンクするページのFacebook管理者ユーザーアカウントURL。

<Note>
  **注記：** Facebookユーザーは、Facebook開発者アカウントに登録している必要があります。招待を受け取るには、Instagram Businessコネクターを使用します。これは、
  [https://developers.facebook.com/settings/developer/requests/の](https://developers.facebook.com/settings/developer/requests/の)
  リンクを選択し、「Register Now」をクリックすることで可能です。
</Note>

## Instagram Businessアカウントに接続する

このセクションでは、Instagram Businessコネクターページ内の **［認証情報］** ペインと **［詳細］** ペインのオプションについて説明しています。このページのほかのペインの項目にある **［スケジュール設定］** や **［DataSetに名前を付け、説明を入力］** に関しては、ほとんどのタイプのコネクターで共通しています。詳しくは、「 [コネクターを使用してDataSetを追加する](/ja/s/article/360042926274) 」を参照してください。

### ［認証情報］ペイン

**［認証情報］** ペインでは、Facebook経由でお使いのInstagram Businessアカウントへの接続を行います。接続は、1） FacebookページとInstagramを接続し、2） Facebookユーザーによるアクセスを有効化した後で初めて可能となりますのでご注意ください。これらのステップについては以降で説明します。

Facebook経由でInstagram Businessに一度接続すると、それ以降は新しいInstagram Business DataSetを作成する際に常に同じアカウントを使用できるようになります。コネクターアカウントは、Data Centerの **［アカウント］** タブで管理できます。このタブの詳細については、「 [コネクターのユーザーアカウントを管理する](/ja/s/article/360042926054 "コネクターのユーザーアカウントを管理する") 」を参照してください。

#### InstagramをFacebookに接続する

FacebookページのInstagramへの接続は、以下の手順で行います。

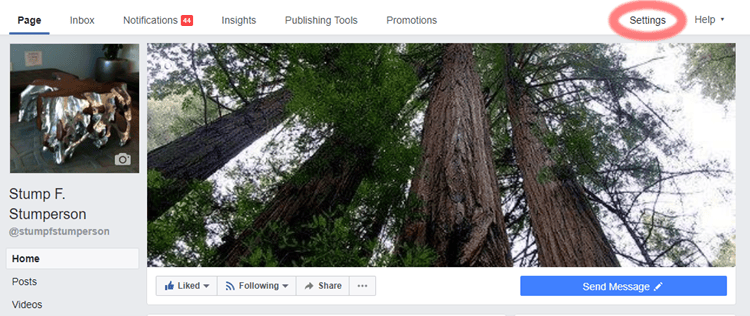
1. Facebookにログインし、Instagramに接続するページに移動します。

2. 右上隅の **［Settings］** をクリックします。

   <Frame>
     <img alt="instagram_biz_1.png" src="https://mintcdn.com/domoinc-openapi-sync-dataflows/J3x-O8qWbl7BB1F9/images/kb/ka0Vq000000EZKT-00N5w00000Ri7BU-0EM5w000005vO0Z.png?fit=max&auto=format&n=J3x-O8qWbl7BB1F9&q=85&s=f27c6d2500da7df81326fa7ebc872e0f" width="750" height="316" data-path="images/kb/ka0Vq000000EZKT-00N5w00000Ri7BU-0EM5w000005vO0Z.png" />
   </Frame>

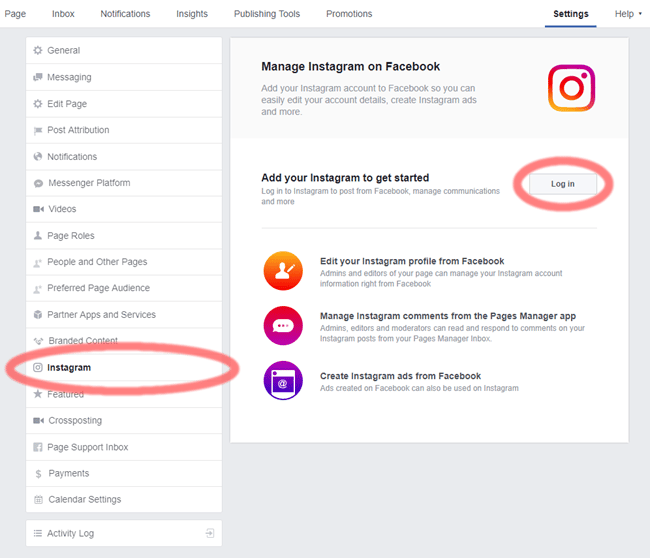
3. **［Settings］** 画面で、左側にある **［Instagram］** を選択し、 **［Manage Instagram on Facebook］** ペインの **［Log In］** をクリックします。

   <Frame>
     <img alt="instagram_biz_2.png" src="https://mintcdn.com/domoinc-openapi-sync-dataflows/J3x-O8qWbl7BB1F9/images/kb/ka0Vq000000EZKT-00N5w00000Ri7BU-0EM5w000005vO0i.png?fit=max&auto=format&n=J3x-O8qWbl7BB1F9&q=85&s=9bb5b44f06a83dd9730d180b9d0fec3f" width="650" height="558" data-path="images/kb/ka0Vq000000EZKT-00N5w00000Ri7BU-0EM5w000005vO0i.png" />
   </Frame>

4. Instagramログイン画面で、Facebookに接続するInstagramアカウントのユーザー名とパスワードを入力します。

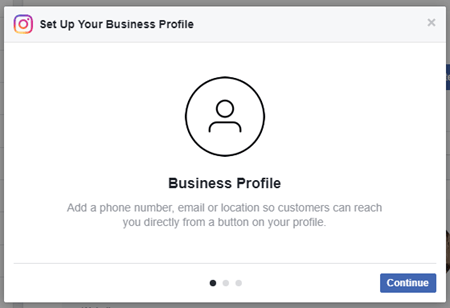
   Instagramアカウントがビジネスアカウントでない場合は、次のようにビジネス用プロフィールへの切り替えが求められます。
   <Frame>
     <img alt="instagram_biz_4.png" src="https://mintcdn.com/domoinc-openapi-sync-dataflows/J3x-O8qWbl7BB1F9/images/kb/ka0Vq000000EZKT-00N5w00000Ri7BU-0EM5w000005vO0g.png?fit=max&auto=format&n=J3x-O8qWbl7BB1F9&q=85&s=d7ad2151c2cfaddb8260536172e138a7" width="450" height="308" data-path="images/kb/ka0Vq000000EZKT-00N5w00000Ri7BU-0EM5w000005vO0g.png" />
   </Frame>

5. （条件付き）上記のダイアログが表示されたら、**［Continue］** をクリックした後、 **［Done］** をクリックします。

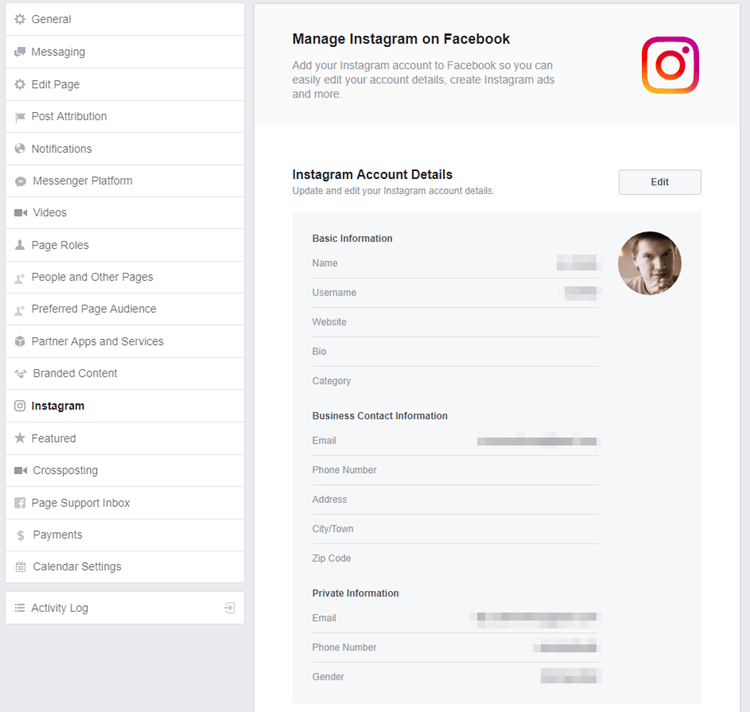
リンクが完了すると、Facebookページの設定にInstagramプロフィールのビジネス情報が表示されます。
<Frame>
  <img alt="instagram_biz_6.png" src="https://mintcdn.com/domoinc-openapi-sync-dataflows/J3x-O8qWbl7BB1F9/images/kb/ka0Vq000000EZKT-00N5w00000Ri7BU-0EM5w000005vO0b.png?fit=max&auto=format&n=J3x-O8qWbl7BB1F9&q=85&s=8168ce0f5cca09b015cc10845fbc8d73" style={{width: 542, height: 515}} width="750" height="712" data-path="images/kb/ka0Vq000000EZKT-00N5w00000Ri7BU-0EM5w000005vO0b.png" />
</Frame>

#### Facebookユーザーを有効にする

InstagramアカウントをFacebookページにリンクした後、コネクターへのアクセスをFacebookユーザーに許可するようDomoに依頼する必要があります。 [Domoサポートに連絡](/ja/s/article/360042922874) して、アクセス許可を依頼してください。この際、以下の情報提供が必要となります。

* 所属企業でお使いのDomoインスタンスのURL（例：
  [mycompany.domo.com](http://mycompany.domo.com) ）
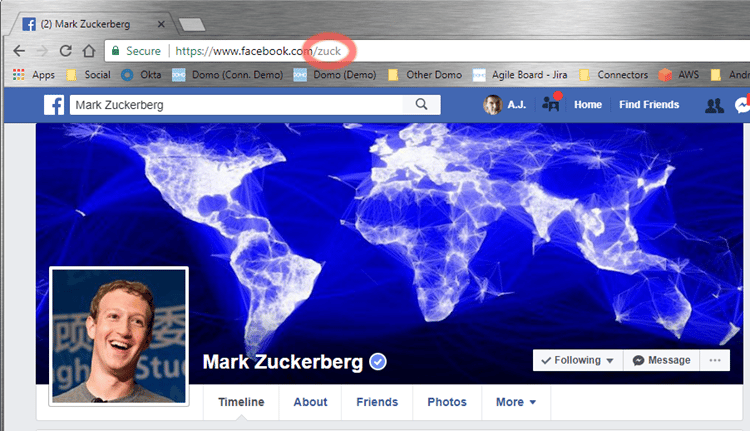
* お使いのFacebookのユーザー名。コネクターを使用するユーザーのFacebookユーザー名である必要があります。ページ名またはInstagramアカウント名とは
  *異なり* ますのでご注意ください。Facebookプロフィールにアクセスすると、Facebook URLでお使いのユーザー名を検索可能です。
  <Frame>
    <img alt="instagram_biz_7.png" src="https://mintcdn.com/domoinc-openapi-sync-dataflows/J3x-O8qWbl7BB1F9/images/kb/ka0Vq000000EZKT-00N5w00000Ri7BU-0EM5w000005vO0c.png?fit=max&auto=format&n=J3x-O8qWbl7BB1F9&q=85&s=330b7a3eefd43eea0551213988e78816" width="750" height="431" data-path="images/kb/ka0Vq000000EZKT-00N5w00000Ri7BU-0EM5w000005vO0c.png" />
  </Frame>

お使いのユーザー名が有効になると（最大5営業日かかります）、Facebookから送信される招待に承諾する必要があります。

FacebookプロフィールとFacebookページの違いに関する詳細については、ウェブサイト（
[https://www.facebook.com/help/337881706729661](https://www.facebook.com/help/337881706729661)
）を参照してください。

<Note>
  **注記：** この通知はモバイルAppに表示されない場合があるため、デスクトップ上で確認することをお勧めします。
</Note>

### ［詳細］ペイン

このペインには、メインの **［Reports］** メニューのほか、選択したレポートタイプに応じて表示・非表示になる様々なメニューがあります。

<table border="1" cellpadding="1" cellspacing="1" data-aura-rendered-by="33:195;a"><thead><tr><th colspan="1" rowspan="1"><p> メニュー </p></th><th colspan="1" rowspan="1"><p> 説明 </p></th></tr></thead><tbody><tr><td colspan="1" rowspan="1"><p> Report </p></td><td colspan="1" rowspan="1"><p> 実行するInstagram Businessレポートを選択します。以下のレポートが利用できます。 </p><table border="1" cellpadding="1" cellspacing="1"><tbody><tr><td colspan="1" rowspan="1"><p> Hashtag Recent Media </p></td><td colspan="1" rowspan="1"><p> 特定のハッシュタグで公開された最新の写真と動画を取得します。 </p></td></tr><tr><td colspan="1" rowspan="1"><p> Hashtag Top Media </p></td><td colspan="1" rowspan="1"><p> 特定のハッシュタグでタグ付けされた最も人気のある写真や動画を取得します。 </p></td></tr><tr><td colspan="1" rowspan="1"><p> Media Comments </p></td><td colspan="1" rowspan="1"><p> 特定のメディアオブジェクトのコメントを読み込みます。 </p></td></tr><tr><td colspan="1" rowspan="1"><p> Media Insights </p></td><td colspan="1" rowspan="1"><p> 個々のメディアオブジェクトのインサイトデータを取得します。 </p></td></tr><tr><td colspan="1" rowspan="1"><p> Other Users </p></td><td colspan="1" rowspan="1"><p> ほかのInstagram Businessアカウントに関連付けられたInstagramページの基本的なメタデータを取得します。 </p></td></tr><tr><td colspan="1" rowspan="1"><p> Other User's Media </p></td><td colspan="1" rowspan="1"><p> ほかのInstagram Businessアカウントに関連付けられたInstagramページのメディア情報を取得します。 </p></td></tr><tr><td colspan="1" rowspan="1"><p> Recently Searched Hashtags </p></td><td colspan="1" rowspan="1"><p> Instagram Businessユーザーが直近7日間で検索したハッシュタグを取得します。 </p></td></tr><tr><td colspan="1" rowspan="1"><p> User </p></td><td colspan="1" rowspan="1"><p> 現在のユーザーのメタデータを取得します。 </p></td></tr><tr><td colspan="1" rowspan="1"><p> User Insights </p></td><td colspan="1" rowspan="1"><p> お使いのInstagram Businessアカウントについてのインサイトを取得します。 </p></td></tr><tr><td colspan="1" rowspan="1"><p> User Media </p></td><td colspan="1" rowspan="1"><p> Instagram Businessアカウントのメディアオブジェクトを取得します。 </p></td></tr><tr><td colspan="1" rowspan="1"><p> User Stories </p></td><td colspan="1" rowspan="1"><p> Instagram Businessアカウントのユーザーストーリーを取得します。 </p></td></tr></tbody></table></td></tr><tr><td colspan="1" rowspan="1"><p> Instagram Business Account Page </p></td><td colspan="1" rowspan="1"><p> Instagram BusinessアカウントがリンクされているFacebookページを選択します。 </p></td></tr><tr><td colspan="1" rowspan="1"><p> Reporting Timeframe </p></td><td colspan="1" rowspan="1"><p> レポートの各日のタイムフレームを選択します。 </p></td></tr><tr><td colspan="1" rowspan="1"><p> User Metrics </p></td><td colspan="1" rowspan="1"><p> レポートに含める各種メトリクスを選択します。 </p></td></tr><tr><td colspan="1" rowspan="1"><p> Media Type </p></td><td colspan="1" rowspan="1"><p> データを取得するメディアのタイプを選択します。 <b> ［Story］ </b> を選択した場合、ストーリーのメディアデータの取得は通常、ストーリー作成後24時間に限り可能ですのでご注意ください。 </p></td></tr><tr><td colspan="1" rowspan="1"><p> Media Metrics </p></td><td colspan="1" rowspan="1"><p> レポートに含める各種メトリクスを選択します。 </p></td></tr><tr><td colspan="1" rowspan="1"><p> Media Items </p></td><td colspan="1" rowspan="1"><p> データのプル対象を、単一のメディアアイテム、特定のアイテム範囲、すべてのメディアアイテムから選択します（「User Media」レポートのみ）。 </p></td></tr><tr><td colspan="1" rowspan="1"><p> Media </p></td><td colspan="1" rowspan="1"><p> データを取得するメディアアイテムを選択します。 </p></td></tr><tr><td colspan="1" rowspan="1"><p> Date From </p></td><td colspan="1" rowspan="1"><p> 日付範囲の第1日目が特定日付か相対日付かを指定します。範囲の最後の日付を、 <b> ［Date To］ </b> で選択します。 </p></td></tr><tr><td colspan="1" rowspan="1"><p> Select Specific Date From </p></td><td colspan="1" rowspan="1"><p> 日付範囲の最初の日付を選択します。 </p></td></tr><tr><td colspan="1" rowspan="1"><p> Date To </p></td><td colspan="1" rowspan="1"><p> 日付範囲の2番目の日付が特定の日付なのか、相対的な日付なのかを指定します。日付範囲の最初の日付は、 <b> ［Date From］ </b> で選択します。 </p></td></tr><tr><td colspan="1" rowspan="1"><p> Select Specific Date To </p></td><td colspan="1" rowspan="1"><p> 日付範囲の最終日を選択します。 </p></td></tr><tr><td colspan="1" rowspan="1"><p> Date From Offset </p></td><td colspan="1" rowspan="1"><p> レポートで表示する過去の日のうち、現在から最も遠い日までの日数を入力します。 <b> ［Date To Offset］ </b> と組み合わせて、表示する日付の範囲を作成します。 </p><p> 例えば、 <span class="mt-font-courier-new" /><b> ［Date From Offset］ </b> で「10」、 <span class="mt-font-courier-new" /><b> ［Date To Offset］ </b> で「5」を入力した場合、レポートに含まれるのは、 <span class="mt-font-courier-new"> 10 </span> 日前から <span class="mt-font-courier-new"> 5 </span> 日前のデータとなります。 </p></td></tr><tr><td colspan="1" rowspan="1"><p> Date To Offset </p></td><td colspan="1" rowspan="1"><p> レポートで表示する、直近の日までの日数を入力します。 <b> ［Date From Offset］ </b> と組み合わせて、表示する日付の範囲を作成します。 </p><p> 例えば、 <span class="mt-font-courier-new" /><b> ［Date From Offset］ </b> で「10」、 <span class="mt-font-courier-new" /><b> ［Date To Offset］ </b> で「5」を入力した場合、レポートに含まれるのは、 <span class="mt-font-courier-new"> 10 </span> 日前から <span class="mt-font-courier-new"> 5 </span> 日前のデータとなります。 </p></td></tr></tbody></table>

### その他のペイン

スケジュール設定、再試行、更新に関するオプションなど、コネクターインターフェースのその他のペインに表示されるオプションについては、「 [コネクターを使用してDataSetを追加する](/ja/s/article/360042926274 "コネクターを使用してDataSetを追加する") 」を参照してください。

## よくある質問

<AccordionGroup>
  <Accordion title="OAuth経由でFacebookに接続する際に知っておくべきことはありますか？">
    <Warning>
      **重要：** Facebook APIの制約があるため、約60日ごとにFacebookアカウントを再接続して不正なエラーを避ける必要があります。最も簡単な方法は、Data Centerのアカウントタブに移動してInstagram Businessアカウントを検索し、スパナアイコンをクリックして「再接続」を選択することです。
    </Warning>

    DomoからInstagram Businessアカウントに接続すると、FacebookのOAuthプロセスが開始されます。OAuthを正しく設定する必要があります。そうしないと、一部のデータ（Instagram Businessデータ、設定セクションのFacebookページなど）が失われる可能性があります。

    OAuthを正しく設定するための基本的なステップを以下に示します。

    1. 最初に、Instagram BusinessコネクターDataSetを作成するページ、またはコネクターのアカウント一覧で、［アカウントを追加］を選択します。アカウントについて詳しくは、「 [コネクターのユーザーアカウントを管理する](/ja/s/article/360042926054) 」を参照してください。
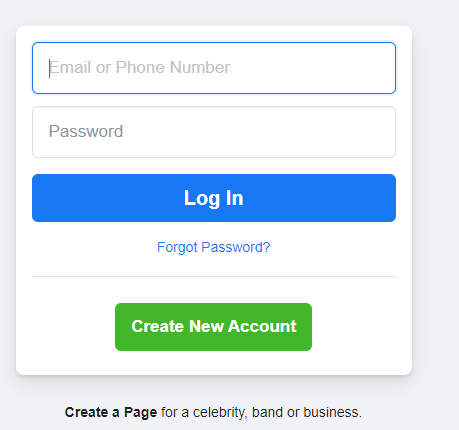
    2. FacebookをDomoに接続したことがない場合、FacebookのOAuthの最初の画面は、以下の2つの画面のいずれかになります。必要な場合はFacebookの認証情報を入力し、続行します。

    <Frame>
      <img alt="Facebook_login.png" src="https://mintcdn.com/domoinc-openapi-sync-dataflows/J3x-O8qWbl7BB1F9/images/kb/ka0Vq000000EZKT-00N5w00000Ri7BU-0EM5w000005vO0h.png?fit=max&auto=format&n=J3x-O8qWbl7BB1F9&q=85&s=7502eca9b68e533bcc3daab8f225b60d" width="459" height="430" data-path="images/kb/ka0Vq000000EZKT-00N5w00000Ri7BU-0EM5w000005vO0h.png" />
    </Frame>

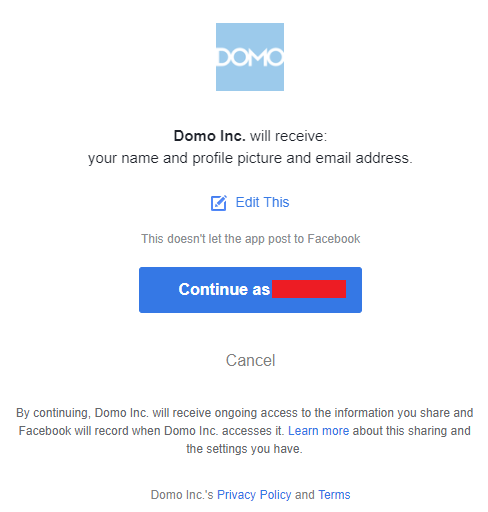
    Facebookアカウントに既にログインしている場合は、同じアカウントを使って接続するかどうかを確認する画面をDomoが表示します。
    <Frame>
      <img alt="Domo-Facebook_login.png" src="https://mintcdn.com/domoinc-openapi-sync-dataflows/J3x-O8qWbl7BB1F9/images/kb/ka0Vq000000EZKT-00N5w00000Ri7BU-0EM5w000005vO0d.png?fit=max&auto=format&n=J3x-O8qWbl7BB1F9&q=85&s=fe34e9067daecedf049f551cb80205e6" width="488" height="512" data-path="images/kb/ka0Vq000000EZKT-00N5w00000Ri7BU-0EM5w000005vO0d.png" />
    </Frame>

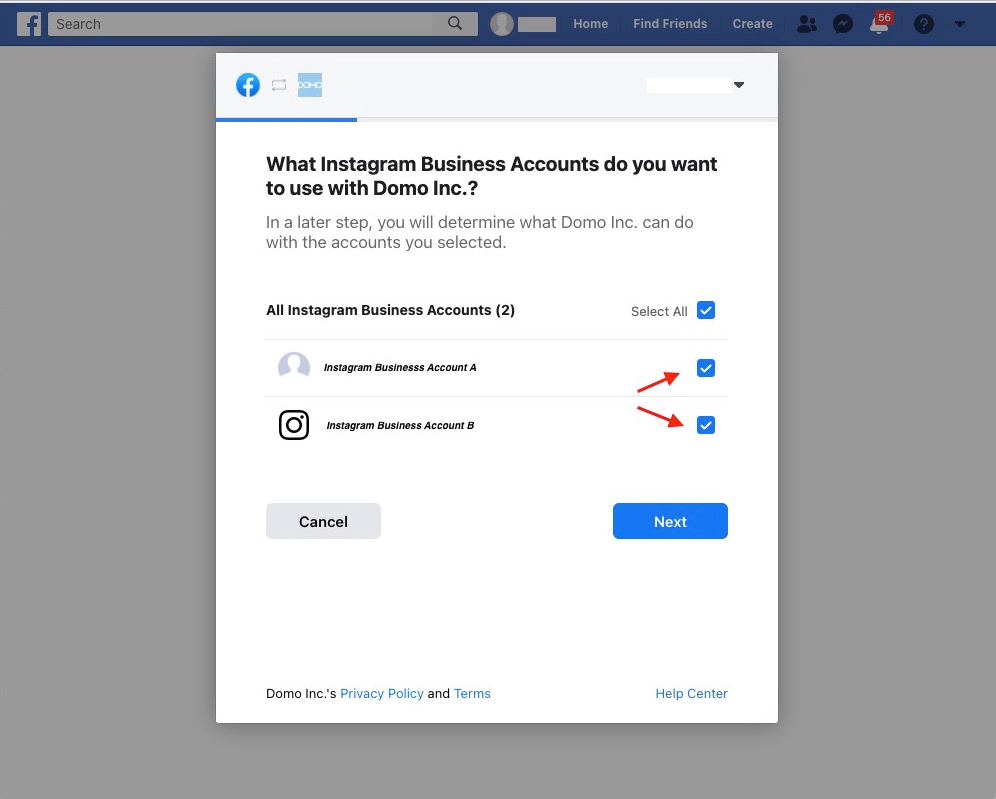
    3. データの取得に使用するInstagram Businessアカウントを選択します。
    <Frame>
      <img alt="Select_Instagram_Accounts.png" src="https://mintcdn.com/domoinc-openapi-sync-dataflows/J3x-O8qWbl7BB1F9/images/kb/ka0Vq000000EZKT-00N5w00000Ri7BU-0EM5w000005vO0f.png?fit=max&auto=format&n=J3x-O8qWbl7BB1F9&q=85&s=e0308b4cc6acb616a84bd5c68b79e397" width="996" height="799" data-path="images/kb/ka0Vq000000EZKT-00N5w00000Ri7BU-0EM5w000005vO0f.png" />
    </Frame>

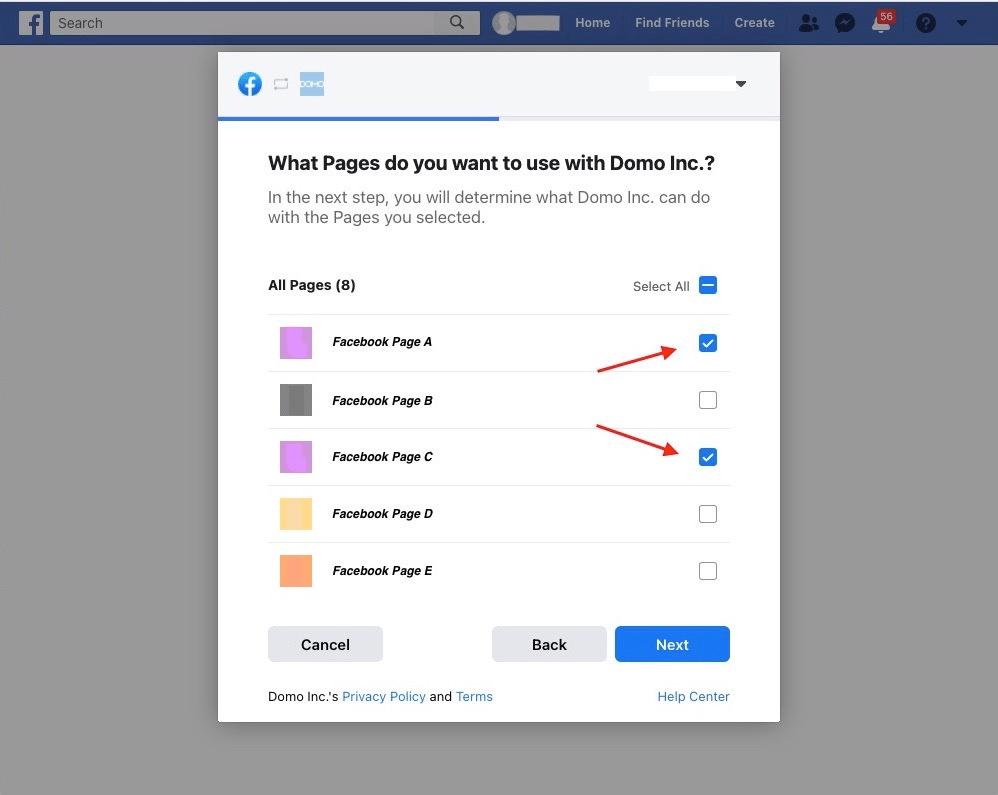
    4. 次に、Instagram BusinessアカウントにリンクされているFacebookページを選択します。
    <Frame>
      <img alt="Select_Facebook_Pages.png" src="https://mintcdn.com/domoinc-openapi-sync-dataflows/J3x-O8qWbl7BB1F9/images/kb/ka0Vq000000EZKT-00N5w00000Ri7BU-0EM5w000005vO0e.png?fit=max&auto=format&n=J3x-O8qWbl7BB1F9&q=85&s=63b95b9978c681bead33f1195f18f2ed" width="998" height="795" data-path="images/kb/ka0Vq000000EZKT-00N5w00000Ri7BU-0EM5w000005vO0e.png" />
    </Frame>

    <Note>
      **注記：** Instagram BusinessアカウントにリンクされていないFacebookページのみを選択すると、データが失われます。ただし、無関係なFacebookページを選択しても問題ありません。つまり、Instagram BusinessアカウントがどのFacebookページにリンクされているか分からない場合は、［すべて選択］を選択することができます。
    </Note>

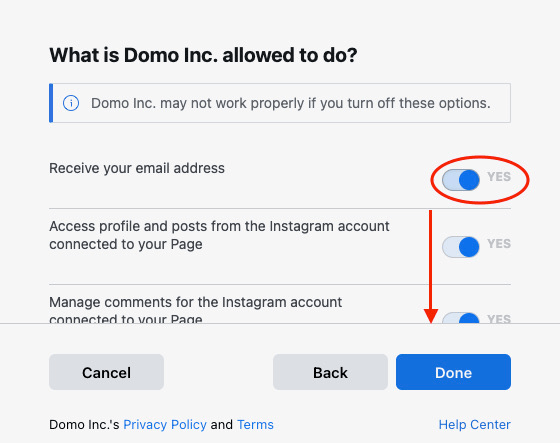
    5. 最後にすべての権限を有効にして、Domoがデータにアクセスしてデータを取得できるようにします。

    <Frame>
      <img alt="Enable_Permissions.png" src="https://mintcdn.com/domoinc-openapi-sync-dataflows/_Ljp6rbTQtrUUZqN/images/kb/ja/ka0Vq000000EZM5-00N5w00000Ri7BU-0EM5w000005vO0a.png?fit=max&auto=format&n=_Ljp6rbTQtrUUZqN&q=85&s=1339d3bf67315e1fd42438e8a8fb6461" width="560" height="443" data-path="images/kb/ja/ka0Vq000000EZM5-00N5w00000Ri7BU-0EM5w000005vO0a.png" />
    </Frame>
  </Accordion>

  <Accordion title="このコネクターではどのバージョンのFacebook/Instagramを使用しますか？">
    このコネクターは、バージョン15.0のFacebook API（ [https://developers.facebook.com/docs/graph-api/changelog/version15.0](https://developers.facebook.com/docs/graph-api/changelog/version12.0 "フォローリンク") ）を使用します。
  </Accordion>

  <Accordion title="各レポートコールによってこのコネクターで呼び出されるのはどのエンドポイントですか？">
    <table>
      <tbody>
        <tr>
          <th> レポート名 </th>
          <th> エンドポイントURL </th>
        </tr>

        <tr>
          <td> Hashtag Recent Media </td>
          <td> \{hashtag-id}/recent\_media </td>
        </tr>

        <tr>
          <td> Hashtag Top Media </td>
          <td> /\{hashtag-id}/top\_media </td>
        </tr>

        <tr>
          <td> Media Comments </td>
          <td> /\{instagram\_media\_id}/comments </td>
        </tr>

        <tr>
          <td> Media Insights </td>
          <td> /\{instagram\_media\_id}/insights </td>
        </tr>

        <tr>
          <td> Other Users </td>
          <td> /\{instagram\_business\_account\_id}?fields=business\_discovery.username(\{account\_name})\{user\_fields} </td>
        </tr>

        <tr>
          <td> Other Users' Media </td>
          <td> /\{instagram\_business\_account\_id}?fields=business\_discovery.username(\{account\_name})\{media\_fields} </td>
        </tr>

        <tr>
          <td> Recently Searched Hashtags </td>
          <td> /\{instagram\_business\_account\_id}/recently\_searched\_hashtags </td>
        </tr>

        <tr>
          <td> User </td>
          <td> /\{instagram\_business\_account\_id} </td>
        </tr>

        <tr>
          <td> User Insights </td>
          <td> /\{instagram\_business\_account\_id}/insights </td>
        </tr>

        <tr>
          <td> User Media </td>
          <td> /\{instagram\_business\_account\_id}/media </td>
        </tr>

        <tr>
          <td> User Stories </td>
          <td> /\{instagram\_business\_account\_id}/stories </td>
        </tr>
      </tbody>
    </table>
  </Accordion>

  <Accordion title="このコネクターを作成するには何が必要ですか？">
    まず、お使いのFacebookページ、そのページで特定の役割を果たすFacebookアカウント、そしてInstagramのアカウントが必要です。その後は、InstagramアカウントとFacebookページを接続する手順を実行し、Instagram BusinessコネクターへのアクセスをFacebookユーザーに許可する手順を実行します。詳しくは、「 [InstagramをFacebookに接続する](#h_6c575603-faf1-44af-a5a3-d8e25210473a "#Connecting_Instagram_to_Facebook") 」を参照してください。
  </Accordion>

  <Accordion title="特定の種類のInstagramアカウントとFacebookページが必要ですか？管理者権限が必要ですか？">
    FacebookページをInstagramアカウントに接続後、Instagram Businessアカウントへの変換を行います。ご自身がページ管理者である必要はありませんが、Instagram Businessアカウントへの接続には、ページとアカウント間に何らかの関連付けが必要となります。
  </Accordion>

  <Accordion title="データはどれくらいの頻度で更新可能ですが？">
    ページに関する情報はほとんどが24時間ごとに更新されます。「インサイト」メトリクスが選択されている場合、約15分ごとに更新されます。DataSet設定は、24時間ごとの実行を推奨します。
  </Accordion>

  <Accordion title="注意すべきAPI制限はありますか？">
    Instagram Businessコネクターでは、ユーザー1名につき200コール/時間の制限があります。

    ## トラブルシューティング

    「Domoは利用可能ですが、Instagramからエラーが報告されました。アクセストークンの検証エラー：Sess..」というエラーメッセージが何度も表示されます。

    これを解決するには、以下の手順を実行します。

    1. エラーが発生したら、**［Re-Edit］** または［アカウント］タブの **［アカウントを編集］** をクリックして認証情報を再接続してください。
    2. 引き続きエラーメッセージが表示される場合は、アカウントのOAuthアクセストークンの有効期限がすでに切れていることを示しています。
  </Accordion>

  <Accordion title="注記：有効なサポートパッケージがある場合は、Domoサポートにお問い合わせください。" />
</AccordionGroup>